|
|
December 11th, 2012
For decades shooters have used brass jags attached to brass-tipped cleaning rods. These work effectively. But there is one problem. Many bore solvents will react with the brass metal to give “false positives”. You can get bluish-green patches even when there is no copper fouling in your bore.
To solve this problem DeweyRods.com offers a full line of aluminum jags, aluminum brush adapters, and nylon-coated cleaning rods with aluminum tips. Dewey explains: “Ammonia-based solvents attack copper & brass but also leave your patches a blue-green color so you are never sure if your bore is truly clean of copper. Our aircraft-grade aluminum has the same hardness of brass, it will not embed impurities or harm your bore, and ammonia will not attack it.” As shown below, along with caliber-specific aluminum jags (center), Dewey now offers aluminum thread adaptors (left) and aluminum-shaft brushes (right).

New Dewey ‘Copper Eliminator’ Cleaning Rods
These new rods have the same nylon coating and handle assembly as Dewey’s standard coated rods, but they feature a chemical-resistant, 8/32 female-threaded, aluminum ferrule. No brush adapters are required. Each rod is supplied with a male-threaded aluminum jag. Dewey charges $39.95 for these rods, but you may find them slightly cheaper at other vendors.
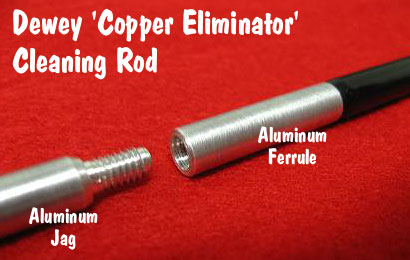
Copper Eliminator Rods are currently offered in two diameters (.22-.26 Cal, or .27+ Cal), and three lengths: 36″, 40″, 44″. Listed rod lengths do NOT include handle assembly. One last note: Dewey cautions users to avoid TM Solution, because this solvent may harm Dewey’s nylon rod-coatings.
Story sourced by Edlongrange.
December 10th, 2012
Bryan Litz, Ballistican for Berger Bullets, is actually a trained rocket scientist, not to mention a skilled long-range shooter. Bryan’s books on Ballistics and Precision Long Range Shooting have been recognized as the leading resources of their kind in print. Now you can save money on Bryan’s highly-regarded books through a special holiday promotion.

Bryan tells us: “For a limited time, we are taking an additional $5 off the retail price of our titles Applied Ballistics for Long Range Shooting 2nd Ed. (regularly $49.95, $44.95 on sale) and Accuracy and Precision for Long Range Shooting (regularly $34.95, $29.95 on sale). And, by purchasing direct from Applied Ballistics you can get your copy autographed by the author”.
CLICK HERE to ORDER with special holiday pricing on Bryan Litz books.
Here are what others are saying about these books.
“Got my copy of Accuracy and Precision for Long Range Shooting and can’t put it down! Exceptionally well done! Both this and Applied Ballistics for Long-Range Shooting” are definite requirements for all long range shooters!” — Eric K.
“Thanks, Brian. You have opened up a whole new ‘world’ in shooting, for those of us who love shooting and hunting, but don’t have the academic background to really appreciate the intricacies of science.” — Terje N.
December 10th, 2012
 After concluding its 2012 Board Meeting, the NBRSA has issued some announcements for its membership. The Fee structure has changed, and Match Directors are requested to submit info on upcoming 2013 Matches. In addition, the NBRSA noted that Long Range Rule Books are now on sale for $5.00. Call (307) 655-7415 to order these Rule Books.
NBRSA Fee Schedule for 2013
Dues and match fees will change beginning January 1, 2013. The new fee structure is designed “to be equitable to everyone”, with adjustments reflecting shipping costs. Normal match fees change to $3 per shooter per day. Annual Fees will be:
- USA Domestic Annual Members & Clubs: $60
- CANADIAN Annual Members: $60 + $25 shipping — Total US $85
- INTERNATIONAL Annual Members: $60 + $60 shipping — Total US $120
2013 Match Schedules and Forms
The NBRSA requests that match directors send in their 2013 match schedules to Regional Directors as soon as possible. This will allow the NBRSA to post schedules online and in Precision Rifleman magazine. Match Directors who require Forms should click the links below.
Memorandums of Agreement (MOAs) | Match Vouchers Forms
News Tip from EdLongrange. We welcome reader submissions.
December 9th, 2012
This article originally appeared in the SAVAGE ACCURACY Blog
Stan Pate is the Captain of Savage’s National Championship F-TR Team. In this article, Stan explains how to adjust the action-screw tension on a three-screw Savage target action to achieve the best accuracy. The procedure described here can be used for any Savage action, including the two-action-screw models. However, the optimal settings for each particular rifle may vary slightly.
 Match shooters need to get that extra accuracy edge from our ammunition and firearm. It is easy to get one of the Savage rifles to shoot accurately — even to match standards. If you are looking for that little bit more from your rifle, then please read a method that I have found that works for me. For those of you that are familiar with tuning a receiver (such as a match rimfire action), this article will be nothing new. For the rest of you, this might be new material. The goal here is to find the “sweet spot” for the rifle in relation to the torque settings used on the receiver screws. The proper torque settings [can vary] from rifle to rifle, but they will usually have a noticeable effect on consistent group sizes. A properly-torqued rifle will optimize the “harmonics” of the barreled action using the receiver screws so that the gun delivers peak consistency.
Here is the process I have found that works for me in tuning a Savage rifle receiver to peak accuracy. To use my process you first must already have a load that shoots accurately and consistently in your rifle, and I always use a fouled barrel like I’d be shooting in a match. This process works for me in both the model 10 (two receiver screws), and the model 12 (three receiver screws).

Seat Recoil Lug and Start with Front Action Screw(s)
On the model 12, I will first ensure that the recoil lug is seated securely against the stock by just lightly tightening up the front receiver screw then gently but firmly bumping the butt pad against the floor. Next I will tighten up the front two receiver screws to 30 inch-pounds starting at 20 inch-pounds and working up to the 30 inch-pounds in 5 inch-pound increments, and always tightening the front screw first and then the second screw. Once the front two receiver screws are torqued to the final torque setting, I will set the rear receiver screw to 5 inch-pounds and shoot a 5-shot group [to evaluate accuracy].
Increase Torque Incrementally on Rear Action Screw
After the group is shot and I am satisfied that I called all of the shots as good shots I will allow the rifle to cool off to about the temperature that the fist group was shot at. I will then add 5 inch-pounds to the rear receiver screw and shoot another five-shot group and allow the rifle to cool again. I repeat this process until I have tightened the rear receiver screw to 40 inch-pounds or have seen the groups get smaller and then start getting larger again. Once you have seen the groups decrease and then start to increase in size then you will have found the area of torque to work in. You can then can fine tune this to the exact inch-pound torque settings.
Tuning a Model 10 with Two Receiver Screws
The Savage model 10 action, which has two receiver screws, uses the same process as the three-screw model 12. Measure your group sizes and place the measurements in front of you so that you can see the bell curve showing where your best groups were achieved. NOTE — there may be a better way of doing this and if you should have one, I’d be very interested in hearing it. Good shooting and I hope to see you all on the range. – Stan Pate
 |
This is on the Palma rifle using the torque settings of 30 inch pounds on the front two reciever screws, and 15 inch pounds on the tang screw, it is approximately 1/2″ center to center. |
 |
This is my second torque setting which for this rifle and this load is the optimal setting of 30 inch pounds on the front two reciever screws and 25 inch pounds on the tang screw, this group is approximately .180″ center to center. |
 |
This is the third torque setting which for this rifle is moving away from the optimal torque setting towards the heavy side of the scale. This torque setting results shows that you will usually see a “bell curve” of accuracy as you move into the optimal torque setting. This group is almost .7″ and the torque setting was 40 inch pounds. |
This article was edited for length to appear in the Daily Bulletin.
December 9th, 2012
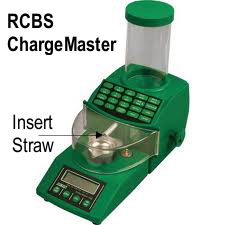 Here’s a clever, easy modification for your RCBS ChargeMaster electronic powder dispenser. Many folks use a McDonald’s straw to smooth kernel flow out of the dispensing tube. Forum member Mike S. (aka in2deep) found that, even with a straw in place, he sometimes got clumps, which dropped 5-6 kernels at once, throwing off his dispensed weight.
Mike looked at the situation and ingeniously decided to trim the straw into little v-shaped arms or prongs. This helps to break up the clumps, so the kernels flow out the end of the tube more consistently during the dispense cycle. Mike writes:
Soda Straw Modification
This is a further tweak of the popular soda straw modification as the original mod would still allow Varget powder to collect in the straw and dump sometimes as many as 6 or 8 or even more extra kernels in the pan. It would sometimes signal an overcharge, but even when it didn’t there could be as many as 6+ kernels too high or too low (total spread of 12+).
The little arms (prongs) on the straw tend to separate the kernels into groups of 1 or 2 or 3 and prevents piling and many times the throw is now within 1 or 2 kernels of the desired weight.

Straw Cutting Tips — Mike found the shape/angle of the “arms” is very important. If the cuts are too fine or too course it allows the kernels to collect almost like before but the illustrated angle seems to allow an average of only 2 or 3 kernels per trickle input from the machine. This means that more charges are much closer to the actual desired weight and max kernel variances will be cut in less than half and there will be almost no overthrows.
Credit Boyd Allen for sourcing this tip.
December 9th, 2012
While many of us now favor digital photography over “old-fashioned” 35mm film, don’t toss those old 35mm film canisters, especially the clear Fuji-type with secure snap-in lids. Small plastic film canisters have a multitude of uses for the shooter and reloader.

Here Are Some of the Things You Can Do with Film Canisters:
1. If you weigh powder charges after throwing them with a manual powder dispenser, throw the charges first into a film canister and then use that to drop the powder into the measuring pan on your scale. The canister will catch every kernel of powder. If you throw charges directly into a weighing pan, powder can sometimes bounce out. Using the film canister will help keep spilled powder off your loading bench and floor.
2. Store extra sets of foam ear-plugs in the canister. You never want to be without ear protection. This editor has four film canisters filled with plugs. Two go in the range kit, one goes in the car’s glove compartment, and a second stays in a lock box I use to transport pistols. This way I never find myself at the range without ear protection.
3. Place your smaller cotton patches in film canisters, marked by caliber. If you use the water-tight Fuji-style canisters, you can even pre-soak the patches with solvent. You can have one canister for wet patches, another for dry patches. That saves time when you’re at the range, and avoids spillage. One caution–some solvents may react with plastic, so test this first before you put a solvent-filled canister in your range kit.
4. Use film canisters to hold your neck bushings, sorted by caliber. With a permanent marking pen, you can mark the side or top of the canister with the bushing sizes, or caliber.
5. Store your favorite Bolt Grease (for rifles) or anti-seize compound (good for pistol slide rails), in the canister. You don’t need to fill it all the way up — a little dab will do ya. We only recommend this with the snap-top Fuji canisters.
6. During transport, Protect your muzzle with canisters. When shipping a rifle or barrel, slip the film canister over the muzzle, then secure it with electrical tape. This will protect the precious crown of a match barrel from dings or damage.

There are countless other uses for 35mm film canisters. We invite readers to respond with their own tips on using these handy containers. If you don’t have some stashed in your workshop already, you can get empties for free at most film processing centers. The clear plastic Fuji canisters are the best — you can see what’s inside and the lids are watertight.
December 8th, 2012
by Steven Blair, 2012 California State Long Range F-Open Champion
Assess the Terrain and How the Wind Will Interact with It
Before you begin a match, take a few minutes to look around the range at the terrain, any obstructions, range topography (berms and backstop), and trees, buildings or structures that could affect wind flow over the range. Imagine what might happen if the wind was from the left or right, headwind or tailwind. Depending upon the direction, significant effects may be seen on range. A head or tail wind may ripple across the berms, causing elevation changes, both high and low. A tall side berm, like the east side berm at Ben Avery, may cause turbulence when the wind comes from that direction. Blocking features might shield most of the wind but a break along the range can funnel strong gusts through the gap with no other indications. Take a few notes about the effects of different wind directions and refer to them if the prevailing direction changes. (Tip courtesy Tony Robertson.)

Use a Spotting Scope, Even When Shooting a Scoped Rifle
A good spotting scope can “see” mirage much more clearly than even an expensive rifle scope. Take your spotting scope to the line and position it as sling shooters do, close enough to use without much movement. Focus the scope approximately 1/3 of the way down range or where the most significant wind effects are likely to occur. Take a quick look while waiting for pit service, glance at the flags and compare to your scope sight picture. I often see ambiguous indications at the target through the rifle scope, but see a clear indication of wind direction and speed through the spotting scope at the shorter distance. When shooting the Arizona Palma Championship at Ben Avery last weekend, I was scoring while the wind was coming from the east. Shooters up and down the line were out to the left, losing points. Mirage at the target looked moderate and the flags weren’t indicating strong wind. As I focused the spotting scope back, the mirage suddenly looked like it was flowing twice as fast around 500 yards than it was closer or farther. It wasn’t until I realized that the access road cut through the berm there that I understood what was happening. (Tip courtesy Gary Eliseo.)

Don’t Over-React to Something That May Be an Anomaly
On ranges with sizable berms, a headwind or tailwind can cause significant elevation problems. It is generally not possible to see or predict when this will occur. When the conditions exist that cause elevation changes and other competitors are experiencing the same problem, the best strategy is to ignore it. Certainly, avoid shooting when the head or tail wind is gusting, the same as you would in a crosswind. But, if you react to random, range-induced elevation changes, the only likely result is to make it worse. Whether the problem is caused by range or ammunition, maintain your waterline hold until you have evidence that something has fundamentally changed.

My .284 Shehane will usually require a click or two down during a string as the barrel warms. That is normal and manageable. But, if your shots are just bouncing up and down in the 10 ring, leave it alone. The same is also true of an occasional gust pushing a shot into the 9 ring. If the conditions have not changed and one shot just went out, it may be the result of a random occurrence that was not predictable. (Tip courtesy “School of Hard Knocks”.)
Adjust Spotting Scope Focus and Magnification as Needed to View Mirage vs. Target Details
In F-Class we only need to see mirage, spotters, and scoring disks. That does not take a lot of magnification. My scope is a Nikon 25-75x82mm ED. It is a superb scope for the money and makes it trivial to see minor variations in mirage. It is good to have the high magnification available, and it can always be reduced if necessary. I use different power settings for different situations.
 Setting Magnification Levels
During a match, in very good viewing conditions, I set my spotting scope at 75X, full power. The mirage is more subtle in the morning and greater magnification is needed.
During a match with heavy mirage I set my spotting scope at about 40X. I have no problem seeing mirage, even at this magnification.
When practicing at 300 yards or closer I set my spotting scope at max power (75X) so I can see the little 6mm holes from my 6BR rifle. I usually need to focus back and forth between shots to see both bullet holes and mirage.
Steven Blair, 2012 California State Long Range F-Open Champion, has been shooting since childhood and competing for over 30 years. Before retiring, Steve spent 16 years in Engineering and IT with General Atomics. He has held Engineering and Marketing positions with several firearms companies and worked on projects from pistols to 155mm howitzers.
December 8th, 2012
The MidwayUSA Competition Shooting Mat is on sale for just $29.99, forty bucks off the regular $69.99 price. The $29.99 sale price is good now through December 31, 2012. Sized 67″ Long x 27″ Wide, this mat rolls up into a 6.5-inch diameter “sausage” for transport or storage. While we prefer a wider mat (with more room for ammo boxes and shooting accessories), this mat has many nice features. Grommets on the corners allow the mat to be staked down in high winds. The mat has rubberized elbow and knee pads, and it comes with both a carry handle and a convenient shoulder strap.

This would be a useful, inexpensive holiday gift for a junior shooter, or anyone who needs a basic mat for High Power, tactical, or F-Class competition.
- Material: 600 Denier PVC Coated Polyester
- Unrolled Dimensions: 67″ Long x 26-3/4″ Wide (not including front flap)
- Rolled Dimensions: 6-1/2″ Diameter x 26-3/4″ W
- Elbow Pad Dimensions: 22-1/2″ Long x 25-1/2″ Wide
- Knee Pad Dimensions: 12-1/2″ Long x 7″ Wide
- Front Flap Dimensions: Tapers from 27″ to 48-1/2″ wide extending 11-1/2″ from front of mat
- Padding Thickness: Roughly .25″ thick, plus .335″ thick at the elbow and knee pads
December 7th, 2012
Report by Jeff Williams, AccurateShooter Correspondent
If you’ve visited BergerBullets.com lately, you’ve noticed that Berger Bullets has completely over-hauled and updated its website. The new website has a very handsome, clean layout. It is also faster to load and much easier to navigate. We give Berger an “A” grade for the new website.

 On Berger’s home page you’ll find product descriptions, easy-to-use (smart-phone friendly) product buttons, pull-down menus for all four Berger bullet line-ups, recent news items, plus videos. Click “Links” to access a comprehensive list of reloading resources with a directory of shooting association websites. Click the Berger Bulletin tab to read current product status reports, technical articles, and shooting tips.
Redesigned Bullet Info Tables
The bullet product info pages are much easier to read now. Simple tables display all the bullets of a particular type (hunting, target, varmint, and tactical), organized by caliber and weight within calibers. You’ll find BOTH G1 model and G7 model Ballistics coefficients (BCs) for all the bullets in the tables, and recommended twist rates are listed.

Berger Twist-Rate Stability Calculator
The new Berger website also offers a handy Twist-Rate Stability Calculator that predicts your gyroscopic stability factor (SG) based on mulitiple variables: velocity, bullet length, bullet weight, barrel twist rate, ambient temperature, and altitude. This very cool tool tells you if your chosen bullet will really stabilize in your barrel. LIVE DEMO BELOW — Just enter values in the data boxes and click “Calculate SG”.
December 7th, 2012
 Christmas is coming up soon, so today we’re featuring a hand-picked collection of “stocking stuffers” for precision shooters. You can order most of these items online, and if you get your orders in soon, your selections should arrive before December 25th. So as not to bust your holiday budget, all of our selections are priced under $10.00. These items are handy tools that you’ll use over and over again at the range and/or at your loading bench (so you’re allowed to buy them for yourself, even after Christmas).
Gifts $1 to $5

Surveyors Tape
$1.99 |

Hood Kwik Estimator
$2.50 |

Bifocal 3X/6X Magnifier
$2.75 |

Barrel Mirage Shade
$4.95 |
|
Surveyors’ Tape. Always watch the wind when you shoot. Inexpensive, Day-Glo Surveyors’ Tape (aka “Flagging Tape”), attached to a stake or target frame, makes a good wind indicator. It will flutter even in mild breezes, alerting you to both angle and velocity shifts. This should be part of every range kit. Don’t leave home without it.
Hood Kwik Estimator. Here’s a very handy tool to measure your 6mm groups. Bracket the group within the diverging lines of the Kwik Estimator and you’ll instantly get a good approximation of the actual group size. No more trips to the tool box for calipers. The inexpensive Kwik Estimator fits in a shirt pocket. (Thanks to Boyd Allen for this suggestion.)
Bifocal 3X/6X magnifier. This handy, inexpensive dual-power magnifier is always close at hand on our loading bench, because it helps with so many task. We use a compact magnifier to inspect bullet tips, to check brass chamfers, and inspect the internals of triggers and other parts. Priced at just $2.75, a magnifier like this (or the folding variety) is a “must-have” item for every hand-loader.
Sinclair Barrel Mirage Shade. For high-volume varminters, and competitors who shoot fast in warm weather, a mirage shield is absolutely essential. This prevents hot air rising off the barrel from distorting the image in your scope. The aluminum Sinclair shield can be trimmed to fit, and comes with stick-on Velcro attachments. Two lengths are available: 18″ for short BR barrels, and 24″ for longer barrels.
Gifts $6 to $10

Dewey Crocogator
$6.50 |

Ballistol Aerosol Lube
$8.99 |

Sinclair Barrel Bag
$9.95 |

Sinclair Load Block
$9.99 |
|
Dewey Crocogator. The Crocogator tool, with knurled “teeth” at both ends, is simple, inexpensive, and compact. Yet nothing zips though primer-pocket gunk faster or better. Unlike some cutter-tipped primer pocket tools, the Crocogator removes the carbon quick and easy without shaving brass. One end is sized for large primer pockets, the other for small.
Ballistol Aerosol Lube. Ballistol is a versatile, non-toxic product with many uses in the reloading room. We have found it is ideal for lubricating cases for normal full-length sizing. It is clear, not gooey or chalky like other lubes. It is very, very slippery, yet is easy to apply and just as easy to wipe off. As you lube your cases, the Ballistol will also clean powder fouling off the case necks. For heavy-duty case forming and neck expansion, we’ll still use Imperial die wax, but for every-day case sizing, Ballistol is our first choice. It also helps prevent your dies from rusting and it even conditions leather. Ballistol is a favored bore cleaner for Black Powder shooters because it neutralizes acidic powder residues.
 Sinclair Barrel Bag. If you run a switch-barrel rig, or take spare barrels to a big match, this simple but effective barrel bag will protect your valuable steel. The bag is moisture-resistant vinyl on the outside with a soft, quilted interior to protect the barrel’s finish and delicate crown. There are two sizes: one for barrels up to 26 inches, the other for barrels up to 31 inches. Both sizes are priced at $9.95 per bag. That’s cheap insurance for those priceless barrels.
Sinclair ‘Poly’ Loading Block. We’ve tried wood and injection-molded loading trays, and we prefer Sinclair’s white polyethylene loading blocks. They featured chamfered holes properly sized for the particular case you reload. The blocks are heavy enough to be stable on the bench, and the “dishwasher-friendly” material is easy to clean. The standard Poly Loading Block holds 50 cases, while the Competition Loading Block holds 25 cases with a tray for empties. For a bit more money, there’s also a Heavy-Duty 50-case model with an extra-thick 1″ base.
|


