|
|
April 3rd, 2012
 AccurateShooter.com’s Facebook Page has a new look. Our posts and shared links are now organized in a two-column “time-line” format. This new look is part of the Facebook layout update that went into effect this weekend. It may seem a little confusing at first because content now alternates between left column and right column. But you’ll still find the newest stuff at the top, and the older entries at the bottom. Just shift left to right as you read the posts in timeline order from top to bottom. You can still comment on our Facebook entries, or share our posts on your own Facebook “Wall”. If you enjoy what you find on our page, be sure to click the “Like” button, located at the lower RIGHT corner of the header photo. This helps us deliver our content to more Facebook users.

|
The Rifle on our New Facebook Page Header
 We have also added a bold new Facebook header that lets you know that you have arrived at the right place. Up top is a beautiful rifle originally built by Richard Franklin for Forum member Barry O. (aka “TheBlueEyedBear”). This rifle, chambered in 6mm Super LR (a shortened .243 Win Wildcat), features a BAT SV Action, Bartlein 5R barrel, and a handsome walnut LowRider stock. The LowRider is a Richard Franklin design, now produced by Shurley Brothers Custom Rifles. The Shurley Brothers’ operation has been licensed by Richard Franklin to produce his popular hunting, varmint, and long-range stock designs. As did Franklin, Shurley Brothers offers a wide range of wood options, from Rutland laminates to deluxe fancy woods such as: Curly Maple, Cherry, Myrtle-wood, Bastogne Walnut, and Turkish Walnut. If you want a laminate of fancy woods, such as a Maple and Walnut combo, Shurley Brothers can also build that. |
April 3rd, 2012
GS Arizona, a top small-bore and centerfire shooter, uses the 6XC cartridge in some long-range matches. He has tried a variety of different types of brass for this cartridge, including necked-up 22-250 brass and Norma 6XC brass from David Tubb’s (Superior Shooting Systems). German’s measurements reveal significant differences in water capacity, as well as neck-wall thickness.
6XC Source Brass Dimensions

Case Capacity and Pressure Issues
GS has noted significant variances in capacity among the different “flavors” of brass. Norma-headstamp 6XC brass has 49.3 grains of H20 capacity, while Norma 22-250 brass holds only 47.8 grains of H20. Third-generation Tubb-brand 6XC brass is somewhere in the middle, with 48.6 grains of capacity. The tester did not have a chance to measure the high-quality Lapua 22-250 brass introduced in 2010. NOTE: These differences in case capacity are large enough that you MUST adjust your load to the brass type.

 We ran a 6XC QuickLOAD simulation with 115gr bullets and H4350 powder. QuickLOAD predicted that the observed difference in case capacity can result in pressure differentials as much as 4,500 psi! In other words, if you switch from Norma 6XC brass to a lesser-capacity brass type, your pressures could rise 4,500 psi (using H4350 and 115gr bullets).
We recommend sticking with the Norma 6XC brass. It is available from DavidTubb.com for a reasonable $69.00 per 100 cases. These days, that’s cheaper than many other types of premium imported cartridge brass.
Neck Thickness and Chambering Issues
German noted that the different types of available brass varied quite a bit in neck-wall thickness — from 0.0121″ (Norma 22-250) to 0.0140″ (Tubb 3rd Gen). Consequently the diameter of loaded rounds also varied. Depending on the brass you chose, your loaded rounds could be 0.267″ at the neck or 0.271″ (with no-turn brass). That’s a huge difference and it’s something you need to take into account when you have your chamber cut for a barrel. For a cross-the-course rifle, you might want a chamber with at least .003″ total clearance over a loaded round. Obviously, to achieve that clearance, you’ll need to set chamber dimensions base on your preferred type of brass.
NOTE: The research for this story was conducted in 2010. Dimensions may have changed with more recent production, so you should double-check the case capacity of your own 22-250 or 6XC brass.
April 2nd, 2012
 The new Shooterest Shooting System is a hitch-transportable, twin-station shooting bench that deploys directly from your vehicle. You can shoot EITHER with the bench attached to the hitch (and vehicle), or the Shooterest Bench can be detached for stand-alone shooting. The reversible table-tops handle both right- and left-handed shooters.
The Shooterest’s designer, Brian Auer, is a mechanical engineer. He builds Shooterest benches with his brother and father. Brian comments: “The three of us fabricate everything ourselves in our barn workshop in Rathdrum, Idaho. Basically, you can hook up the bench (fully assembled and ready to use) to your vehicle in a vertical position so it won’t hit the ground or extend past the 3-ft legal limit beyond the rear bumper. When you arrive at your shooting location, you pull one pin and move the bench to the horizontal position. You then drop the front stabilizers, maybe adjust your table height if needed, and you’re ready to shoot. The tailgate on a pickup also serves as a handy table to stage ammo, clips, guns, etc. If you don’t want the bench mounted to a vehicle (or if you don’t have a 2″ receiver), you can set the bench directly on the ground using the same parts that attach it to the vehicle.”

Preload the Bench for Added Stability When Hitch-Mounted
Given the fact that vehicles have springs, we were concerned that there might be a little vertical play in the Shooterest when deployed mounted to a hitch. Dan Auer, Brian’s father, explained that you can eliminate any potential “bounce” by putting in a little preload: “With the bench on the hitch mount, just lift up the table a bit and extend the front stabilizers (legs) an inch or two. That preloads the system and pretty much takes up the slack in your truck springs. You end up with a very stable platform that way.”

The Shooterest bench system comes in Deluxe and Standard models, both with twin independently adjustable platforms allowing two shooters to shoot simultaneously. The $489.00 Deluxe version features 3/4 inch plywood tops and seats, plus a convenient center-mounted deluxe shell deflector screen. The $389.00 Standard shooting bench has painted 7/16 OSB plywood tables and seats, with standard deflector screen. Both models share these other features:
- Bench can be used mounted to vehicle OR stand-alone (detached)
- Fully-assembled bench can be transported on vehicle receiver
- Bench is constructed from strong, durable steel tubing
- Bench can be disassembled to transport inside vehicle
- Tables adjust for sitting or standing shooting positions
- Seats are 3-way adjustable for height, fore/aft, width from centerline
- Adjustable stabilizer legs can be adjusted for uneven terrain
- Tables are reversible for right- or left-handed shooters
- Bench is wheelchair accessible
For more information, visit Shooterest.com, call (208) 661-5973, or email sales [at] shooterest.com. Currently, Shooterest Benches can only be shipped within the continental U.S. ($40 flat rate) & Canada ($90 flat rate). Installation Tips: Shooterest benches come with one hitch pin, but a second pin will be required for attaching to the receiver on the vehicle. We recommend a drop receiver for any receivers mounted higher than 25 inches on the vehicle.
Product tip from The Firearm Blog.
April 1st, 2012
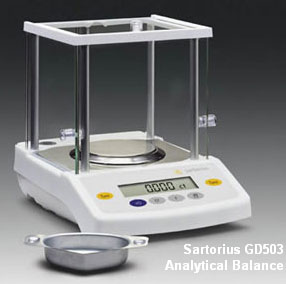 Successful long-range shooters know that careful weighing of powder charges helps them achieve superior long-range accuracy. By maintaining powder charges within very narrow weight tolerances, hand-loaders can produce ammo with more consistent muzzle velocities from shot to shot. Low Extreme Spread (ES) and Standard Deviation (SD) numbers translate directly to reduced vertical dispersion at very long ranges (although velocity is not the only contributing factor to vertical spread). In pursuit of load weight uniformity, many of our top long-range aces have invested in the latest, high-tech magnetic force restoration (MFR) digital scales (such as the Sartorius GD503). These laboratory-grade MFR scales are extremely stable (with minimal drift) and they can reliably measure to .005 grain, that is five thousandths of a grain. That is less than the weight of one kernel of typical extruded powder. For example, with Varget, there are three to four kernels in one-tenth of one grain of Varget. That means each kernel weighs .025 to .035 grains.
With the capability of modern modern MFR scales to measure less than one-hundreth of a grain, we have a new frontier in precision reloading. You’ll note, in the preceding paragraph, we said that one-tenth of one grain of Varget is three or four kernels. Well, “which is it?” you might ask. The answer is that it might be three, or it might be four, depending on the size of the individual kernels. That’s a disturbing uncertainty that we simply had to accept… until now.
Powder Kernel Uniforming — A Breakthrough
We now have the tools and the methodology to resolve the inherent uncertainty in individual kernel weight. Using the new technique of powder kernel uniforming, first pioneered by German Salazar, we can now, for the first time, ensure that every kernel of powder that goes into a cartridge is virtually the same weight — the same, in fact, within 0.01 grain (one-hundredth of a grain) TOTAL spread.
 For a reloader looking to achieve “perfect” load weight uniformity, powder kernel uniforming offers the ultimate control over powder weight. The method we devised to uniform individual kernels consists of kernel core-drilling. The propellant we chose for this kernel-uniforming test was a new prototype (not yet commercially available) EuroChemie RL “X” propellant. This was chosen because it offered relatively large, can-shaped kernels that could be drilled relatively easily.
 Core-Drilling Kernels with Micro Drill-Bits
The center of each kernel was bored out with a micro-drill. But here’s the key. Before drilling, we first weighed each kernel. Then we selected a micro drill bit of appropriate diameter to achieve uniform weights. With the heavier kernels (in the 0.04 gr range) we used a larger micro-bit. With the lighter kernels (in the 0.02 range), we selected a smaller diameter micro-bit that removed less material from the center of the kernel. Obviously, many kernels were ruined while we perfected the drilling process. It required great patience and a very steady hand. But after a few dozen hours of drilling, we had a batch of uniformed kernels that were all within plus or minus .005 grains (.01 grain ES). Now we were ready to do some testing.

 Proof That It Works
All this time-consuming work to drill holes in individual kernels would be pointless, of course, if it did not produce meaningful accuracy gains. The proof, as they say, is “on the target”. We were curious to see if our uniformed powder kernels would out-perform unmodified kernels, so we did some field testing. We prepared two batches of 6mmBR ammo in Lapua brass, with full case prep, and bullet base to ogive sorting (we wanted to eliminate as many variables as possible). Bullets were Lapua 105gr Scenar Ls, which proved to be some of the most consistent projectiles we’ve ever measured.
One set of rounds was loaded with a carefully-weighed charge of unmodified kernels. Case to case charge weight was held to .05 grain (half a tenth uniformity). Then we prepared a second batch of cartridges with uniformed kernels, using the exact same charge weight, also held to .05 grain (half a tenth) tolerances. We took these rounds to the range, and did a “round-robin” test at 800 yards, shooting one of each type in sequence (i.e. one uniformed on right, then one non-uniformed on left) until we had two 10-round groups. The test was done with a rail gun fitted with a 1:8″ twist, 28″ Krieger 0.236″ land barrel. The uniformed-kernel ammo was shot at the right diamond, while the non-uniformed rounds were shot at the left diamond. Conditions were good, so we simply “held center” on every shot. No attempt was made to correct for wind as our primary concern was vertical dispersion.

Ammo with Uniformed Kernels Shows Significantly Less Vertical Dispersion at Long Range
As you can see, the uniformed-kernel ammo out-performed the non-uniformed ammo. The difference is quite clear. The rounds with non-uniformed kernels (on the left) produced a 10-shot group with roughly 3.0 inches of vertical dispersion. On the right, our ammo with uniformed kernels produced a group with 9 of 10 shots showing roughly 1.75 inches of vertical dispersion (we did have one high flier among the uniformed-kernel rounds). Additionally, we had a lower 10-shot ES and SD with the uniformed-kernel ammo. We repeated this test two more times and the results were similar. The targets speak for themselves. If you are looking for ultimate long-range accuracy, powder kernel uniforming is a “new frontier” you may wish to explore. With all other factors held constant, we were able to reduce vertical dispersion by more than an inch at 800 yards by drill-uniforming our NitroChemie powder. That’s huge in the long-range game.
Yes, the kernel-uniforming process is incredibly time-consuming and tedious, and a set of micro-drills is not cheap. We also freely acknowledge that the process may be much less productive with narrow-kernel propellants that are hard to drill. (Also EuroChemie powders are preferred because the burn rate controlling compounds are impregnated throughout the entire kernel — not just the outside.) But the potential for significant accuracy gains is there. We proved that.
Is it worth the huge investment of time to drill your powder kernels? That’s a question each reader must ask himself. But if you know the competitor on the next bench over has uniformed his kernels, can you afford not to do the same? Sometimes the extra effort is worth it, just for the peace of mind you get knowing you’ve done everything possible to achieve “ultimate accuracy”.
April 1st, 2012
 Because of draconian restrictions on handguns in the United Kingdom, Olympic smallbore pistol shooters from the UK have been forced to conduct their training in neighboring countries, such as Belgium and France. Obviously, the need to travel overseas to practice their sport has been a major handicap for UK shooters who will compete with Team GB* at the upcoming London Olympics. Said one smallbore pistol shooter: “Our goal is to win a medal for mother England, the 2012 host nation. But it is hard to compete on a world-class level when we can’t even train at home. Going overseas every time we need to practice wastes precious time and money. Other Olympic shooters don’t face these kind of obstacles.”
 With the 2012 London Olympics soon approaching, UK Olympic officials have been looking at ways that Team GB pistol shooters can avoid the need to travel abroad just to practice shooting. Now, through a special act of Parliament, it appears that UK Olympic pistol shooters may finally be able to hone their marksmanship skills at home. A new law will allow qualified Olympic-level pistol shooters on Team Great Britain to import a new, non-lethal training device recently introduced in the United States. With the aid of the American-made Trigger Trainer, UK Olympic shooters can now practice their trigger-pulling skills without risking a trip to prison. The Trigger-Trainer is a plastic device with a pistol grip, and spring-loaded “trigger”. However, it is incapable of firing a projectile because it lacks a barrel, magazine, firing pin, and sights.

Some of Team GB’s shooters have expressed doubts about the usefulness of the rather primitive Trigger Trainer. (As it lacks front and rear sights, the Trigger Trainer is difficult to align precisely on the target). But top British Olympic decision-makers believe that the shooters’ complaints are unjustified. British Olympic Association official Nigel Wensleydale observed: “Complaints? That’s just idle whinging if you ask me… nothing’s perfect you know. Perhaps the Trigger Trainers do leave something to be desired as they come out of the box. But our Olympic shooters are clever lads. I think, with a little imagination and some sticky tape, these Trigger Trainers will be tip-top. Goodness, you could simply tape a drinking straw on top and sight through that. I mean how much precision do these chaps really need — the target’s only 10m away for goodness sake.”

*Great Britain is the name under which the United Kingdom of Great Britain and Northern Ireland competes at the Olympic Games. Great Britain was one of 14 teams to compete in the first Games, the 1896 Summer Olympics, and has competed at every Games. Great Britain is the only team to have won at least one gold medal at every Summer Games.
March 31st, 2012
After a series of try-outs, 28 shooters have been selected to the U.S. F-Class Open Development Team. From this select group of 28 shooters, F-Open Team USA squads will be filled for future international team matches. After further try-outs, the top 18 (16 + 2 alternates) will be selected for the final F-Open team that represents the United States in the next World F-Class Championship in 2013.

The idea behind the Development Team is that having a larger group of qualified individuals to draw from makes it easier to field a strong team at any given time. Not everyone can travel at the same time — particularly to international matches. From the 28 current Development Team members, a final 18-shooter team will be chosen prior to the 2013 World Championships at Raton, New Mexico.
| The U.S. F-Open Development Team — Officers, Coaches, Shooters |
|
Captain: Shiraz Balolia
Vice Captain: Bryan Otey
Head Coach: Bob Mead
Coaches: Emil Praslick, Rick Hunt, Trudie Fay |
Shooters
(sorted by first name)
Bob Bock (Senior)
Charles Ballard
Charles Clark
Danny Biggs
David Gosnell
David Mann
Dean Morris
Doc Bock
Don Nagel
Emil Kovan
Erik Cortina
Herb Edwards
Jim Fowler |
Jim Murphy
John Brewer
John Dunbar
John Gaines
John Myers
Ken Dickerman
Kenny Adams
Larry Bartholome
Larry Taite
Mark Walker
Rick Jensen
Ron Herms
Ryan Pierce
Tony Robertson
Walter Lange |
The Try-Out Process for the F-Class Open Development Team
The U.S. F-Class Open Rifle Team held nine try-outs throughout the country in six different cities over the course of the last two years. These shooters had to prove themselves multiple times shooting at 1000 yards. The shooters were tested on their ability to shoot under a coach and hold vertical. Each and every shooter had to meet minimum standards. The process was very transparent with all shooters being able to view other shooters’ scores and targets.

March 31st, 2012
 Panteao Productions has just released Make Ready with James Gilliland: Long Gun Basics, a $49.99 DVD. This is the first instructional video in the Make Ready series on long range precision shooting. Host James Gilliland, founder of Shadow 6, is a former United States Army Ranger. While serving in Ramadi, Iraq, Gilliland was recognized for engaging an enemy combatant with a M24 SWS at a range of 1250 meters with a single round, setting a record for the 7.62mm NATO cartridge. In this video Gilliland takes you step by step through ammo and caliber selections, bolt gun and gas gun choices, optics, rifle assembly, initial cleaning, pre-fire check, precision shooting fundamentals, building your dope book, accessories, and more. Whether you use a bolt gun or semi-auto gas gun, this video does offer some good basic tips on setting up your gun and mastering the fundamentals of accurate tactical shooting. It will have limited usefulness to benchrest shooters.
March 30th, 2012
Report by Murray Hicks
On March 10, 2012, history was made down under when 78 shooters attended the inaugural BRT 500m Fly Shoot National Championships held in Canberra, Australia. 500m fly shooting has grown immensely in popularity down under since the first Fly Shoot was held in Canberra, 22 years ago. The Fly Shoot is a highlight of the Aussie shooting calendar, attracting the largest field of competitors among any benchrest-style match in Australia. The day of the match was a cracker (that means good in the Aussie lingo) with blue skies and light winds.

| CLICK “PLAY” to hear Murray Hicks talk about the sport of Fly-Shooting in Australia. Murray explains Fly Shoot rules, including the famous Rule 10: “Any competitor found not enjoying themselves, will be disqualified”. |
[haiku url=”http://accurateshooter.net/Video/flyshoot.mp3″ title=”Fly Shoots by Murray Hicks”] |
 The 500m (560-yard) Fly Target is shot for score on a target with 10 scoring rings, plus a central fly image (instead of an “X”). A shot that hits any part of the fly counts as 10.1. Bonus points are also awarded for group size, with one point for a group under 10″ up to a maximum of 10 points for a group under 1″. Thus, 60.5 is the max possible score for one five-shot target (10.1 x 5 plus ten bonus points).
The Fly Shoot has two equipment classes: Light Gun (under 17 lbs.) and Heavy Gun. This is one of the few matches in Australia where Light and Heavy guns shoot head to head for overall placings. The wide variety of chamberings/calibers used by competitors is remarkable. Unlike the 600-yard BR game in the USA, which is dominated by small 6mm cartridges, at Australia’s Fly Shoots, you will see everything from small varmint calibers all the way up to big-bore Magnums. Many shooters favor the big 30s because it’s easier to see .30-caliber bullet holes through the mirage. This year’s Canberra event was won by Stuart Elliott shooting a 300 Win Mag. It was fitting that Stuart won the Inaugural BRT 500m Fly National Championships. Stuart, who runs BRT Shooters’ Supply, was one of the three Fly Shoot “founding fathers” who dreamed up the Fly Shoot discipline 22 years ago.

To learn more about 500m Fly Shooting or 200m Rimfire Fly Shoots, visit 500mflyshooter.com.au. There you’ll find official records, match results, and you can download the SSSA Fly Shoot Rules. CLICK HERE to view more photos of the competitors and their hardware.
Spotters Add to the Fun
The use of a spotter during the match is permitted and even encouraged. This adds greatly to the fun of the shoot. Having a good mate on a spotting scope alongside you spotting your shots and helping to call the wind changes can really help when conditions get rough (as they often do).

The past year has seen the 500m Fly Shoot officially recognised by the Sporting Shooters Association of Australia (SSAA) and added to the official rule book. As a result the March shoot in Canberra this year became the Inaugural Fly Shoot National Championships. BRT Shooters’ Supply came on board as the event’s major sponsor, offering BRT’s full support and organizing an excellent prize pool. Thus the “BRT 500m National Fly Shoot Championships” was born.
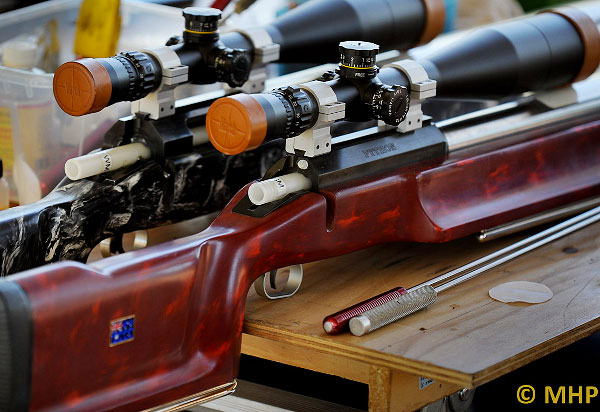
The BRT 500m Fly Shoot Nationals were shot in reasonably good conditions, with major rains and floods in the week leading up to the shoot things were looking a bit dodgy. Luckily the day before the shoot the weather started to clear and over 40 tons of gravel had to be bought in to repair the access road to the 500m target line which had been washed away. The main organiser David Groves and his willing team of helpers took this all in their stride and did a tremendous effort to keep things running smoothly.

The inaugural shoot had an international flavor with shooter Sebastian Lambang, maker of the Seb rest, making the trek from Indonesia to compete. Lambang bought along his new switch-barrel rifle. With wide front “wings” attached and his .284 barrel, Seb finished 14th overall and 7th in Light Gun.

| Top Competitors at 500m BRT Fly Shoot Championships |
|
Name – Score – Class + Placing
1. Stuart Elliott: 261.03 — HG 1
2. Murray Hicks: 260.05 — HG 2
3. Anthony Hall: 257.03 — LG 1
4. Jason Trotter: 249.02 — HG 3
5. Annie Elliott: 247.03 — HG 4
6. Michael Farr: 242.04 — HG 5
7. Les Fraser: 242.01 — HG 6
8. Les Fraser: 241.01 — LG 2
9. Tyson Trotter: 238.01 — LG 3
10. Roy Gow: 237.02 — LG 4
11. Mick Easton: 235.02 — LG 5
12. Dave Groves: 228.02 — HG 7
13. Michael Bell: 228.01 — LG 6 |
Other Important Results
Small Group Paul Read: HG 1.382″
Best target Jason Trotter: HG 58.01
Best Junior Roy Gow: LG 237.02
Note on Rankings: The ranking list (the “Dirty Dozen”) includes 13 rankings of 12 shooters. Les Fraser shot both classes, finishing 7th overall with his HG and 8th overall with his LG. A second entry is included in the “Dirty Dozen” list for Les to allow recognition of his second highest score in Light Gun Class. However, each shooter normally only gets one overall ranking in the “Dirty Dozen” top 12. |

All photos are copyright Murray Hicks, used with permission.
March 29th, 2012
Three-gun match competitor Zak Smith employs a simple, handy means to store his elevation and wind dift data — a laminated data card. To make one, first generate a come-up table, using one of the free online ballistics programs such as JBM Ballistics. You can also put the information in an Excel spreadsheet or MS Word table and print it out. You want to keep it pretty small.
Below is a sample of a data card. For each distance, the card includes drop in inches, drop in MOA, drop in mils. It also shows drift for a 10-mph cross wind, expressed three ways–inches, MOA, and mils. Zak explained that “to save space… I printed data every 50 yards. For an actual data-card, I recommend printing data every 20 or 25 yards.” But Zak also advised that you’ll want to customize the card format to keep things simple: “The sample card has multiple sets of data to be more universal. But if you make your own data card, you can reduce the chance of a mistake by keeping it simple. Because I use scopes with MILS, my own card (photo below left) just has three items: range, wind, drop in MILS only.”
 
Once you have the card you can fold it in half and then have it laminated at a local office store or Kinko’s. You can keep this in your pocket, tape it to your stock, or tie the laminated card to your rifle. If you regularly shoot at both low and high elevations, you may want to create multiple cards (since your ballistics change with altitude). To learn more about ballistic tables and data cards, check out the excellent “Practical Long-Range Rifle Shooting–Part 1″ article on Zak’s website. This article offers many other insights as well–including valuable tips on caliber and rifle selection.
Scope-Cover Mounted Ballistics Table
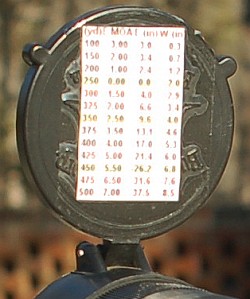 Another option is to place your ballistics card on the back of the front flip-up scope cover. This set-up is used by Forum member Greg C. (aka “Rem40X”). With your ‘come-up’ table on the flip-up cover you can check your windage and elevation drops easily without having to move out of shooting position. Greg tells us: “Placing my trajectory table on the front scope cover has worked well for me for a couple of years and thought I’d share. It’s in plain view and not under my armpit. And the table is far enough away that my aging eyes can read it easily. To apply, just use clear tape on the front objective cover.”
Updated Links for JBM Ballistics Program
With the release of version 5.1 of the JBM program, some URLs for the calculations pages have changed. You may want to update your bookmarks with the following web addresses:
March 29th, 2012
 If you have a firearms collection, you need an inventory of the guns, with serial numbers, photos, and detailed descriptions. This is important for insurance and law enforcement purposes. If your firearms are ever stolen or destroyed in a fire or other natural disaster you need a complete inventory if you expect to get a proper insurance payout. There is nothing wrong with writing down descriptions of your guns in a “hard-copy” notebook or ledger. However, many gun owners don’t bother to take photos of their firearms, making it difficult to claim full value during loss. Additionally, ledgers are easy to misplace, and, in the event of a fire, your “hard copy” gun inventory may go up in smoke.
JHSTech.com has created Gun Inventory, a handy $0.99 smart-phone App that makes it easy to create a detailed inventory of all your firearms, complete with photos. Gun Inventory works with iPhones, iPods, iPads and all iOS devices (no Android version yet). Using this App, in a few minutes you can inventory all your guns, complete with photos taken with your iPhone’s camera. The app allows you to fill in details such as Make, Model, Serial Number, Finish, Barrel Length, and any other info that can help identify your firearms. After the info is saved, your guns are organized into a easily-navigated list, that you’ll have with you when you leave home. Need an inventory print-out? Just email the list from your iPhone or iPad to any web-mail address.

How Secure Is Your List on a Phone?
In reviewing this product, we initially thought: “It’s a really BAD IDEA to carry around a list of your guns on a cell phone”. If a bad guy accesses your iPhone gun list, he learns you are a prime target for theft, and, unfortunately, your home address can be easily traced from your cell number. But the creators of the Gun Inventory App have given some thought to security. First, the App has an optional password protected login screen. By all means, if you use this App, use the password protection! (We wish the log-in screen did not say “Gun Inventory” — that’s enough to tell thieves that you’re a gun owner. The App developers should create a “stealth” entry screen with a title such as “Baby Pictures”.) Second, if you lose your phone, you can delete your gun list using the remote wiping features that come on iOS devices. The Gun Inventory App can be purchased for just $0.99 through the iTunes App Store.

|


