Do you know which one of your eyes is dominant? It’s easy to determine eye dominance with a simple exercise. Pick an object about 6-10 feet away (a light switch or door knob works well). Make an “OK” sign with your right hand (see photo) and hold that about 18″ from your face. Now, with both eyes open, look through the circle formed by your thumb and index finger. Center the circle on the object, so you can see the object in the middle.
Now, here’s the important part — while still holding your hand up, centered on the object, first close your right eye. If you don’t see the object anymore, then your right eye is dominant. If you still see the object, then repeat the procedure with the left eye shut and right eye open. If you don’t see the object when your left eye (only) is closed, then you are left-eye dominant.
The digital archives of Shooting Sports USA contain many interesting articles. A while back, Shooting Sports USA featured a “must-read” expert Symposium on Eye Dominance, as it affects both rifle and pistol shooting. No matter whether you have normal dominance (i.e. your dominant eye is on the same side as your dominant hand), or if you have cross-dominance, you’ll benefit by reading this excellent article. The physiology and science of eye dominance is explained by Dr. Norman Wong, a noted optometrist. In addition, expert advice is provided by champion shooters such as David Tubb, Lones Wigger, Dennis DeMille, Julie Golob, Jessie Harrison, and Phil Hemphill. NOTE: If the story doesn’t open at the links, go to the ssusa.org home page first, indicate you are over 18, and then CLICK HERE.
Top Rifle Champions Talk About Eye Dominance:
David Tubb — 11-Time National High Power Champion
I keep both eyes open, always. Some use an opaque blinder in rifle or shotgun shooting. If you close your non-dominant eye, you will not get as good a sight picture. If your aiming eye is not your dominant eye, you have even more of a problem to overcome.
Lones Wigger — World, National and Olympic Champion Rifleman
Shooters should try to use the dominant eye unless the vision is impaired and the non-dominant eye has better vision. You should always shoot with both eyes open since this will allow the shooting eye to function properly.
Dennis DeMille — National Service Rifle Champion
I close my non-shooting eye initially. Once I pick up my sight picture, it’s not something I focus on. For those that use a patch, I recommend that they use something white to block their view, rather than cover the eye.
Bruce Piatt — 2025 World Action Pistol Team Championship — Member of Winning Team CMP-USA
Some shooters, especially those with nearly equal or cross-dominance, will naturally find themselves squinting one eye. When anyone does this, you are also closing your dominant eye to some extent and adding stress to your face.
That’s custom paint on the stock, NOT a Hydro-dip coating. Impressive paintwork!
Our Sunday GunDay showcase rifle belongs to Shane Sivertsen (aka SoDakDasher in our Forum). This eye-catching tactical rig was smithed by Travis Stevens at TS Customs in Miller, South Dakota. Shane tells us that Travis is a “top-notch builder who builds tack-driving rifles that are still extremely shooter-friendly. Plus he is one of the friendliest guys you’ll meet.”
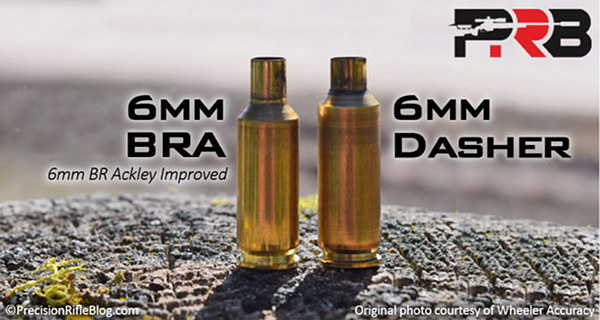
This rifle features a Lone Peak Fuzion Action with Trigger Tech Diamond trigger (flat shoe). Up front is a Benchmark 26″ MTU barrel chambered in 6mm BRA (a 40-degree 6mmBR Improved “BR Ackley”). It’s all nestled into a McMillan A5 stock with adjustable cheekpiece. Getting him on target is a Vortex Razor 4.5-27x56mm optic in Hawkins rings with a Vortex throw lever on the power ring for quick magnification changes. The Atlas PRS Bipod rides on an Area 419 ARCA rail up front. The barrel is finished off with a Piercision 5-Port Self-Timing Muscle Brake.
Custom Camo-Pattern Paint Job
All work on this rig was performed at TS Customs, including Cerakoting the action. The pattern on the McMillan A5 stock is NOT a hydro-dip! That is a custom Kryptek camo paint-job done in-house by a TS Customs employee. Shane liked the Kryptek pattern from day one: “It’s always a good thing to do something a little different to your equipment to stand apart from the rest of the pack.” Shane says the paint pattern is the first thing everyone notices about the rifle.
6mm BRA Chambering
Shane spent quite some time trying to decide which 6mm cartridge to choose. After much deliberation with Travis, he chose the 6mm BRA (aka “6BRA” or “6 BRA”), mainly due to the reputation this little cartridge has earned for accuracy and ease of tuning. This rifle is Shane’s second TS Customs-crafted rifle: “the [other] is basically the same action/barrel combo but set in an MPA chassis and chambered in 6mm Dasher.”
Excellent Accuracy with Varget and Berger 105gr Hybrids
Shane’s 6mm BRA is showing impressive accuracy: “Thanks to Mother Nature this spring (with cold, snowy weather), I have only been able to get 100 rounds fire-formed and the barrel broken-in. I started with 30.5 grains Varget in Lapua BR brass with CCI 450s and topped off with Berger 105gr Hybrids. Velocity averaged 2830 FPS with an SD of 4.7 from 10 rounds randomly picked from the lot.”
Shane knows there’s still more load development to do. But this rifle is grouping under one-half MOA and Shane says the gun can definitely out-shoot his abilities. He admits it’s still a work in progress but he is happy with the gun’s performance so far.
Shane praised his Piercision 5 port Muscle brake. Shane tells us: “While I am a suppressed shooter by preference, I wanted to give this brake a try. It works very well — the control and ability to stay on target for followups is remarkable. This brake works perfect on my 18-lb 6mm BRA and will be used indefinitely. Plus it will be a little payback to the other big-braked shooters on the line.”
While it’s still such a new toy, Shane doesn’t expect to make any modifications in the near future. However he says he might “upgrade to a Tangent Theta optic by the end of this season.”
Below is a comparison between the 6mm BRA and the 6mm Dasher. The Dasher has slightly more capacity, but a much shorter neck. There is some evidence that barrel throat erosion may be slower with the 6mm BRA, and the 6mm BRA is easier to fire-form.
In this interesting video, Brownells Gun Tech Caleb Savant covers the topic of linear compensators, aka “blast diffusers” or “linear blast devices”. These are quite different in function from a typical muzzle brake and they are NOT a sound suppressor. Unlike a traditional muzzle brake, a linear compensator directs the muzzle blast forward, AWAY from the shooter. This is not only good for the shooter but also for folks next to the shooter, either at the range or in a CQB law enforcement or military situation.
A “Linear Compensator”, also known as “blast diffuser”, my look similar to a muzzle brake. But it works differently. A typical muzzle brake shoots blast out the side, and can be pretty annoying for someone positioned next to the shooter. By contract, the Linear Compensator direct blast force more forward. This helps reduce perceived recoil, and importantly doesn’t send hot gasses left and ring to nearby shooters or observes. Muzzle brake output can be very annoying. This Editor once was shooting next to a .338 Lapua Magnum with a brake, just a couple feet away. With each .338 LM shot I could feel heat on arms/hands and actually feel the bones in my forearm vibrate.
Attachment Methods — Direct Thread Mounting vs. Quick-Attach Mounting
Linear compensators have become much more popular in recent years as AR-15 pistols and SBRs have proliferated. Some linear comps, such as popular models from Midwest Industries and the Troy Claymore, attach directly to the muzzle, just like a traditional flash hider or muzzle brake.
Other Linear Compensators are slip-on, quick-attach components that mount OVER another muzzle device. For example, the VG6 Precision CAGE Device (Concussion Altering Gas Expansion) attaches directly over one of their standard muzzle devices. Almost every company that makes a sound suppressor also offers a linear compensator, which typically attaches to the muzzle the same way as the silencer.
Video find by Boyd Allen. We welcome reader submissions.
Need a top-notch Ballistics App for your iPhone or iPad? Start with Ballistic: Advanced Edition (AE), the number 1 (i.e. most installed) App for iOS systems (iPhones and iPads). Ballistics AE (Advanced Edition) is the most popular iOS ballistics program for many good reasons. It offers a full feature set with Ballistic Solver, Ballistic Comparison (with up to 8 projectiles), Target Log (records group sizes), Advanced WindKit, and more. The Ballistic: Advanced Edition software is easy to use, with nice controls. Underneath it all is the proven JBM Ballistics calculator. And here’s the kicker — this excellent mobile App software is now FREE to download and install on iPhones and iPads!
This Video Explains How to Set Up and Use Ballistic: Advanced Edition
Full-featured and easy to use, Ballistics AE has been refined over many years, and it supplies rock-solid solutions derived from JBM Ballistics solver (created by James B. Millard). Unlike some other Apps, Ballistics AE is STABLE on iPhones (with various OS levels). What’s cool is that Ballistics AE is now available for FREE for both iPhones and iPads. This software is now provided by Federal Premium Ammunition, with in-App purchase functionality.
We’ve used the Ballistic: Advanced Edition program on an iPhone 5S, iPhone 6, and iPad, and it performed well. Here are some of the features we liked:
1. Mirrors output from online version of JBM Ballistics we often use for initial calculations.
2. Controls are simple to use and (mostly) intuitive.
3. Handy comparison feature lets you compare ballistics for different projectiles side by side.
4. Advanced Wind Kit allows you to account for complex wind situations.
5. Projectile and BC Databases are very comprehensive.
6. Software is regularly updated to match Apple OS changes.
This article is Copyright 2025 AccurateShooter.com. No republication is authorized. Any appearance of this story on another site obliges that site to pay liquidated damages and/or licensing fees.
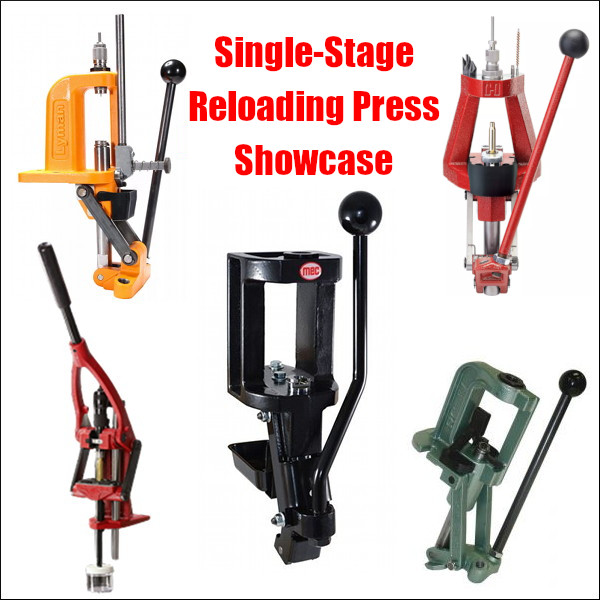
Hand-loaders have never had so many great choices in single-stage presses, with many different configurations and features. There are classic O-Frame presses, Coax-style presses, Open-front presses, Pyramid presses, and compact C-Frame presses. Here is our 2019 Single Stage Press Showcase with products from Forster, Hornady, Lee, Lyman, MEC, and RCBS. We’ve included short videos showing the features of these reloading presses.
If you are shopping for a new press you should look at the various features of each. You may prefer something classic like a Rock Chucker, or the innovative open-front MEC. If you are looking for a compact press to use at the range, the Lyman C-Frame is very impressive for the price. And the Forster Co-Ax remains a great addition to any loading room.
MEC Marksman Single-Stage Press
If you are looking for a new, full-size single-stage reloading press, definitely consider the MEC Marksman. Created by the makers of the popular MEC shotshell reloading systems, the MEC Marksman combines a sturdy cast-iron frame with a modern open-front design. If you are looking for a new, full-size single-stage reloading press, definitely consider the MEC Marksman. Created by the makers of the popular MEC shotshell reloading systems, the MEC Marksman combines a sturdy cast-iron frame with a modern open-front design. With a $245.49 street price, the MEC Marksman press now costs more than an RCBS Rock Chucker Supreme press, but the MEC offers some distinct advantages — such as an open front plus a floating shell-holder system.
Our friend Gavin Gear of UltimateReloader.com got his hands on a MEC Marksman press and put it through its paces. He came away impressed with the product, saying it delivers excellent performance, and has many impressive features. Gavin tells us: “Cast iron tools and machines are a lifetime investment. The made-in-USA MEC Marksman features ductile cast-iron construction, an open-front frame design for easy cartridge access, a new floating shell-holder design with a unique retention system, and ambidextrous handle setup.” MEC also offers a wide selection of accessories for the Marksman press, including a press riser/mount, shell-holder caddy, and die trays.
Forster Co-Ax Press
If you are not yet familiar with the many unique features of the Forster Co-Ax, we recommend you watch the video above, a very thorough video review by Rex Roach. This shows how the press operates and highlights the design elements which set the Co-Ax apart from every other reloading press on the market. This 14-minute video shows the key Co-Ax features, explaining how the floating case-holder jaws work (3:30 time-mark), how the dies are held in place (4:40 time-mark), how spent primers are captured (6:10 time-mark), and how to set the primer seating depth (10:00 time-mark). We’ve used a Co-Ax for years and we still learned a few new things by watching this detailed video. If you are considering purchasing a Co-Ax, definitely watch this video start to finish.
In recent years, Forster Co-Ax® presses have been somewhat hard to find, as demand has out-stripped supply. The Co-Ax has many dedicated fans, given its unique features, such as the floating case-holder jaws, and easy, rapid slide-in/slide-out die placement. We’ve also found that Co-Ax presses load very straight ammo and we like the ability to switch between short handle (good for bullet seating) and long handle (ideal for heavy case-sizing tasks). We also think the Forster Co-Ax has one of the best spent primer capture systems on the market — a straight drop into a removable plastic cup. Simple and it works.
Lyman Brass Smith Victory Single-Stage Press
Lyman’s sturdy Victory Single-stage Press is a full-size unit that competes with the RCBS Rock Chucker Press. With beefy cast iron construction, the Victory’s strength and leverage rivals the Rock Chucker. The press operates smoothly and the handle can be mounted on either side.
If you like to prime cases using a press, this Victory press has a priming system that’s much easier to use than the RCBS Rock Chucker system. The priming tube is right up front, with multiple primers loaded vertically in a tube. Simply push the shuttle at the button of the tube to advance the primer into place.
For convenience, the entire primer-loading system can also be removed so it doesn’t interfere with case and bullet-handling operations. We generally prefer to prime cases separately using a dedicated hand- or bench-mounted tool, but the Victory press does the job nicely.
Overall, the Victory is a great value in a full-size “O-Frame” press with sturdy construction and a solid Lyman warranty. It is available now for $219.99 on Amazon.
RCBS Rock Chucker Supreme Single-Stage Press
Nearly every serious hand-loader has owned or used the RCBS Rock Chucker press. This Editor still uses a Rock Chucker passed down by his brother 20 years ago. And yes, it is still going strong. The latest Rock Chucker Supreme single-stage press features an improved “upside-down Y-path” dual-bin spent primer catcher. Otherwise the Rock Chucker Supreme remains big, strong, versatile and sturdy. It has very strong linkages, with a compound leverage system providing plenty of power — FL-sizing is a breeze even with large, magnum cases. The 1″-diameter ram has 12.5 sq. inches of ram-bearing surface.
The Rock Chucker offers a secondary 1 1/4″ x 12 thread for shotshell reloading dies and Piggyback 3 upgrade. The Rock Chucker Supreme retails for $234.99 now at Midsouth. The Rock Chucker Supreme combines easy operation, ambidextrous handle, and outstanding strength. It has a big 4.25″ loading window that works even for big magnum cases. The long handle and central pivot design provide outstanding leverage. The RCBS Rock Chucker is definitely a quality product that can last a lifetime. For heavy-duty sizing chores this remains one of the best choices in single-stage presses.
Lyman Brass Smith Ideal C-Frame Compact Press
The Lyman Brass Smith Ideal Press is a very affordable, cast iron C-Frame reloading press. We think it is the new “class leader” in compact presses. This works great as a secondary press for your reloading room or a small press you can take to the range. The large front opening allows you to access the shell holder without hitting the support bar on other types of presses. Unlike other compact presses made from aluminum, Lyman’s Ideal press is cast iron so it is rigid and strong. The high-quality steel ram is one inch in diameter. The Brass Smith is a true ambidextrous press that can be accessed from either side and mounted the same. This is a great choice for a second, auxiliary press for depriming and bullet seating. It is now just $134.99 at MidwayUSA.
Hornady Iron Single Stage (Open-front) Press
In this “Reloading with Rosie” video, the attractive female host loads some ammo using the Hornady Iron Press. With a beefy, pyramid-style cast-iron frame with an open front, this press offers some advantages over a traditional “O-Frame” type press. Access is considerably easier, for one thing. And the top of the press includes slots to hold dies and tools — that’s really a very nice feature that saves time. Also an optional “automatic” priming system shuttles primers from a vertical tube in the back to the shell-holder in the front. That’s clever. Over all the Iron Press is a nice piece of engineering — good job Hornady. It is offered for $289.99 at Midsouth.
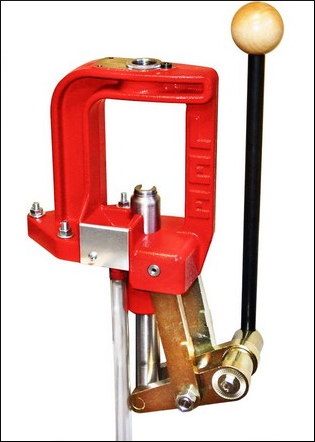
Lee Classic Cast (Iron) Breech Lock Press
The Lee Classic Cast Breech Lock Press offers excellent value for the money ($190.99 at Midsouth). Based on the proven design of the Classic Cast press, the updated Breech Lock series adds the quick-change die bushing and an improved primer drop system. This press is strong, with cast iron frame, all-steel linkage, and 12 square inches of ram bearing surface.
Lee says this press has the “largest opening and the longest stroke in the industry” among O-frame type presses. The handle can be mounted on either side. We love the fact that the handle ANGLE can be adjusted, as well as the lever arm length — that allows you to adjust travel and leverage to suit your preference. Smart engineering.
The new spent primer drop features a large-diameter hollow ram with clear hose that drops primers straight to a bin — that’s simple and effective. The press is very rigid and the base is wide enough for good stability. We have one of these Classic Cast Breech Lock Presses in our reloading room and it works well.
This is a grim tale. A man almost lost the use of his right hand, and did suffer terrible injuries to his fingers. All because he picked the wrong bottle of powder off the shelf. We have run this story before, and we will continue to run it every year, as a caution to our readers. This mistake is easy to make, but the consequences can be dire. Always, always double-check your powder labels before you start the hand-loading process. If you don’t, you may not have a hand to load with next time…
Similar Labels, Disasterous Consequences
The shooter, Denny K., was assembling some rounds for his brand new 7mm-08 Savage hunting rifle. He thought he was loading with Hodgdon Varget. Instead he had filled his powder measure with Hodgdon TiteGroup, a fast-burning pistol powder. The labels are similar, so the mistake is understandable. But the results were devastating. Here’s what 41 grains of TiteGroup can do in a 7mm-08:
Posting on the Firing Line, in a thread entitled “Lucky to Be Alive”, Denny writes:
“This is the hardest post to post. I know if I had read it a week ago my comment would have been: ‘You have no business reloading’. I had everything perfect, except pouring the wrong powder in the powder measure. I type this slowly with my left hand, embarrassed but … possibly saving someone else a tragedy or, like me, a long drive to the Emergency Room and surgery to save my finger.”
The Still-Sealed Bottle of Varget
Denny did not initially comprehend exactly why the kaboom happened. He thought maybe his new Savage rifle was at fault. Then, on his return home, he discovered something…
Denny wrote: “The seven-hour period it took to go to ER, transport to Trauma Center and surgery made me think it was a Savage rifle issue. Brand new rifle, new brass, triple-checked loading data. The next day I was humbled when I realized the Varget powder was still sealed.
I knew what powder to use. I thought [Varget] was what I used. Not until the following day did I realize the Varget was still sealed.”
At that point, Denny realized what caused the accident — “operator error”. He knew he had to warn others about using the wrong powder: “I knew I needed to share my mistake, even though it is embarrassing, just to remind people. I’ve been reloading for 30 years…”
Editor’s Comment: Denny was not a novice reloader. His experience demonstrates that this kind of mistake can be made by any hand-loader, even one with decades of experience. Be safe guys, take your time when you load your ammo. Remove powders from measures after your loading sessions (pistol powders can look very similar to rifle powders). And by all means CHECK the LABEL on the jug. As the TiteGroup label says: “A little goes a long way.”
It’s not a bad idea to separate your pistol powders from your rifle powders, or perhaps even load for pistol in a separate part of your workshop.
Today, October 31st, is Halloween (originally called “All Hallows Eve”). Around the country pumpkins and Halloween decorations are on display in neighborhoods. Why not head to the range and shoot some Halloween-themed targets this weekend amidst the fall foliage. The folks at the NRA Blog have created a series of “spook-tastic” Halloween targets. Writer Kyle Jillson says, “In addition to stocking up on candy and finding great costumes, we thought you might like to have some fun at the range, so we created these spooky targets for you to use.”
Just click an image to launch its full-size version. You can then download the target and print it out on regular 8.5″x11″ paper. Now you have fun Halloween-themed targets to bring to the range this week.
The Lever Action Supreme Rifle (LASR) from Henry Repeating Arms has been named 2025 Rifle of the Year by Guns & Ammo magazine. The selection was based on a rigorous evaluation process, which included extensive field testing, in-store availability checks, and value assessments. With these considerations, Henry’s LASR rose above other new rifles introduced in 2025 to earn Guns & Ammo’s top honor.
Chambered in .223 Wylde or .300 Blackout, the LASR is available at Henry dealers nationwide with an MSRP of $1,299. For more information, visit www.HenryUSA.com.
This new Henry rifle will be featured in the Guns & Ammo November 2025 issue which hits newsstands on November 5th. In the feature story, Guns & Ammo highlighted the Lever Action Supreme Rifle’s ability to reliably feed from commonly available MSR-pattern detachable box magazines, a unique feature for a lever-action rifle. The Guns & Ammo editors also praised the Henry’s quad-bar linkage action that allows reliable, smooth operation without interference from the magazine. Among the key factors that earned Gun of the Year honors, Guns & Ammo noted the LASR rifle’s sub-MOA accuracy potential, suppressor-ready design, good handling, and high-quality materials.
“We set out with this rifle to raise the bar for America’s most iconic rifle platform, and this award suggests that the team was able to accomplish just that,” said Anthony Imperato, Founder and CEO of Henry Repeating Arms. “We’re honored that Guns & Ammo has recognized the fruits of our labor, and I am incredibly proud of the many bright minds that came together to make this rifle a reality.”
At AccurateShooter.com, our primary focus is precision target shooting with rifles. But it’s definitely fun to shoot pistols too, and we bet most of our regular readers own handguns. Here are six tips for shooting safely and accurately with handguns. These pointers will help you advance your skills and have more fun with your pistols and revolvers. Top image courtesy Sanctuary Gun Club.
1. Make Sure Safety Is Number One
Whether you own one gun or one hundred, gun safety must always be your main priority. In this video, Smith & Wesson Team Captain Julie Golob covers the basics of gun safety.
2. Start with a .22 LR Handgun
We strongly recommend that new pistol shooters start off with a .22 LR rimfire handgun. The .22 LR cartridge is accurate but has very low recoil, less “bark” than a centerfire, and very little smoke and muzzle flash. New shooters won’t have to fight muzzle flip, and won’t develop a flinch from the sharp recoil and muzzle blast common to larger calibers. With the .22 LR, the trainee can focus on sight alignment, breathing, and trigger pull. When he or she has mastered those skills, move on to a .38 Special or 9mm Luger (9x19mm).
What gun to use? We recommend the 10-shot Smith & Wesson Model 617. This is ideal for initial training, shooting single action, slow-fire. You want to focus on sight picture and holding steady. Shown above is the 4″-barrel Model 617 which balances well. There is also a 6″-barrel version. It has a longer sight radius, but is a little nose-heavy. Both are great choices. They are extremely accurate and they boast a very clean, precise trigger.
If you prefer a semi-auto .22 LR pistol, we recommend the Browning Buck Mark series. Buck Marks are very accurate and very reliable. This rimfire pistol is available in a variety of models starting at under $350.00. Like the S&W Model 617, a good Buck Mark will serve you for a lifetime.
3. Use Quality Targets with Multiple Aim Points
It’s common for new pistoleros to start shooting at cans or clay birds at a public range. That can be fun, but it’s better to start with proper targets, placed at eye level, at 7-10 yards. We like to use targets with large, brightly colored circles. Focus on putting 5 shots in a circle. We recommend targets that have multiple bullseyes or aiming points — that way you don’t have to constantly change your target. There are also special paper targets that can help you diagnose common shooting problems, such as anticipating recoil. EZ2C Targets offers many great target designs with bright, red-orange aim points. You can also use the bright orange Birchwood Casey stick-on Target Dots (right). These come in a variety of diameters. We like the 2″ dot at 10 yards.
4. Shoot Outdoors If You Can
We recommend that new pistol shooters begin their training at an outdoor range. There are many reasons. First, the light is better outdoors. Indoor ranges can be dark with lots of shadows, making it harder to see your target. Second, sound dissipates better outdoors. The sound of gunfire echoes and bounces off walls indoors. Third, an outdoor range is a more comfortable environment, particularly if you can get out on a weekday morning. Indoor ranges, at least in urban areas, tend to be crowded. Many also have poor ventilation. If you can make it to an outdoor range, you’ll be happy. Many outdoor ranges also have some steel pistol targets, which offer a fun alternative to paper. When shooting steel however, we recommend polymer encased or lead bullets to avoid ricochets.
Too many new pistol shooters try to move right to rapid fire drills. It’s better to start slow, practicing the basics, under the guidance of a good mentor. If you belong to a club, ask if there are certified instructors who will help out. This Editor learned pistol shooting from a seasoned bullseye shooter, who got me started with a .22 LR revolver and very close targets. Over the course of a few range sessions we progressed to farther targets and faster pace. But the fundamentals were never forgotten. When starting your pistol training, it’s wise to view some instructional videos. Top Shot Champion Chris Cheng hosts an excellent Handgun 101 Series produced by the NSSF. We’ve linked one of these Handgun 101 videos for Tip #6.
6. SLOW DOWN — This Is Not a Race
When you learned to ride a bicycle, you started slow — maybe even with training wheels. The same principle applies to pistol shooting. When you get started with handguns, we recommend you shoot slowly and deliberately. Start with the handgun unloaded — just work on your sight alignment and breathing. With snap caps in place, try some dry-firing drills. Then progress to live fire. But be deliberate and slow. With the target at 20 feet, see if you can get three successive shot-holes to touch. Believe it or not, many common pistols are capable of this kind of accuracy (but you won’t see many shooters at indoor ranges who pursue that kind of precision). Once you master your form and accuracy, then you can work on your speed.
Sinclair Internationalhas released an interesting article about Case Concentricity* and bullet “run-out”. This instructional article by Bob Kohl explains the reasons brass can exhibit poor concentricity, and why high bullet run-out can be detrimental to accuracy.
Concentricity, Bullet Alignment, and Accuracyby Bob Kohl
The purpose of loading your own ammo is to minimize all the variables that can affect accuracy and can be controlled with proper and conscientious handloading. Concentricity and bullet run-out are important when you’re loading for accuracy. Ideally, it’s important to strive to make each round the same as the one before it and the one after it. It’s a simple issue of uniformity.
The reason shooters work with tools and gauges to measure and control concentricity is simple: to make sure the bullet starts down the bore consistently in line with the bore. If the case isn’t properly concentric and the bullet isn’t properly aligned down the center of the bore, the bullet will enter the rifling inconsistently. While the bore might force the bullet to align itself with the bore (but normally it doesn’t), the bullet may be damaged or overstressed in the process – if it even it corrects itself in transit. These are issues we strive to remedy by handloading, to maintain the best standard possible for accurate ammunition.
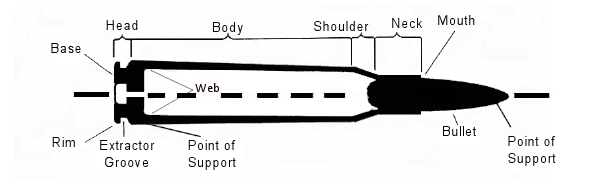
The term “concentricity” is derived from “concentric circle”. In simple terms it’s the issue of having the outside of the cartridge in a concentric circle around the center. That goes from case head and center of the flash hole, to the tip of the bullet.
Factors Affecting Concentricity
The point of using this term is to identify a series of issues that affect accurate ammunition. Ideally this would work best with a straight-walled case; but since most rifle cartridge cases are tapered, it equates to the smallest cross section that can be measured point by point to verify the concentric circle around the center. For the examples below, I’m working with .308 Winchester ammo.
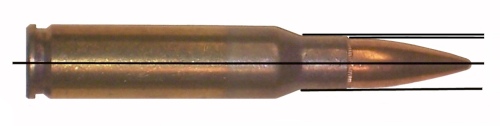
Figure 1: The cartridge.
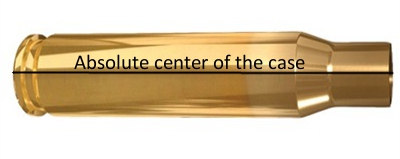
Figure 2: Centerline axis of the case, extending from flash hole to case mouth.
The case walls have to be in perfect alignment with the center, or axis, of that case, even if it’s measured at a thousandth of an inch per segment (in a tapered case).
Figure 3: Case body in alignment with its axis, or centerline, even in a tapered case.
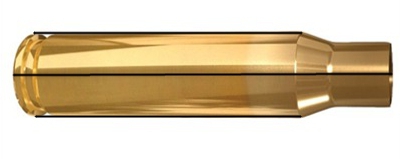
The case neck must also be in alignment with its axis. By not doing so you can have erratic bullet entry into the bore. The case neck wall itself should be as uniform as possible in alignment and in thickness (see the M80 7.62x51mm NATO cartridge in Figure 5) and brass can change its alignment and shape. It’s why we expand the case neck or while some folks ream the inside of the neck and then turn the outside for consistent thickness, which affects the tension on the bullet when seated.
Figure 4: Neck in alignment with center of the case axis.
Figure 5: Variations in case neck wall thickness, especially on some military brass, can cause an offset of the bullet in its alignment. This is an M80 ball round. Note the distinct difference of the neck walls.
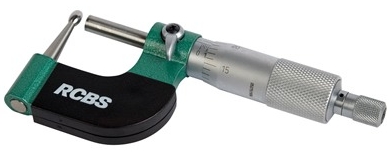
Having a ball micrometer on hand helps, especially with military brass like 7.62x51mm in a semi-auto rifle, where there are limits as to how thin you want the neck walls to be. In the case of 7.62 ball brass you want to keep the wall to .0145″.
Figure 6: A ball micrometer like this RCBS tool (#100-010-268) can measure case neck thickness.
Turning the outside of the neck wall is important with .308 military cases regardless of whether you expand or ream the neck walls. There are several outside neck turning tools from Forster, Hornady, Sinclair, and others. I’ve been using classic Forster case trimming (#100-203-301) and neck turning (#749-012-890) tools for 40 years.
Bullet Run-Out
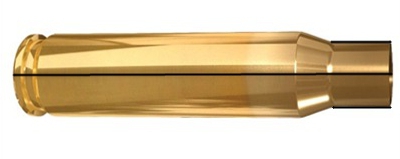
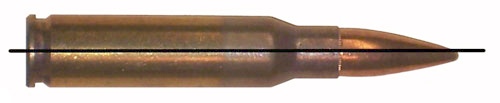
The cartridge, after being loaded, still needs to be in alignment with the center of the case axis. Figure 7 shows a bad example of this, a round of M80 ball. A tilted bullet is measured for what’s known as bullet “run-out”.
Figure 7: An M80 round with the bullet tilted and not aligned with the axis. This will be a flyer!
Run-out can be affected by several things: (1) improperly indexing your case while sizing, which includes not using the proper shell holder, especially while using a normal expander ball on the sizing die (it also can stretch the brass). (2) The head of a turret press can flex; and (3) improper or sloppy bullet seating. This is also relevant when it comes to using a progressive press when trying to load accuracy ammo.
Mid Tompkins came up with a simple solution for better bullet seating years ago. Seat your bullet half way into the case, back off the seater die and rotate the case 180 degrees before you finish seating the bullet. It cuts down on run-out problems, especially with military brass. You also want to gently ream the inside of the neck mouth to keep from having any brass mar the surface of the bullet jacket and make proper seating easier. A tilted bullet often means a flyer.
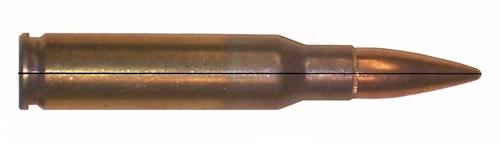
Figure 8: Proper alignment from the center of the case head to the tip of the bullet.
(NOTE: This links to a Web Archive version of the original Sinclair Int’l article.)
*Actually some folks would say that if we are talking about things being off-center or out-of-round, we are actually talking about “eccentricity”. But the tools we use are called “Concentricity Gauges” and Concentricity is the term most commonly used when discussing this subject.


 Do you know which one of your eyes is dominant? It’s easy to determine eye dominance with a simple exercise. Pick an object about 6-10 feet away (a light switch or door knob works well). Make an “OK” sign with your right hand (see photo) and hold that about 18″ from your face. Now, with both eyes open, look through the circle formed by your thumb and index finger. Center the circle on the object, so you can see the object in the middle.
 The digital archives of Shooting Sports USA contain many interesting articles. A while back, Shooting Sports USA featured a “must-read” expert Symposium on Eye Dominance, as it affects both rifle and pistol shooting. No matter whether you have normal dominance (i.e. your dominant eye is on the same side as your dominant hand), or if you have cross-dominance, you’ll benefit by reading this excellent article. The physiology and science of eye dominance is explained by Dr. Norman Wong, a noted optometrist. In addition, expert advice is provided by champion shooters such as David Tubb, Lones Wigger, Dennis DeMille, Julie Golob, Jessie Harrison, and Phil Hemphill. NOTE: If the story doesn’t open at the links, go to the ssusa.org home page first, indicate you are over 18, and then CLICK HERE.


 Custom Camo-Pattern Paint Job


 If you are not yet familiar with the many unique features of the Forster Co-Ax, we recommend you watch the video above, a very thorough video review by Rex Roach. This shows how the press operates and highlights the design elements which set the Co-Ax apart from every other reloading press on the market. This 14-minute video shows the key Co-Ax features, explaining how the floating case-holder jaws work (3:30 time-mark), how the dies are held in place (4:40 time-mark), how spent primers are captured (6:10 time-mark), and how to set the primer seating depth (10:00 time-mark). We’ve used a Co-Ax for years and we still learned a few new things by watching this detailed video. If you are considering purchasing a Co-Ax, definitely watch this video start to finish.
 Lyman’s sturdy Victory Single-stage Press is a full-size unit that competes with the RCBS Rock Chucker Press. With beefy cast iron construction, the Victory’s strength and leverage rivals the Rock Chucker. The press operates smoothly and the handle can be mounted on either side.
 Nearly every serious hand-loader has owned or used the RCBS Rock Chucker press. This Editor still uses a Rock Chucker passed down by his brother 20 years ago. And yes, it is still going strong. The latest Rock Chucker Supreme single-stage press features an improved “upside-down Y-path” dual-bin spent primer catcher. Otherwise the Rock Chucker Supreme remains big, strong, versatile and sturdy. It has very strong linkages, with a compound leverage system providing plenty of power — FL-sizing is a breeze even with large, magnum cases. The 1″-diameter ram has 12.5 sq. inches of ram-bearing surface.

 The Lee Classic Cast Breech Lock Press offers excellent value for the money (


 It’s common for new pistoleros to start shooting at cans or clay birds at a public range. That can be fun, but it’s better to start with proper targets, placed at eye level, at 7-10 yards. We like to use targets with large, brightly colored circles. Focus on putting 5 shots in a circle. We recommend targets that have multiple bullseyes or aiming points — that way you don’t have to constantly change your target. There are also special paper targets that can help you diagnose common shooting problems, such as anticipating recoil.