Hunting season is coming soon. It’s time to sight-in those deer rifles, check the optics, and make sure you’re ready to go. We know some hunters might enjoy shooting game profile targets when at the range for the sight-in process. To that end, here are six animal profile targets from Gun.Deals. Right-click any target to download the printable PDF file, designed to print to standard 8.5″ x 11″ paper. All these targets include entry boxes for Shooter Name, Score, Range (distance), and Date.
Deer Targets with Center Hit Zones Gun.Deals offers two different deer targets, both free to download. We prefer the standing buck with target ring in center mass (left below). Hit the red “10” for maximum points. You can also use this target for rimfire fun practice. NOTE: The ideal shot location for a deer or elk is in a different location, closer to the heart location in the lower, forward torso. However, these targets can be used for initial practice. CLICK HERE for specific anatomical targets for various game species.
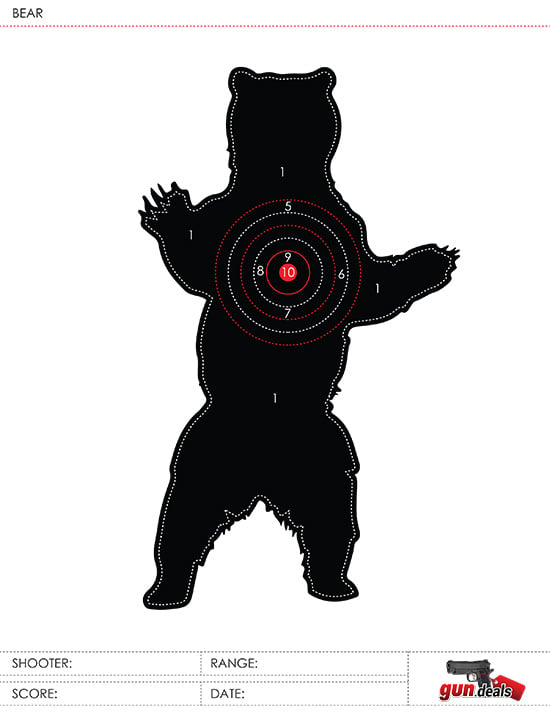
Bear Targets with Center Bulls
Few of us have actually encountered large bears in the wild. But if you do… it can be scary. Work on your bear recognition skills with these two targets, a standing bear, and a bear horizontal profile.
Sight-In Target and Bullseye Target
Courtesy of Gun.Deals, we’ve also included a conventional bullseye and a sight-in target. You can augment that sight-in sheet with neon orange Birchwood-Casey Target Spots if you want multiple aim points. A target pack with 160 1.5″ Target Dots is just $3.33 at Amazon.
In a helpful NSSF video, Ryan Cleckner explains why you normally should avoid canting your rifle — rotating it clockwise or counter-clockwise. Cleckner explains that canting the rifle in one direction or another will change the point of impact: “When you rotate the rifle, not only does the [POI move] in the direction that you’re rotated, [but] it also loses some of its elevation as it rolls down.” This, Cleckner explains, can make you miss on one side or the other:
Cant to the Left — You’re going to miss low and left.
Cant to the Right — You’re going to miss low and right.
In this video, starting at the one-minute mark, Cleckner shows the effect of rifle canting when engaging a 600-yard target. A few degrees of cant (either to the left or to the right), moves the shot POI completely off the steel silhouette target. The POI change occurs mainly because you are lowering (and laterally shifting) the scope sight-line relative to the bore axis, effectively changing your zero.
David Tubb has explained: “Every 1 degree you are off on a cant, is about six inches of difference laterally at 1000 yards”.
Position Shooting with Sling — Rifle Cant Considerations
Cleckner’s discussion assumes that the scope or sights are set to hit center with the rifle level and plumb. That works for most situations when shooting prone off bipod, front mechanical rest, or front sandbag. However, many sling shooters, including David Tubb and John Whidden, do tilt or cant their rifles slightly inward because this allows a more comfortable hold with sling, or allows better eye-to-sight alignment. Holding the rifle at an angle can work — but the angle of cant must be consistent for every shot. Canting the rifle is not a sin by itself. However, after you confirm your zero on your target, the degree of cant must be the same for EVERY shot. You must maintain that exact same degree of rotation on each shot or you will experience the shot POI movement Cleckner illustrates. Consistency is the key.
John Whidden, 5-time Nat’l Long Range Champion, holds a Palma rifle. John now shoots a match rifle with an Anschutz stock which he holds more upright, but still with some counter-clockwise cant. John also installed his iron sights at an angle so that the adjustments are correct (and plumb) even with his canted hold: “While it may not be obvious in the picture, the sights on my rifle are set up so that they’re straight vertical and horizontal while I hold the rifle canted. Making sure your adjustments (scope or sights) are vertical and horizontal is a critical piece of the pie.”
Inexpensive Dual-Diameter Scope-Mounted Bubble Level
The best way to avoid inconsistent rifle canting is to use a bubble level fitted to rail or scope. One very affordable and versatile product is the Jialitte Scope Bubble Level. This features a 30mm milled inside diameter, plus an inner insert ring so it will also fit 1″-diameter main tubes. The Jialitte unit is nicely radiused, and has a low profile in the middle. User reviews have been very positive. You could easily pay $35.00 or more for a 30mm scope level. This costs just $9.99 on Amazon.
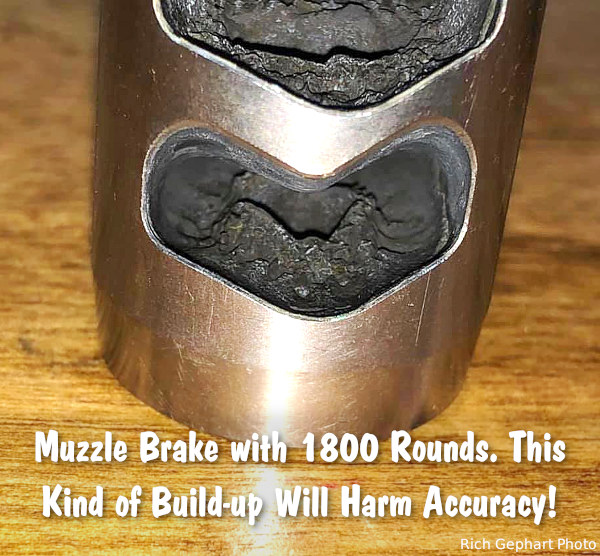
Many hunters and precision rifle competitors use muzzle brakes because these ported devices reduce felt recoil significantly. That makes a real difference getting back on target for quick follow-up shots. While many rifle owners appreciate the benefits of muzzle brakes, they may also neglect their brakes, allowing hard carbon and powder residue to build up. Not good. You should regularly clean your muzzle brake to remove fouling and carbon build-up.
As Mark Edgreen posted: “Carbon build up on the crown and in the brake is a recipe for poor accuracy.” And another gunsmith reported that customers complained about guns that “shot out way too early” but they only needed to have the brakes cleaned.
Gunsmith and PRS/NRL competitor Jim See recently reminded his Facebook Fans about the importance of cleaning muzzle brakes: “How many times do I have to say it? You need to maintain your rifles. Clean your muzzle brakes people!”. Jim, who runs Elite Accuracy LLC, notes that hard carbon build-up in brakes can definitely harm accuracy. Look at this example:
Muzzle Brake Cleaning Methods
There are various methods for cleaning a brake, we list a variety of techniques, but we would start with NON-corrosive ultrasound. You’ll want to remove the muzzle device before doing these tasks.
1. Use Ultrasonic Cleaning Machine with cleaning solution. This may be the most efficient method: “I place my brake in the ultrasonic cleaner. Shiney as new.” (Jim Moseley).
2. Spray with commercial Carb Cleaner and brush. Then apply anti-corrosion coating.
3. Soak in half hydrogen peroxide and half vinegar. Suggestion: “Let sit over night and carbon melts off. Brush remaining carbon off, rinse and put the brake back on.” Apply anti-corrosive before mounting.
4. Soak in 50/50 solution of water and white vinegar and brush. (Be sure to apply anti-corrosion coating, such as Eezox, after soaking).
5. Tumble in liquid solution with stainless pins. Comment: “Comes out slightly faded, but perfectly clean on stainless, non-painted brakes though.” Warning — do NOT do this with threaded brakes — tumbling could affect threads of screw-on brakes. Also, tumbling can harm painted or Cerakote finishes.
Gunsmithing Tip: By fitting the muzzle brake so that the barrel crown is slightly forward, it is easier to wipe carbon fouling off the end of the barrel. See photo:
Our friend Gavin Gear has just released an excellent video showing how to make a threaded Modified Case for use with the Hornady Lock-N-Load Overall Length Gauge. You can watch Gavin make a Modified Case start to finish in the video below:
Video Shows How to Drill and Tap Modified Case
Gavin has some clever tricks. First he uses a sizing die to hold the cartridge case during the threading process. Second he uses two drill bits in sequence — a smaller bit to ream out the primer pocket, and then a larger “M” bit to increase the hole diameter before threading the brass. Finally he leaves the threading tap IN the brass, locks the tailstock, and then “gently pulls on the quill” to remove the brass from the die held in his lathe (See 5:46 timemark).
Get the Correct 5/16″-36 RH Tap
Unfortunately, Hornady has selected an uncommon thread type for OAL Gauges. You probably won’t be able to buy the correct 5/16″ – 36 RH HSS Tap at your local hardware store. However you CAN order this special tap from Amazon for $9.99.
Modified Case Q & A — TECH TIPS
Why do I need a Modified Case?
Every serious reloader should have a Modified Case for each cartridge type they shoot. The reason is that this allows you to get very precise measurements of the length-to-lands in your chamber. When used with the Hornady OAL Gauge, with some practice, you should be able to get repeatable length-to-lands measurements within about 0.0015″. We generally do 4-5 measurements with the OAL Gauge and usually 3 or 4 will be “on the money”. NOTE: We recommend a gentle, easy pressure on the plastic pusher rod. Don’t push too hard or you will jam the bullet hard into the lands, which produces inconsistent results.
Can’t I Just Buy a Modified Case?
Hornady makes a variety of Modified Cases sold on Amazon and through retailers such as Midsouth. While Hornady makes modified cases for many standard cartridges, if you shoot a wildcat such as the 6mm Dasher or .284 Shehane, you’ll need to create a custom modified case. And even if you shoot a standard cartridge such as the .308 Win, you can get more consistent measurements with a custom Modified Case.
If you do decide to make your own modified case, you’ll want to start with a case that’s been fired in your rifle. That way you get the best fit to YOUR chamber. Also, you won’t need to expand the neck to provide bullet clearance. Then you need to drill out the primer pocket and tap the base of the case to match the threads on the Hornady OAL Gauge tool. Make at least two modified cases, as you’ll probably misplace one at some point.
MORE INFORMATION: Want to learn more? We published a much longer story in which Erik Cortina explains in greater detail how to made the Modified Case. That article illustrates the 5/16″ – 36 RH HSS Tap required and shows how to set up the lathe to drill and tap your case. If you are serious about making your own Modified Cases, you should Read the Full Article.
The 2024 Pyramyd Cup is one of the biggest and most prestigious airgun competitions in North America. This year’s Pyramyd Cup will be held September 11-14, 2024 at the Cardinal Shooting Center in Marengo, Ohio. With a wide selection of disciplines (Gunslynger, Field Target, and Benchrest), this year’s competition is set to be one of the most exciting and competitive in the event’s history. If you want to participate, CLICK HERE to Register.
The 2024 Pyramyd Cup will feature top-tier competitions, including the precision-driven 100 yard Benchrest, the action-packed Gunslynger showdown, and the World Class Field Target competition. As always, top airgunners from around the world will gather to test their skills and vie for top prizes.
John McCaslin, President of AirForce Airguns, stated: “We are excited to sponsor this year’s Pyramyd Cup. We are grateful to Val Gamerman, the owner of Pyramyd Air for graciously hosting this event and bringing the airgun community together for [a great] event.”
Field Target Discipline Is Challenging
“Field Target is one of the most difficult shooting disciplines out there,” says recent Pyramyd Air Cup Match Director, Tyler Patner. “Combine the multiple skills required to rise to the top of your game, with the myriad of factors you take into account at each lane, and you’ve got a challenging sport.”
“Targets are small, metal silhouettes of animals that consist of a kill zone and a colored paddle,” explains Pyramyd’s Tyler Patner. “Placed at unknown distances from between 10 yards to as far as 55 yards, the targets have kill-zones ranging in size from 3/8 inch to 1 1/2 inches. When the pellet passes through the kill zone and hits the paddle, the target falls and you’re awarded a point. It’s a game of precision and practice. You range-find with your scope, dope for distance, take the wind into account, and then you have to execute. There are different restrictions based upon your selected class, but the challenges remain the same. Wind-doping, range-finding, and remaining mentally tough over the entire course of fire are the biggest hurdles competitors face.”
Huge Prize Table for Competitors
Competition prizes are being provided by many airgun, optics, and gear manufacturers including: Accu-Tac, AirForce Airguns, Air Arms, Air Venturi, Athlon, ATN, Crosman, Birchwood Casey, Diana, Firebird Targets, FX Airguns, Hatsan USA, H&N, Hawke, Hill Air Pump, Hawke Sport Optics, JTS Airguns, Leapers, Norica, Predator, Pyramyd, RAW, RX Target Systems, Saber Tactical, Sightron, Sportsmatch, Umarex, Vortex, Weihrauch and more. “You’d be hard-pressed to find an airgun competition with a better selection of prizes for its winners,” says says Pyramyd Air CEO, Joshua Ungier. “Our winner’s packages help assure shooters that if they’re limited to traveling to only one competitive shooting event, they recognize the Pyramyd Air Cup as the industry’s premier event.”
CLICK HERE for full list of 2024 Pyramyd Cup Sponsors.
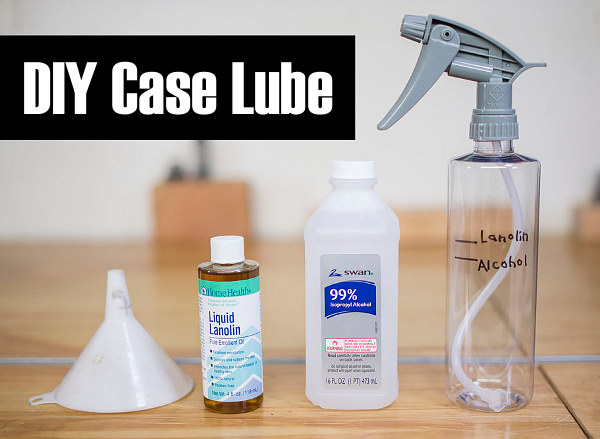
Tired of spending $15-$25 for a can of spray lube that doesn’t last that long? For about the same price as a single 10 oz. can you can make your own effective spray lube that should last for multiple seasons and lube thousands of cases quickly and easily.
In the YouTube video embedded below, our friend Gavin Gear of UltimateReloader.com shows how to make your own case lube using simple, inexpensive ingredients. As recommended by the 6.5 Guys, this Liquid Lanolin + Isopropyl Alchohol mix works well and is very cost-effective. You can make a pint of this home-brew Lanolin case lube that will lube thousands of cases — many more than a typical commercial aerosol spray can (that’s mostly compressed air).
Gavin describes the exact mixing process on his Ultimate Reloader website. Gavin says this lube mix is a good complement to the Hornady One-Shot (pistol) and Dillon DCL (rifle) lubes he has used for pistol and rifle reloading sessions. CLICK HERE to read more.
This evening, Shooting USA TV will feature a major U.S. Practical Shooting Association (USPSA) competition — the USPSA Production Class Nationals. Watch the broadcast at 9:00 pm Eastern/Pacific, 8:00 PM Central on the Outdoor Channel. SEE Shooting USA info. This week’s show also features a review of the new ZEISS Conquest HD Binoculars — great for hunters.
The USPSA Production division is easily the most approachable in terms of equipment. These are virtually out of the box guns with minimal enhancements. Even so the national championship chase is highly contested and the level of competition is extremely high.
Broadcast Times: Wednesday 9:00 PM Eastern/Pacific, 8:00 PM Central on Outdoor Channel.
You can also subscribe for $1.99/month to watch broadcasts “on demand” at any time on Vimeo: vimeo.com/ondemand/shootingusa
About the USPSA — Active Sports Group Nationwide
The United States Practical Shooting Association (USPSA) is a leading competitive shooting organization dedicated to promoting safe, fair, and fun practical shooting sports. Members engage in dynamic and challenging courses of fire, where speed, accuracy, and power are equally tested. USPSA shooters of all skill levels can enjoy shooting on the clock at steel and reactive targets. Whether you’re a seasoned shooter or new to the sport, USPSA offers fun and well-run competitions.
Hit Factor Scoring Based on Time AND Accuracy
Scoring is more complicated than fixed time events or steel shooting where your time is your score. In USPSA and IPSC each stage is worth a specific number of points. After a competitor completes a stage, the total score they shoot on the targets is divided by the time it takes to finish the stage. This establishes their hit factor. The competitor with the highest hit factor wins the stage and earns the total number of points available for that specific course of fire. The remaining competitors receive a percentage of the stage points based on their hit factors.
Top photo credit: Paul Erhardt, U.S. Air Force, Public Domain, Wikimedia.org.
Ever wondered what caused a particular bulge or marking on a case? And more importantly, does the issue make the case unsafe for further use? Sierra Bullets Ballistic Technician Duane Siercks offers some insight into various issues and their causes in two Case Diagnostic articles from the Sierra Blog.
Incipient Case-Head Separation
This is a Winchester .308 Win case that has a real issue. This case has a very obvious incipient case head separation in the process of becoming a complete failure.
This is most commonly caused by over-sizing the case causing there to be excess headspace on the case. After a few firings and subsequent re-sizing, this case is just about ready to come completely apart. Proper die adjustment is certainly a requirement here. Of course this case is not safe to reuse.
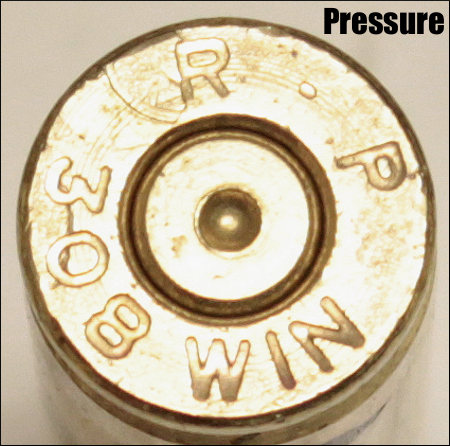
Excessive Pressure (Load Too Hot)
If you will notice in the picture of the case rim, there are two pressure signs to notice. First, look at the primer. It is basically flattened to about the max of what could be considered safe. If this was the only pressure sign noted, I would probably be fine with this load, but would constantly keep an eye on it especially if I was going to use this load in warmer temperatures. This load could easily cross into the “excess pressure” realm very quickly.
There is another sign of pressure that we cannot ignore. If you’ll notice, there is an ejector mark apparent that is located over the “R” of the R-P headstamp. This absolutely tells us that this load would not have been in the safe pressure range. If there were any of these rounds loaded, they should not be fired and should be dis-assembled. This case should not be reloaded.
Split Case-Neck
Here we have an R-P .22-250 case that has died the death. Everything looks fine with this case except the neck is split. This case must be tossed.
A split neck is a normal occurrence that you must watch for. It is caused by work-hardening of the brass. Brass cases get harder with age and use. Brand new cases that are stored for a period of time can become hard enough that they will split like this case within one to two firings. I have had new factory loads do the same thing. Then as we resize and fire these cases repeatedly, they tend to get harder and harder. Eventually they will split. The life of the case can be extended by careful annealing practices. This is an issue that would need to be addressed in an article by itself. Of course this case is no longer usable.
In the classes that I teach, I try to use examples like this to let the students see what they should be looking for. As always, if we can assist you, whether you are new to reloading or very experienced, contact us here at Sierra Bullets by phone at 1-800-223-8799 or by email at sierra@sierrabullets.com.
Dented Case Body
Here we have a Lake City 7.62×51 (.308 Win.) case with two heavy marks/dents in the case body.
This one may be a bit of a mystery. It appears as if this case may have been caught in the action of a semi-auto rifle when the firearm jammed or the case failed to clear during the cycling process. I probably would not reload this case just to prevent any feeding problems. This also appeared to be a factory loaded round and I don’t really see any pressure issues or damage to the case.
Multiple Problems — Lake City 5.56×45 unknown year.
This case has suffered multiple failures and cannot be re-used. First its has have a very rounded shoulder that is split. Upon first look it was obvious that this round had been a victim of excess pressure. The firearm (perhaps an AR?) was apparently not in full battery, or there was possibly a headspace issue also. While taking a closer look, the primer was very flat and the outside radius of the primer cup had been lost. High pressure! Then I also noticed that there was an ejector mark on the case rim. This is most certainly an incident of excessive pressure. This case is ruined and should be discarded.
It is very important to observe and inspect your cases before each reloading. After awhile it becomes second nature to notice the little things. Never get complacent as you become more familiar with the reloading process. If ever in doubt, call Sierra’s Techs at 1-800-223-8799.
With major forest fires this past year in Western states, many have wondered about hazards faced by gun owners in fire zones. This important video shows what really happens when loaded ammunition burns. You will probably be surprised. Contrary to Hollywood notions, the ammo doesn’t ignite in a massive explosion. Far from it… basically the rounds “cook off” one by one, and the bullets release at relatively low velocity. We’ve featured this SAAMI research project before, but it is worth reprising for those who have not yet seen the burn tests.
A few years back, SAAMI released an important video concerning ammo and fire. With professional fire-fighters standing by, over 400,000 rounds of ammo were incinerated in a series of eye-opening tests. If you haven’t had the chance to view this video yet, you should take the time to watch it now
The Sporting Arms and Ammunition Manufacturers’ Institute (SAAMI) has produced an amazing 25-minute video that shows what actually happens to sporting ammunition involved in a fire. This video shows the results of serious tests conducted with the assistance of professional fire crews. We strongly recommend you watch this video, all the way through. It dispels many myths, while demonstrating what really happens when ammunition is burned, dropped, or crushed.
Watch SAAMI Ammunition Testing Video
Video Timeline
2:10 Impact Test (ignited outside firearm)
3:40 65-foot Drop Test
5:08 Bullet Impact (.308 Win firing)
7:55 Blasting Cap Attacks
9:55 Bulldozer and Forklift Tests
12:20 Boxed Ammo Bonfire
15:37 Bonfire without Packaging
17:21 Retail Store Simulation Burn
20:55 Truck Trailer Burn
Over 400,000 rounds of ammunition were used in the tests. Some of the footage is quite remarkable. Testers built a bonfire with 28,000 rounds of boxed ammo soaked in diesel fuel. Then the testers loaded five pallets of ammo (250,000 rounds) in the back of a semi-truck, and torched it all using wood and paper fire-starting materials doused with diesel fuel.
The video shows that, when ammo boxes are set on fire, and ammunition does discharge, the bullet normally exits at low speed and low pressure. SAAMI states: “Smokeless powders must be confined to propel a projectile at high velocity. When not in a firearm, projectile velocities are extremely low.” At distances of 10 meters, bullets launched from “cooked-off” ammo would not penetrate the normal “turn-out gear” worn by fire-fighters.
We are not suggesting you disregard the risks of ammo “cooking off” in a fire, but you will learn the realities of the situation by watching the video. There are some amazing demonstrations — including a simulated retail store fire with 115,000 rounds of ammo in boxes. As cartridges cook off, it sounds like a battery of machine-guns, but projectiles did not penetrate the “store” walls, or even two layers of sheet-rock. The fire crew puts out the “store fire” easily in under 20 seconds, just using water.
Additional Testing: Drop Test, Projectile Test, Crush Test, Blasting Cap Test
Drop Test
The video also offers interesting ammo-handling tests. Boxes of ammo were dropped from a height of 65 feet. Only a tiny fraction of the cartridges discharged, and there was no chain-fire. SAAMI concludes: “When dropped from extreme heights (65 feet), sporting ammunition is unlikely to ignite. If a cartridge ignites, it does not propagate.”
Rifle Fire Test
SAAMI’s testers even tried to blow up boxes of ammunition with rifle fire. Boxes of loaded ammo were shot with .308 Win rounds from 65 yards. The video includes fascinating slow-motion footage showing rounds penetrating boxes of rifle cartridges, pistol ammo, and shotgun shells. Individual cartridges that were penetrated were destroyed, but adjacent cartridges suffered little damage, other than some powder leakage. SAAMI observed: “Most of the ammunition did not ignite. When a cartridge did ignite, there was no chain reaction.”
Bulldozer Crush Test
The test team also did an amazing “crush-test” using a Bulldozer. First boxes of loaded ammo, then loose piles of ammo, were crushed under the treads of a Bulldozer. A handful of rounds fired off, but again there was no chain-fire, and no large explosion. SAAMI observed: “Even in the most extreme conditions of compression and friction, sporting ammunition is unlikely to ignite. [If it does ignite when crushed] it does not propagate.”
Blasting Cap Test
Perhaps most amazingly, the testers were not able to get ammunition to chain-fire (detonate all at once), even when using blasting caps affixed directly to live primers. In the SAAMI test, a blasting cap was placed on the primer of a round housed in a large box of ammo. One cartridge ignited but the rest of the boxed ammo was relatively undamaged and there was no propagation.
While Accurateshooter.com concentrates on high-accuracy rifles, we know that many of our readers enjoy handguns. We are often asked “What is your favorite handgun — Glock? HK? SIG Sauer?” The answer to that question may be surprising. This Editor’s favorite handgun, at least the one that gets shot most often, is a rimfire revolver — that’s right, a wheelgun.
This Editor’s first really accurate handgun was a .22 LR Smith & Wesson Model 617 that could easily stack ten shots in a dime at 10 yards. It remains my favorite and most-used handgun. What can we say about the Model 617? The single-action trigger pull is superb, and the accuracy surpasses most any semi-auto rimfire pistol, except for a few, very expensive target pistols. We like the 6″ version for the longer site radius, but the 4″-barrel 617 is also very accurate, and it balances better.
S&W Model 617 now has a 10-round cylinder, but early models were six-shooters.
We strongly recommend that new pistol shooters start off with a .22 LR rimfire handgun. The .22 LR cartridge is accurate but has very low recoil, less “bark” than a centerfire, and very little smoke and muzzle flash. New shooters won’t have to fight muzzle flip, and won’t develop a flinch from the sharp recoil and muzzle blast common to larger calibers. With the .22 LR, the trainee can focus on sight alignment, breathing, and trigger pull.
Smith & Wesson Model 617 Video Reviews
Here are two video reviews of the Smith & Wesson Model 617, both 4″-barrel and 6″-barrel versions. Both videos demonstrate the 617’s great accuracy. The reviewers concede that this handgun is pretty expensive, but all agree that the Model 617 will last a lifetime, and hold its value.
This Video Features the Full-size 6″-Barrel Model 617:
Recommended .22 LR Revolver Training Targets
The .22 LR cartridge makes small bullet holes in paper. These can be hard to see if you’re shooting at large, black bulls-eyes, particularly at an indoor range. Also, when shooting rimfire, you’ll go through ammo quickly. For that reason we recommend targets with bright-colored, multiple aiming points.
The 19″x25″ Sight-Seer target (left) is great for pistol practice. It features eight red bulls on a 1″-square grid. Ultra bright fluorescent red inks, printed on heavy, 60-lb vellum paper, are highly visible, even indoors. You can use a classic Six O’Clock hold with this target, putting the bottom of each circle on top of your revolver’s front sight.
The smaller, 8.5″x11″ Sinclair Fluorescent Sight-In Target (right) has four small diamonds surrounding a large center diamond overlaid on a 1-inch grid. Diamonds and grid are printed in fluorescent red/orange on white, heavy-grade paper so your shots print nice and clean. A 25-pack is $6.99 at Brownells.
Recommended .22 LR Ammo Box
When we go to the range with rimfire handguns or rifles we bring this handy ” target=”_blank”>$13.99 MTM ammo caddy. The compact carry case will hold boxed ammo, plus you can lay out your ammo in 10-round rows (with 100 rounds nose-down). This makes it easy to fill the 10-Rd cylinder on your Model 617. This ammo case is offered in both blue or red (rust) and there is room in the center for more ammo boxes. One recent purchaser notes: “Very handy box for .22 LR makes knowing your shot count easy”.


 Shooting USA TV will feature a major U.S. Practical Shooting Association (USPSA) competition — the USPSA Production Class Nationals. Watch the broadcast at 9:00 pm Eastern/Pacific, 8:00 PM Central on the Outdoor Channel. SEE


 The Sporting Arms and Ammunition Manufacturers’ Institute (
 We are not suggesting you disregard the risks of ammo “cooking off” in a fire, but you will learn the realities of the situation by watching the video. There are some amazing demonstrations — including a simulated retail store fire with 115,000 rounds of ammo in boxes. As cartridges cook off, it sounds like a battery of machine-guns, but projectiles did not penetrate the “store” walls, or even two layers of sheet-rock. The fire crew puts out the “store fire” easily in under 20 seconds, just using water.


