|
|
January 18th, 2008
Butch Lambert of ShadeTree Engineering just sent us these “Spy Photos” of his latest creation, a 6.5-lb, low-profile front rest designed for F-Class competition. The rest features wide, stable legs, large, easy-to-adjust screw knobs, and Butch’s JoyStick Rest top that adjusts windage and elevation with a single control.

Butch tells us: “This is my latest rest assembly, a new product designed for F-Class. It weighs 6.5 pounds with the Edgewood bag and heavy sand. It has a needle thrust-bearing under the mariner wheel. Please note, the photos do NOT show the finished leg screws. On the bottom of each leg, the leg screws will ride on a 2″-diameter discs with tungsten armor-piercing bullets on the tips.”

For more info, visit the ShadeTree website, or call Butch at (972) 524-2247, from 9am to 5pm Central Time.
January 18th, 2008
On Jan. 25 to Feb. 3, 2008, Cabela’s celebrates the Grand Opening of its new large-format superstore in Post Falls, Idaho. The Grand Opening feature celebrities and hunting and fishing experts sharing stories and advice. The Post Falls store is located just east of Spokane, Washingon, at Exit 2 off I-90 near the Washington/Idaho State line. The 125,000-square-foot showroom is an educational attraction, featuring museum-quality animal displays, aquarium and trophy animals interacting in realistic re-creations of their natural habitats.

Many special bargains are offered during the Post Falls Grand Opening. CLICK HERE for the Grand Opening Sales Circular (Adobe .pdf file). Shown below are two great deals on rifles. We know the Savage 17 HMR to be extremely accurate. At $499.99, the complete Remington 700 VFS rifle costs not much more than a bare Remington 700 stainless action. (Sale Prices good at Post Falls, ID store ONLY.)

Grand Opening giveaways and special prices on clothing and merchandise will also be offered. Customers can enter drawings to win an African safari; a New Zealand Red Stag hunt; a Texas Whitetail Management hunt; an Alaska fishing trip; and a trip to Crocodile Bay Resort in Costa Rica.
January 17th, 2008
 We are currently hard at work on a new Cartridge Guide for the WSM series of cartridges. This will cover the 300 WSM, 7 WSM, and the 270 WSM or 300 WSM necked to 7mm. (Both the 270 WSM and 300 WSM have a slightly longer neck than the 7mm WSM).
If you shoot these cartridges in competition, or use them for hunting, and have developed a highly accurate load, please send us your load data. We are also interested in your comments about bullet selection–both for long-range target shooting and hunting. As with our other Cartridge Guides, we will discuss powder and primer choices. We welcome your comments on these reloading components.

One popular feature of our Cartridge Guides is a comparison line-up of premium bullets. Jason Baney, our 1000-yard Editor, has a good selection of 30-caliber bullets, but we need more 7mm bullet samples. If you can spare 1 or 2 sample bullets, send them in for our “line-up.” Be sure to mark the bullets or otherwise include information on the manufacturer and brand of bullet, such as Sierra 7mm 175gr MatchKing. IMPORTANT: DO NOT send loaded ammo or primed cases. Send only bullets by themselves. Samples will not be returned (we keep these “on file” for future reference).
Send bullet samples to:
Jason Baney
P.O. Box 308
Douglassville, PA 19518
January 17th, 2008
Each summer the Civilian Marksmanship Program sponsors a popular series of Three-Position Air Rifle Camps to teach rifle marksmanship skills to junior shooters and their adult leaders. For 2008, these 5-day camps are offered in Fort Benning, GA; Camp Perry, OH; Rapid City, SD; and Kerrville, TX. The CMP is now accepting 2008 Camp Applications. Camps fill-up quickly, so early registration is recommended.
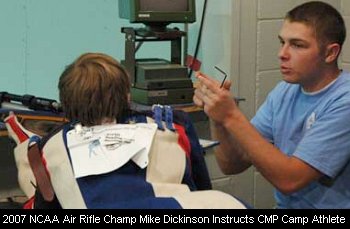
CMP Junior Three-Position Air Rifle Camps are for junior shooters with a basic knowledge of the sport. Athletes should have completed basic rifle marksmanship training and one season of three-position competition. CMP camps are designed for students who will be in grades 9 through 12 during the coming school year. The Junior Shooters must bring their own shooting equipment — either precision or sporter class rifles, prone mat, and a spotting scope (except at Fort Benning where electronic targets will be used).
The 2008 Summer Camp Fees are:
$350 (jr. athlete), $150 (adult) for Residential Camps
$225 (jr. athlete), $30 (adult) for Commuter Camps
$265 (jr. athlete) $70 (adult) for Camp Perry Camp
Dr. Dan Durben will again serve as Camp Director and chief instructor. Dan shot for the USA in the 1988 Olympics and served as the National Rifle Coach from 1997 through the 2000 Olympic Games. Dr. Durben will be assisted by Camp Coordinator, Sommer Wood, and by James Hall, who earned All-American honors in both air rifle and smallbore in collegiate competition.

CLICK HERE for CMP SUMMER CAMP INFO PAGE
January 16th, 2008
There’s a new tool available that should make the gunsmith’s job quite a bit easier. It’s such a logical, clever design, you wonder why somebody didn’t think of it years ago.

Co-Designer Nat Lambeth reports: “The photo shows a new tool called the Lambeth/Kiff Micrometer Adjustable Reamer Stop (Patent Pending). This is a add-on device that controls the depth a reamer can cut. It uses the reamer itself as the micrometer pinion and the barrel tendon face as the anvil. It does not matter where the tail stock or carriage is located, it measures off the reamer. It functions with a floating reamer holder too. These new Micrometer Reamer Stops have 50 indexing marks and will allow for .0005″ adjustments. The gunsmith can preset the Micrometer Adjustable Reamer Stop to about .020″ out and ream without worry. Then re-measure, adjust once, and make the final cut right on the money.”
These tools are available from Dave Kiff at Pacific Tool & Gauge, Nat Lambeth at NLambeth [@] embarqmail.com, and several gunsmith tool suppliers.
January 15th, 2008
Gunsmith Gordy Gritters and Grizzly Industrial have joined forces to produce an excellent DVD on chambering and fitting match barrels. In our Jan. 5 Bulletin, we ran a segment showing Gordy completing the headspacing of the barrel. That video was a bit hit with our readers. Today we offer another segment from the Grizzly DVD. In this clip, you’ll see Gordy dialing in the barrel using a Grizzly G0509G 3-Phase Gunsmith Lathe. Once Gordy finishes that process he’s ready to align the threaded shoulder and pre-drill the chamber.
CLICK HERE to PLAY VIDEO
(8 megabyte file — Quicktime Plug-in Required)

Click HERE for YouTube FLASH Version (Faster Download)
 On the full DVD, available from Grizzly for $59.95, you can see Gordy do the complete job of chambering a barrel from start to finish, including fitting the barrel to a custom action. Gordy gives step by step instructions for all important operations: 1. Dialing in the barrel; 2. Threading the barrel; 3. Aligning the threaded shoulder; 4. Predrilling/preboring the chamber; 5. Reaming the chamber; 6. Checking and setting headspace; 7. Crowning the muzzle; and, 8. Stamping and polishing the barrel
CLICK HERE for more photos from the DVD. The full DVD can be ordered from Grizzly’s Web Site.
January 15th, 2008
After 10 years of hosting the Int’l Defensive Pistol Assn. (IDPA) Winter Championships, Smith & Wesson will now hold the first IDPA Indoor National Championships February 21-23, 2008 (Thurs-Saturday). This year’s prestigious event will be held at the Smith & Wesson Shooting Sports Center in Springfield, Massachusetts.
The 2008 IDPA Indoor National Championships will feature over 300 competitors in five IDPA divisions. Each participant will face nine courses of fire involving low-light conditions, moving targets, and defensive shooting scenarios. Along with the match itself (a half-day of shooting for each class), competitors can participate in Smith & Wesson factory tours, training seminars with Champions such as Jerry Miculek, and shooting demonstrations.

Robert Ray, IDPA’s Marketing Manager observed: “We are very excited to be holding the first IDPA Indoor National Championships at the Smith & Wesson Shooting Sports Center, one of the most advanced training facilities in the United States.” Ray added, “The Smith & Wesson Winter Championships have grown into the second largest IDPA event in the world and we expect that momentum to extend into this year’s Indoor National Match.”
For more info on this year’s IDPA Indoor National Championships including match details and important updates, visit www.matches.smith-wesson.com.
MATCH ENTRY Form ($150.00 Entry Fee)
MATCH INFO Form (With Stage Formats)
January 14th, 2008
 A Universal Decapping Die belongs in every reloader’s die inventory. This simple, inexpensive tool allows you to remove primers from any size case, without altering the case body or neck. This die can be useful if you have very dirty brass that you plan to tumble or ultrasonically clean before sizing and loading. If you decap BEFORE ultrasonic cleaning, the ultrasound will clean out the primer pocket. By cleaning before you run the brass in your full-length die, you keep the FL die cleaner and reduce the risk of scratching the inside of the die.
Another benefit of the Universal Decapping Die is that it lets you punch out any occlusions in the flash hole before loading for the first time. Lastly, if you use a progressive press, using a decapping die on the brass first will let you inspect and clean the primer pockets before cycling your brass through the progressive loader.
The LEE Universal Decapping Die is inexpensive and performs as advertised. Right now it is on sale for $7.99 at MidwayUSA. We’ve used a LEE Universal Decapping Die on everything from a 17 Fireball case to a 45/70. However, as delivered with the die, the decapping pin was too large in diameter to fit the small flash-holes on our 6BR brass. Lapua 220 Russian (PPC parent), 6BR, and 6.5×47 brass has flash-holes spec’d at 1.5mm or about 0.059″. The pin can probably be jammed through, but that’s not wise. If your pin is a bit too large you can just chuck the pin in a drill and turn it down slightly with some sandpaper or a stone.
January 13th, 2008
Accurate, modular, and supremely versatile, the AR15 is America’s favorite semi-auto rifle. But let’s face it, the AR is a maintenance hog.
 There are various schools of thought when it comes to maintaining an AR. Some folks prefer to run their AR “dry” with minimal lube on the lugs and friction surfaces. Other shooters prefer to run their ARs “wet”, with lots of lube. But whatever your preference, you need to clean your AR regularly. And nothing is more important that the AR’s bolt/carrier assembly. Because it is involved in feeding, firing, and extracting, the AR-15 bolt/carrier assembly can be considered the most critical portion of the AR-15 system.
The editor of the Top Quark Blog has created an excellent illustrated AR15 Bolt Take-Down Guide that shows how to disassemble an AR15 bolt and carrier for regular cleaning. Even if you’re an experienced AR15 shooter, you can learn something from this page (sample at left), and you may want to bookmark it for future reference. The photos are large and clear and there are helpful hints for each step of the process.
The author knows his stuff and offers some important insights. For example, he notes that “Extractor springs in most AR15 bolt assemblies are fairly weak, and this can lead to various extraction-related failures. One of the few high points about Colt assemblies is their usage of higher-strength extractor springs. You can tell the difference by looking at the inner plastic insert. ‘Normal’ springs feature a blue plastic insert, Colt strong springs have a black insert.”
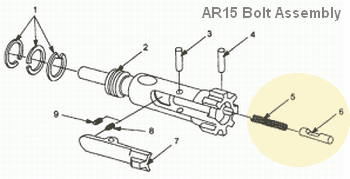
There is one notable oversight on this page — the author doesn’t cover disassembly and cleaning of the ejector assembly. This is actually quite important. A few small brass shavings, combined with carbon and lube in the ejector slot, WILL cause malfunctions. In fact, when this editor is called to diagnose problem ARs, the first things I look at (after swapping magazines) are the ejector recess and the slot for the extractor. Clogged ejectors are responsible for fail-to-ejects and other jams. It is essential that you keep the ejector hole clean. Old, gooey lube residues mixed with carbon and tiny brass shavings in the ejector recess will create all sorts of problems. As shown in the diagram below, it is simple to remove the ejector (#6) and ejector spring (#5), by drifting the ejector retaining pin (#4).
January 13th, 2008
This do-it-yourself project comes from ace silhouette shooter Larry Medler. He devised a hand-crank system for turning case necks that offers the best of both worlds — the speed and “muscle” of powered neck-turning with the “feel” afforded by manual methods. The flywheel, salvaged from an old grape crusher, delivers plenty of RPM when needed, but Larry still has total control over the neck-turning speed and torque.

Larry explains: “My neck turner is a home-made model with a 15.5″ crank flywheel. This arrangement almost makes turning necks fun. I’ve learned that the secret to neck turning is how easy it is to turn the case. If it takes too much force or effort you’re probably not going to do a good job. However, when you turn by hand you have the best feel for the cutting process. So I wanted a system that reduced the effort required, but still retained good “feel”. My hand crank system fits the bill — it makes cutting easy, but you still have good sensitivity throughout the process.

The case holder was made for 308 Winchester cartridges. The case holder fits into a rubber heater hose that connects to a 0.5-inch rod. The rod is fed through two bearing blocks which mount on a frame on my work bench. The rod is turned using a crank on the grape crusher flywheel. This system works great for neck turning. It is easy to crank and you still have a feel for how the cutter is working. While I now use an electric screwdriver to power other case prep tools, at one time I attached a variety of tools to this simple crank system.
I recently upgraded to a K&M Neck Turner (from a Sinclair previously). K&M makes a great tool. It’s easy to make very small adjustments to the cutting depth. I use the K&M case-holder that came with the neck turner for triming cases. It grips a little better than the Sinclair case-holder and both are easier to use than the Lee case-holder.”

You’ll find more helpful, illustrated tips on uniforming cartridge brass on Larry Medler’s Case Prep and Loading web page.
|


