September 23, 2023, was National Hunting and Fishing Day (NHFD). We’re proud to recognize how important hunting is for millions of Americans — as a source of food for families and as an important connection with nature and the outdoors. The NFHD website has helpful resources for hunters, and in this article we provide links for Where to Hunt, How to get Hunting Licenses, and Hunter Education.
NHFD was first established by President Nixon in 1972. According to NationalToday.com, NHFD’s “roots go back more than 100 years to President Theodore Roosevelt, who introduced the first laws regulating the hunting of wildlife in the United States.”
This month we hope some of our readers can take new shooters afield and introduce them to hunting. Many hunters receive their first introduction to hunting from family or friends as a tradition passed down from generation to generation. There are over 9.2 million hunters in the United States.
To have a successful hunt you must first get to areas where game thrives. Finding the right places to hunt is essential. The NSSF offers a nationwide Where-to-Hunt database of hunting areas. You can click on a particular state, then specify the specicies you wish to hunt. This is a very useful resource.
In most states, when hunting game animals, you’ll need a hunting license and/or zone permit. The Federal Fish & Wildlife Service has state-by-state listing for hunting licenses on FWS.gov. Click the box below to learn how to get hunting licenses in your region.
For all hunters, whether they have mentors to guide them or not, the most important first step into the woods begins with a state-certified hunter education course. Click the box below to see hunting education opportunities around the nation.
Game Resources — To learn more about different game species, click these NSSF links:
To help you prepare for a fall hunt, here is a free, printable Deer Practice target. Hone your skills on a trio of bucks with a red bullseye centered on the animals. You can print the targets in black and white, but they look best in color. Right-click the image below to download a FREE printable PDF file.
Ever wondered how factory ammunition is produced, from start to finish? How are brass cases made, how are bullets created, and how are finished cartridges produced on automated assembly lines? Today’s video showcase features six major factories that, collectively, produce bullets, powder, and finished ammo. We start with the Berger Bullet plant, follow by Vihtavuori powder production in Europe. Then we show the Remington (now Vista Outdoor) ammo plant in Utah, along with a Federal plant that produces rimfire ammunition. Last but not least, there’s an excellent, very informative video from the Norma ammo factory, plus a Hornady ammo plant video.
Bullets being seating at Hornady ammo factory.
Berger Bullets Factory Tour — Made in USA
In this video, Recoil TV takes a behind-the-scenes look at Berger Bullets, and how the outstanding, match-winning Berger bullets are created. The video covers the entire process — from raw materials, to the placement of bullet cores inside jackets, to the final ultra-consistent and uniform projectiles. To see the complete line of Berger Bullets, with full Ballistic data, visit BergerBullets.com
Vihtavuori Powder Production in Europe
Vihtavuori produces some of the most consistent, high-quality powder on the planet. Vihtavuori powders have been used to set world records and win countless championships in multiple disciplines. This excellent video goes inside Vihtavuori’s European production centers. It is really fascinating — you see how extruded powder starts with long spaghetti-like strings, before being finalized into the tiny sticks that we load.
Along with the powder production process, this video includes the entire VV production line, so you see how powder bottles are filled with powder and the tops of the bottles are secured by automated machines.
Remington Ammo Factory (Now Operated by Vista Outdoor)
This SHWATteam video visits the Remington ammunition plant in Arkansas. Vista Outdoor, the company that produces Federal, Speer and CCI ammo, purchased Remington’s ammunition business in Lonoke, Arkansas. Including the new high-tech plant in the back, this facility has the equivalent of 13+ football fields (1200 acres) under roof at its ammo plant, with over 1100 employees. Production capacity is impressive. When running at maximum output, this Remington ammo plant can crank out a staggering 7,000,000+ rounds every day. To produce that volume of ammunition, the facility needs a huge amount of resources: one million pounds of copper per month and 124,000 pounds of lead per day. Remington started manufacturing ammunition at this Lonoke facility in 1970, but some of the machines have been churning out ammo since long before.
Norma Factory Tour
Guys — honestly, if you do anything today on this site, watch this video. You won’t be disappointed. Guaranteed. This is a very informative (and surprisingly entertaining) video. Every serious hand-loader should watch this video to see how cartridge cases are made. The camera work and editing are excellent — there are many close-ups revealing key processes such as annealing and head-stamping.
VERY Informative Video Show Cartridge Brass and Ammunition Production:
Norma has released a fascinating video showing how bullets, brass, and ammunition are produced at the Norma Precision AB factory which opened in 1902. You can see how cartridges are made starting with brass disks, then formed into shape through a series of processes, including “hitting [the cup] with a 30-ton hammer”. After annealing (shown at 0:08″), samples from every batch of brass are analyzed to check metal grain structure and hardness. Before packing, each case is visually inspected by a human being (3:27″ time-mark).
Federal Rimfire Ammunition Production
Field & Stream Tours Federal Ammo Plant in Minnesota
A reporter for Field & Stream recently got a chance to tour the Federal ammunition production facility in Anoka, Minnesota. This large plant produces both rimfire and centerfire ammunition. While touring the plant, the reporter was allowed to capture video showing the creation of .22 LR rounds from start to finish. This is a fascinating video, well worth watching. Watch and learn how rimfire ammo is made.
Note to Viewers — After Starting Video, Click Speaker Icon to HEAR audio!
This revealing video shows all phases of .22 LR ammo production including cupping, drawing, annealing, washing, drying, head-stamping, priming, powder charging, bullet seating, crimping, waxing, inspection, and final packaging. We recommend you watch the video from start to finish. You’ll definitely learn some new things about rimfire ammo.
Hornady Ammunition Factory
If you wonder how ammo is made, starting with raw metal, check out this video from Hornady. It shows how bullet jackets are formed from copper, followed by insertion of a lead core. The jacket is then closed up over the core with the bullet taking its final shape in a die (a cannelure is applied on some bullet types). Next the video shows how cartridge brass is formed, starting with small cups of brass. The last part of the video shows how cases are primed and filled with powder, and how bullets are seated into the cases, using an automated process on a giant assembly-line.
Here are two different bullet types, seated to the same CBTO length, but different COAL. Note the shiny scratches on the bullets made by the comparator tool which indicates a point on the bullet ogive near where the ogive will engage the rifling.
Effects Of Cartridge Over All Length (COAL) And Cartridge Base To Ogive (CBTO) – Part 2 by Bryan Litz forBerger Bullets. Part One of this series focused on the importance of COAL in terms of SAAMI standards, magazine lengths, seating depths, and pressure levels. Another measure of length for loaded ammunition is highly important to precision, namely Cartridge Base to Bullet Ogive Length (CBTO).
Figure 2. Chamber throat geometry showing the bullet jump to the rifling or lands.
Look at Figure 2. Suppose the bullet was seated out of the case to the point where the base of the bullet’s nose (ogive) just contacted the beginning of the riflings (the lands) when the bolt was closed. This bullet seating configuration is referred to as touching the lands, or touching the riflings and is a very important measurement to understand for precision hand-loading. Due to the complex dynamics of internal ballistics which happen in the blink of an eye, the distance a bullet moves out of the case before it engages the riflings is highly critical to precision potential. Therefore, in order to systematically optimize the precision of his handloads, it’s critically important that the precision hand-loader understands how to alter bullet seating depth in relation to the barrel rifling. Part of the required knowledge is understanding how to accurately and repeatably measure the Cartridge Base To Ogive (CBTO) dimension. This is explained in the FULL ARTICLE.
Bryan Litz offers an extended discussion on how to measure CBTO using different tools and methods, including the Hornady OAL gauge. You can read this discussion in the full article found on the Berger Bullets website. CLICK HERE to Read Full Article.
Why Not Use CBTO as a SAAMI Standard?
If CBTO is so important to rifle accuracy, you might ask, “Why is it not listed as the SAAMI spec standard in addition to COAL?” There is one primary reason why it is not listed in the standard. This is the lack of uniformity in bullet nose shapes and measuring devices used to determine CBTO.
Benefits of Having a Uniform CBTO
There is another aspect to knowing your CBTO when checking your COAL as it pertains to performance. With good bullets, tooling, and carefully-prepared cases you can easily achieve a CBTO that varies less than +/- .001″ but your COAL can vary as much as .025″ extreme spread (or more with other brands). This is not necessarily bad and it is much better than the other way around. If you have a CBTO dimension that varies but your COAL dimension is tight (within +/- .002″) then it is most likely that your bullet is bottoming out inside the seater cone on the bullet tip. This is very bad and is to be avoided. It is normal for bullets to have precisely the same nose shape and it is also normal for these same bullets to have nose lengths that can vary as much as .025″.
Summary of Cartridge Base To Ogive (CBTO) Discussion
Here are four important considerations regarding bullet seating depth as it relates to CBTO:
1. CBTO is a critical measurement to understand for handloaders because it’s directly related to precision potential, and you control it by simply setting bullet seating depth.
2. Tools and methods for measuring CBTO vary. Most of the measurement techniques have pitfalls (which may give rise to inconsistent results) that you should understand before starting out.
3. A CBTO that produces the best precision in your rifle may not produce the best precision in someone else’s rifle. Even if you have the same rifle, same bullets, same model of comparator gauges, etc. It’s possible that the gauges are not actually the same, and measurements from one don’t translate to the same dimension for another.
4. Once you find the CBTO that produces the best precision in your rifle, it’s important to allow minimal variation in that dimension when producing quality handloads. This is achieved by using quality bullets, tooling, and properly preparing case mouths and necks for consistent seating.
Many barrel-makers mark the twist rate and bore dimensions on their barrel blanks.
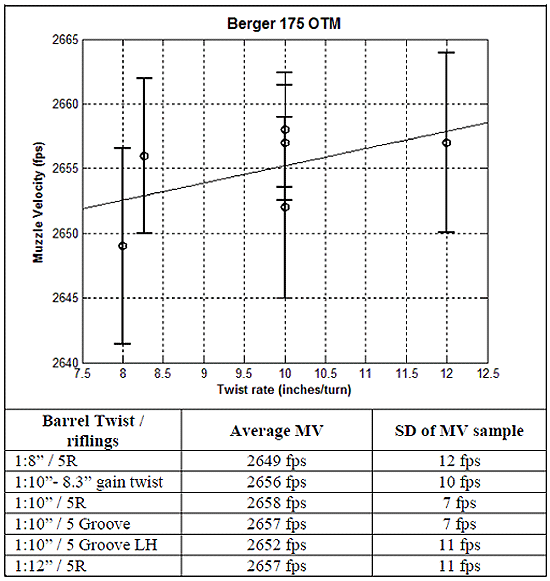
Does muzzle velocity change with faster or slower barrel twist rates? Absolutely, but much less than you might think. Faster twist rates do slow down bullets somewhat, but the speed loss is NOT that significant. With Bartlein .308 Win barrels of identical length and contour, a 1:12″-twist barrel was only 8 fps faster than a 1:8″-twist barrel. That was the result of testing by Applied Ballistics.
The Applied Ballistics team tested six (6) same-length/same-contour Bartlein barrels to observe how twist rate might affect muzzle velocity. This unique, multi-barrel test is featured in the book Modern Advancements in Long Range Shooting, Vol. 1. That book includes other fascinating field tests, including a comprehensive chronograph comparison.
Barrel Twist Rate vs. Velocity — What Tests Reveal by Bryan Litz
When considering barrel twist rates, it’s a common belief that faster twist rates will reduce muzzle velocity. The thinking is that the faster twist rate will resist forward motion of the bullet and slow it down. There are anecdotal accounts of this, such as when someone replaces a barrel of one brand/twist with a different brand and twist and observes a different muzzle velocity. But how do you know the twist rate is what affected muzzle velocity and not the barrel finish, or bore/groove dimensions? Did you use the same chronograph to measure velocity from both barrels? Do you really trust your chronograph?
Summary of Test Results
After all the smoke cleared, we found that muzzle velocity correlates to twist rate at the average rate of approximately 1.33 FPS per inch of twist. In other words, your velocity is reduced by about 5 FPS if you go from a 1:12″ twist to a 1:8″ twist. — Bryan Litz
Savage Test Rifle with Six Bartlein Barrels
Most shooters don’t have access to the equipment required to fully explore questions like this. These are exactly the kinds of things we examine in the book Modern Advancements in Long Range Shooting, Vol. 1. In that book, we present experiments conducted in the Applied Ballistics lab. Some of those experiments took on a “Myth Buster” tone as we sought to confirm (or deny) popular pre-conceptions. For example, here’s how we approached the question of barrel twist and muzzle velocity.
Six .308 Win Barrels from Bartlein — All Shot from the Same Rifle
We acquired six (6) barrels from the same manufacturer (Bartlein), all the same length and contour, and all chambered with the same reamer (SAAMI spec .308 Winchester). All these barrels were fitted to the same Savage Precision Target action, and fired from the same stock, and bench set-up. Common ammo was fired from all six barrels having different twist rates and rifling configurations. In this way, we’re truly able to compare what effect the actual twist rate has on muzzle velocity with a reasonable degree of confidence.
Prior to live fire testing, we explored the theoretical basis of the project, doing the physics. In this case, an energy balance is presented which predicts how much velocity you should expect to lose for a bullet that’s got a little more rotational energy from the faster twist. In the case of the .30 caliber 175 grain bullets, the math predicts a loss of 1.25 fps per inch-unit of barrel twist (e.g. a 1:8″ twist is predicted to be 1.25 fps slower than a 1:9″ twist).
Above, data shows relationship between Twist Rate and Muzzle Velocity (MV) for various barrel twist rates and rifling types. From fast to slow, the three 1:10″ twist barrels are: 5R (canted land), 5 Groove, 5 Groove left-hand twist.
We proceeded with testing all 6 barrels, with twist rates from 1:8″ to 1:12″. After all the smoke cleared, we found that muzzle velocity correlates to twist rate at the average rate of approximately 1.33 fps per inch of twist. In other words, your velocity is reduced by about 5 fps if you go from a 1:12″ twist to a 1:8″ twist. [Editor: That’s an average for all the lengths tested. The actual variance between 1:12″ and 1:8″ here was 8 FPS.] In this case the math prediction was pretty close, and we have to remember that there’s always uncertainty in the live fire results. Uncertainty is always considered in terms of what conclusions the results can actually support with confidence.
This is just a brief synopsis of a single test case. The coverage of twist rates in Modern Advancements in Long-Range Shooting Vol. 1 is more detailed, with multiple live fire tests. Results are extrapolated for other calibers and bullet weights. Needless to say, the question of “how twist rate affects muzzle velocity” is fully answered.
Other chapters in the book’s twist rate section include: · Stability and Drag — Supersonic
· Stability and Drag — Transonic
· Spin Rate Decay
· Effect of Twist rate on Precision
Other sections of the book include: Modern Rifles, Scopes, and Bullets as well as Advancements in Predictive Modeling. This book is sold through the Applied Ballistics online store. Modern Advancements in Long Range Shooting is also available as an eBook in Amazon Kindle format.
Larry Medler has come up with a smart little invention — a simple, inexpensive Empty Chamber Indicator for rimfire rifles. It is made from a section of plastic “weed-wacker” line and a wooden ball from a hobby shop. Larry says he was inspired by Juniors who used something similar for their 17-Caliber Air Rifles.
How to Make the Empty Chamber Indicator
Construction Method: First, drill a 7/64″ diameter hole all the way through the 1″-diameter wooden ball. Then enlarge half of that 1″-long hole using a 13/64” diameter drill. Next insert an 8″ piece of heavy duty (0.095″ diameter) weed wacker line through the ball, leaving about 2″ on the side with the bigger-diameter hole. Then, with the short end of the line, fold over the last half-inch so the line is doubled-over on itself. Then slide the line into the ball, stuffing the doubled-over section through the 13/64″ (large) hole. Finally, pull the longer end of the line until the doubled-over section is flush with the outside of the ball. This gives you a sturdy line attachment without messy adhesives. When the assembly’s complete, hold the ECI by the tail and dip the ball in yellow paint. If you’re making more than one ECI, you can drill horizontal holes in a spare block of wood and use that as a drying rack.
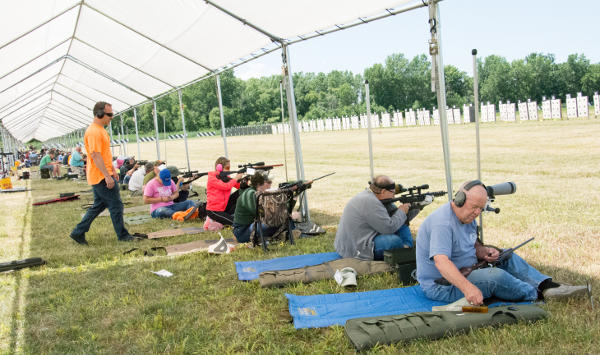
At a Rimfire Sporter match like this, all shooters must have an Empty Chamber Indicator.
The Empty Chamber Indicator for Smallbore Rifles
Larry explains: “At all Highpower rifle matches, silhouette matches, and other shooting events I have attended, Open Bore Indicators (OBI), or what are now called Empty Chamber Indicators (ECI) have been mandatory. The NRA’s yellow ECI for Highpower rifles is easy to use and has been well-received by the shooters. However, I had not seen a truly workable ECI for 22 rimfire rifles — until I visited Michigan’s Washtenaw Sportsman’s Club where I saw juniors using ECIs for their 17 Caliber Air Rifles. Someone at the club made the empty chamber indicators by attaching an 8″ piece of weed wacker line to a 1″-diameter wooden ball, painted bright yellow. I now make similar ECIs for the 22 rimfire silhouette matches I run.”
Need a top-notch Ballistics App for your iPhone, iPad, or iPod? Start with Ballistic: Advanced Edition (AE), the number 1 (i.e. most installed) App for iOS systems (iPhones and iPads). Ballistics AE (Advanced Edition) is the most popular iOS ballistics program for many good reasons. It offers a full feature set with Ballistic Solver, Ballistic Comparison (with up to 8 projectiles), Target Log (records group sizes), Advanced WindKit, and more. The Ballistic: Advanced Edition software is easy to use, with nice controls. Underneath it all is the proven JBM Ballistics calculator. And here’s the kicker — this excellent mobile App software is now FREE to download and install on iPhones and iPads!
This Video Explains How to Set Up and Use Ballistic: Advanced Edition
Full-featured and easy to use, Ballistics AE has been refined over many years, and it supplies rock-solid solutions derived from JBM Ballistics solver (created by James B. Millard). Unlike some other Apps, Ballistics AE is STABLE on iPhones (with various OS levels). What’s cool is that Ballistics AE is now available for FREE for both iPhones and iPads. This software is now provided by Federal Premium Ammunition, with in-App purchase functionality.
We’ve used the Ballistic: Advanced Edition program on an iPhone 5S, iPhone 6, and iPad, and it performed well. Here are some of the features we liked:
1. Mirrors output from online version of JBM Ballistics we often use for initial calculations.
2. Controls are simple to use and (mostly) intuitive.
3. Handy comparison feature lets you compare ballistics for different projectiles side by side.
4. Advanced Wind Kit allows you to account for complex wind situations.
5. Projectile and BC Databases are very comprehensive.
6. Software is regularly updated to match Apple OS changes.
This article is Copyright 2023 AccurateShooter.com. No republication is authorized. Any appearance of this story on another site obliges that site to pay liquidated damages and/or licensing fees.
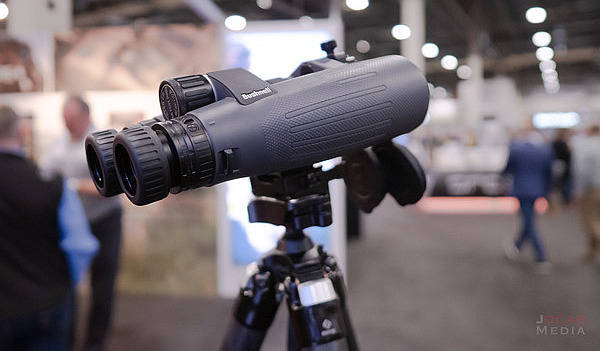
Bushnell offers Match Pro ED 15×56 Binoculars designed for PRS/NRL competition. These 15X Match Pro ED binoculars have a unique box-style MilRad reticle for ranging and determining shot locations. These new-for-2023 Match Pro ED Binoculars combine high-magnification binocular lenses with an MRAD-based reticle for ranging, target sizing, and shot correction. The benefit is that this 15X binocular optic could replace a bigger, heavier reticle-equipped spotting scope. This Match Pro ED Binocular can be quickly mounted on a tripod for enhanced stability. We recommend that because it is pretty hard to hold a 15X optic very steady with hands alone.
The Match Pro ED’s offset SHOT-CALL reticle, located in the right barrel, has a dedicated focus adjustment and can be rotated for leveling after IPD (interpupillary distance) adjustment (i.e. how far the eyepieces are spread apart). Users can secure their preferred IPD with the included BRIDGESET stabilizer, which ensures the binocular is set for quick use and is stable when mounted on a tripod. Claimed light transmission is 92%. Suggested MSRP for the Match Pro ED 15×56 binoculars is $699.99.
Our friend Jonathan Ocab reviewed the new Match Pro ED 15x56mm binoculars: “Bushnell Optics showed off their new Match Pro ED 15×56 binocular, which is based off of their Forge binocular design. The Forge 15×56 has a good reputation as a budget-friendly binocular with good performance at its price range. The Match Pro ED 15×56 is a hefty binocular with a magnesium chassis coming in at 51 ounces with what is dubbed the SHOT-CALL MRAD reticle. The reticle [rotates in the right barrel] so that it can be leveled for the user’s eyes after the barrels are adjusted to the pupil distance.”
Jonathan added: “My initial impressions of this binocular are positive. It is definitely a bigger, heavier binocular and is not going to be one for field use. This is definitely the type of binocular one would employ on the range at NRL/PRS matches to spot for a shooter.” CLICK HERE for full SHOT Show 2023 Optics report by Jonathan Ocab.
In this video, top PRS shooter Robert Brantley explains the features of the Match Pro ED 15X binoculars. He says these can replace a spotting scope, and he says the Shot-Call Reticle works very well for both ranging and calling hit locations.
Recoil Web also did a review of these new 15×56 binoculars stating: “The new Bushnell Match Pro ED 15×56 binoculars [offering] is a big deal, but maybe just to a niche crowd. For a long time, spotting scopes have often come with a MIL or MOA reticle in the eyepiece so one could spot shots at long range and call corrections or for use in ranging a target if a laser rangefinder wasn’t available. With a reticle in the right barrel, you get a MIL grid for ranging and shot correction like a spotting scope but the [wide] field of view and outstanding glass of the binoculars.”
Here’s a smart tip from Bryan Litz, explaining how damage to a bullet jacket can harm the projectile’s Ballistic Coefficient (BC). This tip is posted on Bryan’s new Bryan Litz Ballistics Facebook page. We recommend you subscribe to that page to access Bryan’s latest informative posts.
Bryan notes: “If the case mouth scratches the bullet when you seat it, the damage can cause the BC to be inconsistent, which shows up as vertical dispersion at long range.”
We see this sometimes when running Doppler Radar for competitors at Applied Ballistics Mobile Lab events. If someone is shooting a bullet that typically has a very consistent BC (1% or less) but they’re seeing a higher BC variation, it can be due to the bullets being damaged in the loading process.”
The lead photo above shows the badly-scratched jacket of a bullet seated in a rough-mouthed case. To prevent such jacket damage, one should chamfer, deburr, and smooth case mouths after trimming.
Below is a recorded Doppler radar result showing excessive BC variation. Such variation can increase vertical dispersion at long range. This can result in larger group sizes and lower scores.
Close-up view of a sectioned case. This one here was “fixin’ to pop”, observed Glen Zediker.
Here are highlights from an article Glen Zediker wrote for the Midsouth Blog. In that article Glen, who sadly passed away in 2020, focused on cartridge brass. Glen identified the most common failures that appear with brass that has been shot multiple times, or which has been fired at excessive pressures. Glen explained some simple ways to check your cartridge brass to detect “early warning signs” of case failure, particularly case head separation, which can be very dangerous.
How Cases Degrade with Multiple Firings By Glen Zediker
This article explains when, and then how, to check after the progress of changes commencing with the firing on a new case. It’s the “progress of degeneration,” in a way of looking at it because the concern is getting a handle on when enough change in the brass has come about to require attention. Or abandonment. As said then, for me that’s 4 firings. That, as said last time, is when I might see changes that need attention. Also as said, that figure didn’t come out of a hat, but from my own notes in running my competition NRA High Power Rifle loads. [Editor’s Note: With Lapua brass, using moderate loads, in bolt-action rifles, we typically get about 10 good (match-worthy) firings. But if you anneal your Lapua brass, and run modest pressures, Lapua brass can perform well for 20 or more load cycles.]
The areas most affected are the case neck and case head area. Case neck walls get thicker [but] the case head area body walls get thinner. Primer pockets get shallower and larger diameter.
This case shows a cracked neck AND a crack (separation) above the case head. Zediker says it is “rare to see one case with both of the most common failures. [This case] was attacked by an M14.”
Case Head — Causes of Separation and Cracking
When a case is under pressure during firing, the brass, like water, flows where it can, where it’s more free to move. Of course, the chamber steel limits the amount it can expand. The case shoulder blows fully forward and the case base is slammed back against the bolt face. There is, therefore and in effect, a tug on both ends — it gets stretched. The shoulder area is relatively free to expand to conform to the chamber, but the other end, the case head area, is not. Since that’s the area of the case with the thickest walls, it doesn’t expand “out” much at all. What it does is stretch. The “case head area,” as I refer to it here, is the portion of the case above the web, which is just above the taper that leads in to the extractor groove. The “area” extends approximately an eighth-inch up the case body.
Here’s a “pressure ring.” You’ll see this after firing, if you see it. And, if you see it, that case is done. The bright ring indicates excessive stretching, which indicates excessive thinning. If you see a ring circling the case, noticeable because it’s lighter color than the case body, and it’s in this area, I’d say that case is done. And that’s right where a “head separation” occurs. It can crack and also blow slap in two, and that’s the “separation” part of case head separation.
Photo courtesy GS Arizona.
This is a spot to keep close watch on as cases age. It is also the area that is more “protected” by sizing with less case shoulder set-back. That is, pretty much, where the freedom for the stretching movement in this area comes from (the case shoulder creates a gap). If you’re seeing a sign that a head separation [might happen with relatively few firings], chances are the shoulder set-back is excessive, and also… the load pressure level.
Bent Paper Clip Case-Wall Gauge
Editor: You can use a bent paper clip to detect potential case wall problems. Slide the paper clip inside your case to check for thin spots. GS Arizona explains: “This simple little tool (bent paper clip) will let you check the inside of cases before you reload them. The thin spot will be immediately apparent as you run the clip up the inside of the case. If you’re seeing a shiny line on the outside and the clip is really hitting a thin spot inside, it’s time to retire the case.” Photo by GS Arizona.
Monitor Primer Pocket Dimensional Changes
Another case-head-area and pressure-related check is the primer pocket. As said, the primer pocket will get larger in diameter and shallower in depth each firing. As with many such things, the questions are “when” and “how much,” and the main thing, “how much?”
If the pocket gets excessively shallow, and that’s judged by a primer that seats fully but isn’t at least a tick below flush with the case base, there could be function issues. There’s a risk of a “slam-fire” with a semi-auto that uses a floating firing pin, and, if there is actual protrusion, that has the same effect as insufficient headspace. A primer pocket uniformer can reset the depth of a shallowed primer pocket to what it should be, but the real test for me is how easily the next primer seats into it. If it’s significantly less resistance, I’ll say that case is done. Shallower can be refurbished. That’s a primary function of a primer pocket uniformer. Larger diameter, though, can’t be fixed. I’ve mentioned in another article or two that, any more at least, my main gauge of load pressure has become how much primer pocket expansion there’s been.
AR owners know that their black rifles require regular cleaning and maintenance. And this modular platform allows many options for stocks, fore-arms, and optics mounting. That ability to customize is one of the AR’s major attractions, but customization requires solid understanding of the AR’s design and components.
To help AR owners optimize their rifles and maintain their rifles properly, Gun Digest Media offers an excellent 320-page illustrated book: AR-15 Setup, Maintenance and Repair. Authored by Patrick Sweeney, this book is a “one-stop guide to repairing, maintaining and modifying America’s favorite rifle.” The MSRP for the paperbook resource is $33.99 from Gun Digest, but it is available on Amazon starting at $25.13 with $3.99 shipping. Digital editions are offered by GunDigest for $31.99.
If you need to disassemble and maintain your AR rifle, swap barrels or handguards, add optics, or customize the stock, Gun Digest’s AR-15 Setup, Maintenance and Repair book tells you what you need to know. From field-stripping to barrel mounting and trigger installations, the book covers a wide range of topics. The book provides step-by-step instructions for set-up and maintenance, with hundreds of detailed photos. The book also includes AR gunsmithing chapters with reviews of recommended tools.
Author Patrick Sweeney is a certified master gunsmith and armorer instructor for police departments. Sweeney has also authored the notable 4-volume Gunsmithing the AR-15 series (Vol. 1, Vol. 2, Vol. 3, and Vol. 4) and 20+ other titles for Gun Digest Books.
Whether you want to learn about disassembling your AR for regular maintenance, field-stripping, swapping out parts, adding optics or customizing a stock, AR-15 Setup, Maintenance and Repair guides you through everything you need to know to keep your AR-platform rifle running well. There are also tips on how to improve accuracy, and maintain your bolt carrier group properly.
Authored by Patrick Sweeney
Published by Gun Digest Books
ISBN-13: 978-1951115470
320 pages, softcover, 8 ¼ x 10 7/8 inches
Editor’s NOTE: The key to keeping an AR running reliably is proper lubrication (in the RIGHT places), and regular cleaning of the bolt carrier and bolt, including ejector recess and extractor recess. The majority of non-functioning ARs we’ve seen had gunk, lube, carbon, and brass shavings in those recesses.
Other AR Books by Patrick Sweeney
Bonus Video — AR15 Maintenance with Jerry Miculek
In this helpful video, legendary shooting Jerry Miculek explains how he cleans and maintains his AR-platform rifles. Miculek shoots ARs in three-gun competitions.
This article is Copyright 2023 AccurateShooter.com. No republication is allowed without advance permisson and fees.


 Norma has released a fascinating video showing how bullets, brass, and ammunition are produced at the
  If you wonder how ammo is made, starting with raw metal, check out this video from
 Effects Of Cartridge Over All Length (COAL) And Cartridge Base To Ogive (CBTO) – Part 2


 The Match Pro ED’s offset SHOT-CALL reticle, located in the right barrel, has a dedicated focus adjustment and can be rotated for leveling after IPD (interpupillary distance) adjustment (i.e. how far the eyepieces are spread apart). Users can secure their preferred IPD with the included BRIDGESET stabilizer, which ensures the binocular is set for quick use and is stable when mounted on a tripod. Claimed light transmission is 92%. Suggested MSRP for the Match Pro ED 15×56 binoculars is $699.99.