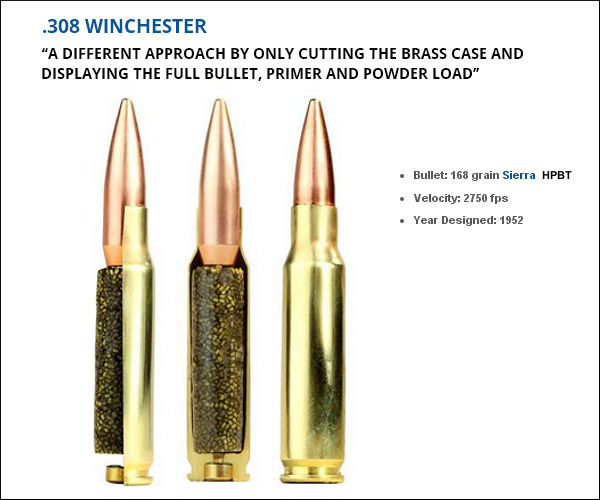
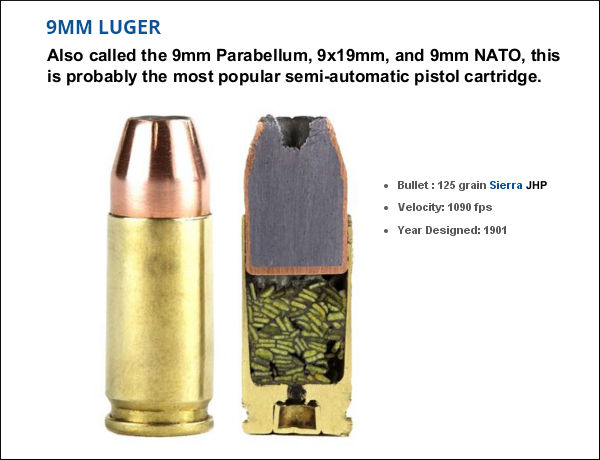
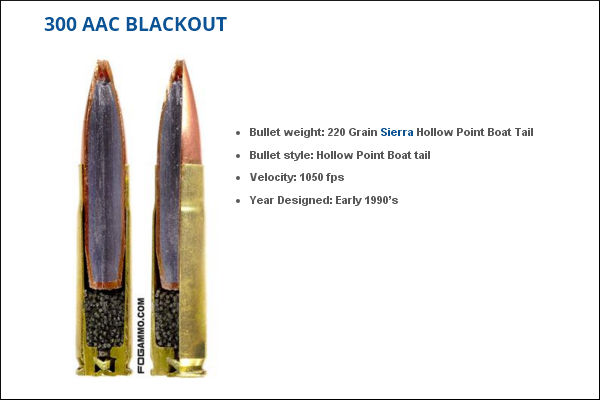
Here’s something you don’t see every day — the inside of loaded cartridges, sliced halfway through. This lets you see how bullet core, jacket, cartridge case, powder, and primer all fit together. Give credit to the folks at FOG Ammunition for creating this interesting series of cut-through ammo images. We show four cartridges here: the .308 Winchester, 9mm Luger, 300 BLK, and .50 BMG. You’ll find two more (the .223 Remington and .45 ACP) on the original FOG Ammo Blog Article.
This .308 Winchester model took on a different approach by only cutting the brass case and displaying the full bullet, primer and powder load. A spec amount of powder was used to create the model powder form. An estimated 10% volume was added during the forming process, along with an undetermined amount of air pockets.
This bisection is a 9mm Luger Jacketed Hollow Point round with flake powder held together with super glue. After this self-defense round was cut by a trained professional the round was polished by hand. This might look like stick powder, but those are in fact flakes stacked up in cross-section. Designed in 1901 by Georg Luger, this popular cartridge is used by civilians, military, and law enforcement.
For this model of the .300 AAC Blackout (aka 300 BLK), a Dremel tool was used to create a pie cut within the bullet and brass case. A measured amount of power, roughly 65% of spec charge, was placed inside the case with super glue. This cartridge was originally optimized for subsonic use with a suppressor, so the amount of powder used is small relative to the nominal case capacity. That leaves more room for the relatively large .30-caliber bullet.
Last but definitely not least is the .50 Caliber BMG round (aka .50 Browning Machine Gun). Famed for its wartime use in the M2 Machine gun, the .50 BMG round is also used in civilian Long Range competitions. A typical .50 BMG cartridge holds over 225 grains of powder. That’s almost ten times the amount in a 5.56×45 NATO Round! To demonstrate the size of the .50 BMG, check out that .223 Rem for comparison.
Even with high-quality brass from Lapua, Peterson, Norma, Alpha and RWS, occasionally you may find one or two cases per box which have a small flake or obstruction in the flash-hole. This will appear like a thin crescent on one side of the flash hole (see photo). You should inspect ALL new brass before loading to identify any pieces with a partially-obstructed flash hole. It’s a good idea to remove any flake or thin crescent left as an artifact of the flash-hole forming process. Because the flash-hole itself is normally centered and of the correct diameter, it is not necessary to ream the flash-hole to a larger diameter. All you really need to do is remove the small obstruction(s). This can be done quickly with inexpensive tools.
Use a Small Pin Vise to Remove Flash-Hole Obstructions
Folks have asked if there is a tool that can remove obstructions from a Lapua small, BR-sized flash hole without opening the hole size. The Lapua PPC/BR flash hole is spec’d at 1.5mm, which works out to 0.059055″. Most of the PPC/BR flash-hole uniforming tools on the market use a 1/16″ bit which is nominally 0.0625″, but these often run oversize — up to 0.066″.
If you want to just clear out any obstructions in the flash hole, without increasing the flash hole diameter, you can use an inexpensive “pin vise” with an appropriate drill bit. For $5.19, Amazon sells a 10-piece set of cobalt steel 1.5mm drill bits that match the Lapua flash hole exactly. Other vendors offer a #53 pin vise drill bit that measures .0595″ or .060″ (depending or source). An 0.0595″ bit is close enough. You can find pin vises and these small-diameter drill bits at hobby stores.
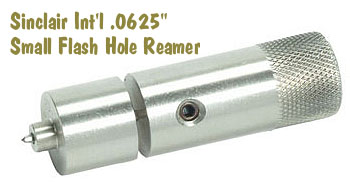
For quite some time, Sinclair Int’l has sold a similar device for small (PPC and BR-size) flash holes. Like the 07-3081 unit for large flash holes, the 073000 Reamer for small flash holes works from the outside, so it can index off the primer pocket. It reams to .0625″, and also costs $29.99. The standard dimension for Lapua 220 Russian and 6mmBR flash holes is 1.5mm or .0590″. This tool will permit standard-size decapping rods with .0625″ tips to work without binding. However, note that both Forster and Redding normally supply .057″ decapping pins with their PPC and BR dies. So, it is NOT necessary to ream your Lapua BR/PPC flashholes, unless you prefer to do so for uniformity. It IS, however, a good idea to check BR/PPC flash holes for burrs before loading the first time.
NOTE: If you purchase either the 073081 or 073000 Sinclair Flash Hole Reamer tools, we recommend you mic the cutter tip before you process a bunch of cases. Sometimes a tip comes through that is oversize. This will ream the flash holes larger than you may intend.
Sherri Jo Gallagher, the second woman in history to win the NRA High Power National Championship, sports Eye Protection at Camp Perry. The first lady High Power Champion was Sherri’s mother, Nancy Tompkins.
In response to a Bulletin article about Protective Eyewear, one of our Canadian readers posted a personal story. His account demonstrates the importance of wearing eye protection whenever you shoot — no matter what type of firearm you are using — even air rifles. We hope all our readers take this to heart. All too often at rifle matches we see shooters, even some top competitors, risking their vision by failing to wear eye protection.
Eye and Hearing Protection are now MANDATORY for Highpower Rifle competitors and Pistol shooters in all CMP-affiliated matches. The 2020 CMP Highpower Rifle, Pistol, and CMP Games Rulebooks all contain the following rule: “All competitors and competition officials are required to wear appropriate eye and hearing protection when on shooting range firing lines during highpower rifle or pistol firing. All competitors must comply with this requirement before they can participate in a CMP sponsored or sanctioned competition. Competitors are responsible for selecting their eyewear and hearing protection.”
Eye Protection — Lesson Learned by Nicholas from Canada
As a boy on a mixed farm on the plains the first shooting stick I owned was a Red Ryder BB gun. My Dad bought it for me as I showed a keen interest in the shooting and hunting sports. I was about 9 years old at the time.
We had literally thousands of sparrows in our large farm yard and they liked to roost on the steel railings in the barn loft. I took to slowly thinning out their ranks by flashlight at night as these little winged pests settled in the farm buildings.
One evening as I slayed sparrow after sparrow in the barn loft — with about a dozen farm cats following me to consume these easy meals, I fired at another bird centered in my flashlight beam.
However, my aim was a bit low — and the copper pellet hit the steel beam square on. Instantly I felt a sharp pain as the BB bounced back and hit me squarely between the eyes on the bridge of my nose – drawing blood from the partial penetration into the skin. A half inch either way and I’d have lost an eye!
Never, never, never shoot at any target with a steel background with any firearm, even a BB gun – is the hard lesson I learned, and wear the best shooting glasses that money can buy!
PLEASE REMEMBER THAT!!
Editor’s Comment: Among competitive pistol shooters, the use of safety eyewear is universal. You’ll never see Rob Leatham, Julie Golob, or Jerry Miculek competing without eye protection — for good reason. The handgun sports’ governing bodies effectively enforce mandatory eye protection policies. We wish the same could be said for competitive rifle shooting. We often see benchrest, High Power, and F-Class competitors shooting without eye protection. We’ve heard all the excuses, yet none of them trump the safety considerations involved.
We recommend that all shooters and hunters employ eye protection whenever they use firearms or are at a location where live fire is taking place. You only have two eyes. A tiny bullet fragment or ricochet is all it takes to cause permanent blindness in one or both eyes. As rifle shooters, we place our eyes a couple inches away from a combustion chamber operating at pressures up to 70,000 psi. I know quite a few guys who will religiously put on safety glasses when running a lathe or a drill press, yet the same guys won’t use eye protection when shooting their rifles — simply because it is “inconvenient”. That’s nuts. It doesn’t matter is you are a cub scout or a multi-time National Champion — you should wear eye protection.
I will give you a personal example. A year ago I was shooting a 9mm pistol. One of the cartridges had a primer burst outward blowing small particles, some brass, and a piece of the pistol’s extractor right back into my eyes. Thankfully I was wearing good wrap-around safety glasses. No injuries at all. But without those safety glasses, this could have been very serious. I always wear safety glasses with ALL firearms. Shown below is the same kind of primer blow-out I experienced, but with a .270 Win rifle cartridge.
Be wise — protect your eyes. To learn more about eyewear safety standards, and to learn about the latest options in ANSI Z87-certified protective eyewear, read our article on Eye Protection for Shooters.
There is an informative article on the NRA’s American Hunter website regarding suppressor use for hunting. The article, What Hunters Need to Know About Suppressors, answers common questions about licensing, tax stamps, and suppressor types. The article explains the history of the $200 tax stamp which must be paid when acquiring a suppressor:
“Why the Tax? In 1934 … the federal government, while battling gangsters such as Al Capone, heavily restricted silencers with passage of the first National Firearms Act. Hoping to gain an advantage on criminals that often had better weapons than cops, the Feds placed a mandatory ‘sin’ tax on silencers that was so high it would effectively ban their purchase by all but the wealthiest individuals. In 1934, $200 was the equivalent of $3,500 today. The $200 tax still stands despite no evidence that a simple metal tube is capable of causing crime.” — American Hunter
The American Hunter article also discusses how well suppressors actually reduce noise. User should be aware that the sound level of a large, centerfire hunting cartridge will still exceed 130 decibels (dB) on average, even with a typical suppressor (silencer) in place. For that reason, we recommend that hunters continue to wear ear protection even when they shoot suppressed.
For example, Thunder Beast Arms says its latest Ultra 9 Suppressor will reduce the report of a .308 Win to 132-134 dB: “The ULTRA 9 will suppress a typical .308 bolt-action rifle down to approx. 132-134 dB. It also has very little or no ‘first round pop’ (FRP) in most applications.” NOTE: These dB levels are measured in accordance with MIL-STD-1474D using BK 2209 SLM offset one meter from muzzle.
How Loud Are Unsuppressed Rifles?
Firearms Are Loud — 140 dB to 175 dB. Audiology group ASHA explains: “Almost all firearms create noise that is over the 140-dB level. Exposure to noise greater than 140 dB can permanently damage hearing. A small .22-caliber rifle can produce noise around 140 dB, while big-bore rifles and pistols can produce sound over 175 dB. Firing guns in a place where sounds can reverberate, or bounce off walls and other structures, can make noises louder and increase the risk of hearing loss. Also, adding muzzle brakes or other modifications can make the firearm louder. People who do not wear hearing protection while shooting can suffer a severe hearing loss with as little as one shot[.] Audiologists see this often, especially during hunting season when hunters and bystanders may be exposed to rapid fire from big-bore rifles, shotguns, or pistols.” Source: ASHA, Recreational Firearm Noise Exposure.
How Much Does a Good Suppressor Really Reduce Firearm Sound Levels?
That depends on the rifle, the cartridge, and the effectiveness of the suppressor. The American Hunter article explains: “Suppressors retard the speed of propellant gases from the cartridge that rapidly expand and rush out of the barrel. It’s these gases that produce the loud boom that’s heard for miles. A suppressor’s series of internal baffles slows these gases so they are not all released at once, thereby muffling the sound.” Many good commercial suppressors can achieve 30-35 dB sound suppression. However, Zak Smith of Thunder Beast Arms says: “There are a bunch of manufacturers who publish values that are not reproducible, or use an ad-hoc test instead of a mil-spec test. In many cases we’ve tested the exact same suppressors they’ve advertised with 30-40 dB reductions and found they are actually in the high 20s instead.”
Again, for this reason, we recommend that hunters use ear protection, such as electronic muffs, even when shooting suppressed.
Choosing a Suppressor for Hunting Use
The American Hunter article explains that there are many types of suppressors on the market. Bigger suppressors are heavier, but they normally are more effective. You also have a choice in muzzle attachments:
“For most hunting applications, direct thread is the best choice. If you intend to buy only one suppressor yet you have multiple guns, it’s advantageous to buy a model sized and rated for the largest caliber you intend to use. While a suppressor made specifically for a .223 Rem. will reduce the sound of that round slightly better than a model made for .30 caliber, for example, you can use a .30-caliber can for smaller calibers — but not vice-versa. In general, the bigger the can, the more it reduces sound. Smaller suppressors, however, are easier to carry in the woods.” — American Hunter
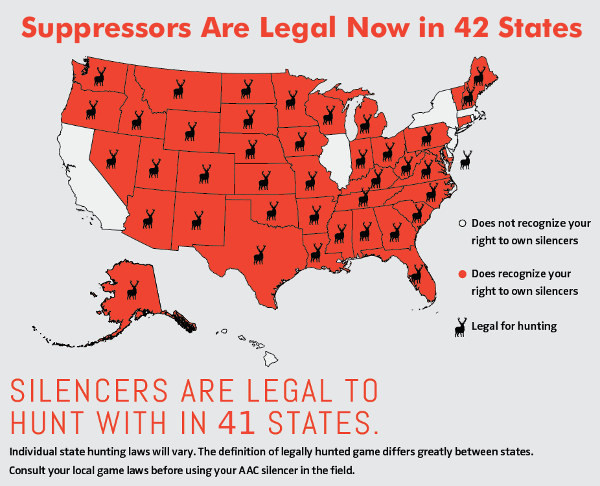
States Where Suppressor Ownership is Allowed
Currently, the following 42 states allow private ownership of suppressors: AL, AK, AZ, AR, CO, CT, FL, GA, ID, IN, IA, KS, KY, LA, ME, MD, MI, MN, MS, MO, MT, NE, NV, NH, NM, NC, ND, OH, OK, OR, PA, SC, SD, TN, TX, UT, VT, VA, WA, WV, WI, WY. NOTE: Suppressors are legal in Connecticut, but hunting with silencers is not allowed in Connecticut.
How to Apply for a Suppressor
To acquire a quality suppressor, you’ll first need to shop around, comparing verified performance. Unfortunately some manufacturer’s dB claims are exaggerated. Give due consideration to size, weight, and durability. When you’ve selected a brand and model, find a Class 3 dealer authorized by the ATF to sell suppressors. You must fill out ATF Form 4, get fingerprinted, and pass a background check. Along with two completed copies of Form 4, submit your fingerprint card, passport photo and a check for $200 to the ATF. Then you wait for the ATF to process your application. American Hunter says the average ATF suppressor processing wait time is now nine months.
BENEFITS OF SILENCERS
NOISE REDUCTION
According to OSHA, the threshold for a hearing safe impulse noise is 140 dB. Without hearing protection, exposure to any impulse noise over 140 dB causes varying degrees of permanent noise-induced hearing loss, which can also lead to tinnitus. Most well-engineered silencers take the dB level of their host firearm well below 140 dB, making those silencers effective primary hearing safety devices. You should always still wear hearing protection (muffs or plugs) when using suppressors.
RECOIL REDUCTION
By containing the explosion at the muzzle, suppressors significantly reduce perceived recoil energy, reduce the rifle’s rearward movement on recoil, and reduce rifle torquing and muzzle flip. The reduction of recoil (and rifle torquing/hopping) lessens shooter fatigue and helps the shooter get his sight picture back on target rapidly after firing. With smaller calibers, a suppressor may enable the shooter to maintain a nearly-continuous sight picture, following the shot into the target. In addition, by reducing felt recoil (and muzzle blast), a suppressor can help inexperienced shooters avoid flinching.
At the request of our readers, we provide select “Deals of the Week”. Every Sunday afternoon or Monday morning we offer our Best Bargain selections. Here are some of the best deals on firearms, hardware, reloading components, optics, and shooting accessories. Be aware that sale prices are subject to change, and once clearance inventory is sold, it’s gone for good. You snooze you lose.
NOTE: All listed products are for sale to persons 18 years of age or older. No products are intended for use by minors.
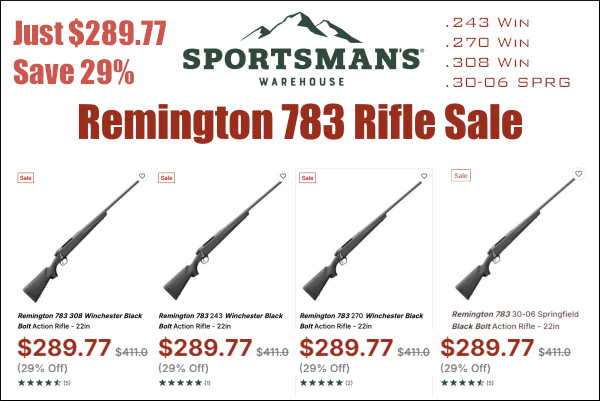
1. Sportsman’s WH — Rem 783 Rifle (Many Calibers), $289.77
⏺️ » Good quality hunting rifles under $300!
It’s hunting season. Here’s an amazing deal on a good Remington hunting rig. The Remington 783 rifle is available in a variety of popular chamberings for just $289.77 at Sportsman’s Warehouse. This modern rifle has a pillar-bedded action, free-floating button-rifled barrel, steel detachable magazine, and modern polymer stock. There are both 22″ and 20″ barrel options. The Rem 783 features Remington’s new user-adjustable Cross Fire trigger system.
2. Precision Reloading — FREE Hazmat On Purchases of $199+
⏺️ » Save $30-$45 with FREE Hazmat through 10/2/2025
When you purchase powder and/or primers, you normally must may the vendor a Hazmat fee of up to $45 per order. But right now Precision Reloading is offering FREE Hazmat on Powder and/or Primer Orders of $199 or More. To get FREE Hazmat use Coupon Code FREEHAZ at checkout. That can save you $30-$45 compared to other online retailers.
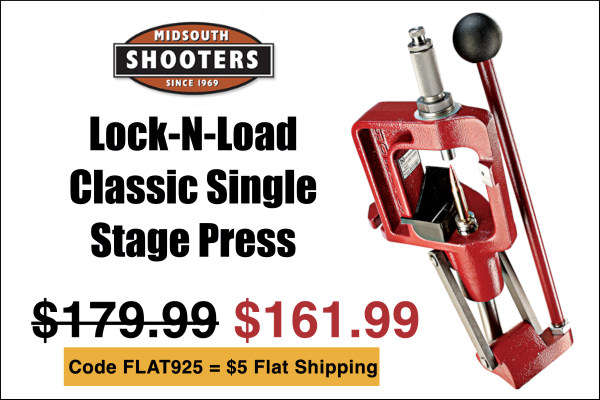
3. Midsouth — Hornady LNL Classic Press, $161.99
⏺️ » Good, strong single-stage press $38 less than elsewhere
The Hornady Lock-N-Load Classic Single-Stage Press is a very good press for loading pistol and rifle rounds. The Lock-N-Load Classic has a strong solid cast frame. The frame front is angled, allowing easier placement and recovery of cartridges. This press also works with Hornady’s Quick Change bushing system to allow rapid die changes. An optional Primer Feed tube system that holds up to 70 primers is available. NOTE: Midsouth is selling this press for just $161.99 — a great deal. This same press sells for $199.97 elsewhere.
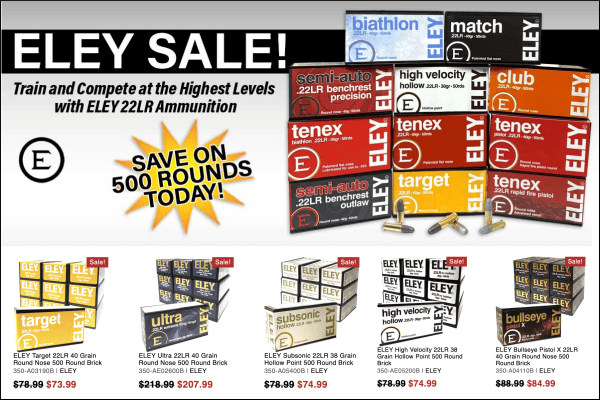
4. Midsouth — ELEY .22 LR Rimfire Ammo Sale
⏺️ » Ultra high-quality .22 LR rimfire ammo with big discounts
ELEY .22 LR Rimfire Ammunition is favored by top rimfire shooters in multiple disciplines — Silhouette, Benchrest, Smallbore 3P/Prone, Field Target, NRL22 tactical, Steel Challenge, Biathlon, and Pistol. ELEY offers a wide range of ammo types starting at about $7.40 per box. Right now Midsouth has 14 types of ELEY rimfire ammo on sale including: Target, Ultra, TENEX EPS, Club, Match, Team, Semi-Auto BR Precision, High Velocity, Benchrest Outlaw, Bullseye, Subsonic, TENEX Pistol and more.
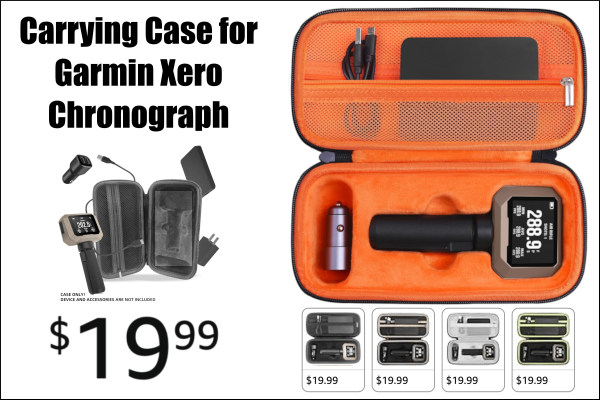
5. Amazon — Carry Case for Garmin Xero C1 Chronograph, $19.99
⏺️ » Handy, quality case for popular Garmin Radar Chronograph
This handy carry case is designed specifically for the Garmin Xero C1 Pro Chronograph. The nicely-padded, waster-resistant case holds the chrono mounted on its tripod, with a zippered compartment above for power cords and accessories. Three different inside colors are offered: Orange (as shown), Black, and Gray. And there are two other black interior versions with contrasting tan or green highlights. This kind of case is a “must-have” for transporting your $599 Garmin Chrono. There is also a smaller $9.99 Garmin Compact Travel Case that just holds the unit and a cord (not the power adapter). Both large and small cases provide protection from scratches, impacts, and everyday wear and tear.
6. Graf & Sons — Hornady Ammo Sale
⏺️ » Large selection of hunting and target ammo at good prices
Graf & Sons is currently running a major sale on Hornady Ammunition for both hunting and target shooting. Hornady Superformance ammo features polymer-tipped Hornady NTX bullets which are accurate and very effective on big game. Hornady’s Superformance ammo works in all action types, including semi‑autos. Along with Superformance ammo, many other ammo types are on sale, including .17 HMR rimfire.
7. Midsouth — Frankford Arsenal Perfect Primer Seater, $62.11
⏺️ » Excellent Primer Seating Tool with very positive user reviews
Amazon has the Frankford Perfect Primer Seater Tool for $62.11 (22% Off). This is a GREAT primer seating tool. It has good feel, plenty of leverage, and the primer tray works well. Importantly, it has a click-adjust wheel for precise primer seating depth control. Read our Frankford Primer Seating Tool Product Review. The tool comes complete with 12 precision shell holders. A quick thumb release system allows you to switch from small to large primers easily. Plus there is a hard stop so you won’t over-crush a primer.
8. Natchez — Federal .223 Rem, 500 Rounds, $199.99
⏺️ » Get 500rds of good .223 Rem ammo for just 40 cents each
Here’s great deal on quality Federal .223 Rem 55gr FMJ American Eagle Ammunition. A 500-round pack is now just $199.99, which works out to just 40 cents per round. American Eagle rifle ammunition offers consistent, accurate, affordable performance for the range. The loads feature quality bullets, reloadable brass cases and dependable primers.
Designed for the smaller heads of youth and women shooters, these Walker’s Slim Passive Earmuffs (#ad) feature a slim profile for comfort and convenience. Lightweight, foldable, and adjustable, these earmuffs are well-suited for female and younger shooters. The $18.02 price is a fantastic deal on good muffs with impressive 27dB Noise Reduction Rating (NRR). These are available in a variety of colors, including Flat Dark Earth (FDE) or Black for $18.02, Olive Green for $18.97, Coral for $20.16, and Teal for $22.53.
As an Amazon affiliate, this site can earn revenues through sales commissions.
You can spend thousands on a rifle, but that expensive hardware won’t perform at its best if you have poor trigger technique. One key element of precision shooting is trigger control. Our friend Kirsten Joy Weiss has produced a good video that shows how to refine your trigger technique for better accuracy. In this video, Kirsten talks about the actual placement of a shooter’s index finger on the trigger. It is important to have the finger positioned optimally. Otherwise you can pull the shot slightly left or slightly right.
Kirsten tells us: “Finger placement on the trigger might not seem like a big deal, but it actually is. The reason for this is because, depending on where your index finger is placed on the trigger, [this] translates to different muscle interactions with the gun.” Watch this video to see Kirsten demonstrate proper finger placement (and explain problems caused by improper finger positioning).
When you pull the trigger, you only want to engage the last section of your finger, in order to avoid unwanted muscle engagement and to achieve a smooth shot. Remember there is a “sweet spot” between the crease (first joint) and the tip of the finger. If you position the trigger in that “sweet spot”, you should see an increase in your accuracy. Don’t make the mistake of putting the trigger in the crease of your finger, as shown below.
Effects of Incorrect Finger Placements
You want to place the trigger shoe between the end of your finger and the first joint. If you place the trigger on the very tip of you finger you’ll tend to push the rear of the rifle to the left when engaging the trigger, causing shots to go right (for a right-handed shooter). On the other hand, if you put the trigger in the crease (first joint), you’ll tend to bring the rear of the rifle to the right, causing shots to fall left. This is illustrated below for a right-handed shooter.
For hunters in a tree stand, SFC McPhail recommends a position with your weakside leg pulled up and firmly braced on the front rail of the treestand. You can then rest your support arm on your leg. This provides a rock-solid position when shooting from a stand.
Team USA Olympian and ISSF World Cup Winner SFC Michael McPhail is one of the world’s best smallbore rifle shooters. He is also an avid hunter, who enjoys harvesting game with centerfire rifles. In a USAMU video, McPhail shows how competition shooting positions can be adapted for hunters. McPhail shows how well-established positions can provide a more stable platform for hunters in the field. That can help ensure a successful hunt. McPhail demonstrates three positions: kneeling, supported prone, and sitting in a tree-stand.
Watch SFC McPhail Demonstrate Positions for Hunters (Good Video):
McPhail first demonstrates the kneeling position. Michael notes: “I like kneeling. It’s a little bit of an under-utilized position, but it’s almost as stable as prone. It allows you get up off the ground a little bit higher to [compensate for] vegetation. For kneeling start by taking your non-dominant foot and put that towards the target, while at the same time dropping down to a knee on the dominant leg. At the same time … wrap the sling around wrist and fore-arm, lean slightly into the target and take the shot.”
McPhail shows a nice “field expedient” use of your backpack. He shows how the basic prone position can be adapted, using the pack as a front rifle support. McPhail recommends pulling your dominant (strongside) leg forward, bent at the knee. According to Michael, this takes pressure off the abdomen, helps minimizes heart beat effects, and helps with breathing.
Hunting season is here. We know that many hunters would like to carry less weight in the field, but still want an accurate and rugged rifle. In our Shooters’ Forum, there’s an interesting thread about a very light hunting rifle. Featuring a Defiance ultra-light all-steel action, this 6.5×57 Lapua lightweight tips the scales at just 4.93 pounds including scope and rings! For reference, a half-gallon of milk weighs 4.3 pounds, so this rifle is LIGHT! Here’s a report from the proud owner who built the rifle for a future Kodiak Island Alaska mountain goat hunt.
Ultralight Rifle Report by Forum Member Dave
I decided I wanted the challenge of a Mountain Goat hunt after I turn 60. It was the perfect excuse to put together an ultralight, something I had wanted to do for years. I wanted to see how light a bolt action rifle could actually be. My goal was to stay under 5 pounds, without going to a Titanium action, including rings and scope. I knew this would be difficult but I did manage to achieve the goal.
I started with a Defiance anTi model Rem Model 7 short action. This is an extremely smooth action that weighs just 19.2 ounces in this size. I had Carson Lilja of Lilja Barrels program a barrel taper to my dimensions for a 6.5mm 1:8″-twist stainless, 3-groove 22″ barrel. As fitted in the rifle, the barrel is free-floated except for the first inch or so forward of the action.
Other rifle components are: Bix n Andy Dakota trigger, aluminum trigger guard, blind magazine with an aluminum follower, titanium action screws, and a Leupold 3-9X lightweight optic in Talley rings. I also had an aluminum adapter installed in the for-end to accept a magnetic mount Javelin carbon fiber bipod.
The rifle was chambered up in 6.5×47 Lapua by my friends at Sportsman’s Outfitters in Knox, Pennsylvania. Then I sent the barreled action to Wayne at Oregunsmithing (Pendleton, OR) to have a Kevlar stock built. The stock weighs a whopping 14 ounces! When it came back I had everything Cerakoted (see bottom photo before coating). This stock was a full custom, built around my barreled action. Wayne’s work was reasonably priced with a 3-month turn around.
Excellent Accuracy — 5/8″ Three-Shot Groups at 100 Yards
Now it was time to shoot the rifle and I was not disappointed. It shoots both Barnes TTSX 100s or Swift Scirocco II 130s into 5/8″ at 100 yards. Off a bipod at 400 yards, three go into 3″ or so. This thing is crazy light even though it wears a 22″ barrel.
Without scope and rings, before Cerakoting the action and barrel, this 6.5×47 rifle tipped the scales at a mere 4.20 pounds (67.2 ounces). Check it out:
KEY FEATURES: Ballistics Solver, GPS Tagging, Weather Forecast, Field Notes with Photos
ZEISS offers a FREE mobile Hunting APP for both Apple and Android systems. The ZEISS Hunting App offers many practical functions: full-featured ballistics calculator, field notes with photo archive, compass function, GPS tagging for documentation of hunting experiences, and a detailed weather forecast service. The Hunting App is offered as a FREE download for Android and iOS (iPhone/iPad) mobile devices.
Hunt Log and Photos
The Field Notes function can do many things. You can log all your shots and hits, and you can plot game sightings during the hunt. Events can be augmented with photos and GPS data. With the Field Notes mapping function, you can even locate game populations in the hunting territory. A compass and automatic night mode round off the list of smart features.
NOTE: The rifle featured in this story was built for an Alaska Mountain Goat Hunt. The ZEISS Hunting App can provide info by species type, including deer, elk, and yes, Mountain Goats.
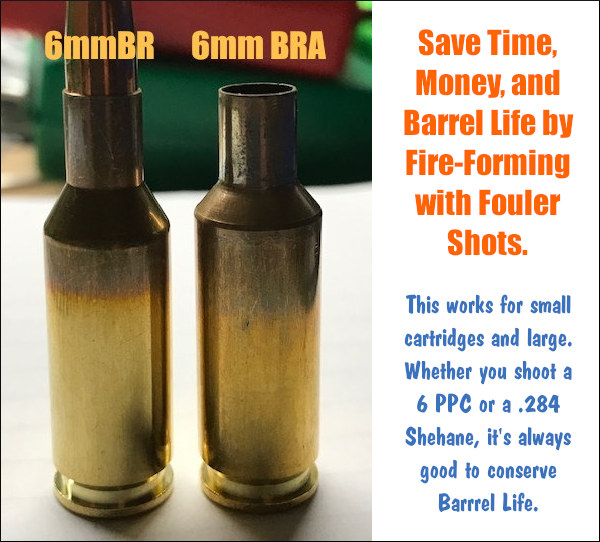
Here’s a tip for guys who shoot the 6 PPC, 6 Dasher, 6 BRA, .284 Shehane, or other wildcat cartridges that require fire-forming. Use your fouler shots to fire-form new cases. That way your fouler shots do “double-duty” and you get your brass fire-formed without putting extra rounds through your expensive barrel.
This procedure is recommended by Joel Kendrick, the 2004 IBS 600-yard Shooter of the Year. After he cleans his barrel, Joel knows it takes two or three shots to foul in the bore before accuracy returns. When shooting his PPC, Joel uses those fouler shots to fire-form his new brass. Joel explains: “I like to have relatively new brass always ready. By fire-forming a couple cases after each barrel-cleaning during a match, by the end of the weekend I’ve got a dozen or more freshly fire-formed cases to put into the rotation. If you do this with your fouler shots you get your fire-forming accomplished without using up any extra barrel life.”
This not only saves barrel wear, but it saves you trips to the range for the purpose of fire-forming. We thank Joel for this smart suggestion. For those who do not have a dedicated barrel for fire-forming, this should help keep your round-count down. Note: With this fouler fire-forming routine, you should ALWAYS do the fire-forming with the SAME POWDER you load for your match ammo. Joel currently works as the Supplier Quality Process Engineer for MMI-TruTec, a company that offers barrel surface coatings that can further extend your barrel life.
PMA Tool offers lightweight yet sturdy cleaning cradles that are handy, affordable, and easy to transport. PMA’s popular single-gun cradle, priced at $119.95, is ideal for benchrest and F-Class rigs. It measures about 17″ in length and weighs about one pound. You can choose among 2.25″, 3″, 4″, 5″, and 6″-wide saddles (U-shaped padded supports) to match your forearm width.
PMA also offers an excellent double cradles for $174.95. These twin cradles have 2.5″, 3″, or 4″ saddles, or a combo of 3″ / 2.25″ front saddles. All these cradle types secure your rifle(s) in a muzzle-down position that allows easy cleaning and prevents solvents from running back into the action. The front saddles and all contact surfaces are covered by thick silicone rubber padding which grips the rifle securely yet protects the stock and components from scratches.
These cradles are most commonly sold with a 3″-wide front saddle for Benchrest and F-Open style stocks, or a 2.25″-wide front saddle for rifles with narrower fore-ends such as those found on F-TR, Hunter Class, and varmint stocks. In addition, you can get 4″-wide cradle for the big, long range benchrest rifles.
Double Rifle Cradle is a Smart, Versatile Design
PMA’s double rifle cleaning cradle was was designed from the ground up to work perfectly for two rifles side-by-side. Using the same tie bar and protective saddles found on the single cradel, PMA widened the base and created new uprights to support the saddles, making the cradle as narrow and light as possible, while retaining all the protective and non-slip features from our single unit.
This PMA Tool double cradle unit is available with twin 3″ front saddles, double 2.5″ front saddles or combination 3″ / 2.25″ front saddle configurations to accommodate different classes of benchrest rifles.


 In response to a Bulletin article about
 Eye Protection — Lesson Learned
 Editor’s Comment: Among competitive pistol shooters, the use of safety eyewear is universal. You’ll never see Rob Leatham, Julie Golob, or Jerry Miculek competing without eye protection — for good reason. The handgun sports’ governing bodies effectively enforce mandatory eye protection policies. We wish the same could be said for competitive rifle shooting. We often see benchrest, High Power, and F-Class competitors shooting without eye protection. We’ve heard all the excuses, yet none of them trump the safety considerations involved.


 Team USA Olympian and


 Here’s a tip for guys who shoot the 6 PPC, 6 Dasher, 6 BRA, .284 Shehane, or other wildcat cartridges that require fire-forming. Use your fouler shots to fire-form new cases. That way your fouler shots do “double-duty” and you get your brass fire-formed without putting extra rounds through your expensive barrel.


