Hornady is now the official Title Sponsor of the Precision Rifle Series. This is a major step up in sponsorship levels for Hornady. Previously Hornady sponsored special events such as the Precision Rifle Challenge. Now Hornady will be the lead sponsor of all PRS centerfire events. Hornady Marketing Director Neil Davies stated: “We are excited for the opportunity to be the Title Sponsor of the Precision Rifle Series. Being the Official Bullet and Official Ammunition of the PRS and becoming the Title Sponsor solidifies our commitment to the sport and the PRS as an organization.”
Ken Wheeler, PRS Director, stated: “We are beyond thrilled to officially announce our 2024 partnership with Hornady as our Title Sponsor and the Official Bullet and Ammunition of the Precision Rifle Series. Hornady is an industry leader and very involved in the PRS community, their … award-winning match bullets and ammunition make them exceptional partners of the largest precision rifle organization[.]”
Hornady A-Tip Match Is Official Bullet of PRS
In connection with Hornady’s sponsorship, the Hornady A-Tip® Match has been named the official bullet of the PRS centerfire series. And Hornady MATCH ammo has been listed as the official PRS factory ammunition. NOTE: This does not make the use of A-Tips or Hornady Ammo mandatory in any respect, but these products will be promoted in connection with Hornady’s PRS sponsorship efforts.
We have shot Hornady A-Tip bullets in various platforms and have been impressed. The BCs are very good and A-Tips are capable of excellent accuracy if you inspect the tips for imperfections and sort the bullets by weight and base-to-ogive measurement. These A-Tips represent a significant design effort by Hornady: “Years of research and testing by the Hornady Ballistic Development Group, combined with advanced manufacturing processes and quality control measures, have led to the creation of the ultimate low-drag, high-performance A-Tip® Match bullet.”
In recent seasons, Hornady has sponsored PRS events such as the Precision Rifle Challenge.
Founded in 1949, Hornady Manufacturing Co. is a family-owned business based in Grand Island, Nebraska. Proudly selling Made-in-USA products, Hornady Manufacturing is a world leader in bullet, ammunition, reloading tool, accessory, and security product design and manufacturing.
Happy Valentine’s Day
Today is February 14th, Valentine’s Day. To celebrate this romantic holiday, talented shooter Kirsten Joy Weiss has devised a cool trick shot with her .22 LR Volquartsen semi-auto rifle.
Kirsten wants to create a heart on a paper card. Braving winter weather, Kirsten drills three shots into a heart shape on her target. This trick shot is performed, Kirsten adds, “for the love of shooting”.
See more cool trick shots on Kirsten’s popular YouTube Channel which now boasts 339,000 subscribers. Learn more about Kirsten’s shooting background on her website, KirstenJoyWeiss.com.
Brownells is a well-known retailer of guns, gun parts, tools, accessories, ammo, and pretty much everything gun-related. What you may not know is that Brownells has a very active video production department that releases new “how-to” and product information videos every week. These videos offer helpful advice on gun cleaning/maintenance, reloading, as well as selecting/assembling components for various kinds of rifles. And every week Brownells serves up a new products video. There now over 3000 videos on the Brownells YouTube Channel, a great resource.
Here are six of our favorite videos from Brownells. There’s a helpful guide to scope installation, AR owners will find some good advice on spare parts, new reloaders can learn how to use the OAL tool, and all gun owners should watch the video on ammunition storage.
Scope-Mounting — Common Mistakes to Avoid
Always be careful when mounting a rifle scope. This isn’t a super-complex or highly technical task, but there are ways you can mess it up. This video explains common pitfalls to avoid when mounting a scope.
1. Make sure the rings don’t touch ANY part of the turret housing, objective bell, or eyepiece.
2. Be certain the scope rings are tightly clamped to the scope base. Grasp the scope with one hand and the rifle with the other, then ensure there is no play.
3. Make sure there’s clearance between the objective bell and the rifle. No part of the scope should touch the rifle itself.
4. NEVER over-tighten the scope rings. You can actually crush the scope tube and damage the optic beyond repair. Stick to the torque specs!
How to Use Hornady OAL Tool and Hornady Bullet Comparator
Gun Tech Steve Ostrem explains how to properly use Hornady’s Overall Length Gauge to determine length-to-land precisely. The OAL Gauge uses a “Modified Case” that threads onto the tool and holds a bullet. Push on the back of the gauge until you feel the bullet just touch the rifling. (We do this gently at first, tapping the rod a couple time to ensure the bullet is aligned correctly). Once you’ve got the length, then use the tool with a comparator on your calipers to get the length-to-lands. NOTE: We recommend taking the measurement 3-4 times in a row to get a reliable number. With a little practice your should be able to get repeatable measurements within .0015″.
Air Travel with Firearms — Key Regulations You Must Follow
You can travel on commercial airlines with firearms. But you must follow the TSA regulations, and your particular airline’s rules. First, make sure your guns are UNLOADED before your leave home. Guns need to be carried in proper hard-sided cases that cannot be pried open. Be prepared to unlock the case if the TSA wants to inspect what’s inside. TSA agents can cut the locks if they need to open the case but can’t locate you. If you use special TSA-approved locks, TSA agents have master keys that let them open the case without destroying your locks. You CAN transport up to 11 pounds of ammunition — with restrictions explained in the video.
How to Store Ammunition Safely and Securely
This has been one of the most popular Brownells videos — with over 1.7 million views. Here’s the deal — ammunition WILL keep for a long time if you store it properly. DO store ammunition in a cool, dry place that doesn’t have wide temperature swings. Temperature cycling will also degrade primers and powder. Put it in airtight ammo cans to keep out the moisture. Tupperware containers will work too. Brownells also recommends putting moisture-absorbing silica packs in your ammo containers. DON’T just keep ammo in factory cardboard factory boxes stacked in the basement, attic, or garage (especially on the floor). Factory ammo boxes can absorb moisture which can degrade primers and corrode the brass cases. Yes, sealed military ammo will usually handle this kind of storage for quite a while, but it’s still not wise.
Must-Have Spare Parts for AR-Platform Rifles
In this video, two knowledgeable gun techs answer the question: “What spare parts should I keep on hand for my AR-15?” On the list are: Gas Rings, Buffer Spring, Extractor Spring and Pin. NOTE: You may want to try the one-piece spiral gas ring rather than the standard rings which require alignment. The cotter pin and cam pin can also easily get lost when the Bolt Carrier Group is disassembled for cleaning. On the lower receiver you’ll want spare springs and detents for the pivot/takedown pins. If you’re using lighter-power springs, keep standard-power spares on hand. If your rifle stops working, swap in the factory-spec springs to find out if the problem is the gun or your ammo. Also, if you have upgraded your trigger, always keep the original trigger as a backup.
Cleaning Advice for .22 LR Rimfire Rifles
Gun Techs Steve Ostrem and Caleb Savant debunk some myths about cleaning .22 LR barrels. One myth is that cleaning will harm the accuracy of a .22 LR barrel. Caleb thinks this myth is the result of people cleaning a barrel from the muzzle and damaging the muzzle crown, which CAN diminish accuracy. If it’s done right, cleaning won’t damage the bore. However, you certainly do NOT have to clean your 22 LR’s bore every time you go to the range. But DO clean the action every time you shoot the rifle, especially on a semi-auto. What about shooting a lot of lead bullets? Won’t that lead up the bore? The guys give us the straight skinny on lead fouling, too. When you see your .22 LR rifle’s groups opening up, you may want to consider cleaning.
This article is Copyright 2023 AccurateShooter.com. Reproduction on any other website gives rise to monetary damages.
At the request of our readers, we provide select “Deals of the Week”. Every Sunday afternoon or Monday morning we offer our Best Bargain selections. Here are some of the best deals on firearms, hardware, reloading components, optics, and shooting accessories. Be aware that sale prices are subject to change, and once clearance inventory is sold, it’s gone for good. You snooze you lose.
NOTE: All listed products are for sale to persons 18 years of age or older. No products are intended for use by minors.
1. Bullet Central — Berger Bullets Promo, All Calibers
⏺ Great bullets in stock at very competitive prices
Bullet Central has a very large selection of Berger bullets in stock right now. You’ll find great prices on match bullets in popular .224, 6mm, 6.5mm, 7mm, and .30 Calibers, starting at just $37.99 for 80gr 22-Cal VLDs. If you shoot a 6mmBR, Dasher, or 6GT, grab some 105gr Hybrid targets for $56.99. In addition, Berger hunting bullets — such as the 185gr .30-Cal Classic Hunter — are offered at good prices.
⏺ Fast, programmable, accurate dispenser at great price
The Frankford Arsenal Intellidropper is a high-quality powder scale/dispenser. It’s accurate to +/- one-tenth of a grain, dispenses in seconds, and can be controlled by a handy mobile App that stores charge weights for different cartridges. This unit has a 7000-grain capacity with both auto and manual trickle capability. This is a fine deal now at Natchez — you save $50 (22%) off the regular $229.99 price. The same Intellidropper is currently $199.02 on Amazon.
3. Midsouth, Powder Valley, Graf’s — Rifle Primers in Stock
⏺ Get Small Rifle Primers including popular CCI, Federal, and Remington
For the past few years, primers have been hard to find at reasonable prices. Now we are finally seeing ample inventory. Right now you can get a wide range of Rifle, Pistol and Shotshell Primers at Midsouth starting at $69.99/1000. In stock now are leading US-made brands CCI, Federal, and Remington. In addition, Midsouth has large inventories of Aguila, Fiocchi, and Unis primers. Another option are RUAG Small Rifle Primers at Powder Valley, priced at $184.99 for 2500, which works out to $75.00 per 1000. If you need large rifle primers, Graf’s has Unis Ginex large rifle, 5000 for $535.00.
4. CDNN Sports — Winchester Wildcat with Optic, $229.99
⏺ Fun rimfire rifle complete with optic — good owner reviews
Here is a fun little semi-auto .22 LR rifle at a crazy low price — $229.99 complete with a mounted Red Dot Reflex optic. The Winchester Wildcat takes Ruger 10/22 mags, and has some great features, such as field-removable lower receiver, ambidextrous controls, integral Picatinny rail, and rear barrel access. It has a good trigger and shoots well. In many respects the Wildcat beats the Ruger 10/22 while costing a lot less. If you don’t need the optic, you can get a basic Wildcat for $219.99 with Strata camo stock or $234.99 with Strata camo stock and threaded barrel.
⏺ Very rugged, full-featured TSA-approved roller case
Whether flying or just transporting your rifles to the range it’s important to protect them with a rugged, quality gun case. The solidly-built HQ Issue 41″ Tactical Rifle Case (#ad) meets all the TSA requirements and can withstand tough treatment. Offered in Flat Dark Earth (tan), this waterproof case has rollers to ease movement through the airport. Handy pick-n-pluck foam allows a secure custom fit for your firearms. NOTE: This case is 41″ overall so it will NOT fit long-barrel competition rifles unless the action is separated from the stock/chassis. For larger rifles, one good option is the Eylar 53″ Protective Roller Rifle Hard Case priced at $199.99.
6. Palmetto SA — AR15 Complete Stealth Lower (Blem), $139.99
⏺ GREAT deal on complete lower with full trigger group and adjustable stock
With changes to Federal law looming on the horizon, it may be wise to get your Black Rifle now. Here is a great deal on a complete lower with stock. The PSA AR-15 MOE Stealth Lowers include full installed trigger group, plus a nice, adjustable MagPul MOE buttstock. The prices are super low because these “blem” lowers may have a small scratch or blemish somewhere. Get the Black Stealth AR Lower for $139.99 or select the Flat Dark Earth AR Lower for $149.99.
7. Bass Pro — 9mm FMJ Pistol Ammo, $0.30/Rd ($14.99/50)
⏺ Very good prices on good quality 9mm FMJ ammunition
Need 9mm ammo for practice or action pistol competition? Right now Bass Pro has some great deals on good quality, brass-cased FMJ 9mm Luger ammunition. Choose CCI 124gr FMJ at $14.99/50rds, Winchester 115gr FMJ at $14.99/50rds, or Herters 115gr FMJ at $26.99 for 100 rounds.
When traveling by air with a handgun, the pistol must be in a case with a TSA-approved lock. The Snapsafe Treklite XL Lock Box complies with TSA rules. It will hold two compact pistols or one larger pistol with magazing (which must be UNLOADED). Made with a strong polycarbonate case, This lightweight (2.2 lb) lock box is one-third the weight of a steel box. Right now the Treklite XL FDE Lock Box is just $29.99 at Midsouth, 25% OFF the regular price.
9. Amazon — KUBEI USB Rechargeable Digital Scale, $24.99
⏺ Compact scale with USB-rechargeable battery at great price
Everyone can use an inexpensive, compact scale for loading at the range or sorting bullets or maybe even primers. One very affordable option KUBEI USB Rechargeable Digital Scale (#ad). Unlike most other inexpensive digital scales, this comes with a large dust cover with a “window” for your powder pan. Notably, this scale can be conveniently recharged with a standard USB cable — no batteries to replace ever! We have heard positive reports from Forum members about this $24.99 portable scale, which offers 9 types of weight units, calibration weight, and fold-down protective lid.
10. Palmetto SA — Walker’s Muffs + Safety Glasses, $15.99
⏺ Killer deal on hearing and eye protection combo
Is it time to replace your hearing and eye protection? Or perhaps you could use an extra set for friends? Check out this Walker’s Ultra Slim Muff & Glasses Combo. You get good quality 27dB NRR (Noise Reduction Rating) muffs AND a set of ANSI Z87.1-rated shooting glasses — all for just $15.99. That’s a great price for essential safety items. Shooters should always have both eye and ear protection whenever at the range.
As an Amazon affiliate, this site can earn revenues through sales commissions.
Editor: Many new barrels will deliver higher velocities with the same load after 100-150 rounds through the bore. The exact reasons for this speed-up are not 100% certain, and velocity increases (if any) will vary from one barrel to the next. But this “speeding up” phenomenon is common, so be prepared if this happens with your next barrel. If you do experience a significant velocity increase you should probably re-tune your load AFTER the velocity stabilizes at the higher level.
From the Sierra Bullets Blog Article by Mark Walker, Sierra New Product Development Director
In a previous post, I discussed a couple of methods to tune a load to your barrel to help achieve the best accuracy possible. People most often work on load tuning if they get a new rifle or have a different barrel installed. In both instances, the barrel is new and has not been fired very much. According to most competitive shooters, this is the most accurate your barrel will ever be, so getting it tuned and shooting accurately is a priority.
The Speed Up Phenomenon After 100-150 Rounds
Even though after you work up a load and your new barrel is shooting great, a lot of shooters notice that at around 100 to 150 rounds their rifle may stop shooting as accurately. I had this happen to a rifle and I was confused as to why something that worked so well to begin with would all of a sudden quit shooting. I decided to break out the chronograph to do another load work up to see what was going on. To my surprise, the velocity had increased around 80 fps over the original velocity! After performing another ladder test and adjusting the seating depth, the rifle was once again shooting well.
There are several thoughts on why this may happen, however, you can rest assured that it does happen. One thought is that as the barrel breaks in, the tooling marks in the throat of the chamber smooth out and allow less resistance to the bullet as it exits the bore thereby increasing speed. Another idea is that the throat area starts to get a little rough which in turn causes more resistance which increases pressure and therefore more velocity. I’m sure there are some out there who have a better understanding as to why this happens, but it can definitely affect the accuracy of your rifle. So be aware and never be afraid to rework a load to keep your rifle in tune.
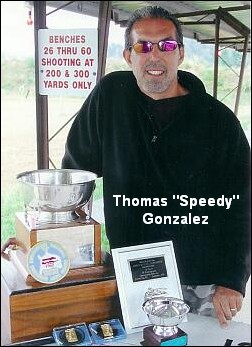
Experts Confirm That Barrel Speed-Up Is Common Two respected shooters have observed an increase in velocity with new barrels, typically after 100 rounds. Gunsmith and Hall-of-Fame benchrest shooter Thomas “Speedy” Gonzalez has documented barrel speed-up with testing. Moreover, Speedy’s bore-scope barrel inspections revealed a smoothing of the barrel lands. Jim See, a top PRS competitor, has encountered barrel speed-up many times. Accordingly, he re-tunes his load at 150 rounds.
“Alex Lipworth and I documented this phenomenon about four years ago and I have told all my customers about this. My son Mikee would shoot 100 rounds through all new barrels we planned on shooting before we would begin to do load development. We had a shooting snail that caught all the bullets set up in front of an indoor bench. We called it a wear-in process because upon careful examination of the bore when the ‘Speed Up’ takes place the cut-rifled bore resembles that more of a button-rifled barrels with the lands taking on more the softer look of a buttoned bore.” — Speedy Gonzalez
“Seen it [barrel velocity increase] too many times to count. All my match barrels get a ‘generic round’ loaded for them, which has worked well in barrels historically. After I hit 150 rounds I fine-tune the load and never look back, until the tube starts to slow down at it’s life end.” — Jim See
Let’s face it, shooting the same bullseye or grid targets over and over again can get boring. Here’s a unique set of Playing Card Targets, courtesy of the NRA. With very cool graphics and a page-filling design, these eye-catching targets can work both indoors and outdoors.
At 100 yards, these are fun scoped rifle targets — you can aim at the small circles or dots on each target. Indoors, with a pistol, just aim for the larger graphic elements, such as the red hearts or black diamonds. If you have access to a color printer, these targets look great.
The NRA Blog published this nice set of super-sized playing card targets. These boast a variety of aiming points (large and small) so they work well for rifles as well as pistols. On the Queen of Diamonds, aim for the large bull-style designs in the “red zone” or aim for the smaller dots on the periphery. For a real challenge, try to shoot each one of the 26 small red diamonds in the curved, central white stripes.
On the Five of Clubs target, you can aim for the smaller club symbols, or shoot for the orange, purple, and green “dripping paint” bulls in the large, central club. The Ace of Spades target offers a colored bullseye in the center, plus a very small bullseye in the letter “C”. That should provide extra challenge for those of you with very accurate rifles. Enjoy these targets.
Do you have .20-Cal fever? Do you yearn to see what a 4200+ fps projectile can do to an unsuspecting prairie dog? Well you could go out and purchase a 204 Ruger rifle, fork over the money for a new, complete die set, and hope that the brass is in stock. Warren B (aka “Fireball”) has a more cost-effective solution. If you have .223 Rem dies and brass, all you need to shoot the 20 Practical is a new barrel and a .230″ bushing to neck down your .223 Rem cases. Warren’s wildcat is simple, easy, and economical. And the 20 Practical matches the performance of the highly-publicized 20 Tactical with less money invested and no need to buy forming dies or fire-form cases. Warren’s cartridge was aptly named. Practical it is.
20 Practical Tikka Bolt Action for Varminting
by Warren B (aka “Fireball”) and Kevin Weaver
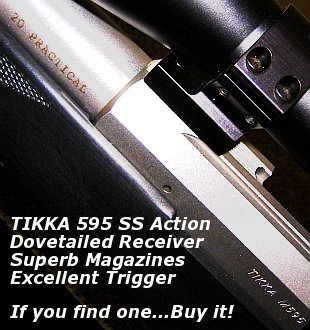
After building my 20 PPC, I wanted to do another .20 caliber, this time a repeater for predator hunting that could also serve as a gopher/prairie dog rifle. I wanted to use a Tikka M595 stainless sporter I had. This rifle is the ultimate repeater with an extremely smooth-feeding cycle from its single-column magazine. Since the Tikka was a .223 Remington from the factory, I first looked at possible case designs that would fit the magazine. The 204 Ruger was a very new round at the time and brass was scarce. I also didn’t care for the overly long case design or the standard throat dimensions of the cartridge. I then looked at the 20 Tactical. It was a nice cartridge but I didn’t like the fact that (at the time) an ordinary two-die Tac 20 set with just a plain full-length die and standard seater were $150. Not only did the costs bother me, but I was accustomed to using a Redding die set featuring a body die, a Type-S bushing neck die, and a Competition seater. To be honest, I also didn’t care for the 20 Tactical’s name–there is absolutely nothing tactical about the cartridge. I didn’t want to adopt a new cartridge based on what I perceived to be a marketing gimmick (that “tactical” title).
Warren B, aka “Fireball”, with his Tikka 595. With its smooth action and phenolic single-column mag, it cycles perfectly in rapid fire.
Simply Neck Down .223 Rem to Make a 20-223 Wildcat
I decided the best thing to do for my purposes was to simply neck down the .223 Rem case and make a 20-223. I already had the dies, the brass, and a rifle that would feed it perfectly. I decided to call the cartridge the 20 Practical because as you will see in this article, it truly is a very practical cartridge. In addition to the generous and inexpensive availability of brass and dies, the 20 Practical is an easy case to create, requiring no fire forming as a final step. Simply neck your .223 Rem cases down, load and shoot.
[Editor’s Note: Over the years, other shooters have experimented with .223 Remington cases necked down to .20 caliber, some with longer necks, some with different shoulder angles. Warren doesn’t claim to be the first fellow to fit a .20-caliber bullet in the .223 case. He gives credit to others who did pioneering work years ago. But he has come up with a modern 20-223 wildcat that involves no special case-forming, and minimal investment in dies and tooling. He commissioned the original PTG 20 Practical reamer design, and he and Kevin did the field testing to demonstrate the performance of this particular version.]
I chose Kevin Weaver at Weaver Rifles to fit and chamber the barrel to my rifle. Kevin does excellent work and is great to work with. Kevin liked the idea of the 20 Practical so much he agreed to purchase the project reamer. (BTW Kevin didn’t even need to purchase a Go/No-Go gauge, he just used an existing .223 Rem gauge.)
Before Kevin ordered the reamer, I talked over the reamer specs with him. My priorities were tolerances on the tight end of the .223 Rem SAAMI specification, a semi-fitted neck with no need for neck-turning, and a short throat so that we could have plenty of the 32gr V-Max in the case and still touch the lands. I also wanted this short throat in case [anyone] wanted to chamber an AR-15 for the 20 Practical. A loaded 20 Practical round will easily touch the lands on an AR-15 while fitting into the magazine with no problem. With its standard 23-degree shoulder, the 20 Practical case also feeds flawlessly through an AR-15.
As for the barrel, I only use Liljas on my rifles. I have had great luck with them. They have always shot well and they clean up the easiest of any barrels that I have tried. I had previously sent my Tikka barreled action to Dan Lilja so that he could program a custom contour into his equipment and turn out a barrel that would perfectly fit the factory M595 sporter stock. There isn’t much material on an M595 sporter stock so the contour had to match perfectly and it did. Dan Lilja now has this custom contour available to anyone who would like to rebarrel their M595 sporter with one of his barrels.
There Are Plenty of Good .204-Caliber Varmint Bullet Options
How to Form 20 Practical Cases — Simple and Easy
Forming 20 Practical cases is very easy. No fire-forming is required. Start with any quality .223 Rem brass. Then simply run the case into your bushing die with the appropriate bushing and call it done.
Project Componentry
My 20 Practical rifle started out as a Tikka Model 595 Stainless Sporter in .223 Remington. Though the M595 is no longer imported, if you shop around you can find M595 Sporters for bargain prices. Mine cost under $500. I think the action alone is worth that! The receiver has a milled dovetail for scope rings plus a side bolt release like expensive BR actions. The bolt cycles very smoothly. Ammo is handled with super-reliable 3- or 5-round detachable single-column magazines (FYI, Tikka’s M595 22-250 mags will feed a 6BR case flawlessly.) We kept the standard Tikka trigger but fitted it with a light-weight spring. Now the trigger pull is a crisp 1.8 pounds–about as good as it gets in a factory rifle. We replaced the factory tube with a custom, 24″, 3-groove Lilja 12-twist barrel. Dan Lilja created a special M595 sporter contour to allow a perfect “drop-in” fit with the factory stock. For optics, I’ve fitted a Leupold 4.5-14x40mm zoom in low Talley light-weight aluminum mounts. All up, including optics and sling, my 20 Practical weighs just under 8.5 pounds.
Test Report–How’s It Shoot?
I sent the barrel and barreled action to Kevin and in a very short time it was returned. Kevin did a perfect job on the rifle. I had asked him to try to match the bead blasted finish of the Tikka when he finished the new barrel. It came out perfect and the only way one can tell it is a custom is the extra two inches of length and the “20 Practical” cartridge designation.
So, no doubt you’re asking “how does she shoot?” Is my “prototype”, first-ever 20 Practical an accurate rig? In a word, yes. Even with the standard factory stock, and light contour barrel, it can shoot 3/8″ groups. Take a look at the typical target from this rifle. This is from an 8.5-pound sporter with a very skinny fore-end and a factory trigger.
Gunsmith’s Report from Kevin Weaver The 20 Practical: Origins and Development
Editor’s NOTE: We can’t say for sure who first necked down the .223 Rem to .20 caliber and chambered a rifle for that wildcat (as opposed to the .20 Tactical). But here is an account from way back in 2006 when the Warren B first came up with the idea of a .20 Practical cartridge, complete with reamer specs.
A year ago I received a call from Warren with a great idea. Warren asked “Why couldn’t we simply neck down the .223 Remington case to 20 caliber and get basically the same performance as the 20 Tactical? This way you can forgo the expensive forming dies that are needed for the 20 Tactical.” The idea made perfect sense to me, and I saw no major technical issues, so we got started on the project. I ordered a reamer from Dave Kiff at Pacific Tool & Gauge (PTG) with a .233″ neck. The .233″ neck should allow for a simple necking-down of the 223 Remington case to produce the 20 Practical in just one step. No fire-forming necessary! Furthermore, the PTG 20 Practical reamer Dave created should work with any available .223 Rem brass, commercial or military.
The first 20 Practical round was launched down range (through Warren’s Tikka) just a few months later. The brass formed as easily as expected. All one needs is a Redding type “S” bushing die with a .230 bushing and with just one step I had a .20 caliber case ready to shoot. Warren is brilliant. [Editor’s Note: We concur. For more details on Warren’s case-forming methods and his tips for adapting .223 Rem dies, read the technical sections further down the page.]
It would be almost six months later until I got around to building a dedicated test rifle chambered for the 20 Practical. I used a Remington 722 action, Remington synthetic semi-varmint stock, and a 24″ Douglas stainless steel XX 12-twist barrel. I formed and loaded about 30 cases using Remington brass in about 20 minutes. I used a .223 Rem seating die to seat the 20 Practical bullets. The .223 seating stem seated the small 20-Cal bullets just fine. The first loads sent the 40gr Hornady V-Max bullets down range at a modest 3500 FPS. I did not shoot for groups. I just wanted to use this load to sight in the rifle and break in the barrel. Load development was painless–I used reduced .223 Rem loads for 40gr bullets and worked up from there. In the table below are some of my preferred loads as well as Warren’s favorite recipes for his 20 Practical.
Bullet Wt.
Powder
Charge Wt.
Velocity FPS
Comments
32GR
H4198
24.1
4025
Warren’s lighter gopher load
32GR
AA2460
27.8
4154
Warren’s coyote/prairie dog load
32GR
N133
26.0
4183
Coyote/PD load, clean burn
33GR
H4198
26.0
4322
Hot Load. Use with Caution!
33GR
N133
27.0
4255
Kevin: 0.388” 5 shot group
40GR
H335
25.0
3583
Kevin’s barrel break-in load
40GR
H4198
24.0
3907
Hodgdon “Extreme” Powder
40GR
IMR4895
26.0
3883
Kevin: 0.288″ 5-shot group
40GR
N133
25.0
3959
Kevin: 0.227″ 5-shot group
Warren’s Load Notes: My pet loads are all with IMI cases, 32gr Hornady V-Maxs, and Fed 205 primers (not match). These are the most accurate loads in my rifle so far. I haven’t even bothered with the 40s as I have the 20 PPC and 20 BR for those heavier bullets. I prefer the lighter bullets in the 20 Practical because I wanted to keep speed up and recoil down in this sporter-weight predator rifle. Also, the 32gr V-Max is exceptionally accurate and explosive. I like N133 the best as it burns so clean. IMI cases are tough and well-made.
Kevin’s Load Notes: I used Remington 223 cases, Hornady V-Max bullets, and Remington 6 1/2 primers to develop the above loads. CAUTION: all loads, both Warren’s and mine, should be reduced 20% when starting load development in your rifle. All load data should be used with caution. Always start with reduced loads first and make sure they are safe in each of your guns before proceeding to the high test loads listed. Since Weaver Rifles has no control over your choice of components, guns, or actual loadings, neither Weaver Rifles nor the various firearms and components manufacturers assume any responsibility for the use of this data.
Comparing the 20 Practical and 20 Tactical
Kevin tells us: “The 20 Practical and the 20 Tactical are almost identical cartridges. There are only slight differences in case Outside Diameter, shoulder angle, and case body length. The neck length on the 20 Tactical is a bit longer, but there is still plenty of neck on the 20 Practical to grip the popular bullets, such as the 32gr V-Max. Here are some specs:
Cartridge
Bolt face to shoulder
Shoulder O.D.
Shoulder Angle
Total length
20 Tactical
1.5232″
.360
30°
1.755″
20 Practical
1.5778″
.3553
23°
1.760″
Both the 20 Tactical and the 20 Practical are fine .20 caliber cartridges. Early on, the 20 Tactical was the more popular of the two because it had more publicity. However, my favorite would be the 20 Practical. Warren’s 20 Practical gives the SAME performance as the 20 Tactical without fire-forming, or having to buy expensive forming dies. So with the 20 Practical you do less work, you shell out a lot less money, yet you give up nothing in performance. What’s not to like? To create 20 Practical cases, just buy a .223 Rem Redding Type “S” Bushing Die set with a .230 or .228 bushing and have fun with this great little cartridge.”
A while back, Cal Zant at PrecisionRifleBlog.com did a big muzzle brake comparison test. Along with measuring recoil reduction, Cal’s team recorded sound levels in PRB’s exhaustive muzzle brake field test. In the PRB archives you’ll find comprehensive muzzle brake sound test results, with hard data on 20 different muzzle brakes.
Sound can be a tricky subject, but Cal Zant, the editor of PrecisionRifleBlog.com, presents everything an informed shooter should know about muzzle brake noise in a straightforward and practical way. Most sound tests are measured from the side of the muzzle, in accordance with mil-spec standards, and Cal did that. But he also measured the sound level of each brake from behind the rifle, closer to the shooter’s position. This provides a more accurate indicator of the actual sound levels that firearms operators will encounter while shooting their rifles.
Muzzle brakes ARE really loud — that’s something most active shooters have observed. But this study finally gives us some hard data and makes objective comparisons. The difference between brakes was quite significant. Some brakes were ear-splitting — more than twice as loud as other brakes tested.
As a bonus, Cal also provides data on how the new Ultra series suppressors from Thunder Beast Arms Corp (TBAC) compare in terms of sound level behind the rifle.
SHOT Show 2024 had thousands of new products on display, including interesting lightweight hunting rifles, innovative optics-ready pistols, cool new compact Radar chronographs, and a variety of high-quality optics. In today’s video showcase we feature four new product videos from SHOT Show 2024. Plus we include a fifth bonus video — an interesting interview with Montana Governor Greg Gianforte.
Backfire (Jim Harmer) Channel at SHOT Show
Here’s a lengthy, 41-minute video from the Backfire YouTube Channel. Host Jim Harmer (a bright chap and trained attorney) visits dozens of booths to showcase new firearms and new products. This video is worth watching start to finish (but perhaps in multiple sessions). Hunters should check out the offerings from Tikka (13:57), Howa (16:54), Savage (18:27), and Bergara (25:56). If you’re considering buying a new chronograph, check out the hot-selling Garmin Xero C1 (8:08 time-mark) and brand new, compact LabRadar LX (7:42 time-mark).
Classic Fireams — Rifles, Pistols, and Vivek Ramaswamy
Here is another lengthy video that covers a wide variety of products and includes an interview with the very bright and articulate Vivek Ramaswamy, who was a Republican presidential candidate. The interview with Vivek starts at the 10:55 time-mark. In the gun realms, there were some interesting rifles shown by Stag Arms (13:48), and upper receivers and stock accessories from VLTOR (28:39). And at 17:18, new pistols from Ed Brown are featured. The video begins with new suppressors for HUXWRX at 2:23.
2:23 HUXWRX
10:55 Vivek Ramaswamy Interview
13:48 Stag Arms
17:18 Ed Brown
24:10 Shadow Systems
28:39 VLTOR
40:24 Modlite
46:20 Hi-Point
48:38 Toast Target
57:26 Range System
March Scopes — F-Class John interviews Gary Costello
Our friend F-Class John visited the March Optics booth to interview UK Ace F-Class shooter Gary Costello and March representative Mary, who traveled from March headquarters in Japan. John and Gary talked about the March-X 8-80x56mm Majesta “High Master” scope which John has fitted on his own match rifle. This is an amazing SFP optic offering a full 10X magnification range and six reticle choices.
New Handguns from SHOT Show — James Reeves of TFB-TV
In this video, James Reeves of The Firearm Blog (TFB-TV) reviews five notable new or recently-updated pistols. James uses some fairly rough language at times, but he is a knowledgeable fellow who gets to shoot more different guns in a year than most of us can shoot in a decade or more. The five featured pistols are: Smith & Wesson “Ultimate Carry” Revolver (00:46), Zev OZ9c (his favorite of the show (2:20), Beretta PX4 Compact Carry 2 (3:33), Daniel Defense H9 (4:36), Beretta 30X Tomcat (see below).
Bonus: Interview with Montana Governor Greg Gianforte
Montana Governor Greg Gianforte attended the 2024 SHOT Show and joined the NSSF tems to discuss the Second Amendment rights of Montana citizens and the importance of the firearm industry to his state. We wish more states had leaders like this who understand the heritage of the Second Amendment and how hunting fees support wildlife conservation efforts. If you can’t load this Facebook Video, CLICK HERE for YouTube version.
The National Shooting Sports Foundation (NSSF) has prepared tips for gun owners transporting firearms in their vehicles. Whenever you are driving with guns (of any kind), the firearms should be transported securely. In some states, the firearms must be in locked cases inside the vehicle. And, with the rise of break-ins on parked vehicles, it’s important to keep gun cases out of sight if possible. This article has tips on safe and secure gun transport.
HERE Are Key Guidelines for Safe, Secure Handling of Firearms in Vehicles:
• Take note of and safely control the muzzle direction of firearms in vehicles. This is one of the main rules of gun safety and applies to the inside of vehicles as well as any other location.
• When finished using your firearm outside your vehicle, unload it before you re-enter your vehicle.
• Even after a long hunt or a day in the sun at the range, always check, and then double check, that guns are unloaded before placing them in a car or truck.
• Be very careful if you must unload a firearm in the confined space of a vehicle so as not to have an accidental discharge. If your location allows, it is safer and easier to unload the firearm outside the vehicle.
• Never leave firearms in parts of the vehicle accessible to children or pets.
• Keep firearms and ammunition out of sight to avoid tempting thieves.
• Use secure temporary storage for firearms in vehicles.
• A lockable gun case or a lock box may be the most practical choice to securely store a gun in a vehicle. These come in a range of prices and models.
• If you’re concerned about quick access to your firearm, many types of lockable safes allow for extremely fast access of your gun while at the same time helping to prevent unauthorized access.
• Secure the lock box to the vehicle, if possible. Some companies make custom concealed compartments for specific model vehicles.
Storing Firearms in Vehicles to Prevent Theft and Misuse
We travel with our firearms all the time, taking them to the range, on hunting trips or carrying them on our person, as permitted by law. When you are transporting guns, the last thing you want is to have your gun stolen and potentially misused by a criminal. In some states, you could even be subject under the law to serious penalties and fines for failure to properly secure a firearm. Unfortunately, thefts of firearms from vehicles are on the rise. Thieves commonly steal cars and trucks even when they don’t obviously contain firearms — a reminder that vehicle door locks are not totally secure.
When you are not in your vehicle, all firearms should be placed in locked storage and out of sight. Locking the doors on your vehicle does not constitute secure firearm storage. As one writer put it: As one writer put it: “Cars and trucks aren’t safes. And they’re not holsters. They’re not storage containers.”
The glove compartment or console of your vehicle, even if lockable, should not be considered a secure storage device either, as it can be pried open quickly and is the first place a thief might look. If you need to leave a handgun in a vehicle, we recommend putting the guns in secure case, preferably out of sight. Many vehicles have a compartment, above the spare tire storage recess, which can be secured.


 Hornady A-Tip Match Is Official Bullet of PRS

 Happy Valentine’s Day


 Two respected shooters have observed an increase in velocity with new barrels, typically after 100 rounds. Gunsmith and Hall-of-Fame benchrest shooter Thomas “Speedy” Gonzalez has documented barrel speed-up with testing. Moreover, Speedy’s bore-scope barrel inspections revealed a smoothing of the barrel lands. Jim See, a top PRS competitor, has encountered barrel speed-up many times. Accordingly, he re-tunes his load at 150 rounds.


 After building my 20 PPC, I wanted to do another .20 caliber, this time a repeater for predator hunting that could also serve as a gopher/prairie dog rifle. I wanted to use a Tikka M595 stainless sporter I had. This rifle is the ultimate repeater with an extremely smooth-feeding cycle from its single-column magazine. Since the Tikka was a .223 Remington from the factory, I first looked at possible case designs that would fit the magazine. The 204 Ruger was a very new round at the time and brass was scarce. I also didn’t care for the overly long case design or the standard throat dimensions of the cartridge. I then looked at the 20 Tactical. It was a nice cartridge but I didn’t like the fact that (at the time) an ordinary two-die Tac 20 set with just a plain full-length die and standard seater were $150. Not only did the costs bother me, but I was accustomed to using a Redding die set featuring a body die, a Type-S bushing neck die, and a Competition seater. To be honest, I also didn’t care for the 20 Tactical’s name–there is absolutely nothing tactical about the cartridge. I didn’t want to adopt a new cartridge based on what I perceived to be a marketing gimmick (that “tactical” title).
 Simply Neck Down .223 Rem to Make a 20-223 Wildcat
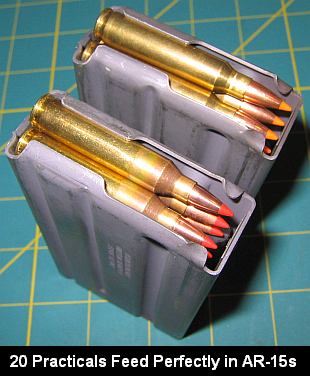 I chose Kevin Weaver at
 Project Componentry
 Test Report–How’s It Shoot?
 Comparing the 20 Practical and 20 Tactical


