Here’s a cool product that makes it easier to stow and/or transport your precious cleaning rods. Sure you can tuck a single rod in a gun case, but what if you want to carry a variety of rods to the range? This affordable MTM Gun Cleaning Rod Case (CRC) holds up to four (4) rods securely, and keeps solvent residues off your fine firearms. Click Here for Product Specs from MTM Case-Gard website.
MTM’s bright red Cleaning Rod Case (CRC) will hold four rifle or shotgun cleaning rods up to 47″ long. Each rod is held in an individual slot and there are foam inserts on either end, making transportation secure and rattle-free. You don’t have to worry about the rods banging into each other. We like the fact that MTM has cleverly included multi-sized “corrals” to hold patches from large to small. Plus there is plenty of room to hold jags and brushes.
We’ve used this cleaning rod case, now just $21.99 at Midsouth and can recommend it. Forum member TIMO agrees: “Just received one, 100% worth the investment. Got it from Midsouth Shooters Supply.”
MTM explains the benefits: “Long gun enthusiasts no longer have to fumble and search for miscellaneous cleaning equipment since it will all be in an easy to access container.”
MTM V.P. explains Gun Cleaning Rod Case Features:
MTM Cleaning Rod Case Features:
— Holds four rifle or shotgun cleaning rods up to 47.5″ long
— Padding holds rods in their own individual slots (Max handle diam. 1.4″)
— Compartments for storing patches, jags, and brushes
— Made of rugged polypropylene plastic
— Has hanging hole for wall storage
— Room for bore guides
A modern F-Class or Benchrest competition rifle can cost $4000.00 or more. Add $2500 for a top-tier scope and you can easily have $6500.00 or more invested in your rig. With that kind of money involved, you should transport that valuable rifle in a very high-quality case — one that is strong, durable, and secure. In addition, the case should have quality, customizable internal foam that cushions the barreled action, stock, scope, and key accessories.
These video reviews look at quality, durability, features, price, and other factors.
TSA-Approved Rifle Cases — Performance Tested
This very informative Warrior Poet Society video covers the key features you need with a rifle case used for airline travel. The reviewer explains the important TSA rules you need to consider when flying with firearms. The reviewer has used all kinds of cases to travel with his firearms on planes, over seas, across continents. In this video he reviews a range of cases — from basic affordable cases to high-end cases costing many hundreds of dollars.
Five Hard Shell Rifle Cases Showcased
This review looks at five (5) of the best rifle transport cases. The video considers key features including hinges, locks, padding, and wheels. The five cases reviewed are:
This 6.5-minute video covers five affordable hard shell cases ranging in price from $50 to $177. The video provides a good look at the external and internal features of these five cases, using mostly manufacturer-supplied video, including some field tests.
This video covers a unique large, long-gun case that holds multiple rifles in a vertical arrangement. The Case Club 4 Rifle/Shotgun Case holds up to 4 long guns, along with 3 pistols in a tough wheeled, waterproof case with a lifetime warranty. The case fits any rifle or shotgun under 41″ long, with room for for optics, foregrips, under-barrel attachments, pistol grips, and more.
The case itself is crushproof, waterproof, stackable, and TSA-approved. Dual purge valves keep moisture out while allowing the case to be opened in high or low altitude. The foam is long-lasting, oil-proof military grade polyethylene that won’t tear. This case is not cheap — it retails for $632.45.
Plano All-Weather Rifle Case — Great Protection for the Price
Plano cases offer excellent value for the money. Priced at $109.99 on Amazon (for 42″ model), the Plano All-Weather Tactical Gun Case offers a strong shell, tough hinges, and secure weather-proofing. The case has pre-perforated, pluck-to-fit foam for easy customization. This airline-approved case boasts a Dri-Loc seal providing a watertight, dust-proof shield that protects your firearms from water damage. For $30 more Plano offers the new All Weather Rustrictor Case with VCI-infused resin and foam emitter blocks that fight rust and corrosion.
Harbor Freight Apache 9800 Weatherproof Rifle Case
This video features the Harbor Freight APACHE 9800 Weatherproof Rifle Case. The reviewer states this very affordable $149.99 case has proven rugged, durable, and secure. This Apache 9800 case is offered in black, tan, and OD green. On sale for $149.99, this 53″-long case is $190.00 less than an equivalent-size Pelican case. Constructed from durable polypropylene, this quality hard case can protect long guns from from impact, moisture, and dust. The built-in purge valve equalizes pressure so you can open the case after changing elevations. NOTE: Case interior dimensions are 50⅜” by 13⅝”.
BONUS Videos — How to Cut Foam for your Gun Cases
For the best fit of your firearms and accessories in a foam-interior hard case, you should customize the foam to fit. Some cases have “pluckable” foam. With these you remove small squares one an a time until the stored items fit. With other cases with dense foam interiors, you’ll need to cut the foam to fit. Here are two videos that show the process of tailoring foam to a rifle using an electric cutting tool. Watch these videos carefully — they can really help create the best custom-fit for your firearms.
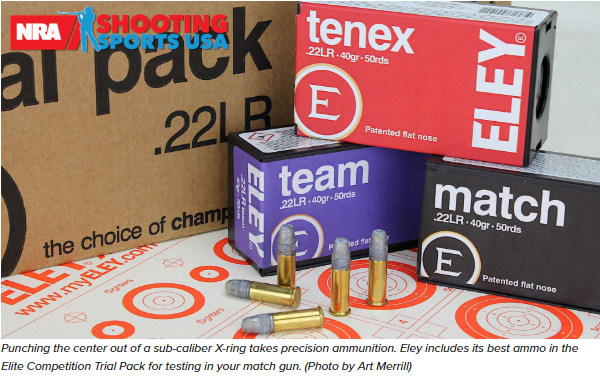
Are you getting started in .22 LR rimfire shooting? Or perhaps you just got a new rimfire rifle and want to find the most accurate and consistent ammo for your new rig? Well, here’s good news. ELEY has started selling 5-packs of select ammunition samples that let you easily acquire five different ammo types for testing and evaluation. This allows you to easily find optimal ammunition for their firearm. There are six different five-pack variations, created to make particular disciplines and budget levels. ELEY says: “Whether you’re an elite competitor, club shooter, or hunter, there’s a pack curated just for you.”
These four, 5-pack sets are offered online at Killough Shooting Sports. All four trial pack types are available currently. Prices range from $42.00 ($8.40 per 50ct box) to $80.00 ($16.00 per 50ct box). See the current Trial Pack offerings at Killoughshootingsports.com.
For more information about the four ELEY .22 LR ammo Trial Packs, visit SSUSA.org. On 9/17/2025 Shooting Sports USA released a detailed, 1580-word article about the ELEY Trial Packs with details about all the featured .22 LR ammo types.
TENEX Signature Pack
This premium pack features a range of velocity variants from ELEY Tenex, the world’s leading .22LR cartridge. Designed for athletes at the highest level, it allows competitors to match their firearm with the exact performance characteristics required for podium-winning precision.
Elite Pack
Premium Accuracy Showcase — This 5-pack has five of ELEY’s most trusted performance rounds: Tenex, Match, Team, Tenex Pistol, and Semi-Auto Precision. Ideal for competitive shooters seeking to refine their ammunition choice across disciplines.
Target & Club Pack
Choice for New Shooters and Clubs — This versatile 5-pack features ELEY entry-to-intermediate level ammunition at great value. Ammo types are: ELEY Club, Bullseye Pistol X, Semi-Auto Outlaw, ELEY Ultra, and ELEY Target.
Semi-Auto Precision Pack
For semi-auto firearm users — This specialized 5-pack includes ELEY Club, Force, Semi-Auto Outlaw, Contact, and Semi-Auto Precision. These ammo types are engineered for reliability and accuracy in semi-automatic platforms.
Hunting & High Energy Pack
For the field and beyond. This pack delivers good stopping power and performance, with Subsonic Hollow, High Velocity Hollow, Contact, Force, and ELEY Ultra included. These ammo types are optimized for hunters, steel shooters, and shooters seeking maximum energy transfer.
ELEY has a been a trusted rimfire provider for 198 years. “These packs were designed to give consumers an accessible way to explore all levels of the ELEY range, without committing to large case quantities,” said Michael Atkinson, Director at ELEY. “We’re confident that once a shooter finds the round that matches their firearm, they’ll experience the ELEY difference first-hand.”
Vertical stringing is a common problem that all precision shooters will face sooner or later. In addition to ammo inconsistencies, many other factors can cause vertical stringing. Accordingly, it’s important that you analyze your gun handling and bench set-up systematically.
EDITOR: Folks, READ THIS ARTICLE! You WILL benefit. There are some VERY important insights here. You’ll learn ways to set up your gun better, and check for various technical issues. That can save you time at the range and save you money spent on expensive bullets and powder.
In this article, Hall of Fame benchrest Shooter Speedy Gonzalez explains how to eliminate mechanical and gun-handling problems that cause vertical spread in your groups. Speedy’s article addresses the many human and the hardware factors that can cause vertical.
Speedy Gonzalez, noted shooter, gunsmith and member of the Benchrest Hall of Fame, offers these pearls of wisdom to help you eliminate vertical in your shot strings. Remember that vertical can result from myriad gear issues and gun-handling mistakes. Try to isolate one item at a time as you work to improve your groups.
BAGS and REST–VERY IMPORTANT
• Front Rest Wobble — You will get vertical if the top section of the front rest is loose. Unfortunately, a lot of rests have movement even when you tighten them as much as you can. This can cause unexplained shots.
• Rifle Angle — If the gun is not level, but rather angles down at muzzle end, the rifle will recoil up at butt-end, causing vertical. You may need to try different rear bags to get the set-up right.
• Front Bag Tension–Vertical can happen if the front sand bag grips the fore-arm too tightly. If, when you pull the rifle back by hand, the fore-arm feels like it is stuck in the bag, then the front bag’s grip is too tight. Your rifle should move in evenly and smoothly in the sand bags, not jerk or chatter when you pull the gun back by hand.
• Sandbag Fill — A front sandbag that is too hard can induce vertical. Personally, I’ve have never had a rifle that will shoot consistently with a rock-hard front sandbag. It always causes vertical or other unexplained shots.
• Bag Ears — If the channel between the Rear Bag’s ears is not in line with the barrel, but is twisted left or right, this can affect recoil and vertical consistency. And take note — if the bag is off-axis quite a bit, you can also get horizontal stringing.
• Reliability — ALL your bench equipment must work flawlessly. If it doesn’t, get it fixed or get rid of it. We need all our attention on wind flags.
GUN HANDLING and BENCH TECHNIQUE
• Be Consistent — You can get vertical if your bench technique is not the same every shot. One common problem is putting your shoulder against the stock for one shot and not the next.
• Free Recoil — Free recoil shooters should be sure their rifle hits their shoulder squarely on recoil, not on the edge of their shoulder or the side of their arm.
• Head Position — Learn to keep your head down and follow-through after each shot. Stay relaxed and hold your position after breaking the shot.
• Eyes — Learn to shoot with both eyes open so you can see more of the conditions.
• Last Shot Laziness — If the 5th shot is a regular problem, you may be guilty of what I call “wishing the last shot in”. This is a very common mistake. We just aim, pull the trigger, and do not worry about the wind flags. Note that in the photo above, the 5th shot was the highest in the group–probably because of fatigue or lack of concentration.
• Last Shot Low — I hear a lot of discussion about low shots in a group and apparently this occurs a lot on the 5th shot. If your 5th shot that goes out most of the time, you can bet you are doing something at the bench.
• Seating — When possible, bring your own stool so that you can sit comfortably, at a consistent height, every time you shoot.
LOAD TUNING
• Find the Sweet Spot — A load that is too light or too heavy can cause vertical problems. When you’ve tuned the load right, you should see a reduction in vertical. Even 0.1 grain may make a difference, as will small changes in seating depth.
• Primers — If you’re getting vertical, and everything else looks fine, try another brand of primers. And remove the carbon from the primer pockets so the primers seat uniformly every time.
• Case Prep — When you chamfer the inside of your case necks make sure they are smooth enough that they don’t peel jacket material off when you seat the bullet. Bullets with J4 Jackets (like Bergers) and Lapua Scenar bullets seem more prone to jacket scratching or tearing than Sierra bullets.
• Shell Holders — Keep shell holders clean, in both your press and priming tool. I have seen so much dirt/crud in shell holders that the cases end up get sized crooked because the rim is not square to the die.
• Water in Cases — I see people walking around with case necks turned up in the loading block. A lot of the time there is condensation dropping from the roof of your loading area. If one drop of water gets in a case you are in trouble. How many times have you had a bad low shot when it has been raining and you have been walking around with your cases turned up in your block?
MECHANICAL and HARDWARE ISSUES
• Barrel Weight — A lot of rifles are muzzle-heavy. Some rifles have too heavy a barrel and this causes vertical, especially when shooting free recoil. Basically the gun wants to tip forward. The remedy is to trim or flute the barrel, or add weight in the rear (if you can stay within weight limits).
• Unbalanced Rifle — If the rifle is not balanced, it does not recoil straight, and it will jump in the bags. If the rifle is built properly this will not happen. Clay Spencer calls this “recoil balancing”, and he uses dual scales (front and rear) to ensure the rifle recoils properly.
• Firing Pin — A number of firing-pin issues can cause vertical. First, a firing pin spring that is either too weak or too strong will induce vertical problems. If you think this is the problem change springs and see what happens. Second, a firing pin that is not seated correctly in the bolt (in the cocked position) will cause poor ignition. Take the bolt out of rifle and look in the firing pin hole. If you cannot see the entire end of firing pin it has come out of the hole. Lastly, a firing pin dragging in bolt or shroud can cause vertical. Listen to the sound when you dry fire. If you don’t hear the same sound each shot, something is wrong.
• Trigger — A trigger sear with excessive spring load can cause problems. To diagnose, with an UNLOADED gun, hold the trigger in firing position and push down on sear with your thumb. If it is hard to push down, this will cause vertical problems.
• Stock Flex — Some stocks are very flexible. This can cause vertical. There are ways to stiffen stocks, but sometimes replacement is the best answer.
SCOPE ISSUES
• Lock Rings — This year alone I have seen nine lock rings on scopes that are not tight. Guess what that does to your group? Make sure yours are tight.
• Big Tubes Need Tension — We’ve observed that some 30mm scope rings are not getting tight enough, and scopes are slipping in the rings under recoil. This will cause point of aim movement.
• Windage Bases — If you’re using a conventional-style single dovetail with rear windage adjustment, make sure both sides of the windage screws are tight. This can induce both windage AND vertical issues since the rear ring is held down by the windage tension.
AWARENESS of CONDITIONS and READING WIND
• Basic Wind-Reading Rule–If you do not know how to read wind flags or are very inexperienced, try to shoot your group with the flags all going in one direction.
• Rate of Fire — The longer you wait between shots when a condition is changing, the more the condition change will affect your shots.
• Look Far and Wide — Learn to look at the whole field of flags, not just the row in front of you. Many times a change quite a ways out will cause shot to go out of your group well before that change shows up in front of your bench.
• Don’t Fear the Wind — When you realize that the wind is your friend you will become a much better benchrest shooter. By this I mean that wind skills can separate you from other shooters who have equally good equipment. To learn how to read the wind, you must practice in challenging winds, not only in good conditions.
• Watch Wind Direction AND Velocity — Pay attention to angle changes on flags. Even though you see the same windspeed indicators, angle changes make a big difference in your groups.
• Watch While You Wait — Between courses of fire, whenever possible, watch conditions on the range. That way you will be aware of any changes in conditions since your last group and you will be mentally prepared for the new condition.
SPECIAL ADVICE for HUNTING RIFLES
• Clean That Barrel — Most hunting rifle barrels do not get cleaned enough. If you keep barrel clean it will shoot better for you. You should clean your barrel well after every 10 to 12 shots. If you’re lazy, just use Wipe-Out.
• First Shot Inconsistency — Most hunting rifles will not put the first shot (after cleaning) with the subsequent shots. So, after cleaning, if you have a rifle that tosses that first shot high or wide, then shoot one fouling shot before going hunting or before you shoot for group.
• Barrel Heat — Thin-contour “sporter” barrels WILL change point of impact as they heat up. When testing loads for your hunting rifle, take your time and don’t let the barrel get hot on you.
On some internet shooting forums, self-declared “experts” advise new rifle shooters to stick to low-end factory rifles. These “experts” (many of whom don’t own a single really accurate rifle), claim that it will take years for a new shooter to learn how to shoot a rifle accurately. So, the argument goes, the accuracy offered by a precision-chambered rifle, with a custom barrel, is “wasted” on a new shooter.
We disagree with that viewpoint, at least when it comes to rifles shot from a rest. We’ve seen relatively new shooters, with help from a skilled mentor, do remarkably well with precision rifles right from the start. With a good bench gun, many new shooters can shoot well under 1 MOA on the first day. Certainly it takes time for a complete novice to learn how to handle the gun and to work the trigger smoothly. However, this editor has personally seen some inexperienced shooters try their hand at benchrest shooting, and within few month they are doing very well indeed at club shoots.
Accurate Rifles Reward Progress As Novices Build Skills
For bench shooting, we think a highly accurate rifle is a much better training device for a new shooter than a typical, cheap factory sporter. With a gun capable of 1.5-2.0 MOA at best, you can never really determine if a “flyer” is you or the gun. Conversely, when a novice shoots a gun that can put 5 shots through one ragged hole, if a shot goes way high or low, the shooter knows his aim, trigger control, or gun-handling is to blame. He (or she) can then correct the problem. And when the shooter does everything right, he or she will see a nice tight group on the target. The accurate rifle provides more meaningful feedback and it rewards progress. That helps the novice become a better shooter in a shorter period of time.
A while back, Forum Member Preacher and his “bunny hugger” niece from California proved this point. The young lady, with almost no shooting experience, took Preacher’s 6-6.5×47 and shot a sub-quarter-MOA, 3-shot group at 350 yards. Don’t tell her she needs to stick to a cheap factory rifle. Preacher reports: “My niece flew in from the west coast and came up to visit. When she saw a few of my full-blown varmint rifles, she wanted to shoot one. She did a super job even if she IS a ‘bunny hugger’. She pulled the 1.5 ounce Jewell on a few fired cases to check out the trigger pull and then got in behind the gun and put three shots into a 350-yard target with a one-inch circle.” We measured her group at 0.822″ (0.224 MOA). Don’t tell Preacher that accuracy is “wasted” on novices. He joked: “I sure don’t want her shooting at me ….”
Rifle Features BAT Action, Krieger Barrel, and Russo Laminated Stock:
For those who are interested, Preacher’s rifle features a BAT 3-lug action, 30″ Krieger 7.5-twist heavy contour barrel, and Russo stock (with clear coat by Preacher). Chambered in 6-6.5×47 Lapua, this gun “shoots the 108gr Bergers very well” according to Preacher. Yep, we agree with that — even when a novice “bunny-hugger” does the trigger-pulling.
The last half-inch or so of your barrel is absolutely critical. Any damage (or abnormal wear) near the crown will cause a significant drop-off in accuracy. Here are ways you can check the end of your barrel, using a common Q-Tip.
Use Q-Tip for Barrel Inspection
To find out if you have a burr or damage to your crown, you can use an ordinary Q-tip cotton swab. Check the edges of the crown by pulling the Q-tip gently out past the edge of the crown. If you have a burr, it will “grab” the cotton and leave strands behind.
Larry Willis has another way to use a Q-Tip: “Here’s a neat trick that will surprise you with how well it works.” Just insert a Q-Tip into your barrel (like the picture below), and it will reflect enough light so that you can get a real good look at the last half inch of rifling and the crown of your barrel. In most cases you’ll find that this works much better than a flashlight. Larry tells us: “I’ve used this method about a jillion times. Q-Tips are handy to keep in your cleaning supplies anyway. This is a good way to judge approximately how well you are cleaning your barrel when you’re at the range. It’s also the best way to examine your barrel when you’re in the field.”
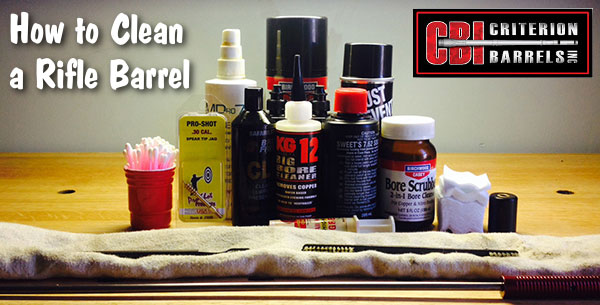
This article comes from the Criterion Barrels website. It provides good, conservative advice about barrel cleaning. Understand that cleaning methods may need to be adapted to fit the amount and type of fouling (and the particular barrel). In general, we do try to minimize brushing, and we follow the procedures Criterion recommends respecting the crown/muzzle. We have also had very good success using wet patches followed by Wipe-Out bore foam. Along with the practices outlined by Criterion below, you may want to try Wipe-Out foam. Just be sure to use a fitted cleaning rod bore guide, to keep foam out of the action recesses and trigger assembly.
The above video shows how to apply Wipe-Out or other bore-cleaning foam. We use a slightly different method. First, we use 3-4 wet patches to remove loose carbon fouling. Then we apply the foam as shown, but usually from the muzzle end (with bore guide in chamber). Here’s the important point — after 20-30 minutes, once the bubbles have dissipated, we apply the foam a second time, getting more of the active ingredients into the barrel. We then patch out, as shown, after 3-4 hours.
What is the Best Way to Clean a Rifle Barrel?
We are asked this question quite frequently alongside requests for recommended break-in procedures. Improper barrel cleaning methods can damage or destroy a barrel, leading to diminished accuracy or even cause a catastrophic failure. When it comes to barrel maintenance, there are a number of useful techniques that we have not listed. Some techniques may work better with different barrel types. This series of recommendations is designed to incorporate a number of methods that the Criterion Barrels staff has used successfully both in the shop and on their personal rifles. Please feel free to to list your own recommendations in the below comments section.
We recommend the use of the following components during rifle cleaning:
• Cloth patches (sized for the appropriate caliber)
• Brass jag sized properly for your bore
• One-piece coated cleaning rod
• General bore cleaner/solvent (Example: Hoppes #9)
• Copper solvent of your choosing (Example: Sweets/KG 12)
• Fitted cleaning rod bore guide
• Plastic AP brush or toothbrush
• Q-Tips
• Plastic dental picks
• CLP or rust preventative type cleaner
There are a number of schools of thought relating to the frequency in which a barrel should be cleaned. At minimum we recommend cleaning a barrel after each shooting session to remove condensation, copper, and carbon build-up. Condensation is the greatest immediate threat, as it can cause the barrel to rust while the rifle sits in storage. Copper and carbon build-up may negatively impact future barrel performance, increasing the possibility of a failure in feed or function. Fouling should be removed whenever possible.
The below tips will help limit the wear of different parts of your barrel during routine maintenance, helping extend the life of the barrel and improving its performance.
The Lands and Grooves
This portion of the barrel may experience reduced efficiency due to copper fouling and cleaning rod damage. If copper fouling takes place during the initial break-in of the rifle, make sure to check our barrel break-in article.
For regular maintenance we suggest using a single piece coated cleaning rod rather than the traditional segmented rod or bore snake. While segmented rods and bore snakes may be convenient for field use, the corners between the segments may bow out and catch on the lands, scraping along the length of the rifling. Residual grit and particles from expended cartridges may also get caught between segments, resulting in an abrasive surface working its way down the length of the barrel. Most bore snakes will remove significant amounts of carbon fouling, but may fall short in the removal residual carbon buildup and copper fouling during deep cleaning. Good rods can be sourced from multiple manufacturers, but we have found good results using both Pro-Shot and Dewey brand products.
General cleaning requires the use of patches rather than nylon or brass bore brushes. Brass brushes may be required when aggressive cleaning is required, but can lead to unnecessary wear on the barrel if used frequently. This is not due to the nature of the soft brushes themselves, but from the abrasive particles of grit that become embedded in the material that is being run repeatedly through the bore. We recommend the use of bore guides when cleaning from both the muzzle and breech. These bore guides will help serve to protect the crown and throat from cleaning rod damage.
If significant resistance develops while running the cleaning rod through the bore, no attempt should be made to force it in further. Back the rod out and inspect the barrel to determine the cause of the resistance. The jag may be pushing between a bore obstruction and the rifling, digging a divot into the barrel before pushing the obstruction back through the muzzle. One way to minimize the risk of a stuck rod is by utilizing a slightly smaller patch during the initial push.
The process of cleaning the length of the rifling is relatively straightforward:
1. Check to make sure the rifle is safely unloaded.
2. Carry out any necessary disassembly procedures prior to cleaning.
3. Remove bolt (if possible) and insert fitted cleaning rod bore guide in action.
4. Soak a patch in bore solvent (similar to Hoppes #9).
5. Center and affix the patch on the brass jag, inserting it into the chamber end of the barrel. A misaligned patch may cause the jag to damage the lands of the rifling, so make sure the patch is centered on the jag.
6. Run the patch the full length of the barrel, retracting it upon reaching the end of the muzzle.
7. Let the solvent sit for a minute.
8. Continue to run patches through the bore until carbon residue is minimized.
9. Run a dry patch through the bore to ensure carbon residue has been removed.
10. Soak a patch in copper solvent (Sweet’s or KG-12).
11. Run the patch through the bore, leaving it to sit for 3-5 minutes (do not let solvent sit for more than 15 minutes.*)
12. Repeat this process until no blue residue remains on the patches.
13. Run a patch of Hoppes #9 and a dry patch through the bore to neutralize the copper solvent.
14. Inspect the barrel prior to reassembling the rifle, verifying that no bore obstructions remain.
*Please note that some ammonia-based copper solvents may prove to be corrosive if left sitting in the barrel for an extended period of time. It is essential that these solvents be removed within 15 minutes to avoid ruining the bore.
The Crown
The crown is the portion of the barrel where the bullet loses contact with the lands and grooves and proceeds to exit the firearm. The area most critical to accuracy potential is the angle where the bullet last touches the bore of the barrel.
Avoid damage to this area by using a plastic toothbrush and CLP type cleaner to scrub the crown from the exterior of the barrel. Even the most minimal variation in wear to the crown will negatively impact barrel performance, so be careful to avoid nicking or wearing away this part of the barrel.
Over 22 million carry permits have been issued in the United States according to a recent study. Overall 8.5% of American adults now have carry permits. Along with CCW permit holders, millions of other gun owners may carry defensive pistols in “open carry” states. Carrying a defensive pistol is a big responsibility. That’s why all those who carry handguns for self-protection should definitely practice regularly. For many, pistol practice is an indoor experience. Indoor ranges are most convenient for those who live near urban centers, where the biggest threats to public safety currently exist. This article covers indoor firearms training and the proper procedures you should follow at indoor ranges.
This Video Covers Basic Gun Range Safety Rules and Etiquette
FIVE IMPORTANT SAFETY PROCEDURES for Indoor Ranges
1. Follow the Three Fundamental Rules for Safe Gun Handling
ALWAYS keep the gun pointed in a safe direction. ALWAYS keep your finger off the trigger until ready to shoot. ALWAYS keep the gun unloaded until ready to use.
2. Follow ALL Range Officer Instructions
ROs are the first and final authority on any range and their decisions are generally final. Arguing with a Range Officer may just get you thrown out.
3. Don’t Bother Others or Touch Their Guns
Respect other shooters’ privacy unless a safety issue arises. Do NOT engage other shooters to correct a perceived safety violation unless absolutely necessary – inform the RO instead. NEVER handle or touch another shooter’s firearm without their permission!
4. Know Your Range’s Rules
Review and understand any and all range rules and requirements/expectations. For example, what is the range’s maximum rate of fire? Are you allowed to collect your brass?
5. Know What To Do During a Cease Fire
IMMEDIATELY set down your firearm, pointed downrange, and STEP AWAY from the shooting booth (or bench). Range Officers do not want shooters trying to “secure/unload” their firearms in a cease fire situation — they want the shooters separated from their guns instantly.
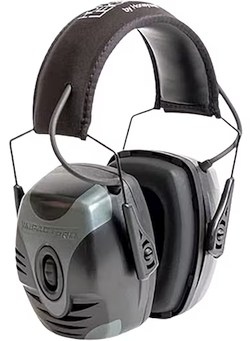
Double-Up on Hearing Protection When Shooting Indoors
Howard Leight states that Impact Pro muffs are “designed for handgun and pistol shooters looking for high NRR … for indoor ranges, covered ranges or other extremely loud shooting environments.”
When shooting indoors we recommend quality muffs with earplugs underneath, offering double protection. When inside an enclosed range, with other shooters blasting away right next to you, you really need effective hearing protection. But you also need to hear range commands and be able to communicate. That’s why we recommend electronic muffs with quality plugs underneath. We recommend the NRR 33 Howard Leight Max-1 Plugs. These tapered plugs are comfortable, easy to insert, and have a flared end for better sound seal.
On top of those plugs, run high-quality muffs. For indoor ranges where sound levels can be extremely high, we recommend Howard Leight Impact Pro Muffs. These offer an impressive 30 dB Noise Reduction Rating (NRR) and the effective noise reduction can be improved by 4 decibels or more by running plugs as well.* These muffs are pretty comfortable and offer Headphone Functionality so you can connect to your phone, MP3 player, or audio device. These muffs are $90.55 on Amazon and $90.55 at MidwayUSA.
* Four decibels may not sound like much, but remember the decibel measurement system is logarithmic, so four decibels is VERY significant. We have discussed the merits of “doubling up” hearing protection with Ph.D. sound engineers. They told us that a combination of muffs and plugs could reduce effective noise levels by up to five decibels compared to plugs alone. In addition, good muffs will block bone conduction sound energy better than plugs alone.
Kirsten Weiss knows a thing about accuracy. She won the 2012 NRA Three-Position Women’s Smallbore Championship, while finishing as the National Overall Woman Champion. She used to shoot with the American team in top-level World Cup competition. Kirsten started shooting fairly late — at age 16. Despite her relatively late start, she earned a place on the University of Nebraska shooting team. That literally opened up a new world for Kirsten: “During the course of my career, I’ve had a lot of success. I’ve gone to World Cups… in Zagreb, Croatia, in Munich, Germany. I’ve won National Championships, and got on to the U.S. Olympic short list, so it’s been a good career.”
In these three videos, Kirsten offers key tips on accurate shooting. In the first video she explains how to get and maintain the proper cheek weld on your rifle. In the second, Kirsten talks about canting error — how having inconsistent side-to-side tilt on your rifle. In the third video, Kirsten explains the importance of proper trigger placement.
Proper Cheek Weld
No matter what your discipline — smallbore, silhouette, High Power, F-Class, or even PRS — it’s vital to have a consistent cheek weld for every shot. You want your head to be in the same position on the stock each time.
In this video, Kirsten explains how to find the best position for your head on the stock, which may require adjusting the cheekpiece. Then Kirsten demonstrates how to maintain consistent cheek weld shot after shot.
Consistent Rifle Cant (Tilt from Centerline)
Kirsten says most training manuals don’t explain rifle cant: “You won’t find this shooting technique just anywhere. Most shooters don’t even think about it — and they’re missing out. Proper Rifle Cant or Gun Cant (also known as cant error or even scope cant) is a complicated topic, but I’ll explain it simply — and how to simply avoid cant error.”
Want to know how to actually aim a gun right? This accuracy tip covers a crucial aspect of marksmanship. If you cant your rifle inconsistently from shot to shot, the point of impact will change, even with “perfect aim”. This is another episode in Kirsten’s How to Shoot Awesomely video series.
Proper Trigger Finger Technique
Kirsten tells us: “Finger placement on the trigger might not seem like a big deal, but it actually is. The reason for this is because, depending on where your index finger is placed on the trigger, [this] translates to different muscle interactions with the gun.” Watch this video to see Kirsten demonstrate proper finger placement (and explain problems caused by improper finger positioning).
When you pull the trigger, you only want to engage the last section of your finger, in order to avoid unwanted muscle engagement and to achieve a smooth shot. Remember there is a “sweet spot” between the crease (first joint) and the tip of the finger. If you position the trigger in that “sweet spot”, you should see an increase in your accuracy. Don’t make the mistake of putting the trigger in the crease of your finger, as shown below.
A while back, the Precision Rifle Blog conducted a fascinating study of Muzzle Brakes. PRB figured out a way to show the actual “blast pattern” of gasses ejecting from the ports of muzzle brakes. The result was a fascinating (and eye-catching) series of images revealing the distinctive gas outflows of 20+ different types of muzzle brakes. If you are considering buying and installing a muzzle brake on your rifle, you should definitely review this important PRB Muzzle Brake Test.
For a prone shooter, particularly on dusty, dirty or sandy ground, muzzle blast is a major bummer. Muzzle blast can be very disturbing — not just for the trigger-puller but for persons on either side of the gun as well. Some muzzle brakes send a huge shockwave back towards the shooter, and others send blast towards the ground, kicking dirt and debris into the prone shooter’s face. If there was a way to illustrate those factors — shockwave and debris — that might help shooters select one brake design over another.
Cal Zant at PrecisionRifleBlog.com applied a unique blend of creativity and resourcefulness to try to answer that question for 20+ muzzle brakes. Using high-speed photography and household products, he captured the blast pattern of 20+ different brake designs for easy side-by-side comparison. Can you figure out how Cal managed to show muzzle brake blasts so clearly? His “hi-viz” solution, revealed in the article, is very clever. See the eye-opening results for 20+ brakes, with illustrative photos, by visiting the Precision Rifle Blog Muzzle Brake Ground Signature Test Page.


 In this article, Hall of Fame benchrest Shooter Speedy Gonzalez explains how to eliminate mechanical and gun-handling problems that cause vertical spread in your groups. Speedy’s article addresses the many human and the hardware factors that can cause vertical.
  • Front Bag Tension–Vertical can happen if the front sand bag grips the fore-arm too tightly. If, when you pull the rifle back by hand, the fore-arm feels like it is stuck in the bag, then the front bag’s grip is too tight. Your rifle should move in evenly and smoothly in the sand bags, not jerk or chatter when you pull the gun back by hand.


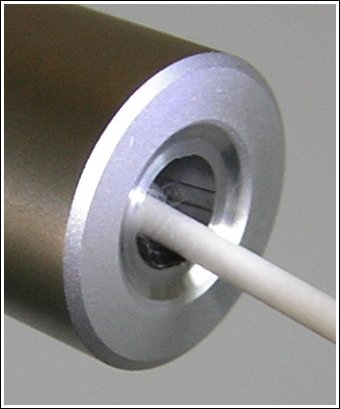 The last half-inch or so of your barrel is absolutely critical. Any damage (or abnormal wear) near the crown will cause a significant drop-off in accuracy. Here are ways you can check the end of your barrel, using a common Q-Tip.