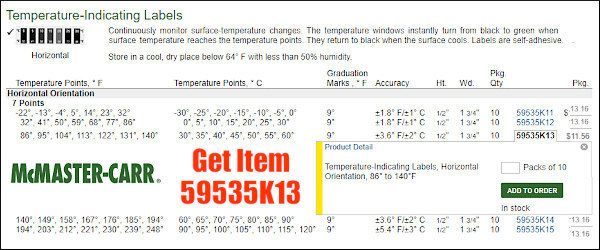
The official start of summer (6/21/2026) is just one month away, and temperatures are starting to heat up. We are already seeing unseasonably hot conditions in some areas of the country. You never want your barrels to get too hot, which can happen more quickly in summertime. Accuracy suffers when barrels over-heat, and excessive heat is not good for barrel life. So how do you monitor your barrel’s temperature? You can check if the barrel is “warm to the touch” — but that method is not particularly precise. There is a better way — using temperature-sensitive strips. McMaster.com (an industrial supply house) offers stick-on temp strips with values from 86° F to 140° F. A pack of ten (10) of these horizontal strips (item 59535K13) costs $11.56. That’s a mere $1.16 per barrel for strips — cheap insurance for your precious barrels. For best barrel life, you should try to keep your barrels under 120 degrees F.
NOTE: On the McMaster.com website, you’ll need to scroll down to the multi-use “Temperature Indicating Labels”. Then click on the horizontal label and select item 59535K13, as shown below.
Forum member Nomad47 says: “I have temperature strips (bought at McMaster-Carr) on all my barrels. I try not to shoot when the barrel gets to 122 degrees or higher[.]” Here are photos of the McMaster-Carr temp strips on Nomad47’s customized Savage.
Creedmoor Sports now offers handy Temp Strips, with 3-packs for $12.95. These have colored temp range markers so you can quickly see if your barrel is getting too hot. Creedmoor Sports notes: “The temperature range of 30-160° spaced in 10° increments fit most … shooting situations. The 1″-wide 6″-long LCD strip will provide many years of service. In general, we recommend that if a barrel begins to reach 140°, it is too hot and continuing to shoot at these temperatures accelerates barrel wear These barrel temperature strips use a 3M® adhesive and will stick to blued, parkerized and stainless barrels.”
Bad things can happen if your barrel gets too hot. First, with some barrels, the point of impact (POI) will shift or “walk” as the barrel heats up excessively. Second, even if the POI doesn’t change, the groups can open up dramatically when the barrel gets too hot. Third, if the barrel is very hot, the chamber will transfer heat to your loaded cartridge, which can lead to pressure issues. Finally, there’s considerable evidence that hot barrels wear out faster. This is a very real concern, particularly for varmint shooters who may shoot hundreds of rounds in a day. For this reason, many varminters switch among various guns, never letting a particular barrel get too hot.
Neconos.com offers BAR-L Temp Strips that visually display heat readings from 86 to 140 degrees. Think of these strips as compact, unbreakable thermometers that monitor barrel heating.
Put a strip on the side of the barrel and the barrel’s temp will be indicated by a stripe that changes from black to green. There is also a “general purpose” strip that reads to 196 degrees (see bottom row). The Benchrest model strip (86°F to 140°F) is in the middle. These Bar-L temp strips cost $12.70 each, or $25.00 for a 3-pack.
NOTE: These strips can be permanently fixed to the barrel with the heavy-duty clear plastic tape strip provided with the BAR-L Temp strip.
Here’s something all shooters need — a smartphone App that calculates bullet-hole group sizes from your own photos. The Ballistic-X App is simple to use. Take a photo of your target, set some values (such as bullet diameter and distance to target), then use the touchscreen to place circles around each hole. The App will calculate group size (in MOA or Mils), distance to point of aim, and provide all the info in an overlay. Then click “save” to record your group for posterity!
This App works well, is relatively easy to set-up, and costs just $7.99. It is available for both Android devices and iOS (Apple) devices. There are other ways to measure group sizes from target images, such as the excellent On-Target program, which we have used for years. However On-Target requires a software installation on a Windows platform desktop or laptop. Ballistic-X is a simple, easy-to-install App with versions for both Android and iOS (Apple) Mobile devices.
The Ballistic-X App has a relatively easy-to-use interface. Of course you can choose either MOA or Milrad group values, and Inch or Metric dimensions. There are various labeling options that provide useful info for Load Development. There is even an ATZ (Adjustment To Zero) feature for adjusting your turrets.
How to Use Ballistic-X App
1. Select Photo Source — Choose Camera to take new photo or get image from Photo Library.
2. Set Reference Values — Select Bullet Diameter and enter Distance to Target.
3. Establish Scale on Image — Mark two points on target photo to set scale. For example, if the target has a 1″-square grid lines, mark two points on grid for 1″ distance.
4. Mark Point Of Aim — Put the central X on the aim point.
5. Designate Shot Locations — Place the green circles around each shot.
6. Finalize Data Display — Position Overlay, select size/color options, and export file.
Android Options — Range Buddy FREE App
Along with Ballistic-X, there is another Mobile App, Range Buddy, that also measures shot groups. Range Buddy is currently offered for Android devices only. It is FREE, but has adverts. Range Buddy isn’t bad, but users complained about the program crashing, and there are compatibility issues with newer phones. We recommend you pay $7.99 and stick with Ballistic-X.
Here’s a cool video from the University of Mississippi Womens’ Shooting Team a decade ago. The gals from Ole Miss challenge their marksmanship skills with a variety of tiny targets — grapes, pencil erasers, and playing cards on edge. The results are filmed with ultra-high-speed cameras so you can watch the moment of impact. This is a fun, feel-good video. Enjoy.
These young ladies were training for competition at the Ole Miss Invitational Tournament in Oxford, Mississsippi. For more information, visit OldMissSports.com.
To understand the heart and mind of a champion, watch this video profiling Jessie Harrison. This talented lady is arguably the best female action pistol shooter in history. No other woman has amassed as many championships or set so many speed-shooting records. Over the past two decades Jessie Harrison (who has also competed with with married names Jessie Duff and Jessie Abbate) has earned dozens of major titles including twenty-two U.S. Practical Shooting Association (USPSA) Ladies Championships. Jessie won her 22nd USPSA title at the 2021 USPSA Race Gun Nationals in Alabama.
Jessie is one of the hardest-working athletes in the shooting game. Jessie is America’s “leading lady” — perhaps the winningest female pistol shooter in the game today. The drive and dedication that has made Jessie a success are revealed in this video from Weatherby.
Jessie Harrison’s Will to Win
Jessie explains how hard work brings titles: “To prepare for a championship, I’m on the range constantly.
My office is the gun range — that’s where I do my work.
I travel the country pullin’ the trigger, makin’ brass, smelling gunsmoke. I have to make sure that I’m in control because… there is no other person on the line with me, helping pull the trigger.
I have to pay attention to my foot placements, my set-ups, my positions, gettin’ the gun clean out of the holster, my reloads. I can’t think about it when I’m shooting. I can’t think about these small things. I have to focus on the sights and pulling the trigger. It’s just me and the gun.
[When] I step out on to the range, I simply have to be perfect — I have to be the best… I won’t settle for anything less.”
First-Ever Female Grand Master
Jessie Duff is the first woman in history to earn the title of USPSA Grand Master (GM), the highest rating conferred by the U.S. Practical Shooting Association (USPSA). To earn this prestigious ranking, Duff had to maintain an average above 95% in shooting classification courses, something never before achieved by a lady shooter. Jessie finished 2013 with a 95.39% average.
We’ve been fans of the Howa Mini Action rifles since they were introduced a decade ago. With actions that are nearly an inch shorter than typical “short actions”, these Mini Action rigs work great as a compact “truck gun” or carry-around varminter. Current chamberings are: 22 ARC, .223 Rem, 6MM ARC, 6.5 Grendel, 7.62x39mm, 350 Legend. These feature a 20″ barrel with a 16.5″ option for the 350 Legend.
6.5 Guy Ed Mobley Tests the 7.62×39 Howa Mini Action Rifle
The Howa Mini Action rifles come with the excellent HACT 2-stage trigger and a 5-round or 10-round, synthetic detachable box mag (depending on caliber). The Mini Action’s bolt is 13% shorter than on regular short actions, providing a shorter, faster bolt throw. Weight is also reduced. This makes for a nice, compact (and very shootable) package.
6.5 Guys Test Howa Mini Actions in 6.5 Grendel and 7.62×39
The 6.5 Guys recently secured a pair of Howa Mini Actions, one chambered in 6.5 Grendel and the other in 7.62×39 Russian: “After trying out the Howa Mini Action rifles at SHOT Show 2017, we got a couple of loaners in 6.5 Grendel and 7.62×39 courtesy of Legacy Sports. These rifles are known for their smooth cycling and lightweight actions, as well as some unique chamberings for bolt rifles (6.5 Grendel, 7.62×39). Long story short, we really enjoyed them.” In fact Steve liked his 6.5 Grendel enough that he plans to purchase the gun. Get the full scoop in this VIDEO REVIEW:
The folks at Legacy Sports also conducted extensive accuracy tests of commercial ammunition in 6.5 Grendel and 7.62×39. The most accurate 6.5 Grendel ammo, with a stunning 0.29″ group, was Alexander Arms with Lapua 123gr Scenar; second best (0.56″ group) was Hornady with 123gr A-Max bullet. The most accurate 7.62×39 ammo was Hornady 123gr SST with a 0.62″ group in the 20″ Heavy Barrel version. View Howa’s Test Reports with these links:
At the request of our readers, we provide select “Deals of the Week”. Every Sunday afternoon or Monday morning we offer our Best Bargain selections. Here are some of the best deals on firearms, hardware, reloading components, optics, and shooting accessories. Be aware that sale prices are subject to change, and once clearance inventory is sold, it’s gone for good. You snooze you lose.
NOTE: All listed products are for sale to persons 18 years of age or older. No products are intended for use by minors.
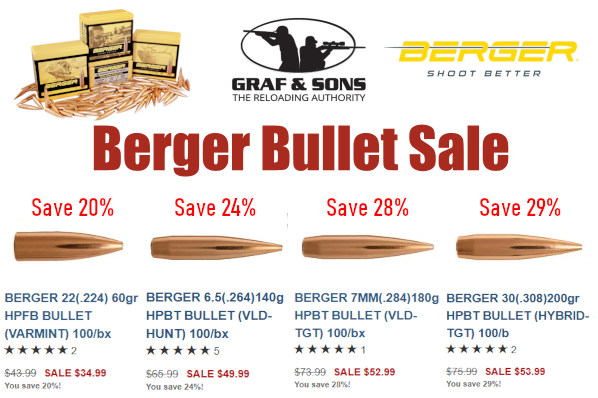
Graf & Sons — Berger Bullet Sale
⏺️ » Good 20-29% savings on Berger match and hunting bullets, many calibers
When it comes to competition components, Berger Bullets produces some of the best bullets you can buy. And Berger offers a wide selection of calibers, bullet weights, and bullet profiles (standard, VLD, hybrid). With savings up to 29%, now is the time to stock up for this year’s matches and take advantage of these big Berger bullet discounts at Grafs.com.
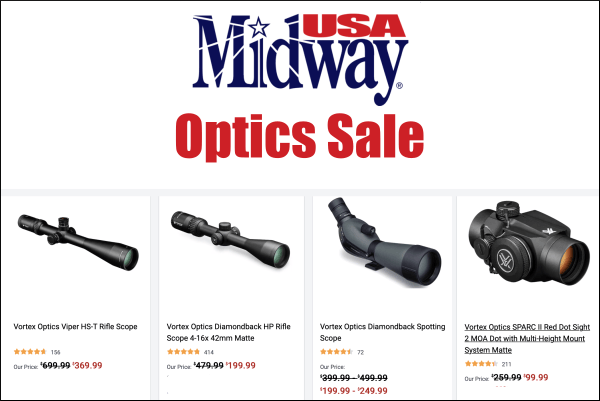
MidwayUSA — Major Discounts on All Types of Optics
⏺️ » Big Optics Sale with major savings, plus FREE Shipping offers
If you’re looking to grab a new scope or other type of optic, check out the optics sale at MidwayUSA. You’ll find riflescopes, spotting scopes, binoculars, thermal monoculars, rangefinders and Red Dots at crazy low prices. For example the Burris 5-20x50mm Eliminator rangefinder scope has been discounted $800, a huge 40% savings. Plus many orders over $100 will qualify for FREE Shipping this week.
As an Amazon affiliate, this site can earn revenues through sales commissions.
When a rifle isn’t shooting up to it’s potential, we need to ask: “Is it the gun or the shooter?” Having multiple shooters test the same rifle in the same conditions with the same load can be very revealing…
When developing a load for a new rifle, one can easily get consumed by all the potential variables — charge weight, seating depth, neck tension, primer options, neck lube, and so on. When you’re fully focused on loading variables, and the results on the target are disappointing, you may quickly assume you need to change your load. But we learned that sometimes the load is just fine — the problem is the trigger puller, or the set-up on the bench.
Here’s an example. A while back we tested two new Savage F-Class rifles, both chambered in 6mmBR. Initial results were promising, but not great — one gun’s owner was getting round groups with shots distributed at 10 o’clock, 2 o’clock, 5 o’clock, 8 o’clock, and none were touching. We could have concluded that the load was no good. But then another shooter sat down behind the rifle and put the next two shots, identical load, through the same hole. Shooter #2 eventually produced a 6-shot group that was a vertical line, with 2 shots in each hole but at three different points of impact. OK, now we can conclude the load needs to be tuned to get rid of the vertical. Right? Wrong. Shooter #3 sat down behind the gun and produced a group that strung horizontally but had almost no vertical.
Hmmm… what gives?
Shooting Styles Created Vertical or Horizontal Dispersion
What was the problem? Well, each of the three shooters had a different way of holding the gun and adjusting the rear bag. Shooter #1, the gun’s owner, used a wrap-around hold with hand and cheek pressure, and he was squeezing the bag. All that contact was moving the shot up, down, left and right. The wrap-around hold produced erratic results.
Shooter #2 was using no cheek pressure, and very slight thumb pressure behind the tang, but he was experimenting with different amounts of bag “squeeze”. His hold eliminated the side push, but variances in squeeze technique and down pressure caused the vertical string. When he kept things constant, the gun put successive shots through the same hole.
Shooter #3 was using heavy cheek pressure. This settled the gun down vertically, but it also side-loaded the rifle. The result was almost no vertical, but this shooting style produced too much horizontal.
A “Second Opinion” Is Always Useful
Conclusion? Before you spend all day fiddling with a load, you might want to adjust your shooting style and see if that affects the group size and shape on the target. Additionally, it is nearly always useful to have another experienced shooter try your rifle. In our test session, each time we changed “drivers”, the way the shots grouped on the target changed significantly. We went from a big round group, to vertical string, to horizontal string.
Interestingly, all three shooters were able to diagnose problems in their shooting styles, and then refine their gun-handling. As a result, in a second session, we all shot that gun better, and the average group size dropped from 0.5-0.6 inches into the threes — with NO changes to the load.
That’s right, we cut group size in half, and we didn’t alter the load one bit. Switching shooters demonstrated that the load was good and the gun was good. The skill of the trigger-puller(s) proved to be the limiting factor in terms of group size.
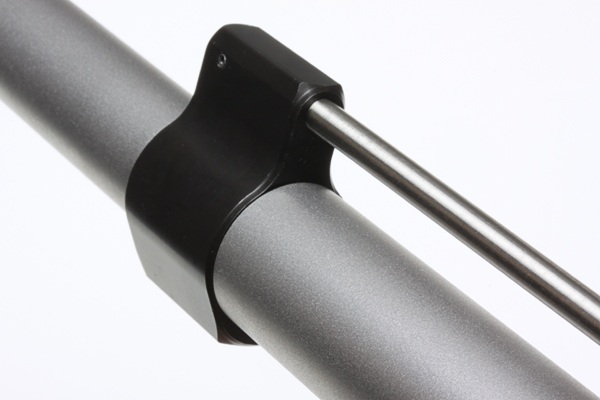
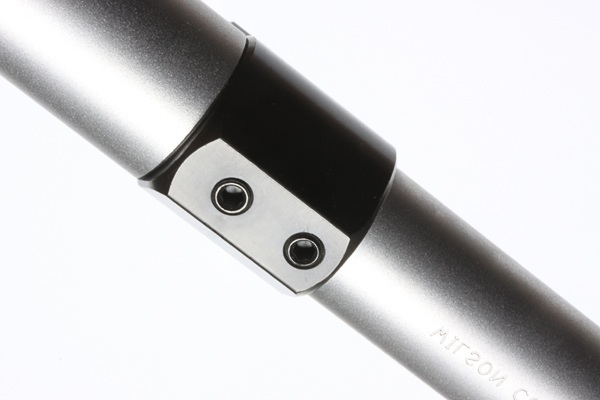
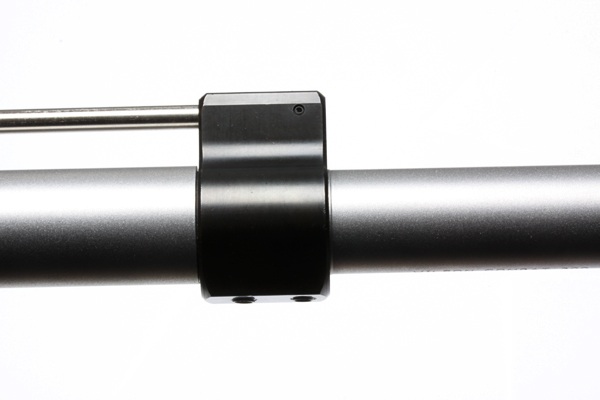
Wouldn’t it be cool if you could adjust the bolt cycling energy on your AR-platform rifle? Turn down the cycling rate for slow fire at the bench or varmint hunting. Crank up the energy for 3-Gun matches and rapid-fire disciplines. This IS possible with a handy accessory that fits on your barrel. Wilson Combat offers an Adjustable Lo-Profile AR Gas Block for direct gas impingement AR-type rifles. Wilson Combat’s adjustable gas block replaces a standard AR gas block and allows you to tune your AR’s gas system for smoother cycling and enhanced reliability. Wilson Combat explains: “Adjusting your rifle’s gas port will lower or increase your bolt’’s cyclic rate. This tailors your rifle’s performance to your unique needs.”
A simple adjustment of the hex screw at the front of the block modulates the gas volume allowing you to tune your rifle’s function to your favorite loads. This is very handy when shooting non-standard AR calibers, unusual hand-loads, or suppressed rifles. Adjustable Gas Block systems are sold as complete kits starting at $61.07. Wilson Combat offers two diameters (.750″, .875″) so you can select the right dimensions for your rifle configuration and barrel diameter. The blocks are Chromoly steel with a black Melonited finish.
Package Includes:
Adjustable Gas Block (Melonite Finish)
Adjustment Set Screw (Installed)
Straight Gas Tube (Installed, Gas Tube Pin Installed)
Editor: This story by Tommy C. (aka “dc.fireman”) comes from our Shooters’ Forum. It’s fascinating to see how a relatively inexpensive Savage M12 BVSS varmint rig was transformed into a sophisticated 300M match rifle with a modern chassis, Shilen barrel, and top-of-line sights. With some ingenuity, and careful parts selection, Tommy created a rifle that can compete with match rifles costing many thousands of dollars more. American ingenuity at work!
Savage Reborn — Old BVSS Transformed into 300M Match Rifle
by Tommy C. (aka “dc.fireman”)
So, I began the project of building a 300M International competition gun, about a year ago, intending to compete at the 300M Nationals this year in Minnesota at the Minneapolis Rifle Club. Realistically, I didn’t want to pay the price-tag demanded of the Bleikers, Grunig & Elmigers, Hammerlis, or Tanners that (infrequently) pop-up for sale from time to time. So I decided to build my own 300M Match rifle with an American action, barrel, chassis, and trigger.
Here is Tommy’s completed 300M Match rifle with Savage action in PDC Custom chassis.
I had decided on the .260 Remington (aka 6.5-08) as the caliber choice. This beat out 6.5×47 Lapua simply due to the cost/availability of brass. The .260 Rem cartridge is based on the .308 Win parent. I made my first batch of brass by necking down some Federal .308, and it worked great. [Editor: We do recommend Lapua .260 Remington brass for match purposes for those who don’t have a supply of good .308 Win brass.]
I had an older Savage M12 stagger-feed action, originally from an old .22-250 BVSS. I contacted James at Northland Shooter Supply, and he walked me through the game plan and equipment I needed: Shilen Select Match 26″ barrel, NSS Stainless recoil lug and nut, a set of Forster headspace gauges, and the NSS action wrench.
Catalog photo of current Savage M12 BVSS in .22-250 Rem.
A few months later, I replaced the original Accu-trigger with a Rifle Basix SAV-II trigger, and immediately wondered why I waited so long to do that. The Rifle Basix is perfect for my application. Mind you the he safety DOES NOT work now, but, I don’t need it for my application.
Another member on the AccurateShooter Forum sold me a BVSS stock that has been re-worked by Alex Sitman of Masterclass Stocks, and it served as a placeholder, until I could find a maker who could nearly replicate my Feinwerkbau 2700 Alu stock in my smallbore match gun.
After scouring the AccurateShooter Forum, and multiple internet searches, I found PDC Custom in Michigan. I spoke with Craig Kierstadt a few times, before finally deciding to pull the proverbial trigger on his chassis. He had a few of the older chassis stocks with spacing for the Savage stagger-feed action. He machined an Anschutz rail into the fore-end for my hand stop and sling. Then he powder-coated the chassis black, and sent it to me sans grip and butt plate.
Photo of action/chassis. Tommy says: “It locks up really tightly, and you can tell Craig spent some time on the CNC work need to make this all fit.”
There are a few minor issues with the PDC chassis, but overall, I would rate this a 9.5 out of a possible 10. The price, and the features built into it, plus the ease of which everything fit together, far outweigh any minor issues. And two of the issues I quickly corrected with Teflon tape. I will need to make a walnut cheek piece — a curved one isn’t conducive to aperture iron sight shooting.
Savage Action .260 Rem 300M Match Rifle Components:
Action, Barrel, Stock, Grip
Savage M12 stagger-feed action, 4.27″ spacing
Shilen Select Match Barrel, 26″
Rifle Basix SAV-II Trigger
PDC Custom Chassis — tool-less adjustments
Bobsled SLED for single loading (required)
MEC Contact III Butt plate (German)
MEC handstop/sling swivel (German)
Walnut Target grip for AR-15 (eBay sourced)
Sight Components and Hardware
MEC Spy Long rear sight (German)
Centra front sight tunnel (German)
Centra adjustable aperture (German)
Medesha sight extension tube + collar
Champion’s Choice front sight base
Champion’s Choice mirage band
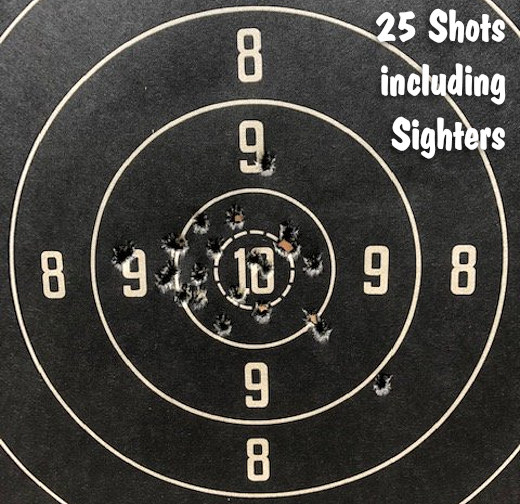
For his practice load, Tommy shot 123gr Hornady ELD-M bullets with H4831 powder and CCI BR2 primers. This load performed well — Tommy posted: “My 25-shot initial prone test today shows promise. There are five sighter shots, and 20 record shots. One of the 9s at 9 o’clock is my first sighter, the other one I own. The 8 out at 4 O’clock was a round that was difficult to chamber. My initial scoring puts me somewhere in the vicinity of 193-7X.”
The target used is the NRA C2, “300M International Rifle Target, reduced for 200 yards”. The 10 Ring is 2.40″ in diameter, while the Inner 10 (X-Ring) is 1.24″.
Match Load — Varget and Nosler Bullets
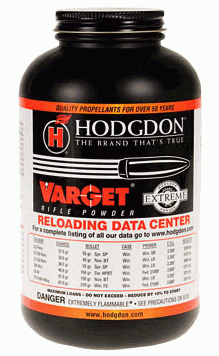
For his match load, Tommy switched to Varget and Nosler bullets: “My match load uses 37.9 grains Hodgdon Varget with a Nosler 123gr bullet. This was a recommendation by a gentleman with a lot of experience in 300M shooting.”
Tommy adds: “The amount of knowledge gained via the AccurateShooter Forum has made this all a reality, instead of just a passing thought.”
Sinclair International has created a series of instructional videos illustrating the basics of metallic cartridge reloading. The 8-Part series starts with reloading basics and provides step-by-step, how-to instructions that will help new reloaders get started. Detailed, animated illustrations show you what happens inside the chamber when shooting, and inside the dies during each step of reloading. The videos can be viewed on Sinclair International’s YouTube channel. Shown below is the first video in the series:
Each of the Sinclair videos is hosted by then Sinclair Int’l President Bill Gravatt (now with Creedmoor Sports). Bill doesn’t just show you “how”, he tells you “why”. The how-to segments cover case inspection, proper die set up, case sizing, primer installation, powder measuring, bullet seating, crimping, and even goes into the record keeping needed for the handloader. “We wanted to give shooters who haven’t reloaded a look at all the advantages of creating your own ammo and how easy it is to get started,” said Gravatt, “without telling them they had to have any certain brand or type of equipment to do the job.”
The Eight Video Topics Are:
Part 1 — Intro to Video Series
Part 2 — Intro to Reloading Safety
Part 3 — Metallic Cartridge Components
Part 4 — The Firing Sequence
Part 5 — Tools for Reloading
Part 6 — Loading Bottle-Neck Cartridges (2 videos)
Part 7 — Loading Straight Wall Cartridges
Part 8 — Reloading Series Conclusion
Reloading Tools
Shown below is Part 5 of the video series, covering the tools used for precision reloading.
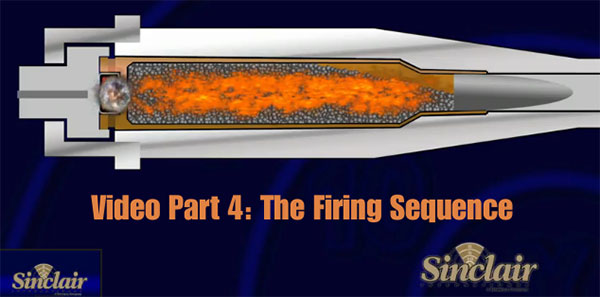
We also strongly recommend the Part 4 Video to readers who are getting started in reloading. This “How Things Work” segment covers the sequence of events inside the chamber (and barrel) when the cartridge is fired. The video includes helpful graphics that show what happens to the primer, powder, cartridge, and bullet when the round is fired. The video also illustrates “headspace” and explains how this can change after firing. We think this video answers many common questions and will help reloaders understand the forces at work on their brass during the firing process.




Neconos.com offers BAR-L Temp Strips that visually display heat readings from 86 to 140 degrees. Think of these strips as compact, unbreakable thermometers that monitor barrel heating.


 Jessie Harrison’s Will to Win







 Match Load — Varget and Nosler Bullets