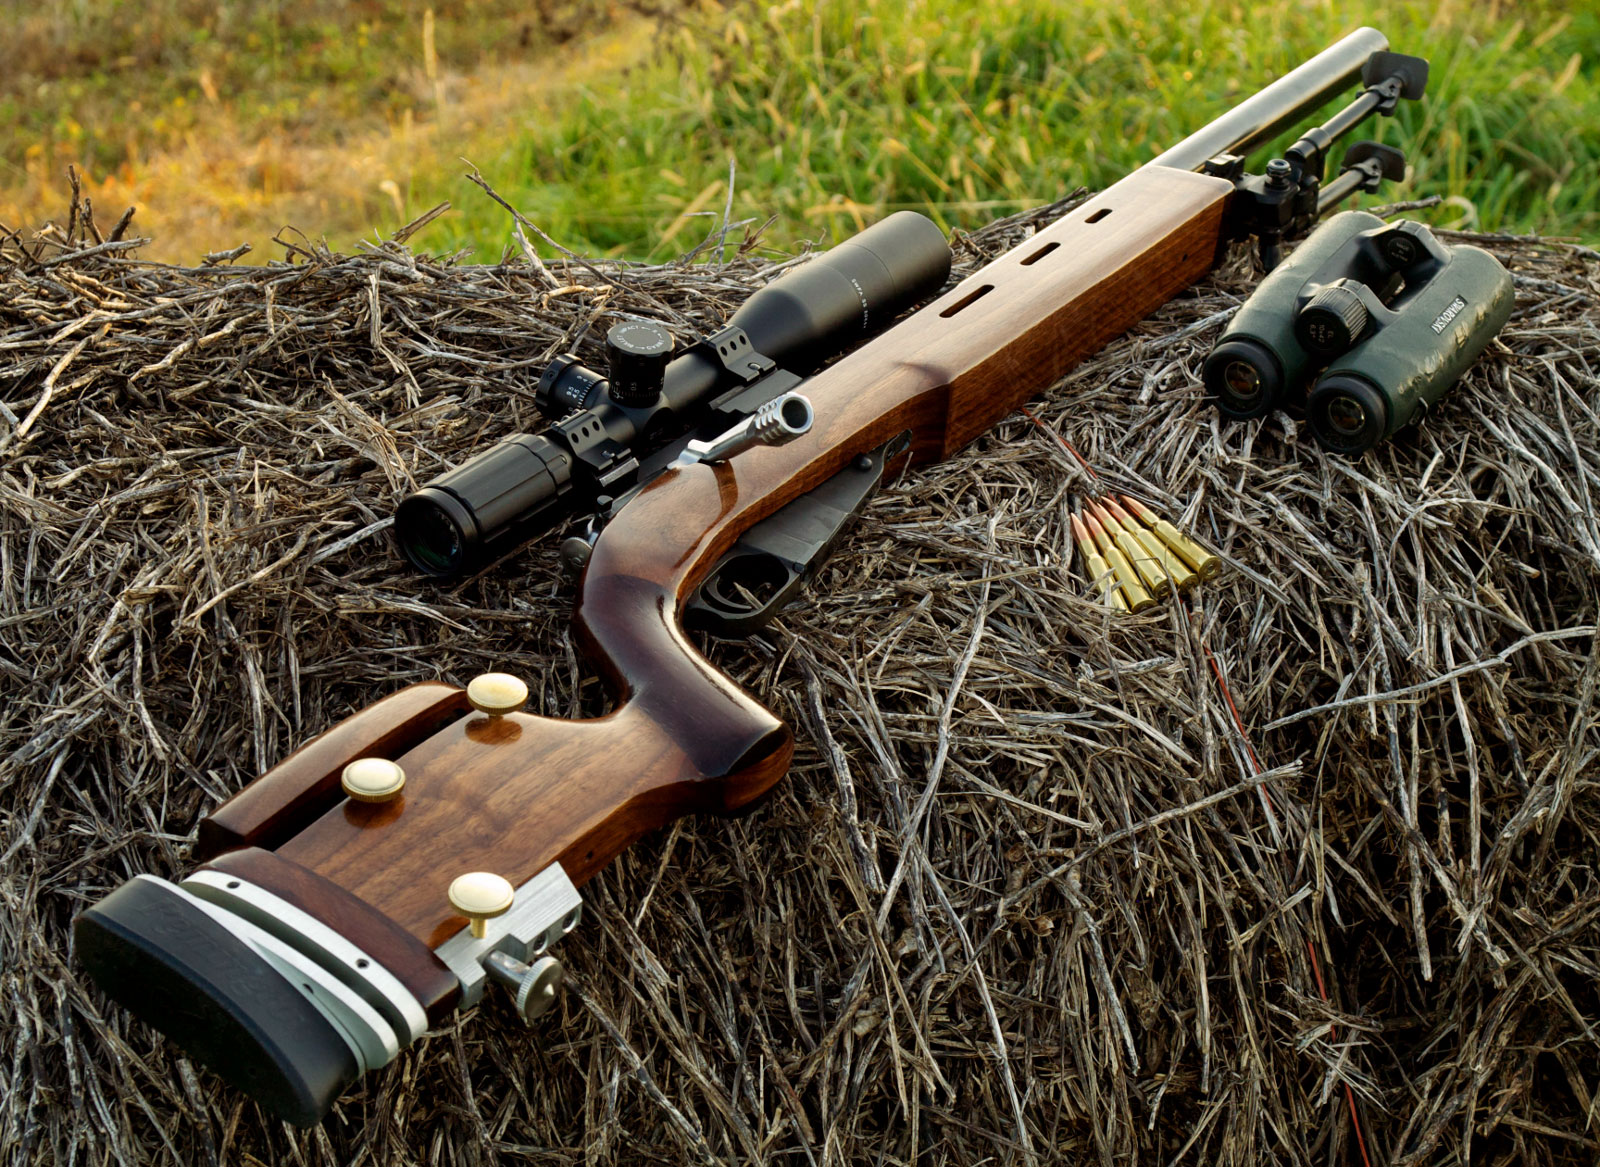
One of the most popular features of our Shooters’ Forum is the Official ‘Pride & Joy’ Rifle thread. There you’ll find dozens of interesting rifles, with photos and descriptions supplied by proud owners. Today we’re spotlighting one of the more interesting ‘Pride & Joy’ rifles unveiled this year, a Mosin Nagant “senior citizen”. This 72-year-old Russian bolt gun is not like any Mosin Nagant you’ve ever seen before. It has been brought into the 21st Century with a handsome target stock and some first-class upgrades, including Lothar Walther barrel and Timney trigger. Here’s a look at a very nice Russian rifle, belonging to Forum member Ben C. (aka “Grimstod”):
Video Shows Rifle Shooting Sub-Half-MOA from Bipod (in the Snow):
Name of rifle: Smyert Mk3 (Modified Mosin Nagant)
Make: Izhmekh/Izhevsk (“Izzy”) High Wall
Model: 91/30 | Year: 1942
Scope mount: Rock Solid (looks like an action sleeve)
Scope: SWFA 20x42mm MRAD
Gunsmith: Sheppard
Bolt handle: Rock Solid with Surgeon tactical handle
Bipod: Versa Pod
Total Weight: 18.6 lbs
Grimstod’s Mosin Nagant Custom Shoots Under 0.5 MOA From Bipod
Even in harsh winter conditions, the rifle shot well. (I guess we should expect that for a Russian gun). The photo below shows a group shot from bipod. (The video shows Grimstod’s snow-bound range session). Grimstod calculated the group at 0.394 MOA measuring from outside edge to edge. Using our On-Target software, which measures center to center of most distant shots, we came up with 0.428 MOA. Still that’s impressive for an ancient action being shot in the dead of winter with snow falling. To learn more about this rifle (and view photos of the build process), visit the SurplusRifleForum.com.
The History and Features of the Mosin Nagant M1891
Now that you’ve seen a modernized Mosin Nagant, we through we’d provide some information about the original rifle, first issued in the late 19th century. It is one of the most mass-produced military bolt-action rifles in history with over 37 million units having been made since 1891.
The is a lengthy Wikipedia article on the Mosin Nagant rifle design and history. The 3-line rifle M1891, known in the West as Mosin Nagant and in former Soviet Union as Mosin’s rifle (Russian: винтовка Мосина), is a five-shot, bolt-action, internal magazine–fed military rifle. It is primarily chambered for its original 7.62×54mmR cartridge. The 3-line rifle, Model 1891, its original official designation, was adopted by the Russian military in 1891. There have been several variations from the original rifle, the most common being the M1891/30, which was a modernized design introduced in 1930.
Here is a test of the Sniper Version of the Mosin Nagant:
Photo credit: Nemo5576 retouched by Ewan ar born, Copyrighted free use, via Wikimedia Commons.
Like the Gewehr 98, the 1891 Mosin uses two front-locking lugs to lock up the action. However, the Mosin’s lugs lock in the horizontal position, whereas the Mauser locks vertically. The Mosin bolt body is multi-piece whereas the Mauser is one piece. The Mosin uses interchangeable bolt heads like the Lee–Enfield. Unlike the Mauser, which uses a controlled-feed bolt head in which the cartridge base snaps up under the fixed extractor as the cartridge is fed from the magazine, the Mosin has a push-feed recessed bolt head in which the spring-loaded extractor snaps over the cartridge base as the bolt is finally closed similar to the Gewehr 1888 and M91 Carcano or modern sporting rifles like the Remington 700. Like the Mauser, the Mosin uses a blade ejector mounted in the receiver. The Mosin bolt is removed by simply pulling it fully to the rear of the receiver and squeezing the trigger, while the Mauser has a bolt stop lever separate from the trigger.
Photo courtesy Armémuseum (The Swedish Army Museum), public domain.
Like the Mauser, the bolt lift arc on the Mosin Nagant is 90 degrees. The Mosin bolt handle is similar to the Mannlicher: it is attached to a protrusion on the middle of the bolt body, which serves as a bolt guide, and it locks protruding out of the ejection/loading port in front of a split rear receiver ring, also serving a similar function to Mauser’s “third” or “safety” lug.
In this video Jerry Miculek tests the carbine version of the Mosin Nagant:
The rifling of the Mosin barrel is right-turning (clockwise looking down the rifle) 4-groove with a twist of 1:9.5″ or 1:10″. The 5-round fixed metallic magazine can either be loaded by inserting the cartridges singly, or more often in military service, by the use of 5-round stripper clips.
Photo courtesy Armémuseum (The Swedish Army Museum), public domain.
Wikipedia text courtesy Creative Commons Attribution-ShareAlike 3.0 Unported License (CC BY-SA).
Forum member Roy Bertalotto did a real nice off-set scope installation on a bolt gun to help a sight-challenged shooter. Roy explains: “A friend of mine shoots left-handed and has lost the sight in his left eye. I built him a scope mount so he can still shoot left-handed, but now use his right eye.” Roy’s fabrication work is impressive and we praise his efforts to help a fellow shooter stay in the game.
Roy bolted a plate to the existing scope rail on the top centerline of the Rem 700 action. This plate extends a few inches to the right. On the outboard end of the plate, Roy fitted a second scope rail, aligned with the bore. Weaver-based rings are then clamped to the outboard (right side) auxiliary rail.
Be Careful of Canting Issues with Offset Scope Installations
We’re pleased to see that Roy developed a solution for a shooter with an optical disability, but we want to stress that this is a specialized installation that can create some problems with point of impact shift if the gun is not maintained perfectly level. With the amount of horizontal offset (between the scope’s optical axis and the bore axis) built into this rig, if the rifle is canted, point of impact can shift rather dramatically. For a southpaw who is willing to adapt his/her shooting style, it may be better, in the long run, to learn to shoot right-handed if his/her right eye is the only good eye. Likewise, if a right-handed shooter can only see well through his left eye, he may benefit from learning how to hold the stock and work the trigger with his left hand. The shooter could still work the bolt with his non-trigger hand. Changing from right-hand to left-hand shooting (or vice-versa) may require a stock swap if the stock is not ambidextrous.
Area 419’s ZERO reloading press is a brilliantly engineered 9-station turret press with some very unique features. This press was designed to be the most precise turret ever created. As tested by Gavin Gear of UltimateReloader.com, the ZERO turret press delivered very impressive shoulder-bump consistency and ultra-low seated bullet run-out (about +/- 0.0005″). The numbers were as good as you can get from a quality single-stage press, so Area 419 did some impressive engineering. We would expect that, as this is an expensive product — MSRP is $1200.00. SEE FULL REVIEW on UltimateReloader.com.
The ZERO turret press lets you install up to nine (9) different reloading dies in the large top turret, which revolves around a central axis. But unlike most turret presses, the ZERO doesn’t have flex or wobble when you’re loading. This is because Area 419 includes a clever system for locking the turret in position after you’ve selected the die from your array. Area 419 also uses a unique system for securing shell-holders (see video at 12:00). This, likewise, adds to the precision of the press.
In the video above, you can see how the turret is secured with a “wedge clamp”. By loosening the wedge clamp you can index the press easily to any station. Then, when you have selected your die, you tighten the wedge clamp again. You can see this important procedure at 13:20 – 13:35 timemark in the video.
ZERO Turret Press Has Very Smooth Operation
Gavin observed that this ZERO turret is both smooth and very precise, thanks to smart engineering and the use of multiple bearings. Area 419 describes the design features:
— Turret (zero-slop) eliminates variability induced when removing and resetting dies
— The turret head holds nine 7/8×14-threaded dies (1-1/4 thread in future)
— Available ram-stroke here is 4.4″, allowing use of very tall cartridge types.
— Adjustable/interchangeable handle setup for maximizing leverage/feel based on operation
— Internally contained primer-catch system, slide-out drawer
Important Features of ZERO Turret Press
1. Press frame: 6061 Aluminum, clear anodized
2. Wedge clamp (locks turret into indexed position)
3. Turret (7075 aluminum and steel construction)
4. Adjustable handle with roller knob (set either left- or right-handed operation)
5. Bearings: Ball bearing plus roller thrust bearings for side plates
6. Ram riding in self-lubricated linear bearing
7. Spent primer catcher drawer
Milled from American billet aluminum and stainless steel, this press employs 14 bearings, including a self-lubricating linear sleeve bearing for the precision-ground 1.25″ ram. The linkage system also glides on bearings providing smooth operation with near-ZERO slop. The oversized ram features a 0.75″-diameter steel arm and ZERO-friction knob. The turret system is located with an oversized ball-detent system and secured using an over-sized, custom-made ZERO-point pull-stud. Locking the turret after indexing require only a half-turn of the supplied T-handle (see photo above). When indexing the turret, repeatability variance of the system should be less than .0005″.
The opening in the press will allow for sizing and seating of cases up to.338 Lapua Magnum, and will accept standard 7/8″ dies and standard shellholders. NOTE: Area 419 will be making and selling shellholders specifically fit to the system later in 2020.
SUMMARY — Impressive Press Delivers Precise Results
Gavin Gear was very impressed with Area 419’s new Zero Press, which he said offers the precision of a quality single-stage with the versatility of a turret: “There will always be people that prefer a traditional single-stage. Where the ZERO will be compelling is to those who want the precision of a single-stage without the need to screw dies in and out. Leaving your dies set can have benefits for precision as well — everything comes back to the ‘same place’ when dies are indexed into position. Screwing dies in and out can impose variation, and variation is the enemy of the ‘white lab coat shooter’. I plan on testing the ZERO press with ultra-high-end dies, and custom dies that I ream to my own specifications. I’m thinking that will show the true potential of this press!”
Area 419 ZERO Press Video with Operation Instructions
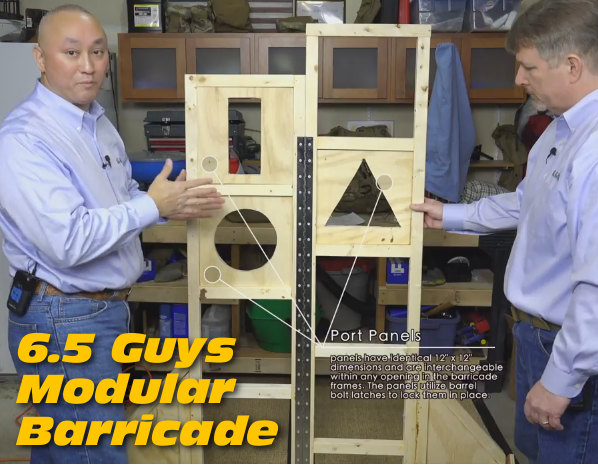
Here’s a great Do-It-Yourself project for tactical shooters. Ed and Steve of the 65Guys.com have created a versatile wooden barricade designed for easy transport. The goal with this design was to create a stable barricade that offers a variety of shooting positions, but can also fit in the bed of a pick-up or the back of an SUV. The 69″ tall barricade is hinged in the middle, so it’s just 27″ wide. To deploy the Barricade you simply fold it open and then nest the lower wings in ground-level stands.
We call this the BYOB Project — Build Your Own Barricade. Anyone with basic wood-working skills should find the Barricade prettyeasy to make. The only tricky part is cutting the side Dado joints for the left and right lower wings. But when you’ve got it completed, you have a low-cost unit that is versatile and sturdy yet easy to pack in a truck and carry out on the range. In the video below the 6.5 Guys showcase their Gen 2 barricade and explain how to build one just like it.
Looking at the 6.5 Guys Modular Barricade
The Modular Barricade was drawn up by Steve in PowerPoint and then dimensions added. Once the entire plan was created, Steve cut components to size and then used ordinary wood screws and wood glue to assemble the barricade frame. This was done to ensure maximum rigidity due to the light weight construction using 2″ x 2″ frame members. A long piano hinge was used to allow the Barricade to fold in half, while still having high torsional rigidity. Each of the Barricade openings are 12″ x 12″ square. This consistent ‘window’ spacing allows interchangeable panels with different cut-out shapes to be placed at varies heights/locations in the Barricade.
Modular Barricade Key Features
— Lightweight construction using low-cost 2×2 wood beams.
— Collapsible frame with center hinges for easy transport and deployment.
— Multiple Support levels at 6″ vertical intervals (6″ variance R to L).
— Modular port design allows ports to be changed and moved as desired.
6.5 Guys’ Modular Barricade — Construction Tips
The Modular Barricade can be constructed over a weekend with the proper materials and basic shop tools such as a power saw and electric screwdriver. Steve used a router for the side panel dado joints but a table saw could also be used for that task. Steve’s only real issue with the build involved the port panels — getting them to fit right. The 2″ x 2″ frame wood wasn’t always straight; even a small variation in the wood could cause a port panel to be too tight or too loose. Steve had to do a lot of extra sanding and planing to get the port panels to fit just right.
Where and How to Use the Barricade for Training
Because the 6.5 Guys’ Modular Barricade is so easy to move, you can simply pack it up and deploy it at your local range for practice. (Do ensure club/range rules allow shooting from barricades.) While the Barricade is designed to sit on the natural ground, the base stands can also be placed on concrete if your range does not allow deployment forward of the normal firing line. While you can use the Barricade for training on your own, Ed and Steve say novice shooters can benefit from a formal clinic.
The popular gun supplies vendor KYGUNCO is running a big 12 Deals of Christmas Sale, with special bargains every day. Today is Day Seven of the promotion, and already there have been some very attractive bargains, with super deals on guns, optics, knives, ammo, game cameras and more. Check the site daily to see the best deals. Here are seven items that caught our attention:
“Shooting Chrony” is a product name. “Shooting Chrony” should not describe (post-mortem) what you have been doing to your chronograph. Sooner or later all of us may make a mistake, and ventilate our chronograph. With luck, the bullet just “wings” your chronograph, and the damage is minor. But if you hit the unit smack dab in the middle, you may have to retire your chrono for good.
A while back, Forum member Jeff M. (aka “JRM850″) experienced a “low blow” that put his Shooting Chrony out of commission. With tongue firmly in cheek, Jeff started a Forum thread entitled Chronograph Not Picking Up Shots in Bright Sunlight Anymore. Looking at the photo at top, the problem is obvious — he ventilated his Chrono.
This was Jeff’s first chrono kill in 23 years of use, so we shouldn’t be too critical. Jeff explained: “I didn’t realize a friend was shifting from a 300-yard target to 100 yards.” The agent of destruction was a low-traveling 58gr V-Max running at 3415 fps. What happened? Well, when one is shooting at 300 yards, the trajectory will be higher than at 100 yards. We should say, however, that this may have been a low shot, or the 100-yard aiming point may have been placed lower to the ground (closer to the bottom of the target frame), as compared to the 300-yard aiming point.
Other Forum members offered some sarcastic responses:
Try it on an overcast day – it might work again.
It looks like the V-Max performed just about as advertised.
Aww…a little duct tape and some Super Glue and you’re good to go.
Double Check Your Aim Point and Trajectory BEFORE You Shoot
The lesson learned here is that you should never change targets (or aim points) without checking your bullet’s flight over the chronograph. We like to align the barrel so the bullet exits a good 6-8 inches above the electronics (check your manual for recommended shot height). In addition, we always boresight the barrel so we can see the actual target through the bore. Then, with gun UNLOADED, bolt removed and action clear, we look back down the barrel so we can see daylight through the bore, with the gun set on solid rests. If you look through the middle of the “V” formed by the sky screen supports and you can’t see light shining through the barrel’s bore, you probably have a set-up problem and you should re-align the rifle.
Use a Test Backer to Confirm Your Bullet Trajectory
You can put tape on the support rods about 6″ up from the unit. This helps you judge the correct vertical height when setting up your rifle on the bags. Another trick is to hang a sheet of paper from the rear skyscreen and then use a laser boresighter to shine a dot on the paper (with the gun planted steady front and rear). This should give you a good idea (within an inch or so) of the bullet’s actual flight path through the “V” over the light sensors. Of course, when using a laser, never look directly at the laser! Instead shine the laser away from you and see where it appears on the paper.
After you have used the laser boresighter to get the rifle centered up in the chrono’s “sweet spot”, confirm with a test shot or two (see photo). Even when using an in-chamber laser boresighter, it is not uncommon for the bullet’s actual point of impact to be different than the laser’s dot location.
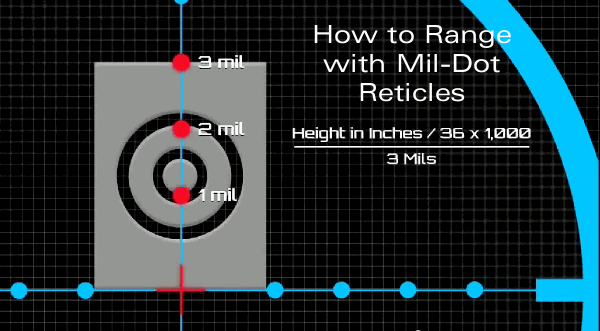
MIL-system scopes are popular with tactical shooters. One advantage of MIL scopes is that the mil-dot divisions in the reticle can be used to estimate range to a target. If you know the actual size of a target, you can calculate the distance to the target relatively easily with a mil-based ranging reticle. Watch this helpful NRA video to see how this is done:
Milliradian Definition and Yardage Ranging Formula
“MIL” or “Milrad” is short-hand for Milliradian, a unit of angular measurement. The subtension of 1 mil equals 3.6 inches at 100 yards or 36 inches at 1,000 yards. (In metric units, 1 mil equals 10 centimeters at 100 meters or 1 meter at 1,000 meters.) Knowing this subtension and knowing the size of the target (or a reference object near the target) allows the distance to the target to be estimated with considerable accuracy. The formula used to calculate range (in yards) based on MIL measurement is:
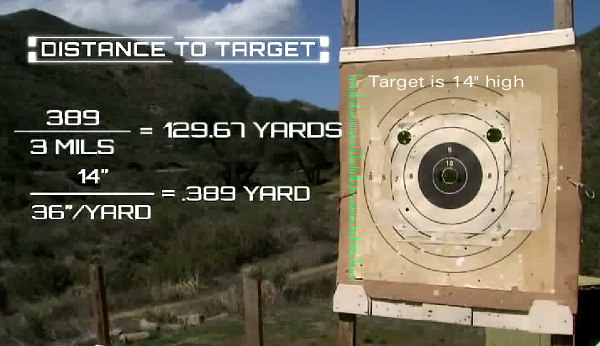
Height of Target in inches (divided by 36) x 1000, divided by the number of mils.
For example, if a 14″ tall target spans 3 mils from top to bottom, the distance is 129.67 yards calculated as follows: 14/36 x 1000 = 389, then divided by 3 = 129.67. You can also use a different conversion to find distance in meters.
Can You Estimate Range with an MOA-Marked Reticle? Yes You Can…
Reader Josh offers this handy advice: “It worth noting that the ability to measure range is not unique to mil-based systems. A MIL is just another unit for measuring angles, and any angular measurement will work. Considering that just about everybody knows that 1 MOA is about an inch per hundred yards, similar formulae can be developed for ranging with MOA marks. The advantage with mils is the precise relationship between units — the MOA-inch measurement is imprecise (being off by 0.047″) — so in principle MILs are a better unit”.
This report comes from the American Suppressor Association (ASA).
The Bureau of Alcohol, Tobacco, Firearms and Explosives (ATF) has announced the imminent launch of a new electronic system for NFA transfers. Known as the eForms system, this overdue modernization will allow consumers to submit both ATF Forms 1 and 4 electronically, hopefully resulting in a significant decrease in transfer times when compared to traditional paper Forms. This should speed up acquisition of firearm suppressors, since these require a Form 4.
According to ATF, the transition to the new system will occur sometime after December 15th, but before Christmas. The new eForms system will handle all existing NFA transfer forms, including the ATF Form 4, which is used for transfers of suppressors.
What is the NFA?
The National Firearms Act of 1934 (NFA) requires the Federal registration of fully-automatic firearms, of short-barreled rifles and shotguns, of rifles over .50 caliber, and of firearms sound suppressors (termed “silencers” under the NFA).
Do NOT Withdraw an Existing Form 4 Submission
If you recently submitted an NFA application, keep it in the queue. The ASA cannot stress this enough. Withdrawing your Form 4 and re-submitting electronically will take longer than allowing your Form 4 to make its way through the approval process. Withdrawing and re-submitting electronically will add months to your overall application process.
That’s because ATF isn’t going to dig through the tens of thousands of forms being processed to find your application. They’re going to wait until your Form 4 reaches an NFA examiner’s desk – the exact point at which it would normally be approved – to process your withdrawal. Instead of approving it though, they will acknowledge your withdrawal and release your serial number. You will not be able to re-submit an eForm 4 with the same serial number until ATF acknowledges your withdrawal and puts it back into your dealers’ inventory.
While traditional paper-based applications will remain a viable option, ASA recommends that suppressor buyers submit new NFA applications electronically. That’s because, if the new eForms system works as promised, it will increase efficiencies by reducing form submission and payment processing times, eliminating weeks of delays in data processing, and all but eradicating data entry errors.
The ASA plans to provide updated information about eForms as soon the ATF officially launches the new program for submitting ATF Forms 1 and 4 electronically. In the meantime, stay tuned by following the American Suppressor Association on Instagram, Facebook, and YouTube.
Once the transition to the new eForms system begins, ATF estimates that the transition will take between two to four days to complete, at which point the new eForms system will go live. ATF has indicated that it will notify the industry 24 to 48 hours prior to the transition, and the ASA will post information as soon as it receives this notifice.
“December 7, 1941, a date which will live in infamy…”
Today, 80 years later, it remains important to remember what took place at Pearl Harbor, and to honor those soldiers, sailors, marines (and civilians) who lost their lives in the surprise attack. The tragic memory of Pearl Harbor reminds us that our nation should never be lulled into complacency. The world remains a dangerous place. The nation must remain alert to all dangers, and be prepared to respond to all threats, both known and unknown. As Wendell Phillips said famously: “Eternal vigilance is the price of liberty.”
The Shooting Wire noted: “Today, as we live in another period of uncertainty … we owe our lives and success as a nation to the more than 16 million Americans who left their homes and traveled over the world to protect freedom.” According to U.S. Department of Veterans Affairs, only about 240,000 of the 16 million Americans who served in World War II are alive in 2021. Today, it’s appropriate to remember them and the sacrifices they made for us.
This Editor’s father and uncle both fought in WWII, father in the Army, uncle in the U.S. Navy. A Lieutenant in the Corps of Engineers, my father took part in three landings — North Africa, Sicily, and the south of France. I still have his invasion armband — a treasured memento. Sadly, we lost my uncle in 2019, when he died at age 100. While in the Pacific, he served at the Tulagi Navy Base, where he knew Lt. (JG) John F. Kennedy. Of Kennedy, my uncle told me: “Jack? He was a good kid… and he loved his country.”
Thoughts on Pearl Harbor, by Dennis Santiago
When I think of December 7th, I remember it is the day my elders began the most difficult four years of their lives. I have seen in their eyes the fear, anger and resolve that come from experiencing what it was like to survive in territory occupied by the Empire of the Rising Sun. My mother had never heard of Pearl Harbor. For her, World War II began on the same day seeing the Japanese bomb a U.S. naval installation called Cubi Point, at the entrance to Manila Bay in the Philippine Islands.
My maternal grandfather never spoke of what horrors he had seen on the Bataan Death March or his years in the prison camps. When I look at my father, I think of my other grandfather’s memories of his son — my father — hanging off the side of a Japanese patrol boat in Subic Bay with an Arisaka pointed at him, forced to give up the catch needed to feed his family….
Time has passed but the poignancy has not faded. Each December 7th, I’m thankful my elders survived because I would not be here to muse about it, had they not. The echoes of their ordeal drive me deeply to make sure that such a thing will never happen again. Whether called the Greater East Asia Co-Prosperity Sphere or some other name made up by the contemporaries of my day, the evil that lurks underneath those who believe their ideas justify the horrors they impose must always be confronted and defeated.
These three videos show how the classic Model 1911 pistol works. This pistol requires the hammer to be cocked in order to fire. Watch the video to see the operation of the trigger, hammer, firing pin, and slide. After the round is fired the slide retracts and the cartridge ejects. Then, a new round rises in the magazine and chambers as the slide moves forward back into battery. With the hammer cocked when the slide came back, the m1911 is ready for the next shot.
Striker-Fired Glock Pistol — Modern Design
For comparison with the Model 1911 shown above, this video shows the Glock 19 (Gen 4) pistol with 3D animation. This modern, polymer-framed, striker-fired pistol has constant trigger pull for all shots. Some folks call this a DAO (double-action-only) trigger but that’s not really correct. Unlike the Model 1911, on a Glock there is no external safety on the frame or slide. The trigger “shoe” (the part that contacts finger) includes a central blade. This prevents the gun from firing unless the trigger is depresses normally. Glock calls this the “safe action”.


 Forum member Roy Bertalotto did a real nice off-set scope installation on a bolt gun to help a sight-challenged shooter. Roy explains: “A friend of mine shoots left-handed and has lost the sight in his left eye. I built him a scope mount so he can still shoot left-handed, but now use his right eye.” Roy’s fabrication work is impressive and we praise his efforts to help a fellow shooter stay in the game.


 The popular gun supplies vendor KYGUNCO is running a big