Brownells’ Do-It-Yourself (DIY) video series provides logical, step-by-step installation help for triggers, stocks, and springs. Nine separate videos cover Brownells various DIY Kits. Not sure if you’re up to the project? Just watch each video to see what’s involved. The nine DIY kits are:
This video shows Remington 700 after-market trigger installation:
In the Do-It-Yourself videos, Brownells’ Gun Techs proceed step-by-step, showing you exactly how to install the parts on your gun. Each kit also comes with complete, illustrated instructions you can take to the bench. To learn more, click the links above, or CLICK HERE to visit Brownells’ DIY Kit online page.
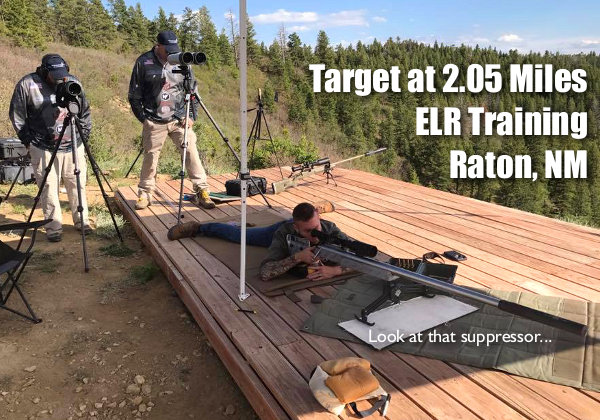
Want to learn more about Long Range Shooting? Check out the NSFF “Elements of Long Range Shooting” videos hosted by ballistics guru Bryan Litz of Applied Ballistics. In this multi-part series, Bryan covers a variety of topics of interest to precision shooters. For today’s Saturday at the Movies special, we feature seven of Bryan’s videos. Watch other informative Long Range Shooting and Ballistics videos with Bryan Litz on the NSSF YouTube Channel.
Atmospherics and Density Altitude
Bryan Litz explains: “An important element in calculating an accurate firing solution for long-range shooting is understanding the effects of atmospherics on a projectile.” Atmospherics include air pressure, air temperature, and humidity. Bryan notes: “Temperature, pressure, and humidity all affect the air density… that the bullet is flying through. You can combine all those factors into one variable called ‘Density Altitude’.” Density Altitude is used by the ballistic solver to account for variables that affect bullet flight.
Bullet Ballistic Coefficients
A bullet’s ballistic coefficient (BC) basically expresses how well the bullet flies through the air. Higher BC bullets have less aerodynamic drag than lower BC projectiles. You will see BCs listed as either G1 and G7 numbers. These correspond to different bullet shape models. Generally speaking, the G7 model works better for the long, boat-tail bullets used for long-range shooting. Notably, a bullet’s drag is NOT constant in flight. The true BC can vary over the course of the trajectory as the bullet velocity degrades. In other words, “BC is dynamic”. That said, you can make very accurate drop charts using the BCs provided by major bullet-makers, as plugged into solvers. However, long-range competitors may want to record “real world” drop numbers at various distances. For example, we’ve seen trajectories be higher than predicted at 500 yards, yet lower than predicted at 1000.
Transonic Range
When considering your rifle’s long-range performance, you need to understand the limit of your bullet’s supersonic range. As the bullet slows below the speed of sound, it enters the transonic zone. This can be accompanied by variations in stability as well as BC changes. Bryan explains “once your bullet slows done below supersonic and you get into transonic effects, there are a lot more considerations that come into play. The drag of the bullet becomes less certain, the stability of the bullet can be challenged, and things related to long times of flight, such as Coriolis and Spin Drift, come into play. So whenever you are shooting long range you need to where your bullet slows down to about 1340 fps.”
Ballistics Solvers — Many Options
Bryan Litz observes: “When we talk about the elements of long range shooting, obviously a very important element is a getting a fire solution, using a ballistic solver. There are a lot of ballistic solvers out there… Applied Ballistics has smartphone Apps. Applied Ballistics has integrated the ballistic solver directly into a Kestral, and the same solver runs (manually) on the Accuracy Solutions Wiz-Wheel. The point is, if it is an Applied Ballistics device it is running the same solutions across the board.”
Bullet Stability and Twist Rates
In this video, Bryan Litz talks about bullet in-flight stability and how to calculate barrel twist-rate requirements for long-range bullets. Bryan explains that bullet stability (for conventional projectiles) is basically provided by the spinning of the bullet. But this spin rate is a function of BOTH the nominal twist rate of the barrel AND the velocity of the projectile. Thus, when shooting the same bullet, a very high-speed cartridge may work with a slower barrel twist rate than is required for a lower-speed (less powerful) cartridge. For match bullets, shot at ranges to 1000 yards and beyond, Bryan recommends a twist rate that offers good stability.
Scope Tracking — Tall Target Test
Have you recently purchased a new scope? Then you should verify the actual click value of the turrets before you use the optic in competition. While a scope may have listed click values of 1/4-MOA, 1/8-MOA or 0.1 Mils, the reality may be slightly different. Many scopes have actual click values that are slightly higher or lower than the value claimed by the manufacturer. The small variance adds up when you click through a wide range of elevation. In this video, Bryan Litz shows how to verify your true click values using a “Tall Target Test”. The idea is to start at the bottom end of a vertical line, and then click up 30 MOA or so. Multiply the number of clicked MOA by 1.047 to get the claimed value in inches. For example, at 100 yards, 30 MOA is exactly 31.41 inches. Then measure the difference in your actual point of impact.
Coriolis Effect
The Coriolis Effect comes into play with extreme long-range shots. The rotation of the earth actually moves the target a small distance (in space) during the long duration of the bullet’s flight. Bryan Litz notes that, in most common shooting situations inside 1K, Coriolis is not significant. At 1000 yards, the Effect represents less than one click (for most cartridge types). Even well past 1000 yards, in windy conditions, the Coriolis Effect may well be “lost in the noise”. But in very calm conditions, when shooting at extreme ranges, Bryan says you can benefit from adjusting your ballistics solution for Coriolis: “The Coriolis Effect… has to do with the spin of the earth. The consequence of that is that, if the flight time of the bullet gets significantly long, the bullet can have an apparent drift from its intended target. The amount [of apparent drift] is very small — it depends on your latitude and azimuth of fire on the planet.”
About Bryan Litz
Bryan began his career as a rocket scientist, quite literally. He then started Applied Ballistics, the leading company focusing on ballistics science for rifle shooting. A past F-TR Long-Range National Champion and Chief Ballistician for Berger Bullets, knows his stuff. His Applied Ballistics squad was the winning team at the 2017 King of 2 Miles event, and Applied Ballistics has earned major U.S. defense contracts.
Shooting Industry magazine just released its latest April 2022 edition. You can read the full digital version on the web for free. This April issue contains an interesting article about long-range and PRS/NRL shooting equipment, and the current market for high-end tactical-style rifles and optics.
Shooting Industry’sEquipping Today’s Long-Range Customer article explains that customers in the long-range tactical market are prepared to spend serious bucks, but they demand high-quality gear that will last: “Those shooters who get serious about the [long-range shooting] sport can spend $10,000 or more on a rifle/optic combo. This is before adding accessories like bipods, Kestrel meters and rangefinders. Even an ‘entry level’ setup can set a customer back $2,000 – $3,000. So, while your average shopper might balk at the idea of spending as much on an optic as they do the rifle, things are different with this crowd” because they have done their homework.
“When people decide to step into the sport, they know they’re going to spend money. They don’t want to buy cheap” said A.J. Hoffman of SoDak Sports in South Dakota. Those who try to succeed at long range with low-end components “are likely to end up regretting the decision” — after gaining a better understanding of what it takes to hit targets at 1,000 yards and beyond.
Here are some recommended products featured in the article:
ZEISS LRP S5 318-50 FFP Scope
This new ZEISS LRP S5 318-50 First Focal Plane (FFP) optic offers the widest vertical adjustment range on the market — a full 140 MOA or 40.7 Milrads. We recently reviewed the bigger brother of this 3-18X power optic, the new ZEISS LRP S5 525-56 scope. Our tester said the 5-25x56mm ZEISS S5 offered great, precise turrets and very sharp glass. And the 5X magnification range gives the scope great versatility, from close-range to one mile and beyond.
WOOX Cobra Thumbhole Stock
Shooting Industry magazine states that “The unique ergonomics of the Cobra Thumbhole Precision stock from WOOX reduces felt recoil to help the shooter… while on the firing line.” We like the modern, adjustable design, with laminated wood on the grip and handguard. This provides the advantages of a contemporary tactical stock with the comfortable feel of wood. This WOOX stock features an adjustable comb, and rear underside Pic rail, and a forearm that can mount various accessories.
Vortex Razor HD Gen III 6-36x56mm FFP
Another popular optic for long range tactical shooters is the Vortex Razor HD Gen III 6-36x56mm FFP. This is a very durable optic with an impressive 6X zoom range. The upper 36X power is effective to see small targets at long distances.
Harrell’s Precision sells “semi-custom” full-length bushing dies for the PPC and 6BR chamberings. While the Harrell brothers do not cut the die to spec, they carry a large selection of dies made with slightly different internal dimensions. When you send in your fired brass, the Harrells choose a die from inventory with just the right amount of sizing (diameter reduction) at the top and bottom of the case. Given the quality, and precise fit, Harrell’s full-length dies cost $115.00 plus shipping. These are currently available for PPC family, 6mmBR, 6mm Dasher, and 6.5×47 Lapua. The folks at Harrells recommend checking if you have questions about die sizing: “Unless you know exactly which die you need, do not order online. We have 8 different sizes of each caliber. Please call (540)380-2683.”
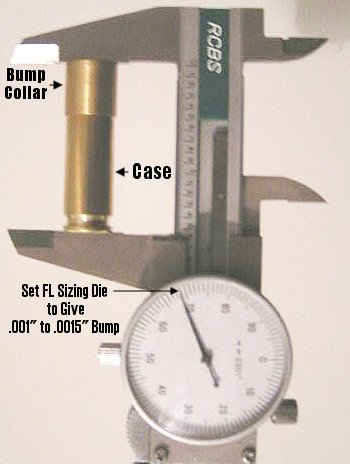
Bump Measuring Collar
The Harrell brothers provide a nice bonus item with each full-length die — a neat, little shoulder bump measuring device as shown in the photo at right. Hornady sells a stand-alone tool that does the same job, but the Harrell’s bump collar is simpler and faster. To measure your shoulder bump, simply place the Harrell’s bump collar over the front of your deprimed case (before sizing) and measure the OAL with your calipers. Then size the case in your full-length die, replace the collar and repeat the measurement. You want to set your die so the shoulder moves back about .001″ to .0015″ for most applications. (With semi-auto guns you may want more shoulder bump, perhaps .003″.)
It was bound to happen sooner or later. With the price of primers rising dramatically, and supplies being extremely restricted, we are now seeing pistol and rifle primers being marketed as “precious metals”, distributed through elite jewelry stores. With highly desirable match primers selling for $350 or more (per thousand) on GunBroker and other websites, primer makers have realized that primers are an exceptionally valuable product. Modern primers, which appear like tiny gold-colored pearls, can actually be marketed successfully through jewelry outlets and precious metals vendors.
The “precious primer” marketing trend is coming from Europe, home of the world’s leading jewelry empires. Primer maker Sellier & Bellot has started this trend, announcing that its primers will be sold through elite jewelry vendors Cartier, Tiffany & Co., and Bulgari. Not to be outdone, primer maker Fiocchi intends to market its high-grade primers through Damiani, Leviev, and Harry Winston outlets.
Starting in May, Sellier & Bellot primers will be put on display next to diamonds, rubies, and gold necklaces at Cartier, Tiffany, and Bulgari stores. Primer buyers will be able to purchase standardized primers, or special edition gold-plated primers with ruby-red internal cores. Initially the primers will be offered in sets of five, priced at $250.00.
Not to be outdone, Italian primer-maker Fiocchi plans to bring out its own jewelry line of primers, which will be offered in sets of four with Gold-tone, Silver, or Nickel finishes. These will be more affordable, with the silver-plated Fiocchis available for just $20 per set of four. There will also be a special 1000-pack of silver-coated primers for customers. This 1000-count Silver Collectors Edition will retail for $2500.00.
A new statute passed in California will bar state employees (as well as teachers, police personnel, and health care workers) from using a variety of firearms terms in official communications. California Assembly Bill 22408, authored by Assemblyman Tony Fulenzo (D. Los Angeles), defines over 30 gun-related words as “hate speech”. Under existing California law, any words/phrases defined as “hate speech” are proscribed (forbidden) in official publications, school textbooks, and all public-sector communications (including email). By effect of AB 22408 then, dozens of gun-related nouns, verbs, and adjectives will be banned, and “shall no longer be uttered or used in the State of California by any public agent or employee”.
Assemblyman Fulenzo said his intent in sponsoring AB 22408 was to alter public attitudes toward firearms, and in particular, to convince school children that firearms are bad. “We want to prevent young kids from perceiving firearms as ‘cool’ or ‘exciting’. The best way to do that is to bury the subject altogether. We need to dismantle the ‘gun culture’. That begins with banning the words themselves.”
Fulenzo said AB 22408 was inspired by existing bans on racist “hate speech”: “We don’t want children to read about guns or talk about guns. The first step, therefore, is to remove firearms-related words from textbooks, classroom presentations, and state documents. This is not something new. California has done the same thing with hateful words directed at minority groups. In California, by law, we have banned the use of the ‘N’ word (and other racist terms) in official state publications and school textbooks. Now we are just following that practice and banning the ‘G’ word (i.e. ‘gun’) and similar firearms-related hate speech”.
Ban on Gun Words in Oregon Next?
Meanwhile, in neighboring Oregon, anti-gun groups have called for the passage of similar legislation banning the use of firearms-related terminology. And there have been protests in Arizona also.
Permitted Word Equivalencies for Banned Firearm Terms
When enacted into law, AB 22408 will ban more than 30 firearm-related words, including “gun”, “pistol”, “rifle”, “bullet” and other commonly-used words. Where it is necessary to reference a firearm, as in a police report, AB 22308 provides for substitute words or phrases. AB 22408 recognizes that, in some instances, it will be necessary to mention firearms-related facts in official documents. By using these officially-designated substitute words, firearms-related facts can be logged without resort to banned “hate speech”.
Gun = “Gunk”
Pistol = “Piddle”
Rifle = “Ripple”
Shoot = “Suit”
Bullet = “Mullet”
Ammo = “Venmo”
Cartridge = “Partridge”
How to Use CA-Approved Substitute Words:
Under AB 22408, if an official report requires description of a hate speech item, then the approved replacement words shall be used instead of the prohibited terms. For example, if a state-funded hospital treats a pistol wound, this shall be listed as a “piddle wound” in the medical report. Likewise the recovery of cartridges at a crime scene by police shall be recorded as a “partridge recovery” in the incident report.
New Law Does Not Restrict Speech by Non-Governmental Entities
This new law only applies to “public sector” entities (schools, police/sheriff agencies, hospitals/health clinics, state and municipal agencies). Private businesses, including newspapers and web sites, will still be allowed to use firearms-related words without the threat of prosecution. Likewise, private citizens will still be allowed to say “gun”, “pistol”, or “rifle” etc. in their own private communications. However internet posting of hate speech involving forbidden firearm words will be monitored by a new California State Agency. This new Agency, the California Office of Firearms Hate Speech (COFHS) will be funded by a new 5% sales tax on firearms ammunition and components.
In the world of varmint cartridges, it’s all about speed. Higher velocity delivers flatter trajectories, and more dramatic impacts on critters. To achieve higher speeds, handloaders have experimented with many extreme wildcats — big cases necked down to a smaller calibers. Here we present what may be the most extreme wildcat cartridge of all, the .17 Incinerator — a .50 BMG necked down to .17 caliber. Created by Ammo-One, a custom cartridge company, the .17 Incinerator offers blistering performance. The special lathe-turned 33gr projectiles* exit the barrel at 5883 Feet Per Second — that’s over Mach 5, five times the speed of sound!
Mach 5 is 3836.35 mph at sea level, which equates to 5626.64 Feet Per Second (FPS). The remarkable .17 Incinerator achieves this stunning velocity by burning over 230 grains of powder in a highly modified .50 BMG case. The velocity of this cartridge (still well over Mach 5 at 100 yards) delivers an incredible amount of energy on target. A hit literally vaporizes a varmint, as you can see from the image below.
It takes a special barrel to shoot the .17 Incinerator. Kent Wilson of Ammo-One, who helped develop this extreme wildcat, explains: “The speeds are so great we had to use a custom 3-groove, polygonal-rifling 1:20″-twist barrel to keep the bullets from disintegrating on launch. The polygonal land/groove geometry reduces bullet engraving, which also helps keep the bullets in one piece. Also we must use solids — regular jacketed bullets can’t handle these speeds”.
Even More Speed — the .17 Incinerator Improved
While the .17 Incinerator is commercially available, there is an even more extreme “Improved” version of this case, with a radical 50-degree shoulder that yields even greater case capacity. The .17 Incinerator Improved (17 IN-IMP), shown below, can hold 20 grains more powder, promising velocities approaching Mach 5.5 or 6189.3 FPS. Now that’s really cookin’!
*Because of the ultra-high velocity generated by the .17 Incinerator, solid bullets must be used. Conventional jacketed projectiles would disintegrate before they reached the target.
CMP Introduces New National Air Gun Event for Adult and Junior Athletes
The Civilian Marksmanship Program (CMP) has received several requests to sanction more air rifle and air pistol events for all age groups. So, in the summer of 2022, the CMP will offer the new Air Gun National Matches — a three-day set of matches for adult and junior athletes.
The inaugural National Air Gun Championship will be held July 16-18 as part of the 2022 Camp Perry National Matches. That schedule allows the CMP’s junior 3PAR National Championship, the Air Gun Championship, and the National Matches Smallbore events to all be fired consecutively, with the Air Gun events held at the Gary Anderson Competition Center at Camp Perry.
The National Air Gun event will include a day of training, a two-member team elimination match and two days of 60-shot competitions that includes a four-member team match. The 60 Shot matches are also considered USA Shooting Designated Ranking events.
CLICK HERE to learn more about the new CMP National Air Gun Matches, including registration and entry fee information. Questions may be directed to Katie Harrington at kharrington@thecmp.org or (419) 635-2141, ext. 731.
Camp Perry Air Gun Championship Events 2022
July 16 – Training & Two-Member Team Elimination Match
July 17 – Air Gun Match 1 Championship
July 18 – Air Gun Match 2 Championship & Final
Additionally, the CMP has implemented new Distinguished Air Rifle and Air Pistol badge programs. Starting in 2022, Air Rifle and Air Pistol competitors of all ages, not just juniors, will be able to earn Excellence-In-Competition (EIC) credits for these badges in 60-shot National Matches Air Gun Championships, Monthly Matches as well as in CMP sanctioned Air Rifle and Air Pistol club matches.
The CMP currently maintains two state-of-the-art electronic target 10-meter indoor facilities: the South CMP Competition Center in Alabama and the Gary Anderson CMP Competition Center in Ohio. International-style air rifle and air pistol matches offered throughout the year at the CMP’s Competition Centers include the Monthly Matches, Camp Perry Open, and Dixie Double. All are open to both adult and junior athletes.
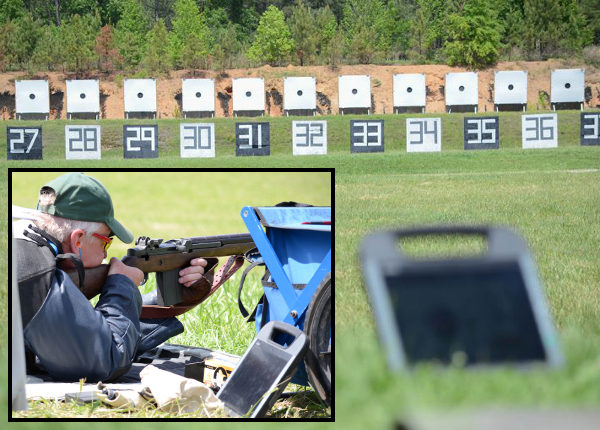
Today, March 30, 2022, Shooting USA TV features bullseye pistol competition at Camp Perry. Traditional Bullseye pistol shooting can bring nearly a thousand competitors to Camp Perry each summer, as part of the CMP National Championships. For these Camp Perry pistol matches, targets are set at 25 and 50 yards. The shooting position is standing and firing one-handed in slow fire, timed fire, and rapid-fire.
SHOW TIMES: This Shooting USA Episode airs Wednesday, March 30, 2021 at 9:00 PM Eastern and Pacific; 8:00 PM Central. If you miss the regular broadcast, you can stream the show at any time on Vimeo for $0.99 per episode.
Camp Perry Bullseye Pistol Competition
Camp Perry is synonymous with the oldest and most prestigious annual trophy matches in our nation’s history. And in a venue renowned for service rifle matches, the sport of precision pistol is no less important, no less challenging, and no less respected. The National Trophy Pistol Matches is all about traditional handgunning — the stance, the intense concentration, and of course, the one-handed grip. It’s all unmistakable as the game of Bullseye Pistol. Every year there are no fewer than 24 separate match trophies for the top Bullseye Pistol shooters, both military and civilian. And the very best will claim National Match Trophies and receive the President’s 100 Tab.
This video shows .45 ACP centerfire pistol competitors at Camp Perry
Civilians and military shooters competed together at the 2019 NTT Pistol Match.
The 2021 National Matches encompass multiple pistol competitions, including a Centerfire Pistol 900 Aggregate, a .45 Pistol 900 Aggregate, and a CMP Revolver Match. To learn more about CMP events at the 2021 National Matches at Camp Perry, visit the CMP Nat’l Matches Website.
Do you attend the CMP Games each year? Are you able to travel to multiple venues around the country? Then here is a special opportunity…
The Civilian Marksmanship Program (CMP) has created a new set of awards for those competitors who attend multiple CMP Competition Games events (formerly known as CMP Travel Games) during a single year. Awards include collectible T-Shirts and free (or discounted) Competition Games entry fees.
The first Competition Games event, the CMP Western Games, took place earlier this month in Phoenix, Arizona. The 2022 schedule also includes: Eastern Games (Butner, North Carolina), New England Games (Jericho, Vermont) and the Oklahoma Games (Oklahoma City, Oklahoma). Competitors that attend at least three of these four events will receive a collectible t-shirt and will be entered into a drawing for a chance to win free match fees to one Competition Game of their choice for the 2023 shooting season.
The Next CMP Competition Games Event is the Eastern Games, April 22 – May 1, 2022
Names will also be drawn to receive a 50% discount on match fees for one Competition Game for the 2023 shooting season. Four winners will be chosen for each drawing. Additional prizes will be awarded to those competitors who fire in all four Competition Games.
CMP Competition Games 2022 Schedule:
• March 11-20 – Western CMP Games & CMP HP Rifle Matches, Phoenix, Arizona
• April 22-May 1– Eastern CMP Games & CMP HP Rifle Matches, Butner, North Carolina
• Sept. 18-25 – New England CMP Games & CMP HP Rifle Matches, Jericho, Vermont
• Oct. 16-23 – Oklahoma CMP Games & CMP HP Rifle Matches, Oklahoma City, Oklahoma
If you have questions about the Competition Games awards, please email Christina Roguski at croguski@thecmp.org or visit the CMP Competition Games website.
The Competition Games are regional events held around the country throughout the year, featuring CMP’s unique rifle and pistol outdoor matches. The Games offer a variety of competition and training activities for experienced marksmen as well as well as novice competitors.


 Bump Measuring Collar
 It was bound to happen sooner or later. With the price of primers rising dramatically, and supplies being extremely restricted, we are now seeing pistol and rifle primers being marketed as “precious metals”, distributed through elite jewelry stores. With highly desirable match primers selling for $350 or more (per thousand) on GunBroker and other websites, primer makers have realized that primers are an exceptionally valuable product. Modern primers, which appear like tiny gold-colored pearls, can actually be marketed successfully through jewelry outlets and precious metals vendors.


 Fulenzo said AB 22408 was inspired by existing bans on racist “hate speech”: “We don’t want children to read about guns or talk about guns. The first step, therefore, is to remove firearms-related words from textbooks, classroom presentations, and state documents. This is not something new. California has done the same thing with hateful words directed at minority groups. In California, by law, we have banned the use of the ‘N’ word (and other racist terms) in official state publications and school textbooks. Now we are just following that practice and banning the ‘G’ word (i.e. ‘gun’) and similar firearms-related hate speech”.