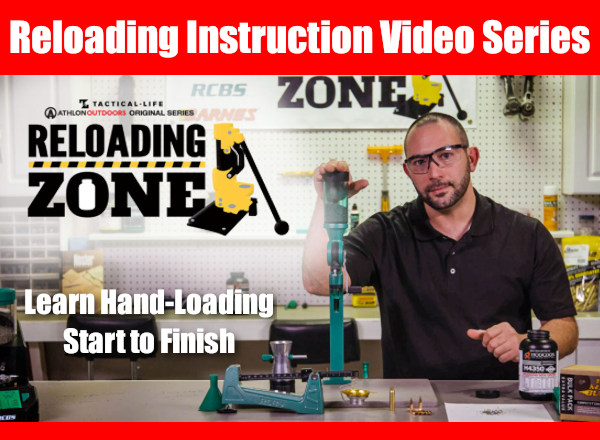
With 7 million new gun owners, and ammo hard to find at reasonable cost, hundreds of thousands of Americans are looking to get started with handloading. While we always recommend new reloaders have a living, breathing human teacher/mentor. It is possible to learn important skills through instructional videos. Here’s a good 4-part series that can help reloading novices AND serve as a refresher course for those who need to brush up their skill set).
This 4-part video series first guides the new hand-loader through the gear/hardware selection process. Then the videos cover, step-by-step, all the key processes of reloading from start to finish. If you are new to hand-loading, or just want a reloading refresher course, we recommend you watch this 4-part series from Tactical Life, part of the Athlon Outdoors Network.
WARNING!! We have embedded the Videos below. You can watch ALL four videos, but each will play back at the TOP. NOTE: They are all the same for the first 30 seconds, so you may want to skip forward. These videos may play back better if you go to the Tactical Life Website. Access: CLICK HERE.
Learn More in Tactical Life’s The Complete Book of Reloading (2020 Edition)
This publication includes over 2000 handgun and rifle loads. In addition, The Complete Book of Reloading (2020) reviews 8 modern Progressive Presses. Take note — there is a special report on the LabRadar Chronograph. Long-range Hunters will enjoy a feature article on the new 6.5 PRC Cartridge. In the “Handloaders’ Stockpile” a variety of new products to make your hours at the bench more productive are reviewed. The issue also has feature stories on Wildcat Cartridges, Subsonic loads, and .44 Magnum loads for both rifle and pistol. There is a Bonus 33-Page Hodgdon and Alliant Load Data Guide.
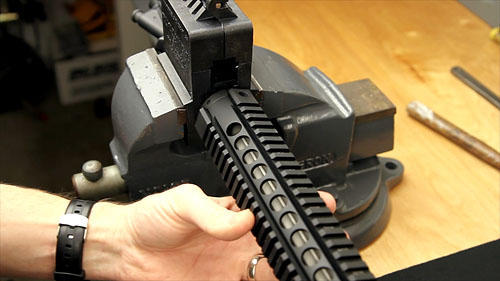
Here are the main tools you’ll need to assemble an AR-platform rifle
With the anti-gun agenda pushed by radical Democrats in Washington, many Americans are anxious to buy an AR-15, or put together an AR-platform rifle while it is still legal to do so. In Canada, the government ordered confiscation of AR-type modern sporting rifles, and both Joe Biden and Kamala Harris applauded that Executive Order. And Joe Biden recently called for a complete ban on semi-auto ARs and full-capacity magazines. With the prospect of radical gun control, we understand why many Americans are looking to buy, and/or build an AR-15. This article explains how.
If you ARE planning to put together an AR-platform rifle or want to upgrade your AR with a new barrel or trigger group, then you should check out the AR-15 Rifle Build DVD from our friends at UltimateReloader.com. This DVD covers all the details of a custom build, using high-resolution video sequences, and helpful supporting graphics.
In this DVD, Gavin Gear guides you through the entire process including selecting components, acquiring and using the necessary tools, assembly steps and details for each component, and even mounting a scope. Building an AR-15 can be overwhelming, but with the right guidance and help it’s not difficult and can be very rewarding. With this DVD you’ll be able to build your AR-15 with confidence.
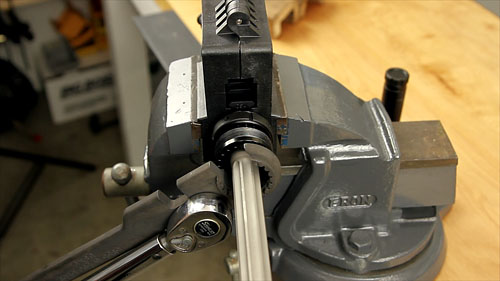
Upper: Barrel / Gas Block / Gas Tube
Upper: Handguard Installation
UltimateReloader.com’s AR-15 Build DVD is available just $9.90 (plus $3.80 shipping/handling). This DVD can pay for itself many times over by showing you how to do your own gunsmithing (and get quality AR components at attractive prices).
Spring varmint season is just around the corner. So here’s a very accurate Half-Mile ‘Hog rifle, that can drill a groundhog at long range. While just about any cartridge from a 22 magnum on up will do the job on a groundhog at close range, when you want to “reach out and touch” your prey at very long distance, it takes a case capable of tossing a heavier, wind-bucking projectile at ultra-high speeds. This week we feature a 6mm Remington Ackley Improved (6mm AI) belonging to our friend John Seibel, who ran the Varmints for Forum website for many years. John’s handsome BAT-actioned rifle sends the 87gr V-Max at a blistering 3675 fps. With its 1/4-MOA accuracy and flat-shooting ballistics, this gun is a varmint’s worst nightmare, a rig that regularly nails groundhogs at a half-mile (880 yards) and beyond.
Quarter-MOA Accuracy For Long-Distance Varminting
GunDay Report by John Seibel
John reports: “So far this gun has been an awesome long-distance varmint rig, with enough velocity to smack those critters hard at 800 yards and beyond. I have some more testing to do, but it seems that the 87gr V-Max (molyed) pushed by 52 grains of N160 or 51.5 grains of RL-19 shoots very well indeed. Velocity runs around 3675 fps. I shot consistent 1″ groups at 500 yards with both of these loads. Warning: These are max loads that work in my rifle, so start at least 10% lower and work up.
My fire-forming procedure is just jam and shoot. I start with a powder (such as H414) that works for the parent case, fire a few cases as I work up the load to where I get a well-formed case, then shoot them at varmints. Then I work my load up with the newly-formed cases over a chrono. If a load looks good at 100 yards, I will go straight for 200 yards. I’ve seen that some loads which grouped well at 100 won’t shoot well at 200. If it is consistent at 200, then I’ll shoot it a steel plate at 500 yards. Then the truth will be told.
Man I love that BAT action! I have tried some Berger 88gr Lo-Drag bullets as well. They have the same BC as the V-Maxs but offer excellent accuracy. The action is BAT’s Model B round action configured Right Bolt, Left Port, with a fluted .308-faced bolt. The port is 3.0 inches wide — perfect for the 6mm Rem Improved cartridge’s OAL. I use a NightForce 8-32x56mm NXS scope mounted to BAT’s 20-MOA aluminum Weaver-style base. I use Burris Signature Zee rings because they are self-aligning and easy on scope tubes, plus you have the option of adding more MOA if needed.
Krieger with Harrell Brake
The barrel is a stainless Krieger 1:12″ twist Heavy Varmint contour, finished at 26″. I installed a Harrell’s muzzle brake because I hate recoil and I like to be able to spot my hits when target shooting and hunting–especially hunting.
When hunting I am usually by myself so when I eyeball a varmint I want to see my shot flatten him … and I hardly ever miss (heh-heh). Make sure you have your earplugs in though — that muzzle brake is loud!
Easy-Steering Thumbhole Varminter
The stock is Richard’s Custom Rifles Model 005 Thumbhole Varminter. This is a big stock that rides the sand bags very well. Took me a while to get used to this stock as I had never shot a thumbhole before. It is very comfortable and easy to control when you are shooting a moving target. In fact, my first kill with this rifle was a coyote at a little over 200 yards, she was moving along at a slow clip and I had to give her the ole’ Texas heart shot before she disappeared over a hill! (It’s pretty rare for me to shoot moving varmints though — at long-range, I want my cross-hairs steady on the target.)
Regarding the stock selection, I like Richard Franklin’s stocks because they are well-suited to my kind of shooting. I prefer a stock that is flat most of the way back towards the action because when I’m shooting out of my truck window it has to balance around mid-point. Also his stocks seem to track very well on the bench. I guess the stocks I like the most are his Model 001 and Model 008 F-Class. [Editor’s note: John often shoots from the driver’s seat of his truck because he is partially paralyzed. He also has a hoist in his truck bed for his wheelchair. Even with his mobility challenges, John tags more varmints in a season than most of us ever will.]
Choice of Caliber — A 6mm with More Punch for Long Distance
I picked the 6mm Rem Improved mainly because it has that long neck for holding long bullets and it doesn’t burn the throats out as fast as a .243 AI would. I don’t use Remington brass; it splits when fire-forming and seems to work-harden fast. Another reason I picked the 6mm Improved was what I saw in the field–it seemed to be a perfect long-range groundhog getter. I saw my stocker, Richard Franklin, flat smack groundhogs out to 900+ yards with regularity. The OAL of a 6mm Improved does make it hard to remove a loaded round from a standard Remington 700 action. That’s why I went with the BAT Model B, with its longer 3.0″ port. For a standard action, a .243 AI might function better.
As for the 6 Dasher, from what I have read, I think it is a fine round. I’m a hunter though and a lot of case-forming isn’t worth it to me. Forming the Ackleyized cases is bad enough. The 6-250 is a real screamer and very accurate but it doesn’t have the capacity to drive the heavier bullets as well as the 6mm Improved. I have tried a .243 WSSM, also with a Richard’s stock (#008) and a BAT action. It may not shoot as well as the 6mm Rem Improved, but I like those short fat cases.
John’s Views on the Great Moly Debate
Editor: John started with moly-coated bullets for this 6mm Rem AI rifle, but he has moved away from that. He does have considerable experience with coated bullets, and now, at least with custom, hand-lapped barrels, he normally uses uncoated bullets. He now favors coated bullets only for the small .17 caliber.
Moly or no moly… hmm? I have used moly and Danzac for several years, mainly Danzac. In my experience, both moly and Danzac can work well for somebody who shoots a lot of rounds before cleaning. A barrel has to be broken-in correctly whether you use moly or not. I have done break-in with naked bullets, using the conventional method of shooting and cleaning till the copper stops sticking. I have also gone through the break-in process using molyed bullets from the start. It seems to me the barrels broke-in more readily with moly bullets than with naked bullets. I think if there are any rough or sharp places in the barrel the slick molyed bullet doesn’t grab it as badly and the moly will “iron” the flaw out without leaving copper behind.
The main mistake I think most people make with moly is improper cleaning. By that I mean they don’t get the bore clean from the beginning. Some people will scoff at me for this but I use JB bore paste for most all my cleaning, hardly ever use a brush. Just JB and Montana Extreme or Butch’s Bore Shine. It works for me! Now shooting molyed bullets works fine to say 500 yards, but any further and you really need a lot of tension on the bullet. If not you will get bad flyers.
Personally, I use coated bullets only with .17 cal rounds now. I did use them initially in my 6mm Rem AI but I am starting to move away from that. With proper break-in, the fine custom barrels we have now will not copper if you clean correctly and don’t push those bullets too fast! And remember that powder-fouling build-up is an accuracy-killer too. That is another reason I use a lot of JB paste.
John lives and works on a farm in Virginia. Getting rid of intrusive varmints is part of the job of running the farm. Here is one of John’s bolt-action pistols, which is very handy when shooting from a vehicle.
The Guru of Varmints For Fun
For many years John Seibel ran the popular Varmints For Fun website (now offline). This site offered excellent advice for hunters and reloaders. John covered a wide variety of varmint chamberings, from big 6mm wildcats, to the popular 6BR, 22BR and .22-250 caliber varmint rounds, and even the micro-caliber wildcats such as the 20 Vartarg and 20 PPC. Shown below is one of his favorite rifles, a 20 PPC with a special short version of Richard Franklin’s Model 008 stock.
John tells us: “I guess one reason I started my web site is that I was getting a lot of inquiries about hunting groundhogs, custom rifles and reloading. Plus I thought it was a fine way to get young people interested in the shooting sports. Lord knows hunting and firearms aren’t taught any more. I get a lot of young hunters and shooters asking what’s the best caliber for hunting varmints, and they’ll ask for reloading help too. It’s a shame, but many of them have no one to teach them. I do my best to help.
Showing others that a person can still shoot, even with a disability, is another reason I started my web site. I am a C 6-7 Quadraplegic, which means I have no grip in my hands. Imagine shooting those 1.5 oz Jewels that way! I had a therapist tell me I wouldn’t be able to shoot or reload once I got out of the hospital…shows you how much he knows! First time I got home from the hospital it was deer season and I had Pops park me at the edge of some woods. Well I had a 7-point buck on the ground in thirty minutes! Being raised on a farm didn’t hurt none either–it helped me figger ways to jury-rig stuff. Of course I couldn’t have done much if it wasn’t for my family and my lovely wife Cathy[.]”
John’s Favorite 20 PPC Varmint Rifle
Cartridge History Lesson — the Original .244 Remington
Here’s bit of cartridge history. The 6mm Remington, parent of John’s 6mm AI, actually started its life with a different name, the “.244 Remington”. What we now know as the “6mm Remington” was originally called the .244 Remington. The cartridge was renamed because it was not a commercial success initially, being eclipsed by the .243 Winchester. The .244 Remington and the 6mm Remington are identical — only the name was changed.
Many thousands of hand-loaders, including this Editor, acquired the original RCBS ChargeMaster 1500 powder scale/dispenser. Mine has worked well for many years. Yes I do have to watch for scale drift, and I use a high-end Force-Restoration scale when loading for major matches, but the original ChargeMaster has served me well, throwing thousands of charges over the years.
RCBS ChargeMaster Lite Reviews
A few years ago, RCBS introduced a new version of the ChargeMaster, the RCBS Chargemaster Lite. This newer unit has some features we really like. The new touch screen is easy to use and the powder tray cover slips off easily — no more hinges to fight. Most importantly the CM Lite has a redesigned, fluted dispensing tube which delivers powder kernels in a smooth flow with no clumps. The RCBS Rep told us “No more McDonald’s straw required”. We tested the unit and it does seem like the newly-designed dispensing tube is better. In fact, this new design will be adapted to the next generation of larger ChargeMasters. The ChargeMaster Lite ships complete with calibration check weights and cleaning brush. MSRP is $299.95 with “street price” around $239.99 at Amazon.
If you’re interested in the RCBS ChargeMaster Lite, here are three recent video product reviews. By watching these videos you can see all the features of the ChargeMaster Lite demonstrated. In the third video, the host also “compares and contrasts” the ChargeMaster Lite with the original ChargeMaster 1500, explaining the differences between the two units. Have at it:
Panhandle Precision ChargeMaster Lite Bench Test and Demo (Good Detailed Review):
Here is the RCBS Press Release: “The new RCBS ChargeMaster Lite packs unparalleled powder-measuring accuracy in a compact package. The one-piece unit features an LCD touchscreen display that ensures accurate data input. The hopper holds nearly a pound of smokeless powder, and can dispense anywhere between 2 to 300 grains with a +/-0.1-grain accuracy.”
UltimateReloader ChargeMaster Lite Unboxing:
Original ChargeMaster 1500 vs. ChargeMaster Lite:
Worth Considering Also — the Frankford Arsenal Platinum Series Intellidropper
Frankford Arsenal also offers an electronic powder scale/dispenser, the Intellidropper. This unit dispenses quickly, loads can be controlled with a Mobile App. Two years ago we did an in-depth Intellidropper Review. If you are in the market for a powder scale/dispenser, you should definitely consider the Intellidropper as well as the RCBS Chargemaster Lite. Watch this video to see how it works:
The Intellidropper is the most high-tech powder scale/dispenser to hit the market. This machine offers a unique powder calibration mode and the first-ever, mobile APP-controlled powder dispensing system. With a retail price under $200, the new Intellidropper is $70 less than the ChargeMaster Lite.
NRA Competitive Shooting has released the Official Calendar for the 2021 NRA National Championships at Camp Atterbury. The 2021 NRA Nationals at Camp Atterbury start with registration for the Smallbore Championships on Tuesday, July 6. The Smallbore Nationals continue through Sunday, July 18. The Precision Pistol National Championships begin on Tuesday, July 20, with the F-Class Mid-Range Nationals starting July 22 (registration/practice), with F-Class Long-Range commencing on July 27. Moving on to High Power Rifle, the Fullbore event runs August 1-7, while the Mid-Range Nationals begin on Tuesday, August 9, followed by the Long-Range Nationals starting on August 14, 2021. Finally, the NRA Extreme Long-Range (ELR) Championship begins on Friday, August 20 and concludes Saturday, August 21. The last week of the month, August 22-27 is slated for OTC competition.
Smallbore Rifle Championship: 6-18 July, 2021
Precision Pistol Championship: 20-25 July, 2021
F-Class Mid-Range Championship: 21-25 July, 2021
F-Class Long Range Championship: 27-30 July, 2021
Fullbore Championship: 1-7 August, 2021
High Power Mid-Range Championship: 9-13 August, 2021
High Power Long Range Championship: 14-19 August, 2021
ELR 1-Mile Championship: 20-21 August, 2021
OTC Competition: 22-28 August, 2021
NOTE: Listed dates include registration/sign-up and/or practice day, and award ceremony.
See full 2021 Camp Atterbury NRA National Championships calendar below. CLICK to view larger, full-screen printable image that is easier to read. ENLARGE (+ with mouse) after loading to read small print.
CLICK CALENDAR to VIEW Full-screen PDF then click Enlarge (+)
To learn more about the 2021 NRA Nationals, visit compete.nra.org. And for the latest updates, subscribe to the free Shooting Sports USA Insider newsletter.
Can you form a wildcat cartridge such as the 6mm Dasher or 6 BRA (BR Ackley) without expending primer, powders, and bullets? Absolutely. Using the hydro-forming method you can form improved cases in your workshop with no firing whatsoever, so there is no wear on your precious barrel. Watch this video to see how it’s done for the 6 Dasher:
6 Dasher Case Hydro-Forming Demonstration:
Forum member Wes J. (aka P1ZombieKiller) has produced a helpful video showing how to form Dasher cases use the Hornady Hydraulic forming die kit. This includes a two-part die (body and piston), and a special shell holder. To form the case, you insert a primer in your virgin brass, top the case off with with a fluid (water or alcohol), then run the case up into the Hydro-forming die. A few stout whacks with a hammer and your case is 95% formed.
Hydro-Forming Procedure Step-by-Step:
1. Insert spent primer in new 6mmBR brass case.
2. Fill with water or alcohol (Wes prefers alcohol).
3. Wipe excess fluid off case.
4. Place case in special Hornady shell-holder (no primer hole).
5. Run case up into Hydraulic forming die.
6. Smack top piston of forming die 3-4 times with rubber mallet or dead-blow hammer.
7. Inspect case, re-fill and repeat if necessary.
8. Drain alcohol (or water) into container.
9. Remove primer (and save for re-use).
10. Blow-dry formed case. Inspect and measure formed case.
Wes achieves very uniform cartridge OALs with this method. He measured ten (10) hydro-formed 6 Dasher cases and got these results: two @ 1.536″; 2 @ 1.537″; and 6 @ 1.538″.
Three or Four Whacks Produces a 95%-Formed Case
With a Hornady hydro-forming die, hydraulic pressure does the job of blowing out the shoulders of your improved case. The process is relatively simple. Place a spent primer in the bottom of a new piece of brass. Fill the case with water, and then slip it into a special Hornady shell-holder with no hole in the middle. Then you run the case up into the forming die. Now comes the fun part. You gently insert a plunger (hydraulic ram) from the top, and give it three or four stiff whacks with a mallet (or better yet, a dead-blow hammer). Remove the plunger and you have a 95% formed case, ready to load.
Special Shell-Holder
Hornady supplies a shell holder made specifically for the hydro die; there’s no hole in the bottom of it. Just insert a spent primer into the primer pocket and you’re ready to go. The spent primer, combined with the solid shell holder, keeps the water from seeping out of the primer pocket. The primer pushes out a little bit during this process, but it’s impossible for it to come out because of the way the shell holder is designed. The shell holder has a grove which allows the case to slide out of the shell holder even when the primer protrudes a bit.
Another Option — Hydro-Forming by DJ’s Brass Service
If you want to hydro-form your brass to save barrel life but you don’t want to go through the effort, or purchase the hydro-forming dies, there is a very good option. Darrell Jones of DJ’s Brass Service will do the job for a modest charge. You send Darrel your brass and he does all the hard work, preparing perfectly formed brass. Darrell can also anneal and/or neck-turn your cases — all for a reasonable fee.
DJ’s Brass Service offers case hydro-forming to your exact specs. Darrell Jones offers this service for a variety of popular cartridges: 6 PPC, 30 PPC, 30 BR, 6 BRA (BR Ackley), 6mm Grinch, 6 BRDX, 6 BRX, .260 Ackley, .284 Shehane and of course the very popular 6mm Dasher. After hydro-forming your brass, Darrell can also neck-up or neck-down the cases to meet your needs. For example, if you shoot a 22 Dasher, Darrell can hydro-form the cases to a 6 Dasher and then neck them down to .22 caliber. He can also turn the necks to your specs (for an additional charge). Hydro-forming by Darrell costs $0.60 (sixty cents) per case with a minimum order of $60 per hundred. NOTE: After cases are hydro-formed by Darrell, every case is washed, cleaned, and re-annealed. This cleaning and annealing process is included in the $0.60 (sixty cents) per case price.
This article based on story by Jason J. Brown, EditorNRABlog.com
Americans are purchasing firearms at historically high levels, with more than 7 million new gun owners in 2020 and gun sales setting new records. There were over 2 million NICS-adjusted gun buyer background checks in January 2021, a 75% increase compared to January 2020.
Gun ownership is a great responsibility, entailing not only a well-formed understanding of the basic rules of gun safety while shooting, but at all times. Gun safety is never more important than inside your own home. Gun safety isn’t just for gun owners — it’s a critical skill for everyone.
In the Home Firearm Safety Course, students will also learn about gun parts, ammunition, basic gun cleaning and care, and provide hands-on training on how to safely unload select types of guns. Each participant receives the NRA Home Firearm Safety handbook, NRA Gun Safety Rules brochure, Basic Firearm Training Program brochure, and a course completion certificate.
The NRA’s network of more than 128,000 NRA Certified Instructors delivers the Home Firearm Safety Course at locations nationwide. To find a course near you or learn about other NRA Training programs, visit the NRA Training portal.
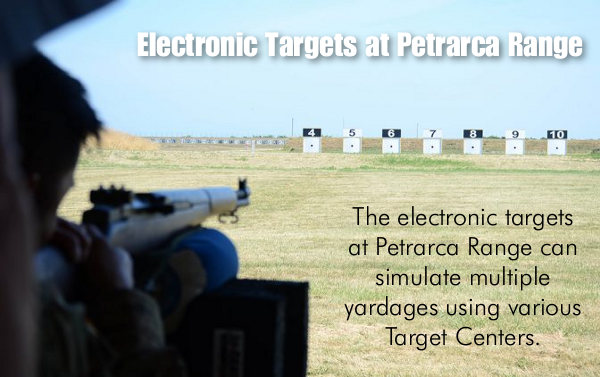
There WILL be shooting matches at Camp Perry in 2021, with safety protocols in effect to prevent COVID transmission. The Civilian Marksmanship Program (CMP) will host a variety of Garand, Springfield, Vintage and Modern Military (GSMM) rifle matches during the 2021 season at the historic Camp Perry National Guard Training Facility in Ohio. There will be matches at both the Petrarca Covered range and the Viale outdoor range. Registration for all matches is now open. Competitors of all skill levels are welcome to attend these recreational events. Knowledgeable CMP staff members will be on hand at all events. Space will be limited, so sign up soon.
Garand, Springfield, Vintage and Modern Military at Petrarca Range
A series of GSMM matches will be held at Camp Perry’s Petrarca Range using Camp Perry’s advanced electronic target system. The use of the KTS (Kongsberg Target System) targets means faster competition time (with no need for pit duty) and extra convenience for competitors who can rely on the instant and accurate shot monitors, located beside each firing point. Dates for the 2021 GSMM events at Petrarca Range currently include: May 22, June 26, and September 25.
High Power Matches at Viale Range
In addition to the Petrarca matches, a set of High Power rifle 800 Aggregate and Excellence-In-Competition (EIC) events will be held on Camp Perry’s outdoor Viale Range, June 26-27, 2021. The CMP explains: “The matches are ideal for those in the quest for a Distinguished Rifleman Badge as well as those with a love for modern military rifle shooting.” The Viale matches will utilize CMP’s High Power electronic targets.
Availability of Petrarca Range for Public Shooting Practice
Along with organized competitions, Camp Perry’s Petrarca Range is open for public shooting each Monday, with advanced reservations. Opening day for Petrarca Range’s Open Public slots begin March 15, 2021. Every Monday, by appointment only, guests may use Petrarca during the hours of 9 a.m. to 5 p.m., March through May and September through November. During the summer months (June through August), Petrarca is open from 9 a.m. until 6 p.m.
Please note: During the National Matches scheduled July 12 – August 14, Petrarca Range will be open throughout the week but only after firing is complete on Rodriguez Range. Guests to Petrarca must adhere to current CDC guidelines, including masks and social distancing.
As record numbers of Americans enjoyed the outdoors amid the pandemic in 2020, purchases of hunting and shooting equipment soared as well. Southwick Associates completed 15,000 hunter and recreational shooter surveys in 2020 through the online HunterSurvey and ShooterSurvey consumer panels and identified the top brands in the market.
What brands are favored by gun guys? Well here are the results of 2020 consumer surveys conducted by Southwick Associates. The surveys asked hunters and shooters to indicate their most frequently-purchased hunting and shooting product categories. This “Top Brand” list was compiled from 2020 internet-based surveys conducted through HunterSurvey.com and ShooterSurvey.com websites.
In 2020, most frequently purchased brands included:
Top Traditional Rifles brand: Savage
Top Handguns brand: Smith & Wesson
Top Reloading Powder brand: IMR
Top Reloading Presses brand: Lee Precision
Top Reloading Dies brand: Lee Precision
Top Handgun Ammunition brand: Federal
Top Shotgun Ammunition brand: Winchester
Top Magazines brand: Magpul
Top Gun Case brand: Allen
Top Binoculars brand: Vortex
Top Reflex/Red Dot Sights brand: SIG Sauer
Top Laser Sights brand: Crimson Trace
Top Non-powered Aftermarket Sights brand: Trijicon
Top Trail Camera brand: Wildgame Innovations
Top Camo Apparel Brand: Mossy Oak
Top Hunting Knives brand: Buck
Topline results of the Southwick Associates consumer tracking study are available in the Hunting & Shooting Participation and Equipment Purchases Report. This in-depth resource tracks hunting & shooting participation and equipment purchases for more than 100 products.
Top Traditional Rifles Brand Savage recently introduced a new straight-pull rifle, the Impulse:
The list above is only a fraction of all hunting and shooting categories tracked by Southwick Associates. Southwick Associates also tracks the percentage of sales occurring across different retail channels, total spending per category, average prices, and demographics for hunters and shooters buying specific products. Full reports, with a wealth of information, are available from Southwick Associates.
The Tactical Rifle Shooters Facebook Group recently showcased tools used to measure case headspace before and after “bumping” the shoulder. After a case is fired, hand-loaders who full-length size their cases will typically bump the shoulders back anywhere from .001″ to .0035″, depending on the rifle and application. With our 6mmBR and Dasher cases we like about .0015″ bump.
You want the amount of case sizing and bump to be the same for all your brass. To ensure uniformity, it makes sense to measure your cases before and after the FL sizing process. When we have time, we check every case. Other folks will simply check the first 3-4 cases coming out of the FL sizing die to ensure the FL die setting is correct and delivering desired headspace/bump.
1. Whidden Gunworks Shoulder Bump Gauge
There are a variety of tools that can be used to measure shoulder bump. Our favorite is a special cartridge-specific bushing made by Whidden Gunworks. The Whidden Shoulder Bump Gauge enables you to adjust your sizing die to the desired measurement. The bump gauge is attached to your calipers with a set screw and determines the measurement from the base to the shoulder of the case. The photo below, from Tactical Rifle Shooters, shows the Whidden Bump Gauge for the .375 CheyTac cartridge.
2. Dave Manson Vertical Comparator with Dial Read-Out
Dave Manson states: “This tool was designed to make life easier for the advanced shooter and re-loader by allowing precise measurement of ammunition, case, and chamber headspace. With this information, the re-loader will be able to fine-tune clearances and fits between his ammunition and chamber, with resultant improvements in accuracy and case life.” The functions of the Manson Comparator are:
1. Measure headspace of factory or reloaded ammunition
2. Quantify chamber headspace by measuring headspace of a fired case
3. Ensure minimal shoulder set-back when setting up re-loading dies
4. Compare base-to-ogive length to ensure consistent bullet-to-rifling relationship.
In addition to the Dial Indicator and Stand, the $130.00 Vertical Comparator is supplied with multiple Datum Blocks of precise length and inside diameter (.3300″/.3750″/.4000″/.4375″). MORE INFO HERE — Catalog page 20.
3. Hornady L-N-L Headspace Comparator System
Hornady’s Lock-N-Load Headspace Comparator system is easy-to-use and handy. You can get a kit with Red bushing-holder body and 5 bushings for $40.12. Hornady explains: “The Lock-N-Load® Headspace Comparator… gauge measures variations in brass before and after firing or re-sizing. It allows for headspace comparison between fire-formed brass and re-sized brass.” IMPORTANT: Hornady states: “To determine the proper bushing diameter for your cartridge, simply add the neck diameter and the shoulder diameter and divide that number by two. Use the bushing closest to that number.” Hornady offers five: .330″, .350″, .375″, .400″, and .420″.
One tip — We have found the Hornady gauges may vary a little from unit to unit even with the same nominal size. If you have more than one gauge for the same cartridge, test each on your brass — you may then note a slight difference in your bump measurements. There is also an Anvil Base Kit that mounts to the opposite blade on the caliper. This provides a more stable surface for the base of your case.
4. L.E. Wilson Case Gage Depth Micrometer
If you are looking for precise “bump” measurements without having to mess with calipers and clamp-on gauge blocks, you may want to consider the L.E. Wilson Case Gage Depth Micrometer. This takes very precise, repeatable measurements, but you need to know your starting point. The manufacturer explains: “Every reloader should know exactly how much your Full Length Sizing Die is pushing back the shoulder. With the NEW Case Gage Depth Micrometer you can do just that! It has never been easier to measure you cases headspace before and after sizing. The Depth Mic allows you to slip the micrometer perfectly over the top of the Gage with your case inserted into the Gage and take a measurement. Micrometer has graduations of .001″. The Case Gage Depth Micrometer is set to a zero of .100″ on the scale at our factory. Because of differences in ‘feel’ and temperature, we include a the Gage Block for you to test Zero and to adjust if necessary.”
5. Pistol Brass Case DIY Bump Gauge
Last is a “field expedient” set-up if you do not have any of the comparator tools shown above. A sized .45 ACP case (or other suitable pistol case) can be used to measure shoulder bump. The mouth of the pistol case sits on the shoulder of your rifle cartridge brass.
Make sure the .45 ACP case is trimmed square and that it is round. We recommend you first run it through an expander, then size it, trim it and chamfer. Next, take the .45 ACP case and slip it over the neck of a fired, unsized rifle case with the primer removed. Align the two cases between the jaws of your calipers and note the length from rim to rim (See left photo below).
OK, now you have the length for a fired rifle case BEFORE sizing. Next, take a full-length sized rifle case (without primer) and do the same thing, placing the .45 ACP case over the neck of the FL-sized case (Right Photo). The difference between the two numbers is the amount of “bump” or set-back you are applying to the shoulder. Here the difference is .0015″. The amount of bump you need varies with your chamber and your load, but .0015-.002″ is a good initial setting.


 Learn More in Tactical Life’s The Complete Book of Reloading (2020 Edition)
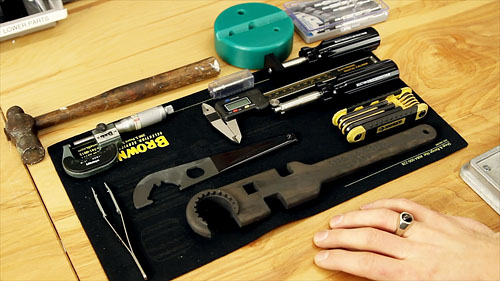


 My fire-forming procedure is just jam and shoot. I start with a powder (such as H414) that works for the parent case, fire a few cases as I work up the load to where I get a well-formed case, then shoot them at varmints. Then I work my load up with the newly-formed cases over a chrono. If a load looks good at 100 yards, I will go straight for 200 yards. I’ve seen that some loads which grouped well at 100 won’t shoot well at 200. If it is consistent at 200, then I’ll shoot it a steel plate at 500 yards. Then the truth will be told.

 Choice of Caliber — A 6mm with More Punch for Long Distance

 The Guru of Varmints For Fun


 Hydro-Forming Procedure Step-by-Step:
 Special Shell-Holder