The Gun Digest 2020 Annual, 74th Edition, is on sale now. This 560-page resource covers rifles, shotguns, handguns, muzzleloaders, airguns, optics and more. We like the print edition, but there will also be an eBook version releasing later in the year. Both provide hundreds of photos with new product roundups, in-depth product tests, and scores of articles and stories. The Gun Digest 2020, paperback edition, is now ON SALE for $21.37 at Amazon.com. That’s a 41% savings over the regular $35.99 price.
Articles by top writers cover long-range shooting, personal defense, hunting, gun-making, and collecting. Reports from the Field provide details on newest firearms and accessories. There is a cool photo essay showcasing fine custom and engraved guns. Among the many gun feature stories is “Finland’s Finest — Sako and Tikka”. There are also many historical gun articles.
Gun Digest 2020 also includes: Testfire reports, Firearms Catalog by Manufacturer, Optics Buying Guide, and Updated Ballistics Tables.
Other Good Books from Gun Digest Media
Gun Digest Media produces numerous other quality books for rifle, pistol, and shotgun owners. Here are four volumes we recommend. These are offered in both paperback and eBook versions:
What can happen when the bottom-most primer in a primer feed tube goes off? A big bang, that’s what. Some or all of the primers in the vertical feeding tube can go off in a chain detonation. That’s exactly what happened to Dustin Ellermann, Top Shot Season 3 Champion. Scary experience, but thankfully Dustin was not injured. He writes: “Super thankful that I was wearing my Wiley X eye protection this weekend when I was reloading some .223 rounds. My press detonated nearly 100 small rifle primers. Shown here is the magazine feed tube. Not fun but it could have been much worse. Stay safe!”
When working with progressive reloading presses, you should definitely wear eye protection. Dustin’s chain detonation experience proves that — without a doubt. Remember you only have one set of eyes!
RCBS APS Strips — Alternative to Primer Tubes When you stack a column of primers in a single metal tube, you’re asking for trouble. As Dustin Ellermann learned, when one primer fires, the entire column can follow suit in a chain detonation. Thankfully, you do have options when it comes to primer feeding on a progressive press. RCBS developed an innovative, smart system with primers in horizontal plastic strips. Instead of being stored in a vertical tube, primers are placed in flat, plastic “APS” strips, with a ring of plastic separating each primer. Moving horizontally, primers are never stacked, so the chance of a chain detonation is reduced dramatically. The re-usable APS strips are color-coded for different primer types. You can buy CCI “pre-loaded” primer strips, or you can insert any brand of primers into strips using an RCBS strip-loader tool.
RCBS APS Strip Priming System This video shows how to use APS primer strips wiht a bench-mounted priming system.
AccurateShooter.com Editor Uses Strip Primers
This Editor owns an RCBS Pro-2000 progressive press. The RCBS strip-priming system was one key reason I selected the RCBS Pro-2000 over similar-priced progressives from Dillon and Hornady. I believe the strip primer system is safer, more positive, and easier to use. Before I purchased my RCBS progressive, I “road-tested” the competition. I loaded hundreds of rounds on each of four different progressives: Dillon 550B, Dillon 650, Hornady Lock-N-Load, and RCBS 2000. I was concerned about the primer feed tubes on the Dillons, and I found the RCBS rotary powder measure was much more precise (and easier to adjust) than the sliding bar system on the Dillon machines. The RCBS priming system was definitely more fool-proof than the system on the Hornady press (a first-generation L-N-L that had issues with primer feeding). After “test-driving” blue, red, and green brand progressives extensively, I settled on the RCBS Pro-2000. A decade later, I still think I made the right choice. I like the APS strips for big jobs, and I can also use them in the RCBS hand-priming tool (shown below). With the strips, it’s easy to prime 20 or 40 cases at a time, and then switch to another type of primer for comparison testing.
The APS priming system also works with press-mounted priming tool, bench-mounted tool, and APS hand-tool. EdLongRange uses the press-mounted tool: “I also like the APS approach but use the press-mounted unit (saves your hands/wrists — and I haven’t had a need for a progressive press in over 20 years). Loading the primers in the strips is a bit of a PITA but very manageable. As with all tools there is a learning curve.” CLICK HERE for video showing strip-loading tool and press-mounted APS tool. The RCBS press-mounted tool is no longer in production by RCBS, but you can still find it in some stores or via eBay.
This website focuses on rifle accuracy and precision — normally indicated by small groups and high scores. But sometimes reactive targets are fun too — particularly when you can hit them at very long range. Here’s a video of a 6-6.5×47 Lapua hitting a milk jug at 1000 yards. This video was filmed during the Long Range Shooters of Utah 1000-Yard Milk Jug Challenge a while back. A remote camera shows a 95gr Sierra MatchKing penetrating a filled jug. The jug was hit with the fifth shot — you can see the fluid leaking out at 0:57. NOTE: Because the remote camera is positioned well off to the side, the jug-penetrating shot appears to impact low and slightly right (as seen in the inset close-up frame). The jug is actually suspended in front of the white square, and that’s where the fifth shot went, right through the bottom section of the jug.
Congrats to Mr. Clint Bryant of Green River, Wyoming for hitting the jug in challenging conditions. Clint had to dial 11 minutes of windage to compensate for a strong cross-wind (see 2:30 time-mark). Clint’s 6-6.5×47 cartridge is a variant of the 6.5×47 Lapua cartridge, necked down to 6mm. This 6-6.5×47 case drives the 95gr SMKs at 3100 FPS, making for a very effective (and accurate) coyote cartridge. Rick’s rifle was a Savage Model 12, with 30″ barrel, in an aftermarket stock, topped by a Leupold scope.
At the request of our readers, we provide select “Deals of the Week”. Every Sunday afternoon or Monday morning we offer our Best Bargain selections. Here are some of the best deals on firearms, hardware, reloading components, optics, and shooting accessories. Be aware that sale prices are subject to change, and once clearance inventory is sold, it’s gone for good. You snooze you lose.
1. CDNN — DPMS A15, Magpul Stock, Match Trigger, $499.89
The DPMS A15 is a good basis for a .223 Rem varmint rifle. It’s an excellent value at $499.89, given the components. The Magpul stock works well with a rear bag. And we like the 1:9″-twist 24″ stainless barrel with target crown. For varminting, it’s nice to have a 24″ barrel for extra velocity. Be aware this barrel has an unusual triangular profile forward of the handguard. This DPMS rig also features a 2-stage Bushmaster target trigger and durable Cerakote finish. NOTE: This is NOT a complete rifle — you need to supply a bolt carrier group and charging handle. But if you already own an AR15, you can use those components.
2. MidwayUSA — Dual Steel Gong System with Frame, $71.99
Who doesn’t like shooting steel? The “clang” of hitting a steel target at long range provides instant gratification. This patented Viking Solutions Gong Target System features two 3/8″-thick, AR500 Steel Gongs (8″ and 10″) suspended by chains. The support frame consists of 2 leg stands and 2 crossbar sections. Assembled, the crossbar is 32″ above ground level. Right now this unit is on sale for $71.99 — 20% off the regular price.
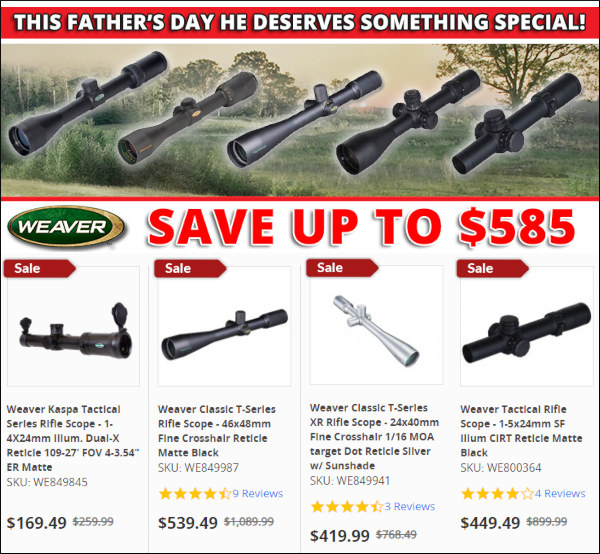
3. Natchez — Big Weaver Scope Sale, Save Hundreds
Weaver makes very good optics for a variety of disciplines — hunting, tactical, even benchrest. With Natchez’s June Weaver Optics Sale you can save up to $585! For centerfire benchrest the 48X T-Series XR scope can do the job at 1/3 the price of a Leupold. And for rimfire benchrest rifle, the 24X Weaver T-Series XR is a fine choice. Hunters will find suitable Weaver zoom scopes at crazy low prices. The 3-9x40mm Kaspa Hunting Series scope is just $79.99 on sale.
4. Midsouth Shooters — SK .22 LR Rimfire Ammo Sale
Right now Midsouth is running a big SALE on SK .22 LR Rimfire ammo. This quality ammo has shown fine accuracy in our rifles. A variety of types are offered starting at $5.59 for 50 rounds. For target rifles we recommend SK Flat-Nose Target ammo at $7.10 per box or $64.79 for 500 rounds. For many folks it performs close to high-end match ammo costing much more. Also, if you are looking for bulk .22 LR ammo, you can get 1000 rounds of Browning BPR 36gr copper-plated HP ammo for just$44.99 at Cabela’s. That’s just 4.5 cents per round.
Varminters rejoice! Here is a killer deal on excellent “dogtown” bullets. These 55gr .224-caliber V-Max bullets deliver explosive results on ground squirrels, p-dogs, and other small varmints. The BC is pretty low, but you can drive these V-Maxs over 3300 FPS with a standard .223 Rem cartridge using Varget or CFE223. With this sale, you can grab these excellent bullets for less than $17 per hundred — that’s a steal. If you’re a V-Max fan, act soon before this deal sells out.
6. Amazon — The Wind Book for Rifle Shooters, $22.99
This is the NEW May 2020 Edition, Just Released!
Readers often ask: “Is there a good, easy-to-comprehend book that can help my wind-reading?” Many of our Forum members have recommended The Wind Book for Rifle Shooters by Linda Miller and Keith Cunningham. Other books cover wind reading in a broader discussion of ballistics or long-range shooting. But the Miller & Cunningham book is ALL about wind reading from cover to cover, and that is its strength. The book focuses on real world skills that can help you accurately gauge wind angle, wind velocity, and wind cycles. Here’s a video review explaining what makes this book so good.
Need a small vertical safe for your workshop, loading room, remote cabin, or RV? This Legend Range & Field 4-Gun Safe can fill the bill. It has an electronic lock and backup key, and secures with five 1″ locking bolt. This small safe also includes a bolt-down kit for added security. At $183.30 this safe offers significantly more protection than a thin-walled security locker, for not much more money. Save $37 with this promotion at Gander Outdoors. NOTE: If you have the safe shipped to your house, there is a $50.00 Shipping Fee. Exterior Dimensions: 55″H x 11.6″W x 11″D
8. Cabela’s — Catch-All Gear Bag $12.99, Many Colors
This versatile bag holds lots of gear, and you can’t beat the price — just $12.99. At 16″x10″x6″ it’s big enough to hold rifle ammo, muffs, a Kestrel, and other accessories. It can also serve as a general utility bag for car camping trips. Six exterior pockets, including zippered mesh pockets on top and side, provide multiple storage options.Sturdy 1-1⁄2″ nylon web carry straps can be joined by a hand-friendly wrap handle. Cabela’s Catch-All Gear Bag available in a variety of colors including True Timber Camo, 02 Octane Camo (3 versions), Lt. Gray, Blue, Green, Tan, Orange Gold, and Dark Gray.
Here’s a great Father’s Day gift that you and your Dad can use together. Walkie-Talkies are “must-have” items for long-range shooting. The 22-CH Motorola T100 Two-Way Radio is an Amazon Favorite among FRS/GMRS Handheld Radios. Motorola says the T100 has a range up to 16 miles (with ideal conditions), and the T100 units can receive communications from all FRS/GMRS two-way radios. Price for a Two-Radio T100 Set is just $29.00
10. Brownells — Wipeout Foam Cleaner, $14.99
Walking the firing line of the Berger SW Nationals this year, one cleaning product was mentioned over and over again and for good reason. Sharp Shoot R Wipe-Out foaming bore cleaner is a no-nonsense, easy-to-use bore cleaner that does a great job. We get best results with two applications of Wipe-Out after some wet patches. If you’re tired of long brushing sessions, give Wipe-Out a try — it really reduces brushing required. This is a great deal. The same 5 oz. can is $23.95 on Amazon.
Good news — shooting clubs can once again hold NRA-sanctioned matches at their facilities. The NRA is now accepting tournament registrations for events to be held July 1, 2020 or later. This is good news for high power competitors, smallbore shooters, silhouette shooters, air rifle competitors, BPCR marksmen, and target pistol shooters.
The NRA has announced that beginning June 15, 2020, the NRA Competitive Shooting Division will begin accepting tournament registrations for sanctioned matches taking place on or after July 1, 2020. Clubs and match directors are urged to comply with federal, state and local guidelines regarding the COVID-19 pandemic. The NRA will continue to monitor the COVID-19 situation and/or make additional statements as needed. Please contact the NRA Competitive Shooting Division at comphelp@nrahq.org, visit the website at Competitions.NRA.org.
You’ll find current news, event info, and shooting tips on the NRA Competitive Shooting Facebook Page. There is also a large photo archive and many videos showing shooters in action at matches. Topics are shown on the left below:
Click Image to visit NRA Competitive Shooting Facebook Page.
NRA Sanctioned Tournaments are a series of matches covered by an official program. Such matches may be all individual matches, all team matches, or a combination of both. They may be all fired matches or a combination of fired and aggregate matches. A tournament may be conducted on one day or successive days.
Registered Tournaments, Approved Tournaments, Regional Championships, Sectional Championships and Sanctioned Leagues may be authorized by the NRA after application has been filed by a local group or organization. See the NRA rules for specific rule questions.
Gage Pin Die System Product Review by F-Class John
Consistent neck tension is often considered key to precision reloading. Neck tension (or interference as it’s more accurately known) helps ensure that the bullet is held with a known amount of pressure ensuring a consistent release each time. The more common expansion method employs expander mandrels. However, there is another lesser-known but very effective method — using GAGE PINS. This article reviews a unique Porter’s Precision Products Reloading Die designed to work with high-quality Gage Pins.
Gage Pins, long-time tool of machinists, are used to measure the size of a bored hole. They come in a variety of sizes and classes. In the reloading world, most people use ZZ Gage Pins that are sized .0005″ apart and are accurate to .0002″. The nice thing about Gage Pins is that you can order them in either a + or – size which means their accuracy errors on one side or the other so by ordering sets of + and – you can effectively make half-sizes. It’s this flexibility and great range of sizes that make Gage Pins so attractive.
For all the good that Gage Pins can do, until now there has not been a handy way to use them in a reloading press. Some folks tried using a bullet puller to hold the Gage Pin. But on many presses, this can be inconvenient because of long handles or unusual height requirements. As a result, I have mostly resorted to using conventional expander mandrels.
But now I have started using precision Gage Pins, thanks to a special new Gage Pin die system from Porter’s Precision Products in Texas. Not long ago I received a video from a friend showing someone using a custom die specifically made for holding Gage Pins. It turns out that Porter’s Precision Products out of Texas makes a custom Gage Pin Die product that consists of a die body, collet, and die cap. Porter’s Precision also sell a wide range of Gage Pins that have been nicely tapered to prevent damage to brass.
Using the Porter’s Precision Gauge Pin Die for Expanding Necks
Using the Porter’s Precision Gage Pin die is pretty straight forward with one caveat. The instructions are very clear that the collet must be inserted at an angle into the threaded cap to help ensure it tightens correctly otherwise damage to the collet may occur. Once you do this a couple times it becomes very simple and shouldn’t be a concern, especially since there’s rarely a ready to actually remove the collet unless you’re changing from one caliber range to another.
With the cap and collet now threaded onto the die body, choose the Gage Pin you want to use, insert it into the collet and tighten the cap down. Once the pin is where you want it, use a set of wrenches to firmly tighten the cap down and you’re ready to go. Thread the die in your press and simply adjust the height to ensure the Gage Pin is being inserted fully into the neck of your brass. You want to make sure the entire neck is being expanded without damaging the rim by pushing it to far up inside the die.
General Thoughts — Gage Pins vs. Expander Mandrels
The actual use of Gage Pins on case neck doesn’t vary from expander mandrels. They both accomplish the same goal and which tool you choose really comes down to personal preference. Where Gage Pins really shine is in their durability and the vast selection of sizes/diameters/tolerances. You can even find long-wearing, reduced friction carbide Gage Pins, but they do cost more.
For me, using the Porter’s Precision Die allowed smooth operation and Porter’s Gage Pins are really well-made. This makes expanding a dream even without any lube in the necks (although I still recommend lube when using a steel Gage Pin, as opposed to carbide). If you’ve been in the market for a way to help expand your necks with enhanced consistency, give Gage Pins a try using the Porter’s Precision Gage Pin Die.
A multi-time F-TR National Champion, James “Jimmy” Crofts is one of America’s top F-Class competitors. And now this F-TR ace has a stunning new rifle in his arsenal. AccurateShooter Forum member CigarCop, head honcho of KW Precision LLC, recently completed a new F-TR rig for Crofts. This handsome, state-of-the-art rifle features top-tier components: Borden action, twin Brux barrels, Cerus RifleWorks F-TR Stock, and Jewell trigger, all resting on a wide-base Phoenix Bipod.
James Crofts photo by Kent Reeve.
Have a good look at these photos below. Yes, envy is the appropriate reaction. With the smooth operation of the Borden action and the predictable accuracy of Brux barrels, we bet James’s new rig will shoot as good as it looks.
CigarCop actually chambered two barrels for James, with different fluting patterns — conventional linear flutes for one tube, and lines of staggered ovals for the other. Finished length for both barrels is 30″. Yes it looks cool, but the fluting was done mainly to save weight with the 30″-long lengths. CigarCop tells us the complete rifle, without scope and rings, weighs just under 15 pounds. Max allowed weight for an F-TR rifle, with scope, is 18.18 pounds (8.25 kg).
When James Crofts is not shooting his .308 Win F-TR rig,
he often trains with a .22 LR Rimfire rifle. Read on…
Rimfire Training for F-Class Competitors
2014 and 2012 U.S. National F-TR Champion James Crofts is one of America’s top F-Class shooters. A member of 2013 World Championship-winning F-TR Team USA squad, James knows a thing or two about long-range shooting. But you may be surprised to learn how James sharpens his shooting skills at relatively short distances. You see, James often practices with a .22 LR rimfire rifle at distances from 50 to 200 yards. James tells us: “Shooting my F-Class rimfire trainer saves me money and improves my shot process and wind-reading abilities.”
Remington rimfire 40X barreled action in PR&T LowBoy stock with PT&G bolt.
Rimfire Training Teaches Wind-Reading Skillsby James Crofts
Training with the rimfire is extremely useful and can be done from 25 yards out to 200 yards. I am lucky and can shoot 50 yards right off my back deck. That is far enough that any miscue on rifle handling will show up on the target. I use a two dry-fire to one actual shot routine for my practices. This gives me much more positive reinforcement without any negative reinforcement.
Wind reading is extremely important with a .22 LR rifle. I use a set of smallbore flags to aid my wind calls. The smallbore flags are a must and force you to look at the flags and mirage on each and every shot.
This Rimfire rifle features a CMP-sourced Rem 40X barreled action, PR&T Low Boy stock, Jewell trigger, and Phoenix bipod. The gun was built by Ray Bowman of Precision Rifle & Tool. James Crofts told us: “The project turned out awesome — the rifle was a hammer from the beginning even with the stock barrel.”
Rimfire Training Is Cost-Effective
Rimfire ammunition is much less costly than centerfire ammo. Though .22 LR prices have risen, you can still get a 500-round brick of very good .22 LR match ammo for around $75.00. That works out to fifteen cents a round. That’s a fraction of the cost of handloading .308 Win match ammo. The top match-grade, .308-cal centerfire bullets can cost around $60 per hundred. Then you have to figure in brass, primers, and powder. Finally you have to consider your precious centerfire barrel life lost to practice.
We are coming into peak Prairie Dog season. For long shots you’ll definitely want a centerfire. We like the 20 Practical in an AR and a 22 BR/BRA in a bolt-action. That will have you covered out to 700 yards. But for shorter shots on small critters — say inside 150 yards — it makes sense to have an accurate 17 HMR rimfire rig. Today’s 17 HMRs are capable of surprising accuracy, rivaling a good centerfire rig, but with less recoil and much lower cost per shot. And the 17 HMR offers more than double the velocity of a .22 LR — up to 2650 fps with a 17-grain bullet.
Top Shot former Champion Dustin Ellerman likes his Volquartsens, and we can see why. With one of his favorite 17 HMR rimfire varmint rigs, he’s seen some outstanding accuracy with CCI ammo. A few seasons back, on his Facebook page, Dustin reported: “Prepping for prairie dogs and I’m floored by this cold, sub-half-inch group shot with the Volquartsen Custom 17 HMR at 100 yards.” This thumbhole-stock rifle features a Bowers Group USS suppressor, and 3-12x56mm Meopta Scope. Dustin tried different types of CCI 17 HMR ammo. This small group was shot with CCI A17 ammo.
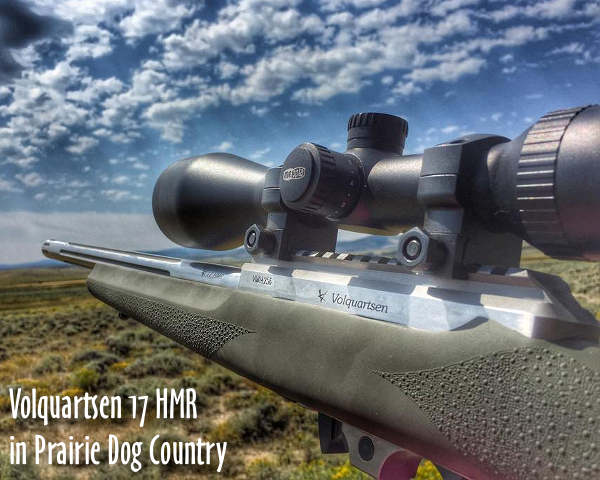
What’s the effective range of a 17 HMR on prairie dogs? You might be surprised. in 2015, Dustin took another Volquartsen 17 HMR on a Prairie Dog hunt in Wyoming. He was impressed with the rifle (shown below) and the little rimfire cartridge. Dustin says the effective range of the 17 HMR is farther than one might expect: “I made hits out to 300 yards. 200 yards was easy as long as the wind wasn’t too bad.”
Here’s the Volquartsen 17 HMR Dustin used in Wyoming in 2015:
After that 2015 P-Dog expedition, Dustin became a fan of the 17 HMR cartridge: “Never paid it much attention before now because the ammo is five times more expensive than .22 LR and I mostly target shoot. However, for prairie dogs, the 17 HMR is amazing!” Consider this — Hornady’s 17 HMR ammo pushes a 17gr V-Max bullet at 2550 fps, twice as fast as typical .22 LR rounds.
Prairie Dog Adventure with Savage A17
This video shows a successful Prairie Dog hunt. Watch and you’ll see hits out to 160 yards (00:50), proving the effective range of the 17 HMR cartridge. The host is shooting a Savage A17 semi-auto 17 HMR rifle in a Boyds laminated stock.
June is National Firearms Safety Month. As part of that effort, the National Shooting Sports Foundation (NSSF) has prepared tips for gun owners transporting firearms in their vehicles. Project ChildSafe and NSSF are emphasizing gun safety as National Safety Month kicks off, and as the nationwide surge in firearm sales continues and includes millions of first-time buyers.
HERE Are Key Guidelines for Safe, Secure Handling of Firearms in Vehicles:
• Take note of and safely control the muzzle direction of firearms in vehicles. This is one of the main rules of gun safety and applies to the inside of vehicles as well as any other location.
• When finished using your firearm outside your vehicle, unload it before you re-enter your vehicle.
• Even after a long hunt or a day in the sun at the range, always check, and then double check, that guns are unloaded before placing them in a car or truck.
• Be very careful if you must unload a firearm in the confined space of a vehicle so as not to have an accidental discharge. If your location allows, it is safer and easier to unload the firearm outside the vehicle.
• Never leave firearms in parts of the vehicle accessible to children or pets.
• Keep firearms and ammunition out of sight to avoid tempting thieves.
• Use secure temporary storage for firearms in vehicles.
• A lockable gun case or a lock box may be the most practical choice to securely store a gun in a vehicle. These come in a range of prices and models.
• If you’re concerned about quick access to your firearm, many types of lockable safes allow for extremely fast access of your gun while at the same time helping to prevent unauthorized access.
• Secure the lock box to the vehicle, if possible. Some companies make custom concealed compartments for specific model vehicles.
Storing Firearms in Vehicles to Prevent Theft and Misuse
We travel with our firearms all the time, taking them to the range, on hunting trips or carrying them on our person, as permitted by law. As a result, there will be times when you might have to leave your firearm in your vehicle. This creates a situation that deserves careful consideration. The last thing you want is to have your gun stolen and potentially misused by a criminal. In some states, you could even be subject under the law to serious penalties and fines for failure to properly secure a firearm. Unfortunately, thefts of firearms from vehicles are on the rise. Thieves commonly steal cars and trucks even when they don’t obviously contain firearms — a reminder that vehicle door locks are not totally secure.
As a responsible gun owner concerned about your firearms falling into the wrong hands, it’s best to always remember this rule: Your firearm must be under your control at all times; when it’s not, it should be placed in locked storage and out of sight. Locking the doors on your vehicle does not constitute secure firearm storage. As one writer put it: “Cars and trucks aren’t safes. And they’re not holsters. They’re not storage containers.”
The glove compartment or console of your car or truck, even if lockable, should not be considered a secure storage device either, as it can be pried open too easily. If you need to leave your firearm in a vehicle, here are some important safety considerations to keep in mind to help prevent theft and unauthorized access.
Many guys getting started in long range shooting are confused about what kind of scope they should buy — specifically whether it should have MIL-based clicks or MOA-based clicks. Before you can make that decision, you need to understand the terminology. This article, with a video by Bryan Litz, explains MILS and MOA so you can choose the right type of scope for your intended application.
You probably know that MOA stands for “Minute of Angle” (or more precisely “minute of arc”), but could you define the terms “Milrad” or “MIL”? In his latest video, Bryan Litz of Applied Ballitics explains MOA and MILs (short for “milliradians”). Bryan defines those terms and explains how they are used. One MOA is an angular measurement (1/60th of one degree) that subtends 1.047″ at 100 yards. One MIL (i.e. one milliradian) subtends 1/10th meter at 100 meters; that means that 0.1 Mil is one centimeter (1 cm) at 100 meters. Is one angular measurement system better than another? Not necessarily… Bryan explains that Mildot scopes may be handy for ranging, but scopes with MOA-based clicks work just fine for precision work at known distances. Also because one MOA is almost exactly one inch at 100 yards, the MOA system is convenient for expressing a rifle’s accuracy. By common parlance, a “half-MOA” rifle can shoot groups that are 1/2-inch (or smaller) at 100 yards.
What is a “Minute” of Angle?
When talking about angular degrees, a “minute” is simply 1/60th. So a “Minute of Angle” is simply 1/60th of one degree of a central angle, measured either up and down (for elevation) or side to side (for windage). At 100 yards, 1 MOA equals 1.047″ on the target. This is often rounded to one inch for simplicity. Say, for example, you click up 1 MOA (four clicks on a 1/4-MOA scope). That is roughly 1 inch at 100 yards, or roughly 4 inches at 400 yards, since the target area measured by an MOA subtension increases with the distance.
MIL vs. MOA for Target Ranging
MIL or MOA — which angular measuring system is better for target ranging (and hold-offs)? In a recent article on his PrecisionRifleBlog.com website, Cal Zant tackles that question. Analyzing the pros and cons of each, Zant concludes that both systems work well, provided you have compatible click values on your scope. Zant does note that a 1/4 MOA division is “slightly more precise” than 1/10th mil, but that’s really not a big deal: “Technically, 1/4 MOA clicks provide a little finer adjustments than 1/10 MIL. This difference is very slight… it only equates to 0.1″ difference in adjustments at 100 yards or 1″ at 1,000 yards[.]” Zant adds that, in practical terms, both 1/4-MOA clicks and 1/10th-MIL clicks work well in the field: “Most shooters agree that 1/4 MOA or 1/10 MIL are both right around that sweet spot.”


 When you stack a column of primers in a single metal tube, you’re asking for trouble. As Dustin Ellermann learned, when one primer fires, the entire column can follow suit in a chain detonation. Thankfully, you do have options when it comes to primer feeding on a progressive press. RCBS developed an innovative, smart system with primers in horizontal plastic strips. Instead of being stored in a vertical tube, primers are placed in flat, plastic “APS” strips, with a ring of plastic separating each primer. Moving horizontally, primers are never stacked, so the chance of a chain detonation is reduced dramatically. The re-usable APS strips are color-coded for different primer types. You can buy CCI “pre-loaded” primer strips, or you can insert any brand of primers into strips using an RCBS strip-loader tool.