Review by F-Class John
Do you know what the inside of your barrel looks like? Borescoping is a great way to diagnose a barrel problem or evaluate your cleaning regimen. Conventional optical borescopes work great but are expensive. Low-cost digitial borescopes have been on the market for a while, but many have have lacked the resolution necessary to get the job done properly. Enter the Teslong rifle borescope. We set out to see whether this new electro-optical borescope, priced at just $49.99, could do the job of conventional optical borescopes that might cost twenty times as much. We concluded that this little device is pretty amazing…
Here is an actual video captured with the Teslong borescope owned by Forum member DMoran. This is the inside of a Howa factory .223 Rem Barrel:
Setting Up and Using the Teslong Borescope
The Teslong borescope comes in a handy, zippered case* with a mesh pouch on one side and an elastic strap on the other to help secure the cords. The unit employs two different cables. One is a flexible USB A/V cable which also thoughtfully comes with a USB/USB-C converter as well. The other piece is the mirrored borescope which is attached to a flexible but fairly rigid cable. The first thing I noticed is the generous length of the combined cable. Since the unit needs to be connected to a computer or other compatible device, the long cable allows you easily scope the entire length of your barrel while you keep your computer at a distance. I appreciated the way this works because it allowed me to continue cleaning my gun and checking the barrel without worrying about getting any cleaning supplies on my computer.
NOTE: The Teslong borescope we purchased from Amazon in September came with the storage case shown. We’d been informed that some recent shipments have omitted the case.
Plug and Play — With Impressive Resolution and Image Quality
Once the unit is plugged into the computer all I had to do was open my photo program and the Teslong activated and displayed the bore image. For Windows at least, there are no Apps to install or anything else to do other than plug it in. Once it’s plugged in you simply slide the unit into your bore and start looking. The angled mirror along with the integrated light allows for easy viewing of the lands and grooves with little to no need for focal adjustment. I ran the scope down some newer barrels as well as one of my oldest, burned-out barrels and I was shocked at the detail and resolution I saw. Rust, copper, carbon and fire-cracking really popped out. If I was assessing barrel cleaning effectiveness, I could easily see how levels of fouling are being removed. I will use my Teslong to capture photos of my next barrel in brand new condition. Then I can reference those “Day 1″ images each time I clean that barrel.
As an owner of a Hawkeye and another digital borescope, both of which are fairly expensive, I have to admit I was skeptical of a borescope that costs a mere fifty bucks. But frankly, I was amazed at the image quality. Look for yourself. These are actual Teslong photos I took while inspecting one of my barrels.
NOTE: This is a fire-forming barrel that was not cleaned for 500 consecutive rounds.
Read Reviews from Teslong Borescope Buyers
Want to know what other Teslong owners think? You can read over five pages of Teslong Rifle Borescope comments and reviews by our Forum members in AccurateShooter’s Teslong Forum Thread.
Here are actual statements by Forum Members and Amazon purchasers
“Received mine last week, incredible quality for the price.” — PhilC
“There’s a couple of threads discussing these borescopes. It actually has the 45 degree mirror so that you can see the everything much better than with a standard endoscope.” — Mark W
“Most firearm borescopes are expensive… The Teslong Rifle Borescope is currently the best affordable borescope you can buy. With the Teslong Rifle Borescope I’m able to see the fire cracking in my rifle’s bore. I definitely recommend purchasing.” — Amazon Purchaser
“The price is right and the quality is first-rate. Plugs into USB-A or Micro USB port on PC, Mac, or Android (it doesn’t work with iPhones). Takes pics or HD video, stored using either native camera software or their Teslong Camera program. It has a very close focus necessary for a borescope. Other commercial ‘endoscopes’ may be the same diameter, but they have a 2- to 5-cm focal distance, making it difficult to use in a barrel and useless for 90 degree viewing except in, say, a 105mm howitzer. Probe diameter is 0.20 in/5.0 mm diameter and is ideal for use on .223/5.56. The removable 45° mirror allows viewing chamber walls and barrel lands/grooves up close and personal.” — Jim Schmidt
“I have tried it out on my 6.5mm and .223 rifles and it performed way beyond my expectations once you know how to focus it. Also, I have a Samsung Android and neither the USB plug nor the additional adapter would fit my phone (I thought). Teslong customer service reps told me that the plug for my phone is actually a part of the standard plug that comes with the unit. Heck, all I had to do was flip the male end of the plug down! Also, there is a light intensity adjustment on the little box-looking thing that is a part of the cable. It’s really small and easily overlooked.” — Barrbqn (Amazon)
F-Class Nationals Competitors Try the Teslong — And Then Place Orders
I gave the Teslong a pretty thorough testing on my bench at home, but I was also able to test it while attending the 2019 F-Class Nationals. It hooks up easily to a laptop (either Windows or Mac). It will also work with an Android tablet or smartphone (but not yet with an iPad or iPhone). I set the Teslong up for some fellow competitors to test. Each time someone stuck it in their barrel there was a collective gasp when they saw how clear and detailed the picture was. It wasn’t long before everyone in our housing unit wanted to try it.
Interestingly, one of the fellows in our housing pulled out the exact same unit. It turned out he loved it just as much as we all did. What really told me it was a keeper is when several of the people who also own Hawkeyes or other borescopes ordered a Teslong as soon as they were done playing with it. On a side note, we also ended up using it to look inside a seating die, inside a disassembled bolt, and under a refrigerator. I’m sure there are countless other uses for the Teslong.
CONCLUSION — Impressive Product — You Won’t Be Disappointed
The bottom line is that there isn’t anything on the market that can compete with this little gem anywhere near its $50 price point. I would say that if you’ve put off buying a borescope because of price or quality concerns this is the unit to buy — you won’t be disappointed. In the video below I show how to use the Teslong in your rifle. The Teslong Borescope is available right now for $49.99 on Amazon.
Software Functionality (Apps and/or Operating System)
Windows 7/8/10 or later (Desktop or Laptop Computer)
1. Use Windows Camera, the built-in Camera software of Windows10, only for Win10.
2. Use Teslong camera software or AmCap software
Android 4.4+ (Tablet or Smartphone)
Use Teslong Camera App, CameraFi, or USB Camera App
Mac OSX 10.6+ (Desktop or Laptop Computer)
Use Photo Booth or QuickTime Player
Notice: This Teslong model does NOT support iPhone and iPad! Teslong says: “WiFi version of the rifle borescope supporting iPhone and iPad is under development, and coming soon.”
Teslong vs. Conventional Optical Borescope (Such as Hawkeye)
The Teslong is not perfect. It does have some shortcomings when compared to a conventional optical borescope such as the Hawkeye. A borescope with a long, rigid metal shaft is easy to rotate within the bore. Therefore you can quickly inspect all 360 degrees inside the barrel. By contrast, the Teslong has a flexible cable that you have to twist to rotate the lens. That works, but it’s not as easy. Additionally, in a large-diameter bore, the 5mm-wide Teslong tends to flop to the low side. Again, with a Hawkeye, it is easy to maintain a constant distance to the bore wall.
Forum member Ned Ludd explains these considerations in a Forum post: “The [Teslong] is designed to fit into a .22 Cal bore. As such, there is quite a bit of play (lateral movement) of the camera head in a .30 Cal bore as you twist the cable to swivel it around 360 degrees. This is largely caused by the angle of the cable as you spin it, which is not perfectly concentric to the bore. This is not an issue of concern in a much more expensive borescope with a purpose-built swivel mechanism.”
That said, we still think the Teslong is a great device, well worth the money ($50 vs. $850+ or so for a Hawkeye). The cable rotation isn’t that big a deal, with a little practice. Overall, for regular visual inspections of your barrels, with easy photo/video capture, the Teslong is hard to beat for the price.
*The Teslong borescope we ordered from Amazon and tested came in the black, zippered case shown in the top-most photo. We have been informed that some Teslong units have recently shipped with NO case. We do not know if cases will be provided in the future.
Here’a useful article by Sierra Bullets Media Relations Manager Carroll Pilant. This story, which originally appeared in the Sierra Blog, covers some of the more common ammo problems that afflict hand-loaders. Some of those issues are: excessive OAL, high primers, and improperly sized cases. Here Mr. Pilant explains how to avoid these common problems that lead to “headaches at the range.
I had some gentlemen at my house last fall getting rifle zeros for an upcoming elk hunt. One was using one of the .300 short mags and every 3rd or 4th round would not chamber. Examination of the case showed a bulge right at the body/shoulder junction. These were new cases he had loaded for this trip. The seating die had been screwed down until it just touched the shoulder and then backed up just slightly. Some of the cases were apparently slightly longer from the base to the datum line and the shoulder was hitting inside the seating die and putting the bulge on the shoulder. I got to thinking about all the gun malfunctions that I see each week at matches and the biggest percentage stem from improper handloading techniques.
One: Check Your Cases with a Chamber Gage
Since I shoot a lot of 3-gun matches, I see a lot of AR problems which result in the shooter banging the butt stock on the ground or nearest solid object while pulling on the charging handle at the same time. I like my rifles too well to treat them that way (I cringe every time I see someone doing that). When I ask them if they ran the ammo through a chamber gage, I usually get the answer, “No, but I need to get one” or “I didn’t have time to do it” or other excuses. The few minutes it takes to check your ammo can mean the difference between a nightmare and a smooth running firearm.
A Chamber Gauge Quickly Reveals Long or Short Cases
Size Your Cases Properly
Another problem is caused sizing the case itself. If you will lube the inside of the neck, the expander ball will come out a lot easier. If you hear a squeak as the expander ball comes out of a case neck, that expander ball is trying to pull the case neck/shoulder up (sometimes several thousandths). That is enough that if you don’t put a bulge on the shoulder when seating the bullet … it can still jam into the chamber like a big cork. If the rifle is set up correctly, the gun will not go into battery and won’t fire but the round is jammed into the chamber where it won’t extract and they are back to banging it on the ground again (with a loaded round stuck in the chamber). A chamber gage would have caught this also.
Oversizing cases also causes problems because the firing pin doesn’t have the length to reach the primer solid enough to ignite it 100% of the time. When you have one that is oversized, you usually have a bunch, since you usually do several cases at a time on that die setting. If the die isn’t readjusted, the problem will continue on the next batch of cases also. They will either not fire at all or you will have a lot of misfires. In a bolt action, a lot of time the extractor will hold the case against the face of the breech enough that it will fire. The case gets driven forward and the thinner part of the brass expands, holding to the chamber wall and the thicker part of the case doesn’t expand as much and stretches back to the bolt face. If it doesn’t separate that time, it will the next time. When it does separate, it leaves the front portion of the case in the chamber and pulls the case head off. Then when it tries to chamber the next round, you have a nasty jam. Quite often range brass is the culprit of this because you never know how many times it has been fired/sized and in what firearm.’Back to beating it on the ground again till you figure out that you have to get the forward part of the case out.
Just a quick tip — To extract the partial case, an oversized brush on a cleaning rod [inserted] and then pulled backward will often remove the case. The bristles when pushed forward and then pulled back act like barbs inside the case. If you have a bunch of oversized case that have been fired, I would dispose of them to keep from having future problems. There are a few tricks you can use to salvage them if they haven’t been fired though. Once again, a case gage would have helped.
Two: Double Check Your Primers
Another thing I see fairly often is a high primer, backwards primer, or no primer at all. The high primers are bad because you can have either a slam fire or a misfire from the firing pin seating the primer but using up its energy doing so. So, as a precaution to make sure my rifle ammo will work 100% of the time, I check it in a case gage, then put it in an ammo box with the primer up and when the box is full, I run my finger across all the primers to make sure they are all seated to the correct depth and you can visually check to make sure none are in backwards or missing.
Three: Check Your Overall Cartridge Length
Trying to load the ammo as long as possible can cause problems also. Be sure to leave yourself enough clearance between the tip of the bullet and the front of the magazine where the rounds will feed up 100%. Several times over the years, I have heard of hunters getting their rifle ready for a hunt. When they would go to the range to sight in, they loaded each round single shot without putting any ammo in the magazine. On getting to elk or deer camp, they find out the ammo is to long to fit in the magazine. At least they have a single shot, it could be worse. I have had hunters that their buddies loaded the ammo for them and then met them in hunting camp only to find out the ammo wouldn’t chamber from either the bullet seated to long or the case sized improperly, then they just have a club.
Four: Confirm All Cases Contain Powder
No powder in the case doesn’t seem to happen as much in rifle cartridges as in handgun cartridges. This is probably due to more handgun ammo being loaded on progressive presses and usually in larger quantities. There are probably more rifle cartridges that don’t have powder in them than you realize though. Since the pistol case is so much smaller internal capacity, when you try to fire it without powder, it usually dislodges the bullet just enough to stick in the barrel. On a rifle, you have more internal capacity and usually a better grip on the bullet, since it is smaller diameter and longer bearing surface. Like on a .223, often a case without powder won’t dislodge the bullet out of the case and just gets ejected from the rifle, thinking it was a bad primer or some little quirk.
For rifle cases loaded on a single stage press, I put them in a reloading block and always dump my powder in a certain order. Then I do a visual inspection and any case that the powder doesn’t look the same level as the rest, I pull it and the one I charged before and the one I charged after it. I inspect the one case to see if there is anything visual inside. Then I recharge all 3 cases. That way if a case had powder hang up and dump in the next case, you have corrected the problem.
On progressive presses, I try to use a powder that fills the case up to about the base of the bullet. That way you can usually see the powder as the shell rotates and if you might have dumped a partial or double charge, you will notice as you start to seat the bullet if not before. On a progressive, if I don’t load a cartridge in one smooth stroke (say a bullet tipped over sideways and I raised the ram slightly to reset it) Some presses actually back the charge back adding more powder if it has already dumped some so you have a full charge plus a partial charge. When I don’t complete the procedure with one stroke, I pull the case that just had powder dumped into it and check the powder charge or just dump the powder back into the measure and run the case thru later.
Lapua offers a sophisticated FREE Ballistics App for iOS and Android smartphones and mobile devices. This state-of-the-art App has many great features — much more than you’d expect for a free App. If you do much shooting past 300 yards, or use a wide variety of bullets and/or cartridge types, we recommend you download the App and give it a try. This article, written by a Lapua technician, explains how to use the App. This article is definitely worth reading — there are many important concepts and procedures discussed here that apply to all Ballistics calculators, not just the Lapua App. For more details, read the Lapua Ballistics App User Manual.
Watch Video for Explanation of Lapua Ballistics App Features
Lapua Ballistics App Basics — How to Get Started
Article by Matti Paananen
As smartphones and tablets are constantly developed, ballistic software and Apps are also improving, and with their help our ability to hit targets can improve significantly. This is a short introduction on why and how to use a ballistic calculator, namely the Lapua Ballistics App, and a few pointers that will help you use the App effectively.
Ballistics software and Apps are designed to help shooters and hunters make calculations to hit distant targets or take down game in the field by offering ballistic solutions. Lapua Ballistics is the first App utilizing the 6DOF calculation model.
Toying around with ballistics apps is always fun, but effective use of ballistic software requires general understanding of how they work. The App gets information from the user and by using mathematical formulas it provides the solution that will give the user a solid starting point to hit the target.
However, it is also important to remember that the App can’t think — it only calculates a solution based on your parameters. You will not know the error until you have already fired the shot.
1. SET UP YOUR SCOPE RETICLE AND RIFLE
Scope manufactures use different units per click, so it’s important that you use the correct unit in the App. For example, in your scope, one click can be 0.1 mil, 1/4 MOA, [or 1/8 MOA depending on the model]. You can find this information in your scope manual and also usually from the scope turrets. Setting your scope reticle is very important, partly because if you use the wrong unit in the App, the ballistic solution will not match your scope. To set up your scope reticle in Lapua Ballistics, go to Manage Rifle / Cartridge Data –> Add Rifle Cartridge Data (or choose to edit a Rifle/Cartridge combo you’ve already set up) –> Reticle –>.
Another thing to setup in Lapua Ballistics is your scope height, i.e. Line of Sight to Bore in the Manage Rifle / Cartridge Data window. This is the distance between the center of the scope and the center of the bore. The default height is 45mm but with tactical rifles, the height can be even 70mm. So check! The height is easy to measure with a ruler. Then there’s also the twist rate of your rifle to set up — look it up in the rifle manual, it can also be stamped on the rifle barrel. The rifle twist rate is needed to calculate spin drift and bullet stability. Spin drift should be taken into account with longer distances, and it can be enabled or disabled in Lapua Ballistics.
2. SET UP YOUR BULLET CHOICE
You can add your bullet of choice from the bullet library, where you find all Lapua bullets. It is also possible to add information manually. In this case, you will need bullet weight, the ballistic coefficient BC and muzzle velocity. The Ballistic coefficient can be given in G1 or G7 values. G7 is designed for low-drag bullets with a boat tail and G1 is used for more traditional flat base bullets. Lapua on the other hand uses Doppler radar-based data to calculate a more accurate ballistic trajectory for Lapua bullets by 6DOF model. Anyway, it is good to remember that the ballistic coefficient changes with velocity, so all changes in a flight path cannot be predicted.
The following thing you will need to set up is the bullet’s actual muzzle velocity. You can reverse engineer the number based on your drop or by using a chronograph. It is good to remember that more rounds you shoot, the better average velocity you will get.
Because temperature affects muzzle velocity, it would be good to shoot velocities in different temperatures and write them down. Those notes can be used with Lapua Ballistics as it is possible to set up the powder temperature variation in the App.
3. SET UP WEATHER CONDITIONS
Lapua Ballistics has settings for temperature, air pressure, and humidity. All these affect the ballistic solution and the chance to hit the target. In a nutshell, temperature affects the powder’s burn speed and in that way the bullet velocity. Air pressure and humidity also affect bullet drag.
If you are shooting approximately on sea level, you do not need to change air pressure values, but if you are shooting or hunting in mountain areas or where there is lot of elevation difference, you might want to check the air pressure. On sea level, the atmospheric pressure is 1013 hPa. The higher you go, the less air pressure you will have and thus less bullet drag. Some like to use handheld weather and wind meters that have a function to get actual air pressure and humidity, however the Get Current Weather function in Lapua Ballistics will give you the air pressure reading from your local and most close weather station, provided that your app is allowed to use your location data.
Temperature is an important variable. To understand how velocity change in different temperatures, only way is to shoot and keep notes. Some ballistic software and apps have values for muzzle velocity in different temperatures. The user needs to input muzzle velocity in different temperatures in order to software to calculate the effect. More velocities in different temperatures the user adds, the more accurate the calculation will be.
4. SET UP A BALLISTIC SOLUTION
After we have set up our own rifle / cartridge data, there are few things that need to be taken into account when shooting: the distance to the target, the wind and our shooting skills. Distance can be measured for example with a laser rangefinder and then put in. Wind can also be measured with a wind gauge but it is important to remember that the wind in the target area can be very different from that in the shooting position. Lapua Ballistics gives a ballistic solution based on stationary wind, so in the end, the shooter’s task is to estimate how much the wind factor will be.
It’s good to remember that Lapua Ballistics is a starting point and designed to assist the shooter. Software and apps have ways of helping us adjust the sight and predict the ballistic solution but they will not replace the shooter. We still have to pull the trigger and record our range data. By keeping good range notes and with the support of good ballistic software like Lapua Ballistics, we should be able hit in all environments.
Article Find by EdLongrange. We welcome reader submissions
One of our Forum members complained that he wasn’t able to set his primers flush to the rim. He tried a variety of primer tools, yet no matter what he used, the primers still didn’t seat deep enough. He measured his primers, and they were the right thickness, but it seemed like his primer pockets just weren’t deep enough. He was mystified as to the cause of the problem.
Well, our friend Boyd Allen diagnosed the problem. It was the decapping rod. If the rod is adjusted too low (screwed in too far), the base of the full-diameter rod shaft (just above the pin) will contact the inside of the case. That shaft is steel whereas your case is brass, a softer, weaker metal. So, when you run the case up into the die, the shaft can actually stretch the base of the primer pocket outward. Most presses have enough leverage to do this. If you bell the base of the primer pocket outwards, you’ve essentially ruined your case, and there is no way a primer can seat correctly.
The fix is simple. Just make sure to adjust the decapping rod so that the base of the rod shaft does NOT bottom out on the inside of the case. The pin only needs to extend through the flash hole far enough to knock the primer out. The photo shows a Lyman Universal decapping die. But the same thing can happen with any die that has a decapping rod, such as bushing neck-sizing dies, and full-length sizing dies.
Whenever you use a die with a decapping pin for the first time, OR when you move the die to a different press, make sure to check the decapping rod length. And it’s a good idea, with full-length sizing dies, to always re-check the height setting when changing presses.
Lee Universal Decapping Die on SALE for $10.96
Speaking of decapping tools, Midsouth Shooters Supply sells the Lee Universal Decapping Die for just $10.96 (item 006-90292), a very good deal. There are many situations when you may want to remove primers from fired brass as a separate operation (prior to case sizing). For example, if your rifle brass is dirty, you may want to de-cap before sizing. Or, if you load on a progressive press, things will run much more smoothly if you decap you brass first, in a separate operation.
NOTE: Some Euro Small Flash Holes are 1.5mm or 0.059″.
The low-cost Lee Universal Decapping Die will work with cartridges from 17 Fireball all the way up to big Magnums. However, NOTE that the decapping pin supplied with this Lee die is TOO LARGE for LAPUA 220 Russian, 6mmBR, 6.5×47, 6.5 Creedmoor, .308 Win (Palma) and Norma 6 PPC flash holes. Because the pin diameter is too large for these brass types, you must either turn down the pin, or decap with a different tool for cases with .059″ flash-holes. Otherwise, the Lee Decapping Die works well and it’s a bargain.
At the request of our readers, we provide select “Deals of the Week”. Every Monday morning we offer our Best Bargain selections. Here are some of the best deals on firearms, hardware, reloading components, optics, and shooting accessories. Be aware that sale prices are subject to change, and once clearance inventory is sold, it’s gone for good. You snooze you lose.
1. Stocky’s — Rem 700 Composite Stock with Accublock, $99.99
These stocks were the first run of Stocky’s Long Range Composite Sporters. There is nothing wrong with these “factory seconds” except the barrel channels are narrower than current versions, so you may have to open up the barrel channels a bit (simple task). On Sale for $99.99, these are an Amazing Bargain. Designed for Rem 700 and Rem clone actions, these LRC Sporter Stocks are constructed from a high-fiber composite with precision aluminum Accublock® chassis molded into the stock.
2. Natchez — Rock Chucker Supreme Reloading Kit, $259.99
Everything you see above can be yours for just $299.99. Great Deal. Right now, Natchez is selling the Rock Chucker Supreme Master Reloading Kit for $259.99, a fantastic price considering what you get: Press, Primer Tool, Scale, Powder Measure, Loading Tray, Reloading Manual and more. Heck, the Rock Chucker press alone is worth $165.00+. This is good starter kit for any reloader with sturdy items (such as the Rock Chucker press), that will last a lifetime.
Here’s a fun target for Rimfire plinking and NRL22 training. This Know Your Limits (KYL) set features 8 different hanging targets with decreasing hit zone diameters: 2.0″, 1.75″, 1.5″, 1.25″, 1.0″, 0.75″, 0.5″, and 0.25″. The paddles are strong 1/4″ thick, powder-coated AR500 Steel. Other parts are weatherproof galvanized 3/4 EMT. Right now ShootingTargets7 has this complete kit, including legs and crossbar, for $144.97 with code “GUNDEALS”. SHIPPING is FREE. Target system breaks down easily for transport.
4. EuroOptic and Midsouth — Nikon Scopes Up to 46% Off
Save hundreds right now on Nikon rifle scopes. Midsouth has slashed prices on Nikon’s excellent FX1000-series scopes while EuroOptic has some amazing deals on Nikon’s M-Tactical and P-Tactical optics — zoom scopes from 1-4X power to 6-24X power. The various discounted Nikon scopes should provide pretty much anything a tactical shooter or hunter could need. Here are some of the best deals:
FX1000 6-24x50mm SF Illum. FX-MOA Reticle FFP
Was $799.95, now just $599.95 at Midsouth
FX1000 4-16x50mm SF FX-MRAD Reticle FFP
Was $649.95, now just $449.95 at Midsouth
Nikon M-TACTICAL 4-16x42mm SF BDC-800
Was $449.95, now just $259.95 at EuroOptic
Nikon M-TACTICAL 3-12x42mm SF MK1-MRAD
Was $399.95, now just $199.95 at EuroOptic
5. Grafs.com — FREE Litz Book with $200 Lapua Product Buy
This is one example. This deal works with $200 of ANY Lapua products purchased from Grafs.com.
Lapua makes great brass, bullets, and ammo. Bryan Litz writes great books. And now you can get both with this promotion from Graf & Sons. Here’s the deal — if you buy at least $200.00 worth of Lapua product at Grafs.com, you’ll get a free Applied Ballistics book authored by Bryan Litz. Mix and match any Lapua products — as long as the order totals $200.00 or more. We know you’ll want Lapua brass, but you should try out the great Lapua Scenar bullets too! NOTE: The book may be one of various Litz titles, such as Modern Advancements in Long Range Shooting or Ballistic Performance of Rifle Bullets. You do NOT get to pick the book title — you get what’s available.
Priced at just $159.99 at MidwayUSA, the Magnetospeed Sporter model costs less than half as much as Magnetospeed’s V3 models. This chronograph attaches directly to your barrel so you don’t have to go downrange to set up skyscreens. For most people the Sporter Model contains all the features they need. Using Magnetospeed’s XFR adapter (sold separately), data can be transferred easily to your mobile device. READ Magnetospeed Sporter Review. NOTE: You need to add the item to cart to see the $159.99 price. This typically sells elsewhere for around $180.00.
7. Graf’s — Platinum Case Prep & Trim + EZ Tumbler, $179.99
If you want to step up your brass preparation game, here’s a great deal. Graf’s is offering the Frankford Arsenal Case Prep & Trim PLUS the EZ Tumbler for only $179.99. That’s an amazing deal considering you could pay $199.99 or more for the Prep & Trim unit by itself, and the EZ Tumbler is regularly $50 or more. This Grafs.com combo deal represents a savings of nearly $70.00.
Nikon’s Prostaff 1000i Laser Rangefinder features ID (incline/decline) technology with both horizontal distance and actual distance display modes. Choose single or continuous measurement (up to 8 seconds). Rated to 1000 yards on reflective objects, the PROSTAFF 1000i is a smart, affordable option for hunters. Compact and reliable, it will do the job at half the price of other popular rangefinders.
This versatile funnel system works with nearly all cartridge types, from 17 Remington up to 500 S&W. Even if you have a fancy metal funnel, it’s worth having one of these RCBS Kits on your reloading bench. The RCBS Quick Change Powder Funnel Kit features five (5) adapters that match case mouth diameter for specific cartridge ranges: 17-20 caliber, 22-264 caliber, 27-284 caliber, 30-375 caliber, 40 caliber and higher. The Funnel Kit includes a handy 4-inch drop tube.
Guys, here’s just what you need (maybe) to convince the significant other to join you for a day at the range — a combo set of “high-fashion” ear muffs and ANSI-rated safety glasses. The comfortable, zebra-print muffs provide 21 dB of noise reduction (we recommend running plugs underneath them). The stylish, tortoise-shell pattern Bella Ballistica™ shooting eyewear has passed MIL-PRF-31013 ballistic tests and meets ANSI Z87+ high-velocity requirements with a chic designer appearance. The lady in your life just might appreciate the stylish eyewear and distinctive muffs, earning you “bonus points”. And she’ll never suspect you only spent five bucks!
Big News in the ammo industry! At the Lake City Army Ammunition Plant, Northrup Grumman is out, and Winchester is taking over.
Olin Corporation (NYSE: OLN) announced that its ammunition division, Olin Winchester, LLC (“Winchester”), has been selected by the U.S. Army to operate and manage the Lake City Army Ammunition Plant in Independence, Missouri. Winchester will be taking over in the fall of 2020. Winchester’s Lake City contract has an initial term of seven years and may be extended for up to three more years, which would put Winchester in charge of the plant for a full decade.
Prior to its acquisition by Northrup Grumman in 2018, Orbital-ATK ran the plant since 2000, initially as Alliant Techsystems (ATK). Before that, Winchester previously operated the Lake City facility from 1985-2000, so Winchester knows this facility. Following a one-year transition period, Winchester will assume full operational control of the Lake City plant on October 1, 2020.
The Lake City plant, which began production in 1941, is the primary provider of small-caliber U.S. military ammunition for training and combat use. The plant produces as many as 2 billion rounds per year. The plant, encompassing nearly 4,000 acres, also serves as a national and regional test center for ammunition performance and weapons firing.
Orbital-ATK Was Losing Millions at Lake City in Recent Years
The Lake City contract was a huge financial problem for Orbital ATK, now a division of Northrup Grumman. Orbital ATK was losing money on its plant contract, due to the high cost of materials. KCRU.org reported:
“Orbital ATK, the defense contractor that ran the Lake City facility from 2000 until it was bought [in 2018] by Northrop Grumman, stunned investors on August 10, 2016, when it announced it wouldn’t be able to file its quarterly earnings report on time. Orbital ATK stock plummeted more than 20%. Institutional investors… filed a class-action lawsuit alleging the company fraudulently hid the fact it was losing hundreds of millions of dollars on its massive, multi-year Army contract. [Orbital ATK] eventually said it expected to lose $373 million on the contract.”
About Orbital-ATK and Alliant Techsystems: Before it split into two companies, Orbital-ATK and Vista Outdoor, Alliant Techsystems (ATK) was the parent company of numerous major gun industry brands, including: Alliant Powder, CCI, Champion, Federal, RCBS, Speer, and Weaver. These brands are still operated by Vista Outdoor.
Michelle Gallagher is one of the nation’s top rifle shooters and team coaches. A past Long Range National Champion, Michelle is part of America’s “First Family” of Shooting, being raised by Mid Tompkins and Nancy Tompkins, both rifle champions in their own right.
Michelle, who works for Sierra Bullets, was at the 2019 F-Class National Championships in Raton, New Mexico. At the event, Michelle captured some great photos of the competitors and the New Mexico countryside at the NRA Whittington Center. This year’s Nationals were very challenging competition, with truly brutal winds on some days. Here is Michelle’s Photo Essay on the 2019 F-Class Nationals.
Father Ken Klemm and Son Ian Klemm shot together in F-TR Team Matches. Individually, Ian was second overall in the 1K F-TR Nationals, while Ken finished as High Grand Senior.
Three talented lady shooters: Michelle Gallagher (L), Nancy Tompkins, and Madison Bramley.
What’s a “Frankengun”? Well it’s a one-of-a-kind rifle that has been pieced together from a variety of different parts and components. It might be a little bit Bolt Gun mixed with a little bit AR-15. Or it might feature some home-made components unlike anything you’ve seen before.
We’ve selected these four Frankengun rifles from a current thread in our Shooters’ Forum.
Frankengun #1 — The EXO (as in Exo-Skeleton)
Forum member jm850 calls this tube-framed wonder the EXO (as in “exo-skeleton”). He says: “This is a prototype I designed around a few core concepts that stick out to me on a traditional configuration. Eliminating stresses, lowering recoil moment, and improved barrel cooling. I’m really happy with it so far.”
The EXO is a very unique rifle. We’ve never seen anything like this since the late Shelley Davidson’s famous Tinkertoy Rifle, a brilliantly innovative 30BR that actually won matches. (Sadly Shelley has passed away). The Tinkertoy, shown below, was truely radical, but it worked ! Could this have been an inspiration for jrm850’s EXO rifle?
Frankengun #2 — Mossberg MVG in LSS Stock with BipodeXt
Forum member BallisticXLR has created something very weird to say the least. It started out as a basic, bone-stock Mossberg MVP Varmint in .223 Rem. Then the transformation began: “I replaced everything except the receiver. It now has an LSS stock, PSG-1 grip from DPMS, XLR butt stock, PT&G lug and barrel nut, Columbia River Arms 26″ barrel with Sonoran coral snake Cerakote, A2 flash hider, Timney and Jard triggers (depending on what I’m doing), and a USO B17 which is now a USO 3.8-22×44.” That long extension tube under the chassis is a BipodeXt from Accuracy Solutions.
Frankengun #3 — A Chassis Rig in 25 Creedmoor
This Frankengun belongs to Forum member Geraldgee. This “black and blue” rig features a mag-fed Kelbly Atlas action in a McCree’s Precision G10 Chassis. The barrel is a Bartlein Rem Varmint Contour, 1:7.5″-twist 4 Groove, chambered for the 25 Creedmoor. There are some interesting .25-Cal bullets coming on the market now. You can make the brass by expanding 6mm Creedmoor, or necking down 6.5 Creedmoor.
Frankengun #4 — MDT Chassis, Fore-end Whittled by Spook
Here’s a real collection of odds and ends, but Forum member Spook says it shoots well, and is a great example of “Left-over parts made useful again”. This mix-n-match Frankengun features a Remington M7 action with PT&G bolt. The barrel is a stainless Pac-Nor chambered in 6mm SLR. The barreled action is carried in an MDT Chassis with rear folding buttstock. Up front is something unusual, a Delrin fore-end that owner Spook “whittled in the mill”.
Frankengun #5 — 6.5×47 in Accuracy Int’l Stock
CLICK photo for full-screen version.
Forum member CT10Ring kicked off the Frankengun thread with this rifle. It’s actually not that shocking, but you rarely see a BAT action in an Accuracy International stock. The BAT VR action is mated to an AI Mag and set up in an AI folding stock. On top is an “old school” Nightforce Benchrest scope. The barrel is a very heavy Krieger chambered for the 6.5×47 Lapua. CT10Ring say the barrel alone weighs about 9 pounds, and the gun “shoots better than [he] can”.
Post Pictures of Your Frankenguns in our Forum
So do you have a favorite Frankengun resting in your gun safe? If you do, visit our Shooters’ Forum and post a description and some photos in the Frankengun thread.
The 2-day Precision Rifle EXPO wraps up today at the Arena Training Facility in Blakely, Georgia. Over 700 visitors have attended the two-day event. This year, manufacturers will be showing off actions, optics, ammo, reloading equipment, stocks, chassis, electronics, supporting equipment (bags and tripods), rifles, triggers, suppressors, and much more. There will be training sessions on precision handloading, wind reading, marksmanship, ballistic devices, and introduction to competition.
There was so much to see and do at the EXPO, with over 50 companies displaying their wares, including some exciting new products. As a teaser, here are three highlights from Sunday in Georgia.
1. Shooting .22 LR Rimfire Ammo at 625 and 850 Yards
David Lott was shooting his .22 LR Vudoo Gun Works Rifle at what can be called “Extreme Long Rang” — at least for a .22 LR rimfire cartridge. David achieved multiple hits on 18″ square targets at 650 yards and 850 yards. Note the TACOM HQ Charlie TARAC Prism on the front of the scope. This $1700 optical device allows David to see the target even with the rifle aimed at an extreme up-angle to compensate for huge bullet drop.
2. AMP Annealing Team — All the Way from New Zealand
Alex Findlay and son Matt, creators of the impressive Annealing Made Perfect (AMP) Annealing Machines, traveled all the way from New Zealand to attend the EXPO. There the AMP team displayed the AMP Mark 2 Machine, plus a new servo-motor bullet seating machine.
Alex reports: “The bullet seater has been putting in some work today. Having some fun playing around with a few variables and how they effect neck tension. So far the results are pretty fascinating!” Yes, that silver gadget is a new, prototype high-tech Load Cell Bullet Seating Press. This uses an electric servo motor to move a ram downwards on the Wilson seating die. A wealth of precise data is collected during the bullet seating process. Alex noted: “Thanks for Berger Bullets for supplying the bullets and the Lapua brass!”
Watch “Smart” Load Cell Seating Press in Action
This interesting video shows how the new, prototype Load Cell Bullet Seating Press with Auto-Drive works. (AMP plans a production version for 2020 or sooner). There’s never been a press like this before! Everything else is old technology.
3. Applied Ballistics Mobile Ballistics Lab
Applied Ballistics brought its Mobile Ballistics Lab down to Georgia. To demonstrate its capabilities, the AB crew set up the big gray Doppler Radar unit for testing. LabRadars were set on ground level as well (see below). Applied Ballistics Guru Bryan Litz lamented that he was spending more time looking at computer screens than having fun shooting rifles on the impressive ranges at the Arena Training Facility.
The Mobile Lab carries both hardware and electronics. Bryan reports: “The Mobile Lab will transport most everything that’s in the main lab including the Doppler radar. This rig is new, so the load-outs will be somewhat flexible depending on the venue we are supporting.”
Arena Training Facility — 2300 Acres with Ranges out to 2100m
The 2300-acre Arena Training Facility is a premier shooting facility with multiple shooting ranges from 50m to 2100m. Arena’s 1000-yard covered Known Distance range offers multiple benches, steel and paper targets out to 1000 yards. On Arena’s UKD (unknown distance) range shooters can engage steel out to 2300 yards. This 2100m UKD range boasts a 3-Story Shooting Tower, Air-Conditioned Shoot House, and multiple Positional Challenges.
At last year’s EXPO, Long-Range Clinics were held on the 1000-yard Range:
It’s summer time. That means many of our readers are on the road (attending major shooting matches or enjoying summer vacations). How do you do your reloading chores while living like a gypsy for a few weeks? Here’s a solution from Forum member Dave Gray (U.S. Army Retired).
Dave is a self-declared “full-time RVer” who spends most of his time on the road. Behind his Ram 3500 pickup, Dave tows a huge 41-foot Heartland Cyclone toy hauler featuring a 12X8 foot garage in the rear. In the rear garage area, which holds a Smart Car, Dave has set up a removable reloading bench complete with RCBS Rockchucker single stage press and Dillon progressive press.
Reloading Bench Mounts to RV Wall with Brackets
Dave explains: “I used a 2″X6″X5′ board for the bench. It’s perfect for my needs, and is easy to disassemble. I made it this small so that I can park my Smart Car in the garage during travel to my destinations. The bench, attached to the wall frames, is very solid. The presses’ centers are 3″ and 6.5″ from the brackets. [There are] four bolts on the wall into aluminum wall frame and 3 bolts in the bench. If I ever have to replace the current board, I’ll do so with oak or birch or hickory. When I’m not reloading, I remove the presses and store them in a protected space. I can easily attach other equipment to the bench by using C-Clamps.” Dave’s “rolling reloading room” looks very well thought-out. We commend Dave for his inventiveness.


 Oversizing cases also causes problems because the firing pin doesn’t have the length to reach the primer solid enough to ignite it 100% of the time. When you have one that is oversized, you usually have a bunch, since you usually do several cases at a time on that die setting. If the die isn’t readjusted, the problem will continue on the next batch of cases also. They will either not fire at all or you will have a lot of misfires. In a bolt action, a lot of time the extractor will hold the case against the face of the breech enough that it will fire. The case gets driven forward and the thinner part of the brass expands, holding to the chamber wall and the thicker part of the case doesn’t expand as much and stretches back to the bolt face. If it doesn’t separate that time, it will the next time. When it does separate, it leaves the front portion of the case in the chamber and pulls the case head off. Then when it tries to chamber the next round, you have a nasty jam. Quite often range brass is the culprit of this because you never know how many times it has been fired/sized and in what firearm.’Back to beating it on the ground again till you figure out that you have to get the forward part of the case out.


 Big News in the ammo industry! At the Lake City Army Ammunition Plant, Northrup Grumman is out, and Winchester is taking over.


 Applied Ballistics brought its Mobile Ballistics Lab down to Georgia. To demonstrate its capabilities, the AB crew set up the big gray Doppler Radar unit for testing. LabRadars were set on ground level as well (see below). Applied Ballistics Guru Bryan Litz lamented that he was spending more time looking at computer screens than having fun shooting rifles on the impressive ranges at the Arena Training Facility.
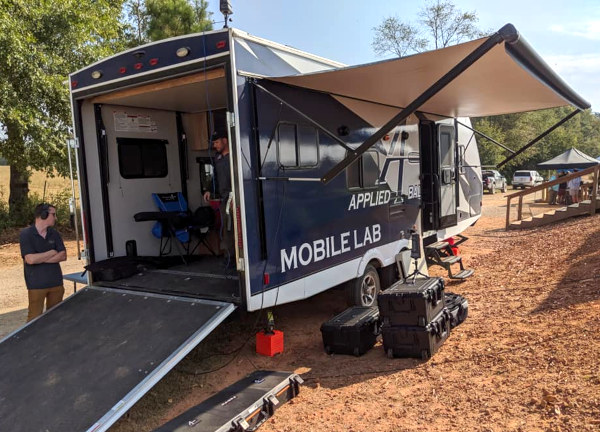


 Reloading Bench Mounts to RV Wall with Brackets


