by Sierra Bullets Ballistic Technician Paul Box
One thing that plays a major role in building an accuracy load is neck tension. I think a lot of reloaders pretty much take this for granted and don’t give that enough thought.
So, how much neck tension is enough?
Thru the years and shooting both a wide variety of calibers and burn rates of powder, I’ve had the best accuracy overall with .002″ of neck tension. Naturally you will run into a rifle now and then that will do its best with something different like .001″ or even .003″, but .002″ has worked very well for me. So how do we control the neck tension? Let’s take a look at that.
First of all, if you’re running a standard sizing die with an expander ball, just pull your decapping rod assembly out of your die and measure the expander ball. What I prefer is to have an expander ball that [can give] you .002″ in neck tension [meaning the inside neck diameter is about .002″ smaller than the bullet diameter after passing the expander through]. If you want to take the expander ball down in diameter, just chuck up your decapping rod assembly in a drill and turn it down with some emery cloth. When you have the diameter you need, polish it with three ought or four ought steel wool. This will give it a mirror finish and less drag coming through your case neck after sizing.
Tips for Dies With Interchangeable Neck Bushings
If you’re using a bushing die, I measure across the neck of eight or ten loaded rounds, then take an average on these and go .003″ under that measurement. There are other methods to determine bushing size, but this system has worked well for me.
Proper Annealing Can Deliver More Uniform Neck Tension
Another thing I want to mention is annealing. When brass is the correct softness, it will take a “set” coming out of the sizing die far better than brass that has become to hard. When brass has been work hardened to a point, it will be more springy when it comes out of a sizing die and neck tension will vary. Have you ever noticed how some bullets seated harder than others? That is why.
Paying closer attention to neck tension will give you both better accuracy and more consistent groups.
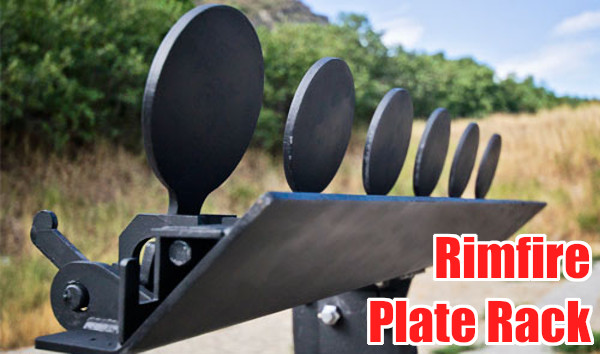
The Action Target Sport Plate Rack is specifically designed for .22 LR Rimfire shooting. This rack features six 4″-diameter plates that reset with a provided cable.
Shooting plates is fun. You get immediate feedback — “instant gratification” when you make a hit. When shooting steel inside 100 yards, we like to use .22 LR rimfire guns. The ammo is inexpensive, noise levels are lower (though you still need ear protection), and at close ranges there are fewer issue with ricochets and bullet splash-back. Additionally, for busy folks who don’t have time to reload, you can pick up a .22 LR rifle or pistol, grab a couple $5 boxes of ammo, and get to the range in a few minutes. The convenience means it is easier to shoot every week if you like.
SFC Joel Turner from the USAMU’s Action Shooting Team offers a few pointers on how to shoot plates quickly and accurately. He’s using a centerfire pistol, but the same principles apply for rimfire handguns. Click speaker icon to activate audio.
New .22 LR CP33 Pistol is Great for Plates
If you like shooting plates, one of the better new handguns for the job is Kel-Tec’s CP33. We tested this interesting handgun at the 2019 SHOT Show Media Day at the Range, and were impressed. The pistol is big, but balances well. The sights are easy to see, and the full-length rail lets you easily mount a variety of optics. The trigger is surprisingly good — better than 90% of rimfire handguns out there. For the plates game, this “quad-stack” gun can handle long stages without mag changes. The standard clear-sided CP33 magazine holds 33 rounds of .22 LR ammo.
If you are interested in an affordable, but very accurate, high-capacity semi-auto rimfire pistol you should consider Kel-Tec’s new CP33. Shooting Sports USA (SSUSA) notes: “The rapid growth of rimfire competition in Steel Challenge has prompted some gun makers to enter the fray. Kel-Tec is one, and their new CP33 .22 LR pistol has a lot of potential.” Watch 22 Plinkster’s video review below. He reports: “This handgun has been 100% reliable IF I load the magazine the right way… and it’s pretty dog-gone accurate.”
SSUSA’s testers tried the pistol with a variety of ammo and it consistently shot about one-half-inch for five shots “from a 25-yard sandbag bench rest using the iron sights.” SSUSA noted that the gun disassembles quickly and easily by removing one central pin. That’s a nice feature.
Overall SSUSA’s tester, Chris Christian, was impressed with the gun, saying it balanced well and the sights aligned naturally: “…the neutral-balance-point grip produced an almost instinctive sight alignment.”
Christian used the CP33 in a 6-stage Steel Challenge Match, and did well: “I decided to shoot Rimfire Pistol Iron (RFPI) and used the CCI Mini-Mag. The high-speed ammo ran perfectly. [T]he bright sights and handling qualities let me finish top among iron-sight shooters and even hold my own with C and B class rimfire pistol shooters using optical sights. It would be interesting to put a reflex sight on the gun, and maybe even shoot some Bullseye with it.”
The competition was founded in 1981 by Mike Dalton and Mike Fichman, in Southern California. The two Mikes wanted an exciting alternative to paper targets and came up with the all-steel format. The Steel Challenge World Speed Shooting Championships have grown to one of the largest professional pistol competitions in America. In 2018, hundredes of competitors from the United States and around the world competed at the Talladega Marksmanship Park for glory and huge cash prizes. The Steel Challenge is governed by the Steel Challenge Shooting Association (SCSA) that consists of eight standardized stages with three types of steel targets: small circle, big circle, and square. Here is a steel challenge layout in Germany.
Steel Challenge is similar to IPSC, but has simpler rules and more consistent stage designs. Up until 2011 the annual Steel Challenge World Championship was held in Piru, California every year. Then, as renamed the World Speed Shooting Championships (WSSC), the Championship was held in Frostproof, Florida (2012, 2013), St. George, Utah (2014), San Luis Obispo, California (2015-2017), and Talladega, Alabama (2018, 2019). There are also over 100 Steel Challenge Regional Matches held around the country.
This Video Shows the Steel Challenge Rimfire Rifle Optics Divison. These guys are FAST!
Yes, folks, it’s officially summer now. This year’s Solstice, considered the official start of summer, transpired Friday, June 21, at 5:54 AM EDT. We hope you have fun this summer with friends and family. To help ensure those summer adventures remain safe and trouble-free, the CTD Shooters’ Log has prepared a helpful Essential Summer Survival Guide. This is worth reading before you venture away from civilization.
Here are some highlights of the article with links for MORE INFO:
First Aid Kits for Campers
You should never venture outside without a first aid kit close at hand. While exploring the outdoors, all types of accidents can occur—from cuts, scrapes, and burns to broken limbs and severe allergic reactions.
Basic Survival Skills
Basic survival skills are a necessity if you plan to spend any amount of time outdoors. These five tips, plus a how-to on what to pack in a lightweight, basic survival kit will help if you are ever stuck, lost, stranded or injured in the field.
How to Treat Burns
Fireworks, barbeques and campfires — in the summer we are frequently around fire, which increases our chance of getting burned. A first-degree burn is most likely home treatable, while a third degree burn requires immediate medical attention. Learn how to spot the differences between minor and severe burns.
Great Case Trimmer for under $130.00
We think Lyman’s new Case Trim Xpress will be a “game changer” for hand-loaders. If you’re like most of us, trimming your brass to length has been a dull, laborious and time-consuming process unless you shell out $500 or more for a top-of-the-line unit. Lyman has broken that mold by releasing an accurate, easy-to-adjust, shoulder-indexing, carbide-bladed, and SPEEDY case trimmer for under $130.00! Given its outstanding performance for the price, the Lyman Case Trim Xpress is a definite winner.
CLICK photo for full-screen view of Case Trim Xpress unit.
Lyman Case Trim Xpress “Hands-On” Review
Review by F-Class John
Case trimming can be one of the most boring and tedious steps in the reloading processes. This is largely because of outdated tools that either require manual turning, clunky pilot systems, or difficult adjustments. In order to overcome these obstacles, you might have to spend $500 for some premium systems. But that has changed with Lyman’s introduction of the new Case Trim Xpress. This bright orange wonder delivers premium trimming performance at a budget price. Available for around under $130, this trimmer offers an easily-adjustable cutting head plus a smart, shoulder-indexing bushing system to improve consistency and speed up the trimming process.
Video Shows How Carbide Cutter Head Adjusts Easily with Index Wheel
The Lyman Case Trim Xpress comes with the main trimming unit, power cord, and 10 bushings in a storage case. These 10 orange bushings let you trim more than 50 popular cartridge types (yes including the 6mmBR, 6.5 Creedmoor, and .308 Win of course). Set-up was simple and straight-forward. Install the bushing you need, turn the unit on and slowly push a piece of brass towards the cutting head. Once the brass is fully depressed, you can start adjusting the dial one click at a time until the case makes contact. Then you start making progressive adjustments and trim until you reach your desired length. The process is so simple that it’ll leave you wondering how you ever used anything else.
Once the machine was adjusted for our brass, we were amazed at how easily and quickly cases could be trimmed. The unit is fairly hefty, so we found it pretty stable just sitting on the bench. If you wish, the unit can also be screwed down for added stability, using the holes in the lower “wings” of the orange housing. There’s a dial adjustment on the side that controls cutter rotation speed (RPM). In our testing, the trimmer worked well across its entire RPM range. These means you can do fast, quick cuts or make slow and precise cuts, as you prefer. And you can adjust the cutter speed to the type of brass you are trimming.
As for trim length control, the adjustment dial has good, positive clicks and the trim length holds very constant. Even after trimming 80+ pieces of brass, we observed trim consistency held within .001″.
One of the things that sets the Case Trim Xpress apart from most trimmers is how it indexes off the shoulder. This ensures that case lengths from mid-shoulder to end of neck are identical for every case (whether they have been sized or not). This is critical for consistent reloading results and will help ensure that every case is optimally positioned in your chamber. A cutting system that indexes off the shoulder is arguably better than a system than merely trims to a given case OAL for both fired and unfired cases.
Another great feature is that this trimmer can be mounted flat on a bench-top, on the underside of a shelf, or even on a vertical wall surface (if oriented horizontally). You can choose different mountings because the clear plastic shroud that catches brass shavings can rotate. This allows the shavings exit port to be orientated to any point on the circle. We liked being able to choose various mounting configurations. Employing little-used wall or shelf space opens up precious bench-top real estate.
Summary — Outstanding Performance for the Price
Overall the Case Trim Xpress is hard to beat for the price. It is one of the few power trimmers we can recommend without hesitation. The machine trims quickly and accurately, the cutter-depth control is precise and easy to use. And the variable speed control is great. Of course we do wish the machine could also de-burr and chamfer brass. But of course that would add quite a bit to the cost, and would probably require a completely different cutting system. For trimming-to-length only, Lyman’s Case Trim Xpress is probably the best trimmer currently available for under $200. This unit should definitely be on the short list of anyone shopping for a variable-speed motorized trimmer.
Want to shoot better scores at your next match? Here’s a smart, inexpensive do-it-yourself project from the good folks at Criterion Barrels. For less than one dollar in materials, in just a few minutes you can create a handy, effective mirage shield, custom-fitted to your favorite rifle.
All precision shooters should be familiar with mirage, a form of optical distortion caused primarily by variations in air temperature. Savvy shooters will use mirage as a valuable tool when gauging wind speed and direction. Natural mirage is unavoidable, but there are many techniques designed to limit its influence in long-range marksmanship.
A form of mirage can be produced by the barrel itself. Heat rising from the barrel may distort sight picture through your optics, leading to erratic results. Mirage caused by barrel heat can be reduced dramatically by a simple, light-weight mirage shield.
How to Make a Mirage Shield
A mirage shield is an extremely cost-effective way to eliminate a commonly-encountered problem. Making your own mirage shield is easy. Using old venetian blind strips and common household materials and tools, you can construct your own mirage shield for under one dollar.
Materials Required:
1. Vertical PVC Venetian blind panel
2. Three 1”x1” pieces adhesive-backed Velcro
3. Ruler or tape measure
4. Scissors or box cutter
5. Pencil or marker
1. Measure the distance from the end of the receiver or rail to the crown of the barrel.
2. Using a pencil and ruler, measure the same distance and mark an even line across the blind.
3. Cut across the line using scissors or a box cutter, shortening the blind to the required length. (Remember, measure twice, cut once!)
4. Expose the adhesive backing on the loop side of the Velcro. Center and apply the Velcro strips on the barrel at regular intervals.
5. Expose the adhesive backing of the fuzzy side of the Velcro.
6. Place the blind on the upper side of the barrel. Apply downward pressure. Once the Velcro has secured itself to the barrel, separate the two sides. Proceed to mold both sides of the Velcro to fit the contour of their respective surfaces.
7. Reaffix the blind. Barrel related mirage is now a thing of the past!
NOTE: You can attach the Velcro on the opposite side of the blind if you want the blind to curve upwards. Some folks thinks that aids barrel cooling — it’s worth a try.
How to Remove and Re-Attach the Mirage Shield
Removal of your mirage shield is accomplished by simply removing the blind. You can un-install the Velcro by pulling off the strips and then gently removing any adhesive residue left behind using an appropriate solvent. (Simple cooking oil may do the job.) Caution: With fine, high-polish blued barrels, test any solvent on a non-visible section of the barrel. Before storing the gun, re-oil the barrel to remove active solvents and residual fingerprints.
Do you have some ammo that got loaded incorrectly, perhaps with the wrong powder? Then you’ll want to disassemble the ammo for safety’s sake. You can use an impact puller to do this task, but if you have more than a dozen rounds or so, you may prefer to use a collet-style bullet puller. These work very quickly and positively, making quick work of big jobs. The efficiency of the collet-style puller is worth the investment if you frequently disassemble ammo. These devices retail for under $25.00 (collets sold separately). Normally, you’ll need a specific collet for each bullet diameter. But collets are not that costly, so this isn’t a big deal, particularly if you only load a few calibers, such as .223, 6mm, and .308.
Hornady and RCBS use different mechanisms to tighten the collet around the bullet. On Hornady’s Cam-Lock Bullet Puller, a lever-arm on the top of the bullet puller serves to tighten the collet around the bullet. Simply rotate the lever from the vertical to the horizontal position to grab the bullet. Lower the ram to remove the case. The bullet will drop out when you return the lever arm to the vertical position. This is demonstrated in the video below:
Hornady Cam-Lock Bullet Puller Demonstrated
Collet bullet-pullers resemble a loading die with a lever or handle on the top. They screw into a standard reloading press. Hornady and RCBS both make collet-style bullet pullers. They use the same basic principle — the device tightens a collet around the bullet, and then the bullet is separated from the case by lowering the press ram. NOTE: Collet pullers may leave small marks on your bullets, unlike impact (kinetic) pullers.*
Like the Hornady tool, the RCBS Bullet Puller employs a collet to grab the bullet. However, the RCBS tool tightens the collet in a different way. The head of the RCBS tool is threaded internally. By rotating the lever arm clockwise in a horizontal circle you squeeze the collet around the bullet. To remove the bullet, after lowering the press ram, simply spin the lever arm back in the opposite direction. The use of the RCBS tool is demonstrated in this video:
RCBS Collet Bullet Puller Demonstrated:
WARNING: When removing bullets from loaded cartridges, always make sure there are no obstructions or debris in your shell-holder or under the loaded round. NEVER engage a primer seating accessory on your press when working with loaded rounds. You can cause a round to discharge by contacting the primer! Also, we recommend you keep your head and torso away from the bullet puller tool at all times.
*By contrast, impact pullers rarely mark bullets, particularly if you put a little bit of foam or paper wadding in the closed end of your impact puller. When dismantling loaded rounds, powder kernels can get trapped in the wadding, so you should remove and replace the wadding before changing to cartridges loaded with a different powder type (assuming you intend to save the powder).
Do you occasionally get completely unexplained flyers, or have a shot land straight down at 6 O’Clock, right below your point of aim? That could be caused by poor or inconsistent trigger technique. How you pull the trigger can and does affect your accuracy.
Many gun enthusiasts start with pistols. When they later start shooting rifles they may carry over some not-so-good practices acquired from shooting handguns with heavy 4 to 6-pound trigger pulls. You may want to “re-learn” your trigger techniques to get better rifle results.
Shooting Sports USA has a good article on trigger technique that offers many useful tips. That article also has many helpful illustrations, including the one shown above. Another illustration shows different types of trigger shoes (straight vs. curved) and explains how each makes a difference: “With a lightly curved trigger, the shooter’s finger can contact the trigger either high or low according to preference. Higher contact will increase the resistance.” READ ARTICLE HERE.
The article analyzes common errors, such as pulling the trigger with the very tip of the finger rather than the pad of the index finger: “Using the tip of the finger can lead to lateral pressure on the trigger, which throws off the shot.”
The article also explains that you should check your trigger regularly to make sure it is functioning properly and is not out of adjustment: “Just like any other moving part, the trigger can suffer from wear. In such a precise mechanism, tiny amounts of wear can cause major problems.”
The ergonomics of the Eliseo Tubegun allow a nice, straight trigger pull.
Trigger Tips
Six Suggestions for Making your Trigger Control More Consistent.
1. If your triggers are adjustable, set the pull weight appropriate to the discipline. For a hunting rifle, you don’t want an ultra-light trigger pull. For High Power, you may want a two-stage pull, while on a Benchrest rifle you may prefer a very light trigger.
2. If you have a two-stage trigger, experiment with different combinations of First Stage and Second Stage.
3. Have a friend watch you as you pull the trigger, and maybe even take a close-up video as you pull the trigger. This can reveal a variety of flaws.
4. Practice dry-firing to see if flaws in trigger technique are causing gun movement.
5. As an experiment, try pulling the trigger with your middle finger. Ergonomically, the middle finger has a more straight alignment with the tendons in your hand. This exercise can help you identify alignment issues with your index finger.
6. For stocks with adjustable Length of Pull you may want to set the LOP differently for bench shooting vs. prone or F-Class shooting.
The Bix’N Andy trigger is one of the very best you can buy. It can be fitted with a variety of trigger shoes according to shooter preference.
Every shooter should have a good rimfire rifle, both for fun shooting and for training. The .22 LR is very affordable to shoot, and the more potent .17 HMR and .22 WMR rounds also are great for small varmints out to 200 yards or so. Among the rimfire rifle makers, the Czech manufacturer CZ (Česká Zbrojovka) has been a world leader for many decades. In today’s Video round-up we feature a variety of CZ rimfire rifles including the the all-new CZ 457, the versatile CZ 455 VPT, and the classic CZ 452. We also include one semi-auto, the CZ 512 in .22 Winchester Magnum Rimfire (WMR).
CZ 455 Varmint Precision Trainer in Manners Stock
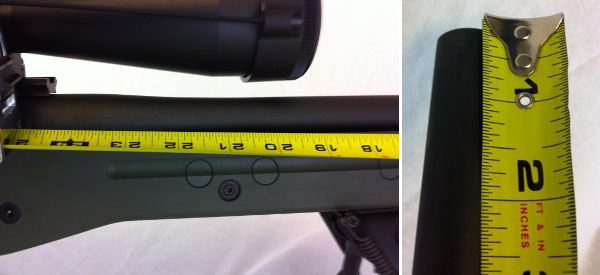
Rimfire cross-training allows PRS competitors to build their skill sets without breaking the bank (or burning out barrels). One great .22 LR option for cross-training is offered by CZ, the Czech arms-maker. The TFBTV video below spotlights the CZ 455 Varmint Precision Trainer (VPT), a smooth-running .22 LR bolt action. This factory rifle was designed specifically as a training tool for precision long-range competition. It boasts a Manners composite stock and 20.5 or 24-inch heavy barrel. The 0.866″-diameter tube is threaded and suppressor-ready. The model 455 VPT is mag-fed and comes with a crisp trigger that adjusts to two pounds. Street price is around $860. That’s pricey for a rimfire — but you’re getting a premium Manners stock that would cost $534 by itself.
Field Testing the CZ 455 Varmint Precision Trainer
CZ 457 MTR Varmint — New for 2019
We really like the new-for-2019 CZ 457 Varmint MTR .22 LR rifle. Along with other CZ 457 models, the MTR (“Match Target Rifle) Varmint features a completely new action that runs very smoothly with shorter bolt throw. The new 457s also have an American-style, push-to-fire safety. The new-generation actions have been trimmed back nearly one-inch in length, and slab-sided to reduce the footprint and weight of the actions. CZ ditched the 90º bolt rotation of the past in favor of 60º rotation. This change provides more room between bolt handle and scope for easier cycling of rounds. It also allows for the use of scopes with larger ocular bell diameters and lower ring heights.
The well-designed MTR stock has good ergonomics and nice stipling on the grip and fore-end. We were pleased to note that, with the 457 series, CZ is once again offering steel magazines that are interchangeable with older 452/455 magazines.
Here our friends at Area 419 offer a side-by-side comparison between a $2300+ rifle with Vudoo V-22 action in Manners stock and the $752.00 CZ 457. On a bang-for-the-buck basis, the CZ wins hands down. However, the Vudoo V-22 does offer centerfire-style action cycle, which helps with training. It also can run Rem 700-compatible triggers.
CZ 452 — Classic Bolt-Action Rimfire Rifle
The CZ 452 is an affordable classic. It is ultra-reliable, easy to clean and maintain, and you’ll find very good examples on the used market for under $400. This is an excellent first rifle for a young family member. In this video, The TFB TV team tests a CZ 452-2E fitted with a suppressor. As the 452 series is being replaced, if you want to buy a new 2019 CZ 452, you’ll need to spend big bucks on the Grand Finale model: “Produced in limited quantity, the 452 Grand Finale (MSRP $1189.00) is a last hurrah to the venerable CZ 452. Built using the last 452 actions ever produced, on the original manual barrelling equipment and at the Brno workshop, the Grand Finale [features] hand-engraved scroll-work on the action, barrel, bottom metal and scope rings. The upgraded American walnut is trimmed with an ebony fore-end and grip cap.”
Semi-Auto CZ — Model 512 American in .22 Magnum Rimfire
The folks at Varminter.com are avid varmint hunters, who test varmint rigs in the real world, seeing how they perform in the varmint fields. Varminter.com was quite impressed with the CZ Model 512 American semi-auto .22 WMR (Winchester Magnum Rimfire) rifle. The testers found the Model 512 to be accurate, extremely reliable, and fun to shoot. Watch the video to field tests conducted in California. This self-loading rifle performed ultra-effective on California ground squirrels. Erik Mayer, Varminter.com’s publisher says: “The 22 Magnum (.22 WMR) is beginning to see a resurgence of sorts, as the rimfire ammunition becomes more readily available. Because of this, rifles like the CZ Model 512 have also begun to see a rise in interest again”. CLICK HERE for FULL REPORT with accuracy findings for multiple ammo types.
You don’t hear much about PacNor barrels in long-range competition, but FORUM member Wes J (aka P1ZombieKiller), proved that they can shoot “lights-out” in a rig assembled by a talented gunsmith. A few seasons back, Wes decided to upgrade a 6mmBR for mid-range benchrest and varmint matches. Wes tells us: “Since I restocked my 6BR … I have not had a chance to shoot it much since I have been playing the 100-200 game. I decided to take it out and do some playing at 500 yards. I have to give some serious props to my buddy (and fellow FORUM member) ‘PREACHER’ who did the chambering and barrel work for me. He can certainly make a gun shoot good. The barrel is a PacNor 1:8″ twist. My load was 105gr Berger VLDs pushed by 29.6 grains of Varget.” The five-round, 500-yard group shot by Wes J with his 6BR, measured just 1.240″, as measured by OnTarget software. Now that’s one accurate rig!
Five by Five — 5-Shot Group at 500 Yards, 1.240″, 0.237 MOA
This Editor knows something about the potential of a PacNor barrel. I have a 3-groove stainless PacNor SuperMatch on a Savage-actioned 6BR. This barrel shoots honest quarter-MOA in calm conditions, and it cleans up super-easy. The interior finish is so good, I’ve never had to brush the bore or use abrasives, and after 750 rounds it shoots as well as ever. I attribute the easy cleaning to the fact the lands in a PacNor 3-groove are wide and flat, so they are gentle on bullet jackets. I think accuracy is helped by the fact that my PacNor runs on the tight side (0.236 land dimension) with a good amount of choke. That works well with the 105gr Lapua Scenars and 103gr Spencers I like to shoot. You can read more about my rifle, nick-named the “Poor Man’s Hammer”, in this Feature Article from our archives. On one particularly calm day, in the hands of my friend (and ace trigger-puller) Joe Friedrich, the Poor Mans’ Hammer put 3 shots in under 0.200″ (measured center to center) at TWO Hundred yards. If you get a good one, PacNor three-grooves can definitely shoot.
Target Measurement with OnTarget Software
We used OnTarget software to measure the 5-shot group in the target above. This easy-to-use software is very repeatable, once you get a feel for plotting the shots. The latest On Target v2.25 Precision Calculator is FREE for a 15-day evaluation period. If you like it (and you will, trust us) there’s a modest $11.99 registration fee to activate the program. In addition to group size (in inches), OnTarget plots distance to aiming point, and the software automatically calculates the group’s vertical height, horizontal dispersion, average to center (ATC), and group size in MOA.
You can run a measurement on a scanned target or a photo of a target. You’ll need some known reference to set the scale correctly. The target above had a one-inch grid so it was easy to set the scale. Once you’ve set the scale and selected bullet diameter and target distance, you simply position the small circles over each bullet hole and the OnTarget software calculates everything automatically, displaying the data in a data box superimposed over the target image. To learn more about OnTarget Software, read AccurateShooter.com’s OnTarget Product Review. This article covers all the basics as well as some advanced “power user” tips. NOTE: Since the review was written, On Target has updated the software, and the free version now has a time limit.
Folks who live in high-crime areas, or where there may be unwanted intruders, should definitely consider a rapid access long-gun safe system. When seconds count, this system lets you instantly get your hands on your defensive rifle or shotgun.
For home or shop use, we like this RAPiD Safe AR Gunlocker from Hornady. The spring-loaded door opens instantly when activated by the owner’s personal RFID devices. The AR Gunlocker also has a keypad so you can enter a combination if your RFID “key” is not around. Or you can use the supplied manual barrel-style metal key. Watch the video to see how the system works:
The RAPiD Safe AR Gunlocker RFID safe secures long guns in a steel-walled vault that can be stored in a closet, under a bed, or even in your vehicle. This will hold an AR and a shotgun with foam inserts. There are several options for entry: 1) Radio Frequency IDentification (RFID) tag system; 2) KeyPad; 3) Manual barrel-style metal key.
For the AR Gunlocker, Hornady provides one RFID Wristband, one RFID Key Fob, and two RFID “stickers”. As a secondary entry method, you can program a four- to six-digit security code. Finally, you can use a manual lock if all power fails.
RAPiD Safe AR Gunlocker Specifications:
Exterior: 42″ Wide x 15.25″ Deep x 6.75″ High
Interior: 40.5″ Wide x 13.5″ Deep x 5.5″ High
Weight: 55 pounds
Power: 12-volt DC (with provided AC power transformer from wall outlet) or four (4) AA batteries.
The RAPiD Safe AR Gunlocker’s exterior is made from 16-gauge steel with four internal hardened locking lugs. The Gunlocker has pre-drilled mounting holes so you can secure it to a floor, wall, or truck bed. Additional security is provided via a 3/8″ by 3-foot polymer-coated steel cable.
This GunsAmerica Video Shows How the Gunlocker Can Be Installed in a Vehicle


 Like the Hornady tool, the


 Rimfire cross-training allows PRS competitors to build their skill sets without breaking the bank (or burning out barrels). One great .22 LR option for cross-training is offered by CZ, the Czech arms-maker. The TFBTV video below spotlights the


 Target Measurement with OnTarget Software


