|
|
May 15th, 2009
 Barrett Rifles, of 50 BMG fame has released a new, high-strength non-ammonia bore cleaner that really works. We know what you’re saying… that the last thing we need is yet another “miracle” bore cleaner. However, we’ve received reliable reports from fellow shooters that Barrett’s new Heavy Bore Cleaner does an amazing job on copper. One shooter told us he had cleaned his barrel with Sweets and then followed with Barrett’s new product and a lot more fouling and copper came out. Another told us that he had to switch to a nickel-plated jag because the Barrett solvent was so effective on copper. Barrett Rifles, of 50 BMG fame has released a new, high-strength non-ammonia bore cleaner that really works. We know what you’re saying… that the last thing we need is yet another “miracle” bore cleaner. However, we’ve received reliable reports from fellow shooters that Barrett’s new Heavy Bore Cleaner does an amazing job on copper. One shooter told us he had cleaned his barrel with Sweets and then followed with Barrett’s new product and a lot more fouling and copper came out. Another told us that he had to switch to a nickel-plated jag because the Barrett solvent was so effective on copper.
We don’t know the Barrett chemistry, but it does NOT contain petroleum distillates or ammonia. It IS biodegradable and non-flammable. Barrett claims: “In a two-step process, our bore cleaner first dissolves copper, then chemically binds it to the solution to remove it from the bore. It also works to remove carbon and residue and even neutralizes corrosive salts.”
We’re always skeptical when we hear about new cleaning compounds. But the reports on this product, so far, have been uniformly excellent. If you have a rifle that copper-fouls badly, you may want to check out the new Barrett Heavy Bore Cleaner. Currently it is available only in a large 16-ounce bottle that costs $24.95. Purchase from the Barrett Store or other online vendors.
February 18th, 2009
 Ace trigger-puller Joel Kendrick, a former IBS 600-yard Shooter of the Year, has been working on a MELONITE® nitrocarburizing process for surface-hardening barrels and other gun parts. The main advantage of Melonite barrel treatment is that it reduces friction in the bore and lessens bore surface wear, potentially extending barrel life. Melonite-treatment of a bore creates a new compound layer in the top 10-20 microns of the surface, creating a very hard, slick surface. Joel has found that this surface is so slick that carbon does not easily adhere, so the barrel is easier to keep clean. Real-world tests have shown that Melonite barrel treatment definitely reduces internal barrel friction. Joel notes that, after processing, barrels deliver 50 to 100 fps LESS velocity with the same load, a reliable indicator of reduced friction. (Likewise, you’ll get less velocity when switching from naked to moly-coated bullets.) Butch Lambert has tried some Melonite-treated barrels, and he reports: “I have had Joel Kendrick do three barrels for me in Melonite. I polished them first and the finish is like a deep polished black-bluing. One Krieger has 5000 rounds on it and it is shooting just as well as when new. It has been an incredible barrel. It has no throat erosion. It has developed a bunch of pinprick looking spots in the throat, but doesn’t seem to hurt anything. The finish is so hard you can’t thread it. I have not put one of the LV barrels on yet and the heavy is a great shooter and doesn’t have many rounds on it. My experience has been great, but a more extensive test is needed.” Ace trigger-puller Joel Kendrick, a former IBS 600-yard Shooter of the Year, has been working on a MELONITE® nitrocarburizing process for surface-hardening barrels and other gun parts. The main advantage of Melonite barrel treatment is that it reduces friction in the bore and lessens bore surface wear, potentially extending barrel life. Melonite-treatment of a bore creates a new compound layer in the top 10-20 microns of the surface, creating a very hard, slick surface. Joel has found that this surface is so slick that carbon does not easily adhere, so the barrel is easier to keep clean. Real-world tests have shown that Melonite barrel treatment definitely reduces internal barrel friction. Joel notes that, after processing, barrels deliver 50 to 100 fps LESS velocity with the same load, a reliable indicator of reduced friction. (Likewise, you’ll get less velocity when switching from naked to moly-coated bullets.) Butch Lambert has tried some Melonite-treated barrels, and he reports: “I have had Joel Kendrick do three barrels for me in Melonite. I polished them first and the finish is like a deep polished black-bluing. One Krieger has 5000 rounds on it and it is shooting just as well as when new. It has been an incredible barrel. It has no throat erosion. It has developed a bunch of pinprick looking spots in the throat, but doesn’t seem to hurt anything. The finish is so hard you can’t thread it. I have not put one of the LV barrels on yet and the heavy is a great shooter and doesn’t have many rounds on it. My experience has been great, but a more extensive test is needed.”
Salt-bath nitrocarburizing by Melonite process has been applied in a wide range of industries throughout the world for many decades. It is used to improve the wear resistance, the fatigue strength, and corrosion resistance of components made from steel, cast iron, and sintered iron materials. The Melonite process is used as an alternative to other surface engineering processes such as case hardening.

Joel tells us: “I have been experimenting with this Melonite process for the last five years. I have been testing nitrocarburized barrels on my F-class and Long Range equipment since 2005 with good results. What will it cost? Joel expects Melonite treatment will cost under $100.00 per barrel, but the final pricing structure hasn’t been set yet. There will be volume discounts for gunsmiths and manufacturers.
There are many potential applications of Melonite processing for shooters, Joel believes. In addition to barrels, bolts, actions, internal components, and even reloading equipment can be surface-hardened with the Melonite process. After processing, the surface compound layers formed consist of iron, nitrogen, carbon and oxygen. Due to its microstructure, the compound layer does not possess metallic properties. Depending on material used, the compound layer will have a Vickers hardness of about 800 to 1500 HV, and a layer depth of 10 to 20 micorons. That’s so hard that conventional reamers won’t work well on a Melonited surface, so the barrel must be chambered BEFORE Melonite processing.

Lower Friction, Less Throat Erosion, Longer Barrel Life
Joel believes there are many benefits to Melonite barrel processing. The barrels he has treated and tested have shown reduced fouling, less throat erosion, and extended useful barrel life. Melonite-treated Chrome-moly barrels will have improved corrosion resistance as well. But are there negatives? According to Joel, “with stainless barrels, Melonite processing may reduce corrosion resistance slightly. Also, the treatment process makes the surface so hard that re-chambering is not practical — so this is something you do to already-chambered barrels.”
What about accuracy? Joel says: “Melonite barrel treatment should have no effect, positive or negative, on accuracy… except to the extent that your barrel may retain its best accuracy longer since it won’t wear out as fast.”
To learn more about the Melonite nitrocarburizing process and its application to shooting products, contact Joel Kendrick, joelkndrck [at] aol.com, or call (704) 616-6442.
January 12th, 2009
Virginia’s Bill Myers is recognized as one of the top rimfire smiths in the country. We featured one of his “Spec Rifles” in a recent Gun of the Week story. Built on a blue-printed Suhl 150-1 action, Bill’s Bubinga-stocked benchrest rig proved to be a winner right from the start.
Bill is a creative thinker, and his own exhaustive testing has convinced him that barrel indexing can enhance accuracy in rimfire benchrest guns. Myers does acknowledge that, particularly with a very good barrel, the advantages of indexing may be subtle, and extensive testing may be required. Nonetheless, Myers believes indexing can improve rimfire accuracy.
The Challenge of Barrel Indexing
With a conventional barrel installation, employing a shoulder with a threaded tenon, it is difficult to index the barrel. Even with a cone breech that eliminates the problem of extractor cuts, you’d have to use shims to alter the barrel index position, or otherwise re-set the shoulder each time you screwed the barrel in further.


Bill has come up with a masterful solution to barrel indexing. He designed and built his own prototype custom action that clamps the barrel rather than holding it with threads. The front section of the action is sliced lengthways, and then clamped down with three bolts. A special bushing (the gold piece in photos) fits between the barrel and the action. By using bushings of different inside diameters, Bill can fit any barrel up to an inch or so diameter, so long as it has a straight contour at the breech end. To mount the barrel, Bill simply places the fitted bushing over the barrel end-shank, then slips the “sleeved” barrel into the front end of the action. Tighten three bolts, and the barrel is secure.
Indexing with the Myers’ Clamping Action
To index the barrel, Myers simply loosens the three clamping-bolts and rotates the barrel in the action. Because there is no thread to pull the barrel in or out, the headspace stays the same no matter how much the barrel is rotated. In other words you can rotate the barrel to any position on the clockface and the headspace remains unchanged.


Right now Bill has no plans to start building his own indexable rimfire actions for sale. However, he is involved in serious experimentation with barrel indexing, in cooperation with Gene Beggs and others. Over the course of the next year we may see a “semi-production” action offered that incorporates aspects of Bill Myers’ indexable, barrel-clamping receiver. For more information, contact Bill Myers, wzmyers [at] comcast.net, (540) 778-1782.
October 21st, 2008
How long will a barrel last before the accuracy “goes south”? There are so many variables involved (powder type, bore diameter, bullet coatings etc.) that it’s hard to predict. You might say “Well, my buddy has a .243 and he got 1500 rounds before the throat was shot out” — those kind of comparisons can be useful, but they’re not very scientific, and they won’t help much if you’ve got a gun in a new chambering (such as the 6.5×47) for which there is not a lot of historical data.
Is there a more reliable way to predict barrel life — one that will work for a broad range of calibers? Well, Forum member MikeCr has developed an Excel spreadsheet that accounts for a number of variables, and gives a pretty good estimate of useful barrel life, whether you’re shooting a .223 Rem or a 338 Lapua Magnum. Mike’s program predicts barrel life using five variables: 1) Bullet Diameter; 2) Powder Charge weight; 3) Powder Heat Potential (KJ/kg); 4) Pressure (in psi); and 5) Bullet Coating (yes/no). Mike provides a table with Heat Potential ratings for most popular powder types. The user needs to know the pressure of his load. This can be estimated with QuickLOAD.
You can download the lastest version of Mike’s spreadsheet below. You’ll need an Excel viewer to open the file.
Click to Download Spreadsheet: Barrel Life Spreadsheet (Lastest Version)
Shown below is Mike’s Spreadsheet, with variables for a 6BR shooting 105gr “naked” bullets with 30.3 grains of Hodgdon Varget powder. The formula predicts 2401 rounds of barrel life. That corresponds pretty well to what we’d expect for a 6BR — about 2500 rounds.
 
Mike observes: “There has been alot of discussion lately related to cartridge design and resulting barrel life. This is a really important factor to consider amongst a myriad of choices. Barrel life is controversial, and subjective. There are no clear-cut standards for comparison. But a few years ago, I put together a spreadsheet based on Bart Bobbit’s rule of thumb. It worked pretty good, only occasionally failing some tests when validated against posted barrel lives.
According to Ken Howell, I had to account for pressure. And Henry Child’s powder temperature testing provided another piece needed. So, I’ve tweaked it here and there to pass more tests. From 223rem to 300 UltraMagnum. Another element added, but turned off is shot interval. I would need way more tests to lock in on this. But everyone knows, the faster you shoot, the worse the barrel life.
Anyway, another factor hard to define is ‘accurate’ barrel life. This cannot be quantified without standards. Barrels are replaced when expectations are no longer met. I feel that a [barrel] passes peak potential in a finite period due to throat erosion. But that don’t mean it’s toast, if it still shoots well enough. It’s just as likely that many of us never see that peak potential anyway. It’s a slippery thing. Point-blank BR competitors will toss a barrel when it leaves the 1s. I could get another 4000 rounds from it, and be content with its performance, I’m sure.
NOTE: This spreadsheet may show a lower barrel life than you prefer. But it pretty well spotlights cartridges to stay away from if you plan much time at the range or in dog town.”
Editor’s Comment: We want to stress that Mike’s spreadsheet is a helpful tool, but it is not a definitive “take-it-to-the-bank” indicator of barrel life. Mike cautions that predicting barrel life involves so many different factors (including how hard/hot the barrel is run), that the task is a bit like predicting tread life on car tires. Still, the spreadsheet is very helpful. It can certainly put shooters on notice that some chamberings (such as the 6-284) are likely to be a barrel burners. That can help you make a smart decision when choosing a chambering for your next rifle.
September 28th, 2008
For two years, Forum member John Skowron (John708) has been campaigning a 6BRX, built by Nat Lambeth (RustyStud). You’ll find the full history of John’s 6BRX project in this Forum Thread. With this rifle, John was the overall 1000-yard winner at Butner in February 2007.
The 6mm BRX is based on the 6mm BR cartridge. The shoulder is moved forward, but the shoulder angle and case taper is the same as the parent cartridge. This way you can use standard dies for most purposes (although it is a good idea to have a custom full-length die so you can size the entire case body). Many of our readers have been interested in the 6mm Improved (BRX, Dasher etc.), but they’ve wondered about case durability and barrel life. John has answers for those questions:
6BRX Case Life
Case life running the Berger 105s at 3000+ fps is 14-15 reloads. Brass was discarded when the primer pockets became too loose. The 6BRX brass OAL after fireforming is 1.56″. Max OAL for the 6BRX is 1.58″. The brass never stretched enough to require trimming before discard. Another plus for the 6BRX and Lapua brass. By the way don’t even bother with Remington-brand 6BR brass. The primer pockets were so loose after my standard fire-forming load I had to trash all the cases. Stick with the good stuff, Lapua.
6BRX Barrel Life
Here are Skowron’s comments as his round count increased:
2750 Rounds: I now have 2570 rounds through my 6mm BRX. I was just at the range today doing an accuracy test. I shot two 10-shot groups at 100 yards, one with 105gr Bergers, and the other with 107gr Sierras. Both were identical 0.44″ 10-shot groups. Not bad for a rifle with 2500+ rounds through it.
2900 Rounds: I now have 2900 rounds through my 6mm BRX. I was doing some load testing with the new 6mm Berger bullets. I compared them with my existing comp. load in my 6mm BRX. The 105gr Bergers, jammed .015″ into the lands, with 31.5 grains of Varget and Fed 205s are still shooting .45″ 10-shot groups at 100 yards. Velocity is 3060 fps. I don’t know how long this Broughton barrel will last, but I’m amazed that it’s lasted this long.
2950-3044 Rounds: I had virtually no throat erosion until I reached 2900 rounds. After 2900 rounds throat became noticeably rougher on cleaning and groups opened up. 10-shot groups with match ammo were now .53″ (compared to low fours before). At 2950 rounds the groups ran .58″. At 3044 rounds, the groups opened up to .7″. That’s not enough accuracy for LR work.
CONCLUSION: Barrel life with competitive accuracy was 2900 rounds with this gun.
Achieving this barrel life goal pretty much completes my 6mm BRX project. I’m now shooting a cartridge that has the same or better barrel life than the 260 Rem, it’s more accurate, with essentially equal wind drift. [Editor’s Note: Richard Schatz recently won the NBRSA 1000-yard Nationals with a 6 Dasher, a similar 6BR Improved cartridge, but with a 40° shoulder. Richard’s barrel had over 2000 rounds through it.]
June 13th, 2008
Put the same load in a variety of barrels (with the same length and chamberings) and you’ll see a wide variance in muzzle velocity. In fact, it’s not unusual to see up to 100 fps difference from one barrel to the next. We demonstrated this with a comparison test of Lapua factory ammo.
Chron Testing Lapua Factory Ammo
We recently chronographed Lapua 105gr 6mmBR factory ammo in three different 8-twist barrels of similar length. The results were fascinating. Lapua specs this ammo at 2790 fps, based on Lapua’s testing with its own 26″ test barrel. We observed a speed variance of 67 fps based on tests with three aftermarket barrels.

Brand ‘S’ and Brand ‘PN’ were pre-fit barrels shot on Savage actions. Brand ‘K’ was fitted to a custom action. All test barrels were throated for the 100-108 grain bullets, though there may have been some slight variances in barrel freebore. With a COAL of 2.330″, the rounds were “jumping” to the rifling in all barrels. Among the four barrels, Brand ‘PN’ was the fastest at 2824 fps average — 67 fps faster than the slowest barrel. Roughly 10 fps can be attributed to the slightly longer length (27″ vs. 26″), but otherwise this particular barrel was simply faster than the rest.
Results Are Barrel-Specific, Not Brand-Specific
These tests demonstrate that the exact same load can perform very differently in different barrels. We aren’t publishing the barrel-makers’ names, because it would be wrong to assume that ‘Brand X’ is always going to be faster than ‘Brand Y’ based on test results from a single barrel. In fact, velocities can vary up to 100 fps with two identical-spec barrels from the SAME manufacturer. That’s right, you can have two 8-twist, 26″ barrels, with the same land-groove configuration and contour, from the same manufacturer, and one can be much faster than another.
Don’t Demand More Than Your Barrel Can Deliver
We often hear guys lament, “I don’t get it… how can you guys get 2900 fps with your 6BRs and I can only get 2840?” The answer may simply be that the barrel is slower than average. If you have a slow barrel, you can try using more powder, but there is a good chance it may never run as fast as an inherently fast barrel. You shouldn’t knock yourself out (and over-stress your brass) trying to duplicate the velocities someone else may be getting. You need to work within the limits of your barrel.
 Factory Ammo Provides a Benchmark Factory Ammo Provides a Benchmark
If you have a .223 Rem, 6BR, .243 Win, 6.5×47 Lapua, 6.5×55, .308 Win, 30-06, or 300 WM Rifle, we recommend you buy a box of Lapua factory-loaded ammo. This stuff will shoot great (typically around half-MOA), and it can give you a baseline to determine how your barrel stacks up speedwise. When you complete a new 6BR rifle, it’s wise to get a box of the factory ammo and chronograph it. That will immediately give you a good idea whether you have a slow, average, or fast barrel. Then you can set your velocity goals accordingly. For example, if the factory 6BR ammo runs about 2780-2790 fps in your gun, it has an average barrel. If it runs 2820+ in a 26″ barrel (or 2835 fps in a 28″), you’ve got a fast tube.

May 19th, 2008
Gunsmith Nat Lambeth, nlambeth [at] embarqmail.com, recently had a client bring in a Custom-Shop Remington that wouldn’t even hold one Minute of Angle (MOA) at 100 yards. Nat was able to correct flaws in the factory action and then fit a new barrel. Remarkably, after action truing and barrel replacement, the gun shot like a house on fire. After working his magic, Nat shot a 0.111″ 5-shot group with the gun.
Nat tells us: “I had a customer bring in a Remington 700. This rifle was supposed to have been from the custom shop. It was a stainless model 700 with a 5R Mil Spec barrel in a HS Precision stock. The customer paid a premium price for this rifle. The customer complained the rifle ‘won’t shoot groups under 1.5″ at 100 yards’, and he wanted a new barrel. He had 400 rounds down the tube. The barrel looked to be in good shape with maybe a scratch 8 inches from the muzzle.

Blue-Printing the Receiver
I removed the barrel from the receiver and looked at the internal bolt lug engagement surfaces. Only one lug seemed to be contacting. I put the bolt in a V-Block and measured the rearward bolt lug surfaces. The right or bottom lug had .019″ more reaward surface than the left or upper lug. This would have taken me two days to lap out so I set up the bolt in a truing jig and turned the bolt .020. I then put the action in a action truing jig and machined the inside lug surfaces until I got one even surface. I lapped the lugs until I had 80% bi-lateral contact, then re-faced the bolt and action face.
New Broughton Barrel
I dialed in a new 26″ Broughton 1:10, 5C barrel. It was indicated on both ends until a .0001″ indicator needle was not moving. The barrel was turned, threaded, and chambered in the same setup using thinbit tooling, a PT&G 95 Palma reamer with a .3004 bushing. The chamber was cut within .0015″ with a Lambeth/Kiff Micrometer Adjustable Reamer Stop. The factory recoil lug was replaced with a precision-ground lug.
The barrel was removed from the lathe and the muzzle was cut 1.250 shorter in a bandsaw. The barrel was re-mounted in the lathe and the muzzle dialed in the steady rest. The crown was faced with a piloted, PT&G facing tool then faced with a piloted, 79° counter bore .100″.
Stock Work
The rifle stock was re-inletted and glassed in for two inches. Then the barrel free-floated.
A Tack-Driver is Born
I thoroughly prepped 22 pieces of used 308 Federal Gold match brass, which were then loaded with 42.5 grains of H4895, CCI BR2 primers, and Hornady 168 HPBT bullets. After cleaning the barrel, I fired one test round with no problems and cleaned the barrel again. I then installed a Leupold 6.5-20AO scope in Farrell bases and rings. I bore-sighted the rifle by eye with the bolt removed at 50 yards.

After some sighters to set Point of Aim, I sat down and did 5 shots for record at 100 yards. Those five shots went into one ragged hole. (See Target Below — this editor measures the group as 0.111″ center to center using OnTarget Software.) Another customer who was there at the range, then shot a 5-shot group that went into 0.312″. That’s an 0.2115″ average for the two groups. I then was able to shoot a couple more groups in the ‘teens.”

Conclusion
Nat proved that attention to detail DOES make a difference, and that truing an action, improving the bedding, and fitting a superior barrel can make a HUGE difference in accuracy. Now, mind you, we’re not suggesting that you can take a factory .308 and make it into a gun that will win the Super Shoot. Nat’s 0.111″ group was exceptional. Still this demonstrates that major gains can be had by action blue-printing combined with bedding work and a new barrel.
March 25th, 2008
The last half-inch or so of your barrel is absolutely critical. Any damage (or abnormal wear) near the crown will cause a significant drop-off in accuracy. Here are ways you can check the end of your barrel, using a common Q-Tip.
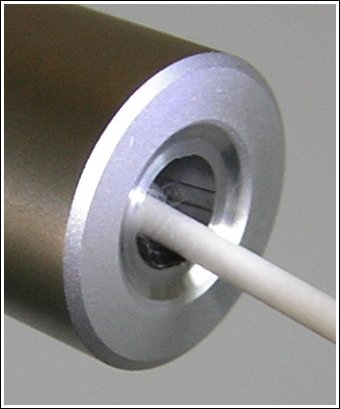
Use Q-Tip for Barrel Inspection
To find out if you have a burr or damage to your crown, you can use an ordinary Q-tip cotton swab. Check the edges of the crown by pulling the Q-tip gently out past the edge of the crown. If you have a burr, it will “grab” the cotton and leave strands behind.
Larry Willis has another way to use a Q-Tip: “Here’s a neat trick that will surprise you with how well it works…
Just insert a Q-Tip into your barrel (like the picture below), and it will reflect enough light so that you can get a real good look at the last half inch of rifling and the crown of your barrel. In most cases you’ll find that this works much better than a flashlight. Since then, I’ve used this method about a jillion times. Q-Tips are handy to keep in your cleaning supplies anyway. This is a good way to judge approximately how well you are cleaning your barrel when you’re at the range. It’s also the best way to examine your barrel when you’re in the field.”
Larry Willis is the inventor of the unique Innovative Technologies Belted Magnum Collet Resizing Die. Larry explains how this die works, and offers many other useful reloading tips on his website, LarryWillis.com.
January 2nd, 2008
 So what does a “worn-out” barrel really look like? Tom Myers answered that question when he removed a 6.5-284 barrel and cut it down the middle to reveal throat wear. As you can see, there is a gap of about 5mm before the lands begin and you can see how the lands have thinned at the ends. (Note: even in a new barrel, there would be a section of freebore, so not all the 5mm gap represents wear.) There is actually just about 2mm of lands worn away. Tom notes: “Since I started out, I’ve chased the lands, moving out the seating depth .086″ (2.18 mm). I always seat to touch. My final touch dimension was 2.440″ with a Stoney Point .26 cal collet.” So what does a “worn-out” barrel really look like? Tom Myers answered that question when he removed a 6.5-284 barrel and cut it down the middle to reveal throat wear. As you can see, there is a gap of about 5mm before the lands begin and you can see how the lands have thinned at the ends. (Note: even in a new barrel, there would be a section of freebore, so not all the 5mm gap represents wear.) There is actually just about 2mm of lands worn away. Tom notes: “Since I started out, I’ve chased the lands, moving out the seating depth .086″ (2.18 mm). I always seat to touch. My final touch dimension was 2.440″ with a Stoney Point .26 cal collet.”
Except for the 2mm of wear, the rifling otherwise looks decent, suggesting that setting back and rechambering this barrel could extend its useful life. Tom reports: “This was something I just thought I’d share if anyone was interested. I recently had to re-barrel my favorite prone rifle after its scores at 1,000 started to slip. I only ever shot Sierra 142gr MatchKings with VV N165 out of this barrel. It is a Hart and of course is button-rifled. I documented every round through the gun and got 2,300 over 4 years. Since I have the facilities, I used wire EDM (Electro Discharge Machining) to section the shot-out barrel in half. It was in amazingly good shape upon close inspection.”

Tom could have had this barrel set back, but he observed, “Lately I have had to increase powder charge to maintain 2,950 fps muzzle velocity. So to set it back would have only increased that problem. [And] I had a brand new 30″ Krieger all ready to screw on. I figured it was unlikely I’d get another full season on the old barrel, so I took it off.”
November 13th, 2007
There was a lot of interest in Jeff Rogers’ Heavy Gun, featured in yesterday’s Daily Bulletin. Jeff is a race-car mechanic and engine builder in Australia, and you’ll find many innovative mechanical features on this rifle.
1. Drop Port for Magnum Case
Jeff reports: “The action is home-made. My shooting buddy Tony Z was the magician here–without his extensive machining experience, the action would still be on the drawing board. As you can see it is a Right Bolt, Left (loading) Port design. What makes it unique is the big gravity port, perhaps the only Drop Port ever made for a case of this size. The port will work will cases up to 2.850″ in length, with a .550″ max rim diameter.” The action is constructed from Swedish 709m chrome-moly steel measuring 2.00″ diameter x 10″ in length. It has roller-assist extraction to help with the high pressure loads Jeff runs. The action is both conventionally bedded and glued into the stock.

2. Removeable Aluminum Side Pods
The two alloy “side pods” were milled from 6061 T6 billet. Given airline weight limit of 32 kg per piece, Jeff made the pods modular (they are through-bolted), so the gun can be air-transported in two sections. Concerning the dual side-pod design, Jeff observed: “[This] is unconventional… but I wanted was something that was true [when bolted together]. Milling the thing up on every surface insured this and the pods are installed with dail indicators on assembly.”

3. Tension Barrel System
The Broughton barrel sits inside a threaded barrel sleeve that holds the barrel in tension. Tensioned barrels have been used on Heavy Guns before, but few have been as successful in competition as Jeff’s rig. Jeff tells us: “The 30-cal barrel is a 1.500″-diameter, 1:13 twist, 32″ Broughton. It is straight for 6″ then tapers to 1.250″ at 32″. The tension tube is 6061 T6 alloy 2.0″ outside diameter with a .187″ wall thickness. At the chamber end, a 431 stainless adaptor is fitted to the barrel, about 1.5″ long, stepped to a slip fit inside the tube for another 1.5 inches. This allows the main heat area of the chamber to sink into the tube. The tension tube is all jointed with a CAT high-temp anti-seize. On the muzzle end is a left hand 1.250x16tpi thread to take the tension nut. We have tried various tensions and found torque settings do not matter to the groups as long as the nut does not come loose. Because I can really rattle down those 10-shot groups with the Drop Port action, remember that the barrel grows in length before it gets a chance to transfer heat to the outer tube. If you shot the gun at pedestrian pace, then only 50 ft/lbs of tension is needed.”

|


