Our friend Robert Whitley of ARX Enterprises LLC has learned, through careful measurement and testing, that some barrels threaded 5/8″ x 24 tpi at the muzzle may not deliver optimal accuracy. The reason is that the end of the barrel can bell out slightly, like a trombone, because too much steel has been removed. This is particularly true with .30-caliber barrels, but it can also be a problem with smaller caliber barrels (even 6mm). Robert demonstrates this phenomenon in the video below. All gunsmiths, and anyone considering threading a barrel, should watch the video. At 1:00 – 1:30 Robert gauges a 5/8″ x 24-threaded .30-Caliber barrel. You can see the belling effect clear as day.
“When setting up a commercial barrel in the lathe, we noticed that the maximum-sized bushing that would fit in the bore at the chamber end was almost .0015” smaller [than what would fit] at the muzzle. That precipitated my pin-gauging of a number of different commercial barrels that were threaded for 5/8” x 24 tpi. What I found is what’s shown on the video.” – R. Whitley
Solve Problem with a Larger Thread Diameter
If 5/8″ x 24 threading is potentially harmful to accuracy, is there a solution? Yes, you simply need to leave a little more steel on the barrel. (See Video starting at 02:40.) Frank Green of Bartlein barrels states: “We get these questions all the time. I say run the largest thread diameter that is possible.” Robert Whitley has found that a 3/4″ x 28 tpi threading does not cause the “belling effect”. Accordingly Robert recommends 3/4″ x 28 if you need to thread your barrel for a muzzle brake or suppressor. Robert explains: “We only make 3/4” x 28 tpi muzzle brakes and that’s what we recommend to customers.”
“See how much meatier the 3/4″ threading is vs. the 5/8″. The 3/4″ threading offers a lot more metal around the bore. There’s a lot less opportunity for the bore to become bell-mouthed…” – Robert Whitley
Barrel Threading Diameter — What’s Important to Know By Robert Whitley
In truth, the 5/8” x 24 tpi threading never came out of any accuracy-based think tank or set-up, it’s a military .30-Cal threading for barrels that someone has to carry around (they needed to keep the barrel weight down so it was smaller in diameter and the threading had to work with that situation). People have somehow assumed because the military uses that threading for certain things that it must mean that it’s also fine for a highly accurate rifle too, but that’s not really correct.
I don’t think there is any better and realistic option than the 3/4” muzzle threading, and we also do it so there is no relief cut behind the threads on the barrel (i.e. put the relief cut on the brake or jam nut, don’t chop down on the muzzle of the barrel). For some reason many have a hard time grasping that the metal at the muzzle end of a rifle is “sacred” and you should not cut it down any more than absolutely necessary. A little threaded pencil diameter nub on the end of a barrel is not ideal for accuracy especially if it’s threaded and you need to torque on it. I cringe when I see a barrel with something like an MTU or Heavy Varmint contour, only to have an itty-bitty pencil thin threaded nub right at the muzzle so someone can “screw on a can” or a muzzle brake.
Lessons Learned Over the Years
A number of years ago I did a 30BR rifle project with Craig Kostyshyn who was big in the 30BR game and he made some of the best 30BR rifle barrels for benchrest competition. When I did the project I wanted a medium-heavy Palma type contour barrel I could use and also have a muzzle turndown for a front sight band. When he found out I was going to have the muzzle turned down he said “whoa, I need to provide for that when I make the barrel because if you turn the front down later you’ll be shooting a trombone” (i.e. the muzzle bore dimension would open up).
What he did was rough contour the barrel with the turndown (about .010” oversize) before he lapped the barrel, then when he lapped the barrel he took it easy in the muzzle area and worked the back of the barrel more. I thought he was a little bit excessive in his concerns but the barrel shot great and I wasn’t going to argue with him, after all he was shooting groups in the ones. I kind of just filed that away and never thought about it until recently when I went to have Fred from Sabreco do some chamber re-work on a commercial .30-caliber barrel I had. When setting up the barrel in the lathe and indicating things Fred noticed that the maximum-sized bushing that would fit in the bore at the chamber end was almost .0015” smaller [than what would fit] at the muzzle and he mentioned it to me. That precipitated my pin- gauging of a number of different commercial barrels I had that were threaded for 5/8” x 24 tpi. What I found is what’s shown on the video.
NOTE: This is a copyrighted article. Do not reproduce or re-link more than 75 words without written permission from AccurateShooter.com.
Advancements in barrel technology in recent decades have been impressive. Today’s premium barrels deliver accuracy that could only have been dreamed-of decades ago. And now a new development promises to help barrel-makers craft the most uniform, consistent, and stable barrels ever.
What’s the new technology? You may be surprised. It’s not a surface treatment, or a cryogenic bath. The latest development in barrel manufacturing is Degaussing — the process of de-magnetizing metal objects. Degaussing is now used in many industries to uniform metallic products and to prevent unwanted interactions with magnetic fields. LEARN MORE.
Degaussing is the process of decreasing or eliminating a remnant magnetic field. It is named after the gauss, a unit of magnetism, which in turn was named after Carl Friedrich Gauss.
At the recent IWA show in Germany, Vallon GmbH, a German manufacturer of degaussing machines, told us that two major Wisconsin barrel-makers have purchased Vallon industrial degaussing units. The units sold to the American barrel-makers are similar to Vallon’s EMS unit show below. This can degauss (i.e. de-magnetize) 50 barrel blanks in one pass.
The Vallon degausser works by passing the barrel steel through a coil. Vallon explains: “The density of magnetic field lines is at its maximum in the coil centre, and is strongly decreasing towards the outside. If a ferromagnetic work piece (steel) is introduced into the coil, the field lines are concentrating and flooding the work piece. The conductivity of steel is up to 800 times higher than that of air. Degaussing is done during a continuous movement of the work piece, leading out of the coil. Decreasing field strength is achieved by a slow extraction from the coil.”
How Degaussing Improves Barrel Steel and Rifle Performance
So what does magnetism have to do with barrel performance? How can degaussing help make a barrel better? Vallon’s scientists tell us that degaussing has three major benefits. First, it aligns ferrous elements within the barrels, strengthening the steel at the molecular level from the inside out. Second, by reducing static surface charges, degaussing reduces chatter during drilling, which creates a straighter bore with a better surface finish. Lastly, there is evidence that degaussed barrels produce slightly more velocity. When a copper-clad bullet spins through a non-degaussed (magnetically-charged) barrel, this creates waste electrical energy. The energy expended reduces velocity very slightly. You can see this effect yourself if you spin a copper rod in the middle of a donut-shaped magnet. This creates an electrical charge.
Here a barrel is checked after degaussing with a Vallon EMS. The meter records a zero magnetic value, showing complete degaussing success.
Degaussing Will Add $50.00 to Barrel Cost
We know what you’re thinking: “All right, degaussing seems beneficial, but how much will this add to the cost of my new barrel?” Based on off-the-record conversations with two barrel-makers, we estimate that degaussing will add less than $50.00 to the cost of a new barrel blank. That’s a small price to pay for greater accuracy and barrel life.
Ask a Sailor — F-Class Champion and U.S. Navy Veteran Explains Degaussing
We asked reigning F-TR Champion James Crofts about barrel degaussing. A U.S. Navy veteran, he immediately understood the potential benefits of this process. “I served in nuclear submarines. Since before World War II, the U.S. Navy degaussed its subs and smaller warships. This had many benefits. Principally, it helped reduce the risk of triggering magnetic mines. But that wasn’t the only benefit — the degaussing process gave the steel greater resilience and longevity. And that’s why the Navy degaussed non-combat vessels as well. Will a degaussed barrel shoot better? Honestly I can’t say. But based on my Navy experience, I bet degaussed steel will be more uniform and will last longer. I’m glad somebody is trying this out on rifle barrels. Put me on the waiting list!”
The above photo show a U.S. nuclear submarine during a degaussing (also called “deperming”) session. This reduces the vessel’s electromagnetic signature, making it more stealthy. Deperming also adds to the vessel’s longevity. With steel-hulled ships, static electricity builds up as the hull slices through the water. A powerful, constant static charge will cause the steel to deteriorate. Degaussing (deperming) helps prevent this, extending the life of the hull.
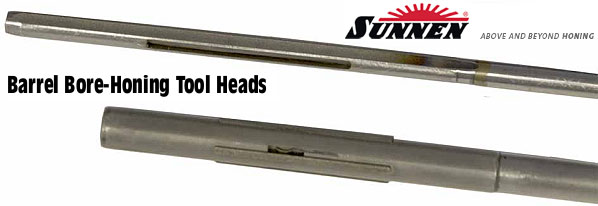
Some custom barrel makers are now honing barrels (after drilling) to improve bore diameter uniformity, smooth the interior finish, and reduce barrel lapping times. For years, large-scale manufacturers of hammer-forged barrels have employed honing. Now the process is being used by smaller, “boutique” barrel-makers. This article explains how and why barrel honing is done. Take the time to watch the video. For anyone with an interest in barrel-making, this video is an eye-opener…
Barrel Honing Process Demonstrated (Worth Watching!):
For custom barrel makers, honing is a time-saver and cost cutter. A few minutes on a honing machine can cut lapping times in half, leaving a cross-hatched surface finish in single or low double-digit Ra. Honing is the same process used to make diesel fuel injectors with bore roundness and straightness controlled to fractions of a micron (<0.000040"), with surface finish Ra ≤0.15 µm (6 µin).
A key manufacturing process used for hammer-forged barrels is now getting attention from the makers of custom button-rifled barrels. This process is precision bore-honing. Honing produces a high-quality bore surface fast, which is critical to hammer forging. (Why is honing so important with hammer forging? Surface finish is the one feature of the barrel that cannot be controlled in hammer forging. Surface imperfections in a barrel blank tend to be amplified as the blank is formed on the rifling mandrel. And if the bore is chromed afterwards, imperfections in the surface finish become even more obvious.)
Honing dramatically improves bore diameter size uniformity and accuracy, surface finish and roundness throughout the length of the barrel. It can certainly be used in place of a pre-rifling lap. The chief difference between a lapped and honed bore is the direction of the finish lines in the bore. Honing leaves fine spiraling crosshatch lines, while a lap leaves lines going longitudinally in the bore. After rifling the manufacturer can remove the crosshatch finish with a quick lap if desired. Honing is fast, accurate, and can be automated. Its surface quality and geometry can duplicate lapping, except for the longitudinal lines of the lapped finish.
Frank Green of Bartlein Barrels told us: “We worked with Sunnen and we did all the initial testing on the prototype machine for them. The machine works great! We ordered and received last year a new manufactured machine with the changes we wanted on it and we just ordered a second one a month or so ago. Should be here next month.”
Computer-Controlled Bore-Honing
Honing can be done with great precision through the use of advanced, computer-controlled honing machines. Sunnen Products Company recently introduced a new machine for .17 to .50-caliber barrels (see control panel below). The spindles on this machine can correct bore size imperfections so small only an air gauge can measure them. The consistency this allows improves bore uniformity, which, in turn, produces more accurate barrels for the precision market.
Sunnen Products Company is the world’s largest vertically-integrated manufacturer of honing systems, tooling, abrasives, coolants and gauging for precision bore-sizing and finishing. Sunnen’s customers include manufacturers of diesel and gas engines, aerospace components, hydraulic components, oil field equipment, and gun/cannon barrels. Sunnen, which just celebrated its 90th anniversary, employs more than 600 people worldwide.
Are you re-barreling a match rifle and need to know if you will still make weight? Or perhaps you want to select the right contour to hit an optimal carry weight for a new varmint rifle? Dan Lilja offers FREE software that will calculate barrel weight for straight contour, straight taper, and radius-tapered barrels. Dan’s software even calculates how fluting alters barrel weight.
For general info on barrel weight calculation for straight and straight tapers, read this article on Lilja’s website. Click HERE for another article explaining weight calculation with barrels that have a radiused (curved) contour section.
Here are the free software programs offered by Dan Lilja. Right click and “Save As”:
We can predict, with some certainty, how long a light bulb will last (in use), or a shingle roof, or even a nuclear reactor. But how about barrels? Is there a way to reliably estimate barrel life based on known characteristics? This article explains one effort to quantify barrel life…
How long will a barrel last before the accuracy “goes south”? There are so many variables involved (powder type, bore diameter, bullet coatings etc.) that it’s hard to predict. You might say “Well, my buddy has a .243 and he got 1500 rounds before the throat was shot out” — those kind of comparisons can be useful, but they’re not very scientific, and they won’t help much if you’ve got a gun in a new chambering (such as the 6.5×47) for which long-term test results are lacking.
Is there a more reliable way to predict barrel life — one that will work for a broad range of calibers? Well, Forum member MikeCr has developed an Excel spreadsheet that accounts for a number of variables, and gives a pretty good estimate of useful barrel life, whether you’re shooting a .223 Rem or a 338 Lapua Magnum. Mike’s program predicts barrel life using five variables: 1) Bullet Diameter; 2) Powder Charge weight; 3) Powder Heat Potential (KJ/kg); 4) Pressure (in psi); and 5) Bullet Coating (yes/no). Mike provides a table with Heat Potential ratings for most popular powder types. The user needs to know the pressure of his load. This can be estimated with QuickLOAD.
You can download the lastest version of Mike’s spreadsheet below. You’ll need Excel or an Excel viewer to open the file.
Shown below is Mike’s Spreadsheet, with variables for a 6BR shooting 105gr “naked” bullets with 30.3 grains of Hodgdon Varget powder. The formula predicts 2401 rounds of barrel life. That corresponds pretty well to what we’d expect for a 6BR — about 2500 rounds.
Mike observes: “There has been a lot of discussion lately related to cartridge design and resulting barrel life. This is a really important factor to consider amongst a myriad of choices. Barrel life is controversial, and subjective. There are no clear-cut standards for comparison. But a few years ago, I put together a spreadsheet based on Bart Bobbit’s rule of thumb. It worked pretty good, only occasionally failing some tests when validated against posted barrel lives.
According to Ken Howell, I had to account for pressure. And Henry Child’s powder temperature testing provided another piece needed. So, I’ve tweaked it here and there to pass more tests. From 223 Rem to 300 UltraMagnum. Another element added, but turned off, is shot interval. I would need way more tests to lock in on this. But everyone knows, the faster you shoot, the worse the barrel life.
Anyway, another factor hard to define is ‘accurate’ barrel life. This cannot be quantified without standards. Barrels are replaced when expectations are no longer met. I feel that a [barrel] passes peak potential in a finite period due to throat erosion. But that don’t mean it’s toast, if it still shoots well enough. It’s just as likely that many of us never see that peak potential anyway. It’s a slippery thing. Point-blank BR competitors will toss a barrel when it leaves the 1s. I could get another 4000 rounds from it, and be content with its performance, I’m sure.”
NOTE: Mike says: “This spreadsheet may show a lower barrel life than you prefer. But it pretty well spotlights cartridges to stay away from if you plan much time at the range or in dog town.”
Editor’s Comment: Mike’s spreadsheet is a helpful tool, but it is NOT a definitive “take-it-to-the-bank” indicator of barrel life. Mike cautions that predicting barrel life involves so many different factors (including how hot the barrel is run), that the task is a bit like predicting tread life on car tires. Still, the spreadsheet is very helpful. It can certainly warn us that some chamberings (such as the 6-284) are likely to be barrel burners. That can help you make a smart decision when choosing a chambering for your next rifle.
What do you get when you combine red Cerakote and barrel fluting? Well, a candy-cane AR barrel — just in time for the holidays. This unique barrel was created by Black Hole Weaponry in St. Helens Oregon. No this is not a Photoshop job. This barrel is really finished this way (as you can see in the close-up). Thanks to Anette Wachter, aka 30 Cal Gal, for finding this festive firearm fitting.
The U.S. Patent Office has awarded BoreSmith utility patents for two unique gun cleaning products. Patents were issued for BoreSmith’s triangular Pyramid Patch™ as well as BoreSmith’s dual-diameter JagBrush™. Both products were designed by Shane Smith, a mathematician/physicist who used his scientific and firearms knowledge to create innovative bore-cleaning products that may well work better than conventional patches and brushes.
BoreSmith’s clever Triangle Patch™ (aka Pyramid Patch) presents more cleaning surface area to the bore wall than does a conventional square or round patch (of equivalent size). At the same time, the unique geometry makes Triangle Patches much less likely to jam in the barrel. This is because the notches in the sides of the triangle allow the patch to sit more uniformly on the jag (without bunching up). The Triangle patch can be used with a standard jag but works best when paired with BoreSmith’s patented dual-diameter JagBrush. Order Triangle Patches HERE.
Triangle Patch Function and Geometry Explained (See 1:18 time-mark):
NOTE: Despite what you may see in this video, you should insert brushes and patches from the chamber end first, using a well-fitting cleaning rod bore guide. With bolt-action rifles, NEVER insert a cleaning rod (with brush or jag) in through the muzzle. This may damage the delicate crown of your barrel.
Patent Awarded to Dual-Diameter JagBrush
The JagBrush is like a standard bore brush but has two different diameters on the bristle section. Bristles in the front are smaller, while the rear bristles are similar length to a standard bore brush. When a patch is pushed through the bore using a JagBrush, the smaller bristles will grab the patch, leaving the longer bristles exposed and creating a dual-action wiping + brushing system. JagBrushes are offered in a wide variety of calibers, in both bronze and nylon versions.
Shane Smith, CEO of BoreSmith, was pleased that his designs have been awarded two important patents: “I created these tools to allow the user to get their firearms cleaner, faster, and without causing unnecessary damage in the process. At BoreSmith, we strive to develop and produce superior cleaning tools that help firearm owners protect their investments.” For more info, visit BoreSmith at RigelProducts.com.
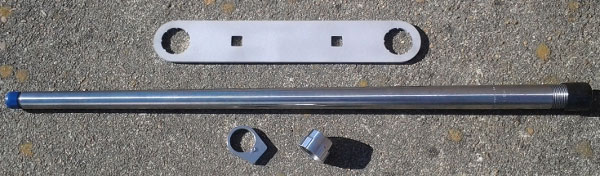
Need a new barrel for your Remington-actioned hunting or tactical rifle? McRee’s Precision has you covered. McRee’s is now offering complete, no-gunsmithing re-barreling kits for Remington and Rem-clone actions. These feature a high-quality, pre-chambered “PRE-FIT” stainless barrel from Criterion, a Savage-style barrel nut, a recoil lug, and a special barrel-nut wrench. With this system you can easily re-barrel your favorite Remington rifle yourself in less than an hour. You don’t need to pay gunsmithing fees, or wait weeks (or months) for a busy smith to do the job.
Right now McRee’s Precision is offering Rem-action Pre-Fit barrel packages (complete with barrel nut, recoil lug, and wrench) starting at just $412.50 (On Sale). Choose from four chamberings: .243 Win, .260 Rem, .308 Win, and .300 Win Mag. These Pre-Fit barrel kits are “100% complete and ready-to-install”. All you need to do is remove your current barrel, place the recoil lug, spin on the new tube, follow the instructions for setting head-space, then torque the barrel nut against the lug. NOTE: You may require a barrel vise and action wrench to remove the original barrel. Minor inletting changes may be needed forward of the action.
The folks at McRee’s Precision say their Pre-Fit system offers many advantages: “Remington Pre-Fitted Barrel Kits have become popular over the years. If Savage can do it, why not for our Remingtons? Our [Criterion-supplied] barrels are spec’d to the McRee standard of performance. We require a minimum of 0.5 MOA with good factory ammo and 0.2 MOA with quality handloads. There are several places to get the tools required to remove your factory barrel correctly. Once you have your barrel removed all you have to do is follow the normal Savage procedure to install your new barrel. We recommend that you contact your local gunsmith for the install. Feel free to call us with any questions.”
Product Tip from Ed LongRange. We welcome readers’ submissions.
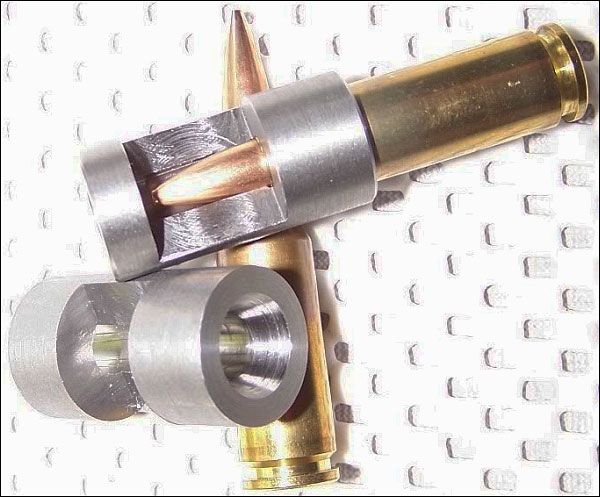
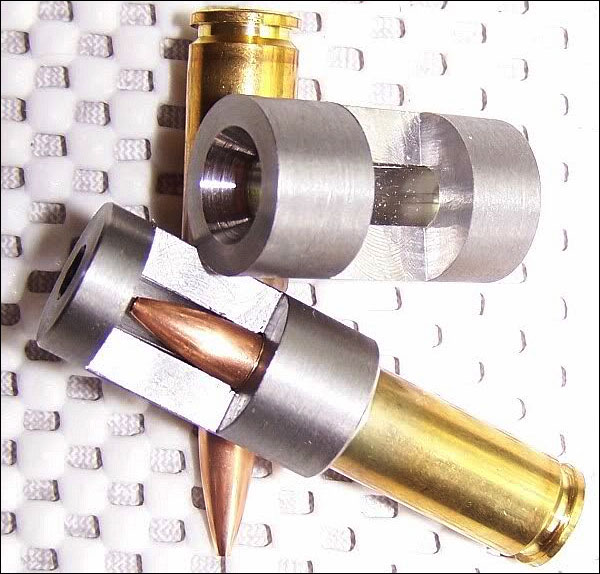
Next time you have a barrel fitted, consider having your gunsmith create a “stub gauge” from a left-over piece of barrel steel (ideally taken from your new barrel blank). The outside diameter isn’t important — the key thing is that the stub gauge is created with the same reamer used to chamber your current barrel, and the stub must have the same bore diameter, with the same land/groove configuration, as the barrel on your rifle. When properly made, a stub gauge gives you an accurate three-dimensional model of the upper section of your chamber and throat. This comes in handy when you need to bump your case shoulders. Just slide a fired case (with spent primer removed) in the stub gauge and measure from base of case to the end of the gauge. Then, after bumping, re-measure to confirm how much you’ve moved the shoulder.
In addition, the stub gauge lets you measure the original length to lands and freebore when your barrel was new. This gives you a baseline to accurately assess how far your throat erodes with use. Of course, as the throat wears, to get true length-to-lands dimension, you need take your measurement using your actual barrel. The barrel stub gauge helps you set the initial bullet seating depth. Seating depth is then adjusted accordingly, based on observed throat erosion, or your preferred seating depth.
Forum member RussT explains: “My gunsmith [makes a stub gauge] for me on every barrel now. I order a barrel an inch longer and that gives him enough material when he cuts off the end to give me a nice case gauge. Though I don’t have him cut that nice-looking window in the side (as shown in photos). That’s a neat option. You can tell how much throat erosion you are getting from when it was new as well. For measuring initial seating depths, this is the most useful item on my loading bench next to calipers. Everyone should have a case gauge made by there smith if you have a new barrel put on.”
Forum member Lawrence H. has stub gauges made with his chamber reamers for each new barrel. He has his smith cut a port in the stub steel so Lawrence can actually see how the bullet engages the rifling in a newly-cut chamber. With this “view port”, one can also see how the case-neck fits in the chamber. Lawrence tells us: “My stub gauges are made from my barrels and cut with my chamber reamers. With them I can measure where my bullets are ‘touching the lands’ and shoulder bump dimensions. This is a very simple tool that provides accurate information.” To learn more about stub gauges, read this Forum Thread. The photos above and below show Lawrence’s stub gauges:
A Negligent Shooter Gets Lucky
Here we have a story so filled with negligent acts that I can only marvel that the shooter survived the experience. The photo and narrative were provided by the gunsmith who took in the repair job, my comments are in italics. It’s worth reading, we can’t get enough safety warnings in our hobby. — GS Arizona, Riflemans Journal
Below is a sectioned barrel showing an 80gr Sierra that was fired in a .223 bolt action with a cleaning rod in the bore. Both the bullet and the rod are still in the bore.
This article originally appeared in the Riflemans Journal website.
Description of Incident (with Commentary)
The shooter had a stuck case in his .223 chamber. The stuck case was actually a loaded round that didn’t fire. It wouldn’t extract because it was a .222 case that got mixed in with his .223 brass. [He had loaded the wrong brass.] I saw the loaded round with an 80gr bullet in it and a light primer strike. Negligent Act #1: Wrong brass was mixed in with the brass being reloaded.
The shooter removed the stuck case with a 3-piece aluminum rod. Negligent Act #2: Hammering out a loaded round with a cleaning rod. People have been killed doing this as the round can fire and drive the cleaning rod right into you. I remember one such incident about 5 years ago, the shooter was pounding out a stuck round, the cleaning rod went right through him, he didn’t survive.
The shooter didn’t notice only two segments of the cleaning rod came out when he removed it. Negligent Act #3: If you put anything at all down the barrel of a rifle you’d better make darn sure you got it all out before doing anything else!
He then chambered another round and fired it. Negligent act #4: If you’ve had a barrel obstruction of any kind, and if you’ve put something in the barrel, look through the barrel before proceeding! Within the past two years I know of an incident in which a benchrest shooter was killed in exactly this manner. The pressure built up and the rifle bolt came out of the receiver and into his chest.
The shooter is ‘OK’, but did not escape unscathed. He said there was a huge explosion and after regaining his senses found he was bleeding heavily from his forehead. The blood was thick enough that it ran in his eyes and he couldn’t see. In his words “I thought I was going to die”.
He has what looks like a pretty deep cut about an inch long on the side of his head, right in line with his right eye starting where the eye socket turns out to the side of the skull. And no telling what he’s got in the way of brass particles embedded in his forehead.
He was shooting on private property, and was alone when this happened. Negligent Act #5: Don’t shoot alone! Accidents happen, this is just one more example. If we could predict accidents, we wouldn’t have them. Always shoot with at least one other person.
He managed to get the bleeding stopped, or at least under control, packed his car and drove himself home without seeking immediate medical attention. Negligent Act #6: This one could have cost him his life after being lucky enough to survive the incident. There’s no way to know what’s happened just after an incident like this. He should have been at a hospital getting checked for shrapnel in the head.
The rod and slug could not be driven out. Since the barrel had a high round count there was no point in trying to salvage it. Note that the aluminum rod is expanded to a tight fit in the bore for the first couple inches. The base of the bullet is a little over 2″ from the mouth of the chamber.
What we’ve seen here is negligence and an absolute indifference to the established rules of safe reloading and gun handling, from start to finish, capped off with the shooter’s foolish avoidance of medical treatment. This shooter is lucky to be alive, but he’s surely used up all his luck. Don’t assume you’ll be so fortunate.


 Ask a Sailor — F-Class Champion and


 Are you re-barreling a match rifle and need to know if you will still make weight? Or perhaps you want to select the right contour to hit an optimal carry weight for a new varmint rifle? Dan Lilja offers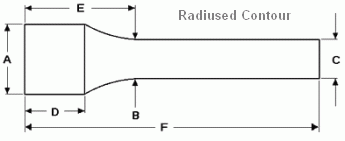
 How long will a barrel last before the accuracy “goes south”? There are so many variables involved (powder type, bore diameter, bullet coatings etc.) that it’s hard to predict. You might say “Well, my buddy has a .243 and he got 1500 rounds before the throat was shot out” — those kind of comparisons can be useful, but they’re not very scientific, and they won’t help much if you’ve got a gun in a new chambering (such as the 6.5×47) for which long-term test results are lacking.