What’s better than a super-accurate 6BR rifle? Well, two super-accurate 6BRs. This week we feature a pair of tack-drivers owned Forum member Mark Schronce. These “Brothers in Arms” share similar stocks, but otherwise the components are different. Mark’s 17-lb gray laminate Light Gun features a Hall action, HV taper barrel, and muzzle brake. The 21-lb Heavy Gun, in “Desert Camo” laminate, boasts a trick dual-port BAT action, and full-contour 30″ barrel without brake. Both guns shoot tiny groups, track like they’re on rails, and give Mark a serious hardware advantage in club competition.
Mark provides this report: “The Light Gun started as my 22-250 AI varmint gun, with a Hall action and McMillan Hunter Benchrest stock. I wanted to build a proper Egg Shoot gun, so I had Richard Franklin (Richard’s Custom Rifles) chamber a Lilja 12-twist in 6mm BR Norma, with a .262″ neck. Using Fowler 80gr FB bullets, the gun shot great right out of the gate. (See my report, Egg Shoots and 600-yard 6 BR). I was curious about the heavier 6mm bullets, so I had Richard chamber and fit a 1:8″ Krieger in 6BR. But this time we went with a .271″ no-turn neck. The Krieger holds quarter-MOA with the heavy bullets, and, to my surprise, it shot the 80s as well as the 12-twist Lilja did. For the 2005 season, I ordered one of Richard’s latest 008 F-Class stocks. This new design is very comfortable to shoot and it’s much more stable in the bags than my old Hunter stock. That added stability will be a big plus for 600- and 1000-yard benchrest matches.
A Heavy Gun for 1000-yard BR and “Belly Benchrest” (F-Class)
I’ve been active in 1000-yard Benchrest for a few years, shooting my 6mm BS and 6mm BR Light gun in both Light and Heavy classes. I wanted to build a rifle for the Heavy Gun Class yet stay within the 22-lb F-Class limit. And I wanted it to have the best hardware I could buy. On a BAT ‘MB’ action (with Jewell trigger) we fitted a 30″ 8-twist 3-groove Lilja, 1.250″ diameter, no muzzle brake. Richard cut the chamber for 6mm BR Lapua Brass, .271″ no-turn neck, throated for Sierra 107gr MKs, matching my current Light Gun. The stock is a pillar-bedded Richard’s 008 1000-yd/F-Class model, with 10 coats of auto clearcoat, all work by Richard. Burris Zee rings hold a Leupold 8.5-25×50 LRT mounted on a BAT one-piece Weaver base. The Heavy Gun weighs in at 21 lbs, much lighter than most Heavy Guns (50 to 100 lbs). But with the 6BR’s light recoil, it’ll do just fine for long range, yet still make weight for F-Class.
Why a 6mm BR Chambering in a Heavy Gun?
I toyed with the idea of going with a 6BR Improved for Heavy Gun, but I’m not convinced the Improveds are worth the extra hassle of fire-forming, not to mention the added cost of custom dies. By way of background, I used to have a Rem-actioned rifle chambered in 6BR BS (Bill Shehane), which is very similar to the 6BR Dasher. I found the 6BR BS was only about 100 fps faster than a standard 6BR. For the shooting I do, that extra 100 fps is not critical. If, in the future, I feel I need more speed, I will go to a .243 AI or a 6.5-284. To be honest, I love the 6BR cartridge. Barrels last forever, and the accuracy can’t be beat. Yes a 6BR is a little light for everyday 1000-yard shooting, but on good days it can set world records. I may move up to a 6.5-284 some day, but for now I will stay with the standard 6mm BR. If I ever do want to go to a bigger caliber, the 8.5-inch BAT Machine MB action gives me this option.
Hall vs. BAT Light vs. Heavy
Comparing the two actions’ bolt lift, lock-up, fit, and finish, I feel they are equally good. However, the BAT can run stout loads with Federal 205 primers — loads that cratered Fed 205s with the Hall. I don’t know if this is a function of the actions’ engineering, or the barrels. I’ve got a Lilja on the BAT, while the Hall wears a Krieger. I do know the BAT has a tight-fitting firing pin, and that might make a difference.
Both my actions have a built-in recoil lug — a really nice feature when you are changing barrels, and one of the main reasons I favor custom actions over a Remington. I think anyone would be pleased with either the BAT or the Hall.
There is a big difference in shooting a Light Gun vs. a Heavy Gun, as you might expect. The Heavy Gun is more stable and recoils straight back. However, even at 21 pounds, the Heavy Gun actually recoils harder into your shoulder than the muzzle brake-equipped Light Gun. But if you take the Light Gun’s brake off, and put the action back in the old Hunter bench stock, the gun would jump, torque and roll. It’s much better with the 008 stock now, but still not as rock solid as the Heavy Gun. On recoil the 21-pounder just tracks straight back, no jumping, no yaw, no rolling–very impressive.
Load Development and Accuracy Results
Developed last year, my favorite Light Gun load is 30.5 grains Varget, CCI BR4 primers, and 106gr Clinch River VLDs, running 2825 fps. The Light Gun shoots other bullets very well, but the Clinch Rivers performed best, with groups in the 0.1s to the low 0.2s at 100 yds. I use Lapua brass of course.
I began my load development for the Heavy Gun with components I had from last year: Varget, N140, and N540 powders, plus Fed 205, CCI BR4, and CCI 450 primers. I also had a good selection of bullets: 95gr and 105gr Bergers, 105gr Lapua Scenars, 106gr Clinch Rivers, and 107gr Sierra MKs.
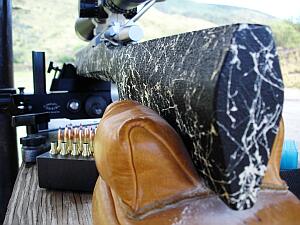
The Heavy Gun liked the Bergers right from the start. During break-in and fire-forming (with 95gr Bergers 0.20” into the lands, 30.0gr Varget and CCI 450s), the rifle shot in the low 0.2s at 100 yds, 0.3s at 200 yds, with a 0.182″ small group at 200 yards (see photo). I then moved up to the heavier bullets and again the Bergers stole the show. Best load for the Berger 105s (seated 0.15″ into the lands) was 30.5 grains Varget and Fed 205s at 2850 fps. At 100 yards, this recipe shot in the 0.1s to the low 0.2s with a small group of 0.089″. (By the way, this same load in my Hall Light Gun would crater the Fed 205 primers. I may have to change to CCI BR4 primers for the hot summer days.) After working with the 105s I wanted to see how the Heavy Gun performed with lighter bullets. I tried my favorite Egg Shoot and 600-yard load–80gr Fowlers pushed by 31.5 grains of Vihtavuori N135 with Fed 205 primers. The results were fantastic. The big BAT produced a 100-yard aggregate (five, 5-shot groups) in the 0.2s with an 0.129″ small group. Overall, at 200 yards, both guns could agg five 5-shot groups in the 0.3s and 0.4s. Eggs Beware!
Big, Strong, and Versatile ‘MB’ Action by BAT Machine
I looked at all the custom actions, and decided on a BAT model ‘MB’, configured Right Bolt, Left Port, Right Eject. The ‘MB’ action has some pretty unique features, including an integral recoil lug on the underside, and a recessed tenon (i.e. the threads start 1″ from the front of the receiver). The action is 8.5″ long, but with a 7.5″ bolt. The extra inch is added to the front. That provides extra bedding surface and room for a third pillar. The 8.5″ action length gives me the option to go up to a 6.5-284, while the dual ports should help give me the speed I need for the 10-round strings in Heavy Class. Also I can load from either side for F-Class.
Why did I choose a BAT? First, BAT quality is second to none. Moreover, BAT will custom-configure your port(s) and bolt for the same price, no added fees. Other action-makers charge extra for anything other than your basic Right Bolt, Right Port. This makes the BAT about the same price as a Stolle or Nesika, if you want a set-up like mine. The right-side ejection port is slightly smaller than the left feed port, but I can still feed 6BR cases from either side if I wish. The MB action is so big, the little BR case runs out of ejector as soon as the case leaves the chamber, so I push the case out to the right as I load the next round from the left. The BAT will eject a loaded 6BR round just fine, but a fired case only ejects sometimes. This action would work great with a longer round, such as a .243 AI or 6.5-284. If you want completely reliable 6BR ejection, you’ll need a smaller BAT action. But then, like my Hall standard action, the port would be too small for a 6.5-284.
Richard’s #008 Stock — How it Handles
The 008 stock is the best design I’ve ever shot off the bench. I like to hold my guns, and the 008’s grip profile gives me the control I like. The trigger is close enough for my short fingers. The underside of the buttstock is flat and completely straight (parallel to the barrel), so the gun tracks straight back. During recoil, the scope stays on target, making for quicker recovery time. In the picture at left, you can see that the underside of the fore-arm is relieved in the middle with raised strips on the left and right. These “rails” make for less surface area contacting the bags, less friction, and more consistent recoil. The high comb on the stock allows better prone shooting. For now, the stock is fine for what prone shooting I do. But if I do get seriously into into F-class I may want to add an adjustable comb or cheekpad. We’ll see.
Plans for Competition — The Lure of Hickory Groundhog Shoot Dollars
Some years ago, after building this pair of accurate 6mmBR rifles, Mark Schronce told us: “I can’t wait to see how this pair perform at long range. I will also take the Light Gun to the big Hickory GroundHog match in April, but I may put the barreled action back in the Hunter stock. This year you have to use bipods or sand bags, no front rest. [Editor: that is no longer the rule.] I don’t know if want to drill into my pretty new 008 stock for a bipod mount. I’ll let you know how it goes, and hopefully I’ll come back with some loot from the Shoot.” NOTE — that year Hickory offered about $8000 worth of prizes.
Want to see the details?CLICK HERE to view full-screen photo.
Here are five targets, each with FIVE shots in essentially one hole. This amazing feat of accuracy was accomplished six years ago. We are reprising our report because this five-target Aggregate arguably represents the most impressive feat of 100-yard accuracy in the history of marksmanship on this planet.
Check out those five targets. The Aggregate (average) of all five targets is a tiny 0.0840 inches! These were shot by Gary Ocock at 100 yards in a California benchrest match on August 6, 2017. Though Gary’s amazing 0.0840 Five-Target Agg beats existing records, this was not a “sanctioned” match, so Gary’s killer Agg will NOT be submitted for IBS or NBRSA records. So, sadly, the Agg won’t appear in the record books, but this remains a spectacular, verified feat of rifle accuracy, accomplished in competition.
The argument can be made that this is the Most Accurate Gun Ever Built. As far as we can determine, no one has ever shot a smaller 5-target Agg anywhere, at any time.
The Unlimited Benchrest Record That Will Never Be (Official)
Report by Boyd Allen
Gary Ocock’s stunning unlimited Aggregate is beyond amazing. That’s an average of five, 5-shot groups of .0840. Shot under sanctioned match rules, but at an unsanctioned 100-yard fun match, this Aggregate is well under the current 100-yard official records of the IBS (.1386), and the NBRSA (.1242). The fourth of the five groups measured a minuscule .018, less than half the size of the existing NBRSA Unlimited record of .049 (also shot by Gary). Check it out:
When the top 15 shooters all post teen Aggs, conditions must be pretty favorable. However there were some light switchy winds — Gary said that he shot better in the left to right condition.
GUN SPECIFICATIONS
Ocock’s red Jay Young Unlimited Railgun features one major difference from Young’s typical Railgun designs. The bottom of the barrel block is integral with the top (moving part), of the gun. The barrel is Ocock’s usual 1:13.5″-twist Krieger chambered for the 6 PPC. The BAT Neuvo action is unusual in that its lugs are horizontal at lock-up instead of the usual vertical. With horizontal lugs, both lugs maintain contact with their abutments when the action is cocked. In the more normal configuration when cocked the top lug is forced off of its seat by a combination of the angle of the trigger cocking piece interface, the pressure of the striker spring, and bolt clearance at the rear of the action.
LOAD SPECIFICATIONS
Gary shot this remarkable Agg with well-used brass, Vihtavuori N133 powder, and self-made 66gr BT bullets* seated at “jam”. This amazing Agg was shot on the second day of a 2-day Unlimited Benchrest match. On Day 1 Gary had experimented with various loads using both surplus IMR 8208 and Vihtavuori N133, but was not satisfied with the results. For his first group on Day 2, Gary tried a light load of N133. After seeing the result, however, he decided to go to the other extreme — a super stout N133 load — with the same powder. As you can see, Gary’s willingness to experiment paid off.
Notably, Gary used light neck tension. Ocock found that for these bullets and this barrel, light neck tension worked best (contrary to “normal” N133 benchrest practice). Ocock used a bushing that only produces .001″ difference between the diameters of sized and loaded case necks.
Comment on Ocock’s Achievement
Congratulations to Gary Ocock for superb shooting (and smart loading). Even though the match was not sanctioned (so the Agg will never be a record), Ocock has raised the bar very high, and given us a new standard of ultimate accuracy.
Though this 0.0840 Aggregate and 0.018 group will never go into the record group, they are still noteworthy. There’s virtually no doubt that they would have survived inspection by any record committee. Except for the lack of fixed backers, an IBS requirement (for detecting cross-fires), all other conditions were met for an officially-sanctioned match.
Boyd Allen notes: The reason that the match was not sanctioned was that the sanctioning bodies like to have a month’s notice when scheduling a sanctioned match and because the range had been down for modifications and this was the first match after that, there was some question as to whether the work required to have stationary backers could be finished in time for the match. Rather than promise what might not be deliverable, the decision was made to hold the match under all of the usual competition rules as a non-sanctioned “fun” match. None of this diminishes Gary’s performance.
* Gary Ocock shot his own, boat-tail match bullets, made with George Ulrich-crafted dies using Hood cores. Although he said that it had been a while since he had weighed any, his best guess was that they weigh something around 66.5 grains.
This discussion of rear bag designs and fill levels may offer some new insights for many readers. By “tuning” your rear bag you can reduce hop on shot-firing and help your rifle track better. All that can translate to better scores, particularly with large-caliber rifles.
Tuning Your Rear Sand Bags
Over the years, noted gunsmith and a Benchrest Hall-of-Fame inductee Thomas ‘Speedy’ Gonzalez has learned a few things about “tuning” rear sandbags for best performance. On his Facebook page, Speedy recently discussed how sand bag fill levels (hard vs. soft) can affect accuracy. Speedy says you don’t want to have both your front and rear sandbags filled up ultra-hard. One or the other bag needs to have some “give” to provide a shock-absorbing function (and prevent stock jump). And you want to tune your fill arrangements to match your shooting style. Free recoil shooters may need a different fill levels than bag squeezers (who a softer bag but harder ears).
SAND BAGS & HOW TO FILL THEMby Speedy Gonzalez
I was asked several times by competitors at the S.O.A. Matches and F-Class Nationals as to how I fill my sand bags for benchrest competition. Here is a copy of a reply I gave several years ago:
Back in the old days, Pat McMillan told me: “You can not have two bags filled so hard that you gun bounces on them in the process of firing round at your target, especially if you have a rig with a very flexible stock. The bags must be set up in a manner for them to absorb the initial shock of the firing pin moving forward and igniting the primer.
Then [they must] maintain their shape and absorb the second shock wave as well the rearward thrust and torque of the rifle. What happens to the rifle when this is not done? Well let me tell you. The rifles have a very bad tendency to jump and roll in the bags. This causes many of those wild, lost shots that one can’t explain.”
Here’s some Good General Advice for Bag Set-up:
1. You should not have TWO hard bags [i.e. both front AND rear] in your set-up.
2. Heavy sand magnifies these phenomena.
3. If you are a bag squeezer, pack ears hard and leave bag pliable enough to squeeze for the movement required. You may pack front bag as hard as rules permit.
4. Free recoil shooters pack both bags firm, but not so hard as to allow stock jump. Especially if you have a stock with a very flexible forearm.
5. We use play-ground sand, also know as silica sand. I sift mine to get any large impurities out then mix it with 25% to 50% with Harts parakeet gravel to the desired hardness that I am looking for. The bird gravel keeps the sand from packing itself into that solid as a brick state.
Speaking of bricks — another thing that happens when shooters employ that heavy zircon sand is the ears form a low spot under them from recoil and then tend to rock back and forth with the rifle causing many low shots to crop up. Edgewood makes an Edgewood/Speedy rear bag specially reinforced under the ears to eliminate this scenario.
Shown below are the latest SEB Bigfoot Bags. Note that the bags sit perfectly flat — there is no bulge on the bottom even though the bags are “packed to the brim with sand”.
General Thoughts about Bag Construction and Ear Materials
I do not like the solid double-stitched leather bottoms. While this seems like a good idea, I see more shooters have problems because of them. They tend to slide around the bench and or slide with the rifle on recoil. The standard Protektor with Cordura rabbit ears and an Otto ring bag with a Cordura front would be what I would suggest to the new shooter or one of the Edgewood / Speedy rear bags, these mimic the “Donut” and feature a ring of leather around the bottom circumference that keep the bottom from rocking on the bench or ground[.]
One last note –If you use the Cordura bags, keep them sprayed with a good silicon spray or “Rain-Ex”. This keeps them from getting sticky. — Speedy
A while back our Aussie friend Stuart Elliot of BRT Shooters Supply filmed some interesting videos at the QTS range in Brisbane, Australia. Stuart told us: “I was shooting in an Air Gun Benchrest match here in Brisbane, Australia. I finished my target early and was awaiting the cease fire and took a short, slow-motion video of windflag behavior.” You may be surprised by the velocity changes and angle swings that occur, even over a relatively short distance (just 25 meters from bench to target).
Here are windflags in slow motion:
The flags show in the videos are “Aussie Wind Flags”, developed by Stuart Elliot. For many years, these were sold in the USA by Butch Lambert, through Shadetree Engineering & Accuracy.
Here is a video in real time:
Stuart says this video may surprise some shooters who don’t use windflags: “Many people say the wind doesn’t matter. Well it sure does — whether for an airgun at 25 meters or a long range centerfire at 1,000.” This video illustrates how much the wind can change direction and velocity even in a small area.
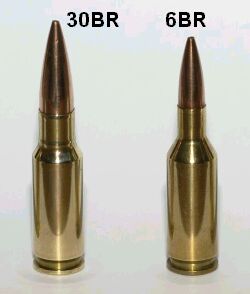
The 30BR is an amazing little cartridge. However, 30BR shooters do have to neck-up 6mmBR brass and then deal with some issues that can arise from the expansion process. One of our Forum members was concerned about the donut that can form at the new (expanded) neck-shoulder junction. Respected bullet-maker Randy Robinett offers tips on how to deal with the “dreaded donut”.
The Forum member was concerned about thinning the brass if he turned his 30BR necks after expansion: “Everything I have found on 30BR case-forming says to simply turn off the bulge at the base of the neck caused by the old 6BR shoulder. I expanded my first case and measured the neck at 0.329″ except on the donut, where it measures 0.335″. Looking inside the case… reveals a groove inside the case under the donut. Now, it is a fact that when I turn that neck and remove the donut, the groove is still going to be there on the inside? That means there is now a thin-spot ring at the base of the neck that is .005 thinner than the rest of the neck. Has anyone experienced a neck cracking on this ring?”
Randy Robinett, who runs BIB Bullet Co., is one of the “founding fathers” of the 30BR who help prove and popularize the 30 BR for benchrest score shooting. Randy offers this advice on 30BR case-forming:
While the thinner neck-base was one of our original concerns, unless one cuts too deeply INTO the shoulder, it is not a problem. For my original 30BR chamber, thirty (30) cases were used to fire 6,400 rounds through the barrel. The cases were never annealed, yet there were ZERO case failures, neck separations, or splits. The case-necks were turned for a loaded-round neck diameter of .328″, and, from the beginning, sized with a .324″ neck-bushing.
The best method for avoiding the ‘bulge’ is to fire-form prior to neck-turning (several methods are successfully employed). Cutting too deeply into the shoulder can result in case-neck separations. I have witnessed this, but, with several barrels and thousands to shots fired, have not [personally] experienced it. The last registered BR event fired using that original barrel produced a 500-27x score and a second-place finish. [That’s] not bad for 6K plus shots, at something over 200 firings per case.
Check out the 30BR Cartridge Guide on AccurateShooter.com
You’ll find more information on 30BR Case-forming in our 30 BR Cartridge Guide. Here’s a short excerpt from that page — some tips provided by benchrest for score and HBR shooter Al Nyhus:
30BR Case-Forming Procedure by Al Nyhus
The 30BR cartridge is formed by necking-up 6BR or 7BR brass. You can do this in multiple stages or in one pass. You can use either an expander mandrel (like Joe Entrekin does), or a tapered button in a regular dies. Personally, I use a Redding tapered expander button, part number 16307. This expands the necks from 6mm to .30 cal in one pass. It works well as long as you lube the mandrel and the inside of the necks. I’ve also used the Sinclair expander body with a succession of larger mandrels, but this is a lot more work and the necks stay straighter with the Redding tapered button. This button can be used in any Redding die that has a large enough inside diameter to accept the BR case without any case-to-die contact.
Don’t be concerned about how straight the necks are before firing them the first time. When you whap them with around 50,000 psi, they will straighten out just fine! I recommend not seating the bullets into the lands for the first firing, provided there is an adequate light crush-fit of the case in the chamber. The Lapua cases will shorten from approx. 1.550″ to around 1.520″ after being necked up to 30-caliber I trim to 1.500″ with the (suggested) 1.520 length chambers. I don’t deburr the flash holes or uniform the primer pockets until after the first firing. I use a Ron Hoehn flash hole deburring tool that indexes on the primer pocket, not through the case mouth. — Al Nyhus
New .300 WSM F-Class rifle, with stock finished by Forum member Cigar Cop.
One of the most popular features of our Shooters’ Forum is the ongoing Pride and Joy Rifle thread. Since 2009, Forum members have posted photos and descriptions of their most prized firearms. Here are some of our favorite “Pride and Joy” rifles recently showcased in our Forum. Do you have a gun you’d like to see featured there? Register for the Forum and you can add your favorite gun to the list.
We hope these “Pride and Joy” rifles may provide inspiration for our readers, whetting their appetite for their next competition, varminting, or hunting rifle project.
Eliseo Tubegun in 7mm SAUM with Pierce Action, Bartlein Barrel
Here is a striking camo-finished Elesio (Competition Machine) Tubegun chambered for 7mm SAUM. Note the block fitted to the tubular fore-end so the rifle rides smooth and steady on the Rodzilla T-Rex joystick front rest. The proud owner, Forum member Aeon, tells us: “This is a Gary Eliseo RTM chassis with pickle forks. It has a custom Ceracoat paint job to match my sling gun.” Key components are: Pierce Engineering long action tube receiver, Bartlein 1:8.5″-twist barrel, Jewell trigger set at 2 oz., and Vortex Golden Eagle scope in Vortex rings. Aeon adds: “The chamber was cut by Mark Chesesbro of Chesebro Rifles. Mark throated it very long so the the 180gr and 184gr Bergers would sit where they belong.”
Tuning the 7mm SAUM and Recoil Reduction
Owner Aeon tells us: “The 7 SAUM was as easy a gun as I have ever shot to find a good load for — H1000 gave great consistency and tuning was not hard. However, the challenge in shooting this rifle was recoil management. The 7 SAUM has a punch to it and I found myself having trouble finishing three relays without form problems in the last relay. I considered getting a RAD Pad but that would have required expensive machine work. I stumbled on a recoil pad that is uniquely effective, the Falcon Strike. Sent the pad to Gary Eliseo and he sent it back with the butt plate machined to fit. Complete game changer! The rifle is a dream to shoot now with a big reduction in felt recoil.”
This gray and blue beauty belongs to Forum member Farmer Dave. He posted: “Got this 6.5×47 Lapua back from my smith about six months ago. It’s the most accurate rifle I have ever owned.” This rifle features: AG Composites CF stock, Stiller TAC 30 action, Bartlein 5R barrel, TriggerTech Diamond trigger. On top is a Trijicon Accupower riflescope.
Henry .45-70 with Modern Buttstock and M-LOK Handguard
Here is member Quest45’s handsome lever-action Henry .45-70 Gov and Glock 40 10mm. About his two guns he posted: “All I need is a can of bear spray”. The rifle is fitted with a red dot sight, ammo caddies, Ranger Point M-LOK handguard, and a modernized modular buttstock. These upgrades make it a thoroughly-modern Henry lever gun for the 21st Century.
A .243 Winchester Hunting Rig that Nailed Scottish Roe Buck
Forum member John V. from Scotland showcased a successful hunt with his .243 Winchester rifle. This sports a suppressed, 26″ MTU 1:7.5″-twist barrel. He loaded Sierra 100gr Pro-Hunter bullets, and took this nice Roe Buck at 240 yards through a gap in the foliage.
Ultra-Low Profile 6 PPC for Short-Range Benchrest
This handsome rifle, which belongs to Forum member J.J.Coe, represents the state-of-the-art for 100/200-yard benchrest rifles. It is chambered (no surprise) for the 6 PPC cartridge, which dominates the short-range game. In features a super-low profile carbon composite stock. Note how the vertical centerline of the stock is very close to the barrel. This keeps the center of gravity low and helps the rifle recoil smoothly with less hop in the bags. Note also the tuner on the barrel.
Do-it-Yourself Paint Job, Done in the Bathroom at Home
Many eye-catching rifles start with a great paint job. Forum member JHN did this job himself. He posted: “Went to local paint shops, some cost a two-month work income, some said guns were a ‘no-no’. So I did it myself — my first Candy Apple red. Base collar is gold metallic, followed by the red. I didn’t have a good paintwork place so I had to improvise. Our bathroom has nice concealing in the summer — a perfect paint booth. So I only have to apologize about some red flakes in our bathroom.”
Mauser M96 with Quilted Maple Stock — for the Wife
We like this handsome quilted Maple-stocked Mauser belonging to Forum member Steel Mover. He posted: “Some like synthetic and some like wood — I have both. Here is the wife’s quilted Maple 96 Mauser 6.5×55. I was working in the shop, wife walked through and said ‘You are building that for me aren’t you?’ Well ‘Yes, dear’ I said of course … so I Lost my rifle.”
Patriotic .284 Shehane F-Open Rig
Forum member 1shot is proud of this new F-Classer: “Just got my first F-Open rifle finished chambered in .284 Shehane. It features a Kelbly stock w/RAD system, Shilen 1:8″-twist ratchet-rifled barrel with EC Tuner, and X-treme 2-stage trigger — all mated up to a Kelbly Panda action. I think this dog will hunt!”
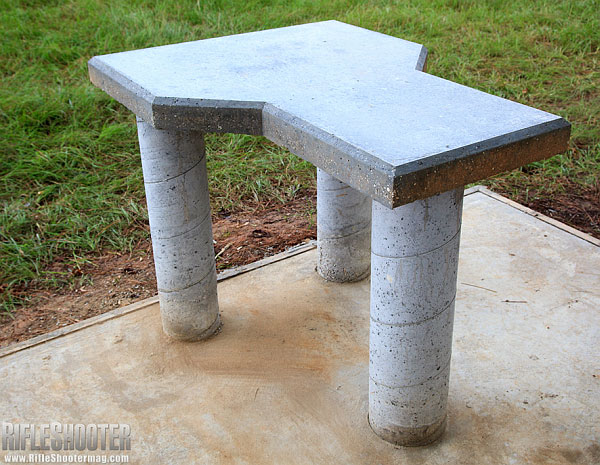
Who hasn’t dreamed of having a professional-quality, permanent shooting bench on their own property? Well here’s an article that can help you make that dream come true. This “how-to” feature from the archives of RifleShooter Magazine shows how to build a quality concrete shooting bench step-by-step.
All aspects of the construction process are illustrated and explained. The author, Keith Wood explains: “Construction happened in three phases — first creating the slab foundation, then the support pillars (legs), and finally the table.”
Click image below to load article with slide show.
Each step in the process is illustrated with a large photo and descriptive paragraph. Starting with framing the foundation (Step 1), the article illustrates and explains the 15 Steps that produce the finished, all-concrete bench (see top photo).
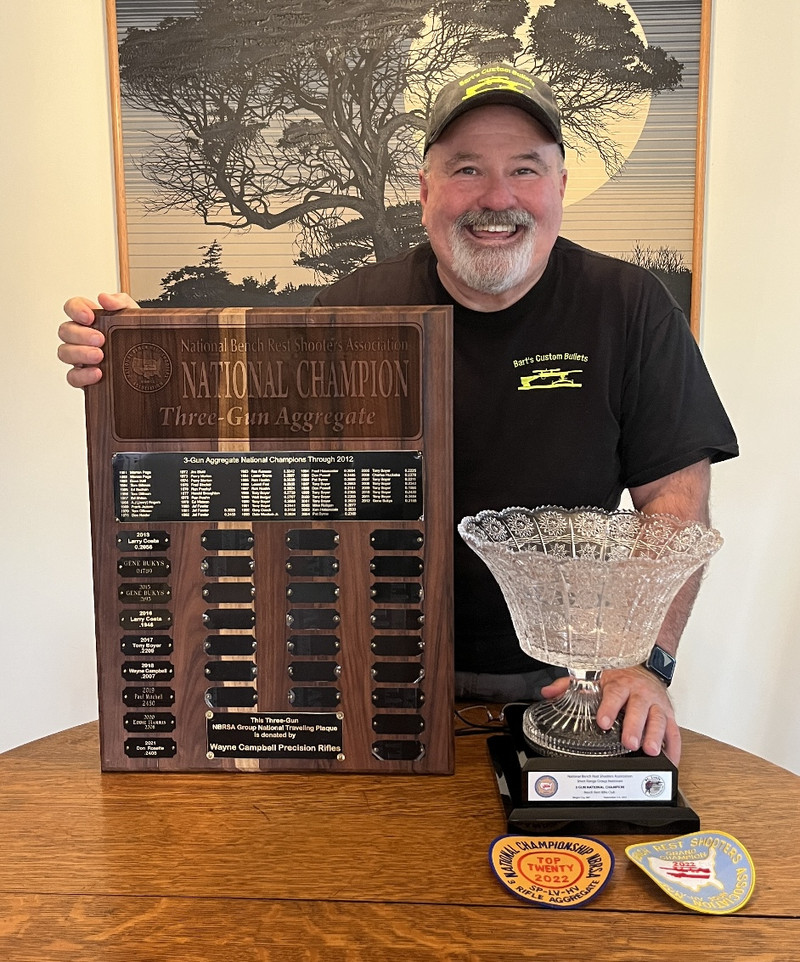
Bullet-maker Bart Sauter is the king of 300 meters, winning his second straight Tack Driver III multi-discipline match in South Carolina. For the second year in a row, Bart won the Tack Driver Grand Agg, after finishing sixth in Group shooting and first in Score shooting. Finishing second overall was short-range Benchrest ace Wayne Campbell. Wayne finished first in the Group-shooting phase and took eighth place in score shooting. Third overall was Jeff Peinhardt who, interestingly, was fifth in Group AND fifth in Score — that’s consistency. According to reports, 6mm PPCs dominated this year’s Tack Driver III match held November 5-6, 2022. We believe 6 or 7 out of the top 10 finishers shot a 6PPC. For decades the 6PPC has been the leading chambering for 100/200-yard benchrest-for-group competition.
The Tack Driver Showdown is a one-of-a-kind “all comers” rifle match. This unique multi-discipline match, with both SCORE and GROUP targets, reveals what rifle types are truly the MOST accurate, at least out to 300 meters. The Tack Driver Showdown III match took place last weekend, November 5-6, 2022 at the Mid-Carolina Gun Club in Orangeburg, South Carolina. The organizers invited virtually any type of rifle (except railguns) to compete at 300 meters for group and score honors. No organization membership is required. There were 89 competitors this year.
Unlike any other rifle match in the world, on the Tack Driver firing line you might see 6 PPC LV/HV rifles, 30 BR score rigs, and 17-lb 600-yard and 1000-yard benchrest guns together all lined up together. There may also be a few F-Class rifles, a PRS rifles, and maybe even an AR15 or two. But in 2022, nearly all the competitors had benchrest-style rifles, the majority designed for the 100/200 yard score and group games. That’s not surprising, as low-profile, smooth-recoiling BR rifles rule the roost at 100, 200, and 600 yards. Here are the list of rifles that competed this year according to cartridge type:
Tack Driver III targets were placed at 300 meters (328 yards). That’s not even “mid-range” by benchrest standards, but it is far enough that higher-BC bullets should have an advantage in windy or rapidly changing conditions. This year, however, the 6PPCs shooting lighter-weight 6mm bullets dominated.
Commentary by Tack Driver III Winner Bart Sauter
Winning Equipment — I shot a 6PPC with a .273 no-turn neck, Bartlein 1:13.5″-twist barrel, BAT DS action, Jewell trigger, Harris tuner, and Scarborough stock. On top was a great big ole 10-60X Valdada “Precision” scope with 40mm tube. I also used Vihtavuori N133 powder and my 68gr boat-tail bullets.
Shooter vs. the Gun — The long and the short of it is… you’re only as good as your equipment and the equipment can only perform up to the ability of the shooter. It’s a system. I’ve won it last year with a 6BRA and now with a 6PPC. I’m telling you, caliber-wise, there are a lot of different cartridges and combinations that can win. Jeff Godfrey (of the Piedmont Mafia) brought his 6BRX (I believe), and it shot like a laser. Jeff was in second place at the end of Day 1. If not for a couple of “Orangeburg Gotchas” Jeff would have been right there for the win.
Rifle and Cartridge Choice — Why did I shoot the 6PPC? It’s simple — the goal for this year was to try to make the benchrest World Team. So my resources were directed towards barrels for the 6PPC. I didn’t buy a single long range barrel this year. I used the last of my competitive long range gear for the 600- and 1000-yard Nationals. If I had both the 6BRA and 6PPC working, for this match I’d pick the 6BRA EVERY TIME and TWICE ON SUNDAY.”
Video of Bart Explaining Rest/Bag Set-Up and Showing Shooting Technique
Editor’s Note: 2022 has been a good year for Bart Sauter. He also won the 2022 NBRSA 3-Gun Short Range National Championship shooting his no-turn-neck 6PPC.
Comments by Forum Members:
“Congratulations Bart for your second Tack Driver win! Bart is no doubt a great shooter. He has [the ability] to prepare for a match to the Nth degree, then adapt and overcome changes that arise during a match. Not many have his skill, knowledge, and dedication! Congratulations to all that were there. You are all winners… I hear it was a great time had by all competitors!” — Samuel Hall (Past IBS Champion)
“While the Tack Driver concept is designed to attract shooters from Short Range Group, Short Range Score, F Class, PRS, and all of the other disciplines that require the ultimate in rifle accuracy, it is still a Benchrest match, run under Benchrest rules. Downrange ballistics such as a bullet’s ability to buck conditions take a back seat to a combination’s overall Agging capability. That includes the bullets, the barrel, the tune, the bench equipment[.]” — Jackie Schmidt
“What [the Tack Driver match] shows is the domination of the 6mm bore and small cases. It is a great event to showcase precision bench shooting [with] different disciplines coming together. Good job to Mr. Cline and all those involved including the shooters.” — Jeff PPC
Basic Information on the Tack Driver Shoot:
There are two divisions — bolt-action rifles and semi-auto gas guns. There are no specific design limits other than a 22-lb maximum weight, and a .338 maximum caliber. Past IBS President Jeff Stover tells us: “We envision the full array of the world’s most accurate rifles on the line: short and long range benchrest rifles, F-Class, AR, other tactical, egg-shoot rifles, whatever…[.]” Semi-autos required chamber flags, otherwise bolts must be out at all times.
We first ran this story a few years back. But it’s still a very interesting subject for benchrest shooters. Shown above, the 30 BR (a 6mmBR necked up to .30 caliber) currently rules the benchrest-for-score game. However, a 30 BR Improved offers some potential advantages, particularly when the winds are strong or tricky. In this article Al Nyhus explains his 30 BRX wildcat. Running Hodgdon H4198, Al says he gets an easy 150 -200 FPS more than the conventional 30 BR. That can translate to less drift in the wind. It also lets you pursue a higher speed node, which can lead to improved accuracy with some barrels.
Forum member Al Nyhus is a top-level score shooter who has competed successfully with the 30 BR cartridge in VFS (Varmint for Score) matches. Al has been working on an “improved” 30 BR cartridge that delivers extra velocity. Al’s 30 BRX cartridge is inspired by the 6mm BRX cartridge, popular in 600-yard benchrest and across-the-course competition. The 6mm BRX cartridge maintains the same sidewall profile and shoulder angle as the parent 6mmBR case. Likewise, the 30 BRX retains the 30° shoulder used on the popular 30 BR cartridge.
Al reports: “Thought you might like to see what I’ll be working with in my VFS gun this season. It’s a true 30 BRX — a 30 BR with the shoulder moved forward 0.100″ with the standard BR shoulder angle. Stan Ware of SGR Custom Rifles built one last season for Steve Grosvenor and I was really impressed by the performance of Steve’s gun. The 30 BR barrel on my VFS gun needed replacing, so the new 30 BRX got the nod.”
30 BRX Delivers 150-200 FPS More Velocity than 30 BR
Al says his 30 BRX gives a solid 150-200 fps speed gain over the 30 BR at the top, while needing just 2.5-3.0 more grains of Hodgdon H4198 to do so. A 30 BR case holds on average 40.8 grains of water, while the 30 BRX holds 42.3 grains (roughly 4% more). So the 30 BRX delivers a 7% increase in velocity with a mere 4% increase in H20 capacity. That’s pretty good efficiency. [Editor’s Note: Assuming 34 grains of H4198 is a typical 30 BR match load, Al’s increase of 2.5-3.0 grains for the 30 BRX represents roughly a 7.5-8.5% increase in actual powder burned. That explains the higher velocities.]
Why did Nyhus decide to try an “improved” 30 BR?
Al explains: “The 30 BRX was created to operate at a [higher] velocity level than can be achieved with the standard 30 BR case, while at the same time keeping the easy-tuning characteristics of the standard 30 BR case. We also wanted to use the same powders currently used with the 30 BR and maintain similar operating pressures.” Is the 30BRX harder to shoot because of the increased velocity? Al doesn’t think so: “In a 13.5-lb HV gun, the 30 BRX case is a pleasure to shoot with just a flea bite of recoil.”
Will the 30 BRX Become Popular in Score Competition?
The 30 BR is already an exceptionally accurate cartridge that dominates short-range Benchrest for Score competition. Will the 30 BRX make the standard 30 BR obsolete? Nyhus doesn’t think so. However, Al believes the 30 BRX offers a small but important edge in some situations: “On any given day, it’s the shooter that hits the flags best and makes the fewest mistakes that ends up on top. No amount of velocity will save you when you press the trigger at the wrong time. Missing a switch or angle change at 200 yards that results in 3/4″ of bullet displacement on the target can’t be compensated for with another 200 fps. That’s the hard fact of benchrest shooting. But on those days when, as Randy Robinett says, ‘our brains are working’, the BRX may offer enough of an advantage to turn a close-but-no-cigar 10 into an ‘X’ at 200 yards. Or turn a just-over-the-line 9 into a beggar 10.” Given the fierce competition in Score matches, an extra 10 or another X can make the difference between a podium finish and also-ran status.
Rimfire Benchrest can be fun and rewarding. It can also be frustrating because sourcing superior lots of ammo is a never-ending challenge. Still we like rimfire benchrest because you don’t need to load at the range. Plus rimfire barrels last a very long time (our friend Joe Friedrich set an ARA Benchrest record with a 100,000+ round-count barrel). Here’s a great video from the National Rimfire Benchrest Association of Ireland (NRBAI). Production quality is excellent! We highly recommend you watch this video, which does a great job illustrating both the fun and challenge of rimfire benchrest competition.
If you’ve never seen 50m Rimfire Benchrest competition, this video is well worth watching:
“If you need to get your mind away from everything… then look down a scope, concentrate, and be disciplined.”
“Comradery is one of our organization’s key traits… there are no barriers of gender, age or mobility. Just a very diverse, bunch of good people enjoying a sport together.”
“The skill, in brief, is having the ability to hit the equivalent of the top of a pinhead at 50 meters, in all conditions with a .22 round. Not easy, especially when you have to do it 50 times to get a maximum score of 500 [points], 250 per sheet.”
Back in the USA — The New National 50 Benchrest League
If this article has motivated you to try rimfire benchrest competition back here in the good ol’ USA, there is a new organization that can help. Launched just a couple seasons ago, the National 50 Benchrest League has easy-to-understand rules, and offers competition with a wide variety of rifles, even including air rifles. The whole idea was to make competition more affordable and get more shooters on the firing line. There are three classes — Pellet, Sportsman, and PRO. One can be very competitive in the Sportsman Class with a basic factory .22 LR rig or Air Rifle.
N50 competition is unique in allowing air rifle shooters to compete side-by-side with rimfire shooters. This allows folks to compete without the cost of expensive “top-dollar” rimfire ammo. Pellets are relatively inexpensive, and yes air is still free!
About N50 — The National 50 Benchrest League
Commentary by Joe Friedrich, Open Grove Benchrest
The new National 50 Benchrest League (N50) is a unique shooting experience. We shoot air rifles with pellets and slugs alongside .22 LR Rimfire shooters. We currently have sanctioned clubs throughout the USA offering competition and good fellowship.
N50 has three Classes: Pellet, Sportsman, and PRO. The first Pellet Class is strictly for pellet airguns ranging in calibers from .177-.30 using Diabolo-style pellets from various manufacturers.
The second class is the Sportsman Slug/Rimfire. This combined class allows any factory air rifle shooting commercially-made slugs in calibers from .177-.30 to compete against any factory rimfire that utilizes a factory-barreled action with no attachments to barrel. Pellet air rifles may also compete in this class.
The third class is the PRO Class, and no you do not have to have some magic card that says “Professional” to compete. This class allows purpose-built air rifles, and what we call “unlimited” rimfire rifles to compete. Three types of loads are allowed in PRO Class: .177 slug air-driven, .22 slug air-driven, and any .22 LR ammunition.
Another point — in N50, competitors are allowed to move up in class — you aren’t restricted to a “lower” division. For example, Pellet Class shooters can also move up to shoot in Sportsman and Pro. In addition, Factory rimfires are allowed in Pro Class. This way shooters with the less-expensive rifles can shoot more relays and also see how they compete with the unlimited rigs. It’s all about having fun.
We wanted to make N50 as simple as we could combining air rifles with rimfire so folks who have a factory rimfire can participate and have fun. We also did not want a lot of classes, so combining the two gun types would be simpler. To be honest we were worried that the rimfires will outpace the air rifles, but that was not the case at this year’s Nationals.
Air Rifle on beautifully crafted, plated Pappas Rest.
National 50 Benchrest League Rules and Course of Fire
The official N50 website, National50.net, lists N50 rules, classes, courses of fire, and membership requirements. There are currently 16 affiliated clubs nationwide, with more coming soon.
And the 2022 N50 National Championship is coming up soon. The event, for rimfire rifles and air rifles, will be held August 26-28, 2022 at the Whittington Center in Raton, New Mexico
General Rules — Here are some of the more notable N50 General Rules that apply to N50 matches:
Target Distance: 50 yards
Match Times: 20 minutes per target
Targets: Official targets produced and distributed by N50
Aggregate Score: Cumulative score of 3 targets shot in sequence on same day
Scoring: No competitor shall score their own target
As far as hardware, N50 is pretty open. For all 3 classes, any scope is allowed and any trigger is allowed. For all 3 classes, stocks are unrestricted, stocks may be bedded, and rifle weight is unlimited. However, the Sportsman Class must retain factory barrel and action. N50 competitors in all classes may use 1-piece rests, 2-piece rests, bags, or bipods — whatever they prefer.
CLICK HERE for a free, printable version of the N50 practice target shown above. After clicking, SCROLL DOWN the page and you will see the left and right target sections that will print on 8.5×11″ paper. You can also purchase the Official N50 11″ x 17″ printed Match Targets for $25 per 100 plus shipping.
Credit Boyd Allen for finding this NRBAI Benchrest Video


 Hall vs. BAT
 Load Development and Accuracy Results
 Big, Strong, and Versatile


 Back in the old days, Pat McMillan told me: “You can not have two bags filled so hard that you gun bounces on them in the process of firing round at your target, especially if you have a rig with a very flexible stock. The bags must be set up in a manner for them to absorb the initial shock of the firing pin moving forward and igniting the primer.


 The 30BR is an amazing little cartridge. However, 30BR shooters do have to neck-up 6mmBR brass and then deal with some issues that can arise from the expansion process. One of our Forum members was concerned about the donut that can form at the new (expanded) neck-shoulder junction. Respected bullet-maker Randy Robinett offers tips on how to deal with the “dreaded donut”.


 Forum member Al Nyhus is a top-level score shooter who has competed successfully with the


 If this article has motivated you to try rimfire benchrest competition back here in the good ol’ USA, there is a new organization that can help. Launched just a couple seasons ago, the


