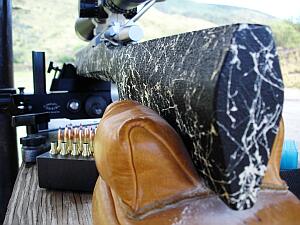
With the Berger Southwest Nationals (SWN) taking place this week in Phoenix, we are reprising this discussing of rear bag designs and fill levels. By “tuning” your rear bag you can reduce hop on shot-firing and help your rifle track better. All that can translate to better scores, particularly with large-caliber rifles.
Tuning Your Rear Sand Bags
Over the years, noted gunsmith and a Benchrest Hall-of-Fame inductee Thomas ‘Speedy’ Gonzalez has learned a few things about “tuning” rear sandbags for best performance. On his Facebook page, Speedy recently discussed how sand bag fill levels (hard vs. soft) can affect accuracy. Speedy says you don’t want to have both your front and rear sandbags filled up ultra-hard. One or the other bag needs to have some “give” to provide a shock-absorbing function (and prevent stock jump). And you want to tune your fill arrangements to match your shooting style. Free recoil shooters may need a different fill levels than bag squeezers (who a softer bag but harder ears).
SAND BAGS & HOW TO FILL THEMby Speedy Gonzalez
I was asked several times by competitors at the S.O.A. Matches and F-Class Nationals as to how I fill my sand bags for benchrest competition. Here is a copy of a reply I gave several years ago:
Back in the old days, Pat McMillan told me: “You can not have two bags filled so hard that you gun bounces on them in the process of firing round at your target, especially if you have a rig with a very flexible stock. The bags must be set up in a manner for them to absorb the initial shock of the firing pin moving forward and igniting the primer.
Then [they must] maintain their shape and absorb the second shock wave as well the rearward thrust and torque of the rifle. What happens to the rifle when this is not done? Well let me tell you. The rifles have a very bad tendency to jump and roll in the bags. This causes many of those wild, lost shots that one can’t explain.”
Here’s some Good General Advice for Bag Set-up:
1. You should not have TWO hard bags [i.e. both front AND rear] in your set-up.
2. Heavy sand magnifies these phenomena.
3. If you are a bag squeezer, pack ears hard and leave bag pliable enough to squeeze for the movement required. You may pack front bag as hard as rules permit.
4. Free recoil shooters pack both bags firm, but not so hard as to allow stock jump. Especially if you have a stock with a very flexible forearm.
5. We use play-ground sand, also know as silica sand. I sift mine to get any large impurities out then mix it with 25% to 50% with Harts parakeet gravel to the desired hardness that I am looking for. The bird gravel keeps the sand from packing itself into that solid as a brick state.
Speaking of bricks — another thing that happens when shooters employ that heavy zircon sand is the ears form a low spot under them from recoil and then tend to rock back and forth with the rifle causing many low shots to crop up. Edgewood makes an Edgewood/Speedy rear bag specially reinforced under the ears to eliminate this scenario.
General Thoughts about Bag Construction and Ear Materials
I do not like the solid double-stitched leather bottoms. While this seems like a good idea, I see more shooters have problems because of them. They tend to slide around the bench and or slide with the rifle on recoil. The standard Protektor with Cordura rabbit ears and an Otto ring bag with a Cordura front would be what I would suggest to the new shooter or one of the Edgewood / Speedy rear bags, these mimic the “Donut” and feature a ring of leather around the bottom circumference that keep the bottom from rocking on the bench or ground[.]
One last note –If you use the Cordura bags, keep them sprayed with a good silicon spray or “Rain-Ex”. This keeps them from getting sticky. — Speedy
Barrel-maker Dan Lilja’s website has an excellent FAQ page that contains a wealth of useful information. On the Lilja FAQ Page as you’ll find informed answers to many commonly-asked questions. For example, Dan’s FAQ addresses the question of barrel life. Dan looks at factors that affect barrel longevity, and provides some predictions for barrel life, based on caliber, chambering, and intended use.
NOTE: This article was very well-received when it was first published last year. We are reprising it for the benefit of readers who missed it the first time.
Dan cautions that “Predicting barrel life is a complicated, highly variable subject — there is not a simple answer. Signs of accurate barrel life on the wane are increased copper fouling, lengthened throat depth, and decreased accuracy.” Dan also notes that barrels can wear prematurely from heat: “Any fast varmint-type cartridge can burn out a barrel in just a few hundred rounds if those rounds are shot one after another without letting the barrel cool between groups.”
Q. What Barrel Life, in number of rounds fired, can I expect from my new barrel?
A: That is a good question, asked often by our customers. But again there is not a simple answer. In my opinion there are two distinct types of barrel life. Accurate barrel life is probably the type most of us are referencing when we ask the question. But there is also absolute barrel life too. That is the point where a barrel will no longer stabilize a bullet and accuracy is wild. The benchrest shooter and to a lesser extent other target shooters are looking at accurate barrel life only when asking this question. To a benchrest shooter firing in matches where group size is the only measure of precision, accuracy is everything. But to a score shooter firing at a target, or bull, that is larger than the potential group size of the rifle, it is less important. And to the varmint hunter shooting prairie dog-size animals, the difference between a .25 MOA rifle or one that has dropped in accuracy to .5 MOA may not be noticeable in the field.
The big enemy to barrel life is heat. A barrel looses most of its accuracy due to erosion of the throat area of the barrel. Although wear on the crown from cleaning can cause problems too. The throat erosion is accelerated by heat. Any fast varmint-type cartridge can burn out a barrel in just a few hundred rounds if those rounds are shot one after another without letting the barrel cool between groups. A cartridge burning less powder will last longer or increasing the bore size for a given powder volume helps too. For example a .243 Winchester and a .308 Winchester both are based on the same case but the .308 will last longer because it has a larger bore.
And stainless steel barrels will last longer than chrome-moly barrels. This is due to the ability of stainless steel to resist heat erosion better than the chrome-moly steel.
Barrel Life Guidelines by Caliber and Cartridge Type
As a very rough rule of thumb I would say that with cartridges of .222 Remington size you could expect an accurate barrel life of 3000-4000 rounds. And varmint-type accuracy should be quite a bit longer than this.
For medium-size cartridges, such as the .308 Winchester, 7×57 and even the 25-06, 2000-3000 rounds of accurate life is reasonable.
Hot .224 caliber-type cartridges will not do as well, and 1000-2500 rounds is to be expected.
Bigger magnum hunting-type rounds will shoot from 1500-3000 accurate rounds. But the bigger 30-378 Weatherby types won’t do as well, being closer to the 1500-round figure.
These numbers are based on the use of stainless steel barrels. For chrome-moly barrels I would reduce these by roughly 20%.
The .17 and .50 calibers are rules unto themselves and I’m pressed to predict a figure.
The best life can be expected from the 22 long rifle (.22 LR) barrels with 5000-10,000 accurate rounds to be expected. We have in our shop one our drop-in Anschutz barrels that has 200,000 rounds through it and the shooter, a competitive small-bore shooter reported that it had just quit shooting.
Remember that predicting barrel life is a complicated, highly variable subject. You are the best judge of this with your particular barrel. Signs of accurate barrel life on the wane are increased copper fouling, lengthened throat depth, and decreased accuracy.
Benchrest Barrel Life — You May Be Surprised
I thought it might be interesting to point out a few exceptional Aggregates that I’ve fired with 6PPC benchrest rifles with barrels that had thousands of rounds through them. I know benchrest shooters that would never fire barrels with over 1500 shots fired in them in registered benchrest matches.
I fired my smallest 100-yard 5-shot Aggregate ever in 1992 at a registered benchrest match in Lewiston, Idaho. It was a .1558″ aggregate fired in the Heavy Varmint class. And that barrel had about 2100 rounds through it at the time.
Another good aggregate was fired at the 1997 NBRSA Nationals in Phoenix, Arizona during the 200-yard Light Varmint event. I placed second at this yardage with a 6PPC barrel that had over 2700 rounds through it at the time. I retired this barrel after that match because it had started to copper-foul quite a bit. But accuracy was still good.
During shooting season, there are probably 400 or more club “fun matches” conducted around the country. One of the good things about these club shoots is that you don’t have to spend a fortune on equipment to have fun. But we’ve seen that many club shooters handicap themselves with a few common equipment oversights or lack of attention to detail while reloading. Here are SIX TIPS that can help you avoid these common mistakes, and build more accurate ammo for your club matches.
1. Align Front Rest and Rear Bags. We see many shooters whose rear bag is angled left or right relative to the bore axis. This can happen when you rush your set-up. But even if you set the gun up carefully, the rear bag can twist due to recoil or the way your arm contacts the bag. After every shot, make sure your rear bag is aligned properly (this is especially important for bag squeezers who may actually pull the bag out of alignment as they squeeze).
Forum member ArtB adds: “To align my front rest and rear bag with the target, I use an old golf club shaft. I run it from my front rest stop through a line that crosses over my speed screw and into the slot between the two ears. I stand behind that set-up and make sure I see a straight line pointing at the target. I also tape a spot on the golf shaft that indicates how far the back end of the rear bag should be placed from the front rest stop. If you don’t have a golf shaft, use a wood dowel.
2. Avoid Contact Interference. We see three common kinds of contact or mechanical interference that can really hurt accuracy. First, if your stock has front and/or rear sling swivels make sure these do NOT contact the front or rear bags at any point of the gun’s travel. When a sling swivel digs into the front bag that can cause a shot to pop high or low. To avoid this, reposition the rifle so the swivels don’t contact the bags or simply remove the swivels before your match. Second, watch out for the rear of the stock grip area. Make sure this is not resting on the bag as you fire and that it can’t come back to contact the bag during recoil. That lip or edge at the bottom of the grip can cause problems when it contacts the rear bag. Third, watch out for the stud or arm on the front rest that limits forward stock travel. With some rests this is high enough that it can actually contact the barrel. We encountered one shooter recently who was complaining about “vertical flyers” during his match. It turns out his barrel was actually hitting the front stop! With most front rests you can either lower the stop or twist the arm to the left or right so it won’t contact the barrel.
3. Weigh Your Charges — Every One. This may sound obvious, but many folks still rely on a powder measure. Yes we know that most short-range BR shooters throw their charges without weighing, but if you’re going to pre-load for a club match there is no reason NOT to weigh your charges. You may be surprised at how inconsistent your powder measure actually is. One of our testers was recently throwing H4198 charges from a Harrell’s measure for his 30BR. Each charge was then weighed twice with a Denver Instrument lab scale. Our tester found that thrown charges varied by up to 0.7 grains! And that’s with a premium measure.
4. Measure Your Loaded Ammo — After Bullet Seating. Even if you’ve checked your brass and bullets prior to assembling your ammo, we recommend that you weigh your loaded rounds and measure them from base of case to bullet ogive using a comparator. If you find a round that is “way off” in weight or more than .005″ off your intended base to ogive length, set it aside and use that round for a fouler. (Note: if the weight is off by more than 6 or 7 grains you may want to disassemble the round and check your powder charge.) With premium, pre-sorted bullets, we’ve found that we can keep 95% of loaded rounds within a range of .002″, measuring from base (of case) to ogive. Now, with some lots of bullets, you just can’t keep things within .002″, but you should still measure each loaded match round to ensure you don’t have some cases that are way too short or way too long.
5. Check Your Fasteners. Before a match you need to double-check your scope rings or iron sight mounts to ensure everything is tight. Likewise, you should check the tension on the screws/bolts that hold the action in place. Even on a low-recoiling rimfire rifle, action screws or scope rings can come loose during normal firing.
6. Make a Checklist and Pack the Night Before. Ever drive 50 miles to a match then discover you have the wrong ammo or that you forgot your bolt? Well, mistakes like that happen to the best of us. You can avoid these oversights (and reduce stress at matches) by making a checklist of all the stuff you need. Organize your firearms, range kit, ammo box, and shooting accessories the night before the match. And, like a good Boy Scout, “be prepared”. Bring a jacket and hat if it might be cold. If you have windflags, bring them (even if you’re not sure the rules allow them). Bring spare batteries, and it’s wise to bring a spare rifle and ammo for it. If you have just one gun, a simple mechanical breakdown (such as a broken firing pin) can ruin your whole weekend.
We love it when family members shoot together. It’s a great way to pass knowledge from generation to generation. Last week we featured a 10-year old boy, his father, and his grandfather who all shot a match together. Three generations! That was the young man’s first benchrest shooting match. Story HERE.
This week we are showcasing the Murdica clan. Our friend Lou Murdica was in Coastal Southern California this week. Grandpa Lou had taken two of his granddaughters to SoCal to enjoy the beach, and to shoot an F-Class match at Camp Pendleton.
Lou reports: “I took my two granddaughters (ages 12 and 14) to shoot their first-ever F-Class match! we went to Camp Pendleton yesterday and shot the 1000-yard match. This was the first time the girls had ever shot on the ground. They made me proud!”
Both girls shot very well as you can see from these targets. Angelina used a .284 Win rifle, while Bella used Lou’s 6.5×55 Improved. Both are top-level F-Open rigs. Lou said conditions were fairly challenging — with about 4 MINUTES of wind.
There were some interesting comments from Lou’s Facebook Friends:
“Lou you best quit shooting now while you can still beat them!” — Larry Bartholome (Editor: Larry B. is a past F-Class National Champion)
“Wow — just 1 point separation for the girls. Keep em in the ‘X’ girls! Good job!” — Anthony Smith
“Yea for Bella and Angelina. Such a proud grandpa!” — Kate White
All in the Family — Shooting is a Fun Hobby
Lou Murdica has also shot Benchrest Matches with his grand-children. This photo captures Grandpa Lou at Ben Avery Range in Arizona with more family members.
Camp Pendleton (California) Map
The Camp Pendleton USMC base is located on the coast between Los Angeles and San Diego. Camp Pendleton’s range is a great place to shoot if you have the opportunity some day.
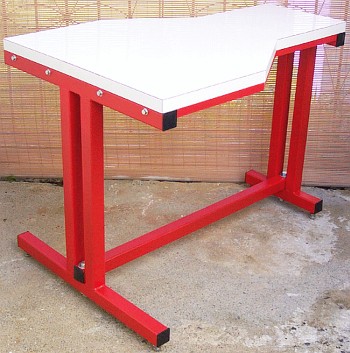
Do you like the Chris Byrne bench at left? For more details, CLICK HERE.
FREE Bench Plans on the Web
Building your own portable shooting bench is a great do-it-yourself project. You can build a sturdy bench for well under $100 in materials. Compare that to some deluxe factory-built benches which may cost $600.00 or more. You’ll find a wide assortment of home-built shooting bench designs (both portable and fixed) on the internet. Renovation Headquarters has links to FREE Plans and building instructions for fourteen (14) different shooting benches. There are all-wood shooting bench designs as well as benches that combine a wood top with a metal sub-frame or legs.
Heavy Wood Bench That Converts to Three Sections for Transport
In addition to the fourteen benches mentioned above, here is an interesting break-down bench design. Call it a “semi-portable” bench. The legs and frame are made from stout 4×4 post segments so the bench is fairly heavy. However, this bench can break down into three (3) sections for easier transport to and from the range. Dado-cut channels assure proper top alignment. This might be a good choice if you plan a multi-day excursion to a location without fixed benches. This three-leg bench design can be made from easy-to-locate materials. Note: The dimensions of this bench are are larger than typical fixed benches to accommodate 50 BMGs and other big rifles. CLICK HERE for more details.
Want to see the details?CLICK HERE to view full-screen photo.
Five targets, each with FIVE shots in essentially one hole. The events of this story happened two years ago. We are reprising our report because this five-target Aggregate arguably represents the most impressive feat of 100-yard accuracy in the history of marksmanship on this planet.
Check out those five targets. The Aggregate (average) of all five targets is a tiny 0.0840 inches! These were shot by Gary Ocock at 100 yards in a California benchrest match on August 6, 2017. Though Gary’s 0.0840 Agg beats existing records, this was not a “sanctioned” match, so Gary’s killer Agg will NOT be submitted for IBS or NBRSA records. So, sadly, the Agg won’t appear in the record books, but this remains a spectacular, verified feat of rifle accuracy, accomplished in competition.
The argument can be made that this is the Most Accurate Gun Ever Built. As far as we can determine, no one has ever shot a smaller 5-target Agg anywhere, at any time.
The Unlimited Benchrest Record That Will Never Be (Official)
Report by Boyd Allen
Gary Ocock’s stunning unlimited Aggregate is beyond amazing. That’s an average of five, 5-shot groups of .0840. Shot under sanctioned match rules, but at an unsanctioned 100-yard fun match, this Aggregate is well under the current 100-yard official records of the IBS (.1386), and the NBRSA (.1242). The fourth of the five groups measured a minuscule .018, less than half the size of the existing NBRSA Unlimited record of .049 (also shot by Gary). Check it out:
When the top 15 shooters all post teen Aggs, conditions must be pretty favorable. However there were some light switchy winds — Gary said that he shot better in the left to right condition.
GUN SPECIFICATIONS
Ocock’s red Jay Young Unlimited Railgun features one major difference from Young’s typical Railgun designs. The bottom of the barrel block is integral with the top (moving part), of the gun. The barrel is Ocock’s usual 1:13.5″-twist Krieger chambered for the 6 PPC. The BAT Neuvo action* is unusual in that its lugs are horizontal at lock-up instead of the usual vertical. With horizontal lugs, both lugs maintain contact with their abutments when the action is cocked. In the more normal configuration when cocked the top lug is forced off of its seat by a combination of the angle of the trigger cocking piece interface, the pressure of the striker spring, and bolt clearance at the rear of the action.
LOAD SPECIFICATIONS
Gary shot this remarkable Agg with well-used brass, Vihtavuori N133 powder, and self-made 66gr BT bullets** seated at “jam”. This amazing Agg was shot on the second day of a 2-day Unlimited Benchrest match. On Day 1 Gary had experimented with various loads using both surplus IMR 8208 and Vihtavuori N133, but was not satisfied with the results. For his first group on Day 2, Gary tried a light load of N133. After seeing the result, however, he decided to go to the other extreme — a super stout N133 load — with the same powder. As you can see, Gary’s willingness to experiment paid off.
Notably, Gary used light neck tension. Ocock found that for these bullets and this barrel, light neck tension worked best (contrary to “normal” N133 benchrest practice). Ocock used a bushing that only produces .001″ difference between the diameters of sized and loaded case necks.
Comment on Ocock’s Achievement
Congratulations to Gary Ocock for superb shooting (and smart loading). Even though the match was not sanctioned (so the Agg will never be a record), Ocock has raised the bar very high, and given us a new standard of ultimate accuracy.
Though this 0.0840 Aggregate and 0.018 group will never go into the record group, they are still noteworthy. There’s virtually no doubt that they would have survived inspection by any record committee. Except for the lack of fixed backers, an IBS requirement (for detecting cross-fires), all other conditions were met for an officially-sanctioned match.
*The new BAT Neuvo actions are the result of a collaboration between Dwight Scott, and Bruce Thom, featuring Dwight’s ideas and BAT’s proven manufacturing expertise.
** Ocock shot his own, boat-tail match bullets, made with George Ulrich-crafted dies using Hood cores. Although he said that it had been a while since he had weighed any, his best guess was that they weigh something around 66.5 grains.
Want to shoot better scores at your next match? Here’s a smart, inexpensive do-it-yourself project from the good folks at Criterion Barrels. For less than one dollar in materials, in just a few minutes you can create a handy, effective mirage shield, custom-fitted to your favorite rifle.
All precision shooters should be familiar with mirage, a form of optical distortion caused primarily by variations in air temperature. Savvy shooters will use mirage as a valuable tool when gauging wind speed and direction. Natural mirage is unavoidable, but there are many techniques designed to limit its influence in long-range marksmanship.
A form of mirage can be produced by the barrel itself. Heat rising from the barrel may distort sight picture through your optics, leading to erratic results. Mirage caused by barrel heat can be reduced dramatically by a simple, light-weight mirage shield.
How to Make a Mirage Shield
A mirage shield is an extremely cost-effective way to eliminate a commonly-encountered problem. Making your own mirage shield is easy. Using old venetian blind strips and common household materials and tools, you can construct your own mirage shield for under one dollar.
Materials Required:
1. Vertical PVC Venetian blind panel
2. Three 1”x1” pieces adhesive-backed Velcro
3. Ruler or tape measure
4. Scissors or box cutter
5. Pencil or marker
1. Measure the distance from the end of the receiver or rail to the crown of the barrel.
2. Using a pencil and ruler, measure the same distance and mark an even line across the blind.
3. Cut across the line using scissors or a box cutter, shortening the blind to the required length. (Remember, measure twice, cut once!)
4. Expose the adhesive backing on the loop side of the Velcro. Center and apply the Velcro strips on the barrel at regular intervals.
5. Expose the adhesive backing of the fuzzy side of the Velcro.
6. Place the blind on the upper side of the barrel. Apply downward pressure. Once the Velcro has secured itself to the barrel, separate the two sides. Proceed to mold both sides of the Velcro to fit the contour of their respective surfaces.
7. Reaffix the blind. Barrel related mirage is now a thing of the past!
NOTE: You can attach the Velcro on the opposite side of the blind if you want the blind to curve upwards. Some folks thinks that aids barrel cooling — it’s worth a try.
How to Remove and Re-Attach the Mirage Shield
Removal of your mirage shield is accomplished by simply removing the blind. You can un-install the Velcro by pulling off the strips and then gently removing any adhesive residue left behind using an appropriate solvent. (Simple cooking oil may do the job.) Caution: With fine, high-polish blued barrels, test any solvent on a non-visible section of the barrel. Before storing the gun, re-oil the barrel to remove active solvents and residual fingerprints.
You don’t hear much about PacNor barrels in long-range competition, but FORUM member Wes J (aka P1ZombieKiller), proved that they can shoot “lights-out” in a rig assembled by a talented gunsmith. A few seasons back, Wes decided to upgrade a 6mmBR for mid-range benchrest and varmint matches. Wes tells us: “Since I restocked my 6BR … I have not had a chance to shoot it much since I have been playing the 100-200 game. I decided to take it out and do some playing at 500 yards. I have to give some serious props to my buddy (and fellow FORUM member) ‘PREACHER’ who did the chambering and barrel work for me. He can certainly make a gun shoot good. The barrel is a PacNor 1:8″ twist. My load was 105gr Berger VLDs pushed by 29.6 grains of Varget.” The five-round, 500-yard group shot by Wes J with his 6BR, measured just 1.240″, as measured by OnTarget software. Now that’s one accurate rig!
Five by Five — 5-Shot Group at 500 Yards, 1.240″, 0.237 MOA
This Editor knows something about the potential of a PacNor barrel. I have a 3-groove stainless PacNor SuperMatch on a Savage-actioned 6BR. This barrel shoots honest quarter-MOA in calm conditions, and it cleans up super-easy. The interior finish is so good, I’ve never had to brush the bore or use abrasives, and after 750 rounds it shoots as well as ever. I attribute the easy cleaning to the fact the lands in a PacNor 3-groove are wide and flat, so they are gentle on bullet jackets. I think accuracy is helped by the fact that my PacNor runs on the tight side (0.236 land dimension) with a good amount of choke. That works well with the 105gr Lapua Scenars and 103gr Spencers I like to shoot. You can read more about my rifle, nick-named the “Poor Man’s Hammer”, in this Feature Article from our archives. On one particularly calm day, in the hands of my friend (and ace trigger-puller) Joe Friedrich, the Poor Mans’ Hammer put 3 shots in under 0.200″ (measured center to center) at TWO Hundred yards. If you get a good one, PacNor three-grooves can definitely shoot.
Target Measurement with OnTarget Software
We used OnTarget software to measure the 5-shot group in the target above. This easy-to-use software is very repeatable, once you get a feel for plotting the shots. The latest On Target v2.25 Precision Calculator is FREE for a 15-day evaluation period. If you like it (and you will, trust us) there’s a modest $11.99 registration fee to activate the program. In addition to group size (in inches), OnTarget plots distance to aiming point, and the software automatically calculates the group’s vertical height, horizontal dispersion, average to center (ATC), and group size in MOA.
You can run a measurement on a scanned target or a photo of a target. You’ll need some known reference to set the scale correctly. The target above had a one-inch grid so it was easy to set the scale. Once you’ve set the scale and selected bullet diameter and target distance, you simply position the small circles over each bullet hole and the OnTarget software calculates everything automatically, displaying the data in a data box superimposed over the target image. To learn more about OnTarget Software, read AccurateShooter.com’s OnTarget Product Review. This article covers all the basics as well as some advanced “power user” tips. NOTE: Since the review was written, On Target has updated the software, and the free version now has a time limit.
Precision rifle shooters don’t have to hit a big-league fastball, or launch a top-fuel dragster in the blink of an eye. Nonetheless, reaction times are important in our sport — both for competitive shooters and hunters. Want to catch that prairie dog before he slips down his hole? You’ll need to be quick. Want to win at short-range benchrest? Then you’ll need to watch your windflags and respond quickly to a change. Miss a major wind-shift and you could ruin your whole weekend.
Here’s a fun test of reaction times from HumanBenchmark.com. The way it works is that, after clicking “Start”, you wait until the background color changes from red to green. The instant you see green, immediately click your mouse. The average (median) reaction time is 215 milliseconds.
Tips for Faster Times
Here are three tips to speed up your reaction times:
1) Respond to the color change, rather than wait to read “CLICK!”.
2) Try focusing at the corner of the colored box, rather than the center.
3) Have your index finger “poised and ready” over the left button–you can shave milliseconds by very slightly depressing the button before you actually click.
Firing line at 2019 Super Shoot. Photo courtesy Armeria Regina.
What components do world-class, short-range group benchrest shooters use? BAT actions, Krieger barrels, and Bix’n Andy triggers (and Jewells) are the components of choice. And barrel tuners are now widely used by the top shooters. As for powder, Vitavuori N133 is still the choice of virtually all top competitors. And yes the 6PPC definitely rules the roost. Every Top 20 shooter at the 2019 Super Shoot shot a 6PPC. Every one. Read on to learn more about the Top 20 Equipment used at this year’s Super Shoot.
We recently reviewed the Top 20 Equipment List for the 2019 Super Shoot at the Kelbly’s Range in Ohio. This Top 20 List reveals the gear choices for the 13.5-lb Heavy Varmint Class and the 10.5-lb Light Varmint/Sporter Class (20 entries for each division). Here are notable gear choices for Top 20 Competitors (both divisions) at the 2019 Super Shoot:
Actions: 14 of 20 HV and 16 of 20 LV/SP shooters used BAT actions. So there were 75% BATs for both classes combined. Barrels: 10 of 13 listed HV barrels and 9 of 12 listed LV/SP barrels were Kriegers. Overall, of the barrels identified in the Top 20 Equipment lists, 76% were Krieger. That’s dominance! [Note: We have been informed that entries with no barrel-maker listed may have been Bartlein barrels.] Triggers: Notably 10 of 20 HV triggers were Bix’n Andy — 50%. For the other class, 7 of 19 listed triggers were Bix ‘N Andy. All others were Jewells. Tuners: In HV Class, 12 of 20 shooters used tuners, mostly Bukys. 11 of 20 LV/SP shooters had tuners. Overall that is 57.5% tuner usage for both classes combined.
Cartridge: For both classes, every single Top 20 competitor shot the 6PPC. ‘Nuf said. Powders: 19 of 20 HV Shooters used Vihtavuori N133. Likewise 19 of 20 LV/SP shooters used VV N133, with one not reporting. That is total dominance for N133.
Bullets: There was a wide selection of bullets used in both classes. Custom bullets by “boutique” bullet makers were certainly favored by Top 20 shooters. Sta Moy 65s were popular, as were Hottenstein 68s and Bart’s bullets among others.


 Back in the old days, Pat McMillan told me: “You can not have two bags filled so hard that you gun bounces on them in the process of firing round at your target, especially if you have a rig with a very flexible stock. The bags must be set up in a manner for them to absorb the initial shock of the firing pin moving forward and igniting the primer.


 1. Align Front Rest and Rear Bags. We see many shooters whose rear bag is angled left or right relative to the bore axis. This can happen when you rush your set-up. But even if you set the gun up carefully, the rear bag can twist due to recoil or the way your arm contacts the bag. After every shot, make sure your rear bag is aligned properly (this is especially important for bag squeezers who may actually pull the bag out of alignment as they squeeze).
 3. Weigh Your Charges — Every One. This may sound obvious, but many folks still rely on a powder measure. Yes we know that most short-range BR shooters throw their charges without weighing, but if you’re going to pre-load for a club match there is no reason NOT to weigh your charges. You may be surprised at how inconsistent your powder measure actually is. One of our testers was recently throwing H4198 charges from a Harrell’s measure for his 30BR. Each charge was then weighed twice with a Denver Instrument lab scale. Our tester found that thrown charges varied by up to 0.7 grains! And that’s with a premium measure.
 5. Check Your Fasteners. Before a match you need to double-check your scope rings or iron sight mounts to ensure everything is tight. Likewise, you should check the tension on the screws/bolts that hold the action in place. Even on a low-recoiling rimfire rifle, action screws or scope rings can come loose during normal firing.


 Target Measurement with OnTarget Software


