Creedmoor Sports has released a series of helpful “how-to” videos in its new InfoZone web page. In the latest InfoZone video Bill Gravatt shows how to seat bullets using L.E. Wilson Hand Dies and an Arbor Press. The basic process is simple, particularly with a micrometer-top seating die. That makes it easy to adjust and set seating depth. Before you start seating bullets, you want to adjust the height of the arbor so the stroke is appropriate to the height of your die.
Bill Gravatt Shows How to Use Hand Seating Dies — Creedmoor INFOZONE
ARBOR PRESS TECHNIQUE: When using an arbor press, smooth is good. You don’t want to slam the handle down quickly. Try to repeat the same motion each time. You can also experiment by seating the bullet part way, then rotate the cartridge (in the die) and do the final seating with a second stroke. If your arbor press has a force gauge, note both the max value of the gauge needle and how it moves as you seat the bullet. If the needle spikes too rapidly, or bounces back and forth irregularly, set that cartridge aside and/or mark it. You could have neck tension issue with that case or some other fault. You might even have a bad bullet. That’s rare, but can happen. The key to success is moving the press arm in a smooth motion every time, maintaining the same down-pressure with each cartridge.
Here Bill Gravatt Offers a Simple Tip for Adjusting Wilson Seating Dies
One of our Forum readers asked “How can I get a custom in-line seater for my new rifle?”. First, we would say that, if you are not shooting an unusual Wildcat, check first to see if L.E. Wilson makes a stainless Micrometer Seater Die for your rifle. These dies are a joy to use, and we’ve found the fit to be exceptionally good with many calibers. Typically priced from $95-$115, Wilson stainless micrometer-top seaters are available for dozens of cartridge types: .204 Ruger, 20 BR, .222 Rem, .223 Rem, 22 PPC, 22 BR, .22-250, .223 WSSM, 6 PPC, 6mmBR, 6XC, 243 Win, .243 WSSM, 25 WSSM, 6.5×47 Lapua, 6.5 Creedmoor, 6.5-284, 26 Nosler, .270 WSM, 7mm-08, .284 Win, 28 Nosler, 7mm RUM, 30 BR, 30 IHMSA, .308 Win, .300 WinMag, .338 Edge (and MORE).
If you do want a custom seater die, the process is relatively simple. Purchase a die blank from Wilson and have your gunsmith run the chambering reamer in. Forum member Gunamonth explains: “I start with a Wilson seating die blank. They’re available from Sinclair and other vendors. Just run the reamer in. For some of my rifles, where I wanted the stainless die with the micrometer adjustment, I bought a smaller die and had the smith ream it with the chamber reamer. That’s how I had my 6 Dasher and 6mm AI seaters made. With the Dasher I stared with a 6mmBR Micrometer die.”
SEATER STEM TIP: If, on your seated bullets, you are seeing a sharp line around the jacket near the ogive, you may want to smooth out the leading edge of the Wilson seater stem (see above left). Do this by putting a little lapping compound on one bullet and manually spin this around in the stem. Without much effort you’ll have a smooth bullet/stem interface.
Micrometer Top Add-on
We really like micrometer tops on a seating die. But what if Wilson doesn’t make a micrometer top seater for your chambering? Don’t despair, Brownells sells a $39.99 Sinclair Micrometer Top that can be added to Wilson standard seaters or to a custom seater die made from a Wilson die blank.
After purchasing a new set of dies from Forster, Hornady, Redding, or Whidden Gunworks, you’ll want to disassemble the dies, inspect then, and then remove the internal grease and/or waxy coatings placed on the dies by the manufacturer. Below are two videos that show how to de-grease and clean dies as they come “out of the box” from the manufacturer. The videos also explain how to clean your dies after regular use. Cleaning your dies helps remove carbon, brass shavings, lube residues and other stuff that can get inside the dies.
In the first video, from Creedmoor Sports, Bill Gravatt (Creedmoor’s President) shows various methods for cleaning dies both when new and after they have accumulated carbon and lube after use. This video is definitely worth watching. In the second video, a Hornady technician shows the method for degreasing dies before first use. A convenient aerosol spray cleaner is used in the video. You can also use a liquid solvent with soft nylon brush, and cotton patches. NOTE: After cleaning you may want to apply a light grease to the external threads of your dies.
Creedmoor Sports Die Cleaning Video with Bill Gravatt
Hornady Video Showing Aerosol Cleaner
Clean Your Sizing Dies and Body Dies Regularly
These same techniques work for cleaning dies after they have been used for reloading. Many otherwise smart hand-loaders forget to clean the inside of their dies, allowing old case lube, gunk, carbon residue, and other contaminants to build up inside the die. You should clean your dies fairly often, particularly if you do not tumble or ultrasound your cases between loadings. It is most important to keep full-length sizing and body dies clean. These dies accumulate lube and carbon residue quickly.
Sinclair International has created a series of instructional videos illustrating the basics of metallic cartridge reloading. The 8-Part series starts with reloading basics and provides step-by-step, how-to instructions that will help new reloaders get started. Detailed, animated illustrations show you what happens inside the chamber when shooting, and inside the dies during each step of reloading. The videos can be viewed on Sinclair International’s YouTube channel. Shown below is the first video in the series:
Each of the Sinclair videos is hosted by then Sinclair Int’l President Bill Gravatt (now with Creedmoor Sports). Bill doesn’t just show you “how”, he tells you “why”. The how-to segments cover case inspection, proper die set up, case sizing, primer installation, powder measuring, bullet seating, crimping, and even goes into the record keeping needed for the handloader. “We wanted to give shooters who haven’t reloaded a look at all the advantages of creating your own ammo and how easy it is to get started,” said Gravatt, “without telling them they had to have any certain brand or type of equipment to do the job.”
The Eight Video Topics Are:
Part 1 — Intro to Video Series
Part 2 — Intro to Reloading Safety
Part 3 — Metallic Cartridge Components
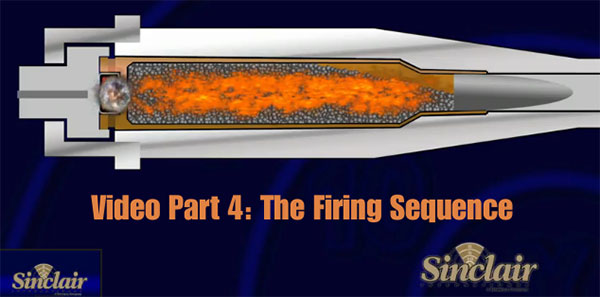
Part 4 — The Firing Sequence
Part 5 — Tools for Reloading
Part 6 — Loading Bottle-Neck Cartridges (2 videos)
Part 7 — Loading Straight Wall Cartridges
Part 8 — Reloading Series Conclusion
Reloading Tools
Shown below is Part 5 of the video series, covering the tools used for precision reloading.
We also strongly recommend the Part 4 Video to readers who are getting started in reloading. This “How Things Work” segment covers the sequence of events inside the chamber (and barrel) when the cartridge is fired. The video includes helpful graphics that show what happens to the primer, powder, cartridge, and bullet when the round is fired. The video also illustrates “headspace” and explains how this can change after firing. We think this video answers many common questions and will help reloaders understand the forces at work on their brass during the firing process.
Creedmoor Sports is a leading vendor of products for competitive shooters and serious hand-loaders. Along with great gear, Creedmoor Sports provides informative content for its customers. The Creedmoor InfoZone provides Reloading Tips, Gear Reviews, Shooting News, and basic gunsmithing information.
Bill Gravatt, President of Creedmoor Sports, is an expert on reloading processes and gear. He developed many of the popular tools marketed by Sinclair Int’l, and he brings that expertise to Creedmoor Sports. Bill hosts a series of “how-to” videos produced for the Creedmoor InfoZone.
In this video, Bill Gravatt demonstrates several methods to clean your cases. Bill tells us: “Powder residue should be removed before you insert your cases into your reloading dies. There are several ways to clean your cases. Many shooters use a combination of various methods…”
1. Manual Cleaning — You can use 0000 Steel wool for the outside of the case and a Case Neck brush for the inside. A paper towel can remove any remaining residue. This is a handy way to clean if you load at the range.
2. Vibratory Tumbling — This traditional method works well, particularly for pistol brass. Experiment with both Corn Cob and Walnut media. You can get a brighter shine by putting a small amount of liquid brass polish in the media.
3. Wet Tumbling with Stainless Media — This process can get your brass clean inside and out. Do check to ensure no pins are stuck in the flash-holes. Watch for peening of case mouths that can occur over time.
4. Ultrasonic Cleaning — Ultrasonic cleaning works great for small parts as well as brass. The ultrasonic process removes all carbon and traces of lube, which can leave the inside of case necks too dry. To smooth bullet seating, try putting a tablespoon of Ballistol in the cleaning solution.
Cleaning Reloading Dies
Cleaning your reloading dies is something that many hand-loaders neglect. In this 60-second Tech Tip, Bill Gravatt provides some smart advice on cleaning your dies. Bill notes: “After heavy use, case lube and carbon can build up in your reloading dies. It’s important to keep them clean. Also, with new dies, give them a good cleaning before first use, because they ship with a corrosion inhibitor.”
1. Step 1 — Prior to cleaning, disassemble the die and spray it with a good degreaser. Do this with brand new dies too.
2. Step 2 – Take a patch and run it in the die to remove old lube and gunk. Don’t forget the decapping assembly and other internal parts.
3. Step 3 — After cleaning the die, but before reassembly, spray the die with a good corrosion inhibitor, such as Corrosion-X or Starrett M1.
Creedmoor Sports has released a series of helpful “how-to” videos in its new InfoZone web page. In the latest InfoZone video Bill Gravatt shows how to seat bullets using L.E. Wilson Hand Dies and an Arbor Press. The basic process is simple, particularly with a micrometer-top seating die. That makes it easy to adjust and set seating depth. Before you start seating bullets, you want to adjust the height of the arbor so the stroke is appropriate to the height of your die.
Bill Gravatt Shows How to Use Hand Seating Dies — Creedmoor INFOZONE
ARBOR PRESS TECHNIQUE: When using an arbor press, smooth is good. You don’t want to slam the handle down quickly. Try to repeat the same motion each time. You can also experiment by seating the bullet part way, then rotate the cartridge (in the die) and do the final seating with a second stroke. If your arbor press has a force gauge, note both the max value of the gauge needle and how it moves as you seat the bullet. If the needle spikes too rapidly, or bounces back and forth irregularly, set that cartridge aside and/or mark it. You could have neck tension issue with that case or some other fault. You might even have a bad bullet. That’s rare, but can happen. The key to success is moving the press arm in a smooth motion every time, maintaining the same down-pressure with each cartridge.
Here Bill Gravatt Offers a Simple Tip for Adjusting Wilson Seating Dies
One of our Forum readers asked “How can I get a custom in-line seater for my new rifle?”. First, we would say that, if you are not shooting an unusual Wildcat, check first to see if L.E. Wilson makes a stainless Micrometer Seater Die for your rifle. These dies are a joy to use, and we’ve found the fit to be exceptionally good with many calibers. Typically priced from $90-$100, Wilson stainless micrometer-top seaters are available for dozens of cartridge types: .204 Ruger, 20 BR, .222 Rem, .223 Rem, 22 PPC, 22 BR, .22-250, .223 WSSM, 6 PPC, 6mmBR, 6XC, 243 Win, .243 WSSM, 25 WSSM, 6.5×47 Lapua, 6.5 Creedmoor, 6.5-284, 26 Nosler, .270 WSM, 7mm-08, .284 Win, 28 Nosler, 7mm RUM, 30 BR, 30 IHMSA, .308 Win, .300 WinMag, .338 Edge (and MORE).
If you do want a custom seater die, the process is relatively simple. Purchase a die blank from Wilson and have your gunsmith run the chambering reamer in. Forum member Gunamonth explains: “I start with a Wilson seating die blank. They’re available from Sinclair and other vendors. Just run the reamer in. For some of my rifles, where I wanted the stainless die with the micrometer adjustment, I bought a smaller die and had the smith ream it with the chamber reamer. That’s how I had my 6 Dasher and 6mm AI seaters made. With the Dasher I stared with a 6mmBR Micrometer die.”
SEATER STEM TIP: If, on your seated bullets, you are seeing a sharp line around the jacket near the ogive, you may want to smooth out the leading edge of the Wilson seater stem (see above left). Do this by putting a little lapping compound on one bullet and manually spin this around in the stem. Without much effort you’ll have a smooth bullet/stem interface.
Micrometer Top Add-on
We really like micrometer tops on a seating die. But what if Wilson doesn’t make a micrometer top seater for your chambering? Don’t despair, Brownells sells a $39.99 Sinclair Micrometer Top that can be added to Wilson standard seaters or to a custom seater die made from a Wilson die blank.
Shiny brass — it may not shoot more accurately, but it does make you feel better about your hand-loaded ammo. While it’s not necessary to get brass “bright and shiny” after every firing, it is a good idea to clean powder residue, grime, and grit off your brass before you run cases into sizing dies. There are many ways to clean cartridge cases. A quick wipe with solvent on a patch may suffice for recently-shot cases. Older brass with baked-on carbon may require lengthy tumbling. Ultrasonic cleaning is another popular option that gets your brass clean inside and out.
Sinclair International has a series of helpful videos on brass cleaning. These short “how-to” videos, hosted by Bill Gravatt, Sinclair’s past President and current Creedmoor Sports President, cover the various processes you can use — tumbling, ultrasonic cleaning, chemical cleaning, and cleaning by hand.
Video ONE — Cleaning Brass in Vibratory or Rotary Tumbler
TIP: Brass that has recently been shot will clean more easily than brass that has been sitting many days or weeks. If your tumbling media is fresh the job should be done in an hour or less. It’s your choice whether to tumble with primers removed or with primers still in the cases. If you choose to tumble with primers out, we suggest you deprime with a depriming die, rather that put dirty brass into your sizing die. Some people like to add a teaspoon of liquid polish to the media. This does work, cutting tumble time, and making your brass more shiny. However, if you add liquid polish, do that BEFORE you add the brass and let the tumbler run for a 15 minutes to get the polish completely mixed into the media. Otherwise you can else up with gooey gunk inside your cases — a very bad thing.
Video TWO — Ultrasonic Case Cleaning
TIP: There are many different types of solutions you can use. Soapy water suffices for some folks, particularly if you add a little Lemi-Shine. The Hornady One-Shot Sonic Clean and Lyman Turbo Sonic solutions both work well, and can be used multiple times, provided you strain the solution to remove dirt and grit after cleaning sessions. Many ultrasonic cleaning machines have timers. Experiment with dwell time to see how long you need to immerse your brass. A very small amount of Ballistol in the solution will help lubricate your necks on the inside. This can make bullet seating go more smoothly, with more consistent neck tension.
Video THREE — Chemical Cleaners (Soaking without Ultrasound)
TIP: After using chemical cleaners, such as the Iosso solution, you need to water-rinse your brass thoroughly. A kitchen strainer helps with this (see video at 0:20). Also, don’t forget your brass in the chemical solution — follow the manufacturers recommendations and don’t exceed the recommended dwell time. Chemical cleaners work surprisingly well to remove grease and grime, and the solution can be re-used multiple times. However, if you want your cases to look bright and shiny (like new brass), you will probably have to tumble. [Editor: A very effective new chemical cleaner is the Brass Monkey product from the makers of Wipe-Out and Carb-Out. Add a teaspoon to a gallon of water then soak your brass for 20-30 minutes. It really works — the cases clean up dramatically].
Video FOUR — Manual Cleaning (By Hand)
TIP: Keep some oversize patches in your range kit. At the end of your shooting sessions, wipe off your fired brass with a patch dampened with a mild, non-corrosive solvent (once again Ballistol works well). Before the carbon sets up on your brass it is very easy to remove. For tougher jobs, you can use 0000 Steel Wool (as Bill recommends in the video). You may find that timely hand-cleaning lets you avoid tumbling altogether — or you may choose to tumble (or ultra-sound) your brass only after a half-dozen or so firings.
Sinclair International has created a series of instructional videos illustrating the basics of metallic cartridge reloading. The 8-Part series starts with reloading basics and provides step-by-step, how-to instructions that will help new reloaders get started. Detailed, animated illustrations show you what happens inside the chamber when shooting, and inside the dies during each step of reloading. The videos can be viewed on Sinclair International’s YouTube channel. Shown below is the first video in the series:
Each of the Sinclair videos is hosted by then Sinclair Int’l President Bill Gravatt (now with Creedmoor Sports). Bill doesn’t just show you “how”, he tells you “why”. The how-to segments cover case inspection, proper die set up, case sizing, primer installation, powder measuring, bullet seating, crimping, and even goes into the record keeping needed for the handloader. “We wanted to give shooters who haven’t reloaded a look at all the advantages of creating your own ammo and how easy it is to get started,” said Gravatt, “without telling them they had to have any certain brand or type of equipment to do the job.”
The Eight Video Topics Are:
Part 1 — Intro to Video Series
Part 2 — Intro to Reloading Safety
Part 3 — Metallic Cartridge Components
Part 4 — The Firing Sequence
Part 5 — Tools for Reloading
Part 6 — Loading Bottle-Neck Cartridges (2 videos)
Part 7 — Loading Straight Wall Cartridges
Part 8 — Reloading Series Conclusion
Reloading Tools
Shown below is Part 5 of the video series, covering the tools used for precision reloading.
We also strongly recommend the Part 4 Video to readers who are getting started in reloading. This “How Things Work” segment covers the sequence of events inside the chamber (and barrel) when the cartridge is fired. The video includes helpful graphics that show what happens to the primer, powder, cartridge, and bullet when the round is fired. The video also illustrates “headspace” and explains how this can change after firing. We think this video answers many common questions and will help reloaders understand the forces at work on their brass during the firing process.
After purchasing a new set of dies from Forster, Hornady, Redding, or Whidden Gunworks, you’ll want to disassemble the dies, inspect then, and then remove the internal grease and/or waxy coatings placed on the dies by the manufacturer. Here are two video that show how to de-grease and clean dies as they come “out of the box” from the manufacturer. In the first video, from Creedmoor Sports, Bill Gravatt (now President of Capstone Precision Group) shows various methods for cleaning dies both when new and after they have accumulated carbon and lube after use. This video is definitely worth watching. In the second video, a Hornady technician shows the method for degreasing dies before first use. A convenient aerosol spray cleaner is used in the video. You an also use a liquid solvent with soft nylon brush, and cotton patches. NOTE: After cleaning you may want to apply a light grease to the external threads of your dies.
Creedmoor Sports Die Cleaning Video with Bill Gravatt
Hornady Video Showing Aerosol Cleaner
Clean Your Sizing Dies and Body Dies Regularly
These same techniques work for cleaning dies after they have been used for reloading. Many otherwise smart hand-loaders forget to clean the inside of their dies, allowing old case lube, gunk, carbon residue, and other contaminants to build up inside the die. You should clean your dies fairly often, particularly if you do not tumble or ultrasound your cases between loadings. It is most important to keep full-length sizing and body dies clean. These dies accumulate lube and carbon residue quickly.
Sinclair International has created a series of instructional videos illustrating the basics of metallic cartridge reloading. The 8-Part series starts with reloading basics and provides step-by-step, how-to instructions that will help new reloaders get started. Detailed, animated illustrations show you what happens inside the chamber when shooting, and inside the dies during each step of reloading. The videos can be viewed on Sinclair International’s YouTube channel. Shown below is the first video in the series:
Each of the Sinclair videos is hosted by then Sinclair Int’l President Bill Gravatt (now with Creedmoor Sports). Bill doesn’t just show you “how”, he tells you “why”. The how-to segments cover case inspection, proper die set up, case sizing, primer installation, powder measuring, bullet seating, crimping, and even goes into the record keeping needed for the handloader. “We wanted to give shooters who haven’t reloaded a look at all the advantages of creating your own ammo and how easy it is to get started,” said Gravatt, “without telling them they had to have any certain brand or type of equipment to do the job.”
The Eight Video Topics Are:
Part 1 — Intro to Video Series
Part 2 — Intro to Reloading Safety
Part 3 — Metallic Cartridge Components
Part 4 — The Firing Sequence
Part 5 — Tools for Reloading
Part 6 — Loading Bottle-Neck Cartridges (2 videos)
Part 7 — Loading Straight Wall Cartridges
Part 8 — Reloading Series Conclusion
Reloading Tools
Shown below is Part 5 of the video series, covering the tools used for precision reloading.
We also strongly recommend the Part 4 Video to readers who are getting started in reloading. This “How Things Work” segment covers the sequence of events inside the chamber (and barrel) when the cartridge is fired. The video includes helpful graphics that show what happens to the primer, powder, cartridge, and bullet when the round is fired. The video also illustrates “headspace” and explains how this can change after firing. We think this video answers many common questions and will help reloaders understand the forces at work on their brass during the firing process.
How do you trim your cases? We use a variety of tools, including power case trimmers. But our go-to trimmer for Benchrest-type cartridges is the L.E. Wilson Trimmer unit, now available in a handsome and durable stainless assembly. This thing is slick. It trims very precisely with the use of Wilson case holders combined with a micrometer-type stop for length control. As sold complete with micrometer, quick clamp, and metal stand, this Wilson Stainless Trimmer is $154.95 at Creedmoor Sports. We think that’s a fair price for a unit that can last a lifetime, trimming many thousands of cases.
In this video, Bill Gravatt of Creedmoor Sports demonstrates the Stainless Wilson trimmer with micrometer length control. Gravatt offers helpful operational tips to improve trimming efficiency, so this video is worth watching even if you’ve used a Wilson trimmer before:
Tips for Trimming with Wilson SS Micrometer Trimmer:
1. After inserting brass in the case holder, tap the case lightly to ensure it seats fully.
2. When starting your case-trimming session, do one or two test cases to check cut length. Adjust length with micrometer, then test length again. If “good to go”, set length stop. NOTE: Release the Stop Screw to make major adjustments. Use the Micrometer to make fine adjustments, in .001″ increments.
3. After trimming operations, be sure to chamfer case mouth after cutting to remove burrs. NOTE: After you have made the chamfer, we recommend gently spinning the chamfer tool backwards a couple times in the case neck. This will burnish/smooth the newly-cut champing, which helps with bullet seating.
Features of Deluxe Wilson Stainless Case Trimmer with Micrometer
— Long lasting Stainless finish with Micrometer adjustment.
— New 304 Stainless Steel Handle included with Micrometer Trimmer.
— Rotary-style clamp swings to secure case-holder — quick and easy.
— Larger stop screw adjustment from 3/8″ (old) to 1/2″ (new) with increased width on stop nut. Coated with black oxide for a long lasting durable finish.
— Made in the USA with American Steel.
— Power Adaptor compatible.


 One of our Forum readers asked “How can I get a custom in-line seater for my new rifle?”. First, we would say that, if you are not shooting an unusual Wildcat, check first to see if L.E. Wilson makes a stainless Micrometer Seater Die for your rifle. These dies are a joy to use, and we’ve found the fit to be exceptionally good with many calibers. Typically priced from $95-$115, Wilson stainless micrometer-top seaters are available for dozens of cartridge types: .204 Ruger, 20 BR, .222 Rem, .223 Rem, 22 PPC, 22 BR, .22-250, .223 WSSM, 6 PPC, 6mmBR, 6XC, 243 Win, .243 WSSM, 25 WSSM, 6.5×47 Lapua, 6.5 Creedmoor, 6.5-284, 26 Nosler, .270 WSM, 7mm-08, .284 Win, 28 Nosler, 7mm RUM, 30 BR, 30 IHMSA, .308 Win, .300 WinMag, .338 Edge (and MORE).


 Shiny brass — it may not shoot more accurately, but it does make you feel better about your hand-loaded ammo. While it’s not necessary to get brass “bright and shiny” after every firing, it is a good idea to clean powder residue, grime, and grit off your brass before you run cases into sizing dies. There are many ways to clean cartridge cases. A quick wipe with solvent on a patch may suffice for recently-shot cases. Older brass with baked-on carbon may require lengthy tumbling. Ultrasonic cleaning is another popular option that gets your brass clean inside and out.


