|
|
March 28th, 2015
Report by Boyd Allen
This pistol belongs to Dan Lutke, a Bay Area benchrest shooter who publishes the results for the Visalia matches to the competitors and the NBRSA. He has been an enthusiastic competitor for an number of years, at various ranges, notably Visalia and Sacramento. The action is a Remington XP-100, to which a Kelbly 2 oz. trigger has been fitted. On top is an old Japanese-made Tasco 36X scope (these were actually pretty darn good). The Hart barrel (a cast-off from Dan’s Unlimited rail gun) was shortened and re-chambered for the 6x45mm, a wildcat made by necking-up the .223 Remington parent case. The custom stock/chassis was CNC-machined by Joe Updike from 6061 Billet Aluminum to fit the XP-100 action and mount a target-style AR grip with bottom hand rest. The gun was bedded and assembled by Mel Iwatsubu. In his XP-100 pistol, Dan shoots 65gr custom boat-tails with Benchmark powder.
 
TEN Shots in 0.303″ (0.289 MOA) at 100 Yards
How does Dan’s XP-100 pistol shoot? Look at that target showing TEN shots at 100 yards, with eight (8) shots in the main cluster at the top. The ten-shot group measures .303″ (0.289 MOA), as calculated with OnTarget Software. Not bad for a handgun! What do you think, can your best-shooting rifle match the 10-shot accuracy of this XP-100 pistol?


This diagram shows the most common 6x45mm wildcat, which is a necked-up version of the .223 Remington parent cartridge. NOTE: The dimensions for Dan Lutke’s benchrest version of this cartridge may be slightly different.

ACAD drawing by Peter Gnanapragasam CC by SA 3.0, via Wikimedia Commons. Title Added.
Story tip from Boyd Allen. We welcome reader submissions.
November 16th, 2014
Most of us assume that if we weigh our powder carefully (down to the tenth of a grain or less) we can achieve a uniform powder fill from case to case in our handloads. Weighing does ensure that the weight of the propellant in each case is the same, but is the column of powder the same by volume each time? “Not necessarily” is the answer. An interesting experiment by our friend Boyd Allen demonstrates that the manner in which you place kernels in the case can make a significant difference in the height of the powder column within the brass case.
Using a Gempro 250 scale, Boyd measured exactly 30.6 grains of Vihtavuori N-133 powder. He then inserted this powder in the same cartridge case multiple times. (The case has a fired primer in place.) But here is the key — Boyd used various filling techniques. He did a slow fill, and a fast fill, and he also experimented with tapping and drop tubes. What Boyd discovered was that you can start with the exact same weight of powder (in fact the very same set of kernels), yet end up with vary different fill heights, depending on how you drop the kernels into the case. Look at the photos. Despite variations in lighting, the photos show the same 30.6 grains of powder, placed in the same cartridge, with four different methods.
Boyd Explains the Procedure Used for his Experiment.
EDITOR’s NOTE: So there is no misunderstanding, Boyd started with a weighed 30.6 grain charge. This identical charge was used for ALL four fills. After a fill the powder was dumped from the case into a pan which was then used for the next fill technique to be tried. So, the powder weight was constant. Indeed the exact same kernels (of constant weight and number) were used for each fill.
Boyd writes: “I used the same powder for all fills, 30.6 gr. on a GemPro 250 checked more than once. All fills employed the same RCBS green transparent plastic funnel. The fast drop with the funnel only overflowed when it was removed from the case neck, and 15 granules of powder fell on the white paper that the case was sitting on. The fast-funnel-only drop with tapping, was done with the funnel in place and the case and funnel in one hand, while tapping the case body with the index finger hard, many times (about 20 fast double taps). My idea here was to “max out” the potential of this tapping technique.
The slow drop with the funnel and 10″-long .22 cal. Harrell’s Precision drop tube, was done by holding the scale pan over the funnel and tapping the spout of the pan repeatedly on the inside of the funnel about 1/3 down from the top, with the scale pan tilted just enough so that the powder will just flow. Many taps were involved, again, to max out the technique.
Again, to be clear, after each case filling, the powder was poured from the case back into the scale pan carefully. You may notice the similarity between the fast drop with the drop tube, and the funnel only with tapping. Although I did not photograph it, fast tube drop and tapping (combined) improved on tapping alone, but only to about half as far down the neck as the slow with drop tube. Due to the endless possible permutations, I picked four and left it at that.
I believe that I can make the rough judgment that the scale pan funnel and drop tube technique, which involved a longer drop period, and probably less velocity at the top of the tube, left more room in the top of the case neck than the slow drop from the measure with the same drop tube. You have both pictures, so you can make the comparison.” — Boyd
Does Powder Column Height Variance Make a Difference?
Boyd’s experiment proves pretty conclusively that the method of dropping a given weight of powder can affect the height of the powder column in the case and the degree of powder compression (when a bullet is seated). He showed this to be true even when the exact same set of kernels (of constant weight) was used in repetitive loadings. This raises some interesting questions:
1. Will subsequent cartridge transport and handling cause the powder to settle so the variances in powder column height are diminished?
2. If significant inconsistencies in powder column height remain at time of firing, will the difference in fill level hurt accuracy, or result in a higher extreme spread in velocity?
3. Is there any advantage (beyond increased effective case capacity) for a tight (low level) fill vs. a loose (high level) fill?
We don’t know the answer to these follow up questions. This Editor guesses that, if we tested low-fill-height rounds vs. high-fill-height rounds (all with same true fill quantity by weight), we might see meaningful differences in average velocity. I would also guess that if you fired 10 rounds that exhibited quite a difference in powder column heights, you might see a higher ES/SD than if you shot 10 rounds loaded with a very consistent powder column height (either high or low). But further testing is needed to determine if these predictions are true.
May 2nd, 2013
 Precision Rifleman, the official magazine of the NBRSA, is now available for free online. In addition to match results, equipment lists and pictures, in each eZine issue you’ll find good articles about various benchrest-related topics. Precision Rifleman, the official magazine of the NBRSA, is now available for free online. In addition to match results, equipment lists and pictures, in each eZine issue you’ll find good articles about various benchrest-related topics.
CLICK HERE to Read NBRSA Precision Rifleman Magazine
Daily Bulletin contributor Boyd Allen recommends you check out these NBRSA eZines: “For those who are considering the sport of benchrest, this is a good way to get a better ‘feel’ for what it is like. For those who are building a new rifle, the equipment lists can provide invaluable information. Take a look.” All of the back issues are available at: www.issuu.com/precisionrifleman.

January 8th, 2013
 The tool-makers at 21st Century Shooting have come up with a very slick new Precision Hand-Priming Tool. This extremely well-made, benchrest-grade unit raises the bar among single-primer seating tools. Feel is great, changing shell-holders is simple, and nothing else on the market offers better control over primer seating depth. The tool’s precision-adjusting head provides clicks in .0025″ increments for precise seating depth. The tool’s body, internals, and shell-holders are stainless, while the handle is anodized aluminum. Price is $118.00 for the tool itself. Shell-holders (sizes from 17 Remington up to .338 Lapua Magnum) cost $7.99 each. The tool-makers at 21st Century Shooting have come up with a very slick new Precision Hand-Priming Tool. This extremely well-made, benchrest-grade unit raises the bar among single-primer seating tools. Feel is great, changing shell-holders is simple, and nothing else on the market offers better control over primer seating depth. The tool’s precision-adjusting head provides clicks in .0025″ increments for precise seating depth. The tool’s body, internals, and shell-holders are stainless, while the handle is anodized aluminum. Price is $118.00 for the tool itself. Shell-holders (sizes from 17 Remington up to .338 Lapua Magnum) cost $7.99 each.
21st Century Priming Tool Review
By Boyd Allen
I have been priming cases, with various hand-priming tools, for about three decades, and in the process have pretty much tried them all, from least to most expensive. When I found out that this new 21st Century tool was adjustable for seating depth, I wondered about that. After all, what do I, who believes in seating by feel, need with adjustable seating depth? Well…..I was wrong. Let me explain.
Why Adjustment for Primer Seating Depth Is Important
Most hand-seating tools do not have an adjustment for how far up the priming punch comes up into the shell holder. As a result, when priming a case with a deep pocket, especially if there has been some wear of the tool’s linkage, the finger/thumb lever may contact the tool’s body before the primer is fully seated. Having a primer seated too high can cause a myriad of problems. Prior to this, the only seater that I had used that had an adjustable linkage was the Sinclair tool, and adjusting its linkage requires disassembly — regular disassembly if you want to keep it perfect. That’s not convenient. The Sinclair is good tool, but a pain in the neck to adjust.

Precision Control Over Seating Depth — With Click Adjustment
The 21st Century Priming Tool offers quick and easy depth adjustment (unlike its rival from Sinclair). The 21st Century unit can be adjusted in precise increments (.0025”) more quickly than you can read this sentence. The knurled head of the tool is threaded onto the body, which has a very sturdy ball and spring detent indexing system that is easy to adjust and precise. Clicks are secure and positive. With this feature, you can set the tool so that the handle is in any position (distance from the tool body) that you find convenient, when the primer is fully seated. Additionally, since leverage increases as the handle approaches the tool body, different stopping points afford differing mechanical advantages (more or less effort required) and sensitivity. By doing a little experimenting, I have found a point of adjustment that give me better feel for when the primer hits the bottom of the pocket, without overshooting the mark, while keeping the force requirement within a range that is comfortable when priming a large number of cases.

Quick and Easy Shell-Holder Changing
Changing shell holders is easily accomplished. No extra hex-wrenches or tools are needed, and there are no tiny set screws to roll of the desk, to be lost forever in the carpet, never to be heard from again until you hear them rattling up the vacuum cleaner hose. To swap shell-holders, simply screw the head off of the body, lift off the one that you one that you are replacing, set the one that you intend to use in place (assuming that it used the same size primer) and screw the head back down to the setting that you want. Changing primer sizes is equally easy. NOTE: The tool requires 21st Century-made shell holders. These may be turned (relative to the handle) so that the loading slot opening faces whatever direction you prefer.
Fit, Finish, and Feel
The body and head of the tool, as well as the internal linkages, are all made from stainless steel. These closely-fitted parts are precisely machined, with an smooth, attractive finish. The handle is black anodized aluminum. Overall, the tool is well-shaped, and built like a stainless/aluminum brick.
Bottom Line: Great Tool That Works Exceptionally Well
 I can’t imagine anyone, who uses a single-primer tool of this type, not liking this tool. When it comes to hand reloading tools, I can afford to have pretty much whatever I want (within reason). After testing and using this tool, I pulled my Sinclair tool from its case, and replaced it with this one. That should say it all. After using this tool, I will have to give serious consideration to other 21st Century reloading products the next time I need a new tool. One thing is for sure — we have an important new player in the design and manufacture of top end of reloading equipment. 21st Century’s Precision Priming Tool “raises the bar” among single-primer seating tools. I can’t imagine anyone, who uses a single-primer tool of this type, not liking this tool. When it comes to hand reloading tools, I can afford to have pretty much whatever I want (within reason). After testing and using this tool, I pulled my Sinclair tool from its case, and replaced it with this one. That should say it all. After using this tool, I will have to give serious consideration to other 21st Century reloading products the next time I need a new tool. One thing is for sure — we have an important new player in the design and manufacture of top end of reloading equipment. 21st Century’s Precision Priming Tool “raises the bar” among single-primer seating tools.
Tool Size Considerations
I wrote the review and then took the pictures, which, upon reflection, make the tool look smaller than it is, because of the size of my hands. I thought about putting a ruler in the pictures, but rejected that as visual clutter, so I will simply tell you that from tip of thumb to that of my little finger, my right hand measures a little over 10 inches, and the palm is 4 inches wide. The size of the tool is just right.

December 13th, 2012
Most of us assume that if we weigh our powder carefully (down to the tenth of a grain or less) we can achieve a uniform powder fill from case to case in our handloads. Weighing does ensure that the weight of the propellant in each case is the same, but is the column of powder the same by volume each time? “Not necessarily” is the answer. An interesting experiment by our friend Boyd Allen demonstrates that the manner in which you place kernels in the case can make a significant difference in the height of the powder column within the brass case.
Using a Gempro 250 scale, Boyd measured exactly 30.6 grains of Vihtavuori N-133 powder. He then inserted this powder in the same cartridge case multiple times. (The case has a fired primer in place.) But here is the key — Boyd used various filling techniques. He did a slow fill, and a fast fill, and he also experimented with tapping and drop tubes. What Boyd discovered was that you can start with the exact same weight of powder (in fact the very same set of kernels), yet end up with vary different fill heights, depending on how you drop the kernels into the case. Look at the photos. Despite variations in lighting, the photos show the same 30.6 grains of powder, placed in the same cartridge, with four different methods.
Boyd Explains the Procedure Used for his Experiment.
EDITOR’s NOTE: So there is no misunderstanding, Boyd started with a weighed 30.6 grain charge. This identical charge was used for ALL four fills. After a fill the powder was dumped from the case into a pan which was then used for the next fill technique to be tried. So, the powder weight was constant. Indeed the exact same kernels (of constant weight and number) were used for each fill.
Boyd writes: “I used the same powder for all fills, 30.6 gr. on a GemPro 250 checked more than once. All fills employed the same RCBS green transparent plastic funnel. The fast drop with the funnel only overflowed when it was removed from the case neck, and 15 granules of powder fell on the white paper that the case was sitting on. The fast-funnel-only drop with tapping, was done with the funnel in place and the case and funnel in one hand, while tapping the case body with the index finger hard, many times (about 20 fast double taps). My idea here was to “max out” the potential of this tapping technique.
The slow drop with the funnel and 10″-long .22 cal. Harrell’s Precision drop tube, was done by holding the scale pan over the funnel and tapping the spout of the pan repeatedly on the inside of the funnel about 1/3 down from the top, with the scale pan tilted just enough so that the powder will just flow. Many taps were involved, again, to max out the technique.
Again, to be clear, after each case filling, the powder was poured from the case back into the scale pan carefully. You may notice the similarity between the fast drop with the drop tube, and the funnel only with tapping. Although I did not photograph it, fast tube drop and tapping (combined) improved on tapping alone, but only to about half as far down the neck as the slow with drop tube. Due to the endless possible permutations, I picked four and left it at that.
I believe that I can make the rough judgment that the scale pan funnel and drop tube technique, which involved a longer drop period, and probably less velocity at the top of the tube, left more room in the top of the case neck than the slow drop from the measure with the same drop tube. You have both pictures, so you can make the comparison.” — Boyd
Does Powder Column Height Variance Make a Difference?
Boyd’s experiment proves pretty conclusively that the method of dropping a given weight of powder can affect the height of the powder column in the case and the degree of powder compression (when a bullet is seated). He showed this to be true even when the exact same set of kernels (of constant weight) was used in repetitive loadings. This raises some interesting questions:
1. Will subsequent cartridge transport and handling cause the powder to settle so the variances in powder column height are diminished?
2. If significant inconsistencies in powder column height remain at time of firing, will the difference in fill level hurt accuracy, or result in a higher extreme spread in velocity?
3. Is there any advantage (beyond increased effective case capacity) for a tight (low level) fill vs. a loose (high level) fill?
We don’t know the answer to these follow up questions. This Editor guesses that, if we tested low-fill-height rounds vs. high-fill-height rounds (all with same true fill quantity by weight), we might see meaningful differences in average velocity. I would also guess that if you fired 10 rounds that exhibited quite a difference in powder column heights, you might see a higher ES/SD than if you shot 10 rounds loaded with a very consistent powder column height (either high or low). But further testing is needed to determine if these predictions are true.
July 10th, 2012
Product Preview by Boyd Allen
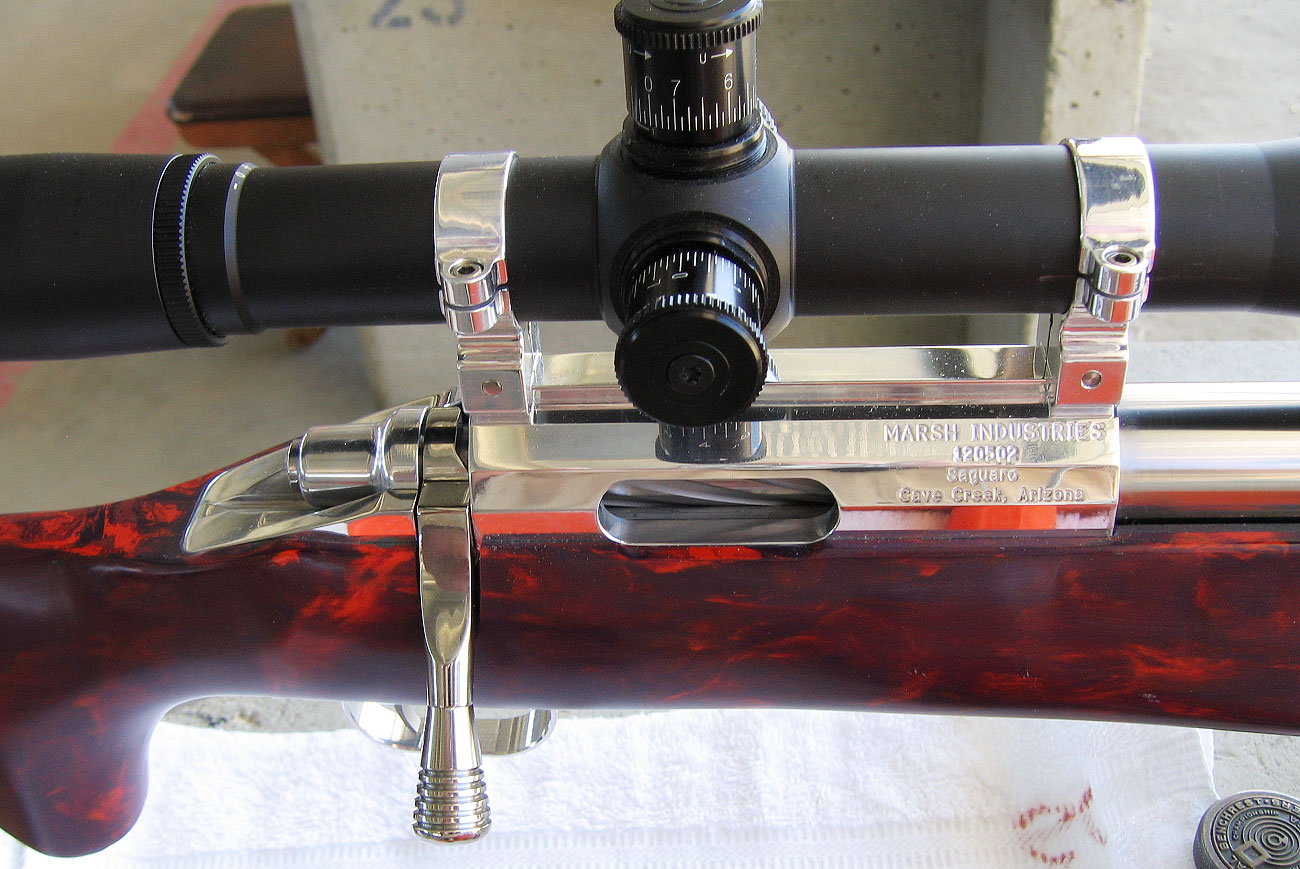
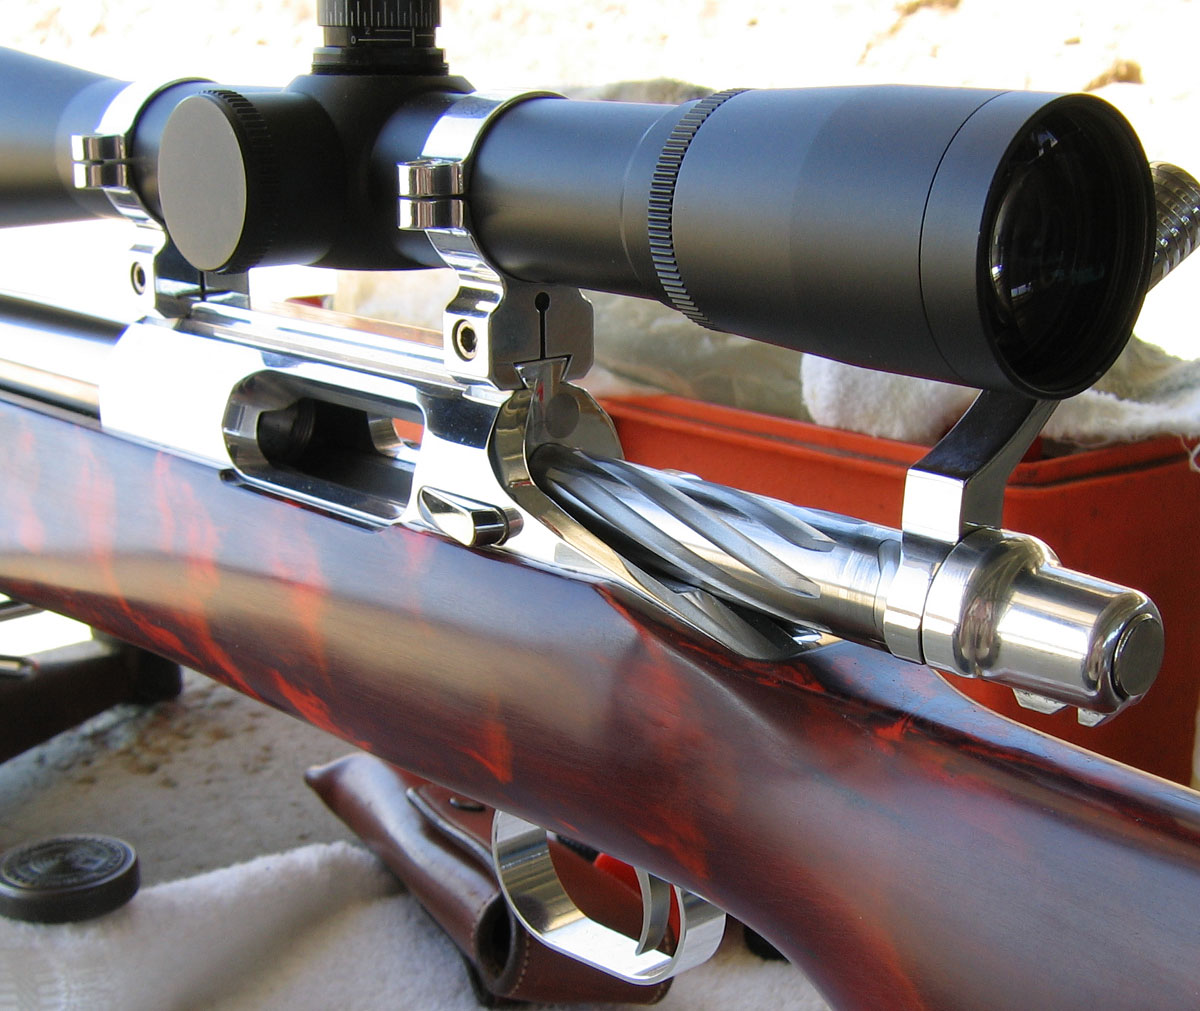
 Marsh Industries LLC of Cave Creek, Arizona, has just started production of its new “Saguaro” benchrest action. (Saguaro is the distinctive tall cactus plant found in the Southwest.) If the Saguaro action looks familiar, that’s by design. The idea was to produce a Panda-type action with 1 1/16″ removed from the middle to allow for reduced weight, and importantly, shorter bolt “draw” during cycling. In addition, Marsh Industries wanted smoother function and optimal accuracy. In that quest, Marsh crafted a state-of-the art striker assembly, configured specifically for short cartridges typically used for 100- and 200-yard benchrest matches. Marsh Industries LLC of Cave Creek, Arizona, has just started production of its new “Saguaro” benchrest action. (Saguaro is the distinctive tall cactus plant found in the Southwest.) If the Saguaro action looks familiar, that’s by design. The idea was to produce a Panda-type action with 1 1/16″ removed from the middle to allow for reduced weight, and importantly, shorter bolt “draw” during cycling. In addition, Marsh Industries wanted smoother function and optimal accuracy. In that quest, Marsh crafted a state-of-the art striker assembly, configured specifically for short cartridges typically used for 100- and 200-yard benchrest matches.

The Saguaro action is like a Stolle Panda with 1 1/16″ removed from the middle.
Design and Testing of New Saguaro Action
After spending some time with “Doc” Marsh, (the owner of Marsh Industries), I must say that I am impressed with his new product. After learning what has gone into the design and production of these actions, and hearing how well Saguaro prototypes shot, this is one action I want to add to my collection.
Beneath the shiny exterior, the heart of any benchrest action is the striker assembly. Its specifications and adherence to tolerance are a formula that ultimately determines the potential of the action. Striker fall, weight, and spring rate, all work together to put the sharpest edge on accuracy, or if they are not right, result in run of the mill (for a benchrest action) accuracy, even if all the other details are perfectly executed. Rather than leave these details to the expertise of one person, several big names in the benchrest community were consulted about this part of the design. Intelligent input was received, and the design was improved from one prototype to the next. The final result is impressive to say the least. When the late prototype Saguaro was tested in a very good tunnel, using a rail-gun, the results were unequivocally outstanding. (Editor: This means the Saguaro action shot small enough groups to be “more than competitive” with any other hardware on the market.)

Saguaro Actions Can Use Barrels And Stocks Now Fitted to Pandas
The truth is that no one can quite put his finger on what makes the difference between a good action and a great action. Designs are created, actions built, they become parts of rifles, and only then is the truth revealed. Whether you believe that it was skill or luck, it would seem that the details that comprise this new action just happen to have the exact right stuff. For many of you, who already know how your barrels shoot on your rifles that have Panda actions, for the first time, a direct comparison is available. This is because Panda barrels fit Saguaro actions. So current Panda owners can remove one of their barrels, place it on a Saguaro-actioned rig, and see if the barrel shoots as good or better. That allows direct testing of one action vs. another.
You can use that closet full of barrels, on your new action, without modification, (and have a couple of more ounces toward that tuner that you have been waiting to try). For that matter, other than having to do a little filling in at the front of the action, you can replace your Panda with a Saguaro, and keep using the same stock. That offers a significant savings on a new build.

Saguaro Actions Start at $1050.00
For serious benchresters, an action that comes out of the box a potential winner is almost priceless. Saguaro actions will cost $1,200.00 polished, or $1,050.00 with a 400 grit finish. That’s reasonable given the build quality and performance. While you could pay a bit less for some other actions, if you are in the game to win, a less-than-competitive action isn’t worth owning (even if it is inexpensive).
Marsh Industries, LLC
7040 E. Lone Mt. Rd. North
Cave Creek, AZ 85331
Email: info [at] marshindustriesllc.com
Phone: 480-699-2902 | Fax: 480-699-2397
And so there you have it — Part One of my report on a brand new action. Hopefully, in the not too distant future, I will have a chance to do more than just cycle the bolt (felt good) and actually shoot a rifle built around one. Until then, I will have to content myself with trying out some of Bergers new Column bullets, and doing some more work with the slower but otherwise identical brother to the yet to be released Accurate LT 32 powder, some of that Canadian 2015, as soon as the temperatures get out of the triple digits on a day when the wind is suitable.
February 26th, 2012
If you’re looking for a solid, beautifully fabricated loading press that can do double-duty at home AND at the range, consider the Combo Press from Harrell’s Precision, run by brothers Lynwood and Walter Harrell. Though it is very compact, it has plenty of leverage to full-length-size cases. The Harrell’s Combo Press works BOTH as an arbor press and as a standard press that functions with shell-holder and conventional screw-in dies. The arbor section on the left is tall enough to hold a Wilson micrometer-top seater. The threaded die section on the right has enough clearance for .308-sized cases.


One of the best features of the Combo Press from Harrell’s Precision is its sturdy clamp. This mounts solidly to a wood loading bench or table top. It also has enough vertical clearance between the jaws to work with most range benches. Forum member Boyd Allen has written a detailed review of the Harrell’s press, with additional photos by Paal Erik Jensen of Norway. The Harrell’s Precision Combo press retails for $295.00. That’s pretty pricey, but consider that it can replace BOTH an arbor press and a standard press. CLICK HERE to read full COMBO PRESS REVIEW
 
Combo Press Has Plenty of Power to Bump Shoulders
This Editor has loaded ammo with this press and I can say it performed well. It actually bumped shoulders on fired 6BR brass more easily than a larger cast-iron press we have in our loading area. I attribute that to the fact that the threads for the die are very precise and the shell-holder seats firmly on the ram, with no slip. Seating with a hand die (on the left side of the press) yields repeatable results, although I have to say I get better “feel” with a good Arbor press, such as those made by 21st Century, K&M, or Sinclair Int’l. I also like the availability of the seating Force Gauge on the K&M Arbor.
|