World Record group shot by Bart Sauter in IBS 600-yard Match on April 21, 2018 in Memphis, TN.
0.282 inches, 0.04 MOA… at 600 Yards. Simply amazing…
What can we say… this 0.282″ 5-shot group 600 yards represents one of the most impressive feats of rifle accuracy in history. Shot in competition, this five-shot group at 600 yards easily fits inside a dime with plenty of room to spare!
Bullet-maker Bart Sauter recently shot this 0.282″ five-shot group at a 600-yard IBS match. Yep, you read that right — 0.282″ at 600. Most shooters would be happy with that group at 100 yards. At 200 it would be remarkable. But at 600 — it is truly amazing. Readers, 0.282″ at 600 works out to 0.04 Minutes of Angle (MOA). Not point four MOA, but point ZERO four MOA, and it was all in the TEN RING for a 50 score. Even measured outside edge to outside edge, that group is just 0.525″, so Bart’s group will easily fit inside a dime (0.705″ diameter).
Sauter’s amazing 0.282″ 50 group smashes the existing IBS Heavy Gun 600-yard record, a 0.404″ shot by John Lewis way back in 2008. It also happens to beat the existing IBS Light Gun group record — the stunning 0.336″ by Rodney Wagner in 2013. (A group many said could never be bettered). Bart’s group will be a new score record too — many 50s have been shot before, but the group size is the tie-breaker, and no one has ever shot smaller at 600 than Bart.
Sauter Smashes IBS World Records with Stunning 600-Yard Group
Report by Boyd Allen, IBS Vice President
On the 21st of April, at the beautiful Memphis Sport Shooting Assn. 600-yard benchrest range, bullet-maker Bart Sauter made history. About 11:00 O’clock with 12-15 MPH switchy winds, Bart Sauter waited for his chosen condition and then ran five shots into an incredible 0.282″ record-breaking group, with a score of 50. Shot in Heavy Gun Class (with his Light Gun), this combination of group and score bettered the previous HG group and score records with sufficient margins that their records in both categories are virtually guaranteed. The previous group record, a 0.404″, belonged to John Lewis and stood for ten years. The previous score record was 50/.513 (group size being the tie breaker) shot by B.J. Francis last year. Bart’s target was 50/.282.
To put it in perspective Bart’s record has the equivalent angular dispersion (MOA) of a .04″ group shot at 100 yards. (Bart’s exact MOA is 0.0448) But consider that crosswinds have roughly 36 times more effect at 600 yards than at 100 yards (by the “Rule of the Square”).
Record-Setting Cartridge and Load with Bart’s Own 105gr Bullets
Bart shot a 6mmBR Ackley Improved (6BRA) wildcat cartridge with an 0.272″ neck. This is basically the 6mmBR Norma with a 40° shoulder. The neck is long like the parent cartridge, not short like a 6mm Dasher. Bart was shooting his own 105 grain, 13 Ogive VLD bullets. He calls this new bullet design “The Hammer” (for good reason). Bart’s Hammer 105s were loaded in Lapua brass with Hodgdon H4895 powder and Wolf primers. Bullet tips were trimmed on a Giraud bullet point trimmer, but not pointed. Bart feels that there is too much potential for damaging bullets during pointing, so he does not point his match bullets. Bart had his LabRadar chrono on the bench during the match. Velocities were 2970-2975 fps with single-digit ES.
Record-Setting Rifle — IBS Light Gun Shot in Heavy Gun Class
Bart’s rifle features a melonited BAT B action, with a 26″, 1:8″-twist, HV contour James Lederer barrel, fitted with a Mike Ezell tuner. The Jewell trigger was set to 1.5 ounces. On top was a March 40X in BAT rings. The initial build was by Mike Moses, with chambering by Dean Stroud, and final (glue and screw) bedding by Billy Stevens. The handsome wood JB 1000 stock (3″-wide fore-end) boasts an aluminum keel added by Alex Wheeler after the initial build. Bart said that it only took him 15 minutes to adjust the keel so that the cross hairs did not wiggle on the target when the gun was pulled back a full 2 ½ inches. Bart is definitely a fan of the adjustable keel.
Bench Equipment and How Rifle Was Shot
Bart used a Farley Coaxial front rest with soft leather Edgewood front back sprinkled with baby powder. In the back was a Protektor Model DR rear bag with Cordura ears and no added lube (not needed with aluminum keel) borrowed from Mike Moses. Bart shot the rifle lightly pinned between his shoulder and the fore-end stop. Interestingly, Bart kept his Labradar chronograph on his bench throughout the day, and recorded velocities during the record group: 2970-2975 fps with single-digit ES.
Reloading Equipment and Methods
After firing, cases are annealed with a Benchsource flame annealer. The inside of the case-necks are brushed with a nylon brush (no lubricant is used). Cases are sized with a custom Whidden Full-length sizing die (with bushings), and a cut-down Wilson micrometer seater that was originally made for the Dasher.
Bullets are seated with a 21st Century Shooting Hydro Bullet Seater, used with the Wilson cut-down Wilson seating die. This state-of-the-art arbor press boasts a hydraulic seating pressure cylinder and gauge. During seating, the force gauge reads about 27.
The powder charge is first thrown from a manual measure and usually trickled onto an A&D 120 FXi magnetic force restoration scale using an Adams automatic trickler, but this time Bart had to settle for his old RCBS trickler because the drive band of the Adams auto-trickler wore out.
Brass Prep — The chamber is a 0.272″ no turn. Bart lightly skims the necks AFTER the first firing just enough to achieve batch to batch uniformity in neck thickness. He uses a .266 bushing which gives him .003 neck tension.
Pre-Loading vs. Loading at the Range
I asked Bart if he pre-loads, or loads at the range. Unexpectedly his answer was “Both…depending”. Bart will identify his “in tune” velocity at his home range and then pre-load that load before the match. However, Bart takes all of his reloading equipment to the match, and if the conditions are such that his pre-loaded ammunition does not give the velocity he wants (as revealed by the LabRadar), he will load at the match.
Another test that he feels is important is to be able to pass a bullet all the way through the neck of his fired cases. Bart thinks that even if the shank of a seated bullet does not directly contact a doughnut, that doughnut can have a negative effect on accuracy.
Bart has brought short range benchrest know-how to 600-yard competition. He uses a full set of short range flags, shown above. At last year’s Nationals, at the same Memphis range, Bart was one of the only shooters with a set of flags. Now other 600-yard competitors are following suit.
Final Throughts — The 6BR Ackley vs. 6mm Dasher
Given its prominence, it is inevitable that comparisons be made between the 6mmBR Ackley Improved and the Dasher. On this subject Bart told me that, based on his experience, he is a “Dasher basher”. He believes the Dasher can be finicky, and has a tendency to flip shots out of the group. For Bart, the 6BR Ackley has been a lot easier to work with and more predictable.
Below is a test target Bart shot at 100 yards. The load yielding the smallest 3-shot group, measuring 0.092″, was the load Bart took to the match. As you can see, the positions of the various load adjustments did not change on the targets. Bart said that that is the kind of positive compensation that he likes to see.
While Bart does most of load testing at short range, he can shoot out to 500 yards near his home. He says his record-setting gun has produced multiple 500-yard, 3-shot groups in the “three-quarter inch range” when testing in calm conditions. That’s 0.14 MOA for three shots. At 500…
Congratulations to Bart on His Great Shooting
Finally, I would like to add my congratulations to Bart Sauter for this spectacular group. I also want to thank Bart for generously taking the time to share the details of his load, reloading methods, and rifle components. Bart has shown that applying some short-range benchrest techniques to the mid-range game can produce remarkable results.
Report by Boyd Allen, IBS Executive VP
The 2017 IBS 600-Yard Nationals were held October 20-21 at the Memphis Sport Shooting Association (MSSA) Range. There was a good turn-out for the event, with 80 shooters. Conditions were challenging Saturday afternoon — strong winds that put some shooters right off the target. But those who mastered the conditions earned glory. The “Top Gun” at this year’s Nationals, earning the title of IBS 600-yard National Champion, was Andy Ferguson. In winning the Two-Gun Overall, Andy turned in a truly dominant performance, recording First Place Score in both Light Gun and Heavy Gun classes, along with second in HG group and fourth in LG Group. Finishing second Overall was Gaylan Breyans, while Jim Bauer was third.
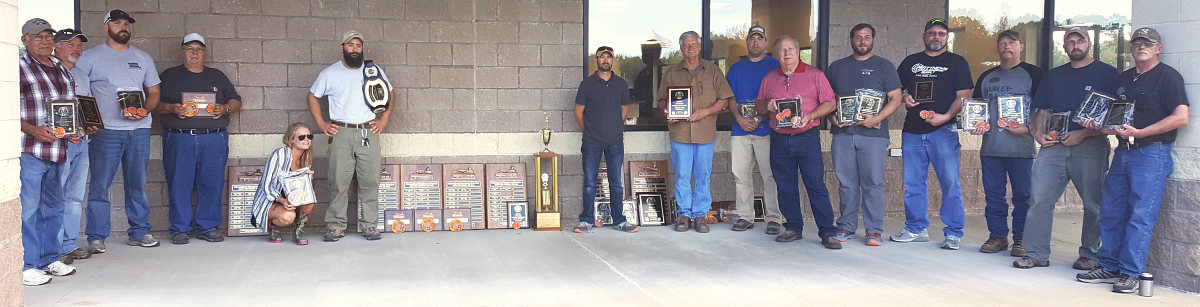
Top Shooters (L to R): Steve Wilson, Scotty Powell, Seth Wooten, Gene Ford, Lindsey Talley, Andy ”Who” Ferguson, Gaylon Breans, Jim Bauer, Justin Dale, Darrell Jones, James Lederer, Robby Miles, Jeff Godfrey, Jason Wolfe, Mike Hanes. NOTE: CLICK PHOTO for large image of top shooters.
Today’s 600-yard benchrest rigs are capable of remarkable accuracy. Even with tough conditions in the afternoons, there was some pretty impressive shooting. Out of 640 targets that were shot by 80 competitors there were 27 scores of 50, 56 groups of 2” or less, 14 of 1.50” or less, 3 groups of 1.25″ or less, and one of 1” or less. See the FULL Results for more details.
Demonstration of Winning Form — Smooth and Fast
How do you win a 600-Yard National Benchrest Championship? Here’s a video answer to that question. To see how a top shooter handles his rifle on the bench, watch the short clip below of Two-Gun Winner Andy Ferguson shooting one of his targets with his 6BR Light Gun. Andy demonstrates smooth “table manners”. He keeps his head down, running off five shots in under 15 seconds. Note how well the gun tracks, returning to Point of Aim.
Match Winner Andy Ferguson Drills Five Shots in Under 15 seconds with his Light Gun
Notably, Andy won the match shooting the “plain vanilla” 6mmBR Norma — not a Dasher, not a 6 BRX, not a 6 BR Ackley. The parent 6mmBR cartridge can still do the job, particularly in the hands of a smooth shooter like Andy Ferguson. At the Memphis range, the usual strategy is to shoot on the sighter gong just before the switch to the record and then fire all shots on the record target as rapidly as possible to stay in the same wind condition.
600-Yard Benchrest Competition — The Basics
Two Classes — Light Gun and Heavy Gun
For those that are not familiar with this 600-yard Benchrest competition, the equipment rules are the same as for 1,000-yard Benchrest. There are two classes of rifles. The Light Gun (LG) rifles are limited to 17 pounds with no stock width or buttstock angle restrictions. The front and rear of these rifles must rest on sand bags. The rear bag may not have any provision for aiming the rifle.
Heavy Gun (HG) rifles have no weight limit. Like the LGs their stocks are not limited as to width or butt stock shape. HG rear sand bags may be supported by “mechanical” rests. Return to battery rests are not allowed for either class. Both HG and LG classes may use muzzle brakes.
Match Procedures at Memphis
In 600-yard IBS Benchrest competition, targets are measured for group size and there is also a score value based on shot placement in the target rings. Prizes are awarded for group, score, and combined. Before the first record target of an Aggregate, the sighter period is six minutes. For subsequent targets in that Agg, it is reduced to two minutes. At the end of sighter period, upon command, shooters have 10 minutes to complete their record target. Aggregates consist of eight targets. Shots that do not print on the target result in that target being disqualified (DQ), as well as the applicable Aggregate.
At this year’s Nationals, shooters rotated four benches to the right after every pair of targets was shot, continuing that rotation through both days. LG was shot on Friday, HG on Saturday. Thanks to an efficient target crew and recorded match commands, shooting was over by 2:25 pm both days.
Equipment List for Top Ten Shooters
The Top Ten Shooters all ran 6mm cartridges (6BRs and Dashers) loaded with similar components. All of the Top Ten who listed their components ran Varget powder and CCI 450 primers in Lapua brass. BAT Actions were predominant, and both Nightforce and Sightron scopes were popular. The top projectiles were Vapor Trail 103s and Berger 105s.
Top Ten Equipment List CLICK HERE for longer Equipment List.
A Well-Run Match
According to all reports the entire event ran like a well-oiled machine. The target crew was quick and skilled and all of the other details were handled efficiently. Prizes and trophies were in abundance. There was even some originality. Much to everyone’s amusement, instead of the usual (boring) plaque or trophy for the Two-Gun winner, a professional wrestling-style Prize Belt was awarded. Great idea! Showing off the Champ’s Belt is Two-Gun winner Andy Ferguson (Right) with past Shooter-of-the-Year Richard Schatz.
Wicked Winds Challenge Shooters on Saturday
The conditions were variously described as “horrible”, the “worst for any match on this range this year”, and so on. Conditions were worse on Saturday than Friday, blowing like stink by the end of the day. Friday morning it was cool, humid and breezy, with a wind speed of a little over 3 mph. By mid-afternoon, when the match finished, it was 20 degrees warmer and the wind had increased significantly to about 9 mph. Saturday morning was warmer, less humid, and the wind speed was about the same as Friday afternoon. But by mid-afternoon, at the end of the match, the wind was blowing 15 mph having peaked an hour earlier at 17 mph!
Doing a little research on the Berger Bullets website, with a 105gr VLD running 2950 fps, and a 15 mph wind coming from 5 O’Clock, the bullet deflection at 600 yards would be over 17.5 inches. There were a fair number of shooters with good records that missed targets.
Good Deed by Match Director Mike Moses
Match Director Mike Moses “paid it forward” this year in Memphis. Mike learned that his friend, bullet-maker Bart Sauter, had invited a young barrel-maker, James Lederer, to the Nationals. As this would be Lederer’s first 600-yard experience, Bart was going to lend Lederer one of Bart’s rifles. But it had another maker’s barrel installed. Mike decided Lederer should, fittingly, use a barrel Lederer made himself. So Mike then chambered up one of two Lederer barrels Mike had recently purchased, and fitted it to one of his own rifles. Mike then fire-formed cases, worked up a load, and assembled ammo for the match.
Mike prepared three complete rifles (and ammo) for the match — one for himself, one for his daughter (Lindsey Talley, ace photographer), and one for James Lederer. It’s hard enough to prepare a Nationals rig for one shooter. Mike did it for three people, PLUS he ran the match.
How did it work out? James Lederer finished mid-pack on Friday, and put what he had learned to good use on Saturday, taking a solid fourth place in Heavy Gun.
Both Bart and Mike have been impressed with the quality of Lederer barrels. James has several years’ experience working for a well-known barrel-maker before designing his own computer-controlled cut-rifling machine, and opening his own one-man shop.
Bauer Power — Jim and Sally Bauer at IBS 600-Yard Nationals
Jim Bauer sends 5 record rounds down range with his “Eagle” HG in Maxi-Tracker stock.
Sally Bauer shoots sighter rounds with her Stars & Stripes HG Maxi-Tracker.
The Bauers have a great transport set-up, with custom, slide-out rifle carriers fitted to their van. You can see the two Heavy Guns featured in the videos in the lower drawer.
The Memphis Sport Shooting Association Facility
The Memphis Sport Shooting Association operates an impressive facility with ranges for rifle, pistol, and shotgun. The 600-yard benchrest range, with covered firing line, is nicely sited, with thick stands of trees left and right. There are 24 very solid concrete-top benches. Plentiful rain and sunshine provide ideal conditions for trees and grass. For those of us in the arid West, the Memphis range seems green and lush. The trees on either side offer some (but obviously not complete) protection from wind.
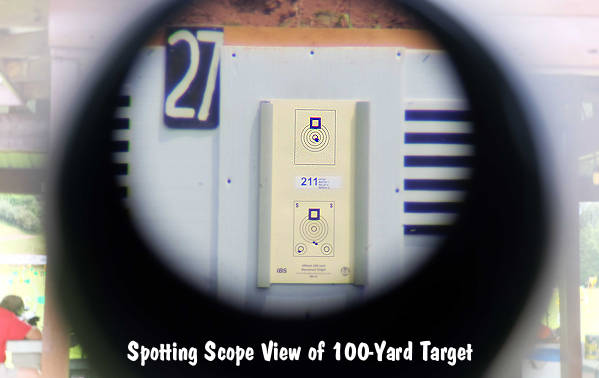
The range was built on land that had been an across-the-course High Power range, and the raised berms for intermediate firing lines are still present. That makes the wind bit more “interesting” when head- or tail-wind angles prevail. There are no pits. For each bench, at 600 yards, two record targets are posted one above the other with a 20” square steel sighter gong directly below. The sighter plates are repainted throughout the day during target changes. CLICK HERE for a 360-degree video view of the range from the covered firing line.
To the IBS Membership — Thanks for Helping with Match Reports
Putting together these match reports for the IBS page on Accurateshooter.com is challenging and enjoyable work. The hard part is coming up with pictures and videos. This time I have been lucky and I am thankful for that. The best part is that I get to talk to some very fine people. Thank you all for taking the time to make my work possible. I appreciate it. — Boyd Allen
Credit Randy Dawson (Birdog) for most of the images and videos used here.
The International Benchrest Shooters (IBS) is pleased to announce the hiring of Boyd Allen as its new Executive Vice President/IBS Editor. Boyd will be responsible for guiding the IBS’s marketing and Public Relations efforts. He will handle all articles on IBS’s web partner, Accurateshooter.com, the leading rifle accuracy site on the Internet. He will also coordinate and contribute to preparation of match reports on Accurateshooter.com for IBS National Championships and other featured matches. Boyd will also work with the IBS Executive Board and discipline committees on rulebook and other administrative activities. Boyd Allen can be reached at: boydallen [at] live.com.
A long-time competitive shooter, Boyd has competed in registered benchrest matches near his home in Fresno, CA. He has written for both Precision Shooting magazine and Shooter’s News. Most recently, Boyd has been a regular contributor to Accurateshooter.com and an active Forum member. Boyd will help the IBS reach a broader audience through AccurateShooter.com and social media. He expects to enhance match reports and also do regular articles on benchrest equipment and trends. He will spearhead a proposed 300-yard exhibition match in 2018 that can bring together shooters from multiple precision rifle disciplines. (Editor: We like this idea — this 300-yard showdown could be the ultimate “bragging rights” match with “point-blank” PPC shooters dueling with Dasher pilots and F-Class aces.)
The IBS is a leading organization for group and score benchrest competition, including the 100/200/300 benchrest games, along with 600-yard and 1000-yard benchrest disciplines.
News Tip from Edlongrange. We welcome reader submissions.
2017 IBS 1000-Yard Benchrest Nationals Report By Boyd Allen
On September 1-4, the IBS held its 2017 1000-yard Benchrest Nationals at the Whitehorse Shooting Center in Peeltree, West Virginia. There was a great turn-out this year, with 118 entries in Light Gun Class (17-lb limit, 5 shots per target) class and 107 shooters in Heavy Gun Class (Unlimited weight, 10 shots per target). The conditions this year were challenging to say the least, with rain storms, spiraling winds, and fog. In fact, rain and fog on Saturday (with cancelled relays) caused the Nationals to be extended by one day through Monday, September 4th. What’s more, of the 107 shooters listed in the Two-Gun Overall results who actually shot both guns, there were dozens of DQs. (Yes, the wind was a bit tricky at this year’s Nationals.)
Sam Hall, past IBS Shooter of the Year, provided this image and most of the photos in this report.
Congratulations to the “top guns” at the Nationals: Edward Kenzakoski (Two-Gun Overall Champion), Mike Gaizauskas (Light Gun Overall, plus LG Score Agg), and Mike Brennan (Heavy Gun Overall, plus HG Score Agg). Group Agg winners were Richard Schatz for LG, and Charlie Lentz for Heavy. Two ladies also deserve mention. Sally Bauer shot the smallest group of the match, a 1.923″ 5-shot group in LG — that’s 0.184 MOA! Ruth Edwards drilled a 2.104″, also mighty impressive. Nice shootin’ ladies…
White Horse Wind and Weather Factors — and Topography
The firing line for the 1000-yard range has a covered structure with 14 well-spaced masonry benches with block bases and cast concrete tops. Facing southwest, the firing line is above the land between it and the target butts, which are at the head of a canyon. There is a low area with trees on the left with an elevated flat area on the right.
This topography create unpredictable wind patterns that can change rapidly with no warning. Those changes can wreak havoc with competitors’ groups and scores. The wind direction at the targets can be opposite that at the firing line, with the result that a let-off down range not only carries the penalty of making a hold-off incorrect, but because the wind at the firing line can continue, adding the additional penalty of a reversal. This was the common cause of disqualifications, which were numerous at this year’s Nationals.
Light Gun and Heavy Gun Equipment Lists (Partial Sample):
Barrel-Block Heavy Gun with a handsome wood stock. Wide fore-ends enhance stability.
Delay Caused by Fog and Rain
On Saturday, rain and fog delays, caused the match to be extended through Monday. The rules dictate that if a full match cannot be finished because of weather, then all of the day’s results are discarded. This meant that even those shooters who completed their relays on Saturday had to shoot them over — hence another day was added to the event. Because of the prospect of worsening conditions on Saturday afternoon, even though there was daylight left, the decision was made to extend the match through Monday.
Profile of 2017 IBS 1000-Yard National Champion Edward Kenzakoski
Commenting on his performance at the Nationals, Ed said modestly:
“I didn’t shoot really good. I just shot better than them other guys.”
Winning Hardware (with a 110-lb Heavy Gun)
Notably, Ed does all of his own gunsmithing, and he built his Championship-winning rifles. Both guns featured 1:11″-twist, 30″ Krieger barrels. (LG: 1.250″ shank and .950 muzzle; HG: 2″ contour untapered). Ed’s Light Gun has a BAT action, no barrel block, Jewell trigger, and McMillan Tooley MBR stock. His Heavy Gun boasts a 10″-long BAT action in a two-piece aluminum stock with barrel block. That HG beast weighs 110 pounds! Both of Ed’s rifles (light and heavy) wore Nightforce 12-42x56mm BR scopes.
Winning Numbers
To win the Two Gun Overall, Ed posted 137 LG Score, 262 HG Score, and 399 Two-Gun Score Agg. His Group numbers were: LG Group 5.659, HG Group 7.483, Two-Gun Agg: 6.571.
Winning Loads and Reloading Methods
Both rifles are chambered in 300 WSM. Ed shoots 210gr Berger VLDs (sorted every way possible), with Norma brass, Hodgdon H4350 powder, and CCI BR2 primers. For the two guns he used very different seating depths — barely touching for the HG, 0.100″ jump for the LG. He said that it takes him a full four days to load the ammunition for both rifles for a match. Yes, he weighs primers, and he even passes his bullets through a .309 bushing.
No Dark Horse at White Horse — Kenzakoski is a Proven Winner
One shouldn’t be surprised at Edward Kenzakoski’s success. Ed really cleaned up at Williamsport this year, winning one 6-match Aggregate and two 10-match score and group Aggregates. He also established a new Williamsport club Light Gun record of 3.2″.
Last year’s winner Tom Mousel sitting at the bench on Sunday. Tom finished third overall this year.
Record-Setting Asymmetry
In 2016 Michael Gaizauskas set the current 1000-yard IBS Heavy Gun (10 shot) group and score records. He set those records with the rifle on the left (below), then chambered in 6.5×47 Lapua. In this match, Mike won LG Group and LG Overall with the rifle on the right as chambered in his own 7mm short magnum wildcat. Mike designed and built both these distinctive assymetric stocks.
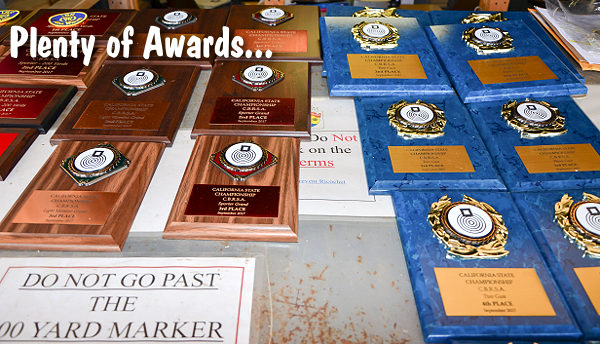
Prizes and Gift Certificates Galore at White Horse
The prize table at the IBS 1000-yard Nationals was impressive, with many scopes and stocks as prizes, plus a treasure trove of gift certificates:
White Horse Shooting Center Facilities, Organization, and Location
The 1000-yard range used at the IBS 2017 Nationals is part of a large shooting facility run by Whitehorse Firearms Outdoor Education Center in cooperation with the West Virginia Division of Natural Resources. White Horse is located off of Route 20 near the small community of Peeltree, WV. The nearest town of any size, ten miles to the south, is Buckhannon, WV, which has about 5600 residents.
White Horse Geography and Climate
The White Horse range is set in wooded hill country, with lots of creeks and some smaller rivers all kept green and running by an annual rainfall of about 48 inches and about the same for snowfall. To my eyes it is beautiful county, pleasingly rural and lush, in marked contrast to where I live where every plant must be served by some sort of irrigation.
The Visalia Sportsman’s Association Dale Wimp Shooting Range — a great place to shoot.
Report by Boyd Allen | Photos and video by Pete Kitrinos
The IBS is in the West! The first International Benchrest Shooters (IBS) match at the Visalia, CA range was held over the recent Labor Day Weekend. Despite scorching 106° heat, many of the West’s top short-range benchrest shooters assembled for the first IBS-sanctioned match (after a 30-year history with the NBRSA) at the Visalia range. The mix of shooters included at least one Benchrest Hall of Fame member, as well as NBRSA record holders. Competitors were happy to return to Visalia, which had been closed for seven months while range improvements were made (some parts of the East berm were still under construction). With only two ranges in the entire state holding short range group matches, the temporary loss of Visalia had a significant impact. It was time to get back to business — the business of shooting tiny groups.
This video includes Aerial Drone footage of the range — worth watching!
Surrounded by fields, the Visalia Range is located in California’s Central Valley, a rich agricultural area.
For about thirty years the California 3-Gun Benchrest Championship match has been held at the Visalia Sportsman’s Association Dale Wimp Range over Labor Day weekend. For all those years, the matches have been put on by local shooter and current club president Dennis Thornbury. During a good part of that time, he has also managed to keep his name in the NBRSA record book, and pick up four Benchrest Hall of Fame points, as well as having recently done a tour as NBRSA president. This year’s match is sanctioned by the IBS, a first at Visalia.
Don “The Pumpkin” Nielson used an action he fabricated, a “fat bolt” aluminum 3-lug with steel insert.
Dennis Thornbury has been putting on registered matches at the Visalia range for 30 years. He holds an NBRSA record, and has 4 Hall of Fame points.
The format: On Saturday competitors shot 100 yards all day, Sporter in the morning, Light Varmint in the afternoon. The following day the morning competition was Heavy Varmint at 100 and at lunch the targets were moved to 200 yards with Heavy Varmint being shot that afternoon. On Monday, Labor Day, at 200 yards, Light Varmint was shot in the morning and Sporter in the afternoon. All three days consisted of five, 5-shot matches in the morning and five more in the afternoon.
Morning, Day 1 — Very few “daisy wheels”. This has been the trend for many years at this range.
Getting down to business. Shown, from right to left: Henry Pinkney, Joe Stanovich, Steve Epstein, Keith Cottrell (face obscured), Jim Nicolas (standing).
Sunday Top Shots: Jack Childers, Keith Cottrell, John Pierce, Lester Bruno, Dennis Thornbury, and Don Nielson. (Yes that’s a corn field in the background):
With the big temp changes between morning and afternoon, competitors were chasing powder loads all weekend. Small groups were hard to find, so only three “screamers” were recorded all weekend, and no teen Aggs. With the oppressive heat, attrition was also a factor: “We started with 30 shooters, and ended with just 21 competitors”.
Temperatures were in the triple digits for Saturday and Sunday, backing off to the high 90s on Monday. High humidity made it feel even hotter — heat stress was a definite issue. Even the rifles seemed to be at less than their best, causing very light wind conditions to produce Aggregates that were larger than the observed wind conditions would lead one to expect. Wind was generally light and switchy. Lighter mornings with wind increasing slightly through the days. Sunday saw more wind than the other two days after ten o’clock or so.
Loading benches with the usual clutter. Note the LabRadar chronograph on a bench at the firing line. Lawrence Weisdorn tracked his velocities during the match to know when a powder charge adjustment was needed.
Top Shooters: The Top Five in the 3-Gun (HV, LV, and Sporter) Championship were: Keith Cottrell (.2534), John Pierce (.2695), Dennis Thornbury (.2714), Art Kawai (.2885), and Rich Shaw (.3016). Winners of the Class Grand Aggs were Dennis Thornbury (HV .2424), Lester Bruno (LV .2400), and Keith Cottrell (Sporter .2395). CLICK HERE for full Match Results.
Equipment List for Top Five Shooters
You can use a LabRadar during competition. This was Lawrence Weisdorn’s set-up at Visalia.
Benchrest Technique — How to Shoot at Visalia
This range is built a bit like a large bathtub, dug into a flat field with the excavated earth thrown up in steep berms on three sides. This configuration and the usual lack of strong winds creates a lot of thermal-generated switchiness with flags changing direction often and very little agreement within any shooter’s set. This places a high premium on visual memory and the ability to judge equivalent conditions, because duplicates are almost never seen. Although the opportunity to run groups can happen, this is mostly a “pickers” range, which places a high premium on visual memory.
Facilities at Visalia Sportsman’s Association Range
There are 28 monolithic, steel-reinforced, concrete benches (poured in place, base and top all one pour). The reloading area is behind the benches with most of it on the same level as the benches. There are permanent (fixed position) tables that have laminate tops, except for where the range house sits, mid-range, with a “wailing wall” along its east and north sides. The direction of fire is north. The benches are under a slightly pitched metal roof that has recently been extended so that it has a good amount of overhang in front of the benches. Electricity is available in the reloading area and there are a few electrical outlets in the parking lot for RVs. There are both steps and a wheelchair ramp connecting parking lot to the reloading level and the shooting level.
Field of (Benchrest) Dreams — Precision Shooting Among the California Corn Fields.
There was an excellent article about Mirage created for the South Texas Marksmanship Training Center (STMTC) website a while back. This article explains what causes mirage and how mirage can move the perceived aiming point on your target. Most importantly, the article explains, in considerable detail, how you can “read” mirage to discern wind speeds and wind directions.
Mirage Is Your Friend
While hot days with lots of mirage can be frustrating, mirage can reveal how the wind is flowing (and changing). If you learn how to recognize and read mirage patterns, you can use that information to shoot higher scores. That’s why many leading long-range shooters tell us: “Mirage is your friend.” As the STMTC article explains: “A mirage condition is not a handicap, since it offers a very accurate method of perceiving small wind changes[.]”
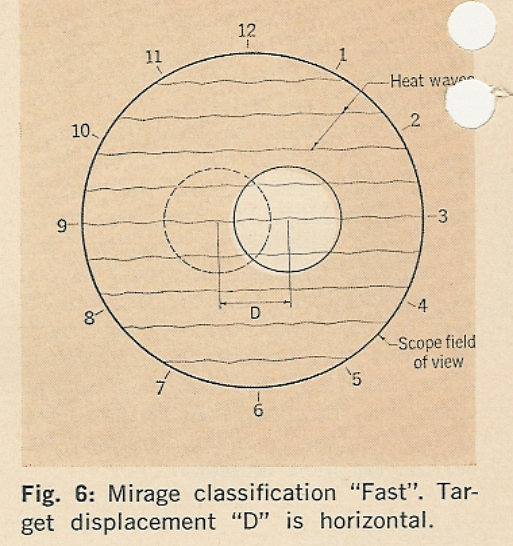
Mirage Illustrated with Diagrams
With simple but effective graphic illustrations, this is one of the best explanations of mirage (and mirage reading) we have found on the internet. This is a “must-read” for any serious competitive shooter. Here is a brief sample from the article, along with an illustration. NOTE: the full article is six times longer and has 8 diagrams.
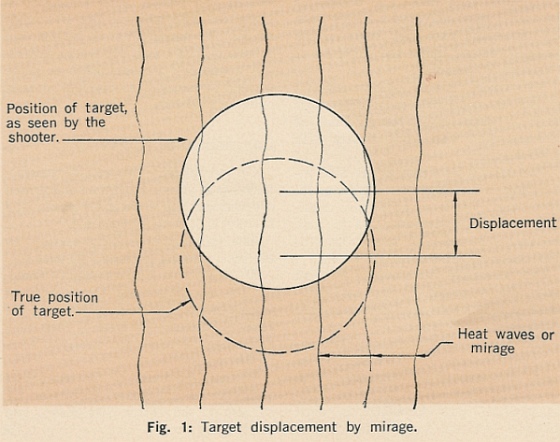
The term “mirage” as used by the shooter does not refer to a true mirage, but to heat waves and the refraction of light as it is bent passing through air layers of different density. Light which passes obliquely from one wind medium to another it undergoes an abrupt change in direction, whenever its velocity in the second medium is different from the velocity in the first wind medium; the shooter will see a “mirage”.
The density of air, and therefore its refraction, varies with its temperature. A condition of cool air overlaying warm air next to the ground is the cause of heat waves or “mirage”. The warm air, having a lower index of refraction, is mixed with the cooler air above by convection, irregularly bending the light transmitting the target image to the shooter’s eye. Figure 1 shows (greatly exaggerated) the vertical displacement of the target image by heat waves.
Heat waves are easily seen with the unaided eye on a hot, bright day and can be seen with spotting scope on all but the coldest days. To observe heat waves, the scope should be focused on a point about midway to the target. This will cause the target to appear slightly out of focus, but since the high power rifle shooter generally does not try to spot bullet holes, the lack in target clarity is more than compensated by clarity of the heat waves.
Story tip from Boyd Allen. We welcome reader submissions.
TEN Shots in 0.303″ (0.289 MOA) at 100 Yards
How does Dan’s XP-100 pistol shoot? Look at that target showing TEN shots at 100 yards, with eight (8) shots in the main cluster at the top. The ten-shot group measures .303″ (0.289 MOA), as calculated with OnTarget Software. Not bad for a handgun! What do you think, can your best-shooting rifle match the 10-shot accuracy of this XP-100 pistol?
Report by Boyd Allen
This pistol belongs to Dan Lutke, a Bay Area benchrest shooter who publishes the results for the Visalia matches to the competitors and the NBRSA. He has been an enthusiastic competitor for an number of years, at various ranges, notably Visalia and Sacramento. The action is a Remington XP-100, to which a Kelbly 2 oz. trigger has been fitted. On top is an old Japanese-made Tasco 36X scope (these were actually pretty darn good). The Hart barrel (a cast-off from Dan’s Unlimited rail gun) was shortened and re-chambered for the 6x45mm, a wildcat made by necking-up the .223 Remington parent case. The custom stock/chassis was CNC-machined by Joe Updike from 6061 Billet Aluminum to fit the XP-100 action and mount a target-style AR grip with bottom hand rest. The gun was bedded and assembled by Mel Iwatsubu. In his XP-100 pistol, Dan shoots 65gr custom boat-tails with Benchmark powder.
This diagram shows the most common 6x45mm wildcat, which is a necked-up version of the .223 Remington parent cartridge. NOTE: The dimensions for Dan Lutke’s benchrest version of this cartridge may be slightly different.
ACAD drawing by Peter Gnanapragasam CC by SA 3.0, via Wikimedia Commons. Title Added.
Story tip from Boyd Allen. We welcome reader submissions.
You are looking at one of the most impressive examples of precision shooting in history. On each of those five targets is a five-shot group made at 100 yards. This is the best set of five targets ever shot consecutively at 100 yards in the history of firearms competition on this planet. That’s right, nobody has ever drilled a better set of five, five-shot targets. The combined Aggregate for these five targets is a stunning 0.1014″, with the individual groups measuring: 0.102″, 0.168″, 0.123″, 0.053″, and 0.061″. So, two of the five groups were in the Zeros. And the 0.1014″ Agg handily beats existing world records.
This is an amazing accomplishment that beats both the existing NBRSA and IBS records. The NBRSA Record 100-yard Unlimited 5×5 Aggregate is 0.1242 set by Jerry Lahr in 2012. The IBS Record Heavy Benchrest 100-yard Aggregate (for five, 5-shot groups) is 0.134″, set by R. Howell in 2004.
But there’s more…
Lozano Grand Agg of 0.1226 also Breaks IBS and NBRSA World Records
George Lozano also shot a superb five-target Aggregate at 200 yards: 0.1439. This gave him a combined 100 + 200 Grand Aggregate of .1226 which is also a new world record. NOTE: for the 200-yard Agg, the actual group measurements (in inches) are summed, averaged and then divided by two to provide equivalency with the 100-yard results. Lozano’s actual group measurements at 200 yards were: 0.205″, 0.307″, 0.220″, 0.409″, and 0.298″. As averaged and divided by two, that is 0.1439. When combined with George’s 0.1014 100-yard Agg, Lozano’s 100+200 Grand Agg is a stunning 0.1226.
Lozano’s 0.1226 Grand Agg breaks both NBRSA and IBS World Records. The current NBRSA Unlimited Grand Agg Record for five, 5-shot groups at both 100 and 200 yards is a 0.133 by Dave Dowd in 2012. The equivalent 100 + 200 IBS Heavy Benchrest Grand Agg Record is a 0.1575 by Lester Bruno in 2004.
The talented shooter, George Lozano (shown above), was modest about his achievement: “Thanks, guys. I appreciate your very kind compliments. It was a good Father’s Day weekend and a fun match.”
NOTE: These records are pending verification by the NBRSA official records committee. But based on the numbers we’ve seen, it looks like Lozano will soon find his name in the record books.
Technical Details
We don’t know much about George Lozano’s load — either the powder or bullet. We’re told he was shooting a 6PPC cartridge in an Unlimited Benchrest rig, also known as a “railgun”. Here is a photo of a modern benchrest railgun. This is NOT Lozano’s record-breaking rig, but it shows the type of hardware used in the modern Unlimited Class.
One of our Forum members complained that he wasn’t able to set his primers flush to the rim. He tried a variety of primer tools, yet no matter what he used, the primers still didn’t seat deep enough. He measured his primers, and they were the right thickness, but it seemed like his primer pockets just weren’t deep enough. He was mystified as to the cause of the problem.
Well, our friend Boyd Allen diagnosed the problem. It was the decapping rod. If the rod is adjusted too low (screwed in too far), the base of the full-diameter rod shaft (just above the pin) will contact the inside of the case. That shaft is steel whereas your case is brass, a softer, weaker metal. So, when you run the case up into the die, the shaft can actually stretch the base of the primer pocket outward. Most presses have enough leverage to do this. If you bell the base of the primer pocket outwards, you’ve essentially ruined your case, and there is no way a primer can seat correctly.
The fix is simple. Just make sure to adjust the decapping rod so that the base of the rod shaft does NOT bottom out on the inside of the case. The pin only needs to extend through the flash hole far enough to knock the primer out. The photo shows a Lyman Universal decapping die. But the same thing can happen with any die that has a decapping rod, such as bushing neck-sizing dies, and full-length sizing dies.
Whenever you use a die with a decapping pin for the first time, OR when you move the die to a different press, make sure to check the decapping rod length. And it’s a good idea, with full-length sizing dies, to always re-check the height setting when changing presses.
Lee Universal Decapping Die on SALE for $9.89
Speaking of decapping tools, MidwayUSA has the Lee Universal Decapping Die on sale this month (June, 2010), for just $9.89 (item 136543). There are many situations when you may want to remove primers from fired brass as a separate operation (prior to case sizing). For example, if your rifle brass is dirty, you may want to de-cap before sizing. Or, if you load on a progressive press, things will run much more smoothly if you decap you brass first, in a separate operation. The Lee Universal Decapping Die will work with cartridges from 17 Fireball all the way up to 45-70. However, NOTE that the decapping pin supplied with this Lee die is TOO LARGE for LAPUA 6.5×47, 6BR, 220 Russian, and Norma 6 PPC flash holes. Because the pin diameter is too large for these brass types, you must either turn down the pin, or decap with a different tool for cases with .059″ flash-holes. Otherwise, the Lee Decapping Die works well and it’s a bargain.
Hail the Rail. If you are looking to put multiple shots through one hole, the Unlimited Class benchrest gun, aka “Rail Gun”, is the firearm of choice. These heavy Unlimited rigs are the most accurate benchtop shooting machines ever created. Campaigned by ace competitors in the 100/200-yard benchrest game, rail guns are capable of delivering the ultimate in rifle accuracy — multiple 5-shot groups in the ones and zeros.
Watch Video to Learn More about Rail Guns and See Them in Action:
In this video, YouTuber “Taofledermaus” takes a look at high-tech rail guns on display at the Visalia (CA) shooting range. He says: “The Unlimited Class rail guns are indeed the epitome of precision shooting. [These rifles] resemble something out of a ballistics test laboratory. Each [rail gun] weighs about fifty pounds…”
One-Hole Accuracy with Rail Gun
What kind of accuracy can a top-of-the-line rail gun deliver? Check out this target shot by our friend Lou Murdica in January 2015 in Phoenix. Sometimes superlatives really aren’t necessary. Just look at that target. Yes that is FIVE shots (although it truly appears like one hole). And it is centered! This remarkable group measured at 0.039″. Lou drilled this group with one of his 6 PPC railguns. Rounds were loaded with Accurate LT-32 powder and Berger 65gr BT bullets. The target was submitted to the NBRSA as a potential new 100-yard Benchrest record in the Unlimited (Railgun) Class.
This is a file photo with Lou Murdica with a different rail gun (not the one that shot above target).
Story/video tip by Boyd Allen. We welcome reader submissions.


 Reloading Equipment and Methods