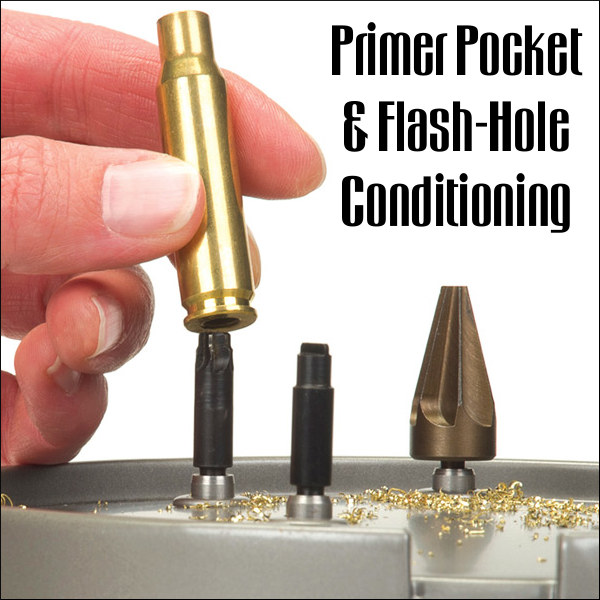
Each Wednesday, the U.S. Army Marksmanship Unit publishes a reloading “how-to” article on the USAMU Facebook page. This week’s “Handloading Hump Day” article covers two basic case prep chores — uniforming primer pockets and deburring flash-holes. Visit the USAMU Facebook page for other tips.
Primer Pocket & Flash-Hole Conditioning
This week, we’ll address a question that frequently arises: “Do you uniform primer pockets and deburr flash-holes?” As we tailor our handloading methods to the specific needs of each instance, the answer, not surprisingly, is “Sometimes!” However, don’t flip that dial just yet, as what determines our approach may be helpful in deciding how to address one’s own techniques. Moreover, we have a buried “Easter Egg” morsel that may bring a chuckle, as well as useful safety information!
Generally, the USAMU Handloading Shop does not uniform primer pockets (PP) or deburr flash holes (FH) of our rifle brass. We’re certainly not against it… Rather, this reflects the very high volume of ammunition we load, the fact that very few cases are ever re-loaded for a second firing, and the types of brass we use. However, as a need is perceived, we DO deburr flash holes. Of interest, we have fired many very small, 1000-yard test groups and aggregates using weight-selected, domestic brass that had not had PPs uniformed or FHs deburred.
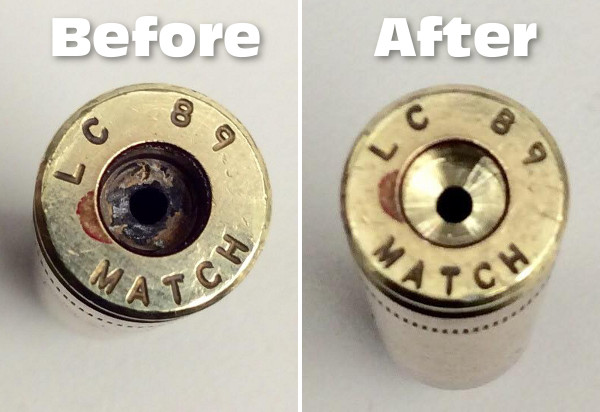
Before and After — On the left is a fired, deprimed 7.62×51 case with primer residue intact. On the right the primer pocket has been uniformed to SAAMI specs. Note the shiny finish at the bottom of the pocket — evidence of the the removal of metal when uniforming the primer pocket.
As to the type cases we use, many thousands of our long-range 5.56mm cases come to us from the arsenal with the primer of our choice pre-installed and staked-in, per usual practice. Obviously, we cannot uniform either FHs or PPs on this live, primed brass. However, after careful sorting, inspection and preparation, we do obtain match-winning results with it.
Shooters who reload their brass several times may decide to uniform PPs and deburr FHs, especially on their “300-yard and beyond” brass. Here, they will use the cases many times, while the uniforming is performed only once. Also, most handloaders only process moderate amounts of brass, compared to our multi-thousand round lots.
Having high quality Long Range (LR) brass helps. Many of the better brass manufacturers install their flash holes so that no burrs are created. Still, it does pay to inspect even THESE manufacturer’s products, as occasional slips are inevitable. Very rarely, some of the best makers will have a significant burr in, say, 1 per 1000 or 2000 cases, and it’s worth catching those.
Exceptions can always be found. Recently, we began processing a large lot of match brass from a premier manufacturer. We were startled to find that every case had a significant burr in the FH — something we’d never before seen from this maker. We then broke out the FH deburring tools and went to work.
Some observers have noted that it can be difficult to truly verify the contribution to accuracy of these procedures — particularly when firing from the shoulder, in conditions. Members of this staff, as individual rifle competitors, do often perform these operations on their privately-owned LR rifle brass. One could ascribe this to the old Highpower Rifle maxim that “if you think it helps, then it helps.”
However, a World Champion and Olympic Gold/Silver medalist here commented on his own handloading (for International competition, which demands VERY fine accuracy). He noted that he did seem to see a decline in accuracy whenever he did not uniform FHs, deburr FHs and clean primer pockets before each reloading. (One might be tempted to counter that only a truly World Class shooter could reliably detect the difference.) However, with the wisdom of decades experience, our Champion also remarked that “It could have been that I just wasn’t shooting as well that day.”
For those who do opt for these procedures, note that various tool models may have adjustable depth-stops; pay attention to the instructions. Some FH-deburring tools (which enter the case mouth, not the primer pocket) are dependent upon uniform case length for best results.
Above is a flash-hole deburring tool on an RCBS powered case-prep unit. These case prep machines can save a lot of pain and misery, helping one perform various functions quickly and efficiently.
Can you form a wildcat cartridge such as the 6 Dasher without expending primer, powders, and bullets? Absolutely. Using the hydro-forming method you can form improved cases in your workshop with no firing whatsoever, so there is no wear on your precious barrel. Watch this video to see how it’s done:
6 Dasher Case Hydro-Forming Demonstration:
Forum member Wes J. (aka P1ZombieKiller) has produced a helpful video showing how to form Dasher cases use the Hornady Hydraulic forming die kit. This includes a two-part die (body and piston), and a special shell holder. To form the case, you insert a primer in your virgin brass, top the case off with with a fluid (water or alcohol), then run the case up into the Hydro-forming die. A few stout whacks with a hammer and your case is 95% formed.
Hydro-Forming Procedure Step-by-Step:
1. Insert spent primer in new 6mmBR brass case.
2. Fill with water or alcohol (Wes prefers alcohol).
3. Wipe excess fluid off case.
4. Place case in special Hornady shell-holder (no primer hole).
5. Run case up into Hydraulic forming die.
6. Smack top piston of forming die 3-4 times with rubber mallet or dead-blow hammer.
7. Inspect case, re-fill and repeat if necessary.
8. Drain alcohol (or water) into container.
9. Remove primer (and save for re-use).
10. Blow-dry formed case. Inspect and measure formed case.
Wes achieves very uniform cartridge OALs with this method. He measured ten (10) hydro-formed 6 Dasher cases and got these results: two @ 1.536″; 2 @ 1.537″; and 6 @ 1.538″.
Three or Four Whacks Produces a 95%-Formed Case
With a Hornady hydro-forming die, hydraulic pressure does the job of blowing out the shoulders of your improved case. The process is relatively simple. Place a spent primer in the bottom of a new piece of brass. Fill the case with water, and then slip it into a special Hornady shell-holder with no hole in the middle. Then you run the case up into the forming die. Now comes the fun part. You gently insert a plunger (hydraulic ram) from the top, and give it three or four stiff whacks with a mallet (or better yet, a dead-blow hammer). Remove the plunger and you have a 95% formed case, ready to load.
Hornady supplies a shell holder made specifically for the hydro die; there’s no hole in the bottom of it. Just insert a spent primer into the primer pocket and you’re ready to go. The spent primer combined with the solid shell holder, keeps the water from seeping out of the primer pocket. The primer pushes out a little bit during this process, but it’s impossible for it to come out because of the way the shell holder is designed. The shell holder has a grove which allows the case to slide out of the shell holder even when the primer protrudes a bit.
Story tip from Boyd Allen. We welcome reader submissions.
Here’s a very handy cartridge information sheet you will definitely want to save for future reference. Shown below is Page One of the Primer Size and Bullet Diameter Chart created by Graf & Sons. This chart shows the bullet diameter and primer size for more than 320 popular cartridges. The full three-page chart is available in PDF format for easy printing.
NOTE: If you have the PDF reader installed in your browser, the Graf’s Chart may open in a new tab when you click on the image above. To save the three-page PDF file to your computer or device, click the Floppy Disc icon that appears in the lower right (after the PDF file opens). Here is the direct link:http://www.grafs.com/uploads/technical-resource-pdf-file/12.pdf.
Note: There are a few issues which arise from brass sources. For example, if you are making 22 BR from Lapua brass, you’ll want a small rifle primer. And the 6.5 Creedmoor is not listed (it uses Large Rifle primers for most brass, but Small Rifle primers for Lapua brass). There are a couple other oversights, so we recommend that you double-check your brass before you buy a truckload of primers.
Resource Tip from EdLongrange. We welcome reader submissions.
The most hotly-anticipated cartridge brass, the new-for-2017 6.5 Creedmoor cases from Lapua, arrived late last week at Graf & Sons. With the strength and uniformity for which Lapua brass is famous, this new brass should definitely “raise the bar” for 6.5 Creedmoor and 6mm Creedmoor shooters. Note — the new Lapua 6.5 Creedmoor brass features a small flash hole and small primer pocket. As of 9:00 am Monday morning this brass is in stock at Grafs.com priced at $119.99 per 100-ct box, with a max order of five (5) boxes.
UPDATE: The 6.5 Creedmoor brass sold out after we posted this story. But there will be more coming. You can ask Graf’s to be notified as soon as the next shipment arrives.
TECH TIP: For those who have been loading Hornady or other-brand 6.5 Creedmoor brass with large primer pockets and large flash holes, you may need to reconfigure your reloading tools. Check your sizing die — you may need to change to a smaller-diameter decapping rod. In addition you’ll need to use a small primer size “pusher” on your priming tool.
When we first ran this story a while back, it generated great interest among readers. By popular request, we’re reprinting this story, in case you missed it the first time around. — Editor
Precision shooters favor premium brass from Lapua, Norma, or RWS. (Lake City also makes quality brass in military calibers.) Premium brass delivers better accuracy, more consistent velocities, and longer life. Shooters understand the importance of good brass, but many of us have no idea how cartridge cases are actually made. Here’s how it’s done.
The process starts with a brass disk stamped from strips of metal. Then, through a series of stages, the brass is extruded or drawn into a cylindrical shape. In the extrusion process the brass is squeezed through a die under tremendous pressure. This is repeated two or three times typically. In the more traditional “draw” process, the case is progressively stretched longer, in 3 to 5 stages, using a series of high-pressure rams forcing the brass into a form die. While extrusion may be more common today, RWS, which makes some of the most uniform brass in the world, still uses the draw process: “It starts with cup drawing after the bands have been punched out. RWS cases are drawn in three ‘stages’ and after each draw they are annealed, pickled, rinsed and subjected to further quality improvement measures. This achieves specific hardening of the brass cases and increases their resistance to extraordinary stresses.” FYI, Lapua also uses a traditional draw process to manufacture most of its cartridge brass (although Lapua employs some proprietary steps that are different from RWS’s methods).
After the cases are extruded or drawn to max length, the cases are trimmed and the neck/shoulder are formed. Then the extractor groove (on rimless cases) is formed or machined, and the primer pocket is created in the base. One way to form the primer pocket is to use a hardened steel plug called a “bunter”. In the photos below you see the stages for forming a 20mm cannon case (courtesy OldAmmo.com), along with bunters used for Lake City rifle brass. This illustrates the draw process (as opposed to extrusion). The process of draw-forming rifle brass is that same as for this 20mm shell, just on a smaller scale.
River Valley Ordnance explains: “When a case is being made, it is drawn to its final draw length, with the diameter being slightly smaller than needed. At this point in its life, the head of the draw is slightly rounded, and there are no provisions for a primer. So the final drawn cases are trimmed to length, then run into the head bunter. A punch, ground to the intended contours for the inside of the case, pushes the draw into a cylindrical die and holds it in place while another punch rams into the case from the other end, mashing the bottom flat. That secondary ram holds the headstamp bunter punch.
The headstamp bunter punch has a protrusion on the end to make the primer pocket, and has raised lettering around the face to form the headstamp writing. This is, of course, all a mirror image of the finished case head. Small cases, such as 5.56×45, can be headed with a single strike. Larger cases, like 7.62×51 and 50 BMG, need to be struck once to form a dent for the primer pocket, then a second strike to finish the pocket, flatten the head, and imprint the writing. This second strike works the brass to harden it so it will support the pressure of firing.”
Thanks to Guy Hildebrand, of the Cartridge Collectors’ Exchange, OldAmmo.com, for providing this 20mm Draw Set photo. Bunter photo from River Valley Ordnance.
Ever wondered what caused a particular bulge or marking on a case? And more importantly, does the issue make the case unsafe for further use? Sierra Bullets Ballistic Technician Duane Siercks offers some insight into various issues and their causes in this article from the Sierra Blog.
Diagnosing Problems with Cartridge Brass
by Duane Siercks, Sierra Bullets
I was handed a small sample of .223 Rem cases the other day and was asked if I could comment on some marks and appearances that had been noticed as they were sorting through the cases. I will share what was observed and give you what would seem to be a cause for them. These were from an unknown source, so I have no way of knowing what type of firearm they were fired in or if they were factory loaded or reloaded ammunition.
Example ONE: Lake City 5.56, Unknown Year
Case #1 was seen to have a very rounded shoulder and split. Upon first look it was obvious that this round had been a victim of excess pressure. The firearm (perhaps an AR?) was apparently not in full battery, or there was possibly a headspace issue also. While taking a closer look, the primer was very flat and the outside radius of the primer cup had been lost. High pressure! Then I also noticed that there was an ejector mark on the case rim. This is most certainly an incident of excessive pressure. This case is ruined and should be discarded. See photo below.
Example TWO: Lake City Match 1993
Case #2 appears very normal. There was some question about marks seen on the primer. The primer is not overly flattened and is typical for a safe maximum load. There is a small amount of cratering seen here. This can be caused by a couple of situations.
Cratering is often referred to as a sign of excess pressure. With safety in mind, this is probably something that should make one stop and really assess the situation. Being as there are no other signs of pressure seen with this case, I doubt that pressure was unsafe. That leads us to the next possibility. This can also be caused by the firing-pin hole in the bolt-face being a bit larger than the firing-pin, and allowing the primer to flow back into the firing-pin hole causing the crater seen here. This can happen even with less-than-max pressures, in fact it has been noted even at starting loads. Always question whether pressure is involved when you see a crater. In this situation, I lean toward a large firing-pin hole. This case should be safe to reload.
Example THREE: R-P .223 Remington
Case #3 appears normal with one exception. There are two rings seen about one half inch below the base of the shoulder. These rings are around the circumference of the case, one being quite pronounced, and the other being noticeably less.
As we do not know the origin of the firearm in which this case was fired, it does seem apparent that the chamber of the firearm possibly had a slight defect. It could have been that the reamer was damaged during the cutting of this chamber. I would suggest that the chamber did have a couple of grooves that imprinted onto the case upon firing. This firearm, while maybe not dangerous should be looked at by a competent gunsmith. In all likelihood, this case is still safe to use.
Example FOUR: R-P .223 Remington
Case #4 has no signs of excess pressure. There is a bulge in the case just ahead of the case head that some might be alarmed by. This bulge is more than likely caused by this case being fired in a firearm that had a chamber on the maximum side of S.A.A.M.I. specifications. There is actually no real issue with the case. Note that the primer would indicate this load was relatively mild on pressure.
If this case was reloaded and used in the same firearm numerous times there might be a concern about case head separation. If you were going to use this case to load in an AR, be sure to completely full-length re-size to avoid chambering difficulties. This case would be safe to reload.
It is very important to observe and inspect your cases before each reloading. After awhile it becomes second nature to notice the little things. Never get complacent as you become more familiar with the reloading process. If ever in doubt, call Sierra’s Techs at 1-800-223-8799.
Guys — honestly, if you do anything today on this site, watch this video. You won’t be disappointed. Guaranteed. This is a very informative (and surprisingly entertaining) video. Every serious hand-loader should watch this video to see how cartridge cases are made. Your Editor has watched the video 5 times now and I still find it fascinating. The camera work and editing are excellent — there are many close-ups revealing key processes such as annealing and head-stamping.
VERY Informative Video Show Cartridge Brass and Ammunition Production:
Norma has released a fascinating video showing how bullet, brass, and ammunition are produced at the Norma Precision AB factory which first opened in 1902. You can see how cartridges are made starting with brass disks, then formed into shape through a series of processes, including “hitting [the cup] with a 30-ton hammer”. After annealing (shown at 0:08″), samples from every batch of brass are analyzed (at multiple points along the case length) to check metal grain structure and hardness. Before packing, each case is visually inspected by a human being (3:27″ time-mark).
The video also shows how bullets are made from jackets and lead cores. Finally, you can watch the loading machines that fill cases with powder, seat the bullets, and then transport the loaded rounds to the packing system. In his enthusiasm, the reporter/narrator does sometimes confuse the term “bullets” and “rounds” (5:00″), but you can figure out what he means. We definitely recommend watching this video. It’s fascinating to see 110-year-old sorting devices on the assembly line right next to state-of-the art, digitally-controlled production machinery.
Video suggestions by Boyd Allen and EdLongrange. We welcome reader submissions.
On our main Accurateshooter.com website, you’ll find a comprehensive review of the STM system for cleaning cartridge brass with stainless media. To clean brass with stainless media, start with five pounds of small stainless pins sold by StainlessTumblingMedia.com. Place these along with a gallon of water, a little liquid cleaner, and two pounds of cartridge brass in a rotary tumbler, and run the machine for one to four hours.
Forum Member Tests STM System
Our reviewer, Forum member Jason Koplin, purchased the STM media and a new Thumler’s Tumbler. He then tested the STM cleaning procedure on his own brass, including some extremely dirty and tarnished “range pick-up” brass. Jason was thoroughly impressed with how well the STM process worked — as you can see from the “before and after” photos below. Brass which looked like it was ready for the scrap heap was restored to “like-new” appearance. The process works equally well on both rifle brass and pistol brass. Jason observed that one surprise benefit of the STM cleaning procedure is a big reduction in noise. Jason said the water-filled rotary tumbler was much quieter than his vibratory tumblers.
You’ll want to read Jason’s full review which shows more before and after images. The full article features a “how-to” video created by Forum member Cory Dickerson, the young man who pioneered the stainless tumbling process and founded STM. The video shows how to load brass, media, and cleaner solutions into the tumbler, and how to separate media from brass once the tumbling is done.
If you’re the kind of guy who likes to get his brass shiny inside and out, then wet-tumbling with stainless media gets the job done. For heavy-duty wet-tumbling jobs, it used to be that you had to buy a Thumler’s Tumbler and then figure out your own solution for media separation. Now there are other options on the market which may be more convenient for many users.
Lyman has just introduced its Cyclone Rotary Tumbler. For under $190.00 on Amazon.com, this ships as a complete system with everything you need — even the stainless media and media separators. The Tumbler unit itself holds up to 1000 pieces of .223 Rem brass and features a rubber lining to protect your cases and reduce noise during operation.
Conveniently, a built-in timer can be set from 0 to 3 hours, shutting off automatically. The drum features a large, screw-on end-cap to allow easy loading and unloading. In addition, the tumbler comes with two special sifter pans that make it easy to separate pins from brass. Simply empty the tumbler into the stacked pans. The first pan catches the brass, while the second, finer screen pan catches the pins. Very clever. The Cyclone Tumbler system ships with five pounds of stainless media pins and a sample packet of Brass Cleaning Solution.
Video shows Lyman Cyclone wet tumbling system in action:
TECH TIP: Wet-tumbling brass with stainless media really works. With enough “run-time” the process will definitely remove stubborn carbon on the inside of cases. However, some folks observe that case-mouths can occasionally get peened during the process. This is not a big deal but it is worth noting. In addition, with large flash-hole cases, it is possible (though rare) for a pin to stick in a flash hole. Therefore you should inspect every case before loading in a progressive press or bulk-priming cases with a bench tool.
Bryce Towsley has authored an informative article on Reclaiming .223 Rem Brass. Writing for Shooting Illustrated Online, Towsley confesses: “I’m a brass horder…. I end every shooting match on my hands and knees. If the rest of the competitors want to litter the range with their discarded cases, I see it as my civic duty to clean up the mess.” If you burn through a lot of .223 Rem ammo on the varmint fields or in multi-gun matches, we suggest you read Towsley’s article.
Towsley advises that you need to be cautious with range pick-up brass: “Range brass is full of dirt, dust, sand and debris that can be damaging to loading dies, as well as causing other problems.” So, range pick-up brass must be cleaned and then sorted carefully. Towsley explains that you should toss brass that is badly dented, and you have to make sure to remove the primer pocket crimp in military brass. This can be done with a crimp reamer or a swaging tool such as the Dillon Super Swage 600. The latter works well, but Towsley cautions: “For the swager to work properly, you must sort the cases by brand and lot, and then readjust the swager for each new lot.”
Trimming Quantities of Brass
Before loading, “reclaimed” range brass should, of course, be full-length sized and you should trim all the brass to the same length. “Cases that are too long can cause all kinds of problems”, explains Towsley.
We envy the system Towsley uses to trim brass. He has a Dillon Rapid Trim 1200B set up on the top of a single-stage press: “You simply insert a case into the shell holder and raise the ram to trim it instantly. The process is so fast, it almost feels like cheating.” The Rapid Trim is a very neat gadget — it even has an attachment for a vacuum hose to remove the cuttings. The photo at right shows a 1200B installed on a Dillon progressive press.
We definitely recommend you read Bryce Towsley’s Reclaiming Range Brass Article from start to finish. The article offers useful advice that will help you reload any rifle cartridge — not just .223 Rem range brass. Towsley also showcases many good labor-saving devices that can speed up and simplify the process of bulk rifle cartridge reloading.


 Hydro-Forming Procedure Step-by-Step:
 Hornady supplies a shell holder made specifically for the hydro die; there’s no hole in the bottom of it. Just insert a spent primer into the primer pocket and you’re ready to go. The spent primer combined with the solid shell holder, keeps the water from seeping out of the primer pocket. The primer pushes out a little bit during this process, but it’s impossible for it to come out because of the way the shell holder is designed. The shell holder has a grove which allows the case to slide out of the shell holder even when the primer protrudes a bit.


 Precision shooters favor premium brass from


 Norma has released a fascinating video showing how bullet, brass, and ammunition are produced at the
 On our main


 Bryce Towsley has authored an informative article on
  Trimming Quantities of Brass


