|
|
June 1st, 2014
When we first ran this story a while back, it generated great interest among readers. By popular request, we’re reprinting this story, in case you missed it the first time around. — Editor
 Precision shooters favor premium brass from Lapua, Norma, or RWS. (Lake City also makes quality brass in military calibers.) Premium brass delivers better accuracy, more consistent velocities, and longer life. Shooters understand the importance of good brass, but many of us have no idea how cartridge cases are actually made. Here’s how it’s done. Precision shooters favor premium brass from Lapua, Norma, or RWS. (Lake City also makes quality brass in military calibers.) Premium brass delivers better accuracy, more consistent velocities, and longer life. Shooters understand the importance of good brass, but many of us have no idea how cartridge cases are actually made. Here’s how it’s done.
The process starts with a brass disk stamped from strips of metal. Then, through a series of stages, the brass is extruded or drawn into a cylindrical shape. In the extrusion process the brass is squeezed through a die under tremendous pressure. This is repeated two or three times typically. In the more traditional “draw” process, the case is progressively stretched longer, in 3 to 5 stages, using a series of high-pressure rams forcing the brass into a form die. While extrusion may be more common today, RWS, which makes some of the most uniform brass in the world, still uses the draw process: “It starts with cup drawing after the bands have been punched out. RWS cases are drawn in three ‘stages’ and after each draw they are annealed, pickled, rinsed and subjected to further quality improvement measures. This achieves specific hardening of the brass cases and increases their resistance to extraordinary stresses.” FYI, Lapua also uses a traditional draw process to manufacture most of its cartridge brass (although Lapua employs some proprietary steps that are different from RWS’s methods).

Deep-Draw Ram Illustration from Demsey Mfg.

After the cases are extruded or drawn to max length, the cases are trimmed and the neck/shoulder are formed. Then the extractor groove (on rimless cases) is formed or machined, and the primer pocket is created in the base. One way to form the primer pocket is to use a hardened steel plug called a “bunter”. In the photos below you see the stages for forming a 20mm cannon case (courtesy OldAmmo.com), along with bunters used for Lake City rifle brass. This illustrates the draw process (as opposed to extrusion). The process of draw-forming rifle brass is that same as for this 20mm shell, just on a smaller scale.


River Valley Ordnance explains: “When a case is being made, it is drawn to its final draw length, with the diameter being slightly smaller than needed. At this point in its life, the head of the draw is slightly rounded, and there are no provisions for a primer. So the final drawn cases are trimmed to length, then run into the head bunter. A punch, ground to the intended contours for the inside of the case, pushes the draw into a cylindrical die and holds it in place while another punch rams into the case from the other end, mashing the bottom flat. That secondary ram holds the headstamp bunter punch.

The headstamp bunter punch has a protrusion on the end to make the primer pocket, and has raised lettering around the face to form the headstamp writing. This is, of course, all a mirror image of the finished case head. Small cases, such as 5.56×45, can be headed with a single strike. Larger cases, like 7.62×51 and 50 BMG, need to be struck once to form a dent for the primer pocket, then a second strike to finish the pocket, flatten the head, and imprint the writing. This second strike works the brass to harden it so it will support the pressure of firing.”
Thanks to Guy Hildebrand, of the Cartridge Collectors’ Exchange, OldAmmo.com, for providing this 20mm Draw Set photo. Bunter photo from River Valley Ordnance.
March 20th, 2014
This new tool trims cases quickly, with precision control over case length via a micrometer-type dial. The folks at ACT Tactical have developed an easy-to-use compact case trimmer called the TRIM-IT. Crafted from 6061-T6 aluminum, this sturdy case trimmer comes with a 100% lifetime guarantee. The $97.50 TRIM-IT features a micrometer that’s built into the unit itself. Caliber-specific inserts (called “Caliber Dies”) index off the case shoulder.

The TRIM-IT can work with any hand-drill or drill press. Once you get the hang of it, you can trim a case in 7-8 seconds — that gives you a production rate of 400+ cases per hour. The TRIM-IT delivers repeatable precision to plus/minus one-thousandth. This unit also holds its cut-length setting, unlike some other trimmers which require frequent adjustment.

The basic unit ships with two caliber dies, for .223 and .308. Other listed caliber dies include 6.8 SPC, .300 BLK, .30-06, 30-30 Win, 300 Win Mag, 7MM REM, 7.62x54R, and 8MM Mauser. Other cartridge types can be custom-ordered from EZTrimit.com. To change dies, simply loosen the set screw on the TRIM-IT, take the caliber die out, add another one, and tighten the screw — quick and easy.
The built-in micrometer is great. The handy dial gives you a positive, repeatable length setting quickly — no fiddling with locking rings or spacers. Once you get the ring set properly, the cut lengths are consistent from the first case to the last. Expect your case OAL spread to be about +/- .001″ (starting with full-length-sized cases with uniform rim to shoulder lengths). For more information, email sales [at] eztrimit.com or call (562) 602-0080. You can see how the Trim-It device works in the video below.
Video Shows Trim-it Set-Up and Operation
March 2nd, 2014
What is “Overbore”? That’s a question rifle shooters can debate to no end. This article from our archives proposes one way to identify “overbore cartridges”. We think the approach outlined here is quite useful, but we know that there are other ways to define cartridges with “overbore” properties. Whenever we run this article, it stimulates a healthy debate among our readers — and that is probably a good thing.
Forum Member John L. has been intrigued by the question of “overbore” cartridges. People generally agree that overbore designs can be “barrel burners”, but is there a way to predict barrel life based on how radically a case is “overbore”? John notes that there is no generally accepted definition of “overbore”. Based on analyses of a wide variety of cartridges, John hoped to create a comparative index to determine whether a cartridge is more or less “overbore”. This, in turn, might help us predict barrel life and maybe even predict the cartridge’s accuracy potential.
John tells us: “I have read countless discussions about overbore cartridges for years. There seemed to be some widely accepted, general rules of thumb as to what makes a case ‘overbore’. In the simplest terms, a very big case pushing a relatively small diameter bullet is acknowledged as the classic overbore design. But it’s not just large powder capacity that creates an overbore situation — it is the relationship between powder capacity and barrel bore diameter. Looking at those two factors, we can express the ‘Overbore Index’ as a mathematical formula — the case capacity in grains of water divided by the area (in square inches) of the bore cross-section. This gives us an Index which lets us compare various cartridge designs.”


OVERBORE INDEX Chart
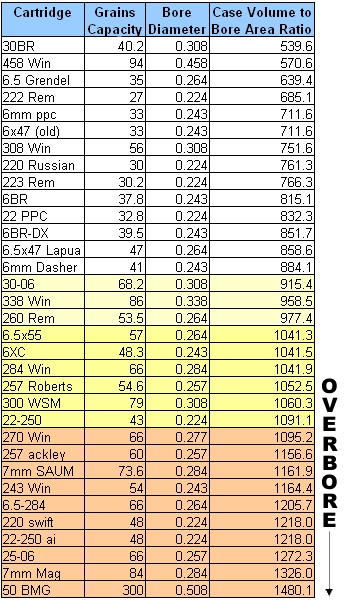
So what do these numbers mean? John says: “My own conclusion from much reading and analysis is that cartridges with case volume to bore area ratio less than 900 are most likely easy on barrels and those greater than 1000 are hard on barrels.” John acknowledges, however, that these numbers are just for comparison purposes. One can’t simply use the Index number, by itself, to predict barrel life. For example, one cannot conclude that a 600 Index number cartridge will necessarily give twice the barrel life of a 1200 Index cartridge. However, John says, a lower index number “seems to be a good predictor of barrel life”.
John’s system, while not perfect, does give us a benchmark to compare various cartridge designs. If, for example, you’re trying to decide between a 6.5-284 and a 260 Remington, it makes sense to compare the “Overbore Index” number for both cartridges. Then, of course, you have to consider other factors such as powder type, pressure, velocity, bullet weight, and barrel hardness.
Overbore Cases and Accuracy
Barrel life may not be the only thing predicted by the ratio of powder capacity to bore cross-section area. John thinks that if we look at our most accurate cartridges, such as the 6 PPC, and 30 BR, there’s some indication that lower Index numbers are associated with greater inherent accuracy. This is only a theory. John notes: “While I do not have the facilities to validate the hypothesis that the case capacity to bore area ratio is a good predictor of accuracy — along with other well-known factors — it seems to be one important factor.”
February 15th, 2014
 Nosler has introduced a new 6.5mm (.264 caliber) hunting cartridge, the 26 Nosler. Nosler will initially offer 26 Nosler cartridge brass, and then, eventually, 26 Nosler loaded ammunition. Nosler has introduced a new 6.5mm (.264 caliber) hunting cartridge, the 26 Nosler. Nosler will initially offer 26 Nosler cartridge brass, and then, eventually, 26 Nosler loaded ammunition.
This new cartridge is designed to be a speedy, flat-shooting hunting cartridge, with performance exceeding a 6.5-284. This is possible because the 26 Nosler is a big, long cartridge with plenty of “boiler room”. Length from base to neck/shoulder junction is 2.33″ for the 26 Nosler, compared to 1.91″ for the 6.5-284 (and 2.04″ for a 7mm Rem Magnum). The 26 Nosler has a 35° shoulder angle and a magnum-size 0.534″ outside rim diameter.
The 26 Nosler cartridge can drive the Nosler 129 grain, AccuBond® LR bullet at 3400 fps. Zeroed at 350 yards, the 26 Nosler has a Point Blank Range of 0-415 yards. Loaded with the 129gr Accubond, the 26 Nosler retains as much velocity at 400 yards as a .260 Rem produces at the muzzle. This makes the 26 Nosler a “quintessential deer, antelope and long-range” cartridge according to company CEO/President Bob Nosler.
Nosler has just released the SAMMI print for this cartridge. CLICK HERE for SAMMI Print PDF.
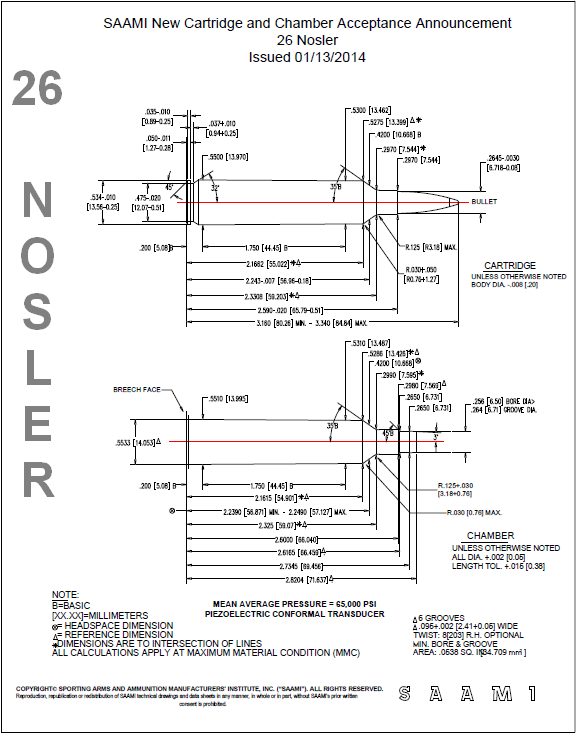 Credit Grant G. for story tip. We welcome reader submissions.
December 21st, 2013
 Norma is making a big push to expand its presence in the North American market. As part of this effort, Norma is introducing seven (7) new types of cartridge brass for 2014. We’re pleased to report that Norma-USA will be importing top-quality brass for the 6.5 Grendel, and 6.5 Creedmoor, two popular target cartridges. In addition, for 2014, Norma will offer 7mm RUM, 7mm Blaser Magnum, 300 AAC Blackout (300 BLK), .300 RUM, and the .338 Blaser Mag. The Norma brass we have shot in other chamberings (6 PPC, 6mmBR Norma, 6XC, .243, 7mm RSAUM) has all been excellent, giving good accuracy. Case weights were very consistent and the neck-wall thickness was very uniform, particularly with the PPC and BR brass. The new 300 BLK brass is an important offering for AR shooters. (NOTE: You can also make 300 BLK cases from Norma or Lapua .221 Fireball brass). Norma is making a big push to expand its presence in the North American market. As part of this effort, Norma is introducing seven (7) new types of cartridge brass for 2014. We’re pleased to report that Norma-USA will be importing top-quality brass for the 6.5 Grendel, and 6.5 Creedmoor, two popular target cartridges. In addition, for 2014, Norma will offer 7mm RUM, 7mm Blaser Magnum, 300 AAC Blackout (300 BLK), .300 RUM, and the .338 Blaser Mag. The Norma brass we have shot in other chamberings (6 PPC, 6mmBR Norma, 6XC, .243, 7mm RSAUM) has all been excellent, giving good accuracy. Case weights were very consistent and the neck-wall thickness was very uniform, particularly with the PPC and BR brass. The new 300 BLK brass is an important offering for AR shooters. (NOTE: You can also make 300 BLK cases from Norma or Lapua .221 Fireball brass).
Though the annealing “shadow” may not be as visible as with Lapua brass, the case necks of Norma brass cartridges are indeed annealed near the end of the manufacturing process. This assures more consistent neck tension — something critical to accuracy. Most of the new cartridge brass offerings should be be available at vendors by early April, 2014. You can get Norma brass from Bullets.com, Grafs.com and Midsouth Shooters Supply, as well as many other online vendors.
New Norma-USA Brass Offerings for 2014:
- 6.5 Grendel
- 6.5 Creedmoor
- 7mm RUM
- 7mm Blaser Magnum
|
- 300 AAC Blackout (300 BLK)
- .300 RUM
- .338 Blaser Magnum
|
Product Tip from EdLongrange. We welcome reader submissions.
December 19th, 2013
 On his Riflemans’ Journal blog, German Salazar wrote an excellent article about cartridge Case-Head Separation. We strongly recommend that you read this article. German examines the causes of this serious problem and he explains the ways you can inspect your brass to minimize the risk of a case-head separation. As cases get fired multiple times and then resized during reloading, the cases can stretch. Typically, there is a point in the lower section of the case where the case-walls thin out. This is your “danger zone” and you need to watch for tell-tale signs of weakening. On his Riflemans’ Journal blog, German Salazar wrote an excellent article about cartridge Case-Head Separation. We strongly recommend that you read this article. German examines the causes of this serious problem and he explains the ways you can inspect your brass to minimize the risk of a case-head separation. As cases get fired multiple times and then resized during reloading, the cases can stretch. Typically, there is a point in the lower section of the case where the case-walls thin out. This is your “danger zone” and you need to watch for tell-tale signs of weakening.
The photo below shows a case sectioned so that you can see where the case wall becomes thinner near the web. German scribed a little arrow into the soot inside the case pointing to the thinned area. This case hadn’t split yet, but it most likely would do so after one or two more firings.

One great tip offered by German Salazar involves using a bent paper clip to detect potential case wall problems. Slide the paper clip inside your case to check for thin spots. German explains: “This simple little tool (bent paper clip) will let you check the inside of cases before you reload them. The thin spot will be immediately apparent as you run the clip up the inside of the case. If you’re seeing a shiny line on the outside and the clip is really hitting a thin spot inside, it’s time to retire the case. If you do this every time you reload, on at least 15% of your cases, you’ll develop a good feel for what the thin spot feels like and how it gets worse as the case is reloaded more times. And if you’re loading the night before a match and feel pressured for time — don’t skip this step!”

December 16th, 2013
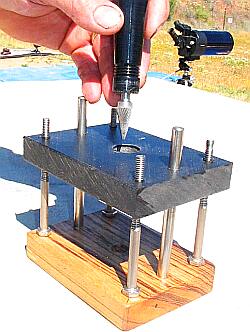
California shooter Mark LaFevers has come up with a slick, adjustable fixture that delivers a precise, repeatable inside-neck chamfer every time. He uses a Holland Case Mouth Chamfer Tool with a 14° cutter, but this set-up works equally well with other chamferers with an extended handle. With Mark’s tool jig, the Holland Tool inserts through the top, indexing vertically off a shoulder. A small recess is cut in the center of the wood base for the case head. The tool mount can be raised or lowered with the adjusting bolts on all four corners. Simply slide a trimmed-to-length case in the middle, give the Holland Tool a few spins, and you get a perfect, identical chamfer every time. Now that’s ingenuity! Mark isn’t planning to produce these commercially, but he’s happy if someone wants to copy his jig design.
 |
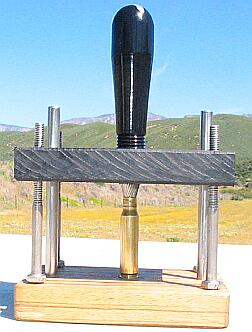 |
NOTE: In the photos above, you see an older version of the tool. Hollands has improved the design of its current 14° Chamfer Tool. The cutting head now has a 3-flute design that provides a smoother, chatterless cut. The head is now made of carbide so it cuts faster and holds its cutting edge longer. This tool is available from Holland’s Shooters Supplies for $32.00 (item CMCT-CAR).

December 14th, 2013
Lapua just dropped a bombshell — multiple bombshells, in fact. Lapua just announced that it will be producing .221 Fireball brass and .50 BMG brass starting early 2014. This will be the first truly match-grade brass ever offered for the .221 Fireball. That’s great news for varminters, who can use Lapua’s new .221 Fireball brass “as is” or neck it down to .20 Vartarg or 17 Fireball. Tactical shooters can also use the .221 Fireball brass to make the .300 Whisper and 300 Blackout sub-sonic cartridges. At the other end of the spectrum, ultra-long-range shooters now have a new ultra-premium brass source for the mighty .50 BMG. This is potentially a “game-changer” for fifty-cal shooters who have had to “make do” with military surplus brass for the most part. Lapua says the new brass, both .50 BMG and .221 Fireball, should be in the USA by early April, 2014. Sorry, no pricing info is yet available.
Here is the Lapua Product Announcement for .221 Fireball and .50 BMG Brass:

New 180-Grain and 150-Grain 7mm Scenar-L Bullets
The other big news from Lapua is the release of two new 7mm (.284 caliber) Scenar-L target bullets. Recognizing the popularity of 7mm cartridges among F-Class Open Division shooters, Lapua will offer a high-BC, 180-grain bullet. As part of the “L” series, this new 180-grainer bullet should exhibit extreme consistency in base-to-ogive measurements and bullet weight. We expect this new 180gr projectile to be extremely accurate in the .284 Winchester, .284 Shehane, 7mm WSM, and 7mm RSAUM — popular chamberings for F-Class and long-range benchrest shooters. No BC information has been released yet, but we expect the BC number to be quite high, giving this bullet great wind-bucking capability. In addition to the new 180gr 7mm Scenar-L, Lapua will offer a new 150gr 7mm bullet. This is optimized for medium range competition in Silhouette and Across-the-Course competition. It should offer great accuracy, but with less felt recoil than its 180-grain bigger brother.

December 2nd, 2013
 When neck-turning cases, it’s a good idea to extend the cut slightly below the neck-shoulder junction. This helps keep neck tension more uniform after repeated firings, by preventing a build-up of brass where the neck meets the shoulder. One of our Forum members, Craig from Ireland, a self-declared “neck-turning novice”, was having some problems turning brass for his 20 Tactical cases. He was correctly attempting to continue the cut slightly past the neck-shoulder junction, but he was concerned that brass was being removed too far down the shoulder. When neck-turning cases, it’s a good idea to extend the cut slightly below the neck-shoulder junction. This helps keep neck tension more uniform after repeated firings, by preventing a build-up of brass where the neck meets the shoulder. One of our Forum members, Craig from Ireland, a self-declared “neck-turning novice”, was having some problems turning brass for his 20 Tactical cases. He was correctly attempting to continue the cut slightly past the neck-shoulder junction, but he was concerned that brass was being removed too far down the shoulder.
Craig writes: “Everywhere I have read about neck turning, [it says] you need to cut slightly into the neck/shoulder junction to stop doughnutting. I completely understand this but I cant seem to get my neck-turning tool set-up to just touch the neck/shoulder junction. It either just doesn’t touch [the shoulder] or cuts nearly the whole shoulder and that just looks very messy. No matter how I adjust the mandrel to set how far down the neck it cuts, it either doesn’t touch it or it cuts far too much. I think it may relate to the bevel on the cutter in my neck-turning tool…”

Looking at Craig’s pictures, we’d agree that he didn’t need to cut so far down into the shoulder. There is a simple solution for this situation. Craig is using a neck-turning tool with a rather shallow cutter bevel angle. This 20-degree angle is set up as “universal geometry” that will work with any shoulder angle. Unfortunately, as you work the cutter down the neck, a shallow angled-cutter tip such as this will remove brass fairly far down. You only want to extend the cut about 1/32 of an inch past the neck-shoulder junction. This is enough to eliminate brass build-up at the base of the neck that can cause doughnuts to form.

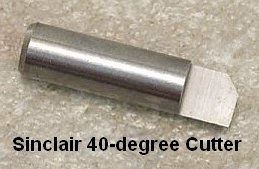
The answer here is simply to use a cutter tip with a wider angle — 30 to 40 degrees. The cutter for the K&M neck-turning tool (above) has a shorter bevel that better matches a 30° shoulder. There is also a 40° tip available. PMA Tool and 21st Century Shooting also offer carbide cutters with a variety of bevel angles to match your case shoulder angle*. WalkerTexasRanger reports: “I went to a 40-degree cutter head just to address this same issue, and I have been much happier with the results. The 40-degree heads are available from Sinclair Int’l for $13 or so.” Forum Member CBonner concurs: “I had the same problem with my 7WSM… The 40-degree cutter was the answer.” Below is Sinclair’s 40° cutter for its NT-1000, NT-1500, and NT-4000 neck-turning tools. Item NT-3140, it sells for $12.95. There is also a 40° cutter for the NT-3000 tool, item NT-3340 ($13.95).
Al Nyhus has another clever solution: “The best way I’ve found to get around this problem is to get an extra shell holder and face it off .020-.025 and then run the cases into the sizing die. This will push the shoulder back .020-.025. Then you neck turn down to the ‘new’ neck/shoulder junction and simply stop there. Fireforming the cases by seating the bullets hard into the lands will blow the shoulder forward and the extra neck length you turned by having the shoulder set back will now be blended perfectly into the shoulder. The results are a case that perfectly fits the chamber and zero donuts.”
* 21st Century sells carbide cutters in: 15, 20, 21.5, 23, 25, 28, 30, 35, 40, and 46 degrees. PMA Tool sells carbide cutters in: 17.5, 20, 23, 25, 28, 30, 35, and 40 degrees.
November 12th, 2013
 Hornady plans to start producing .50 BMG ‘Match Grade’ Cartridge Brass. MSRP is $131.99 for twenty (20) cases (Item #8772). Hornady claims the new brass will have very uniform case wall thickness, and very consistent case weight and internal capacity. Hornady has not stated when its .50 BMG brass will start shipping. When the Hornady .50 BMG brass (Item #8772) does hit the market, we expect it will be in high demand. Our friends at the Fifty Caliber Shooters Association (FCSA) tell us that it is “getting harder and harder to get your hands on good .50 Cal brass these days.” Hornady plans to start producing .50 BMG ‘Match Grade’ Cartridge Brass. MSRP is $131.99 for twenty (20) cases (Item #8772). Hornady claims the new brass will have very uniform case wall thickness, and very consistent case weight and internal capacity. Hornady has not stated when its .50 BMG brass will start shipping. When the Hornady .50 BMG brass (Item #8772) does hit the market, we expect it will be in high demand. Our friends at the Fifty Caliber Shooters Association (FCSA) tell us that it is “getting harder and harder to get your hands on good .50 Cal brass these days.”

Grafs.com lists the new Hornady .50 BMG brass in its catalog at $101.99 for 20 cases, but inventory (Item HRN8772) is not yet in stock. CLICK HERE to check for updates.
Product tip from EdLongrange. We welcome reader submissions.
|
 Precision shooters favor premium brass from Lapua, Norma, or RWS. (Lake City also makes quality brass in military calibers.) Premium brass delivers better accuracy, more consistent velocities, and longer life. Shooters understand the importance of good brass, but many of us have no idea how cartridge cases are actually made. Here’s how it’s done.


 Norma is making a big push to expand its presence in the North American market. As part of this effort, Norma is introducing seven (7) new types of cartridge brass for 2014. We’re pleased to report that Norma-USA will be importing top-quality brass for the 6.5 Grendel, and 6.5 Creedmoor, two popular target cartridges. In addition, for 2014, Norma will offer 7mm RUM, 7mm Blaser Magnum, 300 AAC Blackout (300 BLK), .300 RUM, and the .338 Blaser Mag. The Norma brass we have shot in other chamberings (6 PPC, 6mmBR Norma, 6XC, .243, 7mm RSAUM) has all been excellent, giving good accuracy. Case weights were very consistent and the neck-wall thickness was very uniform, particularly with the PPC and BR brass. The new 300 BLK brass is an important offering for AR shooters. (NOTE: You can also make 300 BLK cases from Norma or Lapua .221 Fireball brass).
 On his


 When neck-turning cases, it’s a good idea to extend the cut slightly below the neck-shoulder junction. This helps keep neck tension more uniform after repeated firings, by preventing a build-up of brass where the neck meets the shoulder. One of our Forum members, Craig from Ireland, a self-declared “neck-turning novice”, was having some problems turning brass for his 20 Tactical cases. He was correctly attempting to continue the cut slightly past the neck-shoulder junction, but he was concerned that brass was being removed too far down the shoulder.


 Hornady plans to start producing


