This coming Saturday, September 27th, is National Hunting and Fishing Day, held each year on the fourth Saturday of September. To help the avid hunters among our readers, here are Twenty Tips that can help ensure a safe and successful hunt. These tips have been compiled from our AccurateShooter Hunting Forum, with help from Hunting Editor Colton Reid (who has already been out hunting this month). Some items are preparatory — such as working with maps, sighting in the rifle, and improving physical fitness. We also talk about equipment — having the right gear, from proper boots to a GPS for multi-day hunts.
Of course there are entire volumes written on hunting, but these 20 Tips can benefit all hunters. Follow these suggestions and you should have a safer hunting experience with greater likelihood of success. If you liked these pointers, you’ll find two dozen more helpful hints on the NSSF Website.
Preparations Before The Hunt
1. Map Your Hunt and Notify Others — Before your hunt, make a plan and notify friends and family members about WHERE you are going and your intended return date and time. Print out a Google Satellite map and locate landmarks and trailheads. Mark where you plan to park your vehicle and give a copy of this map to friend and/or family members. A hunter may injure himself by falling off a rock, or tumbling in a creek-bed. After that kind of injury the hunter may be confused or unable to walk. If you get stranded in the wilderness, you want trusted persons to know where you are. So, before you leave on a trip, provide a map to a friend or family member. Show them where you will leave your vehicle, and where you expect to be every day of your hunting adventure.
2. Licenses and Permits — Make sure you have a valid hunting licenses and all the necessary tags. Begin this process with ample time before your intended hunt(s). The NSSF adds: “If you are crossing state or national borders, find out about any special considerations you must take care of. Border crossings can mean knowing about firearm transport laws or Chronic Wasting Disease-related regulations.”
3. Work on Your Fitness — On a multi-day hunt you may be trekking many miles. You need to be in good shape. If you are out of shape you may be putting yourself in a precarious situation, particularly if you underestimate the terrain difficulty. As the NSSF says: “Not being able to handle the conditions lessens your chances of success, can turn a great experience into an agonizing one and can endanger your health.”
4. Do Your Homework — Study the area you will be hunting. Talk to other hunters. Look at satellite photos. Get a real sense of the walking and terrain challenges. For a multi-day hunt, MAKE a PLAN. The NSSF states: “Eliminate surprises. Learn as much about where you will be staying, the area you will be hunting, what the weather might be like and what you need to bring[.]”
5. Rifle and Ammo — Make sure your rifle is sighted-in and your ammo is tested. Sight-in your rifle with the ammo you plan to use on your hunt. CLICK HERE for 4-Shot Sight-in Method. After sighting-in from the bench, confirm your zero by shooting from typical hunting positions (kneeling and with forearm supported on a rock or post).
6. Shooting Positions — Practice the shooting positions you will use in the field. Practice sitting, kneeling, and prone positions. You should also practice with shooting sticks, using your day pack as a rest, and with a bipod. Try to have a rock-steady rest before taking your shot.
7. Back-Up Irons — If possible, select a rifle with back-up iron sights. While modern scopes are very durable, they can and do fail (glass can crack). If you’ve invested a lot of time and money in your hunt, back-up iron sights can keep you in the game even if your riflescope fails.
8. Communications and GPS — Bring a GPS if you are in a wilderness area far from civilization. It’s a good idea to bring a cell phone, but you may not have coverage if you’re quite a distance from populated areas. A smart-phone also doubles as a digital camera to record your trophies. For navigation and safety, consider getting Garmin inReach Explorer+. This high-tech handheld unit features interactive SOS, connecting you to the GEOS 24/7 search-and-rescue monitoring center. They also allow you to send and receive text messages, no matter where you are, via advanced inReach satellite technology. Yes you can communicate even if you are miles from the nearest cell tower.
9. Select Good Gear — Make sure you have GOOD BOOTS that are comfortable — you’ll spend a lot of time on your feet. You may want a pack with harness for your rifle so you have both hands free. On a multi-day trip, make sure you can carry enough water, and that you will stay warm enough at night. Good practices for backpacking apply to multi-day hunts.
10. Make a Gear Checklist — Create a complete checklist of the gear and supplies you need. That includes arms, ammunition, rangefinder, binoculars, proper clothing (including spare clothes), hunting accessories, sleeping gear (on multi-day hunts), toiletries, medications. Don’t forget a good first aid kit — lots of bad things can happen during any wilderness trip. You can cut a hand, break an ankle or worse.
During The Hunt
11. Have a Plan — know where you plan to go and when. Try to be where you want in the early morning and early evening hours when deer are likely most active.
12. Take Your Time — If you spot a deer and get too excited and don’t take your time you may spook him. Go slow and glass. If possible, wait for the animals to bed down and relax. Then work out the best way to approach your prey. Remember, “You get so few opportunities, don’t screw it up!”
13. Glass More, Walk Less — Let your eyes do the walking — get good binoculars and use them. With their heightened senses of smell and hearing, deer/elk are able to spot you way better than you can spot them. If you are walking around a lot, chances are you are getting spotted by your prey.
14. Riflescopes Are Not Binoculars — Never use a riflescope as a substitute for binoculars. The temptation to do so is real, but when one does this, one is by definition pointing the muzzle of the gun at unknown targets. We like binoculars with built-in rangefinders. When glassing at long range, try supporting your binoculars on your pack.
15. Be Sure of Your Target before Shooting — Every year during whitetail season, farmers are forced to spray-paint their cattle or risk having them “harvested” by hunters who don’t bother confirming the species in their sights. Hunters with “buck fever” can make mistakes. When in doubt, don’t shoot.
16. Know When to Unload — When finished hunting, unload your firearm before returning to camp. You should also unload your gun before attempting to climb a steep bank or travel across slippery ground.
17. Bring Hearing Protection — While pursuing and stalking your prey you’ll want full sensory use of your ears. But when you’re finally ready to take the shot, slip in hearing protection. A shot from a large-caliber hunting rifle can exceed 170 decibels. Unprotected exposure to noise from a SINGLE 170+ dB shot can cause permanent hearing damage. (Source: ASHA.org). If you make a follow-up shot, you double that noise hazard. Therefore a hunter with a non-suppressed rifle should have hearing protection available.
You can keep a pair of easy-to-use quick-insert ear plugs on a cord around your neck. Or, get a lightweight neck band with earbuds, such as the Sellstrom Band, Peltor Band, or 3M Safety Band, all with a good 25 dB or better Noise Reduction Rating. You can keep these lightweight bands around your neck for quick deployment before you shoot.
“Once a hunter is successful, the REAL work begins.” — Colton Reid
18. Harvesting the Animal — When dressing your animal, be careful with the meat. You’ll want very sharp knives. Some hunters prefer knives with replaceable, razor-sharp blades. Don’t rush the task. Make sure you don’t get moisture or dirt on meat. The three spoilers of meat are heat, moisture, and dirt.
19. Pace Yourself When Packing Out — If you DO succeed, and bring down a big buck, will you be able to dress the animal and carry out the meat? Always be prepared to hike out with extra weight. If you are successful, make sure not to waste the meat you worked so hard for. Choose a pack that can help you carry a heavy load. Remember, this is not an insignificant challenge — you may be carrying 60 to 100 extra pounds in addition to your other gear. Again, take your time. Rest as needed. Don’t hurt yourself.
20. Remember to Enjoy the Experience — Our Hunting Editor, Colton Reid, offers this sage advice to all hunters, but particularly to novices: “Have fun, and appreciate your hunt, whether you bag a buck or not. It is a privilege to experience the wilderness and to get away from the city. Enjoy it while you’re out there. And keep your spirits up. You may get tired, but remember that ‘comes with the territory’. At the end of the day, yes you may be exhausted. And you may want to quit and go home. But stay positive, stay focused. Be patient, the experience is worth it.”
CLICK HERE for Hunter Training/Mentoring Programs State-by-State.
Visit WhereToHunt.org
There’s a great online resource for hunters that will help you find game locations in your state and ensure you have all the proper permits and game tags. WheretoHunt.org features an interactive map of the country. For all 50 states, the NSSF has compiled information about hunting license and permits, where to hunt, hunter education classes, laws and regulations and more. For each state you’ll also find a link for required applications and license forms.
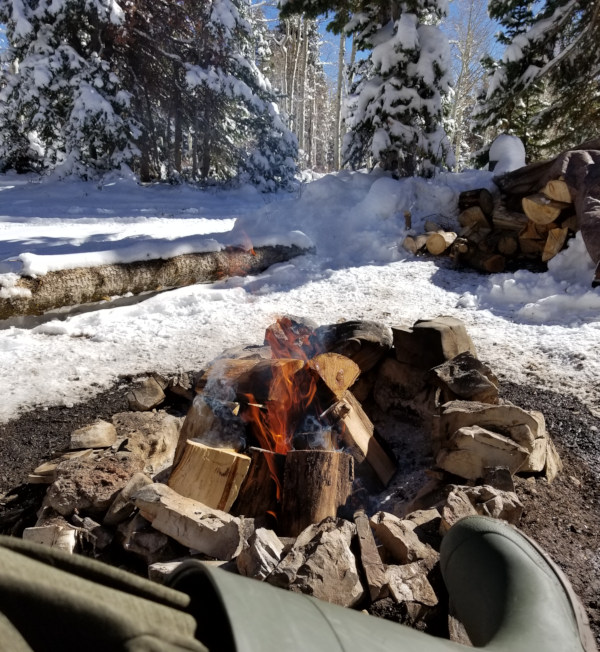
Winter is right around the corner, with December just two weeks away. Even now there is snow on the ground in Montana, Wyoming, Colorado and other northern and mountain states. And a major winter storm is predicted to hit America with snow and cold temperatures ahead of Thanksgiving week travel. Last week Denver had 20 inches of snow — the biggest November snowfall in over 40 years.
If you plan to go shooting or hunting in the weeks ahead, while the weather is below freezing and snow is on the ground, you need to be prepared. You should always have the right equipment and make sure that you can contact help if something goes wrong (such as not being able to start your vehicle).
The folks at the Precision Rifle Network have created a good video on winter shooting and hunting. Host Marcus Hom provides his TOP 10 TIPS for wintertime shooting/hunting adventures. We recommend that any 4-season shooter watch this video.
TOP 10 TIPS for Winter Shooting and Hunting:
1. Wear Good Sunglasses — With snow on the ground, wearing sunglasses is a must because of the extra reflected light. You can get good sunglasses that also have ANSI Z87.1-approved impact protection.
2. Wear Protective, Moisture-Proof Clothing — Wear a set of Bibs and a long jacket. This will prevent you from getting snow inside your clothing when shooting prone.
3. Take Care of Your Hands — Bring good winter gloves, preferably with a waterproof outer layer. Make sure the inner gloves can work with your trigger/trigger guard.
4. Bring a Good Tripod — A tripod keeps you elevated so you can avoid laying down in snow or slush. That, in turn, avoids body heat loss. “Keeping out of the snow and shooting from an elevated position is pretty important in the wintertime.”
5. Protect Optics and Action — Keep your scope lenses and action clear of moisture, snow, and fog. You will want to have good caps on both lenses. Make sure the action remains closed, and consider some kind of wrap over the action until you’re ready to load and shoot.
6. Ranging Challenges — Laser range-finders don’t perform optimally with intense, bright, ambient light. Also, if it’s showing you may get false readings from snow particles. So take multiple readings to ensure you have the right distance. Also, if you have a reticle with MOA or MIL marks, and you know the size of your target, then you can range the target with the scope.
7. Drop and Windage Info (DOPE) Chart — Bring a waterproof, hard copy dope chart. Out in the field on cold days, a phone battery dies fast, and you’ll want to preserve that battery for emergency phone use if needed. So, you should keep a good old-fashioned drop chart in a waterproof laminate.
8. Muzzle Velocity Issues — Cold temperatures can lower muzzle velocity. Before you go, get an idea of how your velocity will change with low temperatures. Some powders are more sensitive to temperature than others, causing a noticeable reduction in muzzle velocity. A load you’ve worked out in summer may shoot LOW in winter because the actual velocity is low. Even with a “temperature stable” powder you may see a 10 fps slow-down. Do some winter velocity testing if you can before you go.
9. Keep Your Ammo Warm — A simple way to avoid muzzle velocity changes with low ambient temperatures is to keep you ammunition ON YOUR BODY. Have a pouch under your layered clothing where the ammo can be kept relatively warm. See video: 07:50
10. Safeguard Keys and Valuables — Keep keys and valuables in a secure, zippered pocket. “There is nothing worse than losing something… keys, phone, wallet. It’s really hard to find something when its buried under [many] inches of snow”. We also recommend keeping a spare vehicle key hidden on your car/truck. There are magnetic holders that can keep that spare key secure but safely hidden from view.
Winter Hunting — Success with Snow on the Ground
There has been snow on the ground for much of November in many areas of the country. Hunters have had to cope with the snow and cold temperatures. Our hunting editor, Colton Reid, recently returned from a successful deer hunt in the mountains of Utah. He said it was beautiful, but you needed really high-quality outdoor clothing — otherwise you could get in trouble. You need to stay warm and dry.
With careful planning, and some skilled tracking, Colton had success, making a perfect hit on a buck at 300 yards. The animal dropped instantly. Colton brought back a good harvest of deer meat, which formed part of the Thanksgiving feast for his family.
Colton offered these 5 TIPS for hunters. These apply in any season, but are even more important in winter with freezing temps and snow on the ground:
1. Have a Plan — know where you plan to go and when. Try to be where you want in the early morning and early evening hours when deer are likely most active.
2. Take Your Time — If you spot a deer and get too excited and don’t take your time you may spook him. Go slow and glass. If possible, wait for the animals to bed down and relax. Then work out the best way to approach your prey. Remember, “You get so few opportunities, don’t screw it up!”
3. Glass More, Walk Less — Let your eyes do the walking — get good binoculars and use them. With their heightened senses of smell and hearing, deer/elk are able to spot you way better than you can spot them. If you are walking around a lot, chances are you are getting spotted by your prey.
4. Pace Yourself When Packing Out — If you DO succeed, and bring down a big buck, will you be able to dress the animal and carry out the meat? Always be prepared to hike out with extra weight. If you are successful, make sure not to waste the meat you worked so hard for. Choose a pack that can help you carry a heavy load. Remember, this is not an insignificant challenge — you may be carrying 60 to 100 extra pounds in addition to your other gear. Again, take your time. Rest as needed. Don’t hurt yourself.
5. Always Enjoy the Experience — Have fun, and appreciate your hunt, whether you bag a buck or not. It is a privilege to experience the wilderness and to get away from the city. Enjoy it while you’re out there. And keep your spirits up. You may get tired, but remember that ‘comes with the territory’. At the end of the day, yes you may be exhausted. And you may want to quit and go home. But stay positive, stay focused. Be patient, the experience is worth it.
Winter Solace in the Backcountry
There is a nice thread in our Forum appropriately entitled “Winter Time”. You’ll find some great backcountry images taken by our Forum members. Winter is a special time in the outdoors. Forum member JDP explains: “Winter is the best time to shoot! One of the few of life’s ironies that works in my favor. The range is empty and barrels keep cool, no bugs, no waiting on people, no mirage. Yup, this world needs more thin blooded snow birds. This cool weather is terrible and dangerous, tell your friends! Do people get lonely while shooting or something? It’s the true holiday season in multiple ways.”
Forum member DNorton posted: “I live way up north where our white sandy beaches look like this!”
Tomorrow, September 28th, is National Hunting and Fishing Day, held each year on the fourth Saturday of September. To help the avid hunters among our readers, here are Twenty Tips that can help ensure a safe and successful hunt. These tips have been compiled from our AccurateShooter Hunting Forum, with help from Hunting Editor Colton Reid (who has already been out hunting this month). Some items are preparatory — such as working with maps, sighting in the rifle, and improving physical fitness. We also talk about equipment — having the right gear, from proper boots to a GPS for multi-day hunts.
Of course there are entire volumes written on hunting, but these 20 Tips can benefit all hunters. Follow these suggestions and you should have a safer hunting experience with greater likelihood of success. If you liked these pointers, you’ll find two dozen more helpful hints on the NSSF Website.
Preparations Before The Hunt
1. Map Your Hunt and Notify Others — Before your hunt, make a plan and notify friends and family members about WHERE you are going and your intended return date and time. Print out a Google Satellite map and locate landmarks and trailheads. Mark where you plan to park your vehicle and give a copy of this map to friend and/or family members. A hunter may injure himself by falling off a rock, or tumbling in a creek-bed. After that kind of injury the hunter may be confused or unable to walk. If you get stranded in the wilderness, you want trusted persons to know where you are. So, before you leave on a trip, provide a map to a friend or family member. Show them where you will leave your vehicle, and where you expect to be every day of your hunting adventure.
2. Licenses and Permits — Make sure you have a valid hunting licenses and all the necessary tags. Begin this process with ample time before your intended hunt(s). The NSSF adds: “If you are crossing state or national borders, find out about any special considerations you must take care of. Border crossings can mean knowing about firearm transport laws or Chronic Wasting Disease-related regulations.”
3. Work on Your Fitness — On a multi-day hunt you may be trekking many miles. You need to be in good shape. If you are out of shape you may be putting yourself in a precarious situation, particularly if you underestimate the terrain difficulty. As the NSSF says: “Not being able to handle the conditions lessens your chances of success, can turn a great experience into an agonizing one and can endanger your health.”
4. Do Your Homework — Study the area you will be hunting. Talk to other hunters. Look at satellite photos. Get a real sense of the walking and terrain challenges. For a multi-day hunt, MAKE a PLAN. The NSSF states: “Eliminate surprises. Learn as much about where you will be staying, the area you will be hunting, what the weather might be like and what you need to bring[.]”
5. Rifle and Ammo — Make sure your rifle is sighted-in and your ammo is tested. Sight-in your rifle with the ammo you plan to use on your hunt. CLICK HERE for 4-Shot Sight-in Method. After sighting-in from the bench, confirm your zero by shooting from typical hunting positions (kneeling and with forearm supported on a rock or post).
6. Shooting Positions — Practice the shooting positions you will use in the field. Practice sitting, kneeling, and prone positions. You should also practice with shooting sticks, using your day pack as a rest, and with a bipod. Try to have a rock-steady rest before taking your shot.
7. Back-Up Irons — If possible, select a rifle with back-up iron sights. While modern scopes are very durable, they can and do fail (glass can crack). If you’ve invested a lot of time and money in your hunt, back-up iron sights can keep you in the game even if your riflescope fails.
8. Communications and GPS — Bring a GPS if you are in a wilderness area far from civilization. It’s a good idea to bring a cell phone, but you may not have coverage if you’re quite a distance from populated areas. A smart-phone also doubles as a digital camera to record your trophies. For navigation and safety, consider getting Garmin inReach Explorer+. This high-tech handheld unit features interactive SOS, connecting you to the GEOS 24/7 search-and-rescue monitoring center. They also allow you to send and receive text messages, no matter where you are, via advanced inReach satellite technology. Yes you can communicate even if you are miles from the nearest cell tower.
9. Select Good Gear — Make sure you have GOOD BOOTS that are comfortable — you’ll spend a lot of time on your feet. You may want a pack with harness for your rifle so you have both hands free. On a multi-day trip, make sure you can carry enough water, and that you will stay warm enough at night. Good practices for backpacking apply to multi-day hunts.
10. Make a Gear Checklist — Create a complete checklist of the gear and supplies you need. That includes arms, ammunition, rangefinder, binoculars, proper clothing (including spare clothes), hunting accessories, sleeping gear (on multi-day hunts), toiletries, medications. Don’t forget a good first aid kit — lots of bad things can happen during any wilderness trip. You can cut a hand, break an ankle or worse.
During The Hunt
11. Have a Plan — know where you plan to go and when. Try to be where you want in the early morning and early evening hours when deer are likely most active.
12. Take Your Time — If you spot a deer and get too excited and don’t take your time you may spook him. Go slow and glass. If possible, wait for the animals to bed down and relax. Then work out the best way to approach your prey. Remember, “You get so few opportunities, don’t screw it up!”
13. Glass More, Walk Less — Let your eyes do the walking — get good binoculars and use them. With their heightened senses of smell and hearing, deer/elk are able to spot you way better than you can spot them. If you are walking around a lot, chances are you are getting spotted by your prey.
14. Riflescopes Are Not Binoculars — Never use a riflescope as a substitute for binoculars. The temptation to do so is real, but when one does this, one is by definition pointing the muzzle of the gun at unknown targets. We like binoculars with built-in rangefinders. When glassing at long range, try supporting your binoculars on your pack.
15. Be Sure of Your Target before Shooting — Every year during whitetail season, farmers are forced to spray-paint their cattle or risk having them “harvested” by hunters who don’t bother confirming the species in their sights. Hunters with “buck fever” can make mistakes. When in doubt, don’t shoot.
16. Know When to Unload — When finished hunting, unload your firearm before returning to camp. You should also unload your gun before attempting to climb a steep bank or travel across slippery ground.
17. Bring Hearing Protection — While pursuing and stalking your prey you’ll want full sensory use of your ears. But when you’re finally ready to take the shot, slip in hearing protection. A shot from a large-caliber hunting rifle can exceed 170 decibels. Unprotected exposure to noise from a SINGLE 170+ dB shot can cause permanent hearing damage. (Source: ASHA.org). If you make a follow-up shot, you double that noise hazard. Therefore a hunter with a non-suppressed rifle should have hearing protection available.
You can keep a pair of easy-to-use quick-insert ear plugs on a cord around your neck. Or, get a lightweight neck band with earbuds, such as the Sellstrom Band, Peltor Band, or 3M Safety Band, all with a good 25 dB or better Noise Reduction Rating. You can keep these lightweight bands around your neck for quick deployment before you shoot.
“Once a hunter is successful, the REAL work begins.” — Colton Reid
18. Harvesting the Animal — When dressing your animal, be careful with the meat. You’ll want very sharp knives. Some hunters prefer knives with replaceable, razor-sharp blades. Don’t rush the task. Make sure you don’t get moisture or dirt on meat. The three spoilers of meat are heat, moisture, and dirt.
19. Pace Yourself When Packing Out — If you DO succeed, and bring down a big buck, will you be able to dress the animal and carry out the meat? Always be prepared to hike out with extra weight. If you are successful, make sure not to waste the meat you worked so hard for. Choose a pack that can help you carry a heavy load. Remember, this is not an insignificant challenge — you may be carrying 60 to 100 extra pounds in addition to your other gear. Again, take your time. Rest as needed. Don’t hurt yourself.
20. Remember to Enjoy the Experience — Our Hunting Editor, Colton Reid, offers this sage advice to all hunters, but particularly to novices: “Have fun, and appreciate your hunt, whether you bag a buck or not. It is a privilege to experience the wilderness and to get away from the city. Enjoy it while you’re out there. And keep your spirits up. You may get tired, but remember that ‘comes with the territory’. At the end of the day, yes you may be exhausted. And you may want to quit and go home. But stay positive, stay focused. Be patient, the experience is worth it.”
CLICK HERE for Hunter Training/Mentoring Programs State-by-State.
Visit WhereToHunt.org
There’s a great online resource for hunters that will help you find game locations in your state and ensure you have all the proper permits and game tags. WheretoHunt.org features an interactive map of the country. For all 50 states, the NSSF has compiled information about hunting license and permits, where to hunt, hunter education classes, laws and regulations and more. For each state you’ll also find a link for required applications and license forms.
by Colton Reid
In hunting, great opportunities are a rare and precious thing. Their scarcity and the difficulty in distilling clear lessons from those opportunities is what makes hunting one of the most challenging and yet most rewarding activities I have ever pursued. As Tom Hanks succinctly stated in A League of Their Own, “The hard is what makes it great.” But, in my recent hunt in Utah’s high country I was given not only a chance at some of the biggest deer in my life, but also two opportunities to harvest a trophy buck after a heartbreaking series of hard lessons learned.
About the Gear — Tikka T3 Lite in .30-06, SWFA Scope, Leica GeoVid 3200.com LRF Binoculars
Colton was using a Tikka T3 Lite* chambered for the .30-06 Springfield. The scope was an SWFA Super Sniper 3-15x42mm with 0.1 MRAD clicks. Colton painted the Tikka rifle and scope himself with a combination of colors for camouflage. The cheek pad is a piece of balsa wood Colton sanded to correct height and covered with a SKD tactical PIG rifle stock pack. For spotting and ranging Colton employed a set of Leica Geovid 3200.com 10×40 LRF binoculars. Carry bags were from Badlands.
Ammunition: For this hunt, Colton handloaded his .30-06 ammunition with Lapua brass and Sierra 165gr SBT GameKing bullets. Drop was approximately 13″ at 300 yards.
October Hunt in Utah’s Central Mountain Range
In late October I traveled to Utah’s central mountain range for one week trip in pursuit of mule deer. I have never hunted this area before and, to add difficulty, there were several snowstorms expected throughout the week. Simply stated, I was in for a tough hunt. Given the newness of the area and no opportunity to scout pre-season, my strategy was to spend the first couple of days hiking slowly between various vantage points to locate the best animal activity. I saw several mature bucks during this period, but none that I chose to harvest. On day three, my efforts were rewarded with one of those rare opportunities.
This buck was sighted early in the hunt in a family group of does. This image was taken through my Swarovski spotting scope. The buck was about 150 yards away.
Six inches of snow covered the ground. A storm had crept in the night before and began to color a forest of green and brown pines in a picturesque winter white. Snow was still falling as I started my morning hunt in a new area. The temperature, now in the low teens, was a constant reminder to keep my layers on and jacket zipped. I started my hike down a rugged ridgeline road, and periodically peeked through the adjacent pine trees to glass a hillside across a small valley. After several instances of stopping to glass with my Leica Geovid 3200.com 10×40 LRF binoculars, I spotted a monster grazing the exposed grass at the edge of a group of bare poplar trees. At 1100 yards I could easily tell this was a nice 4×4+ buck.
I sat and watched him for several minutes and noticed he was grazing near a group of does that were slowly moving down their hillside and towards the base of mine. The buck, however, was slowly moving up and to the right. If he continued this path he would soon be around the corner of his hill where I could not see. Concerned that he would move out of sight, I decided to attempt a speedy stalk in the hopes of cutting him off. My first mistake. Gathering up my gear, and not knowing the terrain, I took the most direct path I could see. My second mistake. The hope was a direct path would put me into an equivalent altitude on his hillside, where I could make an ethical and successful shot. At least, that was the plan.
As I descended the hillside, I soon realized that the does I spotted were funneling directly towards me. To avoid spooking them I began to traverse the hillside at my current elevation and move to an area that completely changed my site picture of the hillside and where I saw the buck. Great, I had “solved” one problem and created another.
In this new area, I proceeded to again move down my hill and up the buck’s hillside in the hopes of reaching my previously planned location. But, I had no idea what was in front of me. I could not see this “new” area when glassing on the ridge. And now I was close enough to the buck’s area that spooking another deer would likely push the buck. So I had to go slow, and waste time I didn’t think I had.
Moving along the hillside I eventually spotted the poplars that marked where I had seen the buck last. 600 yards away, the trees now obscured the area where the buck had been feeding. Seemingly my only option, I pressed on through the snow. As I reached the 400-yard mark I spotted a young buck and doe less than 50 yards in front of me. I was now faced with a choice to proceed forward and spook these two deer in front of me or move downhill around them and try to climb up directly below where I spotted the big one. I chose the latter. Mistake number 3. Once I moved 100 yards below the young buck and doe, I traversed sidehill directly below where I had spotted the 4×4+ and started my climb.
This buck was spotted among trees early in the hunt. Scroll down to see the larger buck that Colton took on Day 3 of his Utah adventure.
Creeping up to the edge of the poplar trees I saw lots of fresh sign and decided to load a round in the chamber. I couldn’t see very far in front of me due to the snow and slope of the hill, but it seemed I was close. Moving further into the trees I saw nothing but bare trunks and a snow-covered ground. A feeling of disappointment and frustration washed over me. I had missed my window. Without thinking I let my guard down and stood up, mistake number 4. Out of the corner of my eye I saw a blur of brown and white bound away through the trees, only catching glimpses a white rump and large antlers as the buck moved out of the poplar trees and around the corner where I lost sight of him. I was heartbroken. Exhausted and defeated I started back toward the ridge.
In the higher elevations there was snow everywhere. Winter wonderland in October Utah.
My long hike back to the road gave me time to think. I walked along the ridge of the hill where I spotted the buck and found that this location intersected with the road. As I trudged up the road to my truck, I learned that simply following the road would have given me a good vantage point of the poplar trees and obscured me from view until I reached the ridgeline of the buck’s hill. If only I had known this before!
The whole night I replayed the events in my head. Where did I go wrong? What could I have done better? I decided that my best way to learn from it and that the first hasty decision put me in a tough situation from which I made more poor decisions. If I had sat and watched the deer bed, I would have had more time to figure out an easier stalking route (like the road!) to get a clean and ethical shot above the animal. And since I saw lots of sign in that area, I decided to give it a second try the next day.
The next morning, I was back on the road and stopping at periodic vantage points to glass across the valley. The whole time I was thinking “will I really get a second bite at the apple”?
When I started to glass at the first opening, I slowly and methodically scanned the poplars where I had seen deer the day before and caught a glimpse of a brown spot moving through the trees. I pulled out my tripod for more stability and focused on where I had seen movement.
Lo and behold a nice buck was limping along the trees toward a small grass patch. Yes limping. Having the failure of yesterday’s stalk very fresh in my head I decided to wait until I saw the buck stop moving. After some slow grazing, the buck bedded at the base of a large tree just above his grazing area. Now was the time to move above him.
Because the buck was moving slowly from his limp, I figured I had time to work my way around to the ridgeline that would offer me an ethical shot. Again, learning from yesterday’s failures, I walked along the ridgeline road and periodically glassed the area where the buck was bedded.
During these periodic checks I was not able to see the buck, but there was no reason to think the buck had moved. It also offered several advantages: I refreshed my site picture as I moved to different positions, I checked my range to the poplars, and I found the location and range to where I wanted to shoot. While I walked, I noticed a storm rolling in that would soon be make this stalk much harder. I continued along the road until I found the ridge of the buck’s hill intersected, and I turned to make my way towards the buck.
Click Photo for large, full-frame image of stalking path.
Walking through the trees and slightly below the ridgeline I moved to a spot perpendicular to where the buck should be bedded and crept toward the ridgeline. As I crested the ridge I moved carefully from tree to tree, checking the wind was anywhere but behind me and used my binoculars at each stop to relocate the buck. As I approached a large grassy opening between my trees and the poplars, I spotted him bedded down right where I saw him lay down. He was 330 yards away, but I didn’t have a good angle for a clean vital shot. Where I stood the trees were thinning and I had no intention of blowing my stalk by being seen in the last 30 yards. Dropping to the ground I took off my backpack and army crawled in the snow to a downed log where I could rest my rifle for a shot.
For this Utah hunt, Colton’s bullet choice was the Sierra 165gr SBT GameKing. In this photo, the cartridge in the Tikka magazine has a 168gr Barnes all-copper TSX bullet.
I checked my range and angle — 301 yards and a 5-degree decline from me to the target. No significant wind in any direction. I had sighted in my rifle at 1000 feet above sea level in 75 degree weather and was now at 9500 feet with the temperature a bone-chilling cold. Instead of the 1.1 MRAD dope I estimated 1 MRAD and held directly over vitals. With slow steady breaths I calmed my heartrate, took a deep breath, exhaled halfway and held. A smooth squeeze of the trigger and the rifle roared. Maintaining my sight picture, I re-acquired the buck and cycled the bolt. He was on his side making a last attempt to run. Like a dog chasing a rabbit in his sleep. 20 seconds later and his chase had ended.
When I moved my head from behind the scope, I noticed snow steadily falling all around me. The storm had held until the job was done. As if my rifle was the signal for the heavens to let loose. To say that I was happy in this moment is a gross simplification of what this experience meant to me. I was happy with my success, I was thankful for the opportunity, I was sad at the loss of life of such a majestic creature, I was proud of having learned my lesson from the day before and having executed the best stalk of my life, while also harvesting the biggest buck of my life. My hunt was successful. My hunt was over. And now, the real work had started.
Arriving at the downed deer I checked for life. He had passed. My shot went directly through the buck’s heart, and he had lost most of his blood in the first 15 seconds. As ethical as it gets. The storm was starting to really gain momentum now, so I had to choose to either quarter the deer and hang it for tomorrow or gut it and drag it to the road, which was approximately a mile away. With the snow blanket from previous storms, I decided it would be easiest to drag the deer using my body harness (Muddy Deluxe Deer Drag Harness).
The drag back to the road reminded me of grandpa’s route to school: 20 miles in the snow and uphill both ways. The drag was tough. Each incline felt like I was climbing vertically with a 100-lb. pack. Fortunately, the snow helped the body slide and I made it to my truck in about an hour.
My drive back to camp was dead quiet. I tried to soak in the experience as much as I could. To fully appreciate the opportunity, I had been given. The sacrifice my family had made so that I could be here.
And as Vince Lombardi once noted: “Any man’s finest hour, the greatest fulfillment of all that he holds dear, is that moment when he has worked his heart out in a good cause and lies exhausted on the field of battle — victorious.”
* Colton Reid has the Tikka T3 Lite, which has been superseded by the T3X LITE, which has some enhanced features. The notable T3X LITE upgrades are covered in this Tikka Product Video.
This article is Copyright 2023 AccurateShooter.com. Any republication on any another website gives rise to damages for copyright violations.
Winter is definitely here, with December just days away. Even now there is an abundance of snow on the ground in many parts of the country. 2022 has brought some unusually cold weather to many regions — witness the recent deluge of snow in upstate New York.
If you plan to go shooting or hunting in the weeks ahead, while the weather is below freezing and snow is on the ground, you need to be prepared. You should always have the right equipment and make sure that you can contact help if something goes wrong (such as not being able to start your vehicle).
The folks at the Precision Rifle Network have created a good video on winter shooting and hunting. Host Marcus Hom provides his TOP 10 TIPS for wintertime shooting/hunting adventures. We recommend that any 4-season shooter watch this video.
TOP 10 TIPS for Winter Shooting and Hunting:
1. Wear Good Sunglasses — With snow on the ground, wearing sunglasses is a must because of the extra reflected light. You can get good sunglasses that also have ANSI Z87.1-approved impact protection.
2. Wear Protective, Moisture-Proof Clothing — Wear a set of Bibs and a long jacket. This will prevent you from getting snow inside your clothing when shooting prone.
3. Take Care of Your Hands — Bring good winter gloves, preferably with a waterproof outer layer. Make sure the inner gloves can work with your trigger/trigger guard.
4. Bring a Good Tripod — A tripod keeps you elevated so you can avoid laying down in snow or slush. That, in turn, avoids body heat loss. “Keeping out of the snow and shooting from an elevated position is pretty important in the wintertime.”
5. Protect Optics and Action — Keep your scope lenses and action clear of moisture, snow, and fog. You will want to have good caps on both lenses. Make sure the action remains closed, and consider some kind of wrap over the action until you’re ready to load and shoot.
6. Ranging Challenges — Laser range-finders don’t perform optimally with intense, bright, ambient light. Also, if it’s showing you may get false readings from snow particles. So take multiple readings to ensure you have the right distance. Also, if you have a reticle with MOA or MIL marks, and you know the size of your target, then you can range the target with the scope.
7. Drop and Windage Info (DOPE) Chart — Bring a waterproof, hard copy dope chart. Out in the field on cold days, a phone battery dies fast, and you’ll want to preserve that battery for emergency phone use if needed. So, you should keep a good old-fashioned drop chart in a waterproof laminate.
8. Muzzle Velocity Issues — Cold temperatures can lower muzzle velocity. Before you go, get an idea of how your velocity will change with low temperatures. Some powders are more sensitive to temperature than others, causing a noticeable reduction in muzzle velocity. A load you’ve worked out in summer may shoot LOW in winter because the actual velocity is low. Even with a “temperature stable” powder you may see a 10 fps slow-down. Do some winter velocity testing if you can before you go.
9. Keep Your Ammo Warm — A simple way to avoid muzzle velocity changes with low ambient temperatures is to keep you ammunition ON YOUR BODY. Have a pouch under your layered clothing where the ammo can be kept relatively warm. See video: 07:50
10. Safeguard Keys and Valuables — Keep keys and valuables in a secure, zippered pocket. “There is nothing worse than losing something… keys, phone, wallet. It’s really hard to find something when its buried under [many] inches of snow”. We also recommend keeping a spare vehicle key hidden on your car/truck. There are magnetic holders that can keep that spare key secure but safely hidden from view.
Winter Hunting — Success with Snow on the Ground
There has been snow on the ground for much of November in many areas of the country. Hunters have had to cope with the snow and cold temperatures. Our hunting editor, Colton Reid, recently returned from a successful deer hunt in the mountains of Utah. He said it was beautiful, but you needed really high-quality outdoor clothing — otherwise you could get in trouble. You need to stay warm and dry.
With careful planning, and some skilled tracking, Colton had success, making a perfect hit on a buck at 300 yards. The animal dropped instantly. Colton brought back a good harvest of deer meat, which formed part of the Thanksgiving feast for his family.
Colton offered these 5 TIPS for hunters. These apply in any season, but are even more important in winter with freezing temps and snow on the ground:
1. Have a Plan — know where you plan to go and when. Try to be where you want in the early morning and early evening hours when deer are likely most active.
2. Take Your Time — If you spot a deer and get too excited and don’t take your time you may spook him. Go slow and glass. If possible, wait for the animals to bed down and relax. Then work out the best way to approach your prey. Remember, “You get so few opportunities, don’t screw it up!”
3. Glass More, Walk Less — Let your eyes do the walking — get good binoculars and use them. With their heightened senses of smell and hearing, deer/elk are able to spot you way better than you can spot them. If you are walking around a lot, chances are you are getting spotted by your prey.
4. Pace Yourself When Packing Out — If you DO succeed, and bring down a big buck, will you be able to dress the animal and carry out the meat? Always be prepared to hike out with extra weight. If you are successful, make sure not to waste the meat you worked so hard for. Choose a pack that can help you carry a heavy load. Remember, this is not an insignificant challenge — you may be carrying 60 to 100 extra pounds in addition to your other gear. Again, take your time. Rest as needed. Don’t hurt yourself.
5. Always Enjoy the Experience — Have fun, and appreciate your hunt, whether you bag a buck or not. It is a privilege to experience the wilderness and to get away from the city. Enjoy it while you’re out there. And keep your spirits up. You may get tired, but remember that ‘comes with the territory’. At the end of the day, yes you may be exhausted. And you may want to quit and go home. But stay positive, stay focused. Be patient, the experience is worth it.
Winter Solace in the Backcountry
There is a nice thread in our Forum appropriately entitled “Winter Time”. You’ll find some great backcountry images taken by our Forum members. Winter is a special time in the outdoors. Forum member JDP explains: “Winter is the best time to shoot! One of the few of life’s ironies that works in my favor. The range is empty and barrels keep cool, no bugs, no waiting on people, no mirage. Yup, this world needs more thin blooded snow birds. This cool weather is terrible and dangerous, tell your friends! Do people get lonely while shooting or something? It’s the true holiday season in multiple ways.”
Forum member DNorton posted: “I live way up north where our white sandy beaches look like this!”
Tomorrow, September 24th, is National Hunting and Fishing Day, held each year on the fourth Saturday of September. To help the avid hunters among our readers, here are Twenty Tips that can help ensure a safe and successful hunt. These tips have been compiled from our AccurateShooter Hunting Forum, with help from Hunting Editor Colton Reid (who has already been out hunting this month). Some items are preparatory — such as working with maps, sighting in the rifle, and improving physical fitness. We also talk about equipment — having the right gear, from proper boots to a GPS for multi-day hunts.
Of course there are entire volumes written on hunting, but these 20 Tips can benefit all hunters. Follow these suggestions and you should have a safer hunting experience with greater likelihood of success. If you liked these pointers, you’ll find two dozen more helpful hints on the NSSF Website.
Preparations Before The Hunt
1. Map Your Hunt and Notify Others — Before your hunt, make a plan and notify friends and family members about WHERE you are going and your intended return date and time. Print out a Google Satellite map and locate landmarks and trailheads. Mark where you plan to park your vehicle and give a copy of this map to friend and/or family members. A hunter may injure himself by falling off a rock, or tumbling in a creek-bed. After that kind of injury the hunter may be confused or unable to walk. If you get stranded in the wilderness, you want trusted persons to know where you are. So, before you leave on a trip, provide a map to a friend or family member. Show them where you will leave your vehicle, and where you expect to be every day of your hunting adventure.
2. Licenses and Permits — Make sure you have a valid hunting licenses and all the necessary tags. Begin this process with ample time before your intended hunt(s). The NSSF adds: “If you are crossing state or national borders, find out about any special considerations you must take care of. Border crossings can mean knowing about firearm transport laws or Chronic Wasting Disease-related regulations.”
3. Work on Your Fitness — On a multi-day hunt you may be trekking many miles. You need to be in good shape. If you are out of shape you may be putting yourself in a precarious situation, particularly if you underestimate the terrain difficulty. As the NSSF says: “Not being able to handle the conditions lessens your chances of success, can turn a great experience into an agonizing one and can endanger your health.”
4. Do Your Homework — Study the area you will be hunting. Talk to other hunters. Look at satellite photos. Get a real sense of the walking and terrain challenges. For a multi-day hunt, MAKE a PLAN. The NSSF states: “Eliminate surprises. Learn as much about where you will be staying, the area you will be hunting, what the weather might be like and what you need to bring[.]”
5. Rifle and Ammo — Make sure your rifle is sighted-in and your ammo is tested. Sight-in your rifle with the ammo you plan to use on your hunt. CLICK HERE for 4-Shot Sight-in Method. After sighting-in from the bench, confirm your zero by shooting from typical hunting positions (kneeling and with forearm supported on a rock or post).
6. Shooting Positions — Practice the shooting positions you will use in the field. Practice sitting, kneeling, and prone positions. You should also practice with shooting sticks, using your day pack as a rest, and with a bipod. Try to have a rock-steady rest before taking your shot.
7. Back-Up Irons — If possible, select a rifle with back-up iron sights. While modern scopes are very durable, they can and do fail (glass can crack). If you’ve invested a lot of time and money in your hunt, back-up iron sights can keep you in the game even if your riflescope fails.
8. Communications and GPS — Bring a GPS if you are in a wilderness area far from civilization. It’s a good idea to bring a cell phone, but you may not have coverage if you’re quite a distance from populated areas. A smart-phone also doubles as a digital camera to record your trophies. For navigation and safety, consider getting Garmin inReach Explorer+. This high-tech handheld unit features interactive SOS, connecting you to the GEOS 24/7 search-and-rescue monitoring center. They also allow you to send and receive text messages, no matter where you are, via advanced inReach satellite technology. Yes you can communicate even if you are miles from the nearest cell tower.
9. Select Good Gear — Make sure you have GOOD BOOTS that are comfortable — you’ll spend a lot of time on your feet. You may want a pack with harness for your rifle so you have both hands free. On a multi-day trip, make sure you can carry enough water, and that you will stay warm enough at night. Good practices for backpacking apply to multi-day hunts.
10. Make a Gear Checklist — Create a complete checklist of the gear and supplies you need. That includes arms, ammunition, rangefinder, binoculars, proper clothing (including spare clothes), hunting accessories, sleeping gear (on multi-day hunts), toiletries, medications. Don’t forget a good first aid kit — lots of bad things can happen during any wilderness trip. You can cut a hand, break an ankle or worse.
During The Hunt
11. Have a Plan — know where you plan to go and when. Try to be where you want in the early morning and early evening hours when deer are likely most active.
12. Take Your Time — If you spot a deer and get too excited and don’t take your time you may spook him. Go slow and glass. If possible, wait for the animals to bed down and relax. Then work out the best way to approach your prey. Remember, “You get so few opportunities, don’t screw it up!”
13. Glass More, Walk Less — Let your eyes do the walking — get good binoculars and use them. With their heightened senses of smell and hearing, deer/elk are able to spot you way better than you can spot them. If you are walking around a lot, chances are you are getting spotted by your prey.
14. Riflescopes Are Not Binoculars — Never use a riflescope as a substitute for binoculars. The temptation to do so is real, but when one does this, one is by definition pointing the muzzle of the gun at unknown targets. We like binoculars with built-in rangefinders. When glassing at long range, try supporting your binoculars on your pack.
15. Be Sure of Your Target before Shooting — Every year during whitetail season, farmers are forced to spray-paint their cattle or risk having them “harvested” by hunters who don’t bother confirming the species in their sights. Hunters with “buck fever” can make mistakes. When in doubt, don’t shoot.
16. Know When to Unload — When finished hunting, unload your firearm before returning to camp. You should also unload your gun before attempting to climb a steep bank or travel across slippery ground.
17. Bring Hearing Protection — While pursuing and stalking your prey you’ll want full sensory use of your ears. But when you’re finally ready to take the shot, slip in hearing protection. A shot from a large-caliber hunting rifle can exceed 170 decibels. Unprotected exposure to noise from a SINGLE 170+ dB shot can cause permanent hearing damage. (Source: ASHA.org). If you make a follow-up shot, you double that noise hazard. Therefore a hunter with a non-suppressed rifle should have hearing protection available.
You can keep a pair of quick-insert plugs on a cord around your neck. Or, get a lightweight neck band with earbuds, such as Howard Leight Quiet Band QB2HYG, 3M Safety Band, or Sellstrom Band, all with a good 25 dB Noise Reduction Rating. You can keep these lightweight bands around your neck, for quick deployment before you shoot.
“Once a hunter is successful, the REAL work begins.” — Colton Reid
18. Harvesting the Animal — When dressing your animal, be careful with the meat. You’ll want very sharp knives. Some hunters prefer knives with replaceable, razor-sharp blades. Don’t rush the task. Make sure you don’t get moisture or dirt on meat. The three spoilers of meat are heat, moisture, and dirt.
19. Pace Yourself When Packing Out — If you DO succeed, and bring down a big buck, will you be able to dress the animal and carry out the meat? Always be prepared to hike out with extra weight. If you are successful, make sure not to waste the meat you worked so hard for. Choose a pack that can help you carry a heavy load. Remember, this is not an insignificant challenge — you may be carrying 60 to 100 extra pounds in addition to your other gear. Again, take your time. Rest as needed. Don’t hurt yourself.
20. Remember to Enjoy the Experience — Our Hunting Editor, Colton Reid, offers this sage advice to all hunters, but particularly to novices: “Have fun, and appreciate your hunt, whether you bag a buck or not. It is a privilege to experience the wilderness and to get away from the city. Enjoy it while you’re out there. And keep your spirits up. You may get tired, but remember that ‘comes with the territory’. At the end of the day, yes you may be exhausted. And you may want to quit and go home. But stay positive, stay focused. Be patient, the experience is worth it.”
CLICK HERE for Hunter Training/Mentoring Programs State-by-State.
Visit WhereToHunt.org
There’s a great online resource for hunters that will help you find game locations in your state and ensure you have all the proper permits and game tags. WheretoHunt.org features an interactive map of the country. For all 50 states, the NSSF has compiled information about hunting license and permits, where to hunt, hunter education classes, laws and regulations and more. For each state you’ll also find a link for required applications and license forms.
Field Test and Hunt Review by Colton Reid
Dawn breaks. It’s a brisk 28 degrees. I sit concealed amongst a grove of fallen trees near the edge of a steep decline where I can see the canyon below and opposing hillsides. Snow blankets the mountainous slopes with patches of fir and naked aspen woven into the landscape. The soft glow of sunrise brightens southeastern slopes and illuminates a solitary statue of orange and green on an adjacent ridge. His presence alerts an already wary elk of the danger that moved in the night before.
It is second rifle season in Colorado and I have a cow elk tag in hand. I would love to say this is not my first rodeo, but in many ways it is. I’m on my first hunt in pursuit of an elk and my first hunt in Colorado. It is, however, the second test of my newest piece of hunting equipment — Leica’s latest, state-of-the-art Geovid 3200.COM 10×42 rangefinding binoculars.
Early morning light in Colorado, on a hunt for elk…
These laser rangefinder binoculars I purchased for myself from the good people at EuroOptic.com. I should note that I am not sponsored by EuroOptic or Leica. I happen to know a few people at EuroOptic and they are a knowledgeable friendly group who use the gear they sell.
When I evaluate optics I have a clear priority in how I rank them. At the top of the list is optical quality. That is, how clear is the optical image? How crisp are the edges? Can I resolve and distinguish similar small items? Anyone who has been hunting in the great American West knows that most of your time is spent behind optics of some sort, so it is best to buy optics that make it easier to spot your target and are easy on your eyes.
Second on the list is a combination of weight and durability. I tend to hunt rugged backcountry terrain, so weight is a big consideration for my trips. But if something is feather light but breaks when you sneeze? That isn’t good either. So a combination of a robust rubberized body with modest additional weight is desired. And since the Geovid 3200.COM is a combination optic, i.e. it includes a laser rangefinder, then that helps with weight since I don’t need a separate LRF.
Third on this list is the rangefinder’s performance. By performance I mean mostly accuracy and precision of the measurement. I can live with a max of 500 yards, as long as the measurement is correct and repeatable to within a handful of yards. If, however, the measurement is off by 10% (50 yards in the case of a 500-yard reading) or measurement to measurement varies by say 20 yards, then that will dramatically affect my ability to make an ethical shot.
The Geovid’s laser ranging beam showed excellent precision. Here it picks up a single male pronghorn (not broadside) at nearly 400 yards. The return was immediate.
Other considerations such as ergonomics or comfort are less important to me because they start to move away from “functional” requirements. That is, they don’t make a big difference when it comes to spotting and harvesting an animal. So while I do think about “nice to have” features when selecting equipment, they are of lower consideration than the functional requirements.
With my framework for evaluation laid out then, here is my assessment. The Leica Geovid 3200.COM 10x42s are high-quality rangefinding binoculars — well made, with good materials, and a thoughtful design. They weigh a mere 34.6 ounces (about 2 lbs.) and are built to withstand more than a few falls. They also come with both objective and ocular lens caps. Even though they are built tough, I would not take these into the field without some sort of binocular case. I personally use a Badlands Bino case (see top and bottom photos) but there are plenty of other good options.
This 6-minute Leica factory video shows the technical features and operations of the Geovid 3200.COM series of rangefinding binoculars. Worth watching:
The glass is amazing — remarkably good (and I have high standards). The image is extremely crisp, noticeably better than my tried and true pair of Swarovski Habicht 10×40 Porro prism binoculars. This matters because the exaggerated hand motion observed in higher power optics, aka “shake”, initially made me dizzy. Leica does offer a lower power unit, the Geovid 3200.com 8×42, for those who prefer less magnification. One could argue that the optics being too sharp means they aren’t a good fit, however, my philosophy is to get the best gear possible and figure out how to use it to the max potential. My solution here was an ultralight tripod to stabilize the image when glassing or if weight is a factor I place my arms on my knees while leaning against a tree or rock. Scouting with these binoculars over long periods on a stable platform is a pleasant experience. Shown belong is the Geovid mounted on my tripod.
The Geovids present a bright, crisp image, with excellent distance distinction (pop out effect) — all characteristics of high quality optics. The image at the edge of the field of view is less sharp, but that is typical, even for scientific glass. Because the binocular image quality is so good, the image quality change when I go to my spotting scope is a much shorter jump than with previous binoculars. That means I can resolve more items with the binoculars and therefore only go to my Swarovski spotting scope when I really want to clarify something. Overall A+ optics.
Over 950 yards — yes that is what we were looking for…
The rangefinder is top shelf. One innovation I like about these rangefinding binoculars is that Leica put the laser source outside of the optic tube. That means the source is unimpeded by additional optics allowing for more power transmission and reflection. They also implemented the patented Perger prism which incorporates the rangefinder into the base optical design as opposed to using extra optics to “modify” a non-laser rangefinder configuration. As an engineer I love the idea of function integration and minimizing components. It usually makes for a more efficient and superior performing design.
One other impressive feature is the ability to link to a rangefinder program. The Leica website explains: “Thanks to Bluetooth® connection, [the Geovid 3200.com] can be paired to either the Leica Hunting App to adjust and manage quickly and easily on the fly, or to a LINK-enabled Kestrel windmeter to get results from the Kestrel right in your Range Finder[.] In addition, users will benefit from various integrated atmospheric sensors, such as temperature, air pressure and inclination sensors, producing angle-compensated distance measering for shooting uphill or downhill with maximum precision.”
Testing Laser Ranging Performance
To test the Geovid’s laser rangefinder I did my usual measurement of different objects near my house and checked the accuracy with Google earth. I was able to consistently range larger objects (trees, hills, rocks) out to about 2200 yards, which is longer than I would ever shoot, but good when planning where to move for my next vantage point. I was also able to range a large reflective target (pedestrian overpass) out to a staggering 3300+ yards (see below).
In this video, the Geovid ranges a concrete pedestrian overpass at distance of 3334 yards.
I suspect the max range I can consistently get with large, non-reflective objects is somewhere around 2400 yards, but didn’t have the opportunity to test that specific distance. The rangefinder had some trouble at shorter distances and through thick branches. Around 25 to 45 yards I would get several yards variation when ranging tree trunks. Tall grass and a nest of tree branches would also interfere with the measurement. I would either get a slightly incorrect reading or no reading at all. This might come up if I am trying to range a buck bedded in tall grass. That is a drawback for me because that is a typical situation in archery. My workaround was to range nearby objects and estimate the handful of yards separation between the ranged item and target.
Summary: Geovid 3200.COM Rangefinding Binoculars Are Excellent
In summary, the Leica Geovid 3200.COM rangefinder binoculars are excellent in all key respects. The glass is top-notch and the rangefinding performance is very impressive. The modern Bluetooth connectivity is a plus. These Leica Geovids offer a slightly better price point than their equivalent competitors and are the optics I bought with my own money. I doubt you will be disappointed.
New for 2022 — Leica Geovid Pro 32 RangeFinding Binoculars
Smaller, Lighter, with Applied Ballistics and GPS Mapping Integration
Trading on the success of the Geovid 3200.COM series, on 1/6/2022, Leica announced a new smaller, lighter version, with enhanced software — the Leica Geovid Pro 32. Weight 30.6 ounces, this is about 4 oz. lighter than the original, and 0.83 inches shorter. With notably smaller objective lenses (32mm for the Pro 32 vs. 42mm with the Geovid 3200.com) these new Geovid Pro 32s should be easier to hold for extended periods, but they may give up a bit of low light capability compared to their bigger brothers.
The other big news is enhanced software in the Pro 32: “Leica Geovid Pro was built ground up to combine the on-board atmospheric sensors with NEW on-board Applied Ballistics[.] The Geovid Pro comes standard with Applied Ballistics Ultralight … upgradable to Applied Ballistics Sportsman or Elite. The Geovid Pro 32 now also offers advanced GPS tracking connectivity, Leica ProTrack, to guide the user to the target based on the last ranged measurement. The Geovid Pro 32 is the first premium rangefinder to feature GPS mapping integration through BaseMaps, Google Maps and Garmin mapping.”
Today is National Hunting and Fishing Day. To help the avid hunters among our readers, here are Twenty Tips that can help ensure a safe and successful hunt. These tips have been compiled from our AccurateShooter Hunting Forum, with help from Hunting Editor Colton Reid (who has already been out hunting this month). Some items are preparatory — such as working with maps, sighting in the rifle, and improving physical fitness. We also talk about equipment — having the right gear, from proper boots to a GPS for multi-day hunts.
Of course there are entire volumes written on hunting, but these 20 Tips can benefit all hunters. Follow these suggestions and you should have a safer hunting experience with greater likelihood of success. If you liked these pointers, you’ll find two dozen more helpful hints on the NSSF Website.
Preparations Before The Hunt
1. Map Your Hunt and Notify Others — Before your hunt, make a plan and notify friends and family members about WHERE you are going and your intended return date and time. Print out a Google Satellite map and locate landmarks and trailheads. Mark where you plan to park your vehicle and give a copy of this map to friend and/or family members. A hunter may injure himself by falling off a rock, or tumbling in a creek-bed. After that kind of injury the hunter may be confused or unable to walk. If you get stranded in the wilderness, you want trusted persons to know where you are. So, before you leave on a trip, provide a map to a friend or family member. Show them where you will leave your vehicle, and where you expect to be every day of your hunting adventure.
2. Licenses and Permits — Make sure you have a valid hunting licenses and all the necessary tags. Begin this process with ample time before your intended hunt(s). The NSSF adds: “If you are crossing state or national borders, find out about any special considerations you must take care of. Border crossings can mean knowing about firearm transport laws or Chronic Wasting Disease-related regulations.”
3. Work on Your Fitness — On a multi-day hunt you may be trekking many miles. You need to be in good shape. If you are out of shape you may be putting yourself in a precarious situation, particularly if you underestimate the terrain difficulty. As the NSSF says: “Not being able to handle the conditions lessens your chances of success, can turn a great experience into an agonizing one and can endanger your health.”
4. Do Your Homework — Study the area you will be hunting. Talk to other hunters. Look at satellite photos. Get a real sense of the walking and terrain challenges. For a multi-day hunt, MAKE a PLAN. The NSSF states: “Eliminate surprises. Learn as much about where you will be staying, the area you will be hunting, what the weather might be like and what you need to bring[.]”
5. Rifle and Ammo — Make sure your rifle is sighted-in and your ammo is tested. Sight-in your rifle with the ammo you plan to use on your hunt. CLICK HERE for 4-Shot Sight-in Method. After sighting-in from the bench, confirm your zero by shooting from typical hunting positions (kneeling and with forearm supported on a rock or post).
6. Shooting Positions — Practice the shooting positions you will use in the field. Practice sitting, kneeling, and prone positions. You should also practice with shooting sticks, using your day pack as a rest, and with a bipod. Try to have a rock-steady rest before taking your shot.
7. Back-Up Irons — If possible, select a rifle with back-up iron sights. While modern scopes are very durable, they can and do fail (glass can crack). If you’ve invested a lot of time and money in your hunt, back-up iron sights can keep you in the game even if your riflescope fails.
8. Communications and GPS — Bring a GPS if you are in a wilderness area far from civilization. It’s a good idea to bring a cell phone, but you may not have coverage if you’re quite a distance from populated areas. A smart-phone also doubles as a digital camera to record your trophies. For navigation and safety, consider getting Garmin inReach Explorer+. This high-tech handheld unit features interactive SOS, connecting you to the GEOS 24/7 search-and-rescue monitoring center. They also allow you to send and receive text messages, no matter where you are, via advanced inReach satellite technology. Yes you can communicate even if you are miles from the nearest cell tower.
9. Select Good Gear — Make sure you have GOOD BOOTS that are comfortable — you’ll spend a lot of time on your feet. You may want a pack with harness for your rifle so you have both hands free. On a multi-day trip, make sure you can carry enough water, and that you will stay warm enough at night. Good practices for backpacking apply to multi-day hunts.
10. Make a Gear Checklist — Create a complete checklist of the gear and supplies you need. That includes arms, ammunition, rangefinder, binoculars, proper clothing (including spare clothes), hunting accessories, sleeping gear (on multi-day hunts), toiletries, medications. Don’t forget a good first aid kit — lots of bad things can happen during any wilderness trip. You can cut a hand, break an ankle or worse.
During The Hunt
11. Have a Plan — know where you plan to go and when. Try to be where you want in the early morning and early evening hours when deer are likely most active.
12. Take Your Time — If you spot a deer and get too excited and don’t take your time you may spook him. Go slow and glass. If possible, wait for the animals to bed down and relax. Then work out the best way to approach your prey. Remember, “You get so few opportunities, don’t screw it up!”
13. Glass More, Walk Less — Let your eyes do the walking — get good binoculars and use them. With their heightened senses of smell and hearing, deer/elk are able to spot you way better than you can spot them. If you are walking around a lot, chances are you are getting spotted by your prey.
14. Riflescopes Are Not Binoculars — Never use a riflescope as a substitute for binoculars. The temptation to do so is real, but when one does this, one is by definition pointing the muzzle of the gun at unknown targets. We like binoculars with built-in rangefinders. When glassing at long range, try supporting your binoculars on your pack.
15. Be Sure of Your Target before Shooting — Every year during whitetail season, farmers are forced to spray-paint their cattle or risk having them “harvested” by hunters who don’t bother confirming the species in their sights. Hunters with “buck fever” can make mistakes. When in doubt, don’t shoot.
16. Know When to Unload — When finished hunting, unload your firearm before returning to camp. You should also unload your gun before attempting to climb a steep bank or travel across slippery ground.
17. Bring Hearing Protection — While pursuing and stalking your prey you’ll want full sensory use of your ears. But when you’re finally ready to take the shot, slip in hearing protection. A shot from a large-caliber hunting rifle can exceed 170 decibels. Unprotected exposure to noise from a SINGLE 170+ dB shot can cause permanent hearing damage. (Source: ASHA.org). If you make a follow-up shot, you double that noise hazard. Therefore a hunter with a non-suppressed rifle should have hearing protection available.
You can keep a pair of quick-insert plugs on a cord around your neck. Or, get a lightweight neck band with earbuds, such as Howard Leight Quiet Band QB2HYG, 3M Safety Band, or Sellstrom Band, all with a good 25 dB Noise Reduction Rating. You can keep these lightweight bands around your neck, for quick deployment before you shoot.
“Once a hunter is successful, the REAL work begins.” — Colton Reid
18. Harvesting the Animal — When dressing your animal, be careful with the meat. You’ll want very sharp knives. Some hunters prefer knives with replaceable, razor-sharp blades. Don’t rush the task. Make sure you don’t get moisture or dirt on meat. The three spoilers of meat are heat, moisture, and dirt.
19. Pace Yourself When Packing Out — If you DO succeed, and bring down a big buck, will you be able to dress the animal and carry out the meat? Always be prepared to hike out with extra weight. If you are successful, make sure not to waste the meat you worked so hard for. Choose a pack that can help you carry a heavy load. Remember, this is not an insignificant challenge — you may be carrying 60 to 100 extra pounds in addition to your other gear. Again, take your time. Rest as needed. Don’t hurt yourself.
20. Remember to Enjoy the Experience — Our Hunting Editor, Colton Reid, offers this sage advice to all hunters, but particularly to novices: “Have fun, and appreciate your hunt, whether you bag a buck or not. It is a privilege to experience the wilderness and to get away from the city. Enjoy it while you’re out there. And keep your spirits up. You may get tired, but remember that ‘comes with the territory’. At the end of the day, yes you may be exhausted. And you may want to quit and go home. But stay positive, stay focused. Be patient, the experience is worth it.”
CLICK HERE for Hunter Training/Mentoring Programs State-by-State.
Prepare For Your Hunt — Get Fit and Practice Positions
As part of the NRA’s Tips & Tactics video series, Kristy Titus explains how to prepare for a hunt. Titus, co-host of the Team Elk TV show has hunted around the globe. She grew up in the outdoors, running pack mules in Oregon with her father. In this video, Kristy discusses fitness training and demonstrates field positions that can be employed during a hunt.
Kristy explains: “Hunting can lead you into some steep, rough country. It’s really important that you train both your body and your mind to handle the elements and the rigors of hunting So, if you plan on going on a mountain hunt, get out and train your body. Train with your firearm. Get off the bench and have some fun with this. Do some positional shooting or, if you want to add a stress dynamic… have someone put you under a time parameter.”
Visit WhereToHunt.org
There’s a great online resource for hunters that will help you find game locations in your state and ensure you have all the proper permits and game tags. WheretoHunt.org features an interactive map of the country. For all 50 states, the NSSF has compiled information about hunting license and permits, where to hunt, hunter education classes, laws and regulations and more. For each state you’ll also find a link for required applications and license forms.
Today is National Hunting and Fishing Day. To help the avid hunters among our readers, here are Twenty Tips that can help ensure a safe and successful hunt. These tips have been compiled from our AccurateShooter Hunting Forum, with help from Hunting Editor Colton Reid (who has already been out hunting this month). Some items are preparatory — such as working with maps, sighting in the rifle, and improving physical fitness. We also talk about equipment — having the right gear, from proper boots to a GPS for multi-day hunts.
Of course there are entire volumes written on hunting, but these 20 Tips can benefit all hunters. Follow these suggestions and you should have a safer hunting experience with greater likelihood of success. If you liked these pointers, you’ll find two dozen more helpful hints on the NSSF Website.
Preparations Before The Hunt
1. Map Your Hunt and Notify Others — Before your hunt, make a plan and notify friends and family members about WHERE you are going and your intended return date and time. Print out a Google Satellite map and locate landmarks and trailheads. Mark where you plan to park your vehicle and give a copy of this map to friend and/or family members. A hunter may injure himself by falling off a rock, or tumbling in a creek-bed. After that kind of injury the hunter may be confused or unable to walk. If you get stranded in the wilderness, you want trusted persons to know where you are. So, before you leave on a trip, provide a map to a friend or family member. Show them where you will leave your vehicle, and where you expect to be every day of your hunting adventure.
2. Licenses and Permits — Make sure you have a valid hunting licenses and all the necessary tags. Begin this process with ample time before your intended hunt(s). The NSSF adds: “If you are crossing state or national borders, find out about any special considerations you must take care of. Border crossings can mean knowing about firearm transport laws or Chronic Wasting Disease-related regulations.”
3. Work on Your Fitness — On a multi-day hunt you may be trekking many miles. You need to be in good shape. If you are out of shape you may be putting yourself in a precarious situation, particularly if you underestimate the terrain difficulty. As the NSSF says: “Not being able to handle the conditions lessens your chances of success, can turn a great experience into an agonizing one and can endanger your health.”
4. Do Your Homework — Study the area you will be hunting. Talk to other hunters. Look at satellite photos. Get a real sense of the walking and terrain challenges. For a multi-day hunt, MAKE a PLAN. The NSSF states: “Eliminate surprises. Learn as much about where you will be staying, the area you will be hunting, what the weather might be like and what you need to bring[.]”
5. Rifle and Ammo — Make sure your rifle is sighted-in and your ammo is tested. Sight-in your rifle with the ammo you plan to use on your hunt. CLICK HERE for 4-Shot Sight-in Method. After sighting-in from the bench, confirm your zero by shooting from typical hunting positions (kneeling and with forearm supported on a rock or post).
6. Shooting Positions — Practice the shooting positions you will use in the field. Practice sitting, kneeling, and prone positions. You should also practice with shooting sticks, using your day pack as a rest, and with a bipod. Try to have a rock-steady rest before taking your shot.
7. Back-Up Irons — If possible, select a rifle with back-up iron sights. While modern scopes are very durable, they can and do fail (glass can crack). If you’ve invested a lot of time and money in your hunt, back-up iron sights can keep you in the game even if your riflescope fails.
8. Communications and GPS — Bring a GPS if you are in a wilderness area far from civilization. It’s a good idea to bring a cell phone, but you may not have coverage if you’re quite a distance from populated areas. A smart-phone also doubles as a digital camera to record your trophies. For navigation and safety, consider getting Garmin inReach Explorer+. This high-tech handheld unit features interactive SOS, connecting you to the GEOS 24/7 search-and-rescue monitoring center. They also allow you to send and receive text messages, no matter where you are, via advanced inReach satellite technology. Yes you can communicate even if you are miles from the nearest cell tower.
9. Select Good Gear — Make sure you have GOOD BOOTS that are comfortable — you’ll spend a lot of time on your feet. You may want a pack with harness for your rifle so you have both hands free. On a multi-day trip, make sure you can carry enough water, and that you will stay warm enough at night. Good practices for backpacking apply to multi-day hunts.
10. Make a Checklist — Create a complete checklist of the gear and supplies you need. That includes arms, ammunition, rangefinder, binoculars, proper clothing (including spare clothes), hunting accessories, sleeping gear (on multi-day hunts), toiletries, medications. Don’t forget a good first aid kit — lots of bad things can happen during any wilderness trip. You can cut a hand, break an ankle or worse.
During The Hunt
11. Have a Plan — know where you plan to go and when. Try to be where you want in the early morning and early evening hours when deer are likely most active.
12. Take Your Time — If you spot a deer and get too excited and don’t take your time you may spook him. Go slow and glass. If possible, wait for the animals to bed down and relax. Then work out the best way to approach your prey. Remember, “You get so few opportunities, don’t screw it up!”
13. Glass More, Walk Less — Let your eyes do the walking — get good binoculars and use them. With their heightened senses of smell and hearing, deer/elk are able to spot you way better than you can spot them. If you are walking around a lot, chances are you are getting spotted by your prey.
14. Riflescopes Are Not Binoculars — Never use a riflescope as a substitute for binoculars. The temptation to do so is real, but when one does this, one is by definition pointing the muzzle of the gun at unknown targets. We like binoculars with built-in rangefinders. When glassing at long range, try supporting your binoculars on your pack.
15. Be Sure of Your Target before Shooting — Every year during whitetail season, farmers everywhere are forced to spray-paint their cattle or risk having them “harvested” by hunters who don’t bother confirming the species in their sights. Hunters with “buck fever” can make mistakes. When in doubt, don’t shoot.
16. Know When to Unload — When finished hunting, unload your firearm before returning to camp. You should also unload your gun before attempting to climb a steep bank or travel across slippery ground.
17. Hearing Protection — While pursuing and stalking your prey you’ll want full sensory use of your ears. But when you’re finally ready to take the shot, slip in hearing protection. A shot from a large-caliber hunting rifle can exceed 170 decibels. Unprotected exposure to noise from a SINGLE 170+ dB shot can cause permanent hearing damage. (Source: ASHA.org). If you make a follow-up shot, you double that noise hazard. Therefore a hunter with a non-suppressed rifle should have hearing protection available.
You can keep a pair of quick-insert plugs on a cord around your neck. Or, get the Howard Leight Quiet Band QB2HYG. This is a plastic ring with earbuds, you can keep around your neck.
“Once a hunter is successful, the REAL work begins.” — Colton Reid
18. Harvesting the Animal — When dressing your animal, be careful with the meat. You’ll want very sharp knives. Some hunters prefer knives with replaceable, razor-sharp blades. Don’t rush the task. Make sure you don’t get moisture or dirt on meat. The three spoilers of meat are heat, moisture, and dirt.
19. Pace Yourself When Packing Out — If you DO succeed, and bring down a big buck, will you be able to dress the animal and carry out the meat? Always be prepared to hike out with extra weight. If you are successful, make sure not to waste the meat you worked so hard for. Choose a pack that can help you carry a heavy load. Remember, this is not an insignificant challenge — you may be carrying 60 to 100 extra pounds in addition to your other gear. Again, take your time. Rest as needed. Don’t hurt yourself.
20. Remember to Enjoy the Experience — Our Hunting Editor, Colton Reid, offers this sage advice to all hunters, but particularly to novices: “Have fun, and appreciate your hunt, whether you bag a buck or not. It is a privilege to experience the wilderness and to get away from the city. Enjoy it while you’re out there. And keep your spirits up. You may get tired, but remember that ‘comes with the territory’. At the end of the day, yes you may be exhausted. And you may want to quit and go home. But stay positive, stay focused. Be patient, the experience is worth it.”
CLICK HERE for Hunter Training/Mentoring Programs State-by-State.
Prepare For Your Hunt — Get Fit and Practice Positions
As part of the NRA’s Tips & Tactics video series, Kristy Titus explains how to prepare for a hunt. Titus, co-host of the Team Elk TV show has hunted around the globe. She grew up in the outdoors, running pack mules in Oregon with her father. In this video, Kristy discusses fitness training and demonstrates field positions that can be employed during a hunt.
Kristy explains: “Hunting can lead you into some steep, rough country. It’s really important that you train both your body and your mind to handle the elements and the rigors of hunting So, if you plan on going on a mountain hunt, get out and train your body. Train with your firearm. Get off the bench and have some fun with this. Do some positional shooting or, if you want to add a stress dynamic… have someone put you under a time parameter.”
Visit WhereToHunt.org
There’s a great online resource for hunters that will help you find game locations in your state and ensure you have all the proper permits and game tags. WheretoHunt.org features an interactive map of the country. For all 50 states, the NSSF has compiled information about hunting license and permits, where to hunt, hunter education classes, laws and regulations and more. For each state you’ll also find a link for required applications and license forms.
Field Test by Colton Reid, AccurateShooter Hunting Editor
As a solo backcountry hunter, I try to carry as little weight as possible. Each step is a reminder to bring only the most essential/effective equipment. Each item in my pack must earn its precious backpack real estate. That’s why I favor gear that serves multiple purposes — and binoculars are no exception. In a previous optics review, I field-tested Zeiss Victory RF 10×42 ranging binoculars and the results were beyond expectation — they are outstanding. However, such superior, upper-eschelon ranging optics from Zeiss cost over $3000.00. And Leica Geovid HD-B 3000 ranging binoculars cost around $2500.00.
For those looking for a more affordable option, there are several mid-range binoculars with integrated ranging capability. One popular choice is the Vortex Fury HD 5000 10×42 LRF Binoculars. Priced at around $1200 on Amazon, the Fury HD 5000 is half the price of some European LRF Binoculars. Yet the Fury HD 5000 LRF Binos still combine two optical systems (magnification and laser ranging) into one that is more valuable than the sum of the parts.
Vortex Fury HD 5000 Look and Feel
The Fury binoculars are compact and relatively light — a modest 2 pounds. They are covered by a rubber armor exterior that feels sturdy enough to survive some hard falls, but is also comfortable to hold. The compact size did offer a challenge in determining how best to place my thumbs (see top photo). The rangefinder controls (Measure, Menu) are easy to access and are distinguishable by the braille-like bumps that cover them. Considering that these buttons are going to be located and pressed without looking at the top of the binoculars each time, it was perhaps a poor design choice to place the raised Vortex logo adjacent to the controls. But after a little practice I was able to quickly locate the measure button when ranging in the field.
The eye cups are comfortable and offer four discrete eye relief positions. The focus and diopter knobs are large and easy to turn but also provide resistance to rotation. Resistance is useful for maintaining the previous positional setting.
Vortex Fury 5000 — Rangefinding Performance
The Vortex Fury’s rangefinder function, along with its menu, is simple and intuitive. In my humble opinion, simple is better. The display is a red LED projection in the right optic. As noted in another review, the red display can be difficult to distinguish against a tan/brown image, so I used max brightness at all times to ensure display visibility. The display menu covers the core items: distance (line of sight or angle compensated), measurement units (yards/meters), brightness, and the ability to display either the strongest “Best” signal or the “Last Result” to help range objects behind trees or brush. The rangefinder also enables scan mode (continuous ranging) that updates displayed distance every three-quarters of a second as you sweep over the terrain.
In the field, rangefinder performance was good. I could consistently range objects at distances out to around 1500 yards. Beyond that, the rangefinder struggled with hills, trees, and brush. Ranging Longer distances required a rock or something more reflective. I will likely never shoot targets at or beyond 1500 yards, but the ability to range objects at those distances is extremely useful when scouting in the field. I routinely use my rangefinder to measure the distance to my next vantage point or staging area for a stalk, which can be over a mile away.
Optics — How Good is the Glass?
I should first note that it is difficult to quantitatively compare optical systems without objective data from sophisticated scientific measurement systems used in optics labs. Consequently, I must rely on a qualitative comparison with a known reference. In this case I compared the Fury HD against my tried and true Swarovski Habicht porro-prism binoculars.
With that disclaimer, I would rate the Vortex Fury optics as good to very good. In ample daylight, the Fury and Habicht binoculars were comparable. The main difference being that the Fury required a more precise adjustment of the focus knob in order to capture a crisp image. In low light, the Habichts had the advantage. The Fury images appeared slightly darker than the Habichts and the image sharpness in the Fury seemed to degrade more quickly with the fading light.
That may be partially linked to lower light transmission but also to the more sensitive focus knob of the Fury. With that sensitivity it could be difficult to tell which knob position yielded the best image. That being said, I was still able to spot deer with the Furys in low light (see image). What is more, I didn’t have to switch between my binoculars and a rangefinder to determine distance or suffer the reorientation of a different magnification and field of view. That is a huge benefit!
The Verdict
Overall, I was happy with the Vortex Fury’s performance. Both the optics and rangefinder were what I would consider mid-range in terms of performance. But for a street price of about $1200.00, that is a good value. Yes you can do better, but you’ll have to pay more than twice as much. Considering my recommendation is always to buy the best optics you can afford, the Vortex Fury HD 5000 would be a good choice for serious hunters on a budget. These are solidly made. Vortex states the aluminum alloy body is nitrogen-purged, and O-ring sealed to provide a waterproof, fogproof and shockproof product.


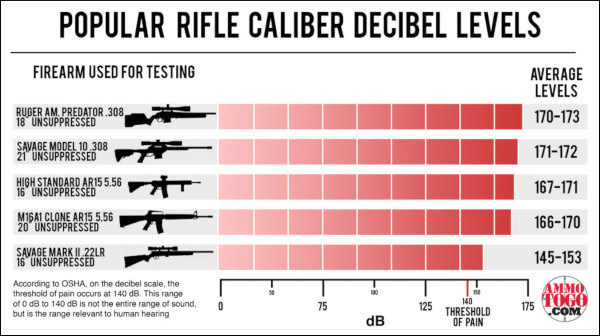


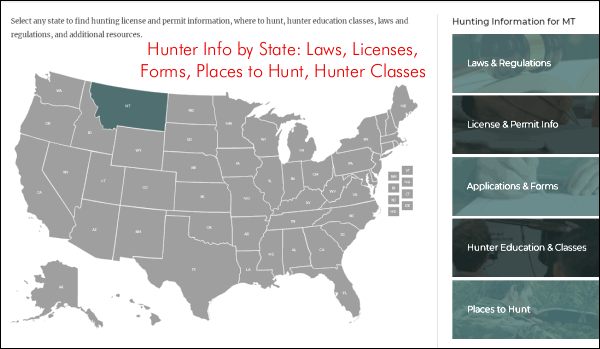
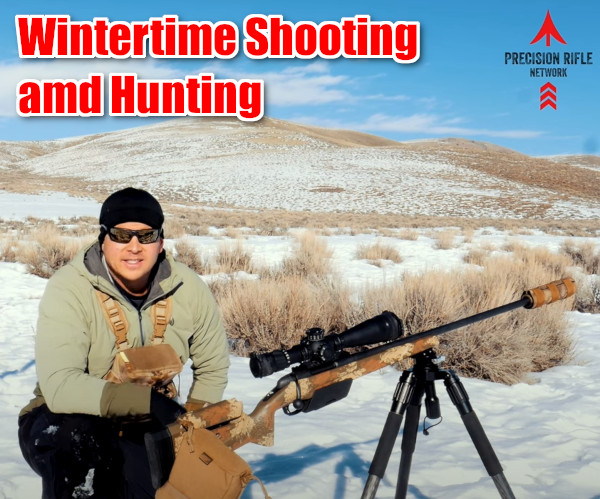


 With careful planning, and some skilled tracking, Colton had success, making a perfect hit on a buck at 300 yards. The animal dropped instantly. Colton brought back a good harvest of deer meat, which formed part of the Thanksgiving feast for his family.


 The next morning, I was back on the road and stopping at periodic vantage points to glass across the valley. The whole time I was thinking “will I really get a second bite at the apple”?