Would you like to swap dies in and out of a reloading press in just seconds, with a quick twist of the wrist? Hornady’s Lock ‘N Load twist-lock hardware makes that possible. This time-saving system uses “die bushings” that screw on to your dies. Don’t have Hornady press? No problem — the Lock-N-Load system can be used with non-Hornady presses via the Lock-N-Load Conversion Kit. This includes three die bushings and one press conversion insert. The adapter will work with RCBS RockChuckers and any other reloading press using a 1-1/4-12 thread. The Lock-N-Load Conversion Kit costs just $15.59 at Midsouth Shooters Supply. Watch this video to see how it works.
Product and video tip from EdLongRange. We welcome reader submissions.
Each Wednesday, the U.S. Army Marksmanship Unit (USAMU) publishes a reloading “how-to” article on the USAMU Facebook page. A while back, the USAMU’s reloading gurus addressed a question frequently asked by handloaders: “How much neck tension is optimal, and how should I select a neck bushing size?” The USAMU offers a straight-forward answer, suggesting that hand-loaders start with a neck bushing that sizes the neck so that it is .003″ less than the loaded outside diameter with bullet in place. From there, you can experiment with more or less tension, but this is a good starting point for many popular cartridge types.
Determining Optimal Case-Neck Tension
This week, we examine determining the correct case neck tension for optimum accuracy. Our method is simple, but relies on the use of case sizing dies which accept interchangeable neck diameter bushings graduated in 0.001″ increments. (Those readers using fixed-diameter dies with expander balls aren’t forgotten, however. Methods of tailoring these dies for proper neck tension will be found below.)
In our experience across many calibers, sizing case necks 0.003″ under the loaded-case neck diameter usually yields excellent accuracy. In other words, the sized case neck expands 0.003″ when the bullet is seated.
Bushing Choice for Optimal Sizing
Over the years, we have periodically experimented with increasing neck tension to possibly improve accuracy. In testing with machine rests at 300/600 yards, accuracy often deteriorated as neck tension increased; thus, 0.003″ expansion (from sized neck to loaded neck) is where we usually start.
Using the .260 Remington as an example, our loaded cartridge case necks measure 0.292”. Simply subtract 0.003” from that, and use a bushing that sizes necks to 0.289” (after springback). There are exceptions — sometimes, brass may be a bit soft or hard. Some case necks might need, say, 0.001” more tension, but in general, this works well.
This .003″ standard of neck tension works very well for single-loaded, long range cartridges. Depending on your caliber and firearm, it MAY also work very well for magazine-fed cartridges. If this neck tension proves inadequate for your purpose, one can increase neck tension as needed while monitoring for possible accuracy changes.
Special Considerations for Coated Bullets: If you are using moly-coated bullets, this significantly reduces the “grip” of the case neck on the bullet, and you can expect to have to tighten your case necks accordingly — particularly for magazine-fed ammunition. In any event, we do not crimp rifle cartridges, and advise against it for accuracy handloads.
Tips for Using Expander Balls
Many savvy handloaders avoid the use of expander balls in high-accuracy reloading, if possible. These can stretch cases and/or disturb the concentricity of the case neck vs. case body. If using a die with an expander ball, tapering both ends of the ball and polishing it to a mirror finish can significantly reduce these effects. (Special carbide expander ball/decapping stem sets are available for this as well.)
The typical dies used with expander balls are intended to take any cases the user may find, and size them down well below the ideal “spec” to ensure any cases will give good neck tension. The necks are then expanded up to provide heavy to medium neck tension as the expander ball exits the neck. The brass is over-worked, leading to premature work-hardening, and seated-bullet concentricity may suffer. However, the cartridges produced are perfectly adequate for most handloaders. Those who seek finest accuracy generally prefer not to over-work their brass if possible.
Another Option — Custom-Honed FL Dies
There are companies which offer to convert one’s standard dies to accept neck bushings, and that gives excellent flexibility. Another, more “old-school” approach, is to have the neck of one’s FL die honed out to the desired diameter for sizing, based on one’s case neck thickness. The expander ball may then be reduced until it barely touches the case necks after sizing, or it may be eliminated entirely. However, once performed, this modification is permanent and leaves fewer options than the bushing route, if one later changes case neck thickness.
Those shooters who turn their case necks for optimum neck wall thickness uniformity, or for a tight-neck chamber, will want to take the reduced neck wall thickness into consideration. For example, when setting up a 7mm match rifle to use a standard hunting die without an expander ball, the slightly thinner necks resulted in a perfect 0.003″ reduction in the fired-neck diameter. The result was a low-cost die that fit with custom precision and yielded excellent, match accuracy!
Here is a simple technique that can potentially help you load straighter ammo, with less run-out (as measured on the bullet). This procedure costs nothing and adds only a few seconds to the time needed to load a cartridge. Next time you’re loading ammo with a threaded (screw-in) seating die, try seating the bullet in two stages. Run the cartridge up in the seating die just enough to seat the bullet half way. Then lower the cartridge and rotate it 180° in the shell-holder. Now raise the cartridge up into the die again and finish seating the bullet.
Steve, aka “Short Range”, one of our Forum members, recently inquired about run-out apparently caused by his bullet-seating process. Steve’s 30BR cases were coming out of his neck-sizer with good concentricity, but the run-out nearly doubled after he seated the bullets. At the suggestion of other Forum members, Steve tried the process of rotating his cartridge while seating his bullet. Steve then measured run-out on his loaded rounds. To his surprise there was a noticeable reduction in run-out on the cases which had been rotated during seating. Steve explains: “For the rounds that I loaded yesterday, I seated the bullet half-way, and turned the round 180 degrees, and finished seating the bullet. That reduced the bullet runout by almost half on most rounds compared to the measurements from the first test.”
Steve recorded run-out measurements on his 30BR brass using both the conventional (one-pass) seating procedure, as well as the two-stage (with 180° rotation) method. Steve’s measurements are collected in the two charts above. As you can see, the run-out was less for the rounds which were rotated during seating. Note, the change is pretty small (less than .001″ on average), but every little bit helps in the accuracy game. If you use a threaded (screw-in) seating die, you might try this two-stage bullet-seating method. Rotating your case in the middle of the seating process won’t cost you a penny, and it just might produce straighter ammo (nothing is guaranteed). If you do NOT see any improvement on the target, you can always go back to seating your bullets in one pass. READ Forum Thread..
To err is human… Sooner or later you’ll probably get a case stuck in a die. This “fix-it” article, which originally appeared in the Western Powders Blog, explains the procedure for removing a firmly stuck cartridge case using an RCBS kit. This isn’t rocket science, but you do want to follow the directions carefully, step-by-step. Visit the Western Powders Blog for other helpful Tech Tips.
Curing the Stuck Case Blues
Sticking a case in the sizer die is a rite of passage for the beginning handloader. If you haven’t done it yet, that’s great, but it probably will eventually happen. When it does, fixing the problem requires a bit of ingenuity or a nice little kit like the one we got from RCBS.
The first step is to clear the de-capping pin from the flash hole. Just unscrew the de-capping assembly to move it as far as possible from the primer pocket and flash hole (photo at right). Don’t try to pull it all the way out. It won’t come. Just unscrew it and open as much space as possible inside the case.
Place the die upside down in the padded jaws of a vise and clamp it firmly into place. Using the supplied #7 bit, drill through the primer pocket. Be careful not to go too deeply inside the cartridge once the hole has opened up. It is important to be aware that the de-capping pin and expander ball are still in there and can be damaged by the bit.
Drill and Tap the Stuck Case
Once the cartridge head has been drilled, a ¼ – 20 is tap is used to cut threads into the pocket. Brass is relatively soft compared to a hardened tap, so no lube is needed for the tapping process. RCBS says that a drill can be used for this step, but it seems like a bit of overkill in a project of this nature. A wrench (photo above right) makes short work of the project.
RCBS supplies a part they call the “Stuck Case Remover Body” for the next step. If you are a do-it-yourselfer and have the bit and tap, this piece is easily replicated by a length of electrical conduit of the proper diameter and some washers. In either case, this tool provides a standoff for the screw that will do the actual pulling.
With an Allen Wrench, Finish the Job
Run the screw through the standoff and into the tapped case head. With a wrench, tighten the screw which hopefully pulls the case free. Once the case is free, clamp the case in a vice and pull it free of the de-capping pin. There is tension here because the sizing ball is oversized to the neck dimension as part of the sizing process. It doesn’t take much force, but be aware there is still this last little hurdle to clear before you get back to loading. Don’t feel bad, everyone does this. Just use more lube next time!
Article find by EdLongrange. We welcome reader submissions.
Wouldn’t it be great if you could quickly and easily adjust shoulder bump during the full-length sizing process, without struggling to move die lock-rings by trial and error (or fiddle with shims). Well you can. The PMA Micro Die Adjuster is a brilliant little device that replaces the lock ring on your FL sizing die. It allows you to move the die up and down in precise, tiny increments. The tool has .001″ index marks, but you can easily set your die between the marks to achieve .0005″ (half-thousandth) adjustments.
To see how the PMA Micro-Die Adjuster works, watch this video by our friend Boyd Allen:
Many of our Forum members now use the PMA Micro Die Adjuster, and they give this specialty tool high praise. Here are actual reviews by Forum members and other verified tool buyers. Read more comments in this AccurateShooter Forum Thread.
PMA Micro Die Adjuster User Reviews
“No more ‘close enough’ for headspace[.] With this tool set-up it’s easy to put headspace exactly where you want it, then repeat it exactly for subsequent batches for the same cartridge.” — JohnF
“I have four of these Micro Adjuster rings and all I can say is that it works and it is repeatable. I bump my brass .0005″-.001″ and this die lock ring will do it without issue.” — TrapperT
“I size brass for four different 6.5×47 rifles (chambered with three different reamers) using a single die, set in the PMA Adjuster. I have to say… I should have bought one sooner. Adjusting it is very quick and repeatable to well under .001.” — /VH
“Great product. Shims used to drive me crazy, put a .002 in and get .0035 of change. With this if you want .0015 set it and that’s what you get.” — John B
“I’ve been using PMA’s lock ring for some time now and find it to be very easy to adjust to within .0005″ on a single piece of brass. Very quick to do as well. One thing I have found is that if you still need that half-thou adjustment I will run the brass once more at the same setting before I make that .0005″ adjustment and 50 percent of the time that does the trick. The marked increments are in .001″ scale so if you go half way in between there’s your half-thousandth.
PMA Micro-Adjuster vs. Shims: With respect to using shims, that requires you to completely remove the die. That gets old rather quickly after having used the PMA adjustable lock ring.” — Patch 700
“I like mine — adjustments are easy and it will adjust very fine. I used to use .001″ shims. Now can adjust my bump as fine as I want.” — Joe139
“The PMA adjuster works just like they say it does and is very simple to use and adjust. I use JLC inserts as well … as nice as they are you’re still hobbled by a click. However with the PMA you can go between what would be clicks. And you can use them … with any die.” — Dusty Stevens
Product Description from PMA Tool
The PMA Tool Micro Die Adjuster (MDA) replaces your existing lock ring and can be used with nearly any 7/8-14 full length sizing die. We successfully used this tool with sizing dies from Redding, RCBS, Hornady, Lee, Harrells Precision and those made from Newlon Precision die blanks. It allows you to easily make adjustments to your “shoulder bump” as fine as .0005″. The engraved marks on the MDA are equal to approximately .001 inches (true adjustment .000992″) of adjustment to the shoulder bump. Splitting the engraved marks is therefore approximately equal to .0005″. The design of the MDA does not allow it to work with the Forster Co-Ax press. Some custom dies for very short cartridges may require the use of an extended shellholder. Micro Die Adjuster shown in use installed on Custom Newlon/Scott 6mm PPC Die and Harrells Precision Compact Press.
When your cases become hard to extract, or you feel a stiff bolt lift when removing a cartridge, it’s probably time to full-length size your cases, and “bump” the shoulder back. With a hunting load, shoulder bumping may only be required every 4-5 loading cycles. Short-range benchrest shooters, running higher pressures, typically full-length size every load cycle, bumping the shoulder .001-.002″. High Power shooters with gas guns generally full-length size every time, and may need to bump the shoulders .003″ or more to ensure reliable feeding and extraction.
Use Shims for Precise Control of Shoulder Bump
Some shooters like to set the “default” position for their full-length die to have an “ample” .003″ or .004″ shoulder bump. When they need less bump, a simple way to reduce the amount of shoulder movement is to use precision shims in .001″ (one-thousandth) increments.
Here are reports from Forum members who use the shims:
“Great product. I have my die lock ring(s) adjusted for the shortest headspace length on my multiple chambers 6BRs and 6PPCs. When needing a longer headspace, I just refer to my notes and add the appropriate shim under the lock ring. Keep it simple.” — F.D. Shuster
Mats Johansson writes: “I’ve been using [shims] since Skip Otto (of BR fame) came out with them. I set up my dies with the .006″ shim, giving me the option of bumping the shoulder a bit more when the brass gets old and hardens while still having room to adjust up for zero headspace, should I have missed the original setup by a thou or two. Hunting rounds can easily be bumped an extra .002-.003″ for positive, no-crush feeding. Being a safety-oriented cheapskate, I couldn’t live without them — they let me reload my cases a gazillion times without dangerous web-stretching. Shims are a must-have, as simple as that.” — Mats Johansson
Sinclair Int’l offers a seven-piece set of Sizing Die Shims that let you adjust the height of your die (and thereby the amount of bump and sizing) in precise .001″ increments. Sinclair explains: “Some handloaders will set their die up to achieve maximum sizing and then progressively use Sinclair Die Shims between the lock ring and the press head to move the die away from the shellholder. Doing this allows you to leave the lock ring in the same position. These shims are usually available in increments of .001″ and work very well.”
Seven Shims from .003″ to .010″
Sinclair’s $12.49 Die Shim Kit (item 22400) includes seven shims in thicknesses of .003, .004, .005, .006, .007, .008, and .010. For ease of use, shim thickness is indicated by the number of notches cut in the outer edge of each shim. Even without looking you can “count” the notches by feel.
Some of our readers have questioned how to set up their body dies or full-length sizing dies. Specifically, AFTER sizing, they wonder how much resistance they should feel when closing their bolt.
Forum member Preacher explains:
“A little resistance is a good, when it’s time for a big hammer it’s bad…. Keep your full-length die set up to just bump the shoulder back when they get a little too tight going into the chamber, and you’ll be good to go.”
To quantify what Preacher says, for starters, we suggest setting your body die, or full-length sizing die, to have .0015″ of “bump”. NOTE: This assumes that your die is a good match to your chamber. If your sizing or body die is too big at the base you could push the shoulder back .003″ and still have “sticky case” syndrome. Also, the .0015″ spec is for bolt guns. For AR15s you need to bump the shoulder of your cases .003″ – .005″, for enhanced reliability. For those who have never worked with a body die, bump die, or Full-length sizing die, to increase bump, you loosen lock-ring and screw the die in further (move die down relative to shell-holder). A small amount (just a few degrees) of die rotation can make a difference. To reduce bump you screw the die out (move die up). Re-set lock-ring to match changes in die up/down position.
That .0015″ is a good starting point, but some shooters prefer to refine this by feel. Forum member Chuckhunter notes: “To get a better feel, remove the firing pin from your bolt. This will give you the actual feel of the case without the resistance of the firing pin spring. I always do this when setting up my FL dies by feel. I lock the die in when there is just the very slightest resistance on the bolt and I mean very slight.” Chino69 concurs: “Remove the firing pin to get the proper feel. With no brass in the chamber, the bolt handle should drop down into its recess from the full-open position. Now insert a piece of fire-formed brass with the primer removed. The bolt handle should go to the mid-closed position, requiring an assist to cam home. Do this several times to familiarize yourself with the feel. This is how you want your dies to size your brass, to achieve minimal headspace and a nearly glove-like fit in your chamber.”
We caution that, no matter how well you have developed a “feel” for bolt-closing resistance, once you’ve worked out your die setting, you should always measure the actual amount of shoulder bump to ensure that you are not pushing the shoulder too far back. This is an important safety check. You can measure this using a comparator that attaches to your caliper jaws, or alternatively, use a sized pistol case with the primer removed. See Poor Man’s Headspace Gauge.
In our Shooters’ Forum a reader asked: “How much neck tension should I use?” This prompted a Forum discussion in which other Forum members recommended a specific number based on their experience, such as .001″, .002″, or .003″. These numbers, as commonly used, correspond to the difference between case-neck OD after sizing and the neck OD of a loaded round, with bullet in place. In other words, the numbers refer to the nominal amount of interference fit (after sizing).
While these commonly-used “tension numbers” (of .001″, .002″ etc.) can be useful as starting points, neck tension is actually a fairly complex subject. The actual amount of “grip” on the bullet is a function of many factors, of which neck-OD reduction during sizing is just one. Understanding these many factors will help you maintain consistent neck tension as your brass “evolves” over the course of multiple reloadings.
Neck Tension (i.e. Grip on Bullets) Is a Complex Phenomenon
While we certainly have considerable control over neck tension by using tighter or looser bushings (with smaller or bigger Inside Diameters), bushing size is only one factor at work. It’s important to understand the multiple factors that can increase or decrease the resistance to bullet release. Think in terms of overall brass-on-bullet “grip” instead of just bushing size.
One needs to understand that bushing size isn’t the beginning and end of neck tension questions, because, even if bushing size is held constant, the amount of bullet “grip” can change dramatically as the condition of your brass changes. Bullet “grip” can also change if you alter your seating depth significantly, and it can even change if you ultrasonically clean your cases.
Bullet grip is affected by many things, such as:
1. Neck-wall thickness.
2. Amount of bearing surface (shank) in the neck.
3. Surface condition inside of neck (residual carbon can act as a lubricant; ultrasonic cleaning makes necks “grabby”).
4. Length of neck (e.g. 6BR neck vs. 6BRX).
5. Whether or not the bullets have an anti-friction coating.
6. The springiness of the brass (which is related to degree of work-hardening; number of firings etc.)
7. The bullet jacket material.
8. The outside diameter of the bullet and whether it has a pressure ridge.
9. The time duration between bullet seating and actual firing (necks can stiffen with time).
10. How often the brass is annealed
— and there are others…
Seating Depth Changes Can Increase or Decrease Grip on Bullet
You can do this simple experiment. Seat a boat-tail bullet in your sized neck with .150″ of bearing surface (shank) in the neck. Now remove the bullet with an impact hammer. Next, take another identical bullet and seat it with .300″ of bearing surface in another sized case (same bushing size/same nominal tension). You’ll find the deeper-seated bullet is gripped much harder.
Neck-Wall Thickness is Important Too
I have also found that thinner necks, particularly the very thin necks used by many PPC shooters, require more sizing to give equivalent “grip”. Again, do your own experiment. Seat a bullet in a case turned to .008″ neckwall thickness and sized down .003″. Now compare that to a case with .014″ neckwall thickness and sized down .0015″. You may find that the bullet in the thin necks actually pulls out easier, though it supposedly has more “neck tension”, if one were to consider bushing size alone.
In practical terms, because thick necks are less elastic than very thin necks, when you turn necks you may need to run tighter bushings to maintain the same amount of actual grip on the bullets (as compared to no-turn brass). Consequently, I suspect the guys using .0015″ “tension” on no-turn brass may be a lot closer to the guys using .003″ “tension” on turned necks than either group may realize.
Toward a Better Definition of Neck Tension
As a convenient short-cut, we tend to describe neck tension by bushing size alone. When a guy says, “I run .002 neck tension”, that normally means he is using a die/bushing that sizes the necks .002″ smaller than a loaded round. Well we know something about his post-sizing neck OD, but do we really have a reliable idea about how much force is required to release his bullets? Maybe not… This use of the term “neck tension” when we are really only describing the amount of neck diameter reduction with a die/bushing is really kind of incomplete.
My point here is that it is overly simplistic to ask, “should I load with .001 tension or .003?” In reality, an .001″ reduction (after springback) on a thick neck might provide MORE “grip” on a deep-seated bullet than an .003″ reduction on a very thin-walled neck holding a bullet with minimal bearing surface in the neck. Bushing ID is something we can easily measure and verify. We use bushing size as a descriptor of neck tension because it is convenient and because the other important factors are hard to quantify. But those factors shouldn’t be ignored if you want to maintain consistent neck tension for optimal accuracy.
Consistency and accuracy — that’s really what this all about isn’t it? We want to find the best neck tension for accuracy, and then maintain that amount of grip-on-bullet over time. To do that you need to look not only at your bushing size, but also at how your brass has changed (work-hardened) with time, and whether other variables (such as the amount of carbon in the neck) have changed. Ultimately, optimal neck tension must be ascertained experimentally. You have to go out and test empirically to see what works, in YOUR rifle, with YOUR bullets and YOUR brass. And you may have to change the nominal tension setting (i.e. bushing size) as your brass work-hardens or IF YOU CHANGE SEATING DEPTHS.
Remember that bushing size alone does not tell us all we need to know about the neck’s true “holding power” on a bullet, or the energy required for bullet release. True bullet grip is a more complicated phenomenon, one that is affected by numerous factors, some of which are very hard to quantify.
Here is a simple technique that can potentially help you load straighter ammo, with less run-out. It costs nothing and adds only a few seconds to the time needed to load a cartridge. Next time you’re loading ammo with a threaded (screw-in) seating die, try seating the bullet in two stages. Run the cartridge up in the seating die just enough to seat the bullet half way. Then lower the cartridge and rotate it 180° in the shell-holder. Now raise the cartridge up into the die again and finish seating the bullet.
Steve, aka “Short Range”, one of our Forum members, recently inquired about run-out apparently caused by his bullet-seating process. Steve’s 30BR cases were coming out of his neck-sizer with good concentricity, but the run-out nearly doubled after he seated the bullets. At the suggestion of other Forum members, Steve tried the process of rotating his cartridge while seating his bullet. Steve then measured run-out on his loaded rounds. To his surprise there was a noticeable reduction in run-out on the cases which had been rotated during seating. Steve explains: “For the rounds that I loaded yesterday, I seated the bullet half-way, and turned the round 180 degrees, and finished seating the bullet. That reduced the bullet runout by almost half on most rounds compared to the measurements from the first test.”
Steve recorded run-out measurements on his 30BR brass using both the conventional (one-pass) seating procedure, as well as the two-stage (with 180° rotation) method. Steve’s measurements are collected in the two charts above. As you can see, the run-out was less for the rounds which were rotated during seating. Note, the change is pretty small (less than .001″ on average), but every little bit helps in the accuracy game. If you use a threaded (screw-in) seating die, you might try this two-stage bullet-seating method. Rotating your case in the middle of the seating process won’t cost you a penny, and it just might produce straighter ammo (nothing is guaranteed). If you do NOT see any improvement on the target, you can always go back to seating your bullets in one pass. READ Forum Thread….
One of our Forum members complained that he wasn’t able to set his primers flush to the rim. He tried a variety of primer tools, yet no matter what he used, the primers still didn’t seat deep enough. He measured his primers, and they were the right thickness, but it seemed like his primer pockets just weren’t deep enough. He was mystified as to the cause of the problem.
Well, our friend Boyd Allen diagnosed the problem. It was the decapping rod. If the rod is adjusted too low (screwed in too far), the base of the full-diameter rod shaft (just above the pin) will contact the inside of the case. That shaft is steel whereas your case is brass, a softer, weaker metal. So, when you run the case up into the die, the shaft can actually stretch the base of the primer pocket outward. Most presses have enough leverage to do this. If you bell the base of the primer pocket outwards, you’ve essentially ruined your case, and there is no way a primer can seat correctly.
The fix is simple. Just make sure to adjust the decapping rod so that the base of the rod shaft does NOT bottom out on the inside of the case. The pin only needs to extend through the flash hole far enough to knock the primer out. The photo shows a Lyman Universal decapping die. But the same thing can happen with any die that has a decapping rod, such as bushing neck-sizing dies, and full-length sizing dies.
Whenever you use a die with a decapping pin for the first time, OR when you move the die to a different press, make sure to check the decapping rod length. And it’s a good idea, with full-length sizing dies, to always re-check the height setting when changing presses.
Lee Universal Decapping Die on SALE for $9.89
Speaking of decapping tools, Midsouth Shooters Supply sells the Lee Universal Decapping Die for just $9.34 (item 006-90292), a very good deal. There are many situations when you may want to remove primers from fired brass as a separate operation (prior to case sizing). For example, if your rifle brass is dirty, you may want to de-cap before sizing. Or, if you load on a progressive press, things will run much more smoothly if you decap you brass first, in a separate operation. The Lee Universal Decapping Die will work with cartridges from 17 Fireball all the way up to 45-70. However, NOTE that the decapping pin supplied with this Lee die is TOO LARGE for LAPUA 6.5×47, 6BR, 220 Russian, and Norma 6 PPC flash holes. Because the pin diameter is too large for these brass types, you must either turn down the pin, or decap with a different tool for cases with .059″ flash-holes. Otherwise, the Lee Decapping Die works well and it’s a bargain.


 Bushing Choice for Optimal Sizing
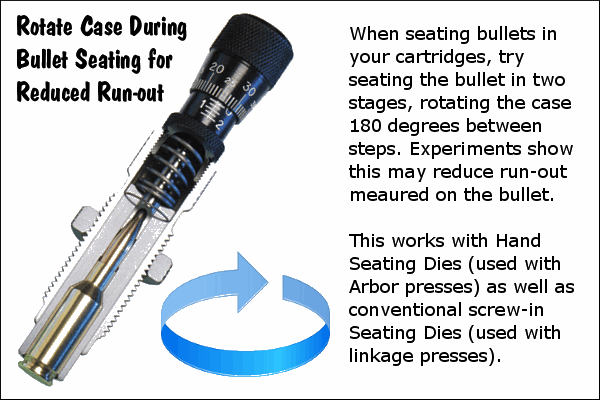


 Sticking a case in the sizer die is a rite of passage for the beginning handloader. If you haven’t done it yet, that’s great, but it probably will eventually happen. When it does, fixing the problem requires a bit of ingenuity or a nice little kit like the one we got from RCBS.


 To quantify what Preacher says, for starters, we suggest setting your body die, or full-length sizing die, to have .0015″ of “bump”. NOTE: This assumes that your die is a good match to your chamber. If your sizing or body die is too big at the base you could push the shoulder back .003″ and still have “sticky case” syndrome. Also, the .0015″ spec is for bolt guns. For AR15s you need to bump the shoulder of your cases .003″ – .005″, for enhanced reliability. For those who have never worked with a body die, bump die, or Full-length sizing die, to increase bump, you loosen lock-ring and screw the die in further (move die down relative to shell-holder). A small amount (just a few degrees) of die rotation can make a difference. To reduce bump you screw the die out (move die up). Re-set lock-ring to match changes in die up/down position.
 In our
  Neck-Wall Thickness is Important Too
 Here is a simple technique that can potentially help you load straighter ammo, with less run-out. It costs nothing and adds only a few seconds to the time needed to load a cartridge. Next time you’re loading ammo with a threaded (screw-in) seating die, try seating the bullet in two stages. Run the cartridge up in the seating die just enough to seat the bullet half way. Then lower the cartridge and rotate it 180° in the shell-holder. Now raise the cartridge up into the die again and finish seating the bullet.


