Our friend and colleague F-Class John tests some of the finest reloading and shooting equipment you can buy. Recently he added the impressive Henderson Gen 3 Powered Trimmer to his inventory of tools. John is now a Henderson fan. He likes the speed, precision, and repeatability of the $779.00 Henderson machine, which trims-to-length and chamfers the case mouth all in one pass. Unlike some other trimming tools, the Henderson indexes off the overall case length NOT the shoulder. John found this worked just fine for his .284 Winchester brass, which has all been full-length sized prior to trimming.
John liked the precision of the Henderson trimmer and the overall design of the machine, which offers good ergonomics and very precise alignment of the cases. Cycling is smooth and positive, as you can see from the videos. Fit over the pilot was fine for John’s .284 Win brass, but he notes that other users may need to expand their case necks appropriately to fit their pilot.
Watch the video to see the Henderson trimmer in action. The dual, parallel horizontal support shafts provide precise alignment of the case as it moves inward toward the cutter blade. The Taper-Lock cutter provides a 14-degree inside chamfer and 30-degree outside chamfer. The trimming process is very consistent case after case, and the Henderson’s design captures brass shavings effectively.
Testing Trim Length Consistency — Henderson Shows Superb Repeatability
John did a separate quick test to demonstrate the trim length consistency of the Henderson unit. Measuring with digital calipers, John found that he could easily hold case overall trim lengths within .001″ (one-thousandth). The consistency was excellent even when trimming cases very quickly. When trimming .003″ off his cases, John said the Henderson showed superb repeatability. Henderson promises the trimmer “will repeat to within 0.002″ with same brand brass”, and John was able to hold 0.001″ length consistency.
Another Henderson owner posted: “I love mine. I like [the] consistent trim length with the positive stop. [Doing] the trim, chamfer, and debur all in one step sure makes the process nice and easy! I also immediately noticed the problem with the pilot on the cutting head with my sized cases. I just polished the pilots on my cutting heads with some fine grit sand paper a little at a time till I got it perfect for my preferred neck tension setting! I’m very pleased with my purchase of the Henderson precision trimmer.”
Henderson Power Trimmer vs. Giraud Power Trimmer
After he tested his new Henderson trimmer, F-Class John compared the pros and cons of the Henderson vs. his other high-volume power trimmer, a Giraud. He likes both machines, but now favors the Henderson for trimming his .284 Winchester match brass. He found that his ES/SD dropped a bit for brass trimmed with the Henderson vs. brass trimmed with the Giraud. With the Henderson-trimmed brass, John achieved an ES of 15 fps for 49 shots. That’s mighty impressive (see photo at right).
But the Giraud does have it’s advantages. It can work with calibers above .338, and it is very fast. One viewer of this video commented: “The Giraud is insanely fast if you aren’t only loading insane precision ammo. I borrowed one when I first started reloading and immediately ordered one. I’ve trimmed somewhere between 40-50k .223 cases. You can just rip through them while watching TV or listening to a podcast. It trims to length consistently less than +/-.001 all day.” The Giraud also indexes off the shoulder while the Henderson trims based on Cartridge Overall Length (OAL).
Henderson Gen 3 Trimmer Details
The Henderson Trimmer is available from HendersonPrecision.com for $779.00. When ordering, you must select a caliber and a collet size. Expect to wait a bit for delivery, depending on the cartridge type(s) you load. Available calibers are: .223, .243 (6mm), .25, .264 (6.5mm), .277, .284 (7mm), .308, and .338.
Product Description: The Gen 3 powered case trimmer uses a powerful, single-speed DC motor. The DC motor is extremely smooth and quiet and powers the spindle at around 1700 rpm. The enclosed aluminum motor mount shroud bolts directly to the bearing housing. The 90-volt DC motor offers maximum torque at 1700 rpm where you need it most. The motor has an in-line on/off switch for easy control. The Tri-Trim case trimmer includes one Henderson Precision Taper-Lock cutting head with Forster pilots as well as one Forster collet. The Taper-Lock cutter provides a 14 degree inside chamfer and 30 degree outside chamfer. The following cutter heads are available: 224, 243, 25, 264, 277, 284, 308, 338.
In this article we cover a better barrel cooler you can build yourself for under $15. This uses a high-speed inflator fan sold on Amazon, along with a piece of temp-stable tubing. Forum member (and popular YouTube host) F-Class John devised this system. He found it cools his barrels in less than half the time of some other products. And the system can also serve as an Empty Chamber Indicator (ECI).
Barrel coolers perform an important function — reducing barrel operating temperatures. This can definitely help preserve barrel life and help maintain good accuracy in competition. In addition, keeping barrels cool can reduce the chances of excess chamber pressure, an important safety concern.
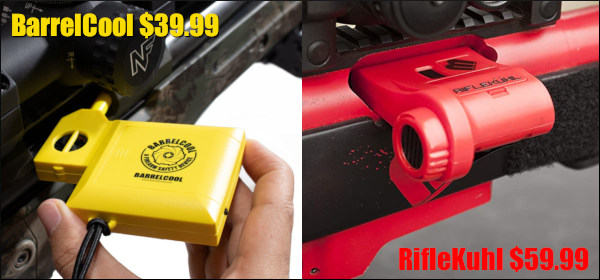
There are a variety of commercially-available barrel cooling systems. There are external fans, as well as internal, slip-in systems than can do double duty as an Empty Chamber Indicator (ECI). You can get the original yellow $39.99 BarrelCool or the red $59.99 RifleKuhl from Magnetospeeed. Both are good products. But F-Class John came up with a system that works even better — one you can build for a fraction of the cost of those yellow or red fans.
Build Your Own Barrel Cooler for Under $15
This system is easy to put together. Order a $11.99 YIVAR pump from Amazon. This is a small, high-output pump designed to inflate air mattresses. Then get some high-temp-rated tubing from a local supply shop. Then trim the case-head off an old piece of brass. Taper the end of the tube a bit and fit it in the case. NOTE: Use of the fitted case is optional. Having the case provides a nice fit in your chamber. But the system works pretty well just with the tubing and Yivar air pump.
In his .284 Win barrel, the Yivar pump system blows air at 10+ mph out the muzzle. F-Class John says that is “about three times the velocity of other systems”. The Yivar pump “holds about 45 minutes of charge” so he can use it for 15 minutes after each of three strings in a match. And then it can be recharged from a USB-compatible battery pack at the range. John notes the fan continues to blow about the same speed for the full 45-minute charge duration.
Key Benefits of this system
1. Faster Cooling
2. Low Cost (under $15)
3. Longer run time on battery
4. Fan battery is USB rechargeable
5. Finally a use for that worn-out brass
John confirmed the effectiveness of his barrel cooler using a stick-on temperature tape placed on the barrel. This showed that his fan system cooled the barreled in less than HALF the time as the plastic commercial fan systems. In addition, his run time was excellent, and the Yivar’s built-in Lithium-Ion battery is fully rechargeable so he never has to buy expensive batteries.
What are the downsides? Not many. The fan IS somewhat noisy — watch video at 4:04-4:28 time mark to hear the fan. F-Class John notes, however, that the Yivar fan is about 4 decibels (dB) quieter than a Magnetospeed RifleKuhl, so the Yivar’s noise is not that bad.
Here are comments from YouTube viewers who like F-Class John’s invention:
Finally something affordable! It’s compact and can be recharged at the range. I have room for this but not all the other gadgets you show. And a poor pensioner like my self can afford it! Thanks for the tip.
Ingenious and awesome idea! I bought one as soon as I saw this. I’ve been thinking about getting a cooler when I’m testing my loads. Thanks!
Brilliant… Brilliant… Brilliant! I have been deferring buying a barrel cooler for years now on account of wanting to spend my toy fund budget on other things. Considering how cheap it is to build, there is no excuse to not make one now.
Fan with Plain Hose Also Works Well (No Brass Case Cutting/Fitting Required)
F-Class John likes the custom fit he achieves with the hose inserted into a piece of modified brass. However he notes that the system also works well with no brass at all — i.e. just hose and fan. If you have a small diameter chamber, this may actually work better. Simply put the hose on the fan, trim/taper the forward hose end to fit and you are good to go.
F-Class John explains: “The heavy duty tubing and the motor works just fine without a brass case. The hose can sit in the chamber by itself. Obviously not every brass case will easily allow for you to put it on the end of the tube. For many people simply using the tube (without brass) may be the simpler option.”
Forum member F-Class John is an avid F-Class competitor and expert handloader. John reviews reloading hardware and shooting-related products for his popular F-Class John YouTube Channel, which now boasts 220+ videos. John also does important product testing for AccurateShooter.com. Through his YouTube channel, John has reviewed many of the latest and greatest reloading tools and accessories. For today’s Video Showcase, we selected eight F-Class John tool and reloading product reviews.
If you like these selected videos, consider joining F-Class John’s Patreon Channel for live video meetings, more in-depth videos, and detailed explanations.
21st Century Hydro Press and Standard Arbor Press
John notes: “You can’t really talk about precision reloading without taking about inline dies and arbor presses. For my money there’s nothing better than the lineup from 21st Century Shooting. They offer the Hydro Seater which is hands-down the best manual seater out there as well as their standard arbor press which is great for taking on the road to push back bullets as needed.”
Primal Rights Competition Priming Seater (CPS) Review
If there is a Ferrari of priming tools, it has to be the Primal Rights Competition Primer Seater (CPS). This impressive bench-mounted tool allows very precise control over primer seating depth. A vertical tube holds primers ready for insertion. The action is smooth and precise. John believes that this is definitely the best priming tool on the market, though it may not be for everyone given its premium $600.00 price.
Lyman Powered Case Trimmer Review
The Lyman Case Trim Xpress is an efficient, precise unit that allows easy adjustment of trim length with a click-adjustable collar. The trimmer comes with a set of cartridge-specific bushings that index off the case shoulder. One nice feature is a variable speed control. For the price, $154.99 on Amazon, this trimmer delivers excellent performance. F-Class John has another video review of the Lyman Case Trim Xpress which shows set-up and operation.
Dillon 750 Tips and Tricks
The Dillon XL 750 is a favorite of high-volume reloaders. With the optional case feeder, the XL 750 offers high output with great reliability. And Dillon offers one of the best warranties in the business. In this video, F-Class John features upgrades including the Armanov tool-head holders from Europe. These are drilled and tapped for all FIVE stations allowing the user to put threaded dies in any station.
Gunsmithing Torque Wrench Comparisons
When you are working on custom rifles that might cost $5000+, and mounting scopes that can run $3000 (or more), you need to use very high-quality tools. Precise torque settings are essential, both to avoid damage to valuable parts, and to have the rifle and optic perform optimally. In this video, F-Class John looks at a variety of torque wrenches suitable for gunsmithing duties.
Concentricity Checking with Accuracy One Gauge
Every serious hand-loader needs a quality concentricity gauge. The Accuracy One Concentricity Gauge boasts a smart design that delivers precise, repeatable results. We like the unit’s easy adjustability and its ability to work in a variety of configurations. The Accuracy One Gauge measures internal and external neck runout of cartridge cases as well as seated bullet runout. It can also measure the runout of the ogive, bearing surface, and boat-tail of individual bullets. And it can even measure your primer pocket runout.
Teslong Rigid (Shaft) Borescope with Monitor
Seeing inside your barrel can provide clues to how well you’re cleaning and the bore’s overall health. One of the best tools on the market is the Teslong Rigid Borescope. This features a solid rod for easy use in barrels. Plus it comes with a self-contained high-definition viewing monitor so no smartphones or WiFi tablets are needed. If you’re looking for something more portable and a bit more versatile, try the Teslong Flexible Borescope, $99.99 including monitor. John was impressed with the new rigid Teslong he tested, and he likes having a dedicated monitor (no WiFi required).
Zero Turret Press with Whidden Sizing Die
The new Zero Press from Area 419 is arguably the best turret press ever crafted. It offers unrivaled precision, along with the highest-capacity turret head with NINE die/tool stations. Milled from billet aluminum and stainless steel, this press moves with the help of 14 bearings. In this video, F-Class John shows how to use a Whidden Gunworks full-length sizing die on the Zero Press. And John has two other video reviews of the $1200 Zero Press: 1. Zero Press First Thoughts Video; 2. Loading on a Zero Press.
Meet the new T-Rex front rest from Rodzilla. In the world of front rests there have been many innovations over the past decade, but this new front rest from Rodzilla really represents significant innovation. The new T-Rex offers impressive capabilities that can truly take your shooting experience to the next level.
At first glance the new T-Rex may resemble some other coaxial front rests. The T-Rex has a joystick, three points of ground contact, and a platform for the rifle. But look closer and you’ll see this isn’t your typical rest. Designer/builder Rod Brakhage (the Rod in Rodzilla) has started from the ground up to create the most user-friendly, match-ready, modular front rest on the market. The new T-Rex is already in high demand, but currently Rodzilla has been fulfilling orders in about 8 weeks. T-Rex MSRP ranges from $1895.00 to $2305.00 depending on options.
The T-Rex weighs just over 21 pounds — about the same as many mid-sized rests. However the T-Rex has a large footprint, rivaling the largest rests on the market. Rod tells us: “The T-Rex has a similar footprint to the SEB MAX… 12.5″ wide X 11.25″ front to back. However, at just over 21 lbs. my rest weighs less than a SEB NEO.” This combination (wide base with moderate weight) allows for an incredibly stable platform that is still quite portable.
Rugged Carry Case Makes Transport Easy
Rodzilla delivers the T-Rex in a custom-designed hard carry case that fits it perfectly and still has room for additional feet and accessories. This sturdy case makes taking the T-Rex to matches easy. The case is strong enough that I can stack things on top of it in my truck. One side note, if you plan on storing your rest in the case between matches, it’s wise to put a desiccant pack in the case to absorb moisture.
The T-Rex boasts an adjustable joystick that extends from 15.5″ to 21″ in length. With this adjustability, no matter what your stock length or design, you can find a comfortable position without having to stretch uncomfortably. And you won’t have to shop for a joystick extension.
Using the T-Rex is a pure pleasure when shooting prone F-Class or from the bench. That’s because of its revolutionary ability to make large vertical adjustments without getting out of position. This is accomplished with a detachable arm/handle you can actuate while behind the gun. (This is the long T-handle on the right side of the rest).
The simplest way to show why this is a game changer is to consider when you’ve just left the 800-yard line during a match. You head up to the 900-yard line, get all set up, the range officer calls a hot line and suddenly realize you didn’t adjust your elevation for the new yardage. Normally you’d have to turn your scope dials then get up from your position to adjust your front rest, or at best stretch uncomfortably in hopes of reaching your rest adjustments. With the T-Rex, you simply turn the right-side gross elevation handle while still in position, move to your new hold point, and begin firing.
This same principal applies to other situations that require adjusting vertical without breaking your shooting position. All of this is accomplished in conjunction with an incredibly sensitive, yet easy-to-adjust counterbalance system. Once set, the counterbalance ensures that smooth and fluid motion occurs in any direction without any resistance or fear of backlash that might affect your shots.
Very Wide Horizontal Range is Useful in Matches
When it comes to looking downrange, the T-Rex can deliver nearly twice the range of horizontal motion as that of some other rests. (In high ratio mode, there is about 70 MOA of horizontal travel.) This means you can quickly scan a wide expanse of targets/flags without having to change magnification or go to your spotting scope. The huge field of view is a great help when shooting in a condition that is switching and you want to view targets on either side.
Rodzilla offers a number of options for the T-Rex. The first choice is the top. Select the Rodzilla 5-Axis roller top or the new 5-Axis IBS-legal sandbag top. Or, if your budget permits, you can order both — they are easily interchangeable in minutes. The video below shows the easy top-swap procedure:
This video explains how to exchange tops on the Rodzilla T-Rex
5-Axis Top Advantages
Rod Brakhage tells us: “This innovative new 5-Axis top rotates independently of the base plate so no matter how the rest is set on the line you only need to move your rear bag to pan across the row of targets with no binding of the rifle. Also, the sides of the rifle run against vertical Delrin rollers.”
Color Choices for Rodzilla T-Rex Base
In addition to the choice of tops, there are four (4) standard colors on the website, but for an additional fee you can have it made in just about any color you want, which is pretty cool.
Choose Standard Feet, Sand Feet, or Both
When you order a T-Rex, you can choose standard bench feet or large, gorgeous sand/dirt feet. Or order them both, as I did. I use the bench feet at my regular club where I shoot from wood and concrete platforms, but the sand feet are great for matches held on dirt, gravel, sand, or grass. These sand feet provide an incredibly stable platform on the ground.
Linear Bearings Allow Ultra-Smooth and Precise Adjustments
Rodzilla’s Rod Brakhage is a smart, innovative designer committed to improving the shooter’s experience. One of Rod’s key innovations in the T-Rex is the use of linear ball bearings for both X and Y axis: “The horizontal/vertical assembly, or X-Y block, moves on 6 double-sealed ball bearings that travel on hardened shafts for effortless movement”.* This system delivers a smooth, fluidity of movement that lets you aim quickly and efficiently. Gone are the days of having to move PAST your aim point and then come back (to get the aim right), or resetting your joystick position after every shot. With the T-Rex, you make one smooth, precise move and your aim is set. And it stays set after the shot.
The T-Rex allows you to position your crosshairs with pinpoint precision every time and if you need to move them just a hair, you can do it with ease. In F-Class, we often hold between the target’s scoring lines to correct for wind variations (without touching the scope’s windage knob). With the T-Rex, I could make those holds quickly and precisely without wasting time bouncing back and forth.
Overall, I’ve come to really enjoy the repeatable confidence the T-Rex has given me whether I’m doing load development, practicing at the range, or shooting a match. So, if you’re in the market for a superb front rest that just might give you an edge or, at minimum, make your life easier, head over to TheRodzilla.com and learn all about the impressive, new T-Rex Front Rest.
* Rod Brakhage explains: “The bridge travels up and down on double-sealed ball bearings on 1” hardened shafts. My design utilizes a rack and pinion with an 18″-long drive shaft for adjusting the height of the bridge. This system allows you to stay in shooting position and looking through the scope while adjusting the vertical placement of your crosshairs. Precisely dial your vertical to the center of your target with the joy stick at the exact height you prefer. A 1/4 MOA movement is very easy to accomplish with this design. Also, there is no need to lock the bridge as there is an adjustable clutch to hold the vertical position. The long drive shaft utilizes a scalloped hand wheel on the shooters side and a quick coupling adapter on the rest side. Once adjusted you merely pull back on the drive shaft and remove it or just set it on your shooting mat out of the way. The geared rack and pinion can be placed on the right for right-handed shooters or on the left.”
Looking for a faster, easier, and more accurate way to measure bullet positions on your loaded rounds? Check out the Accuracy One Seating Depth Comparator. This unique tool provides a shoulder-to-ogive measurement instead of the traditional cartridge base-to-ogive measurement. The Accuracy One Comparator just might work for you. This unique tool allows a very rapid and secure measurement that provides a precise determination of the bullet seating depth in the case.
Accuracy One Seating Depth Comparator
Product Review by F-Class John
You probably check your loaded ammo by measuring cartridge base to ogive, but have you ever considered there may be a better way? Curt at Accuracy One has considered the question, and after exhaustive research and testing he created the Accuracy One Seating Depth Comparator. As opposed to looking for a base to ogive measurement, this tool measures from the shoulder to ogive, which is arguably the more repeatable number when it comes to accuracy.
Click Arrow to Watch Video Tool Review
As Curt explains, “Well, when you fire a chambered cartridge, the strike from the firing pin first pushes the cartridge forward until it bottoms against the shoulder. The primer is then ignited. What this means is that your seated bullet depth consistency can more accurately be gauged using the dimension from shoulder to ogive. Using this dimension, you effectively eliminate any small variances in your sized case length from the equation”. As a result, it made sense that when he was designing the measurement tool his goal was to create a universal insert that allowed a user a quick, easy, accurate and repeatable process that measures from mid-shoulder to ogive.
The comparator fits cartridges from .22 to .30 Caliber with 0.400″ and larger shoulder diameters. The tool fits so many bullet sizes because of the specific taper that Curt developed. This ensures that any caliber in that range makes good contact along the ogive. As I used this tool and talked to people about it, I kept getting skeptical comments with people asking how it could measure the ogive on that many calibers accurately. I had to remind them that the ogive is not a single point on the bullet but in fact the entire curve from the tip of the bullet to the point it straightens out. As a result, it’s only important that the tool you use is consistent in what point along the ogive it measures and that’s where the Accuracy One Seating Depth Comparator shines. According to Curt, he went through countless iterations on his design until he was able to accurately and repeatably measure all those calibers (.22 to .30).
How to Use the Accuracy One Seating Depth Comparator
Using the comparator is simple. There are alternative methods. The easiest way is to simply zero the indicator, insert a loaded round, note the measurement and compare any future rounds against it for variation. An alternative to this is a method I use. I insert a loaded round and then zero the indicator. This allows you to see the exact variation without mental math (and frankly it’s faster this way). I also use this method to sort loaded rounds for matches in order from shortest to longest ensuring that rounds that measure the same are fired together.
Bonus Option — Measuring Length to Lands with Tool
Another great use for this Accuracy One comparator is to take my initial depth to lands. This helps ensure my seating depth was properly set. Using a case with very light neck tension, I load a bullet, and with a stripped bolt I load and close it. Then I can remove the round and take a measurement, zero the indicator and make a note of it in my book. After that the comparator will remember the new zero until it’s zeroed again and if that happens by accident, I can always reference the number that my round measured and pull on the indicator stem until that number is found and then zero it again. I found this entire process fast, easy and repeatable as I loaded rounds and needed to check for any seating depth variance.
Tool Pricing:
Seating Depth Comparator without Indicator: $65.00
Seating Depth Comparator with Indicator: $115.00
Gauge Stand: $47.00
Purchase Options
You can buy the tool with or without an Digital Indicator. Accuracy One also makes a Primer Depth Gauge. Both Accuracy One tools employ the same digital indicator. This helps save money as you can order the comparator alone if you already have one (either from another Accuracy Tool or another tool).
The Accuracy One Seating Depth Comparator is essentially the same size as the Accuracy One Primer Depth Gauge, so you can even utilize Accuracy One’s primer gauge storage case. There is also an optional stand that I HIGHLY RECOMMEND as it can hold either the seating depth OR primer gauge, making for amazingly simple one-handed operation while you’re loading.
CONCLUSION — Tool Is Precise, Repeatable, and Fast
Overall, this tool left me feeling confident in my depth setting and I found it quick and easy compared to past methods. At the end of the day there are several ways to skin the proverbial cat when it comes to measuring seating depth. But if you’re looking for what just might be the most accurate, consistent and speediest method, give the Accuracy One Seating Depth Comparator a try.
I absolutely love using this press stand. I use it with my Forster Co-Ax as well as my Dillon 550. The stand mounts those presses at the right height to minimize fatigue and maximize torque. Some products I merely review and return but this one is a keeper and won’t be leaving my bench anytime soon. — F-Class John
Lyman Universal Press Stand REVIEW
Product Review by F-Class John
Positioning your press at the optimal height is one of the oldest problems in reloading. Most presses sit low off the edge leading to uncomfortable arm strain or inconsistent pressure being applied while using. Lyman has set out to fix that problem with a reasonably-priced ($54.99 at Midsouth) press riser that works with the vast majority of reloading presses. This unit will raise just about any press up off your bench securely, allowing you to working more comfortably from a standing position. This also frees up vital bench space UNDER the press. Unfortunately this press stand is so popular it is back-ordered at most vendors.
I have used a variety of presses over the years. At times I’ve run into issues mounting a press at a level that doesn’t promote arm or hand strain during normal operations. In the past I’ve used blocks of wood or even tried other brands’ proprietary stands. But I had very limited success with those options. Accordingly, I was very excited to give the Lyman Universal Press Stand a chance.
Lyman’s Universal Press Stand comes complete with side plates, two different top plates, and a large collection of mounting hardware. The two top plates are pre-drilled for numerous popular Single Stage or Progressive presses. Helpful diagrams and instructions show which side of the top plate you need to use. The pre-drilled holes accommodate a variety of presses from RCBS, Dillon, Lyman, Redding, and Hornady. But surprisingly, the plates are not pre-configured for the Forster Co-Ax Press.
CLICK to WATCH VIDEO Showing Lyman Universal Press Stand
Setting up the stand was very simple. The two sides bolt to the lower shelf unit at which point you attach the top plate. All the supplied bolts made this a breeze and once everything was snugged down, I was able to place it on my bench where I wanted it and mark the drill holes to mount it. After securing the stand to my bench it was time to mount my press.
Lyman Universal Press Stand with Dillon 550 Press
Adapting Lyman Universal Press Stand for Forster Co-Ax
At the time of testing I was primarily using a Forster Co-Ax press. With no pre-drilled Co-Ax configuration for either Lyman top plate, I decided to customize the blank side of one of the top plates. I opted to position the mounting holes so that the press could sit 100% on top of the mounting plate and not just off one edge. I found this process simple to execute. Mark your drill holes, then drill the plate. This can easily be done with regular drill bits although using a step-bit worked faster and cleaner to help enlarge the holes just a little when I needed some extra clearance.
Lyman Universal Press Stand Is Stable and Strong
Once set-up, I found the stand to be incredibly stable. The design allows for full force to be applied to the press no matter what the operation. Having used this Lyman Press stand regularly over the past few months with both my Co-Ax and a Dillon 550c, I still find myself loving it. The height is perfect and allows me to load as much as I like without straining my arm or getting fatigued. With an attractive price point (under $55.00 street price) and a simple design, I feel this is a great system for those looking for a secure and raised platform for their reloading presses.
The Universal Press Stand comes with two plates. If you have different presses that fit each plate you could easily swap presses just by changing plates while leaving the presses attached. It’s less functional if you have two presses that share one plate and would require removing one press before installing the next one.
Lyman Press Stand Unboxing and Set-Up (KFW Video Review):
Product Review by F-Class John
Case preparation is critical for precision reloading. One must trim cases, debur/chamfer case mouths, clean necks, spruce up primer pockets and do other important tasks. Complete case prep can involve many separate processes, each requiring its own tools. With each of those tools comes additional cost as well as the need for more storage and bench space. To make case prep easier, faster, and more convenient Lyman created the Case Prep Xpress. The Case Prep Xpress, introduced a few years back, combines up to five prep stages into one well-built, stable, versatile unit. Watch this video to see the machine in action:
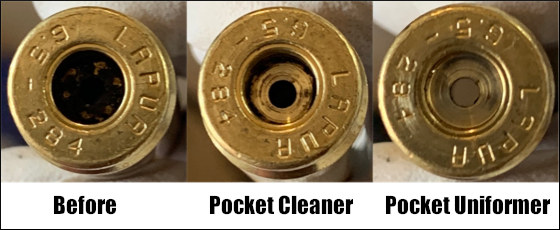
The Case Prep Xpress features five (5) independently-turning spindles all with the common 8/32 thread. This allows you to attach multiple tools supplied with the unit PLUS many other screw-on prep tools. For our testing we started out using a variety of the 12 included tools and found they cover the majority of case prep tasks. Lyman supplies deburr and chamfer tools, pocket uniformers, reamers and cleaners, as well as an assortment of neck brushes.
The deburr and chamfer tools worked really well, creating beautiful bevels all while leaving a nice flat edge across the top of the neck which is critical for accuracy and brass life. We found the primer pocket cleaning tool did a good job, but for truly clean pockets we recommend using the primer pocket uniforming tool, which very efficiently removes even hard residues.
The benefit of having interchangeable heads is that you can add your own accessories. We like to use a bore brush with bronze wool wrapped around it for use inside our necks. This worked perfectly once we screwed it in. In fact, we couldn’t think of any 8/32-threaded accessory that wouldn’t work well on this machine. Another great design feature is how all the accessories are oriented straight up. This allows for perfect visual alignment of your cases onto the tools which is critical — especially when performing cutting operations such as primer pocket uniforming.
Along with the five power stations there are six female-threaded storage spots on the sides where tools can be placed to ensure they don’t get lost. We like this feature since there will be more than five accessories you want to use and having them easily available is a great feature. You can keep 11 tools right on the machine (5 on top, 6 on the sides). That way you don’t have to dig through storage bins.
The Case Prep Xpress has a removable front bin to hold brass shavings, and there are two circular trays on either side of the bin. In front is a long tray that holds the provided brush. This makes it relatively easy to clean off brass shavings and other debris from case prep processes.
SUMMARY — Versatile Case Prep Xpress Is A Good Value
For the money, Lyman’s Case Prep Xpress is tough to beat. It performs multiple tasks well while being stable and easy-to-use. Yes there are some multi-spindle prep centers that offer variable or fast/slow RPM spindles while the Lyman’s spindles are all fixed RPM. (See, e.g. the RCBS Brass Boss). However those other systems don’t include all the convenient on-board storage of the Case Prep Xpress, and are more expensive. The Lyman Case Prep Xpress sells for $150-$160 “street price”. It costs $154.99 at Midsouth, and is in-stock now (1/13/2021). This makes the Lyman Case Prep Xpress a fine value — it offers great versatility while saving space and saving money compared to buying five or more separate, powered tools.
Holiday Greetings to Our Readers
Merry Christmas and Happy Holidays to all our readers and especially our nearly 54,000 Forum Members. This marks our 16th Christmas “in business”, and the site is stronger than ever thanks to our Gold and Silver Forum members and industry sponsors. AccurateShooter.com is now accessed by over 500,000 visitors every month, who enjoy our Feature Articles, Daily Bulletin, Shooters’ Forum, and our Facebook Page. Part of the reason for that success is the hard work of our dedicated staff and volunteer helpers.
Unsung Heroes Deserve Recognition
I want to acknowledge those guys who have really helped out the site. Number one is Jay Christopherson who served as our Systems Admin for most of the year. Along with being a computer guru, Jay is a superb shooter who won the Berger SW Nationals F-Open this year. Stepping in for Jay in the second half of 2020 has been fellow F-classer Praveen Kumar, a very talented programmer who helped us through the challenge of a major Forum upgrade this fall. We also thank Andy B. our Xenforo ace who has contributed vital software solutions.
A huge “thank-you” goes to F-Class John who finds weekly bargains for the Bulletin and tests new products. John produces gear/hardware reviews for the Daily Bulletin with informative videos showcased on his YouTube Channel. John’s work has become a highlight of our Bulletin content. We thank Boyd Allen and EdLongRange who supply story leads for the Daily Bulletin. And we wouldn’t be here without Jeff Williams, who handles site donations by mail. We have a great place to test rifles thanks to our valued friend Joe Friedrich. Other important contributors include: Gavin Gear of UltimateReloader.com; Bryan Litz of Applied Ballistics, Bill Marr of Rifleshooter.com, Jason Baney of EuroOptic.com, and Dennis Santiago. These folks have contributed stories, reviews, and and videos. I also want to recognize Hunting Editor Colton Reid and Norway’s Thomas Haugland (shown below). All these men (and many others) have aided the site.
Praise for our Site Sponsors and Advertisers
We also want to thank our major sponsors, without whose support the site could not provide the full AccurateShooter.com experience, with an active Forum, an archive of in-depth articles, and fresh content 365 days a year in our Daily Bulletin. We’re grateful to ALL our sponsors and advertisers. In particular, we want to acknowledge the major companies which have been strong supporters of this site for many years: Capstone Precision Group (Berger, Lapua, SK, Vihtavuori), Bruno Shooters Supply, Bullet Central, Graf & Sons, EuroOptic, Krieger Barrels, Midsouth Shooters Supply, Powder Valley Inc., Precision Reloading, Whidden Gunworks, and Zeiss Sports Optics. Their continuing support helps us keep up the flow of information and serve our readers and Forum members.
This image is from multi-time Nat’l Long Range Champion Nancy Tompkins, author of Prone and Long Range Rifle Shooting. Nancy loves to photograph the Aurora Borealis.
As a Christmas present for our readers, today we showcase eight very informative videos from AccurateShooter Forum member F-Class John. A talented F-Class competitor with a smart, technically-focused mind, John has created a series of videos about reloading and precision loading tools, along with rifle and shooting accessories. Many of John’s product reviews are the most thorough and detailed you’ll find in video format. You’ll find over 120 informative videos on F-Class John’s popular YouTube Channel.
21st Century Hydro Press and Arbor Press — Product Review
Many of the world’s top benchrest, long-range, and F-Class shooters prefer to seat their bullets using arbor-type presses with inline dies. This allows smooth, repeatable bullet-seating with very low run-out. One of the very best arbor-type seating presses ever created is the 21st Century Hydro Press. This offers plenty of leverage driving a precision ram. The Hydro Press also features a hydraulic line to drive a precision seating force gauge. Along with the Hydro Press, John tests 21st Century’s standard arbor press.
Cartridge Case Separation — Tell-Tale Warning Signs
If you reload and haven’t experienced a case separation yet then you are fortunate. It’s a fact of life in the shooting world. A bad case separation can have very unfortunate consequences. Therefore you need to watch for warning signs on your cartridge brass, so you stay safe. The video above shows what to look for — and how to recognize signs of incipient separation. One important factor leading to case head separation is improper head-spacing causing growth. To learn more about case head separation watch F-Class John’s follow-up video Case Head Separation Causes, identification and prevention.
Accuracy One Concentricity Gauge — Product review
Every person who makes precision hand-loads should have a quality concentricity gauge to measure run-out of case-necks and loaded rounds. Here John tests one of the best such tools on the market, the Accuracy One Concentricity Gauge. This measures the internal and external neck runout of cartridge cases as well as seated bullet runout. It can also measure the runout of the ogive, bearing surface, and boat-tail of individual bullets and can even measure primer pocket runout. John notes: “I think most precision shooters should have one of these to make sure their ammo is within their specs they’re happy with.”
How to Use a Barrel Tuner to Improve Accuracy and Repeatability
In this video, John works with a barrel tuner created by Erik Cortina, a member of Team Lapua/Brux/Borden. A tuner can be useful in modulating barrel vibrations and that can translate to smaller groups on target. Sometimes the positive effects are quite noticeable. Tuners have been popular with short-range benchresters for many years and now they are becoming more common on top F-Class and Long Range rifles.
John says: “I’ve been using Erik’s E.C. Tuner for a while now and I really like what it’s done to help as my final step in load development. Just remember, a tuner is a tool, not a magician. You still need good load development practices, good brass prep, and solid skills but the tuner does help make great loads even better.”
Teslong Rigid 26″ Borescope with 4.5″ Monitor — Product Review
There are a variety of affordable Teslong digital borescopes for inspecting your barrels and diagnosing issues. All Teslongs deliver impressively sharp images/video. Some units plug into a laptop or tablet, while others work via a dongle to communicate wirelessly. Here John tests a 26″ rigid model borescope that comes complete with its own 4.5″ viewing screen. Priced at $129.99 on Amazon, this system is completely self-contained — you don’t need a laptop or smartphone. You don’t have to worry about connections and there are no Apps to install or configure. John says: “Teslong now offers a 26″ rigid rod model with a 4.5″ monitor. This allows you to use the unit without the need for any mobile device or computer.”
Dillon 550 vs. Dillon 750 for Precision Reloading — Pros and Cons
Progressive presses are not just for bulk reloading these days. Many top shooters, including 5-time National Long Range Champion John Whidden, use Dillon progressive presses to complete many cartridge loading operations more efficiently. Even in the F-Class world, Top Guns such as Erik Cortina have found ways to use Dillon progressives for bullet pointing, case prep and other repetitious tasks, even if a precision arbor press is used for final bullet seating. In this video, F-Class John compares two Dillon options: “If you’re deciding between a Dillon 550 or 750/650 reloading press for precision reloading, here are some pros and cons of each. Both are capable of producing high quality ammunition but each has their own quirks so knowing your capabilities and loading style is important when choosing one over the other.
AutoTrickler V3 — General Set-Up and Operational Advice
In this video, John offers some general advice for setting-up the AutoTrickler system. He notes that you want to set the initial drop weight (from the powder measure) in an optimal range: “When you set the original drop you need it to be about 1 to 1.5 grains below. Some people set it too close to the final weight they want and it actually doesn’t let the trickler unit work as efficiently, consistently and accurately as it will if you start 1 to 1.5 grains low.” John also explains how to hook up the cords and how to position the trickler unit. John places his AutoTrickler on a 30-lb piece of granite, with a thin polymer “anti-static” pad on top. John also uses a line conditioner and grounding wire to provide the best electrical flow to the scale and trickler. John also shows how the angle of the trickler unit can be adjusted. If you own an AutoTrickler or plan to purchase one, we definitely recommend you watch this entire video.
ShotMarker Power-User Tip — How to Test Unit without Shooting
The ShotMarker is an advanced system that plots shot location using electronic sensors mounted on a frame. ShotMarker arrays are now used in many competitions because they are reliable, precise, and much more affordable than competing systems. Invented by Canadian Adam MacDonald, the ShotMarker plots bullet entry on target using sensors activated by the bullet’s soundwaves. Using 8 high precision MEMS microphones placed in the corners of your frame, ShotMarker precisely measures the point of impact and down-range velocity of each shot, so that you can analyze your groups and shoot for score in competition. In this video, John shows how you can quickly and easily test your ShotMarker before deploying it at the range: “Here’s a quick and simple way to ensure your system is working 100% before taking a shot on it.”
Top rifle competitors use the AutoTrickler system because it offers a superior combination of speed and precision in dispensing powder loads. With an AutoTrickler fitted to a compatible lab-grade magnetic force restoration scale, you can achieve single-grain weight consistency with your hand-loads. That kind of load weight uniformity does help deliver low ES/SD that translates to reduced vertical at long range. Adam MacDonald’s AutoTrickler system is so good that it can truly be called a “game-changer” in the precision handloading world.
As good as the AutoTrickler may be, there are some simple ways to keep it functioning better, or to improve your productivity. Here are three videos by F-Class John that provide very helpful tips for AutoTrickler owners. The first video shows general set-up and installation. The second video shows a simple but brilliant trick to speed up the process — use two identical powder measure cups shaved to be the EXACT same weight. In third video, F-Class John shows important maintenance tips to keep your AutoTrickler components running smoothly and quietly.
AutoTrickler V3 — General Set-Up and Operational Advice
In this video, John offers some general advice for setting-up the AutoTrickler system. He explains how you can get the machine optimized. For example he notes that you want to set the initial drop weight (from the powder measure) in an optimal range: “When you set the original drop you need it to be about 1 to 1.5 grains below. Some people set it too close to the final weight they want and it actually doesn’t let the trickler unit work as efficiently, consistently and accurately as it will if you start 1 to 1.5 grains low.”
John also explains how to hook up the cords and how to position the trickler unit. John places his AutoTrickler on a 30-lb piece of granite, with a thin polymer “anti-static” pad on top. John also uses a line conditioner and grounding wire to provide the best electrical flow to the scale and trickler. Interestingly, the granite was an inexpensive “surplus” piece taken from a kitchen top installation.
John also shows how the angle of the trickler unit can be adjusted. Another smart tip involves marking the white trickler tube belt bushing. That makes it is easier to discern slow movement and determine when the trickler is completely stopped.
If you own an AutoTrickler or plan to purchase one, we definitely recommend you watch this entire video.
Are you experience chattering when powder is dispensed? John also explains (3:20 – 5:30 time mark) how to replace a small rubber “wiper” part in the dispenser unit. This can help prevent chattering or kernel-cutting as the powder charge drops into the pan from above.
Use Two Identical-Weight Powder Cups to Load Faster
In this second video, F-Class John shows how you can use TWO identical powder cups to speed up your reloading. This is a VERY clever and relatively inexpensive upgrade. You can use 600-grit wet sandpaper to make the weight of the twin cups absolutely identical. John says: “I just lightly sanded the bottom of these until they both weighed exactly the same on my scale.” He can now use one cup to load a case while the other cup is receiving the next powder charge.
AutoTrickler V3 General Maintenance Tips
If you have been running an AutoTrickler for quite some time, you have probably noticed some noise or vibration. This video shows some very simple maintenance procedures that will have your AutoTrickler running great again. F-Class John reveals some components that can get dirty or worn after considerable use. The video identifies the items that may require a cleaning or adjusting. In the video John shows how to do those tasks quickly and easily.
In the last three minutes of the above video John shows an important process involving the trickler unit motor. The motor’s attachment screws tend to loosen slightly over time. After removing the pulley drive wheel, you want to gently tension the four Phillips screws. Then reattach the wheel and drive belt. Doing this simple process should reduce unwanted vibration.


 After he tested his new Henderson trimmer, F-Class John compared the pros and cons of the Henderson vs. his other high-volume power trimmer, a Giraud. He likes both machines, but now favors the Henderson for trimming his .284 Winchester match brass. He found that his ES/SD dropped a bit for brass trimmed with the Henderson vs. brass trimmed with the Giraud. With the Henderson-trimmed brass, John achieved an ES of 15 fps for 49 shots. That’s mighty impressive (see photo at right).


 Key Benefits of this system


 Purchase Options


 Holiday Greetings to Our Readers


