Summer Solstice is just four days away. That means shooters nationwide will soon be dealing with peak summer ambient temperatures. When it’s hot outside your barrels will heat up even faster during use — and that’s not good for barrel longevity or consistency during long strings of fire. If you want a barrel to have maximum useful life you need to keep it from getting very hot. That’s why you should have a barrel cooler. There are many variations, but the most popular models blow cooling air through the bore. This can reduce barrel temps significantly in a relatively short period of time.
For this Saturday Movies feature, we’ve found 7 videos that review commercial barrel coolers or show how to build your own cooler with a hose, small electric fan, and modified case. There are a variety of barrel coolers on the market currently. Three of the most popular coolers are the yellow BarrelCool, $39.99 at MidwayUSA, the red Magnetospeed RifleKuhl, $56.89 on Amazon ($59.99 MSRP), and the black/yellow Chamber Chiller BA PRO, $80.40 on Amazon.
Barrel Coolers — Why You Should Use Them
This video explains why it’s vitally important to keep your barrel cool, particularly when running a suppressor. The host, a long-range shooting instructor, explains: “The best way to extend your barrel life [is using] barrel coolers. We have learned through decades of shooting that keeping the barrel cool and cooling it as fast as possible between relays and strings of fire will return meaningful results in the longevity of your rifle barrel. If you shoot suppressed like we do, this brings the level of importance up to a whole new level. Keeping it cool will keep it running at its best longer than you ever thought possible.” The barrel cooler featured in this video is $65.00 on the Wolf Precision website.
Barrel Cooler Comparison Tests — Four Options
Barrel coolers are vital accessories that let you get more shots downrange with less time waiting. In this excellent, comparison test video LongRangeOnly’s Ryan Furman shows which barrel coolers will remove the most heat with the rate of air flow comparison. Ryan also covers some basic differences and attributes of each unit tested and tests the units with temp gauges. Units tested are the BarrelCool, Magnetospeed RifleKuhl, the blue-bodied Original Barrel Cooler (6:48 time-mark), and a large Coleman rechargeable Quick-Pump (8:12 time-mark). The latter two units provided the most airflow when fitted with an appropriate hose.
Build Your Own Barrel Cooler — New and Improved
Popular YouTube host F-Class John was one of the pioneers in building very affordable, yet very effective do-it-yourself barrel coolers. John initially used a hose fitted to a battery-powered black Rechargeable Mini Air Pump. John then tapered a hose to fit a cartridge case for a perfect fit in the chamber. The case-head was cut off to better fit the hose for maximum airflow.
F-Class John later created an upgraded barrel cooling system using smaller, more compact pumps. He would charge these with a high-capacity battery pack (see above) and a USB charging cord. As shown in the video above, this Gen 2 system proved to be very effective. John notes: “Make sure you watch how long you the pump runs and don’t let it overheat”. One of these USB-port Mini Air Pumps is currently available on Amazon for $29.98, and there are similar compact pumps for a bit less.
Chamber Chiller BA Pro vs. Magnetospeed RifleKuhl
This video compares two compact barrel coolers, the red Magnetospeed RifleKuhl, $56.89 on Amazon and the yellow Chamber Chiller BA PRO, $80.40 on Amazon. Hear the tester’s conclusions starting at the 2:40 time-mark. The tester reports that both the RifleKuhl and the Chamber Chiller fit well in the chambers. The two units cooled down barrels pretty much identically in the field. Measured with a Kestrel, the RifleKuhl had a 12 mph flow vs. 11 mph flow for the Chamber Chiller (3:03 time-mark). The deciding factors for the tester (1:32 time-mark) were the superior battery life of the Chamber Chiller (with an extra USB battery attached) and the quietness of the Chamber Chiller.
Riflekühl Barrel Cooler by MagnetoSpeed
The MagnetoSpeed Riflekühl barrel cooler is designed to get barrel temperatures down to intended operating levels quickly. The turbocharger-inspired impeller is engineered to produce great airflow in a small package. Powered by a single CR123A Lithium battery (included), ambient air is forced through the extendable nozzle down the bore of the rifle. This is pretty efficient and can typically cool a barrel in under 8 minutes. The Riflekühl doubles as a chamber flag and features an exclusive built-in air filter to prevent dust and dirt from being blown into your rifle.
DIY Barrel Cooler Made with Mattress Inflator and Hose
An average gun-owner can build a good barrel cooler relatively easily with low-cost components. In this GunMart.TV video from the UK, the host showcases a very effective barrel cooler he crafted with an electric mattress inflator and a hose. The unit has good flow and can cool a barrel in a couple of minutes (3:10 time-mark). These components can be purchased for under $30.00. The tester purchased his cooler fan for $14.99 on Amazon (3:40 time-mark).
Thanks to Boyd Allen for help finding these videos.
Anschutz .22 LR rifle set up for F-Class competition. Photo courtesy Sportschieben Blog.
Here’s a fun new discipline that will grow in years ahead — Smallbore F-Class with .22 LR rimfire rifles. Rest-supported prone rimfire matches have been held around the world for quite some time, but only a few years ago was the discipline officially codified in the NRA Smallbore Rulebook. And the first-ever Smallbore F-Class National Championship was held in July 2018 in conjunction with the Smallbore Nationals at Camp Wa-Ke’-De in Bristol, Indiana. The Nationals involved multiple days of prone shooting at 50 meters and 100 yards. For more information read Hap Rocketto’s Shooting Sports USA Smallbore F-Class Report.
Smallbore F-Class competitors may shoot F-TR style with a bipod, or use a front rest. In the above photo from the inaugural NRA National Championship you can see a shooter with SEB Coaxial Rest at top, with a competitor using a low-profile bipod at bottom. Note the extended handle used to adjust bipod elevation. This is not a coaxial joystick, but rather a long handle attached to the mariner wheel.
Smallbore F-Class — The Future Looks Bright
With the high cost of centerfire ammunition, and the limited number of 1000-yard (or even 600-yard) ranges, we can envision that Rimfire F-Class will become a popular event at ranges across the country. Clubs don’t even need benches — just a 100-yard target bay and flat ground for the shooters. You can start with an inexpensive rimfire rig and Harris bipod. Then work up from there. Here is a custom rimfire F-TR style rig that belongs to F-Class ace and past centerfire F-TR National Champion James Crofts.
Rimfire F-Class and Fun Prone Matches with Front Rest or Bipods
Rimfire F-Class offers the fun of centerfire shooting at a much lower cost. Shooting is done prone with either a front rest or a bipod. You can shoot a relatively inexpensive rifle such as a CZ 457 MTR, or a custom build that has the same design features, weight, and ergonomics as a full-size F-TR or F-Open rifle. The choice is yours. We like shooting smallbore F-Class, because you can find decent .22 LR ammo for just $0.20 per round. By contrast, you’ll probably spend at least $1.20 per round for F-Class centerfire ammo (counting bullet, powder, primer, and part of the brass cost).
Top-Tier Vudoo V22-S Target Rifle for Rimfire F-Class
Vudoo Gun Works now offers an impressive .22 LR Single Shot Target Rifle that should prove ideal for rimfire F-Class (Open division). It features the new V22-S single-shot action, McMillan stock, and Flavio Fare BR-VS trigger.
Rimfire F-Class in the Canary Islands
This video comes from the Canary Islands, part of Spain. The voice-over is in Spanish but there are English sub-titles. The host explains: “In this video we summarize the main characteristics of this [shooting sport] that is practiced at 50 meters, 100 meters, and 200 meters with your .22 LR. Learn how to prepare your rimfire carbine and learn how to score your own targets by following our simple explanations. In another video we will delve into shooting techniques, shooting accessories and field accessories.”
Here is another rimfire F-Class video from the Canary Islands. This shows how the sport can be done with a variety of rimfire rifle types, even including a .22 LR AR clone. Some shooters are using a wide-base bipod, others are using normal Harris-type bipods, while others are using a large, benchrest-style front rest.
Rimfire F-Class-Style Local Fun Match in Oregon
In this video, F-Class John shoots an F-Class-style local fun match in Oregon. He is using a .22 LR rimfire rifle that has a full-size stock very similar to his custom F-Open centerfire rifles. This allows him to easily switch from centerfire F-Class to rimfire prone shooting with front rest and rear bag. The local fun match rules are a little different than an official F-Class match, but the shooting skills required are the same. Shooting this kind of local rimfire match allows John to keep his F-Class skills at a high level at a fraction of the cost of shooting centerfire F-Open.
Rimfire F-Class in Russia
NOTE: This video was filmed in Russia. The dialog is in Russian (without English subtitles), but it is still interesting to watch. Shooting F-Class with .22 LR ammo has become popular in Russia and other parts of Europe. You can have fun on a relatively short (200m) range with low-cost ammo.
Smallbore F-Class Course of Fire
The Smallbore F-Class Nationals was completed on paper targets at 50 yards and 100 yards. According to Shooting Sports USA: “The tournament ran during the any sight and metric phases of the 2018 NRA National Smallbore Rifle Championships, featuring a daily course of fire which mirrored the sling shooters, 40 shots at 50 meters on the A-50 target, a Metric Dewar, followed by 40 shots at 100 yards on the A-33 target. Although the international targets were shot throughout, the first two days were titled ‘conventional’ and the last two ‘metric’.”
The specifics of the match such as rifle requirements, rests, and sights may be found in the Provisional Smallbore Rifle F-Class Rules (Section 23), found on page 65 of the current NRA Smallbore Rifle rulebook. Any rules not covered in Section 23 will [reference] the normal rules of Sections 1 through 22.
Holiday Greetings to Our Readers
Merry Christmas and Happy Holidays to all our readers and especially our 66,500+ Forum Members. This marks our 18th Christmas “in business”, and the site is stronger than ever thanks to our Gold and Silver Forum members and industry sponsors. AccurateShooter.com is now accessed by over 500,000 visitors every month, who enjoy our Shooters’ Forum, Daily Bulletin, Cartridge Guides, and Feature Articles. Part of the reason for that success is the hard work of our dedicated staff and volunteer helpers.
Unsung Heroes Deserve Recognition
I want to acknowledge those guys who have really helped out the site. Number one is skilled F-Class shooter Praveen K. who serves as our System Admin. Along with being a talented trigger-puller, Praveen is a super-smart computer wizard who has kept our servers running smoothly and helped with vital software upgrades. Praveen has also done some key product tests for the site. We also thank Andy B., our Xenforo ace who has contributed vital Forum software solutions.
A huge “thank-you” goes to F-Class John who finds weekly bargains for the Bulletin and tests new products. John produces gear/hardware reviews for the Daily Bulletin with informative videos showcased on his YouTube Channel. John’s work has become a highlight of our Bulletin content. We also regularly feature videos from wind wizard Keith Glasscock, and product tests from Gavin Gear of UltimateReloader.com. We thank Boyd Allen and EdLongRange who supply story leads for the Daily Bulletin. And we wouldn’t be here without Jeff Williams, who handles site donations by mail. We have a great place to test rifles thanks to our valued friend Joe Friedrich. Other important contributors include: Bryan Litz of Applied Ballistics, Bill Marr of Rifleshooter.com, Jason Baney of EuroOptic.com, and Dennis Santiago. These folks have contributed stories, reviews, and videos. I also want to recognize Hunting Editor Colton Reid and Norway’s Thomas Haugland. All these men (and many others) have aided the site.
Praise for our Site Sponsors and Advertisers
We also want to thank our major sponsors, without whose support the site could not provide the full AccurateShooter.com experience, with an active Forum, an archive of in-depth articles, and fresh content 365 days a year in our Daily Bulletin. We’re grateful to ALL our sponsors and advertisers. In particular, we want to acknowledge the major companies which have been strong supporters of this site for many years: Capstone Precision Group (Berger, Lapua, SK, Vihtavuori), Bruno Shooters Supply, Bullet Central, EuroOptic, Graf & Sons, Midsouth Shooters Supply, Powder Valley Inc., PMA Tools, Precision Reloading, Whidden Gunworks, and Zeiss Sports Optics. Their continuing support helps us keep up the flow of information and serve our readers and Forum members.
The 2022 NRA F-Class National Championships have been underway at the Ben Avery Range in Arizona this past week. The Mid-Range F-Class Nationals ran October 16-19, and the Long Range (1000-yard) event started on October 20 and concludes on Sunday, October 23, 2022. Many of the nation’s leading F-TR and F-Open shooters are battling it out at Ben Avery right now. The week of competition will conclude on Sunday October 23, 2022 with the final 1000-yard relays followed by award ceremonies.
Looking down-range with F-TR rifle at Ben Avery Shooting Facility in Phoenix, Arizona.
F-Class Shooting at Bisley Range in the United Kingdom
F-Class competition is popular around the world, and the UK is a major center of F-Class shooting in Europe. The Bisley range is justly famous, with a long heritage of shooting competitions. This video features the European F-Class Championship held at Bisley in 2015.
Highlights from Day 1 of 2021 F-Class Nationals
In 2021 the NRA F-Class National Championships were held at Camp Atterbury, Indiana. Here is interesting footage from Day 1 of the Long-Range 1000-yard match. The video is narrated by our friend Erik Cortina, a top F-class shooter and member of Team Lapua-Brux-Borden. Erik has a popular YouTube Channel featuring interviews with many top shooters as well as reloading and tech tips.
WICKED WINDS — At Ben Avery with 18-30 mph Winds
Long-range F-Class shooters will tell you that the winds can be the biggest challenge in a match. And things can get pretty wild at times as the Ben Avery range in Phoenix, site of the 2022 NRA F-Class National Championships. In this video, shooters fight through extremely strong 18-30 mph winds at 600 yards. In these kind of extreme conditions, a major unexpected gust can send your bullet off-target.
F-0pen rifle at the Berger SW Nationals at the Ben Avery Shooting Facility in Phoenix, AZ.
Front Rest Options for F-Open (and Benchrest) Competition
If you are shopping for a front rest, definitely watch this comprehensive 42-minute video from start to finish. This is probably the most informative video about premium shooting rests available on YouTube. Top F-Class shooter and video-maker F-Class John covers a wide selection of front rests, with some observations about coaxial bipods as well. John covers the impressive new SEB NEO-X, the easy-to-transport SEB Mini-X, the excellent Rodzilla Rest, the innovative 21st Century Hybrid Rest, the sleek Italian Lenzi Rest. And at the end of the video John reviews the very affordable Caldwell Fire Control Rest ($204.99 on Amazon), explaining how it can be a decent choice for shooters on a limited budget.
Newbie Perspective — First Time Shooting F-Class
Just getting started in F-Class? Then you would appreciate this video, which covers the experience of an F-Class novice from Australia. The host of the video shot his first F-Class match at 600 yards with the Brisbane Mariners Rifle Club (BMRC) in Brisbane, Australia. He was using a Tikka T3 factory rifle with a $40 bipod. He enjoyed the challenge and had a good experience. This video shows that club-level F-Class can be fun, even with a modestly-priced factory rig. NOTE: This video is filmed indoors after the match, NOT on the lovely BMRC range shown above.
Reloading for F-Class — Interview with Erik Cortina
In this Precision Rifle Network video, Erik Cortina of Team Lapua-Brux-Borden covers the reloading process for his F-Class rifle. All phases of reloading are noted — brass prep, annealing, primer seating, precision powder measuring (to the kernel), and bullet seating. Erik also talk about load testing and use of barrel tuners. Erik produces the EC Barrel Tuner which is used by many top competitors.
Building a Modern F-Open Stock for Competition
In this video, our friend F-Class John explains the process for building two custom laminated stocks for his F-Open rifles. John selected handsome, highly-figured African hardwoods, which were then laminated into layers with purple-tinted heart-wood and dark Wenge wood stringers in the middle. The stock-maker then sliced the wood into layers (1:02) and then glued the layers together (1:40). After final cutting, the stocks are shown at 2:00, and then the video shows how the stocks received their final finish. Both stocks are fitted with the R.A.D. recoil-reduction system. See the bedding at 19:00 and the fully finished rifles at 19:12 with barreled actions fitted.
Here is another beautiful F-Open stock, on the firing line at Ben Avery with a SEB Mini front rest. Note the metal side-bars on the front of the forearm. These metal fittings extend the stock’s “wheelbase” while also lowering the rifle’s center of gravity.
BONUS Video
Crazy Small F-Class Group — Five Shots in 1.3″ at 1000 Yards
This video might just make you slap your forehead and say “that’s amazing!” During a practice session, Erik Cortina had a camera set up on the firing line along with a ShotMarker system on the target 1000 yards away. Erik recorded himself nailing a 1.3″ five-shot group, with four of the shots all touching in just 0.3″. The full group size, 1.3″, works out to 0.124 MOA — amazing accuracy for a big 7mm cartridge! And the four touching shots in 0.3″ represent an insane 0.029 MOA cluster! (1 MOA at 1000 yards is 10.47″.) As this was not shot in a competition, Erik’s 1.3″ group doesn’t count as a record, but it just shows how accurate a modern F-Open rifle can be when all the stars align for a talented trigger-puller.
Hydro Press and Arbor Press from 21st Century Shooting
Gear Review by F-Class John
Inline dies, used with arbor presses, continue to dominate the world of precision reloading. While arbor presses have remained mostly unchanged, 21st Century Shooting offers the Hydro Bullet Seating Press, a radical departure from your average arbor press. If you are looking for improved “feel” and feedback on bullet seating pressure, you should definitely check out the Hydro Press. This design has been around for a while now but has remained unchallenged since its inception. The 21st Century Hydro Press still remains a category leader (and the choice of many top competitors) for good reason. It is offered for $300.00 or, with a variety of gauge options, for $367.00. You can add an extended base with loading block another $85.00. CLICK HERE for ordering options.
Arbor presses have traditionally worked by using a gear-driven ram operated with a rotating handle. This allows for a compact design but often lacks the tactile feel and smooth operation that many reloaders want. The 21st Century Hydro Bullet Seater works by using simple mechanical leverage coupled with a hydraulic pressure gauge to seat bullets in a smooth motion all while helping you keep track of seating pressures.
Editor: Many top shooters believe they can seat bullets with greater precision using the 21st Century Hydro Press. I personally get more consistent seating, which seems to improve accuracy and even help a bit with lowering ES. The Hydro Press gives you excellent feedback when seating bullets. That has helped me detect a case with too much neck tension, or a case that may have doughnut issues. When the gauge does something odd or spikes, you are alerted to a possible issue.
In this video, John Perkins of 21st Century Shooting Shows how the Hydro Seater functions.
You might be asking why or how simple a simple mechanical lever gives you an advantage over gear driven systems and the answer is simple, leverage. The Hydro Seater is equipped with a long arm that comes straight up and out from the front and uses a set of hinges that connect to the ram. This elongated arm provides lots of leverage allowing easy force modulation. This smoothly applies pressure to the seating die in one fluid motion. This transfer of power helps seat bullets smoothly in even the tightest of necks without any jerky or stuttering movements.
Working at the same time is a hydraulic pressure gauge using internal oil. I found this gauge was incredibly sensitive, accurate, and repeatable compared to spring-driven gauges. The Hydro gauge read-out really gives the user the chance to sort ammo by seating pressure should they choose. In my particular case I only use it to cull out noticeably high or low ones as “blow off” rounds and am perfectly happy if the rest fall within a given pressure range. The nice thing is that the press allows you to be as picky as you want.
Compact 21st Century Standard Arbor Press
Not to be outdone by its big brother, 21st Century offers a Standard Arbor Press as well, in both right-hand and left-hand versions. Affordably priced at $128.00, this small arbor press in made to the same exacting standards as the Hydro Seater and has some nice features of its own compared to other small arbors.
The large, knurled adjustment knob is one of my favorite features. It tightens securely, yet it allows for easy raising or lowering of the head unit without the need for hex wrenches. 21st Century’s basic arbor press also has a slightly canted lever arm which allows the user to apply pressure more easily and consistently compared to some other arbor presses. While this press is small enough to fit many range bags, it can be disassembled quickly with a single Allen wrench.
While I own the 21st Century Hydro Press for use at home, the Standard Arbor Press goes with me to out-of-town events, so I can adjust bullet seating depth at the match. I love using it for this purpose since the little press is so easy to transport, and then set up and use on the road. The seating action is smooth, and there is plenty of leverage.
Seating my bullets long before I travel gives me the ability to set them to adjust for any throat erosion that may occur. This also ensures my bullets are seated correctly, by eliminating any potential bullet weld or problems from the bullets accidentally bouncing in your luggage. I like the confidence of knowing that my bullets are properly seated before a big match, especially when it has been days or weeks since I loaded them.
New Generation Arbor Press from 21st Century
UPDATE: In addition to the Standard Arbor Press, 21st Century now offers a New Generation Arbor Press for $185. This features direct leverage action plus a light-weight return spring that provides enhanced “resistive feedback” when seating bullets. This Editor has used this New Generation Arbor Press and it does have improved seating “feel”. An extended base with loading block is available at extra cost.
21st Century explains: “Our New Generation Arbor Press is the perfect upgrade for shooters looking to get the most out of their hand dies. With many truly unique features… this press features a butter-smooth direct leverage action. The tight tolerances of this design and exclusion of friction-inducing gears ensures that the press exerts consistent pressure through its full range of motion with minimal effort. Leverage is increased through the incorporation of an extra-long press handle, reducing hand and arm fatigue. The return springs are strong enough to reset the press but do not diminish the operator’s ability to feel the resistive feedback generated by neck tension. Press head clearance is adjustable up to 9 inches.”
SUMMARY — 21st Century Makes Great Bullet Seating Presses
Whether you need a premium bullet-seating Press such as the Hydro Bullet Seater or a basic, easy-to-transport Arbor Press, 21st Century Shooting has a excellent option for you. The Hydro Press offers outstanding bullet seating “feel” and consistency, with an ultra-smooth operation. The basic Arbor Press is well-made, compact, and also yields excellent results. Both these presses are built for a lifetime of use, using high-quality materials.
Product Review by F-Class John
Case preparation is critical for precision reloading. One must trim cases, debur/chamfer case mouths, clean necks, spruce up primer pockets and do other important tasks. Complete case prep can involve many separate processes, each requiring its own tools. With each of those tools comes additional cost as well as the need for more storage and bench space. To make case prep easier, faster, and more convenient Lyman created the Case Prep Xpress. The Case Prep Xpress, introduced a few years back, combines up to five prep stages into one well-built, stable, versatile unit. Watch this video to see the machine in action:
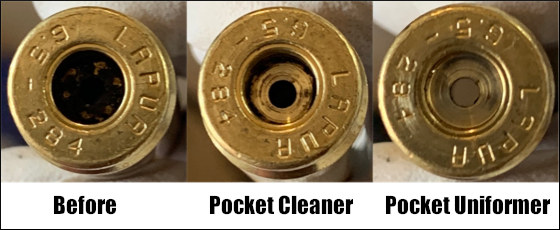
The Case Prep Xpress features five (5) independently-turning spindles all with the common 8/32 thread. This allows you to attach multiple tools supplied with the unit PLUS many other screw-on prep tools. For our testing we started out using a variety of the 12 included tools and found they cover the majority of case prep tasks. Lyman supplies deburr and chamfer tools, pocket uniformers, reamers and cleaners, as well as an assortment of neck brushes.
The deburr and chamfer tools worked really well, creating beautiful bevels all while leaving a nice flat edge across the top of the neck which is critical for accuracy and brass life. We found the primer pocket cleaning tool did a good job, but for truly clean pockets we recommend using the primer pocket uniforming tool, which very efficiently removes even hard residues.
The benefit of having interchangeable heads is that you can add your own accessories. We like to use a bore brush with bronze wool wrapped around it for use inside our necks. This worked perfectly once we screwed it in. In fact, we couldn’t think of any 8/32-threaded accessory that wouldn’t work well on this machine. Another great design feature is how all the accessories are oriented straight up. This allows for perfect visual alignment of your cases onto the tools which is critical — especially when performing cutting operations such as primer pocket uniforming.
Along with the five power stations there are six female-threaded storage spots on the sides where tools can be placed to ensure they don’t get lost. We like this feature since there will be more than five accessories you want to use and having them easily available is a great feature. You can keep 11 tools right on the machine (5 on top, 6 on the sides). That way you don’t have to dig through storage bins.
The Case Prep Xpress has a removable front bin to hold brass shavings, and there are two circular trays on either side of the bin. In front is a long tray that holds the provided brush. This makes it relatively easy to clean off brass shavings and other debris from case prep processes.
SUMMARY — Versatile Case Prep Xpress Is A Good Value
For the money, Lyman’s Case Prep Xpress is tough to beat. It performs multiple tasks well while being stable and easy-to-use. Yes there are some multi-spindle prep centers that offer variable or fast/slow RPM spindles while the Lyman’s spindles are all fixed RPM. (See, e.g. the RCBS Brass Boss). However those other systems don’t include all the convenient on-board storage of the Case Prep Xpress, and are more expensive. The Lyman Case Prep Xpress sells for $150-$170 “street price”. It’s currently on sale for $146.99 on Amazon. This makes the Lyman Case Prep Xpress a fine value — it offers great versatility while saving space and saving money compared to buying five or more separate, powered tools.
To shoot tight groups and high scores from the bench, or in prone F-Open competition, a quality front rest is essential. And a good rest is also very valuable when zeroing rifles, testing loads, and shooting varmints from a portable bench. Today’s Saturday video showcase includes multiple video reviews of some of the best front rests on the market — great products from SEB, Rodzilla, 21st Century, Lenzi, and Sinclair Int’l. In addition, the lead-off video from F-Class John covers some of the less expensive rests as well as SEB Joy-Pod coaxial bipods.
Review of Many Popular Front Rests from $250 to $2200
If you are shopping for a front rest, definitely watch this comprehensive 42-minute video from start to finish. This is probably the most informative video about premium shooting rests available on YouTube. Top F-Class shooter and video-maker F-Class John covers a wide selection of front rests, with some observations about coaxial bipods as well. John covers the impressive new SEB NEO-X, the easy-to-transport SEB Mini-X, the excellent Rodzilla Rest, the innovative 21st Century Hybrid Rest, the sleek Italian Lenzi Rest. And at the end of the video John reviews the very affordable Caldwell Fire Control Rest ($249.99 on Amazon), explaining how it can be a decent choice for shooters on a limited budget.
NEW SEB NEO-X — Set-Up in the Field
Still in its final prototype stage, the innovative SEB NEO-X raises the bar for transportable coaxial front rests. An innovative design with hinged legs allows the 20-lb NEO-X to be transported in a small case. Once the legs are extended however, the NEO-X has proven to be very stable. And this new coaxial rest offers very precise, easy-to-use controls. A swivel head speeds up deployment, as the allows you to quickly align the rest top to the target. Users have confirmed the NEO-X works great and is very stable. In the video above ace F-Class shooter Erik Cortina (below) shows how to quickly deploy the NEO-X in the field.
Rodzilla T-Rex — High Quality, Big Footprint, Advanced Features
The impressive Rodzilla T-Rex front rest offers outstanding stability with smooth, precise performance. Designer/builder Rod Brakhage (the Rod in Rodzilla) started from the ground up to create a user-friendly, match-ready, modular front rest on the market. The T-Rex weighs just over 21 pounds, and the T-Rex has a large footprint, rivaling the largest rests on the market. That provides exceptional stability, even with heavy-recoiling rifles.
The T-Rex boasts an adjustable joystick that extends from 15.5″ to 21″ in length. With this adjustability, no matter what your stock length or design, you can find a comfortable position without having to stretch uncomfortably. Rodzilla delivers the T-Rex in a custom-designed hard carry case that fits it perfectly and still has room for additional feet and accessories. The T-Rex can be ordered with excellent Sand Feet.
21st Century Hybrid-X Front Rest
Lateral Control Arm, Vertical Elevation Knob
The innovative 21st Century Hybrid-X front rest offers the “best of both worlds”. It allows precise lateral movement (for wind holds) with no elevation change. The entire center section of the rest rotates as one unit for fast, perfect horizontal alignment to target. Then adjust vertical precisely with the rotary knob on the outboard end of the control rod. Our Daily Bulletin Hybrid-X article has a full description with multiple photos of this unique rest. See additional Hybrid-X Video.
Sinclair Int’l Competition Front Rest — Sturdy and Stable Design
The Sinclair Int’l Competition Rest is a classic heavy and very stable rest that works great on the bench. Weighing 30+ pounds, with a 1″-thick steel base, this rest has a very low center of gravity and is ultra-stable. Currently priced at $699.99, the Sinclair Competition Rest is less than half the cost of the more exotic front rests.
Horizontal (windage) movement is controlled with a large rear knob which uses dual sets of twin tapered roller bearings for a non-binding windage operation. Nearly four feet of windage adjustment is offered at 100 yards. Elevation changes are made with the large wheel. With its mass and low COG, this Sinclair Rest is very stable. And because of its ability to hold elevation shot to shot, this rest has been popular with long-range benchrest competitors who often shoot quick strings of 5 or 10 shots.
SEB Mini-X and SEB Mini — Transportable Joystick Tripod Rests
The original SEB Mini was an innovative collapsible tripod rest with a coaxial top. On its introduction the SEB Mini became immediately popular with varminters, F-TR shooters, and anyone who wanted an affordable, easy-to-transport front rest that offered easy, precise and rapid adjustment of windage and elevation with the Joystick. Building on the success of the original SEB Mini, the new SEB Mini-X offers an improved head design, and new adjustable “ankle” units on all three legs. This makes it easier to level the Mini-X on uneven ground. The Mini-X has proven very successful in competition, winning major F-Open matches. Folding into a very compact package, it is easy to transport in airline luggage. Yet it offers a very stable shooting platform with precise, effortless joystick control of elevation and windage.
Sebastian (“Seb”) Lambang, the brilliant designer/builder of SEB Shooting Rests, is also one darn good shooter, as demonstrated at a recent major rifle competition in Australia. Shooting at multiple yardages from 300 to 1000 yards, Seb won the Queens Series F-Open title, and finished third overall in the Duncan & Queens Series Grand Agg. That’s mighty good marksmanship considering it was done with an F-Open rifle Seb had just acquired and never shot before! Congrats to Seb for his outstanding performance!
One of the factors in Seb’s success was an all-new front rest that Seb designed and crafted himself. This new SEB NEO-X rest has many advanced features including a swivel-adjusting head, a wide footprint, and the ability to fold-up for easier transport. We have a full report on the impressive NEO-X rest in this story, with bench testing videos by F-Class John.
The 2022 QRA Duncan & Queens Series in Australia
Report by Sebastian Lambang
This was my first overseas travel since the Berger Southwest Nationals in early 2020 [right before the COVID-19 shutdowns]. Three years ago I participated in the WARA Queens 2019 in Perth shooting the F-TR, and this was my second F-Open match in Australia. Usually I shoot the F-TR division. However this year I was invited to shoot the F-Open in the QRA Queens 2022 by Jason Mayers, my Australian dealer. Jason has been my “Little Big Brother” and my best friend in Australia. So why not? Let’s just do it!
Jason has two, twin F-Open guns. I bought one and used it during this match. Chambered for 7mm RSAUM, this F-Open rifle features a Barnard action, Marty Lobert trigger, Bartlein barrel with a large tuner in the front, McMillan Kestros ZR stock, and a Nightforce scope. I was shooting 7mm 180gr Berger bullets.
Jason did all of the load development, provided the ammunition and all equipment needed to shoot. The rifle shot and tracked very well — I loved it! Yes, I used a NEO-X prototype unit during the Queens match, i.e. the one that Jason used during the Duncan matches. The second unit just came in the day before the Queens started, it is set for left-handed shooter like him. I used his NEO rest during the Duncan Series.
We had various conditions during the match, from sunny, misty and rainy, to dead calm conditions and switchy wind. I was very fortunate to be able to pick the right time and shot well in the final 900 and 1000-yard stages, winning both yardages! With those results at 900/1000 I finished first in the Queens Match in F-Open. I then finished third overall in the Duncan & Queens Series F-Open Grand Aggregate.
Jason Mayers (L) and Seb Lambang (R). Seb had never shot this F-Open rifle before he piloted it to victory in the 2022 QRA Queens match.
Overcoming Challenges — Rifle Suffers Trigger Failure
I had a trigger failure which caused my score to drop by at least 2 points in the 1000-yard session just before the final day. I dropped 4 points in a good condition and it made me really upset! But huge thanks must go to Mark Fairbairn. Mark helped me to fix the rifle and loaned me a trigger so I still had a few minutes to finish the string!
After that trigger problem I chose to not give up! I hoped for a miracle, to be able to choose the right time to start to shoot (wind wise), to be good enough in reading the current conditions and to get the best possible scores! Jason’s encouragement in the morning that I could still win the match really helped boost my motivation! I do not know why or how but I retained confidence to shoot well and to win the match.
Thanks to Family, Friends, and Fellow Competitors
My sincere thanks to my lovely wife Lily who always supports and loves me as what I am all the time! Thanks again to my Little Big Brother Jason Mayers who has always helped and supported me genuinely! Without his help and support I wouldn’t have been able to win the match so it’s a more about him than me. My Thanks to QRA and all of the Match Organizers, Range Officers, Staffers, and Volunteers during the championship. My thanks also to all competitors and for the warmth and generous welcome!
Thoughts about the New NE0-X from its Inventor
I am really happy that the NEO-X works as expected, too. I think my effort to make even a better rest has been paid off. The New NEO-X combines the best features from the NEO rest and Mini rest in one package with a few extra features. The new NEO-X is designed for those who seek a light-compact rest and want the best one!
Great Scores Shot by Seb Lambang with new NEO-X Front Rest
Seb shot superbly to win the Queens Series in F-Open Division and take third overall in the combined Duncan and Queens Series Grand Aggregate. Here are two of Seb’s targets, as electronically logged — 1000 yards on the left, 600 yards on the right. NOTE: In Australia, the maximum numerical ring points value is 6, not 10 as in North America. But the center-most ring does register “X” as here. The match included targets shot at 300, 500, 600, 900, and 1000 yards.
Bench Testing with SEB NEO-X Prototype — VERY Impressive
Our friend F-Class John recently received one of the very first NEO-X prototypes sent to North America. John assembled the impressive new rest and took it to the range for testing. John was very impressed with the new rest to say the least. He told us: “This really is state-of-the art. I’m very impressed with how it folds compactly for transport, yet is extremely stable, with a nice open platform in the rear.” John noted that the swivel top allows precise alignment with your targets, even if the rest is not positioned perfectly on the ground. That helps when a shooter needs to set up quickly at a new yardage during a match.
When testing with his 7mm F-Open rifle, John noted that the rest is very solid on the bench and does not bump or wobble. See his observations in this exclusive test video:
Commentary by F-Class John
Here’s my quick review after shooting off the NEO-X prototype a couple times. It’s AMAZINGLY STABLE. The way it unfolds not only makes for a wide and stable footprint, but it also leaves lots of room for the shooter to work with, while controlling the joystick.
Another cool thing is that you don’t, technically, even have to lock the bridge down. The bridge is 100% stable after moving it up or down and the lock is more academic than anything.
The swivel head is a feature people will have seen on other rests but the way you can shoose to leave it swiveled or locked down is great. This new NEO-X is going to change things, I have no doubt.
Unboxing SEB NE0-X Prototype
John noted: “The way the NEO-X folds up is amazing, perfect for transporting. It weighs under 20 pounds fully loaded with all parts, joystick, and control arm.”
Forum member F-Class John is an avid F-Class competitor and expert handloader. John reviews reloading hardware and shooting-related products for his popular F-Class John YouTube Channel, which now boasts 300+ videos. John also does important product testing for AccurateShooter.com. Through his YouTube channel, John has reviewed many of the latest and greatest reloading tools and accessories. For today’s Video Showcase, we selected eight F-Class John tool and reloading product reviews.
If you like these informative videos, consider joining F-Class John’s Patreon Channel for live video meetings, more in-depth videos, and detailed explanations.
AndiScan Micro A2 Doppler Radar Chronograph
This is break-through technology folks. Imagine a device that replaces a big, bulky chronograph and is a small fraction of the size and weight. The revolutionary AndiScan Micro A2 chronograph records bullet velocity with great precision. Yet it can fit in your pocket, and be easily mounted on your rifle or front rest. This recent video follows up on F-Class John’s initial AndiScan Test Video. And yes folks, this product is now, finally, in production according to the maker: “(6/July/2022) Model A2 will be available on e-shop in several supply batches. Batches of first small production series will be available during July and August.”
The AndiScan Micro A2 is an advanced 24 GHz Doppler radar for measuring velocity of projectiles. This extremely small form-factor device can be directly mounted on your rifle. This makes set-up fast and easy. Plus the AndiScan Micro A2 can be used in dynamic situations, such as multiple distance matches, multi-position stages, or PRS/NRL courses. SEE: AndiScan Micro A2 Product Information.
21st Century Hydro Press and Standard Arbor Press
John notes: “You can’t really talk about precision reloading without taking about inline dies and arbor presses. For my money there’s nothing better than the lineup from 21st Century Shooting. They offer the Hydro Seater which is hands-down the best manual seater out there as well as their standard arbor press which is great for taking on the road to push back bullets as needed.”
Zero Turret Press with Whidden Sizing Die
The new Zero Press from Area 419 is arguably the best turret press ever crafted. It offers unrivaled precision, along with the highest-capacity turret head with NINE die/tool stations. Milled from billet aluminum and stainless steel, this press moves with the help of 14 bearings. In this video, F-Class John shows how to use a Whidden Gunworks full-length sizing die on the Zero Press. And John has two other video reviews of the $1200 Zero Press: 1. Zero Press First Thoughts Video; 2. Loading on a Zero Press.
Dillon 750 Tips and Tricks
The Dillon XL 750 is a favorite of high-volume reloaders. With the optional case feeder, the XL 750 offers high output with great reliability. And Dillon offers one of the best warranties in the business. In this video, F-Class John features upgrades including the Armanov tool-head holders from Europe. These are drilled and tapped for all FIVE stations allowing the user to put threaded dies in any station.
Concentricity Checking with Accuracy One Gauge
Every serious hand-loader needs a quality concentricity gauge. The Accuracy One Concentricity Gauge boasts a smart design that delivers precise, repeatable results. We like the unit’s easy adjustability and its ability to work in a variety of configurations. The Accuracy One Gauge measures internal and external neck runout of cartridge cases as well as seated bullet runout. It can also measure the runout of the ogive, bearing surface, and boat-tail of individual bullets. And it can even measure your primer pocket runout.
Teslong Rigid (Shaft) Borescope with Monitor
Seeing inside your barrel can provide clues to how well you’re cleaning and the bore’s overall health. One of the best tools on the market is the Teslong Rigid Borescope. This features a solid rod for easy use in barrels. Plus it comes with a self-contained high-definition viewing monitor so no smartphones or WiFi tablets are needed. If you’re looking for something more portable and a bit more versatile, try the Teslong Flexible Borescope, $99.99 including monitor. John was impressed with the new rigid Teslong he tested, and he likes having a dedicated monitor (no WiFi required).
Lyman Powered Case Trimmer Review
The Lyman Case Trim Xpress is an efficient, precise unit that allows easy adjustment of trim length with a click-adjustable collar. The trimmer comes with a set of cartridge-specific bushings that index off the case shoulder. One nice feature is a variable speed control. For the price, $154.99 on Amazon, this trimmer delivers excellent performance. F-Class John has another video review of the Lyman Case Trim Xpress which shows set-up and operation.
Primal Rights Competition Priming Seater (CPS) Review
If there is a Ferrari of priming tools, it has to be the Primal Rights Competition Primer Seater (CPS). This impressive bench-mounted tool allows very precise control over primer seating depth. A vertical tube holds primers ready for insertion. The action is smooth and precise. John believes that this is definitely the best priming tool on the market, though it may not be for everyone given its premium $600.00 price.
Gunsmithing Torque Wrench Comparisons
When you are working on custom rifles that might cost $5000+, and mounting scopes that can run $3000 (or more), you need to use very high-quality tools. Precise torque settings are essential, both to avoid damage to valuable parts, and to have the rifle and optic perform optimally. In this video, F-Class John looks at a variety of torque wrenches suitable for gunsmithing duties.
For this Saturday-at-the-Movies session we offer a selection of videos featuring interesting tools and products for handloaders. If you spend much time in your reloading room, these tools can save you time and help you load better ammo in less time. Today’s feature products range from sophisticated, premium tools such as 21st Century powered neck-turning lathe, to basic add-ons such as Lee Breech Lock Bushings, which are very handy if you load a variety of cartridge types.
21st Century Powered Neck-Turning Lathe
Power is activated by the red button on the end of the blue, horizontal feed handle:
Do you neck-turn hundreds of cases annually? Then you deserve this outstanding tool. The 21st Century Innovation Powered Neck-Turning Lathe may well be quite simply the best system ever created for quickly and precisely uniforming (and reducing) the neckwall thickness of cartridge brass. We have the original manual 21st Century neck-turning lathe, and can attest that it works great. With this powered system you can turn necks faster and more efficiently, with less effort. This is like going from a stick shift to an automatic transmission. The cases feed very smoothly and the results are beautiful. Note: The videos show the version as first marketed by 21st Century Shooting, which now operates as 21st Century Innovation.
The Powered Neck-Turning lathe is a modular system. Swing the bar from right to left to feed the case. The power head (with case holder) glides on stainless steel rails for smooth movement. This allows very precise feed rate. Power is supplied via a button that is built into the end of the feed handle. Push the red button to make the case spin. It’s as simple as that.
Hornady OAL Tool and Hornady Bullet Comparator
Gun Tech Steve Ostrem explains how to properly use Hornady’s Overall Length Gauge to determine length-to-land precisely. The OAL Gauge uses a “Modified Case” that threads onto the tool and holds a bullet. Push on the back of the gauge until you feel the bullet just touch the rifling. (We do this gently at first, tapping the rod a couple time to ensure the bullet is aligned correctly). Once you’ve got the length, then use the tool with a comparator on your calipers to get the length-to-lands. NOTE: We recommend taking the measurement 3-4 times in a row to get a reliable number. With a little practice your should be able to get repeatable measurements within .0015″.
Henderson Power Case Trimming/Chamfering Machine Test
F-Class John tests some of the finest reloading and shooting equipment you can buy. Recently he added the impressive Henderson Gen 3 Powered Trimmer to his inventory of tools. John is now a Henderson fan. He likes the speed, precision, and repeatability of the $779.00 Henderson machine, which trims-to-length and chamfers the case mouth all in one pass. Unlike some other trimming tools, the Henderson indexes off the overall case length NOT the shoulder. John found this worked just fine for his .284 Winchester brass, which has all been full-length sized prior to trimming.
Watch the video to see the Henderson trimmer in action. The dual, parallel horizontal support shafts provide precise alignment of the case as it moves inward toward the cutter blade. The Taper-Lock cutter provides a 14-degree inside chamfer and 30-degree outside chamfer. The trimming process is very consistent case after case, and the Henderson’s design captures brass shavings effectively.
This related video shows a comparison with the popular Giraud Powder Trimer
As noted in this comparison, John liked the precision of the Henderson trimmer and the overall design of the machine, which offers good ergonomics and very precise alignment of the cases. Cycling is smooth and positive, as you can see from the videos. The Giraud is also an excellent machine for bulk trimming/chamfering but the Henderson has some advantages.
Concentricity Checking with Accuracy One Gauge
Every serious hand-loader needs a quality concentricity gauge. The Accuracy One Concentricity Gauge boasts a smart design that delivers precise, repeatable results. We like the unit’s easy adjustability and its ability to work in a variety of configurations. The Accuracy One Gauge measures internal and external neck runout of cartridge cases as well as seated bullet runout. It can also measure the runout of the ogive, bearing surface, and boat-tail of individual bullets. And it can even measure your primer pocket runout.
Lee Die Lock Rings and Spline Drive Breech Lock Bushings
In this recent video Gavin Gear reviews three types of die accessories from LEE. These work for virtually all standard dies, not just LEE-brand reloading dies. The new LEE basic silver-finish die lock rings now feature splines for enhanced grip and compatibility with LEE’s new die lock ring wrench (photo right). They still boast a rubber 0-Ring that helps “float” the die for improved concentricity. Gavin also reviews Lee’s Spline Drive Breech Lock Bushings for use with presses fitted with LEE’s Breech Lock system. These Breech Lock bushings allow rapid change-out of dies without modifying the setting. The colorful new bushings feature splines on top that work with the new Lee Lock ring wrench shown above. In addition, the Breech Lock Bushings have a clamp to preserve die depth setting.
Tools Galore — Affordable Tools and Accessories for Reloaders
This detailed 15-minute video from the Bolt Action Reloading YouTube Channels, features a variety of lower-cost products/tool that help with key reloading tasks. The video looks at hand priming tools, case prep tools, Lyman stepped loading blocks, powder tricklers, expander mandrels, powder trickler, long-tube funnels and more! If you are getting started in hand-loading, this is a very helpful video to watch. It covers a lot of ground, illustrating options for tool types.
This Lyman case prep tool is one of many products reviewed in this 15-minute video.


 Holiday Greetings to Our Readers


 Just getting started in F-Class? Then you would appreciate this video, which covers the experience of an F-Class novice from Australia. The host of the video shot his first F-Class match at 600 yards with the


 The
The 


 In this recent video Gavin Gear reviews three types of die accessories from LEE. These work for virtually all standard dies, not just LEE-brand reloading dies. The new LEE basic silver-finish die lock rings now feature splines for enhanced grip and compatibility with LEE’s new die lock ring wrench (photo right). They still boast a rubber 0-Ring that helps “float” the die for improved concentricity. Gavin also reviews Lee’s


