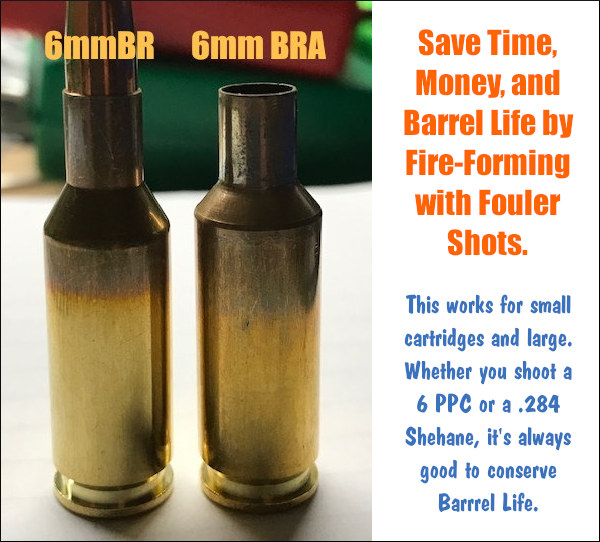
Here’s a tip for guys who shoot the 6 PPC, 6 Dasher, 6 BRA, .284 Shehane, or other wildcat cartridges that require fire-forming. Use your fouler shots to fire-form new cases. That way your fouler shots do “double-duty” and you get your brass fire-formed without putting extra rounds through your expensive barrel.
This procedure is recommended by Joel Kendrick, the 2004 IBS 600-yard Shooter of the Year. After he cleans his barrel, Joel knows it takes two or three shots to foul in the bore before accuracy returns. When shooting his PPC, Joel uses those fouler shots to fire-form his new brass. Joel explains: “I like to have relatively new brass always ready. By fire-forming a couple cases after each barrel-cleaning during a match, by the end of the weekend I’ve got a dozen or more freshly fire-formed cases to put into the rotation. If you do this with your fouler shots you get your fire-forming accomplished without using up any extra barrel life.”
This not only saves barrel wear, but it saves you trips to the range for the purpose of fire-forming. We thank Joel for this smart suggestion. For those who do not have a dedicated barrel for fire-forming, this should help keep your round-count down. Note: With this fouler fire-forming routine, you should ALWAYS do the fire-forming with the SAME POWDER you load for your match ammo. Joel currently works as the Supplier Quality Process Engineer for MMI-TruTec, a company that offers barrel surface coatings that can further extend your barrel life.
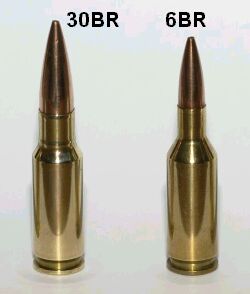
The 30 BR is an amazing little cartridge. However, 30 BR shooters do have to neck-up 6mmBR or 7mmBR brass and then deal with some issues that can arise from the expansion process. One of our Forum members was concerned about the donut that can form at the new (expanded) neck-shoulder junction. Respected bullet-maker Randy Robinett offers tips on how to deal with the “dreaded donut”.
The Forum member was concerned about thinning the brass if he turned his 30 BR necks after expansion: “Everything I have found on 30 BR case-forming says to simply turn off the bulge at the base of the neck caused by the old 6BR shoulder. I expanded my first case and measured the neck at 0.329″ except on the donut, where it measures 0.335″. Looking inside the case… reveals a groove inside the case under the donut. Now, it is a fact that when I turn that neck and remove the donut, the groove is still going to be there on the inside? That means there is now a thin-spot ring at the base of the neck that is .005 thinner than the rest of the neck. Has anyone experienced a neck cracking on this ring?”
Randy Robinett, who runs BIB Bullet Co., is one of the “founding fathers” of the 30 BR who help prove and popularize the 30 BR for benchrest score shooting. Randy offers this advice on 30 BR case-forming:
While the thinner neck-base was one of our original concerns, unless one cuts too deeply INTO the shoulder, it is not a problem. For my original 30BR chamber, thirty (30) cases were used to fire 6,400 rounds through the barrel. The cases were never annealed, yet there were ZERO case failures, neck separations, or splits. The case-necks were turned for a loaded-round neck diameter of .328″, and, from the beginning, sized with a .324″ neck-bushing.
The best method for avoiding the ‘bulge’ is to fire-form prior to neck-turning (several methods are successfully employed). Cutting too deeply into the shoulder can result in case-neck separations. I have witnessed this, but, with several barrels and thousands to shots fired, have not [personally] experienced it. The last registered BR event fired using that original barrel produced a 500-27x score and a second-place finish. [That’s] not bad for 6K plus shots, at something over 200 firings per case.
Check Out the 30 BR Cartridge Guide on AccurateShooter.com
You’ll find more information on 30 BR Case-forming in our 30 BR Cartridge Guide. Here’s a short excerpt from that page — some tips provided by benchrest for score and HBR shooter Al Nyhus:
30 BR Case-Forming Procedure by Al Nyhus
The 30 BR cartridge is formed by necking-up 6mmBR or 7mmBR brass. You can do this in multiple stages or in one pass. You can use either an expander mandrel (like Joe Entrekin does), or a tapered button in a regular dies. Personally, I use a Redding tapered expander button, part number 16307. This expands the necks from 6mm to .30 cal in one pass. It works well as long as you lube the mandrel and the inside of the necks. I’ve also used the Sinclair expander body with a succession of larger mandrels, but this is a lot more work and the necks stay straighter with the Redding tapered button. This button can be used in any Redding die that has a large enough inside diameter to accept the BR case without any case-to-die contact.
Don’t be concerned about how straight the necks are before firing them the first time. When you whap them with around 50,000 psi, they will straighten out just fine! I recommend not seating the bullets into the lands for the first firing, provided there is an adequate light crush-fit of the case in the chamber. The Lapua cases will shorten from approx. 1.550″ to around 1.520″ after being necked up to 30-caliber I trim to 1.500″ with the (suggested) 1.520 length chambers. I don’t deburr the flash holes or uniform the primer pockets until after the first firing. I use a Ron Hoehn flash hole deburring tool that indexes on the primer pocket, not through
In the video below, Shiraz Balolia takes you through the essentials of fire-forming brass with his custom-made, water-cooled benchrest railgun. Shiraz is a former Team Captain (and member) of the U.S. F-Class Open Rifle Team. Shiraz has competed on the National and World level for more than two decades, and has won multiple major International championships in 1000-yard shooting. In this video he will walk you through fire-forming cartridges in .284 Shiraz, a wildcat based on the .284 Winchester.
Fire-forming properly is a pre-requisite for accuracy in a match rifle. Done right, fire-forming can improve cartridge consistency shot to shot. Creating a fire-forming fixture like this, or even a more basic design, can save you time and potential frustration on the range, Shiraz explains. The key is getting the initial case expansion to match your competition chamber quickly but without generating excessive heat. Follow along as Shiraz takes you through the methodology of fire-forming both in his work shop and on the range.
Here Shiraz Balolia takes you through the essentials of fire-forming brass with his custom-made, water-cooled benchrest railgun.
Along with running the successful Grizzly Industrial enterprise, Shiraz is a top competitor and member of the U.S. F-Open team. He has competed in three world championships. In recent years he captured three straight Canadian National F-Class Championships (READ 3-Peat STORY). So, this guy knows his stuff.
Shiraz shows fellow shooters how to fire-form cases efficiently without burning precious match barrel life. In the video above he uses a custom-designed railgun that employs water cooling for the barrel. This is done with hoses running from a sink, so that cool water is constantly flowing through the barrel jacket.
Shiraz says the fired cartridge are actually cool to the touch because the water-jacketed barrel keeps everything at a moderate temperature. (See video at 8:00)
The 30 BR is an amazing little cartridge. However, 30 BR shooters do have to neck-up 6mmBR or 7mmBR brass and then deal with some issues that can arise from the expansion process. One of our Forum members was concerned about the donut that can form at the new (expanded) neck-shoulder junction. Respected bullet-maker Randy Robinett offers tips on how to deal with the “dreaded donut”.
The Forum member was concerned about thinning the brass if he turned his 30 BR necks after expansion: “Everything I have found on 30 BR case-forming says to simply turn off the bulge at the base of the neck caused by the old 6BR shoulder. I expanded my first case and measured the neck at 0.329″ except on the donut, where it measures 0.335″. Looking inside the case… reveals a groove inside the case under the donut. Now, it is a fact that when I turn that neck and remove the donut, the groove is still going to be there on the inside? That means there is now a thin-spot ring at the base of the neck that is .005 thinner than the rest of the neck. Has anyone experienced a neck cracking on this ring?”
Randy Robinett, who runs BIB Bullet Co., is one of the “founding fathers” of the 30 BR who help prove and popularize the 30 BR for benchrest score shooting. Randy offers this advice on 30 BR case-forming:
While the thinner neck-base was one of our original concerns, unless one cuts too deeply INTO the shoulder, it is not a problem. For my original 30BR chamber, thirty (30) cases were used to fire 6,400 rounds through the barrel. The cases were never annealed, yet there were ZERO case failures, neck separations, or splits. The case-necks were turned for a loaded-round neck diameter of .328″, and, from the beginning, sized with a .324″ neck-bushing.
The best method for avoiding the ‘bulge’ is to fire-form prior to neck-turning (several methods are successfully employed). Cutting too deeply into the shoulder can result in case-neck separations. I have witnessed this, but, with several barrels and thousands to shots fired, have not [personally] experienced it. The last registered BR event fired using that original barrel produced a 500-27x score and a second-place finish. [That’s] not bad for 6K plus shots, at something over 200 firings per case.
Check Out the 30 BR Cartridge Guide on AccurateShooter.com
You’ll find more information on 30 BR Case-forming in our 30 BR Cartridge Guide. Here’s a short excerpt from that page — some tips provided by benchrest for score and HBR shooter Al Nyhus:
30 BR Case-Forming Procedure by Al Nyhus
The 30 BR cartridge is formed by necking-up 6mmBR or 7mmBR brass. You can do this in multiple stages or in one pass. You can use either an expander mandrel (like Joe Entrekin does), or a tapered button in a regular dies. Personally, I use a Redding tapered expander button, part number 16307. This expands the necks from 6mm to .30 cal in one pass. It works well as long as you lube the mandrel and the inside of the necks. I’ve also used the Sinclair expander body with a succession of larger mandrels, but this is a lot more work and the necks stay straighter with the Redding tapered button. This button can be used in any Redding die that has a large enough inside diameter to accept the BR case without any case-to-die contact.
Don’t be concerned about how straight the necks are before firing them the first time. When you whap them with around 50,000 psi, they will straighten out just fine! I recommend not seating the bullets into the lands for the first firing, provided there is an adequate light crush-fit of the case in the chamber. The Lapua cases will shorten from approx. 1.550″ to around 1.520″ after being necked up to 30-caliber I trim to 1.500″ with the (suggested) 1.520 length chambers. I don’t deburr the flash holes or uniform the primer pockets until after the first firing. I use a Ron Hoehn flash hole deburring tool that indexes on the primer pocket, not through the case mouth. — Al Nyhus
Here’s a tip for guys who shoot the 6 PPC, 6 Dasher, 6 BRA, .284 Shehane, or other wildcat cartridges that require fire-forming. Use your fouler shots to fire-form new cases. That way your fouler shots do “double-duty” and you get your brass fire-formed without putting extra rounds through your expensive barrel.
This procedure is recommended by Joel Kendrick, the 2004 IBS 600-yard Shooter of the Year. After he cleans his barrel, Joel knows it takes two or three shots to foul in the bore before accuracy returns. When shooting his PPC, Joel uses those fouler shots to fire-form his new brass. Joel explains: “I like to have relatively new brass always ready. By fire-forming a couple cases after each barrel-cleaning during a match, by the end of the weekend I’ve got a dozen or more freshly fire-formed cases to put into the rotation. If you do this with your fouler shots you get your fire-forming accomplished without using up any extra barrel life.”
This not only saves barrel wear, but it saves you trips to the range for the purpose of fire-forming. We thank Joel for this smart suggestion. For those who do not have a dedicated barrel for fire-forming, this should help keep your round-count down. Note: With this fouler fire-forming routine, you should ALWAYS do the fire-forming with the SAME POWDER you load for your match ammo. Joel currently works as the Supplier Quality Process Engineer for MMI-TruTec, a company that offers barrel surface coatings that can further extend your barrel life.
In the video below, Shiraz Balolia takes you through the essentials of fire-forming brass with his custom-made, water-cooled benchrest railgun. Shiraz is a current Team member (and former Team Captain) of the U.S. F-Class Open Rifle Team. Shiraz has competed on the National and World level for more than two decades, and has won multiple major International championships in 1000-yard shooting. In this video he will walk you through fire-forming cartridges in .284 Shiraz, a wildcat based on the .284 Winchester.
Fire-forming properly is a pre-requisite for accuracy in a match rifle. Done right, fire-forming can improve cartridge consistency shot to shot. Creating a fire-forming fixture like this, or even a more basic design, can save you time and potential frustration on the range, Shiraz explains. The key is getting the initial case expansion to match your competition chamber quickly but without generating excessive heat. Follow along as Shiraz takes you through the methodology of fire-forming both in his work shop and on the range.
Here Shiraz Balolia takes you through the essentials of fire-forming brass with his custom-made, water-cooled benchrest railgun.
Along with running the successful Grizzly Industrial enterprise, Shiraz is a top competitor and member of the U.S. F-Open team. He has competed in three world championships. In recent years he captured three straight Canadian National F-Class Championships (READ 3-Peat STORY). So, this guy knows his stuff.
Shiraz shows fellow shooters how to fire-form cases efficiently without burning precious match barrel life. In the video above he uses a custom-designed railgun that employs water cooling for the barrel. This is done with hoses running from a sink, so that cool water is constantly flowing through the barrel jacket.
Shiraz says the fired cartridge are actually cool to the touch because the water-jacketed barrel keeps everything at a moderate temperature. (See video at 8:00)
Spring varmint season is just around the corner. So here’s a very accurate Half-Mile ‘Hog rifle, that can drill a groundhog at long range. While just about any cartridge from a 22 magnum on up will do the job on a groundhog at close range, when you want to “reach out and touch” your prey at very long distance, it takes a case capable of tossing a heavier, wind-bucking projectile at ultra-high speeds. This week we feature a 6mm Remington Ackley Improved (6mm AI) belonging to our friend John Seibel, who ran the Varmints for Forum website for many years. John’s handsome BAT-actioned rifle sends the 87gr V-Max at a blistering 3675 fps. With its 1/4-MOA accuracy and flat-shooting ballistics, this gun is a varmint’s worst nightmare, a rig that regularly nails groundhogs at a half-mile (880 yards) and beyond.
Quarter-MOA Accuracy For Long-Distance Varminting
GunDay Report by John Seibel
John reports: “So far this gun has been an awesome long-distance varmint rig, with enough velocity to smack those critters hard at 800 yards and beyond. I have some more testing to do, but it seems that the 87gr V-Max (molyed) pushed by 52 grains of N160 or 51.5 grains of RL-19 shoots very well indeed. Velocity runs around 3675 fps. I shot consistent 1″ groups at 500 yards with both of these loads. Warning: These are max loads that work in my rifle, so start at least 10% lower and work up.
My fire-forming procedure is just jam and shoot. I start with a powder (such as H414) that works for the parent case, fire a few cases as I work up the load to where I get a well-formed case, then shoot them at varmints. Then I work my load up with the newly-formed cases over a chrono. If a load looks good at 100 yards, I will go straight for 200 yards. I’ve seen that some loads which grouped well at 100 won’t shoot well at 200. If it is consistent at 200, then I’ll shoot it a steel plate at 500 yards. Then the truth will be told.
Man I love that BAT action! I have tried some Berger 88gr Lo-Drag bullets as well. They have the same BC as the V-Maxs but offer excellent accuracy. The action is BAT’s Model B round action configured Right Bolt, Left Port, with a fluted .308-faced bolt. The port is 3.0 inches wide — perfect for the 6mm Rem Improved cartridge’s OAL. I use a NightForce 8-32x56mm NXS scope mounted to BAT’s 20-MOA aluminum Weaver-style base. I use Burris Signature Zee rings because they are self-aligning and easy on scope tubes, plus you have the option of adding more MOA if needed.
Krieger with Harrell Brake
The barrel is a stainless Krieger 1:12″ twist Heavy Varmint contour, finished at 26″. I installed a Harrell’s muzzle brake because I hate recoil and I like to be able to spot my hits when target shooting and hunting–especially hunting.
When hunting I am usually by myself so when I eyeball a varmint I want to see my shot flatten him … and I hardly ever miss (heh-heh). Make sure you have your earplugs in though — that muzzle brake is loud!
Easy-Steering Thumbhole Varminter
The stock is Richard’s Custom Rifles Model 005 Thumbhole Varminter. This is a big stock that rides the sand bags very well. Took me a while to get used to this stock as I had never shot a thumbhole before. It is very comfortable and easy to control when you are shooting a moving target. In fact, my first kill with this rifle was a coyote at a little over 200 yards, she was moving along at a slow clip and I had to give her the ole’ Texas heart shot before she disappeared over a hill! (It’s pretty rare for me to shoot moving varmints though — at long-range, I want my cross-hairs steady on the target.)
Regarding the stock selection, I like Richard Franklin’s stocks because they are well-suited to my kind of shooting. I prefer a stock that is flat most of the way back towards the action because when I’m shooting out of my truck window it has to balance around mid-point. Also his stocks seem to track very well on the bench. I guess the stocks I like the most are his Model 001 and Model 008 F-Class. [Editor’s note: John often shoots from the driver’s seat of his truck because he is partially paralyzed. He also has a hoist in his truck bed for his wheelchair. Even with his mobility challenges, John tags more varmints in a season than most of us ever will.]
Choice of Caliber — A 6mm with More Punch for Long Distance
I picked the 6mm Rem Improved mainly because it has that long neck for holding long bullets and it doesn’t burn the throats out as fast as a .243 AI would. I don’t use Remington brass; it splits when fire-forming and seems to work-harden fast. Another reason I picked the 6mm Improved was what I saw in the field–it seemed to be a perfect long-range groundhog getter. I saw my stocker, Richard Franklin, flat smack groundhogs out to 900+ yards with regularity. The OAL of a 6mm Improved does make it hard to remove a loaded round from a standard Remington 700 action. That’s why I went with the BAT Model B, with its longer 3.0″ port. For a standard action, a .243 AI might function better.
As for the 6 Dasher, from what I have read, I think it is a fine round. I’m a hunter though and a lot of case-forming isn’t worth it to me. Forming the Ackleyized cases is bad enough. The 6-250 is a real screamer and very accurate but it doesn’t have the capacity to drive the heavier bullets as well as the 6mm Improved. I have tried a .243 WSSM, also with a Richard’s stock (#008) and a BAT action. It may not shoot as well as the 6mm Rem Improved, but I like those short fat cases.
John’s Views on the Great Moly Debate
Editor: John started with moly-coated bullets for this 6mm Rem AI rifle, but he has moved away from that. He does have considerable experience with coated bullets, and now, at least with custom, hand-lapped barrels, he normally uses uncoated bullets. He now favors coated bullets only for the small .17 caliber.
Moly or no moly… hmm? I have used moly and Danzac for several years, mainly Danzac. In my experience, both moly and Danzac can work well for somebody who shoots a lot of rounds before cleaning. A barrel has to be broken-in correctly whether you use moly or not. I have done break-in with naked bullets, using the conventional method of shooting and cleaning till the copper stops sticking. I have also gone through the break-in process using molyed bullets from the start. It seems to me the barrels broke-in more readily with moly bullets than with naked bullets. I think if there are any rough or sharp places in the barrel the slick molyed bullet doesn’t grab it as badly and the moly will “iron” the flaw out without leaving copper behind.
The main mistake I think most people make with moly is improper cleaning. By that I mean they don’t get the bore clean from the beginning. Some people will scoff at me for this but I use JB bore paste for most all my cleaning, hardly ever use a brush. Just JB and Montana Extreme or Butch’s Bore Shine. It works for me! Now shooting molyed bullets works fine to say 500 yards, but any further and you really need a lot of tension on the bullet. If not you will get bad flyers.
Personally, I use coated bullets only with .17 cal rounds now. I did use them initially in my 6mm Rem AI but I am starting to move away from that. With proper break-in, the fine custom barrels we have now will not copper if you clean correctly and don’t push those bullets too fast! And remember that powder-fouling build-up is an accuracy-killer too. That is another reason I use a lot of JB paste.
John lives and works on a farm in Virginia. Getting rid of intrusive varmints is part of the job of running the farm. Here is one of John’s bolt-action pistols, which is very handy when shooting from a vehicle.
The Guru of Varmints For Fun
For many years John Seibel ran the popular Varmints For Fun website (now offline). This site offered excellent advice for hunters and reloaders. John covered a wide variety of varmint chamberings, from big 6mm wildcats, to the popular 6BR, 22BR and .22-250 caliber varmint rounds, and even the micro-caliber wildcats such as the 20 Vartarg and 20 PPC. Shown below is one of his favorite rifles, a 20 PPC with a special short version of Richard Franklin’s Model 008 stock.
John tells us: “I guess one reason I started my web site is that I was getting a lot of inquiries about hunting groundhogs, custom rifles and reloading. Plus I thought it was a fine way to get young people interested in the shooting sports. Lord knows hunting and firearms aren’t taught any more. I get a lot of young hunters and shooters asking what’s the best caliber for hunting varmints, and they’ll ask for reloading help too. It’s a shame, but many of them have no one to teach them. I do my best to help.
Showing others that a person can still shoot, even with a disability, is another reason I started my web site. I am a C 6-7 Quadraplegic, which means I have no grip in my hands. Imagine shooting those 1.5 oz Jewels that way! I had a therapist tell me I wouldn’t be able to shoot or reload once I got out of the hospital…shows you how much he knows! First time I got home from the hospital it was deer season and I had Pops park me at the edge of some woods. Well I had a 7-point buck on the ground in thirty minutes! Being raised on a farm didn’t hurt none either–it helped me figger ways to jury-rig stuff. Of course I couldn’t have done much if it wasn’t for my family and my lovely wife Cathy[.]”
John’s Favorite 20 PPC Varmint Rifle
Cartridge History Lesson — the Original .244 Remington
Here’s bit of cartridge history. The 6mm Remington, parent of John’s 6mm AI, actually started its life with a different name, the “.244 Remington”. What we now know as the “6mm Remington” was originally called the .244 Remington. The cartridge was renamed because it was not a commercial success initially, being eclipsed by the .243 Winchester. The .244 Remington and the 6mm Remington are identical — only the name was changed.
The 30 BR is an amazing little cartridge. However, 30 BR shooters do have to neck-up 6mmBR or 7mmBR brass and then deal with some issues that can arise from the expansion process. One of our Forum members was concerned about the donut that can form at the new (expanded) neck-shoulder junction. Respected bullet-maker Randy Robinett offers tips on how to deal with the “dreaded donut”.
The Forum member was concerned about thinning the brass if he turned his 30 BR necks after expansion: “Everything I have found on 30 BR case-forming says to simply turn off the bulge at the base of the neck caused by the old 6BR shoulder. I expanded my first case and measured the neck at 0.329″ except on the donut, where it measures 0.335″. Looking inside the case… reveals a groove inside the case under the donut. Now, it is a fact that when I turn that neck and remove the donut, the groove is still going to be there on the inside? That means there is now a thin-spot ring at the base of the neck that is .005 thinner than the rest of the neck. Has anyone experienced a neck cracking on this ring?”
Randy Robinett, who runs BIB Bullet Co., is one of the “founding fathers” of the 30 BR who help prove and popularize the 30 BR for benchrest score shooting. Randy offers this advice on 30 BR case-forming:
While the thinner neck-base was one of our original concerns, unless one cuts too deeply INTO the shoulder, it is not a problem. For my original 30BR chamber, thirty (30) cases were used to fire 6,400 rounds through the barrel. The cases were never annealed, yet there were ZERO case failures, neck separations, or splits. The case-necks were turned for a loaded-round neck diameter of .328″, and, from the beginning, sized with a .324″ neck-bushing.
The best method for avoiding the ‘bulge’ is to fire-form prior to neck-turning (several methods are successfully employed). Cutting too deeply into the shoulder can result in case-neck separations. I have witnessed this, but, with several barrels and thousands to shots fired, have not [personally] experienced it. The last registered BR event fired using that original barrel produced a 500-27x score and a second-place finish. [That’s] not bad for 6K plus shots, at something over 200 firings per case.
Check out the 30 BR Cartridge Guide on AccurateShooter.com
You’ll find more information on 30 BR Case-forming in our 30 BR Cartridge Guide. Here’s a short excerpt from that page — some tips provided by benchrest for score and HBR shooter Al Nyhus:
30 BR Case-Forming Procedure by Al Nyhus
The 30 BR cartridge is formed by necking-up 6mmBR or 7mmBR brass. You can do this in multiple stages or in one pass. You can use either an expander mandrel (like Joe Entrekin does), or a tapered button in a regular dies. Personally, I use a Redding tapered expander button, part number 16307. This expands the necks from 6mm to .30 cal in one pass. It works well as long as you lube the mandrel and the inside of the necks. I’ve also used the Sinclair expander body with a succession of larger mandrels, but this is a lot more work and the necks stay straighter with the Redding tapered button. This button can be used in any Redding die that has a large enough inside diameter to accept the BR case without any case-to-die contact.
Don’t be concerned about how straight the necks are before firing them the first time. When you whap them with around 50,000 psi, they will straighten out just fine! I recommend not seating the bullets into the lands for the first firing, provided there is an adequate light crush-fit of the case in the chamber. The Lapua cases will shorten from approx. 1.550″ to around 1.520″ after being necked up to 30-caliber I trim to 1.500″ with the (suggested) 1.520 length chambers. I don’t deburr the flash holes or uniform the primer pockets until after the first firing. I use a Ron Hoehn flash hole deburring tool that indexes on the primer pocket, not through the case mouth. — Al Nyhus
Do you shoot a popular wildcat (such as the 6mm Dasher), but hate the hassle of fire-forming all your own cartridge brass? That takes time, costs money (in bullets and powder), and consumes precious barrel life. Well there IS a better solution — you can have your new brass hydro-formed to your exact specifications for a reasonable cost.
DJ’s Brass Service now offers custom case hydro-forming to your exact specs. Darrell Jones offers this service for a variety of popular cartridges: 6mm Dasher, 6mm BRX, 6mm BRDX, and 6mm Shehane. After hydro-forming your brass, Darrell can also neck-up or neck-down the cases to meet your needs. For example, if you shoot a 22 Dasher, Darrell can hydro-form the cases and then neck them down to .22 caliber. He can also turn the necks to your specs (for an additional charge).
Darrell is a hydro-forming wizard who has perfected the process over the last couple of years. He has learned a few special techniques along the way to ensure uniform case-forming. Without revealing any trade secrets, we can say the Darrell has very special dies and Darrell doesn’t use a mallet or hammer — he has a system that is much more consistent. Darrell tells us: “Many of my customers take this brass and load it ‘as is’ and go straight to a match and shoot some very nice groups.”
Hydro-forming by Darrell costs $0.60 (sixty cents) per case with a minimum order of $60. Neck-turning is an additional $0.50 (fifty cents) per case plus actual return shipping. The turnaround is usually less than five days.
With Darrell’s hydro-forming service you don’t have to buy any special dies or other equipment. Darrell says: “Simply send me the brass you need or have it dropped-shipped to me along with a fired case that has not been sized. If you need formed brass for a new build (gun not yet fired), let me know and I will size the brass to fit within .001 of a PT&G GO gauge.”
For more information, visit DJsBrass.com, or call Darrell at (205) 461-4680. IMPORTANT: Contact Darrell for shipping instructions BEFORE sending brass for processing. In a hurry, don’t have time? Just call Darrell and he’ll make something work for you.
Hydro-Forming Customer Reports
Here are testimonials from recent customers.
“Recently had Darrell Jones of DJ’s Brass Service hydro-form 6 BRX brass for me. The turn around time was very fast and the brass was to the exact specification I ask for. I actually shot the hydro-formed brass in a match [without further fire-forming]. It shot a 3.597″ — pretty amazing. Let DJ do the work for you!” — Mike Wilson (3 Time IBS Record Holder; 2013 and 2014 1000-yard IBS Shooter of the Year.)
“Darrell Jones of DJ’s Brass Service went far beyond the call of duty, to assist me in preparation to shoot for my first time in an IBS match. I have had an interest in 1000-yard competition for many years and finally got the opportunity to try it. After researching the winning competitors, rifles, and rounds I ordered a Panda action with Krieger barrel in 6mm Dasher from Kelby’s. It was one week before the match and I had a rifle and no rounds. I contacted Darrell to hydraulically form 6mm dasher from Lapua 6mm BR brass. He formed the brass and had it in the mail the next day[.] Since I have only reloaded for hunting or magazine fed rifles I was not familiar with proper seating to allow land engagement of the bullets for 1000-yard accuracy. Darrell took the time to advised me every step of the way to allow me to shoot a 3.158″ (5) shot group to win my first round of my first competitive match ever.” — Mike Youngblood
Many of our Forum members shoot an “improved” 6mmBR cartridge. This might be a 30°-shoulder 6mm BRX, or a 40°-shoulder 6mm Dasher, or the 6mm BRDX, which is very similar to the Dasher, but with a slightly longer neck. This Editor shoots a 6mm BRDX and has found it very accurate, and maybe a bit easier to fire-form than a standard Dasher. Speaking of fire-forming, in our Shooters’ Forum, we often see questions about fire-forming BRX/Dasher brass. For those who need a large number of BRX or Dasher cases, one option to consider is using pistol powder in a dedicated fire-forming barrel. Here’s an explanation of how this process can work.
Forum member Skeeter has a 6mm Dasher falling block varmint rifle. The Dasher case is based on the 6mm BR Norma cartridge with the shoulder blown forward about 0.100″ and out to 40°. This gives the Dasher roughly 3.5 grains added capacity compared to the standard 6BR.
A few seasons back, Skeeter needed to form 300 cases for varmint holiday. Skeeter decided to fire-form his brass without bullets. This method avoids barrel wear and saves on components. There are various ways to do this, but Skeeter chose a method using pistol/shotgun powder, some tissue to hold the powder in place, Cream of Wheat filled to within an 1/8″ of top of the neck, and a “plug” of tissue paper to hold it all in place. Shown below are cases filled with a pistol/shotgun powder charge topped with Cream of Wheat and then a tissue paper plug.
To ensure the case headspaced firmly in his Dasher chamber, Skeeter created a “false shoulder” where the new neck-shoulder junction would be after fire-forming. After chamfering his case mouths, Skeeter necked up all his cases with a 0.257″ mandrel (one caliber oversized). Then he used a bushing neck-sizing die to bring the top half of the neck back down to 0.267″ to fit his 0.269″ chamber. The photo below shows how the false shoulder is created.
After creating the false shoulder, Skeeter chambered the cases in his rifle to ensure he could close the bolt and that he had a good “crush fit” on the false shoulder, ensuring proper headspace. All went well.
The next step was determining the optimal load of pistol powder. Among a variety of powders available, Skeeter chose Hodgdon Titewad as it is relatively inexpensive and burns clean. The goal was to find just the right amount of Titewad that would blow the shoulder forward sufficiently. Skeeter wanted to minimize the amount of powder used and work at a pressure that was safe for his falling block action.
Working incrementally, Skeeter started at 5.0 grains of Titewad, working up in 0.5 grain increments. As you can see, the 5.0 grain charge blew the shoulder forward, but left it a hemispherical shape. At about 7.0 grains of Titewad, the edge of the shoulder and case body was shaping up. Skeeter decided that 8.5 grains of Titewad was the “sweet spot”. He tried higher charges, but the shoulder didn’t really form up any better. It will take another firing or two, with a normal match load of rifle powder and a bullet seated, to really sharpen up the shoulders. Be sure to click on the “View Larger Image” link to get a good view of the cases.
The process proved to be a success. Skeeter now has hundreds of fire-formed Dasher cases and he hasn’t had to put one bullet through his nice, new match-grade barrel. The “bulletless” Cream of Wheat method allowed him to fire-form in a tight-necked barrel without neck-turning the brass first. The only step now remaining is to turn the newly Dasher-length necks down about .0025″ to fit his 0.269″ chamber. (To have no-turn necks he would need an 0.271″ or 0.272″ chamber).
Skeeter didn’t lose a single case: “As for the fire-forming loads, I had zero split cases and no signs of pressure in 325 cases fire-formed. Nor did I have any misfires or any that disbursed COW into the action of the firearm. So the COW method really worked out great for me and saved me a lot of money in powder and bullets.” To learn more about the COW fire-forming process, read this Dasher Fire-Forming Forum Thread.
Skeeter did have a fire-forming barrel, but it was reamed with a .269 chamber like his 10-twist Krieger “good” barrel. If he fire-formed with bullets, he would have to turn all 300 necks to .267″ BEFORE fire-forming so that loaded rounds would fit in the chamber. Judging just how far to turn is problematic. There’s no need to turn the lower part of the neck that will eventually become shoulder–but how far down the neck to turn is the issue. By fire-forming without bullets now he only has to turn about half the original neck length, and he knows exactly how far to go.


 Here’s a tip for guys who shoot the 6 PPC, 6 Dasher, 6 BRA, .284 Shehane, or other wildcat cartridges that require fire-forming. Use your fouler shots to fire-form new cases. That way your fouler shots do “double-duty” and you get your brass fire-formed without putting extra rounds through your expensive barrel.
 The 30 BR is an amazing little cartridge. However, 30 BR shooters do have to neck-up 6mmBR or 7mmBR brass and then deal with some issues that can arise from the expansion process. One of our Forum members was concerned about the donut that can form at the new (expanded) neck-shoulder junction. Respected bullet-maker Randy Robinett offers tips on how to deal with the “dreaded donut”.


 My fire-forming procedure is just jam and shoot. I start with a powder (such as H414) that works for the parent case, fire a few cases as I work up the load to where I get a well-formed case, then shoot them at varmints. Then I work my load up with the newly-formed cases over a chrono. If a load looks good at 100 yards, I will go straight for 200 yards. I’ve seen that some loads which grouped well at 100 won’t shoot well at 200. If it is consistent at 200, then I’ll shoot it a steel plate at 500 yards. Then the truth will be told.

 Choice of Caliber — A 6mm with More Punch for Long Distance

 The Guru of Varmints For Fun

 The 30 BR is an amazing little cartridge. However, 30 BR shooters do have to neck-up 6mmBR or 7mmBR brass and then deal with some issues that can arise from the expansion process. One of our Forum members was concerned about the donut that can form at the new (expanded) neck-shoulder junction. Respected bullet-maker Randy Robinett offers tips on how to deal with the “dreaded donut”.


