On German Salazar’s Rifleman’s Journal website, you’ll find an excellent 5-Part Series on barrel chambering. The Series, entitled The Voyeur’s Guide to Barrel Chambering, is not intended to be a “how-to” instructional treatise for gunsmiths. Instead, German’s 5-Part Guide is aimed at the end user — the shooter. German explains: “This Series isn’t intended for anyone who owns a lathe; instead it is for those of us who send an action off to get a new barrel installed. Those who have the equipment know what to do and how to do it and I have nothing to teach them. On the other hand, if you’ve ever wondered just what goes into barrel fitting, this is it.” PART I | PART II | PART III | PART IV | PART V
With well-written text and dozens of very high-quality images, German takes you through the chambering, threading, shoulder-fitting, and crowning processes from start to finish. The idea is to give the “barrel consumer” a clear idea of the processes involved when a barrel blank is converted into functional form, complete with chamber, threaded tenon, fitted breech, and crown.
We highly recommend German’s 5-Part Voyeur’s Guide to Barrel Chambering. German, with the aid of John Lowther (who ran the machines), did a great job. The series has already drawn much attention from our Forum members, along with praise. After reading the articles, John C. from Australia wrote: “Your Chambering articles… really are excellent [and] informative for those of us too scared to watch our gunsmith chamber one of our barrels lest we distract him at a crucial moment!”
We know you’ll learn something from reading through German’s 5-Part Series. And if you see a photo on German’s website that intrigues you, simply click on it to see a larger, higher-resolution version. All the images in the Voyeur Series on RiflemansJournal.com can be zoomed to larger formats.
On our main AccurateShooter.com site, you’ll find an excellent article by GS Arizona on the Basics of Neck Turning. If you’re new to the neck-turning game, or are just looking for good tips on improving your neck-turning procedures, you should read that article. Below we offer some highlights and photos from the article, but you’ll need to read the whole story to view all the illustrations and follow all the procedures step by step.
Why Should You Consider Neck Turning?
Let’s assume that your rifle doesn’t have a tight neck chamber that requires neck turning; if you have a tight neck chamber, of course, the answer to the question is “because you have to”. For the rest of us, and that includes the vast majority of Highpower shooters, neck turning isn’t a requirement, but it can be a useful way to bring your ammunition a small but meaningful step closer to that pot of gold at the end of the rainbow: perfection. I’m not talking about a theoretical improvement, but a real one, an improvement that lies in equalizing and optimizing the neck tension of your loaded rounds. Inconsistent neck tension is a real contributor to increased muzzle velocity variance which itself is a significant factor in increased elevation dispersion at long range. So there’s our basic reason for neck turning: to equalize and optimize neck tension in order to reduce elevation dispersion.
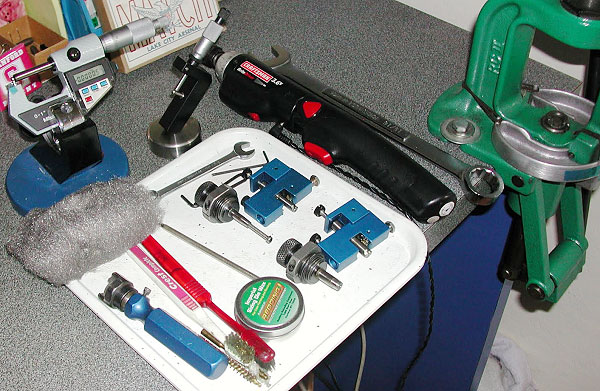
The Tools of the Trade
Here you see everything I use and a bit more. The press, a cordless screwdriver (always plugged in, turning is tough on the old battery), a couple of K&M neck turners (one set up for 6mm, the other for .30 caliber) an expander for each size, some Imperial lube, an old toothbrush or two to keep the cutter clean, a handle with a caseholder (for those emergencies when the screwdriver dies and there’s just one more case to go!), steel wool and a tubing micrometer finish the list of tools. Hey, I left the dial calipers out of the picture! They’re always handy, keep them around, but they are useless for measuring neck thickness, so don’t try. I usually use an Optivisor magnifier while I turn necks, very handy for a clear view of what’s happening on the neck.
Expanding the Neck
Put some lube on the inside of the case neck and run it into the expander. Really, this isn’t hard. I prefer to expand each case immediately before turning it as opposed to expanding all the cases and then turning them. Brass is somewhat springy and will tend to go back toward its original size; therefore, by expanding and turning immediately, you are more likely to have all cases fit the mandrel with the same degree of tightness and to get a more consistent depth of cut.
Cutter Adjustment for Cut Depth and Length
All the tools I’ve seen have pretty good adjustment instructions. The only thing they don’t tell you is that you should have five to ten spare cases to get it right initially. Anything of the right diameter will do while you learn, for instance, just use that cheap surplus .308 brass to do initial setup and save the precious .30-06 for when you know what you’re doing. Be patient and make your adjustments slowly; you’ll need to set the cutter for thickness as well as length of cut (just into the shoulder). The depth of cut (brass thickness) takes a bit of fiddling, the length of the cut is generally easy to set.
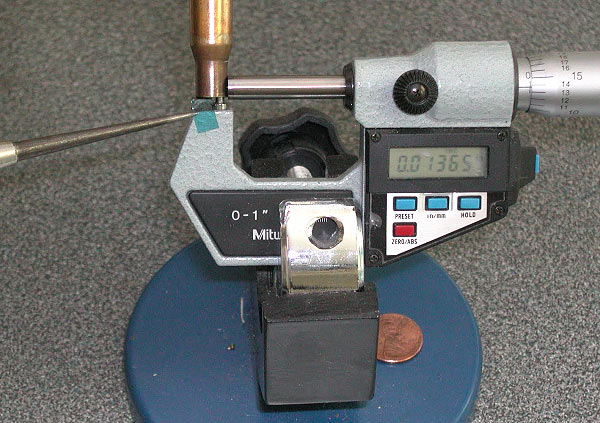
The Finished Product — A Perfectly Uniform Neck
If you read the whole article, and follow the procedures using quality tools, you should get very good results — with a little practice. To demonstrate, here’s an example of my finished, neck-turned brass. You’ll see there is a perfect, 0.0125″ thick neck. It’s very uniform around the circumference, usually I only see 1 or 2 ten-thousandths variance. Now, with the necks uniformed like this, we can select the bushing size that will give us our preferred neck tension and experiment with various levels of tension, secure in the knowledge that all of the cases will actually have the desired neck tension.
On his Riflemans’ Journal blog, German Salazar wrote an excellent article about cartridge Case-Head Separation. We strongly recommend that you read this article. German examines the causes of this serious problem and he explains the ways you can inspect your brass to minimize the risk of a case-head separation. As cases get fired multiple times and then resized during reloading, the cases can stretch. Typically, there is a point in the lower section of the case where the case-walls thin out. This is your “danger zone” and you need to watch for tell-tale signs of weakening.
The photo below shows a case sectioned so that you can see where the case wall becomes thinner near the web. German scribed a little arrow into the soot inside the case pointing to the thinned area. This case hadn’t split yet, but it most likely would do so after one or two more firings.
One great tip offered by German Salazar involves using a bent paper clip to detect potential case wall problems. Slide the paper clip inside your case to check for thin spots. German explains: “This simple little tool (bent paper clip) will let you check the inside of cases before you reload them. The thin spot will be immediately apparent as you run the clip up the inside of the case. If you’re seeing a shiny line on the outside and the clip is really hitting a thin spot inside, it’s time to retire the case. If you do this every time you reload, on at least 15% of your cases, you’ll develop a good feel for what the thin spot feels like and how it gets worse as the case is reloaded more times. And if you’re loading the night before a match and feel pressured for time — don’t skip this step!”
In the spirit of the season, German Salazar offers this gift to our readers: free books. In his Rifleman’s Journal blog, German notes: “I can think of no better gift than knowledge, in this case knowledge of the early days of ballistic science, organized competitive shooting, the NRA and much more.”
Google, a company we all know for its internet search service, has undertaken a massive project known as Google Books under which they are scanning and making available millions of out-of-print books with uncertain copyright ownership.
Below you will find a list of books, each with a clickable title link and brief description. The title link will take you to the Google Books page for each book. You can read the entire book online, or you can download it to your computer as a PDF file and save it (or print it). You can also create your own Google Library and save the books there for access from any computer. Most of these books are hundreds of pages long, so consider your paper and toner supply before printing!
The Bullet’s Flight From Powder to Target, Franklin W. Mann, 1909, 384 pages.
This is the original and still widely read and highly regarded book on internal and external ballistics. Dr. Mann was a tireless experimenter and had the resources to pursue his interest with the best equipment available. A close friend of Harry Pope as well as other notable experimenters in the early days of smokeless powder, Mann’s work is thorough and well documented. If you’re interested in ballistics, this is the foundation that you must know in order to understand the ensuing century of work in that field.
Irish Riflemen in America, Sir Arthur Blennerhassett Leech, 1875, 216 pages.
This book chronicles the Irish rifle team’s trip to America in 1874 to compete against the best of America’s riflemen as organized by the Amateur Rifle Club of New York when the fledgling NRA ignored the Irish challenge. The book also includes a great deal of history of Irish target shooting and an account of a hunting trip in the American West by members of the party. Well worth reading.
The American Rifle, Townsend Whelen, 1918, 637 Pages.
Townsend Whelen was — and remains for many of us — the dean of American firearms writers. Here is a man who truly did it all and wrote about it with the authority of experience and the modesty of a true gentleman. Despite his roots in Philadelphia society, Whelen sought outdoor adventure and hard living and he found it; we are all richer for his ability to document it so well. This book, written immediately after (and during) the Great War gives a great insight into the period from a rifleman’s perspective: equipment, reloading, shooting — it’s all here. A long book and worth every page.
Suggestions to Military Riflemen, Townsend Whelen, 1909, 243 pages.
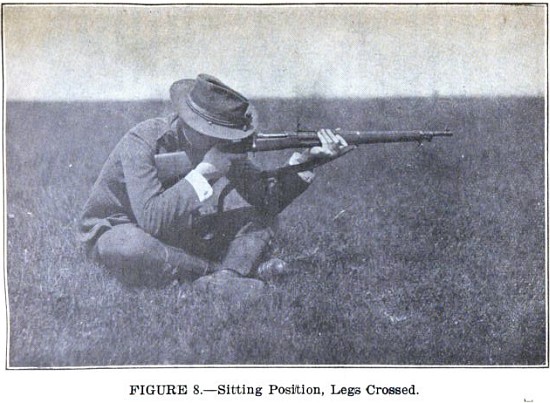
Townsend Whelen’s pre-war book on marksmanship which brought him to national prominence in the military establishment. Whelen, who coached the national championship winning Army rifle team at Sea Girt in 1906, covers all aspects of shooting the Model 1903 rifle, including long-range shooting. There is also an appendix covering the Krag-Jorgensen as it was still used by various state guard units at the time. Positions, sights, zeroing, windage, score books, slow-fire, rapid-fire, long-range, ammunition, vision; it’s all here. Every topic you see covered in a modern book on marksmanship was covered by Whelen in this book. You can’t know where you’re going if you don’t know where you’ve been — this is a “must read” for the serious marksman and student of history.
Modern Rifle Shooting From the American Standpoint, W. G. Hudson, 1903, 155 pp.
Dr. Hudson was one of the leading lights of the early smokeless era (as well as the Schuetzen era), a contemporary and friend of Mann and Pope, Hudson was a tireless investigator of all things related to accuracy. This very hard to find book is an introduction to target shooting with a detailed overview of equipment and practices and is well illustrated with many plates of top level equipment of the day; a real gem.
Manual for Rifle Practice: Including Suggestions for Practice at Long Range, George Wood Wingate, 1879, 303 pages.
Wingate was the central figure in the founding of the National Rifle Association of America. Like Whelen’s manual 30 years later, Wingate’s book was adopted as the training manual by many military organizations. An authoritative view of marksmanship instruction in the day of the Trapdoor Springfield, Sharps, Remington Rolling Block, and Peabody military rifles. Includes diagrams and instructions for their care.
How I Became a Crack Shot — With Hints to Beginners, W. Milton Farrow, 1882, 204 pp.
Milton Farrow was one of the top shots of his time. Well-bred and highly educated, modesty was not among Farrow’s virtues. This makes for entertaining reading as he describes his travels and his many shooting accomplishments. The Hints for Beginners section has advice that remains sound even these many years later.
The Gun and its Development, William Wellington Greener, 1907 (8th Ed.) 786 pages.
Originally published in 1881, Greener’s book covers all aspects of the firearms world at that time and this 8th edition has many updates. While much of the text focuses on shotguns, there is a great deal of other material in this massive tome, including coverage of gunpowder and explosived, pistols, rifles, target shooting, rifle clubs and much more of interest to the modern rifleman. Many great period advertisements at the end will make you wish for a time machine!
Cartridge Manufacture, Douglas Thomas Hamilton, 1916, 167 pages.
This book is a well-written, technical presentation of small arms cartridge manufacturing during the Great War. An inside look at all processes at the Frankford Arsenal including case manufacture, bullet manufacture, loading and packaging. A useful historical treatise on the topic.
Conventional .308 Winchester brass has a large primer pocket with a large, 0.080″-diameter flash hole. Last year, Lapua began producing special edition .308 Win “Palma” brass that has a small primer pocket and a small flash hole, sized 1.5mm (.059″) in diameter. Tests by U.S. Palma Team members showed that the small-flash-hole .308 brass possibly delivers lower Extreme Spread (ES) and Standard Deviation (SD) with some bullet/powder/primer combinations. All things being equal, a lower ES should reduce vertical dispersion at long range.
Why Might a Small Flash Hole Work Better?
The performance of the small-flash-hole .308 brass caused some folks to speculate why ES/SD might be improved with a smaller flash hole. One theory (and it’s just a theory) is that the small flash hole creates more of a “jet” effect when the primer fires. Contributing Editor German Salazar sought to find out, experimentally, whether this theory is correct. German explained: “During one of the many internet forum discussions of these cases, Al Matson (AlinWA) opined that the small flash hole might cause the primer flash to be propagated forward more vigorously. In his words, it should be like shooting a volume of water through a smaller nozzle, resulting in a flash that reaches further up the case. Now that kind of comment really sparked my curiosity, so I decided to see what I could see.”
More Primer Testing by Salazar
You can read more about this test and other primer experiments on RiflemansJournal.com.
Large and Small Flash Hole .308 Cases — But Both with Small Primer Pockets
To isolate the effect of flash hole diameter alone, German set up a test with the two types of .308 case that have a small primer pocket: Remington BR brass with a 0.080″ flash hole and Lapua Palma brass with a 0.062″ flash hole. NOTE: German reamed the Lapua brass to 0.062″ with a Sinclair uniforming tool, so it was slightly larger than the 0.059″ factory spec. The Remington brass has a .22 BR headstamp as this brass was actually meant to be re-formed into .22 BR or 6 BR before there was factory brass available for those cartridges.
German set up his primer testing fixture, and took photos in low light so you can see the propagation of the primer “blast” easily. He first tested the Remington 7 1/2 primer, a primer known for giving a large flame front. German notes: “I thought that if there was a ‘nozzle effect’ from the small flash hole, this primer would show it best. As you can see from the photos, there might be a little bit of a flash reduction effect with this primer and the small flash hole, the opposite of what we expected, but it doesn’t appear to be of a significant order of magnitude.”
Next German tested the Wolf .223 primer, an unplated version of the Small Rifle Magnum that so many shooters use. German notes: “This is a reduced flame-front (low flash) primer which has proven itself to be very accurate and will likely see a lot of use in the Lapua cases. With this primer, I couldn’t detect any difference in the flash produced by the small flash hole versus the large flash hole”.
Remington BR case, 0.080″ Flash Hole, Wolf .223 Primer.
Palma case, 0.062″ Flash Hole, Wolf 223 Primer.
German tells us: “I fired five or six of each primer to get these images, and while there is always a bit of variance, these are an accurate representation of each primer type and case type. You can draw your own conclusions from all this, I’m just presenting the data for you. I don’t necessarily draw any conclusions as to how any combination will shoot based on the pictures.”
Results of Testing
Overall, looking at German’s results, one might say that the smaller diameter of the small flash hole does not seem to have significantly changed the length or size of the primer flame front. There is no discernible increased “jet effect”.
Conventional .308 Winchester brass has a large primer pocket with a large, 0.080″-diameter flash hole. In 2010, Lapua began producing special edition .308 Win “Palma” brass that has a small primer pocket and a small flash hole, sized 1.5mm (.059″) in diameter. Tests by U.S. Palma Team members showed that the small-flash-hole .308 brass possibly delivers lower Extreme Spread (ES) and Standard Deviation (SD) with some bullet/powder/primer combinations. All things being equal, a lower ES should reduce vertical dispersion at long range.
Why Might a Small Flash Hole Work Better?
The performance of the small-flash-hole .308 brass caused some folks to speculate why ES/SD might be improved with a smaller flash hole. One theory (and it’s just a theory) is that the small flash hole creates more of a “jet” effect when the primer fires. German Salazar (Rifleman’s Journal Editor) sought to find out, experimentally, whether this theory is correct. German explained: “During one of the many internet forum discussions of these cases, Al Matson (AlinWA) opined that the small flash hole might cause the primer flash to be propagated forward more vigorously. In his words, it should be like shooting a volume of water through a smaller nozzle, resulting in a flash that reaches further up the case. Now that kind of comment really sparked my curiosity, so I decided to see what I could see.”
More Primer Testing by Salazar
You can read more about this test and other primer experiments on RiflemansJournal.com.
Large and Small Flash Hole .308 Cases — But Both with Small Primer Pockets
To isolate the effect of flash hole diameter alone, German set up a test with the two types of .308 case that have a small primer pocket: Remington BR brass with a 0.080″ flash hole and Lapua Palma brass with a 0.062″ flash hole. NOTE: German reamed the Lapua brass to 0.062″ with a Sinclair uniforming tool, so it was slightly larger than the 0.059″ factory spec. The Remington brass has a .22 BR headstamp as this brass was actually meant to be re-formed into .22 BR or 6 BR before there was factory brass available for those cartridges.
German set up his primer testing fixture, and took photos in low light so you can see the propagation of the primer “blast” easily. He first tested the Remington 7 1/2 primer, a primer known for giving a large flame front. German notes: “I thought that if there was a ‘nozzle effect’ from the small flash hole, this primer would show it best. As you can see from the photos, there might be a little bit of a flash reduction effect with this primer and the small flash hole, the opposite of what we expected, but it doesn’t appear to be of a significant order of magnitude.”
Next German tested the Wolf .223 primer, an unplated version of the Small Rifle Magnum that so many shooters use. German notes: “This is a reduced flame-front (low flash) primer which has proven itself to be very accurate and will likely see a lot of use in the Lapua cases. With this primer, I couldn’t detect any difference in the flash produced by the small flash hole versus the large flash hole”.
Remington BR case, 0.080″ Flash Hole, Wolf .223 Primer.
Palma case, 0.062″ Flash Hole, Wolf 223 Primer.
German tells us: “I fired five or six of each primer to get these images, and while there is always a bit of variance, these are an accurate representation of each primer type and case type. You can draw your own conclusions from all this, I’m just presenting the data for you. I don’t necessarily draw any conclusions as to how any combination will shoot based on the pictures.”
Results of Testing
Overall, looking at German’s results, one might say that the smaller diameter of the small flash hole does not seem to have significantly changed the length or size of the primer flame front. There is no discernible increased “jet effect”.
How Easy it is to Have Fun with Rifles and Equipment You Probably Already Have….
Forum member Rod Vigstol (aka Nodak7mm) has written a great Introduction to F-Class for shooters getting started in this rewarding discipline. Rod’s article, which appears in German Salazar’s Rifleman’s Journal website, covers F-Class basics and addresses concerns that “newbies” may have when trying a new shooting sport. Rod stresses that most guys who own a varmint-hunting or tactical rig likely have nearly all the gear they need to give F-Class competition a try.
Rod explains: “If you’re reading this, you have more than just a general interest in the shooting sports and in the awesome rifles that shoot tiny groups at insane distances. You probably even have friends that enjoy shooting as much as you do. The quandary you may find yourself in is your friends haven’t quite jumped into it head-first like you have and they haven’t spent a lot of money and time obtaining the equipment you have to go shoot these matches. But you know what? Your prairie-dog shooting buddy or coyote-hunter friend can attend these matches and shoot alongside with you. He or she more than likely already has the basic equipment needed to shoot a match.” Most varmint shooters already have a suitable, accurate rifle and the following equipment:
• A variable-power scope in the 4.5-14x range or higher.
• A front bipod like the trusty old Harris 9″-13″, or maybe even a basic pedestal front rest.
• A rear sand-bag or similar sand-sock to rest the butt stock.
• A basic shooting mat from Midway or at least a piece of carpet or canvas to lay on.
Rod also provides a handy checklist of items to bring to the range. These include: Canvas or carpet strip (to set under bipod), Notebook, Kitchen Timer, Cleaning Rod, Camp Chair, Elbow Pads, Shooting Hat, and Open Bolt Indicator (OBI). Along with rifle, bipod (or front rest), rear bag, and ammo, that’s pretty much all you need.
Rod encourages all shooters to give F-Class a try — even novices. Rod explains: “We have all been rookies, newbies, new kids on the block or whatever. So we all have a good idea of what may be going on in your mind, the questions and concerns you may have. I’m telling you this sport is full of fantastic people who deep down find it far more fulfilling to help a new shooter get started than running a clean target. You just have to take the first step to get involved.”
Following shoulder surgery, our Contributing Editor German Salazar moved to F-TR shooting, replacing his sling and iron sights with bipod and scope. German has done remarkably well for an F-TR newbie, winning his first two 500-yard matches (in F-TR class) at Phoenix-area ranges. German has been shooting his “old Palma rifle with a scope and bipod attached”. This rig features a Gilkes-Ross action in a Robertson/Sitman Highpower Prone stock with an Anschütz 5020 trigger and 30″ 1:11″-twist Krieger barrel. The rifle is fitted with a Canadian-made Rempel “Ski” bipod and a Leupold BR 24X scope.
On his Riflemans’ Journal website, German has crafted a helpful article with advice for “sling shooters contemplating a busman’s holiday into F-Class.” Even seasoned F-Class shooters can learn something from German’s observations in his F-TR: Scoping it Out article. Here are some highlights from the article:
Carpet Under the Bipod
“I quickly learned that a piece of carpet was an essential component under the bipod. Without the carpet, [on dirt surfaces] the bipod tends to dig into the dirt with every shot, resulting in odd elevation shots. On the concrete it isn’t quite as essential, but it smooths the recoil movement appreciably and is worthwhile. [I used] a short-nap carpet remnant for this, but my car floor mat also worked well.”
Clicking vs. Holding Off
“I’ve been shooting iron sights and clicking sight knobs for most of my life; trying to hold off made me very uncomfortable and the reflex pull of the trigger just wasn’t there. Once I returned to holding center and clicking, I was more comfortable and was able to execute my shots more quickly and cleanly. By zeroing the windage knob I can also easily return to a previous setting when conditions warrant.”
Reading Mirage with Spotting Scope
“In conversations with other F-Class shooters in our club, I found that few were using a spotting scope to see mirage; they were largely relying on the rifle scope. However, the rifle scope is focused on the target, as it must be to eliminate parallax, and thus cannot show mirage with the same clarity as a spotting scope that is focused roughly halfway down the range.”
Positioning Your Spotting Scope
“I position the spotting scope in the same manner as I did when shooting from the sling. It is very close to me and can be used without moving the head from the cheekpiece. The object, as always, is to minimize movement in order to maintain a consistent position and to minimize the time lost between the last glance at the mirage and breaking the shot.”
Becigneul Case Turning Motor, by German Salazar
Although there have been a variety of similar devices and ‘case lathes’ offered for sale in the past, they’ve been priced fairly high. Paul’s unit is reasonably priced ($220.00) and built like a tank. The motor turns at about 180 rpm which is just right for neck turning. What’s really nice is that the motor has enough torque to hold its speed throughout the whole operation and a/c power to run all day long!
The unit’s design is fairly straight-forward: a surplus electric motor turns a Forster case-holding collet. Paul makes a nice knurled collar to open and close the collet.Power is controlled by a household type wall switch attached to a long cabe. The whole assembly is mounted on a nice hardwood base.
Video of Paul Becigneul’s Case Turning Motor in Use
In operation, it works very well. The collet has enough clamping power to hold the case after a quick hand-tightening, no wrench is needed (although you can use one if you are so inclined). A quarter turn of the collar opens the collet and a quick turn of the wrist tightens it back up. As with any powered case neck turning device, the case wobbles a bit as it turns. This doesn’t matter a bit as the turning cutter is held in your hand (which is free to move) and the cutter’s arbor is the actual alignment device. The wobble is the same or less than what I had using a power screwdriver with a K&M holder.
For more information, email Paul Becigneul via: pbike4466 [at] directv.net. In 2012, the basic unit cost $220.00 each collet was $10 and shipping is $20 to most U.S. locations.
Editor’s Comment: In the video, Paul uniforms case flash-holes with a Lyman tool (from the inside) and then uniforms primer pockets (from the outside) with a K&M tool. While we do believe that flash-holes should be inspected to ensure there are no obstructions or flakes blocking the hole, we have not found that flash-hole or primer-pocket uniforming produced measurable improvements in accuracy with Lapua 6mmBR brass. In fact, in our tests using a manual K&M flash-hole uniformer, ES/SD actually got worse after the flash-holes were “uniformed”.
Keep in mind also that many deburring tools for 0.059 (PPC-size) flash-holes actually over-cut substantially, reaming the holes to as wide as 0.068″. The Lapua PPC/BR flash hole is spec’d at 1.5mm, which works out to 0.059055″. Most of the PPC/BR flash-hole uniforming tools on the market use a 1/16″ bit which is nominally 0.0625″, but these often run oversize — up to 0.067″. If you like to uniform your primer pockets, be our guest (this can be useful with lesser-quality brass). But before pocket-uniforming dozens of cases, you might do a comparison test (by shooting uniformed vs. un-uniformed ammo) to see whether this operation actually improves accuracy with the brass you are using.
Recently, an AccurateShooter team including contributing writer German Salazar visited the Nammo Talley facility in Mesa, Arizona. We were given access to the new Rimfire Service Center and the .338 Lapua Magnum loading facility. The Rimfire Service Center is a brand new facility dedicated to supporting top-level rimfire shooters in all disciplines, including Prone, 3-Position, Silhouette, Benchrest and more. Lapua has over 2 million rounds of various grades of match ammunition on hand for shooters to test and purchase. The RSC has a 100-meter test tunnel where groups are measured under ideal conditions with electronic sensor-equipped “paperless” target frames placed at 50 meters and 100 meters. Shooters can make appointments to visit the center and test ammo in their own rifles. A detailed report on the RSC has just been released on German’s Rifleman’s Journal website.
.338 Lapua Manufacturing and Testing
The .338 Lapua Magnum facility is a super-sized version of the rimfire facility. With a 300-meter tunnel and pressure testing equipment on hand, Nammo’s engineering and loading staff have the ability to develop perfect loads for government clients with a variety of specific requirements. The loading facility has equally impressive technology and is well worth reading about. CLICK HERE to read German’s article about the .338 LM facility.
AccurateShooter.com will have more information on these two state-of-the-art facilitites, including video footage in the coming weeks. So stay tuned!


 On German Salazar’s Rifleman’s Journal website, you’ll find an excellent 5-Part Series on barrel chambering. The Series, entitled The Voyeur’s Guide to Barrel Chambering, is not intended to be a “how-to” instructional treatise for gunsmiths. Instead, German’s 5-Part Guide is aimed at the end user — the shooter. German explains: “This Series isn’t intended for anyone who owns a lathe; instead it is for those of us who send an action off to get a new barrel installed. Those who have the equipment know what to do and how to do it and I have nothing to teach them. On the other hand, if you’ve ever wondered just what goes into barrel fitting, this is it.”


 On his

 In the spirit of the season, German Salazar offers this gift to our readers: free books. In his


 Recently, an AccurateShooter team including contributing writer German Salazar visited the Nammo Talley facility in Mesa, Arizona. We were given access to the new


