Here are some of the fine rifles Mike Bryant has smithed. You’ll find dozens more on BryantCustom.com.
Texas-based gunsmith Mike Bryant has decided to start taking work again. It seems that retired life was just a bit too sedate for Mike. This is great news for fans of precision rifles. Mike is an superb smith who has produced many match-winning competition rigs along with fine hunting and varmint rifles.
The services Mike can provide are listed on his “re-activated” website at BryantCustom.com. Mike will still continue to specialize in Rem Action-based and Custom Action-based rifles with customer-supplied parts. He explains his decision to return to the business he does so well: “Retirement was short with what the economy has done in the oil and gas business. I am back at least part time. I am Looking forward to serving my customer’s needs as I have done in the past.”
Welcome back Mike — we wish you success in your “return to the fold”. As before Mike will offer complete custom rifles as well as a full range of gunsmithing services including chambering, barrel-fitting, stocking, and action truing.
Here’s a bit of Britain in blue — a 270-7mm WSM F-Classer belonging to Elwood in the UK.
One of the most popular items in our Shooters’ Forum is the ongoing “Pride and Joy” thread. Since 2009, Forum members have posted photos and descriptions of their most prized rifles. Here are some of the most recent “Pride and Joy” rifles showcased in our Forum. Do you have a gun you’d like to see featured there? Just Register for the Forum and you can add your gun to the list.
1. Dasher LowBoy. CigarCop just completed a lovely 6mm Dasher in a yellow/gray laminated PR&T LowBoy stock. CigarCop did the stock inletting and finish work himself. Very nice work indeed.
2. Varmint Special. Here’s a handsome varminter with a beautifully-figured walnut stock. This is one of three rifles Forum Member Dan Hall posted this month.
3. 6mm Trifecta. DixiePPC served up not one but THREE pretty rifles, all with pearlescent paint jobs. Details of the three rigs are provided below. Click the image to see a full-screen version.
Top: 6 PPC for 10.5-lb NBRSA LV Class, 1:14″, .262″-necked SS Hart Barrel chambered and fitted by Doug Pascal, Pearl Black Kelbly Stock, RB/RP Blueprint & Trued 40X Short Action (Glued) with a Doug Pascal Bolt Release. This gun is a 1994 build by Doug Pascal of Craftsmith.
Middle: 6 PPC 13.5lb NBRSA HV Class, 1:14″, .262″-necked SS straight-countour Hart Barrel, Pearl White Kelbly Stock/Aluminum Butt Plate, RB/RP Stolle Panda Action (Glued). Kelbly Double Screw Rings. 1994 Vintage Leupold/Premier BR 36X. This gun is a 1992-vintage Kelbly build for NBRSA Unlimited Class.
Bottom: 6mmBR 17-lb IBS Light Gun Class, 28″, 1:8″, .268″-necked SS Bartlein 5R Barrel tipped with a SS Harrell Spiral Muzzle Brake, Pearl Rust Orange 90s-vintage Lee Six Stock with home made Aluminum Butt Plate, RB/RP Blueprinted and Trued 1995-Vintage 700 Short Action.
4. Simple Elegance. This is Chopper Duke’s handsome 6mm PPC. It features a Remington action in a classic older-style benchrest stock. We like the flawless pale-green finish. Subtle but nice.
5. (Nearly) Identical Duo. Here are a matching pair of customs from Forum member NHM16. He tells us: “I sold my two Savages I was using for F-Open, and had these two built in their place. One reason I upgraded was so I could have two (nearly) identical rifles. The nice thing about these rifles is that most everything interchanges, including the barrels.”
Here Are Specs for Both Guns:
— Panda F-Class action (LRBP, no ejector, 20 MOA dovetail scope base, one action is polished, the other unpolished so I could easily tell them apart).
— PR&T LowBoy stocks with adjustable buttplates, with vents on the side and the bottom.
— Both have Bartlein 32″ 7mm, 1:8″-twist, 5R barrels, chambered in 7mm Walker (basically a .284 Shehane with the addition of a 40 degree shoulder).
— Rifles were built by Richard King (“Kings X” in Forum) in Arlington, Texas, though I did the clear coating myself.
6. First Custom. Here is Forum member Barrys’s very first custom rifle, and it’s a nice one. It features a BAT Machine VR action, Krieger #17 heavy varmint contour, chambered for the 6mmBR Norma with 0.272″ neck. The stock is a Shehane Varmint Tracker with a Walnut-color laminated Obeche stock. On top is a Sightron SIII 8-32x56mm scope in BAT Machine rings.
7. Basic Black. David P. offered this F-TR rig: “A buddy of mine just finished up new rifle for NRA F-TR competition. This rifle is built on a Kelbly action, chambered in .308 Win with a custom, tight-neck match chamber. It’s sitting in a PR&T stock, with a Broughton 32″, 1:11″-twist 5C barrel. The rifle was chambered and built by Brian at Plainfield Precision in Shelby, NC.
As a visual treat for our Daily Bulletin readers, we went back to our Gun of the Week archives to showcase a very special rifle. This humdinger could be the prettiest prone rifle we’ve ever seen. Commissioned for Forum member Corbin S., this is one handsome rifle, built with all-premium components and a stunning Curly Maple thumbhole stock with adjustable cheekpiece. The rifle is chambered in .243 Winchester. It features a custom stainless RBRP action Nesika R action, with keycuts in the bottom instead of recoil lug. A Grünig & Elmiger trigger has been specially modified (milled and pinned) to work with the Nesika action. The barrel is a 30″ Broughton 5R Palma-contour tube, and there is another 30″ Broughton 6BR barrel that Corbin uses at shorter ranges. The trigger guard, fore-arm rail, cheek adjuster, and 4-way adjustable butt assembly are all custom metal, designed by Dan Gleason. The stock is cut from exhibition-grade fiddleback maple (from Cecil Fredi Gunstocks in Las Vegas) with a Gaboon Ebony tip wood and butt-plate spacer.
Very Accurate with Fast-Flyin’ Berger 105s
Corbin tells us the gun will put five shots into the size of a quarter at 300 yards “when he does his part.” Corbin shoots pointed Berger 105gr VLDs and 45.5 grains of H4831SC. That load runs 3180 fps. He can push it faster, but “that’s where the node was and where it shoots best”, according to Corbin.
Forum member Jim Hardy has seen (and shot against) this beautiful rifle. He reports:
“A casual observer might think that the trigger guard, cheek plate and butt plate hardware are Anschutz — as the stock takes on the Anschutz prone pattern. However, this is ALL custom metal. The G&E trigger breaks like a glass rod and will makes my BR triggers feel inferior at best. I had the pleasure of holding, shouldering, and lusting over this gun at Camp Perry last year, and it is even more impressive in person. The killer is that there is yet ANOTHER one in a beautiful, dark figured walnut owned by Corbin’s shooting partner. BTW, both guns will hammer at 1000 yards prone.”
Our friend Erik Cortina told us that Jim Borden of Borden Accuracy has developed a new “wide-body” action, the Borden BRMXD. Erik is building a rifle around this action to shoot at the 2016 Berger SW Nationals. The new BRMXD is Borden’s first venture into action bodies larger than 1.350″ in diameter. The round BRMXD action measures a stout 1.470″ in diameter and comes standard with bottom recoil lug. If the customer prefers, Border can deliver the action with a conventional recoil lug on the front. We like the looks of Borden’s new BRMXD, and we bet this new stainless action will be a smooth runner.
Borden BRM-XD Action Specifications:
• Action: BRM-XD
• Length: 8-1/8″
• Outside Diameter: 1.470″
• Port Length: Single Port: 2.750″
— Dual Port w/ Mini Port for BR / PPC: 2.750″ Loading & 1.8″ Eject Port
— Dual Port w/ x47 Family Port: 2.750″ Loading & 1.9″ Eject Port
— Dual Port w/ .284 Family Port: 2.750″ Loading & 2.4″ Eject Port
• Weight: 42.6 oz for Single Port
• Price: $1325.00 with bottom lug for a single port – $1400.00 for a dual port + shipping
• Price: $1250.00 for no lug (Glue-In Only)
Borden Accuracy will also offer a 0.215″ spacer for shooters who wish to use their current PANDA barrels with a new BRMXD action. This hardened steel spacer will cost $50.00 (introductory price).
A while back, Roy Bertalotto acquired a budget-priced Kimber 82G rimfire target rifle from the CMP. The Kimber comes with an oiled-wood stock that works fine for three-position training, but Roy wanted to shoot the gun for the bench. The original Kimber stock, with its narrow, radiused forearm, was not ideal for this purpose. Roy wanted a wide, flat fore-end, which is much more stable in the bags. Rather that spend hundreds on a new benchrest stock, Roy modified his Kimber’s original stock by slicing a section off the bottom of the stock and then replacing this with a 3/4″ X 2 3/4″ X 15″ piece of walnut.
WATCH Project Stages in Slide-Show Below:
Roy explains: “The modification I did on my Kimber 82G stock was done using a milling machine, hand planes, files, die grinder and sand paper. It can also be done with simple hand tools — it will just take longer. The first step is removing the wood on the bottom of the fore-end. This was accomplished in the milling machine. A scrap piece of 2X8 was mounted to the milling machine’s table and the surface milled to be perfectly flat. The Kimber stock was screwed to this 2X8 with two large screws and the bottom of the stock was milled flat. Once this was done, a piece of 3/4″ X 2 3/4″ X 15″ walnut was glued using West System epoxy to the cut out area. I use West System epoxy in boat building, but any good wood glue will work.”
After gluing the new bottom piece in place, Roy milled the sides to provide side flats with a radius to transition from the wider lower section to the narrower upper part of the fore-end. As a added enhancement, Roy contoured the rear of the fore-end to blend with the rear of the stock, adding what he calls “1965 Ford Mustang side scoops”. Roy then used a Die Grinder with a 1.5″ sanding wheel to modify the wrist area to provide more thumb relief.
Following the cutting, milling, gluing, and shaping, Roy sanded with 150 grit and 300 grit sandpaper before applying multiple coats of Tung Oil. Once the main stock was completed, Roy completed the project by crafting an extended buttplate from a couple pieces of 1/8″ aluminum and two 1.5″ aluminum tubes, “all polished to a slightly less than mirror finish”. NOTE: This metal buttplate assembly was made from scratch (other than the pad). This is not an aftermarket extension kit.
Overall the gun turned out very nicely. Log on to Roy’s RVB Precision webpage to learn more about this Kimber stock modification project, and view more photos of the building process.
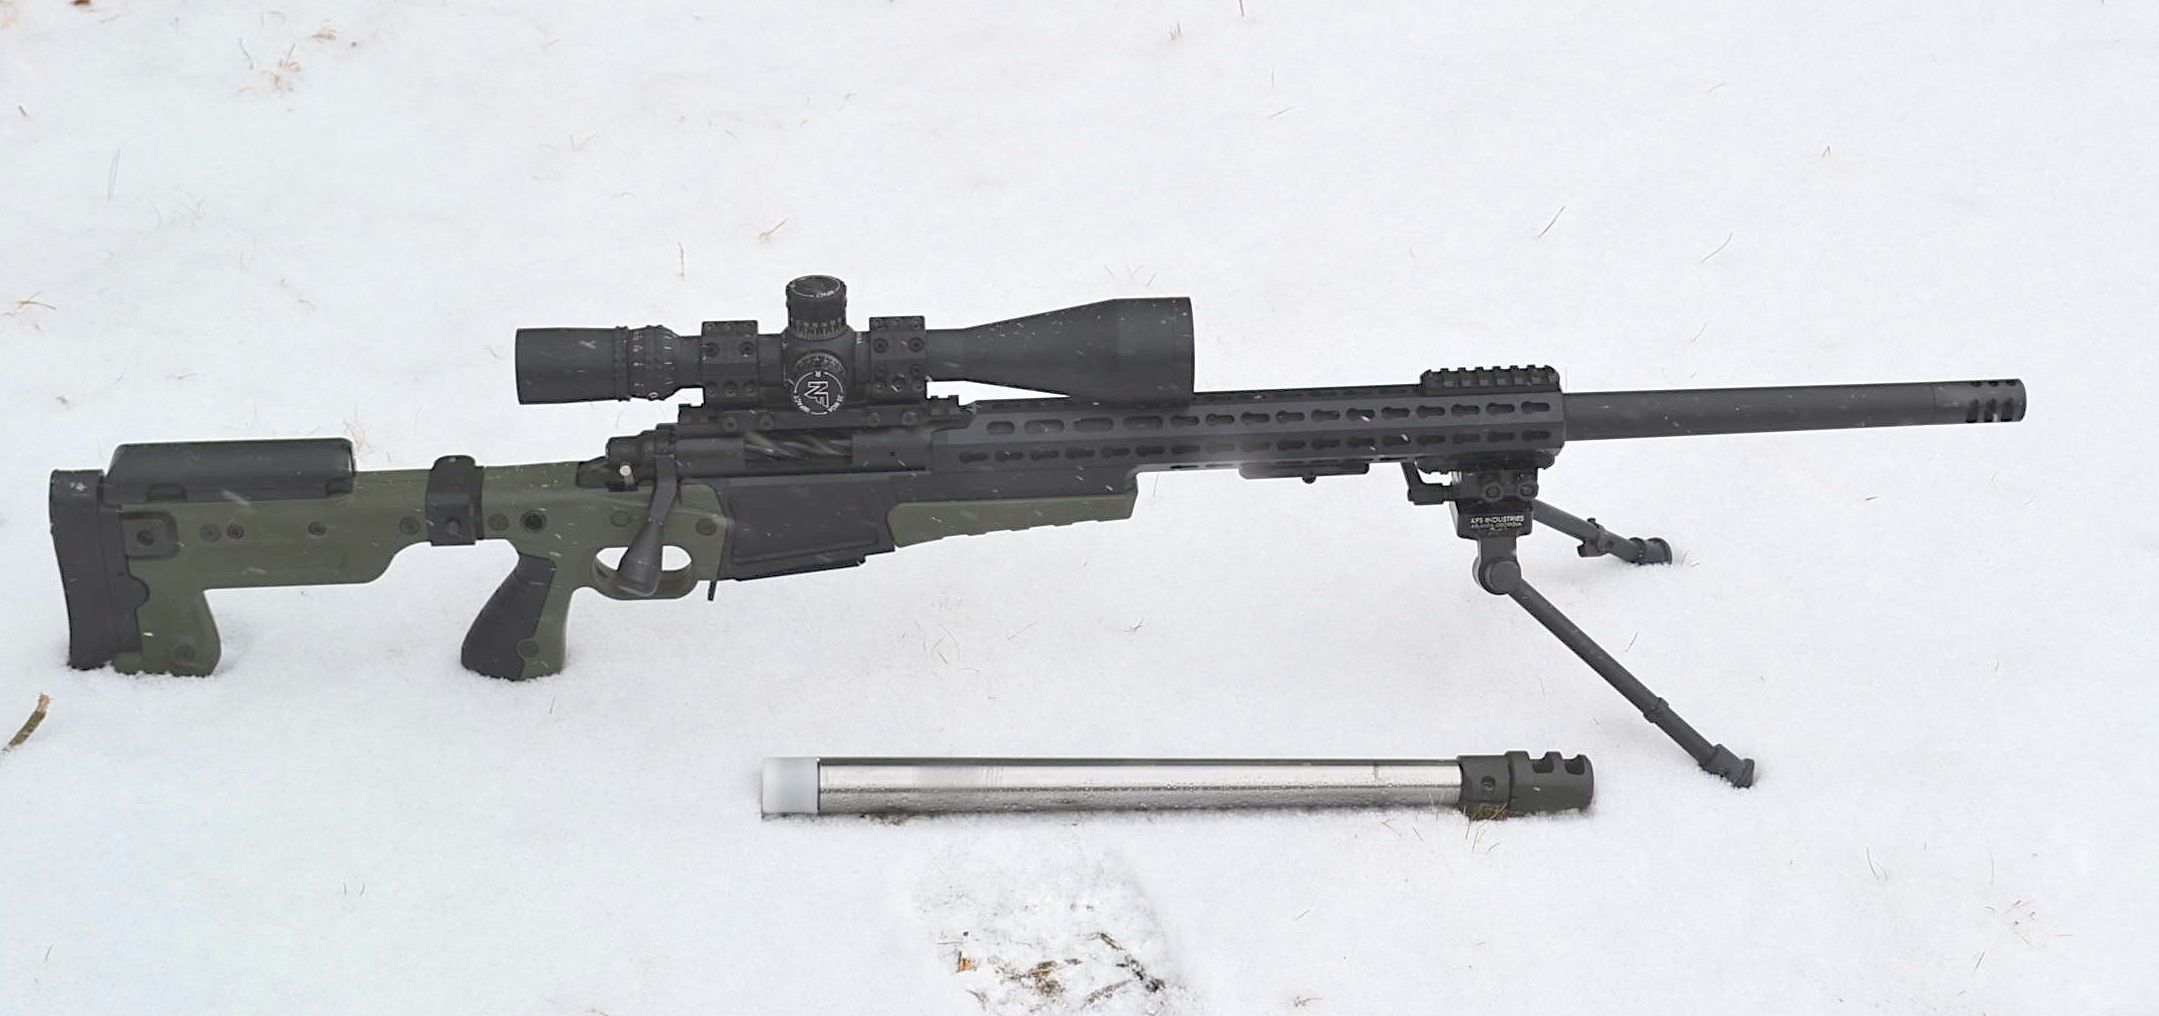
Initially drawn to the 6mmBR and 6mm Dasher, I realized these cartridges wouldn’t feed from an AICS magazine system without extensive modification. I took a look at the 6mm Creedmoor, 6XC, and 6mm-6.5×47 Lapua (aka 6×47 Lapua), all of which feed well from a detachable magazine. At right you can see the 6×47 Lapua in an AICS magazine. It has the “Goldilocks factor” — not too long, not too short.
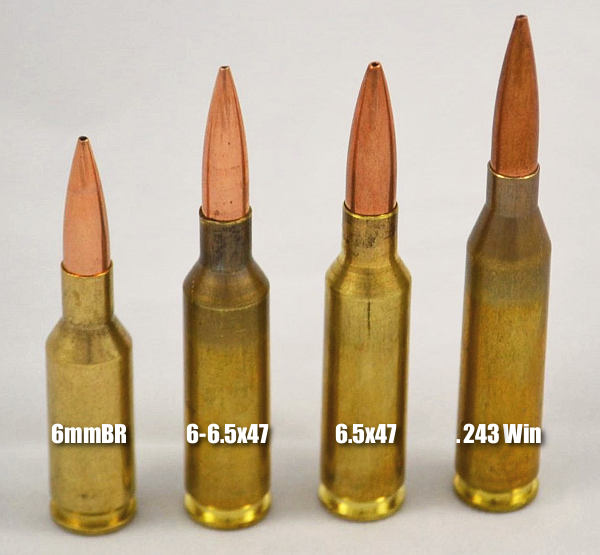
The ability to simply convert 6.5×47 Lapua brass to 6×47 brass by running the parent 6.5mm brass through a full-length Forster sizing die in a single step was what made me choose the 6×47 Lapua over the 6mm Creedmoor and 6XC (both excellent cartridges in their own right). I also own a 6.5×47 Lapua rifle, so I had a supply of 6.5×47 brass ready to neck-down. Being able to create 6×47 brass easily (one pass and done) was very appealing.
Left to right, below: 6mmBR, 6-6.5×47 Lapua, 6.5×47 Lapua, and .243 Winchester.
I cut the chamber end off my .243 Win barrel, threaded and chambered my rifle for the 6×47 Lapua cartridge. I have written a lengthy article on this cutting and re-chambering process. Home gunsmiths interested in this process can READ MORE HERE.
When the re-chambering was complete, I headed to the range and worked up a set of eight loads using Berger 108 BTHPs, H4350, Lapua brass, and CCI 450 primers.
Load development was a little trickier than with the 6.5×47 Lapua parent cartridge. The accuracy nodes were smaller. However, once I dialed in a load with Hodgdon H4350 and the 108-grain Berger BTHP, the rest was history. The 6×47 rig is now one of the most consistent rifles I own, holding just above 0.3 MOA for 5-round groups. Below is a 100-yard test target with 108-grain Berger BT in the 6×47 Lapua. Five-shot group sizes are (L to R): .369″, .289″, and .405″. The average size was .354″ or .338 MOA. [Editor: We think that is excellent accuracy for a tactical-type rifle shot from bipod.]
Learn More about this 6×47 Lapua Project
I’ve written more about this 6×47 rifle on my Rifleshooter.com website. To learn more about my experience with the 6×47 Lapua, click this link: 6-6.5X47 Lapua Review.
About the author: Bill has been a serious shooter for over 20 years. A former Marine Corps Sergeant, he’s competed and placed in High Power Rifle, ISPC, USPSA, IDPA, 3-Gun, F-Class, and precision rifle disciplines. In addition to being an NRA-certified firearms instructor and range officer, Bill has hunted big game in North America, South America, and Africa. Bill writes extensively about gunsmithing, precision rifles, and the shooting sports on his blog, Rifleshooter.com.
Shown above are bolts with TAC-6 Fluting and two-tone Vortex knobs. The fluting and knob installation are two different operations, priced separately.
Paul Fakenbridge of Pro Precision Rifles (PPR) is running a “Group Buy” promotion for AccurateShooter.com readers. For the next month, you can enjoy significant savings on a bolt-fluting job OR on the installation of a custom bolt knob. For Rem 700 bolts, the fluting is now $55 ($30 off), while a new custom PPR knob, installed, is $65 ($30 off). (NOTE: Knob installation does NOT include bolt fluting, and vice-versa.) Paul does excellent work, with a wide variety of fluting options. All fluting is done on a Haas TM1 with four-axis capability. Here is how the Group Buy, a limited-time offer, works:
For this Group Buy, PPR offers Bolt Fluting at $55.00 total (with $5.00/bolt going to AccurateShooter.com to help support the site.) The regular price for fluting Remington bolts was $85.00 so you save thirty bucks. You can choose from a variety of fluting styles for Remington bolts. While Group Buy terms apply to Rem bolts, ask about Savage and Tikka bolts — PPR has some options for them as well.
For this Group Buy, PPR offers a new bolt knob, installed, at $65.00 with $5.00 going to AccurateShooter.com. The $65.00 includeds the price of the new knob. The regular price was $95.00 including knob. Again, you save $30 with this Group Buy.
Advancements in barrel technology in recent decades have been impressive. Today’s premium barrels deliver accuracy that could only have been dreamed-of decades ago. And now a new development promises to help barrel-makers craft the most uniform, consistent, and stable barrels ever.
What’s the new technology? You may be surprised. It’s not a surface treatment, or a cryogenic bath. The latest development in barrel manufacturing is Degaussing — the process of de-magnetizing metal objects. Degaussing is now used in many industries to uniform metallic products and to prevent unwanted interactions with magnetic fields. LEARN MORE.
Degaussing is the process of decreasing or eliminating a remnant magnetic field. It is named after the gauss, a unit of magnetism, which in turn was named after Carl Friedrich Gauss.
At the recent IWA show in Germany, Vallon GmbH, a German manufacturer of degaussing machines, told us that two major Wisconsin barrel-makers have purchased Vallon industrial degaussing units. The units sold to the American barrel-makers are similar to Vallon’s EMS unit show below. This can degauss (i.e. de-magnetize) 50 barrel blanks in one pass.
The Vallon degausser works by passing the barrel steel through a coil. Vallon explains: “The density of magnetic field lines is at its maximum in the coil centre, and is strongly decreasing towards the outside. If a ferromagnetic work piece (steel) is introduced into the coil, the field lines are concentrating and flooding the work piece. The conductivity of steel is up to 800 times higher than that of air. Degaussing is done during a continuous movement of the work piece, leading out of the coil. Decreasing field strength is achieved by a slow extraction from the coil.”
How Degaussing Improves Barrel Steel and Rifle Performance
So what does magnetism have to do with barrel performance? How can degaussing help make a barrel better? Vallon’s scientists tell us that degaussing has three major benefits. First, it aligns ferrous elements within the barrels, strengthening the steel at the molecular level from the inside out. Second, by reducing static surface charges, degaussing reduces chatter during drilling, which creates a straighter bore with a better surface finish. Lastly, there is evidence that degaussed barrels produce slightly more velocity. When a copper-clad bullet spins through a non-degaussed (magnetically-charged) barrel, this creates waste electrical energy. The energy expended reduces velocity very slightly. You can see this effect yourself if you spin a copper rod in the middle of a donut-shaped magnet. This creates an electrical charge.
Here a barrel is checked after degaussing with a Vallon EMS. The meter records a zero magnetic value, showing complete degaussing success.
Degaussing Will Add $50.00 to Barrel Cost
We know what you’re thinking: “All right, degaussing seems beneficial, but how much will this add to the cost of my new barrel?” Based on off-the-record conversations with two barrel-makers, we estimate that degaussing will add less than $50.00 to the cost of a new barrel blank. That’s a small price to pay for greater accuracy and barrel life.
Ask a Sailor — F-Class Champion and U.S. Navy Veteran Explains Degaussing
We asked reigning F-TR Champion James Crofts about barrel degaussing. A U.S. Navy veteran, he immediately understood the potential benefits of this process. “I served in nuclear submarines. Since before World War II, the U.S. Navy degaussed its subs and smaller warships. This had many benefits. Principally, it helped reduce the risk of triggering magnetic mines. But that wasn’t the only benefit — the degaussing process gave the steel greater resilience and longevity. And that’s why the Navy degaussed non-combat vessels as well. Will a degaussed barrel shoot better? Honestly I can’t say. But based on my Navy experience, I bet degaussed steel will be more uniform and will last longer. I’m glad somebody is trying this out on rifle barrels. Put me on the waiting list!”
The above photo show a U.S. nuclear submarine during a degaussing (also called “deperming”) session. This reduces the vessel’s electromagnetic signature, making it more stealthy. Deperming also adds to the vessel’s longevity. With steel-hulled ships, static electricity builds up as the hull slices through the water. A powerful, constant static charge will cause the steel to deteriorate. Degaussing (deperming) helps prevent this, extending the life of the hull.
“Forever”. That’s a serious concept. In a world where many products are guaranteed for just 30 days (or not at all), the Brownells “forever” 100% satisfaction guarantee is pretty darn impressive. In this video, Pete Brownell, company CEO, explains how the Brownells guarantee works. If any product Brownells sells ever proves unsatisfactory, at any time, Brownells will replace it or refund your money. That applies to both Brownells-branded products as well as third-party manufactured items sold by Brownells. Think about that the next time you buy a trigger or scope rail or other firearm accessory.
“One thing about Brownells that sets it apart from any other organization inside or outside the firearms industry is our return policy. Here’s how it is… it’s guaranteed forever. What this means is, if you buy [a product] from Brownells… whatever it is, it’s guaranteed forever. Not just lifetime, but forever.” — Pete Brownell, CEO
100% Satisfaction Guarantee on Everything We Sell
If you aren’t completely, 100% satisfied with any purchase you receive from Brownells, for any reason, at any time, return it for a full refund or exchange. No hassle, no problem. And, we won’t bog you down in endless paperwork. [This statement appears on Brownells.com].
The NRA Gunsmithing Guide contains 336 pages of solid, comprehensive gunsmithing info drawn from articles originally published in the American Rifleman magazine.
The $24.95 book includes 116 articles by expert smiths who build, repair, accurize, and customize all types of firearms (with a strong emphasis on rifles). The three main subject areas are: improving rifle accuracy, customizing fine rifles, and restoring old rifles. Roughly one-third of the articles cover these three topics.
As you would expect from content that first ran in American Rifleman magazine, the articles in the NRA Gunsmithing Guide are richly illustrated with photographs, charts, drawings, diagrams, and data tables. Not Available in bookstores, the NRA Gunsmithing Guide is sold online through Palladium Press, the NRA’s Book Publishing Affiliate.


 Texas-based gunsmith Mike Bryant has decided to start taking work again. It seems that retired life was just a bit too sedate for Mike. This is great news for fans of precision rifles. Mike is an superb smith who has produced many match-winning competition rigs along with fine hunting and varmint rifles.


 Ask a Sailor — F-Class Champion and


