|
|
February 12th, 2019

Intelli-Dropper Priced Under $200.00: The new Frankford Arsenal Intelli-Dropper will be available very soon from leading vendors such as Midsouth, Grafs.com, and MidwayUSA for around $199.99.
A new electronic powder scale/dispenser just hit the market to compete with units from Lyman, RCBS, and Hornady. The new Frankford Arsenal Platinum Series “Intelli-Dropper” scale/dispenser looks similar to a ChargeMaster Lite, with a LED digital touch-screen. But it is a true “new generation” device with an advanced brain that can “talk” to a Mobile App on your smartphone via BlueTooth. This way you can store powder and load information on your smartphone and then control the scale/dispenser from the App. Advantages? You could list different loads for different bullets, and you can also keep a complete history of your loading for different cartridges. For years this Editor recorded his load data via a spreadsheet on a laptop computer. Now you can have the equivalent of a loading spreadsheet right in your phone.
| Frankford Arsenal Platinum Series Intelli-Dropper FEATURES |
Large Back-lit LCD Display
Auto and Manual Trickle capability
Holds up to 7,000 grains (1 lb) of powder |
Bluetooth Capability
Downloadable App Functionality
App Has Powder and Bullet Databases |
Manual Trickle Capability — Nice!
Another cool feature is that you can use the machine to manual trickle. So you could throw powder rapidly with a manual powder measure then “trickle up” to the final tenth of a grain.
 Intelli-Dropper Controls Intelli-Dropper Controls
The Frankford Arsenal Platinum Series Electronic Intelli-Dropper features an individual powder calibration button for the fastest, most accurate powder measurements. The large back-lit LCD display provides easy-to-see controls. The machine stores load data in your downloadable smart-phone or tablet App. The Intelli-Dropper features BOTH Auto and Manual trickle capability with up to 200 grains of powder per throw. Holds up to 7,000 grains (1 lb) of powder and offers +/- 0.1 grain accuracy.
Mobile App Features
The Intelli-Dropper’s downloadable App features bullet and powder databases, with the ability to add additional bullets/powders. The App stores your load data, and comes with info already stored in the App including cartridge list, powder list. Plus the bullet list is very detailed with bullet type, caliber, weight, ballistic coefficient, sectional density, and length. The App lets you input charge weight, case, primer type, barrel length and more. And the App can even upload photos of your test targets — so you can record group size accuracy results. That’s cool.
January 23rd, 2019
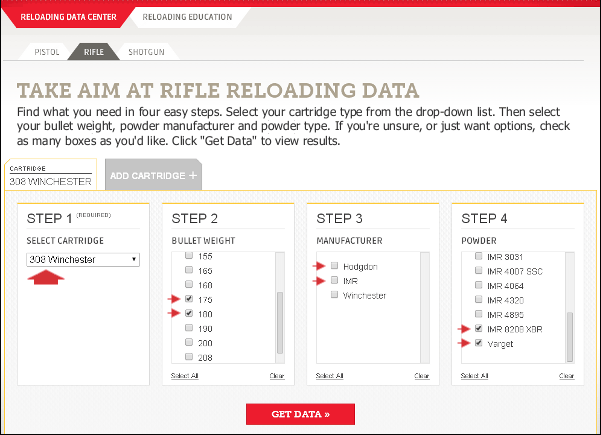

Hodgdon and IMR powders, including H4198, Varget, H4350, and IMR 4451, are some of the most successful propellants used by competitive shooters. If you want to find solid, reliable load data for these and other Hodgdon and IMR powders, we recommend you go right to the source — visit the Hodgdon/IMR Reloading Data Center, at www.HodgdonReloading.com. There you’ll find the latest, updated load recipes for pistol, rifle, and shotgun reloaders.
In the Data Center, you’ll find thousands of load recipes for pistol, rifle, and shotgun. Rifle shooters will find dozens of loads for their favorite Hodgdon, IMR, and Winchester powders such as H4198, Varget, H4350, and IMR 8208 XBR. And Hodgdon’s Reloading Center is now faster and easier to use. Navigation is simplified and the whole interface is more user-friendly.
Precise Search Results for your Cartridge and Favorite Powders

The online Reloading Data Center allows you to get precise search results for any listed cartridge. You can select your preferred powders and bullets. After choosing a cartridge, you can pre-select specific bullet weights and powder types. That quickly delivers just the information you want and need. You won’t have to scroll through scores of entries for bullets or powders you don’t use.
Data Center Works Well with Mobile Devices
Mobile users will notice Reloading Center is very “user-friendly” for smart-phone and tablet users. Controls have been optimized for touch-screens, and buttons are large and easy to use. Likewise the results are displayed in a large, easy-to read format.
Hodgdon tip from EdLongrange. We welcome reader submissions.
June 22nd, 2018
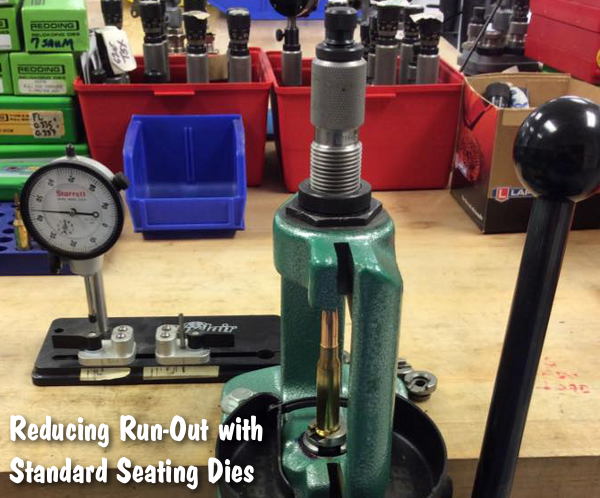
Each Wednesday, the U.S. Army Marksmanship Unit publishes a reloading “how-to” article on the USAMU Facebook page. This USAMU “Handloading Hump Day” article, the second in a series on improving concentricity, has many useful tips. If you use standard (non-micrometer) seating dies when loading some cartridge types, this article is worth reading. And visit the USAMU Facebook page next Wednesday for the next installment.

Once again, it’s time for USAMU’s “Handloading Hump-Day!” Last week, we addressed achieving very good loaded-cartridge concentricity (AKA “TIR”, or Total Indicator Runout) using standard, “hunting grade” reloading dies.
We explained how to set up the Full-Length Size die to float slightly when correctly adjusted for desired case headspace. We also cited a study in which this method loaded ammunition straighter than a set of [higher grade] match dies from the same maker. [One of the keys to reducing TIR with both sets of dies was using a rubber O-ring below the locking ring to allow the die to float slightly. READ Full-Length Sizing Die TIP HERE.]
Now, we’ll set up a standard seating die to minimize TIR — the other half of the two-die equation. As before, we’ll use a single-stage press since most new handloaders will have one. A high-quality runout gauge is essential for obtaining consistent, accurate results.
Having sized, primed and charged our brass, the next step is bullet seating. Many approaches are possible; one that works well follows. When setting up a standard seating die, insert a sized, trimmed case into the shell-holder and fully raise the press ram. Next, back the seating stem out and screw the die down until the internal crimping shoulder touches the case mouth.
Back the die out one-quarter turn from this setting to prevent cartridge crimping. Next, lower the press ram and remove the case. Place a piece of flat steel on the shellholder and carefully raise the ram. Place tension on the die bottom with the flat steel on the shellholder. This helps center the die in the press threads. Check this by gently moving the die until it is well-centered. Keeping light tension on the die via the press ram, secure the die lock ring.

If one were using a micrometer-type seating die, the next step would be simple: run a charged case with bullet on top into the die and screw the seating stem down to obtain correct cartridge OAL.
However, with standard dies, an additional step can be helpful. When the die has a loosely-threaded seating stem, set the correct seating depth but don’t tighten the stem’s lock nut. Leave a loaded cartridge fully raised into the die to center the seating stem. Then, secure the stem’s lock nut. Next, load sample cartridges and check them to verify good concentricity.
One can also experiment with variations such as letting the seating stem float slightly in the die to self-center, while keeping correct OAL. The runout gauge will show any effects of changes upon concentricity. However, the first method has produced excellent, practical results as evidenced by the experiment cited previously. These results (TIR Study 2) will reproduced below for the reader’s convenience.
| TIR Study 2: Standard vs. Match Seating Dies
50 rds of .308 Match Ammo loaded using carefully-adjusted standard dies, vs. 50 using expensive “Match” dies from the same maker.
Standard dies, TIR:
0.000” — 0.001” = 52%;
0.001”– 0.002” = 40%;
0.002”– 0.003” = 8%. None greater than 0.003”.
“Match” dies, TIR:
0.000”– 0.001” = 46%;
0.001” — 0.002” = 30%;
0.002” — 0.003” = 20%;
0.003” — 0.004” = 4%.
AccurateShooter Comment: This shows that, with careful adjustment, the cheaper, standard dies achieved results that were as good (or better) than the more expensive “Match” Dies. |
These tips are intended to help shooters obtain the best results from inexpensive, standard loading dies. Especially when using cases previously fired in a concentric chamber, as was done above, top-quality match dies and brass can easily yield ammo with virtually *no* runout, given careful handloading.
June 4th, 2018

Sinclair International has created a series of helpful articles on rifle cartridge reloading. Today’s feature lists ten basic steps for precision hand-loading, with links to longer, detailed Sinclair Int’l technical articles providing more complete information. There’s a lot of helpful info here guys, if you click all the links to access the ten “long form” articles.
Tying It All Together: 10 Steps To Precision Handloads
Feature based on article by Roy Hill, Brownells/Sinclair Copywriter
Sinclair International offers a series of detailed articles on hand-loading precision rifle ammunition. The articles are included in Sinclair’s GunTech Articles Archive, but sorting through the index to find each article takes time. To help you access all these articles quickly, here’s a handy summary of ten key topics, with links to longer articles covering each subject in detail.
 |
Part 1: The first step in making high-quality handloads is to carefully choose the best brass for your application. You need to know how to identify the different types of brass and how to choose the best kind for the ammo you want to load. CLICK HERE for Part 1. |
 |
Part 2: Even high-quality brass can have burrs around the flash hole that can interfere with the primer flame and cause inconsistent ignition – which can lead to shot groups opening up. Flash hole deburring is a critical step in making sure primers ignite powder consistently. CLICK HERE for Part 2. |
 |
Part 3: The next step is to make sure the primer pockets are square and uniform. Like flash hole deburring, primer pocket uniforming may reduce variations in primer ignition by ensuring more consistent primer seating. CLICK HERE for Part 3. |
 |
Part 4: Making sure all your cases are precisely the same length is crucial, especially when you use cases that have been fired before. Case trimming is the way to get there. CLICK HERE for Part 4. |
 |
Part 5: After trimming, cases still have to be resized. In order for them to work through the resizing die, they have to be lubricated. The case lube method you choose is crucial to making precision handloads. CLICK HERE for Part 5. |
 |
Part 6: Now it’s time to choose the dies that will resize your cases. There are several important options to consider in selecting the right sizing dies. CLICK HERE for Part 6. |
 |
Part 7: Wait! You’re not quite ready to start sizing yet. There’s yet more to consider before you start cranking cases through the press. Learn more about setting up and adjusting your sizing dies. CLICK HERE for Part 7. |
 |
Part 8: Once the cases are completely prepped, it’s time to start putting fresh components back into them. We start off by seating primers. CLICK HERE for Part 8. |
 |
Part 9: After the primers are seated, it’s time to drop in the powder. There are several tools that will help you handle powder for precision handloads. CLICK HERE for Part 9. |
 |
Part 10: The final step in the process is carefully seating the bullet to just the right depth. And then… you’re ready to try your loads at the range. CLICK HERE for Part 10. |
April 14th, 2018

If you have an older version of QuickLOAD, such as V3.1 shown above, then you should definitely upgrade. This will give you more complete and up-to-date cartridge, powder, and bullet data files.
 Got QuickLOAD software? Then it’s time to upgrade your data files — new data became available in January 2018. The makers of QuickLOAD offer inexpensive CDs with updated data files (for propellants and projectiles). These data update CDs will add the latest available powder, cartridge, and bullet files to your current version of QuickLOAD/QuickTARGET. Got QuickLOAD software? Then it’s time to upgrade your data files — new data became available in January 2018. The makers of QuickLOAD offer inexpensive CDs with updated data files (for propellants and projectiles). These data update CDs will add the latest available powder, cartridge, and bullet files to your current version of QuickLOAD/QuickTARGET.
There are two update CDs now offered with data current through January 2018. One handles the older installations, QuickLOAD/QuickTARGET 3.0, 3.1, 3.2, 3.3, 3.4, and 3.5. A second update CD works for QuickLOAD/QuickTARGET 3.6, 3.8, and early 3.9. This second disk is primarily a data update.
V3.9 Update CD for V3.0 – V3.5
V3.9 Update CD for V3.6 – early V3.9
Price for either update disk is $15.95. In North America, order from Neconos.com, or call 800-451-3550 (9 am to 5 pm Pacific Time). In the United Kingdom, you can get the update disk from JMS Arms, Merrivale, London Road, Handcross, West Sussex, RH17 6BA, England, Phone: 01444 400126. In Europe you can order direct from QuickLOAD’s creator: Ing. Hartmut Broemel, Neubrecker Weg 15, D-64832 Babenhausen, Germany, fax/phone (+49) 0 6073 688481
QuickLOAD is a pretty amazing program. Using information for over 1200 cartridges, 250 powders, and 2500 bullet types, QuickLOAD allows you to predict velocities and pressures for your hand-loaded ammo. You can check predicted pressures with different powder choices and seating depths before loading an actual round. If you do not yet own QuickLOAD, you can now order the latest Version 3.9 of this unique software. Priced at $152.95, the latest version 3.9 contains all the updates through January, 2018 and is compatible with WINDOWS 2000, XP, VISTA, Windows 7, Winows 8 and Windows 10. QuickLOAD/QuickTARGET 3.9 can be purchased for $152.95 from Neconos.com. For a full explanation of the features and benefits of QuickLOAD software, click the link below.
EDITOR’S Comment: We believe every serious rifle hand-loader should own and use QuickLOAD. We have used this program for over a decade. It is invaluable in load development, particularly when testing a variety of bullets and when changing seating depths. This software is NOT a substitute for standard, conservative reloading practices. However QuickLOAD can very surprisingly effective in comparing cartridge performance and predicting the effects of changes in charge weight.
Product tip from EdLongrange. We welcome reader submissions.
June 11th, 2017
Case Prep Xpress photo courtesy Lyman Products.
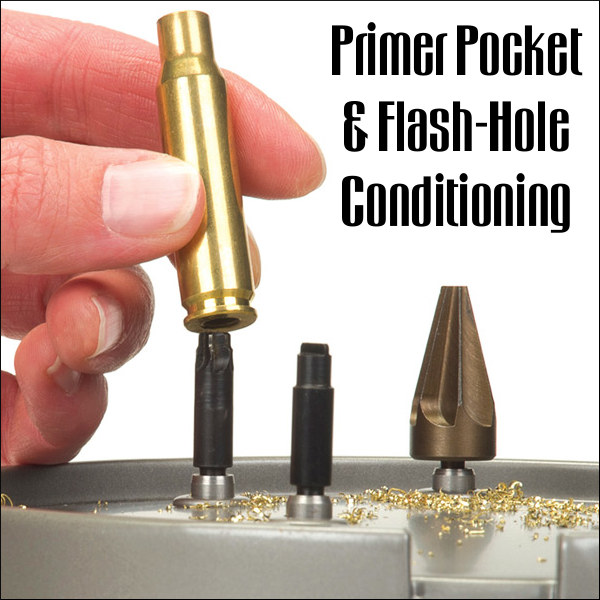
Each Wednesday, the U.S. Army Marksmanship Unit publishes a reloading “how-to” article on the USAMU Facebook page. This week’s “Handloading Hump Day” article covers two basic case prep chores — uniforming primer pockets and deburring flash-holes. Visit the USAMU Facebook page for other tips.
Primer Pocket & Flash-Hole Conditioning
This week, we’ll address a question that frequently arises: “Do you uniform primer pockets and deburr flash-holes?” As we tailor our handloading methods to the specific needs of each instance, the answer, not surprisingly, is “Sometimes!” However, don’t flip that dial just yet, as what determines our approach may be helpful in deciding how to address one’s own techniques. Moreover, we have a buried “Easter Egg” morsel that may bring a chuckle, as well as useful safety information!
Generally, the USAMU Handloading Shop does not uniform primer pockets (PP) or deburr flash holes (FH) of our rifle brass. We’re certainly not against it… Rather, this reflects the very high volume of ammunition we load, the fact that very few cases are ever re-loaded for a second firing, and the types of brass we use. However, as a need is perceived, we DO deburr flash holes. Of interest, we have fired many very small, 1000-yard test groups and aggregates using weight-selected, domestic brass that had not had PPs uniformed or FHs deburred.
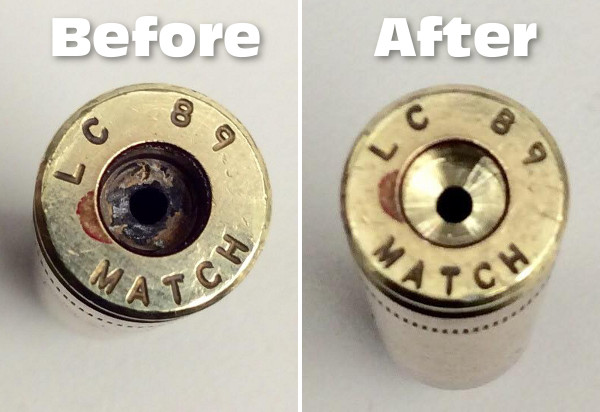
Before and After — On the left is a fired, deprimed 7.62×51 case with primer residue intact. On the right the primer pocket has been uniformed to SAAMI specs. Note the shiny finish at the bottom of the pocket — evidence of the the removal of metal when uniforming the primer pocket.
As to the type cases we use, many thousands of our long-range 5.56mm cases come to us from the arsenal with the primer of our choice pre-installed and staked-in, per usual practice. Obviously, we cannot uniform either FHs or PPs on this live, primed brass. However, after careful sorting, inspection and preparation, we do obtain match-winning results with it.
Shooters who reload their brass several times may decide to uniform PPs and deburr FHs, especially on their “300-yard and beyond” brass. Here, they will use the cases many times, while the uniforming is performed only once. Also, most handloaders only process moderate amounts of brass, compared to our multi-thousand round lots.
Having high quality Long Range (LR) brass helps. Many of the better brass manufacturers install their flash holes so that no burrs are created. Still, it does pay to inspect even THESE manufacturer’s products, as occasional slips are inevitable. Very rarely, some of the best makers will have a significant burr in, say, 1 per 1000 or 2000 cases, and it’s worth catching those.
Exceptions can always be found. Recently, we began processing a large lot of match brass from a premier manufacturer. We were startled to find that every case had a significant burr in the FH — something we’d never before seen from this maker. We then broke out the FH deburring tools and went to work.
Some observers have noted that it can be difficult to truly verify the contribution to accuracy of these procedures — particularly when firing from the shoulder, in conditions. Members of this staff, as individual rifle competitors, do often perform these operations on their privately-owned LR rifle brass. One could ascribe this to the old Highpower Rifle maxim that “if you think it helps, then it helps.”
However, a World Champion and Olympic Gold/Silver medalist here commented on his own handloading (for International competition, which demands VERY fine accuracy). He noted that he did seem to see a decline in accuracy whenever he did not uniform FHs, deburr FHs and clean primer pockets before each reloading. (One might be tempted to counter that only a truly World Class shooter could reliably detect the difference.) However, with the wisdom of decades experience, our Champion also remarked that “It could have been that I just wasn’t shooting as well that day.”
For those who do opt for these procedures, note that various tool models may have adjustable depth-stops; pay attention to the instructions. Some FH-deburring tools (which enter the case mouth, not the primer pocket) are dependent upon uniform case length for best results.
 Above is a flash-hole deburring tool on an RCBS powered case-prep unit. These case prep machines can save a lot of pain and misery, helping one perform various functions quickly and efficiently.
June 5th, 2016

What’s the best book for folks getting started in metallic cartridge reloading? According to our Forum members, the best manual for “newbie” reloaders is the Lyman Reloading Handbook. In our Shooters’ Forum, a newcomer to reloading was looking for a basic reloading guide that also included load data. The most recommended book was the Lyman Handbook, now in its 50th Edition (just released). Along with “how-to” advice on reloading procedures, the Lyman Manual features cartridge specifications and load data for the most popular cartridges.*
Here are some comments from Forum members:
“The Lyman book is an excellent manual with a large section describing the process of reloading. I heartily recommend it. As a beginning reloader, you may want to consider purchasing more than one book in order to get different perspectives on the reloading regimen. One can never be too careful. A ‘minor’ mistake can be costly.” — Cort
“In my opinion, the Lyman Manual is one of the best for the beginning reloader since it covers all the basics and some advanced methods. If possible, you would be also well served to hook up with an experienced reloader, preferably a target shooter or long-range varmint hunter, who can also give you some very useful pointers on precision reloading.” – K22
Editor’s NOTE: K22 echoes the advice we give to new hand-loaders. We suggest that novices find an experienced mentor who can “show them the ropes” and guide them through the basics.
|
Another gun blogger agrees that the Lyman Manual is a logical choice for new handloaders:
Carteach Review: The Lyman Reloading Manual
“[Lyman publishes] an excellent manual for any handloader, but especially for those new to the craft. Perhaps the best judgment of a handloader’s regard for a reloading manual is which one he chooses to give someone new to the fold. The needs of a new reloader differ from those of someone with long experience, and the right manual can set the foundation for years of safe procedures. Here is the one I choose to give a good friend embarking down the path:”
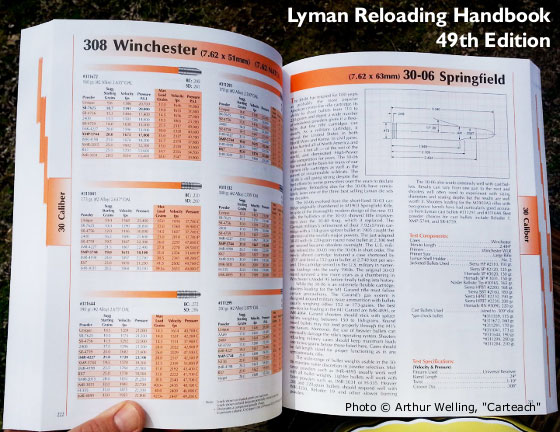
Carteach adds: “Lyman has always taken pains to provide very clear and understandable instruction on the basic process of reloading cartridges. The imaging is helpful and to the point. The load data Lyman provides is comprehensive, and [Lyman] takes the time to note special circumstances which new loaders need to be aware of. As example, the .30-06 section has some words regarding the M-1 Garand and its special needs. For someone who has never loaded for the Garand, these few sentences are golden!” |
*We recommend that you always double-check printed load data with the latest web-based data from the actual powder manufacturers. Powder properties can change. The most current powder data is usually found on the powder-makers’ websites.
March 22nd, 2016

Top to bottom – Remington firing pin assembly with ISS, Tubb SpeedLock alloy-composite system without ISS (current versions have dual, opposite-wound springs), and Remington short action firing pin assembly without ISS.
Each Wednesday, the U.S. Army Marksmanship Unit publishes a reloading “how-to” article on the USAMU Facebook page. Last week’s “Handloading Hump Day” article covered mechanical issues and related ignition irregularities that can cause vertical fliers even with good ammunition in an otherwise excellent rifle. We highly recommend you read this article, which offers some important tech tips.
Vertical Dispersion: Mechanical/Ignition Issues?
Poor or inconsistent ignition has long been known to be one of the “usual suspects” when one encounters vertical fliers that just shouldn’t be there. By having a sense of some of the basic principles involved, and a few basic areas to check, the shooter may avoid colsiderable frustration, not to mention time, expensive loading components and barrel wear.
 Is your well-built rifle of high-quality components plagued with vertical fliers across more than 1-3 handload combinations? Consider the bedding, crown and scope/sight mounts. Are they correct? If so, then you might check for ignition issues before boldly undertaking an extensive, expensive, and quite possibly fruitless quest for the “magic handload”. Is your well-built rifle of high-quality components plagued with vertical fliers across more than 1-3 handload combinations? Consider the bedding, crown and scope/sight mounts. Are they correct? If so, then you might check for ignition issues before boldly undertaking an extensive, expensive, and quite possibly fruitless quest for the “magic handload”.
SEEING IS BELIEVING: While the author had been aware for many years that poor ignition should be considered and ruled out when dealing with vertical fliers in an otherwise-excellent rifle, actually seeing the problem and its almost instantaneous cure really drove the lesson home.
He was working with a “dot” rifle – a .22 LR match rifle that really stacked bullets into little piles at 50 yards and beyond. With one lot of ELEY Tenex, it produced consistent “bughole” groups at 50, but with another, selected lot of Tenex, similar groups were regularly ruined by single, vertical fliers that did not appear in other rifles. Rather than spending days burning up expensive, select ammunition looking for “magic lots”, he contacted a well-respected rimfire gunsmith and explained the situation.
Without so much as batting an eye, the highly-experienced ‘smith tore into the rifle’s action, and quickly found the cause(s) of the problem. He discovered a demonstrably weak firing pin spring, plus a chip out of the face of the firing pin where it contacted the cartridge rim.
After replacing and tuning the offending parts, the rifle immediately began shooting tiny, bughole groups with the previously “unacceptable” lot of Tenex. Centerfire rifles can also benefit from ensuring positive, consistent ignition. A wise riflesmith is literally worth his weight in gold!
So, what are some issues we as shooters can inspect in our rifles to help determine if ignition woes could be part of our problem? At the club level, ask yourself if that “experienced” Remington, Winchester 70, or even Springfield-based match bolt gun you’re using is still running its’ original 40-80 year-old factory striker spring? If so, a new replacement is cheap insurance against current or future problems. (And BTW, it might be best to stick to the normal, factory-spec spring weight. A super-powerful spring can cause vertical, just as a weak one one can.) Along with that, a routine check for proper firing-pin protrusion is a quick preventive measure that can rule out potential issues.
Other areas to consider are the centering and consistency of the firing pin’s operation in the bolt. Admittedly, with the increasing use of precision-machined custom actions, this is becoming less an issue every day. Below is the firing pin assembly from a custom BAT action:

However, particularly with factory actions, a very quick and easy check is to remove the bolt, let the firing pin go forward, and look at the firing pin tip through the firing pin hole. Is the tip off-center in the hole, and possibly striking it as it moves forward? Is the hole out-of-round or burred from being struck repeatedly? If so, a trip to the riflesmith is likely in order.
Similarly, machining issues in the bolt/firing pin system can lead to rough and erratic firing pin movement, in which the firing pin drags against an internal surface of the bolt. In high-quality rifles these issues are relatively rare, but not unheard-of, and it takes mere minutes to rule them out. It may be worthwhile to remove the cocking piece/firing pin/spring assembly and look for any unusual gouges, dings, peening, burrs or signs of abnormal wear.
This task is especially easy with Winchester 70s, Springfields, and the similar Mauser 98s, involving little more than the push of a button and unscrewing the cocking piece assembly. This is just one of the many reasons these tried-and-true actions have earned such a loyal following in the field, among hunters who must maintain their rifles away from a shop.

Particularly with older rifles, watch for and remove excess grease (or even Cosmoline!) from both the firing pin assembly and inside the bolt. This can help improve firing pin speed and consistency. Other bolt-action designs may need a take-down tool or other measures.
As part of this inspection, AFTER ENSURING THE RIFLE IS UNLOADED, slowly cock the rifle, dry-fire, and repeat several times. Listen carefully near the action for inconsistency in the sounds it generates. Does the striker falling make the same sound each time? Do you hear or feel grinding upon operation? If so, where?
Be sure to check the operation of the cocking piece (bolt shroud), firing pin within the bolt shroud, the cocking piece cam and the rear of the bolt body where the cocking piece cam operates. As with our examination for abnormal wear marks discussed above, look for marks indicating roughness or a possible need for light polishing. Then, clean and lightly grease the bearing surfaces while you’re at it.
Remington 700 bolt shroud and cocking cam

These are relatively easy checks that shooters can undertake to perform a preliminary inspection on their own. Other mechanical issues can also cause ignition issues, chiefly centered around the action of the trigger, sear and sear spring. If these are suspected, a trip to an experienced, qualified riflesmith for diagnosis is recommended. We hope you find this information helpful! Join us again next week, and in the meantime, enjoy the shooting sports safely!
February 8th, 2016
We are often asked, “Can you recommend a good reloading book that picks up where the typical reloading manual leaves off — something that goes into more detail about the processes involved.” There is such a book, and it’s fairly recent: Metallic Cartridge Handloading: Pursuit of the Perfect Cartridge, by M.L. (“Mic”) McPherson. Released in 2013, this 425-page book goes into greater depth than McPherson’s popular intro reloading guide, Metallic Cartridge Reloading. McPherson’s latest reloading treatise covers all aspects of the reloading process: the cartridge case; maintaining, improving and loading the case; the seating and reading of primers; the loading of propellant; bullets and the loading of bullets; accurate load development; internal and external ballistics; bullet making and casting; and reloading presses.
 |
|
With hundreds of photos and illustrations, this book is a good reference for shooters getting started in precision reloading for accuracy. Compared to some other books on reloading procedures, McPherson’s new resource is more up-to-date, so it references more modern reloading tools and techniques. NOTE: This is NOT a reloading manual containing specific load data. Rather, it is a how-to book that covers the process of cartridge reloading from start to finish.
Reviews by actual book buyers:
A great resource for handloaders although a little technical for beginners. I have been reloading for 40+ years and picked up some good ideas. — Loren R.
This is a book intended for people who have been reloading for a while. The book contains very detailed information about reloading. — Kaj H.
About the Author, M.L. (“Mic”) McPherson:
Mic McPherson, Technical Editor of Hand Loader’s Digest, is the author of numerous firearms resource books including Metallic Cartridge Reloading and Accurizing the Factory Rifle. He has written scores of articles for leading gun periodicals including Precision Shooting, The Accurate Rifle, Rifle Shooter, and Varmint Hunter Magazine. Mic also served as an Editor of the 8th and 9th Editions of Cartridges of the World.
|


