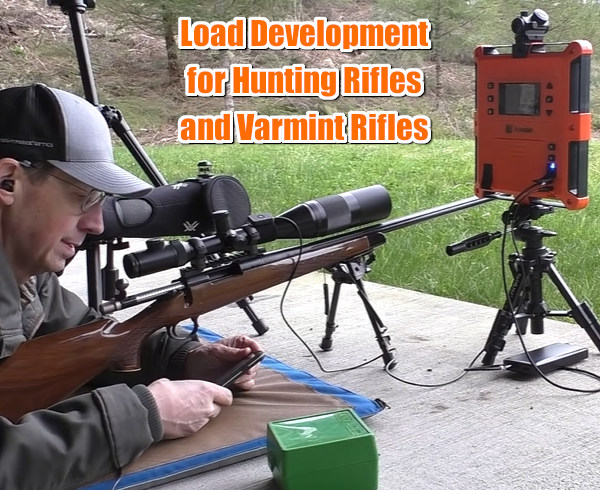
Hunting season kicks off this month in many parts of the USA. If you have a new hunting rifle or need to develop a load for your rig with a new choice of bullets and/or powder, this article can help. Ace shooter Keith Glasscock explains how to develop a good load for a hunting rifle or varmint rifle.
Keith is an outstanding competitive shooter, who has finished second at the F-Class National Championships (F-Open) multiple times. Keith is also a skilled wind coach who runs the popular Winning in the Wind YouTube Channel. Along with his interest in mid-range and long-range F-Class competition, Keith also enjoys game hunting and varmint adventures.
Developing accurate hand-loaded ammo for hunting and varmint rifles involves procedures that may be a bit different than load testing for a match rifle. You want to be efficient, and use the types of brass and bullets you’ll be using on the hunts. In two recent videos, Keith shows how he developed good, accurate loads for a .223 Rem varmint rifle and a .308 Win hunting rifle.
.223 Rem Load Development — Powder Charge and Seating Depth
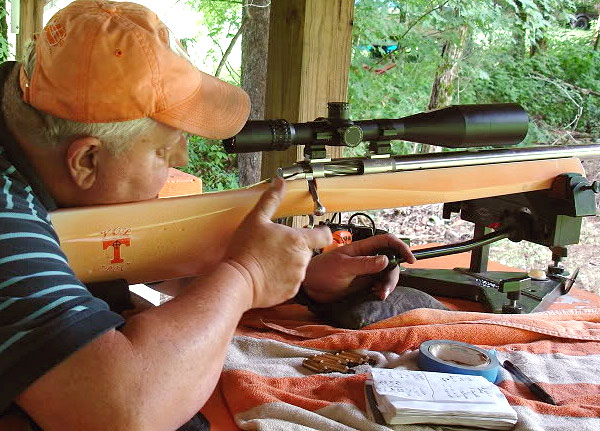
In the first video, Keith covers the load development process for a Remington 700 bolt-action varmint rifle chambered in .223 Remington. Keith starts by full-length sizing the brass. Then he experimented with powder charge weights, and came up with a promising load of 24.7 grains of Alliant AR Comp with Hornady 50gr A-Max bullets.
Next Keith experimented with seating depths (see 5:30-6:100) and found that accuracy improved as he changed OAL length in .005 increments. Keith ended up with 2.270″ with a 3-shot group in the twos! This video shows the importance of testing your bullet choice at various seating depths. Keith shoots this rig prone off bipod, which is similar to the bipod shooting he does in the varmint fields. Keith explains key factors to consider when optimizing the .223 Rem cartridge in a varmint rig. Velocity readings are made with a LabRadar unit.
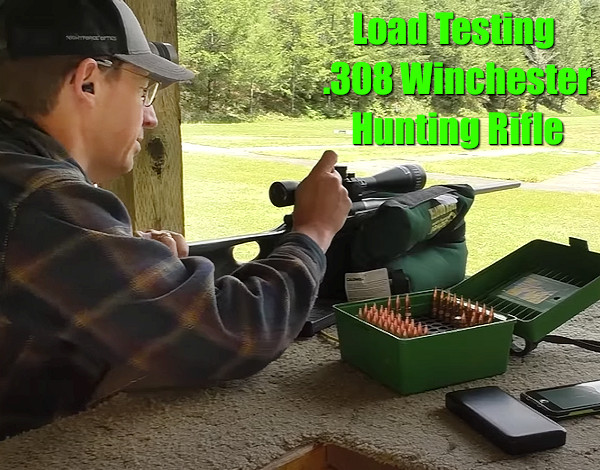
Load Development for .308 Win Hunting Rifle
In a second video, Keith shows the process for load development with a .308 Winchester hunting rifle. Here Keith uses a large X-type sandbag for a front support. Again, he was shooting a Remington 700 bolt-action rifle, this time with Barnes TSX solid copper bullets, PPU Brass, Federal 210m primers, and AR Comp powder. Keith said the Barnes bullets were excellent — he commented that these bullets were “match quality in terms of precision”. Keith achieved some very small three-shot groups with AR Comp and the TSX projectiles. Keith did note that point-of-impact shifted up significantly with increases in charge weight (see 6:20-7:10). With thinner-contour hunting barrels, this is not unexpected. But POI change should be observed carefully during load development, as you may need to adjust your zero after completing testing.
With hunting season coming up soon, we know that many readers will be out in the field — with a set of binoculars. On most game hunts, you’ll speed a lot more time glassing with binocs than looking through your riflescope. With wide field of view and extended low-light capability, a good set of binoculars will be your most important game-finder. And with premium LRF binoculars, such as the ZEISS Victory series, one tool serves both for spotting and laser ranging.
“Without the stabilization of your binoculars [provided by] a tripod … you will be missing a majority of the game you are glassing for.” — Outdoorsmans.com
In this article, Vortex Optics’ Mark Boardman, an experienced hunter, explains the benefits of using a tripod with high-magnification binoculars. Everybody knows that powerful spotting scopes work best when mounted to a stable tripod or otherwise secured to a steady mount. Yet when most folks use binoculars, they never even think of using a tripod, despite the fact that tripod adapters are available for many premium binoculars.
Outdoorsmans Tripod Adapters Outdoorsmans.com sells tripod adapters for various kinds of binoculars. These really work: “Mounting your binoculars to a quality tripod is a must for the serious western hunter. Without the stabilization of your binoculars [by] mounting them to a tripod … you will be missing a majority of the game you are glassing for.”
A serious hunter should learn how to glass with tripod support, using methods outlined here. With binoculars offering more that 8X magnification, you can really benefit from a steady mount. You’ll be amazed at the difference the tripod will make.
Here is a simple but effective product that can benefit varminters and game-hunters. The slip-on, padded RRR (“triple R”) gun rest cushions your rifle on any surface and helps eliminate noise when shifting the gun from one shooting position to another. The RRR slip-on rest is made of neoprene (wet suit material) with a built-in, thick Armaflex foam cushion on the bottom. This $26.95 sleeve protects the finish of your rifle, while providing a cushioned layer between your rifle and the supporting surface.
Key Benefits of the RRR Slip-On Padded Fore-Arm Rest
1. The RRR sleeve cushions your rifle. This helps to keep the shot from going high even when the rifle is placed on a hard surface.
2. The RRR sleeve quiets the gun. The padded, neoprene covering acts like a sound deadener even when you set the gun on a metal frame or hard surface.
3. The RRR protects the finish on the stock of your rifle from scratches when resting on hard surfaces.
Hunting season is starting soon in most areas of the country. Here’s a way you can improve your hunting skills/knowledge. The NRA is offering a FREE online Experienced Hunter Education Course for those preparing to take advantage of the 2025 hunting season.
“Our Experienced Hunter Education Course provides those who might have taken a season or two off a convenient way to sharpen their skills before heading back into the field,” said Peter Churchbourne, director of NRA’s Hunters Leadership Forum.
NRA’s free 2-hour course is a firearm and hunting safety-training refresher in a convenient online format available through desktop, tablet, or smartphone. The course is available to everyone at www.NRAEHE.org. NOTE: The course is NOT a substitute for state-mandated hunter safety requirements and does not offer any certifications.
The NRA’s NRA Experienced Hunter Education Course, is an online training program designed to help hunters brush up their skills. Free to all, this comprehensive hunting refresher course will help hunters become safer and more confident before heading out into the field. CLICK HERE for more information.
“If you’ve taken a break from the shooting sports or haven’t hunted in a season or two, our Experienced Hunter Education Course is the perfect refresher for firearms safety and safe hunting practices,” explained Elizabeth Bush, managing director of NRA Community Engagement. “Best of all, we’re offering this service completely free of charge.”
Course Description
This online training course is specifically designed for individuals who have not hunted in the past year or more and are looking for a safety refresher before they head back out in the field. In this course, hunters will have the opportunity to refresh their skills by taking a look at safe hunting practices and firearms safety. Once completed, you will be a safer hunter in the field.
In years past, one of our favorite features on the NRA Blog was the Friday Feast Recipe of the Week. In the past, the NRA Blog offered up a new delicious food recipe each Friday. Sadly the Friday Feast has not been updated for quite some time, but you can still see dozens of past Friday Feast recipes with this link:
Today’s featured Friday Feast combines two things we love — Italian pasta and Elk meat. Article author Emily Rupertus shares our passion for pasta: “I love pasta. I can’t get enough of it! So when I came across this Classic Elk Lasagna, I couldn’t resist sharing with you! You have to try this perfect twist on a classic comfort food.” After assembling your Lasagna in a big cast-iron skillet and covering with tin-foil, bake the Elk Lasagna in a 400° oven for 30 minutes. Then remove the foil, add more cheese and continue to bake uncovered for ten more minutes.
Ingredients
1/2 Package of Lasagna Noodles
1 lb Ground Elk Meat (you can substitute ground venison or antelope)
1 Medium Sweet Onion (chopped)
2 Cloves Garlic (chopped)
2 tablespoons Olive Oil
3 Cups Tomato Sauce
32 oz. Ricotta Cheese
1 Cup Parmesan Cheese
1 8 oz. Fresh Mozzarella Cheese (sliced)
2 eggs
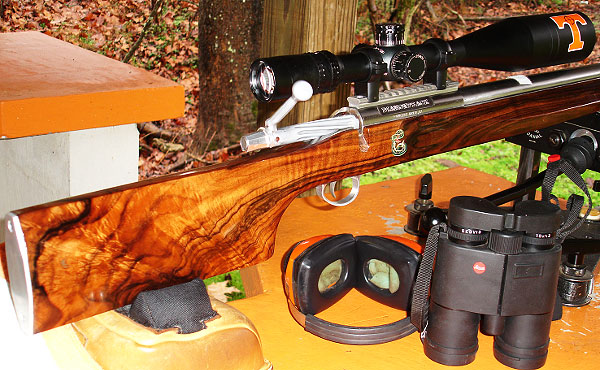
Shooting Prairie Dogs at extreme long range takes some highly specialized equipment. Forum Member VolDoc and his friends have taken long-range varminting to a whole new level. With his Savage-based, Hart-barreled 20 BR, VolDoc managed a verified 1,032-yard Prairie Dog kill, possibly the longest recorded with a .20-Caliber rifle. But that’s just part of VolDoc’s impressive precision varminting arsenal. Here we showcase three of VolDoc’s accurate rigs: his stunning English Walnut Diamondback 6BR/Dasher, his Nesika-actioned “Orange Crush” Dasher, and the 1K Prairie Dog-slaying 20 BR Savage.
Diamondback Switch-Barrel Rifle Specifications
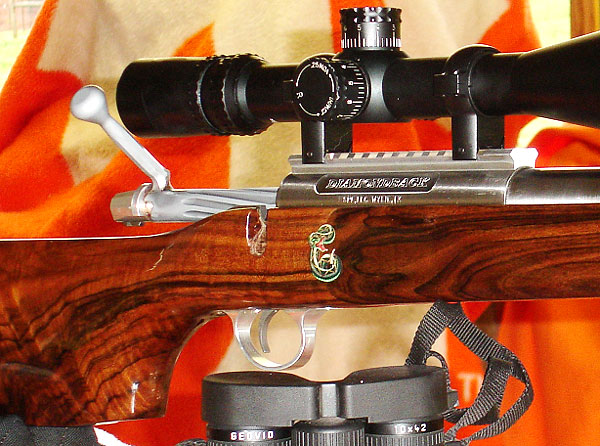
The action is a Stiller Diamondback, drop-port. The custom stock is similar to a Shehane ST-1000, but crafted from 40-year-old English Walnut. [Editor’s note: the wood on this gun is gorgeous!] There are three barrels for the gun with three different chamberings: 6BR Brux 1:8″-twist HV; 6BRX Krieger 1:8″-twist HV, and 6mm Dasher Krieger 1:8.5″ twist fluted straight contour (no taper). The scope is a Nightforce 12-42x56mm, with 2DD reticle.
Comments: This rifle is a good study in comparison of the three different chamberings. On the same rifle platform (same stock and action), each of these barrels had killed prairie dogs over 1,000 yards. So if someone asks which is best, a 6BR, or 6BRX, or 6 Dasher, VolDoc says they are all effective. The improved cartridges will deliver higher velocities, which can be an advantage. On the other hand it is simpler to load 6mmBR brass right out of the box, and it’s easy to find an accurate load for the 6mmBR (see photo).
Nesika 6mmBR/Dasher Rifle Specifications
VolDoc’s “Big Orange Crush” rifle has a stainless Nesika ‘J’ action, with 2 oz. Jewell trigger, in a painted fiberglass Shehane ST-1000 stock. Originally a 6BR, the gun is now chambered as a 6mm Dasher with a .271 no-turn neck. The barrel is a 1:12″-twist Krieger fited with Vais muzzle brake. On top is a NightForce NXS 12-42x56mm scope with double-dot reticle. The double-dot gives precise aiming and lower dot can be used as an aming point, when you need a few more MOA of elevation in the field.
Comments: Big Orange Crush shoots 87gr V-Maxs into bugholes at 3,400 fps. VolDoc’s load with the 87s is very stout, more than 32 grains of Vihtavuori N-135 with Wolf SRM primers. Cases are full-length sized, with an 0.266″ bushing for the necks.
This 3400 fps load with the 87gr V-Maxs has accounted for hundreds of Prairie Dogs killed from 97 yards to 1,050 yards. The 87gr V-Max at this speed literally picks Prairie Dogs up and throws them 10 feet vertically and laterally. VolDoc reports: “The barrel now has more than 3,000 rounds down the tube and exhibits little throat fire-cracking and no loss of accuracy. I can’t explain why, it just hasn’t deteriorated yet. This rifle is my best-ever ‘go-to’ Prairie Dog rifle.”
Savage 20 BR Rifle Specifications
The action is a Savage Dual Port, with an aftermarket Sharp Shooter Supply (SSS) 4 oz. Evolution trigger. The stock is a modified Savage factory unit that has been pillar-bedded. The factory barrel was replaced with a 28″ Hart stainless, 1:9″ twist barrel fitted with a Rayhill muzzle brake. The gun is chambered in 20 BR with a 0.235″ no-turn neck. Kevin Rayhill did the smithing. To provide enough elevation to shoot at 1,000 yards plus, Ray fitted a +20 MOA Bench Source scope base. This +20 rail is very well-crafted, and made especially for the Savage Model 12.
Comments: VolDoc reports: “When I got the Savage back from Kevin Rayhill, it still had my 6 BR factory barrel on it, as I use it to compete in Factory-class regional matches. I put on the new 20 BR Hart barrel Kevin had chambered and quickly put in a full day of load development using the 55gr Bergers (0.381 G1 BC) and the 40gr V-Maxs. Both proved very easy to tune and I soon had my loads. My 55gr Berger load with runs about 3590 fps. Varget was very accurate with the 55s (see load dev. targets below).
The mild recoil of the 20 BR, along with a very good muzzle break (Rayhill’s design) enables me to spot every hit or miss myself. Kevin also re-contoured the underside of the Savage stock so it tracks straight back on recoil, also making seeing hits easier.”
The 20 Caliber 1000-Yard Prairie Dog Quest
Making the 1032-Yard Shot with a 20 BR by Dr. John S. (aka “VolDoc”)
This article covers my recent successful quest for a 20-caliber varmint kill past 1,000 yards. This may be a first — I couldn’t find anyone else with a confirmed 20-Cal Prairie Dog kill at 1000+. I started a thread on the Varmint section of the AccurateShooter.com Forum about building a 20 BR capable of 1,000-yard Minute of Prairie Dog accuracy and many said 20 Cal bullets just could not do it. Some came to my defense and said those that doubted had never studied the ballistics of the 20BR with the new Berger 55gr bullets now available. Well, folks, I can tell you, hitting a Prairie Dog at 1000 yards isn’t easy — but it IS possible. Here’s how it was done….
Gale-Force Winds and High Temps
After arriving at our Prairie Dog Ranch in Colorado, I soon realized my quest was going to be especially difficult because we had continual 40+ mph winds and 100° heat every day. We had a special place where Birdog and I had made many 1,000-yard+ kills in years past, so I knew the ideal location but needed a small window of opportunity either early morning or late afternoon. Based on past experience, I knew I needed about 21 MOA from my 100-yard zero to get to 1,000 yards. On the first day of the Safari, I shot the 20 BR in the 45 mph brutal winds and heat of 97°. But after about 20 shots, I connected on a dog and lifted him about three feet high. Well, that’s a start.
Winds Subside — Here’s Our Chance …
On the second day of our shoot, I had listened to the early weather forecast, so I knew that there was to be a brief period of light winds early in the morning. We were out on the Colorado prairie at daylight and the conditions were perfect. The sunrise was at my back and we had about a 10 mph tailwind. I looked through my Leica Geovid Rangefinder Binos and the Prairie Dogs were out for breakfast. I quickly ranged the targets and found a group at about 1,050 yards. The technique is to find the dogs, range them, click-up according to your ballistic chart and shoot.
My first shot was very, very close. I added about four clicks up and a couple of clicks left for windage and let another go. That shot threw dirt all over, but the dog didn’t even flinch. This is another good point to remember about long-range Prairie Dog hunting. To be successful, the dogs can’t be too skittish, because if they have been shot at even a few times, they will go down and stay down. So, you should have an agreement with those in your party as to where each member is going to be shooting and respect this boundary. Drive-by shooting style is OK if that’s your thing, it’s just not mine.
Hitting the Mark — Dead Dog at 1032 Yards
On the fourth shot, I saw the dog go belly up and kick its final throws. My quest for the 20-Caliber 1,000-yard Prairie Dog had become a reality. We confirmed the distance with our lasers at 1,032 yards. Our technique for retrieving a dead dog at that range is worth mentioning. When I killed that dog, I left it in the crosshairs of my Nightforce scope. My shooting buddy kept looking through the scope (of my gun) and guided me to the deceased dog using Motorola walkie-talkies. When I got to the dog I was jubilant. I marked it with my tripod and orange jacket, and we took some pictures. (See view through scope photo below). The 55gr Bergers require a center mass hit as they will not expand, especially at that range. I centered this dog in the head — his BAD LUCK, my GOOD.
After making the 1,032-yard kill, I shot many many other Prairie Dogs with the Savage 20 BR using the 40gr V-Maxs. The dog flights were spectacular — red mist and helicopters, counter-clockwise or clockwise on demand. I killed at least five at over 500 yards. I will not use the 55 Bergers on Prairie Dogs again since the quest is over. I will use the 40gr V-Maxs and 39gr Sierra BlitzKings for next trip’s 20 BR fodder.
Today is Thanksgiving, aka “Turkey Day”, a time to enjoy an annual get-together with family and friends. To mark this occasion we offer a collection of interesting videos about turkey hunting plus a FREE Turkey target. Enjoy your Thanksgiving holiday!
GetZoneHunting.com has a vast video library for hunters, with hundreds of helpful videos on all types of hunting. In time for spring turkey season, GetZoneHunting offers a big collection of turkey hunting videos: At the Ranch – Turkey. On that page you’ll find 13 turkey hunting “how-to” videos. Here are links to five GetZone Turkey Hunting videos with valuable information from skilled, experienced hunters.
At the Ranch Turkey Hunting Videos
At the Ranch – Turkey offers solid advice for turkey hunters. These five videos will help you better understand turkey behavior and have success on your hunt. Click any photo to watch the particular video on the GetZone website. (Work Warning — When each GetZone video opens, it may immediately launch an annoying commercial with loud AUDIO!). There are eight more turkey hunting videos on GetZone’s Turkey Hunting HQ Page.
At the Ranch: Shot Placement for Turkeys — CLICK PHOTO to Watch Video
At the Ranch: Turkey Hunting Essentials — CLICK PHOTO to Watch Video
At the Ranch: The Difference Between a Jake and a Tom — CLICK PHOTO to Watch Video
At the Ranch: Early vs. Late Spring Turkey Hunt — CLICK PHOTO to Watch Video
At the Ranch: How to Plan a Turkey Hunt — CLICK PHOTO to Watch Video
Free Printable Turkey Target from AccurateShooter.com
As a special bonus for our readers, here is a free, printable Turkey Target, so you can practice for your turkey hunting adventure, This special Turkey Bullseye Target was created by our friend and Forum member Pascal (aka “DesertFrog”). CLICK HERE for FREE Turkey Target.
With days growing shorter and winter on its way — here’s a great audio “infotainment” resource to help fill those long winter nights. Leupold offers podcasts, 40-75 minutes in length, on a variety of topics of interest to hunters and precision shooters. A podcast is like a radio show that’s available 24/7, at your convenience. To “tune in” via your home computer or mobile devices, just visit the Leupold Podcast Page.
Oregon-based optics-maker Leupold & Stevens (“Leupold) offers the “Core Insider” podcast series. These podcasts deliver hunting advice and recount successful hunting trips — such as Caribou hunting in Alaska. Other Leupold podcasts provide optics info, industry intel, and tech tips. Leupold’s Core Insider podcasts can also be accessed directly from Leupold.com. From the Leupold Podcast Home Page, you can stream the podcasts live or download for later listening.
The Leupold Core Insider Podcasts cover a wide variety of shooting and hunting topics. One early episode features Leupold team members Kyle Lamb and Buck Doyle discussing long-range shooting, while recent Episode 55 explains how Binoculars and Rangefinders function. There are now 96 Leupold Podcasts available online for FREE.
Well folks, Thanksgiving is just a week away. Looking for culinary inspiration for your holiday gatherings? The NRA Blog offers three special (and delicious) Wild Game Recipes for your family feasts: Honey Mustard Planked Wild Turkey Breast, Mushroom-Stuffed Wild Boar Roast with Black Truffle Sauce, and BBQ Brined Pigeon. These recipes come from some of the country’s best chefs, and they all seem mouth-watering. You’ll find a full list of ingredients plus step-by-step cooking tips.
One of the many advantages to hunting is the assortment of game you can gather that lasts for an extended period of time. Just because it’s Thanksgiving doesn’t mean you have to stick with a whole turkey from the store and a ham hock.
We have three unique spins on wild game recipes that will suit your dining table perfectly. Even if you’re one of those hunters who enjoys a quick hunt the morning of Thanksgiving, these recipes will make your holiday more delicious than ever. — NRABlog.com
Mushroom-Stuffed Wild Boar Roast with Black Truffle Sauce
Gettin’ Gobblers — Turkey Hunting Tips on GetZone Video
And for those folks who hope to harvest their own gobbler for the Thanksgiving holiday, GetZone.com offers a turkey hunting video with expert guidance on Turkey hunting, specifically stalking and shot placement: “When it comes to shotgun hunting, you don’t want to get BBs in the meat, so the most common (and lethal) shot with a shotgun is a headshot.”
This photo is from GetZone.com, a website that provides information on shooting and hunting. CLICK HERE to watch a GetZone video on turkey hunting. Work Warning: When you click photo, a loud audio track may start immediately, so turn down the audio volume.
Winter is right around the corner, with December just two weeks away. Even now there is snow on the ground in Montana, Wyoming, Colorado and other northern and mountain states. And a major winter storm is predicted to hit America with snow and cold temperatures ahead of Thanksgiving week travel. Last week Denver had 20 inches of snow — the biggest November snowfall in over 40 years.
If you plan to go shooting or hunting in the weeks ahead, while the weather is below freezing and snow is on the ground, you need to be prepared. You should always have the right equipment and make sure that you can contact help if something goes wrong (such as not being able to start your vehicle).
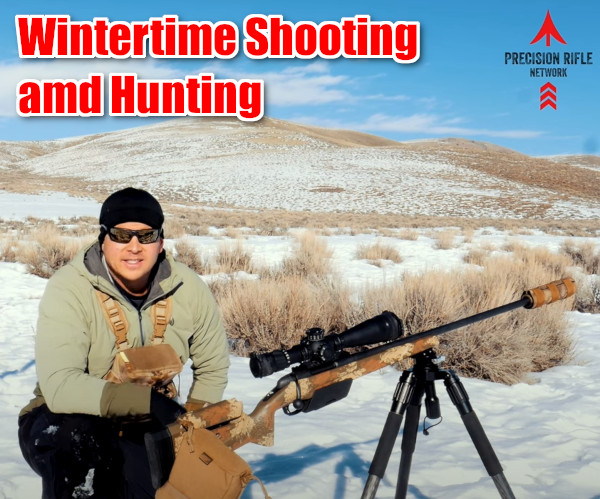
The folks at the Precision Rifle Network have created a good video on winter shooting and hunting. Host Marcus Hom provides his TOP 10 TIPS for wintertime shooting/hunting adventures. We recommend that any 4-season shooter watch this video.
TOP 10 TIPS for Winter Shooting and Hunting:
1. Wear Good Sunglasses — With snow on the ground, wearing sunglasses is a must because of the extra reflected light. You can get good sunglasses that also have ANSI Z87.1-approved impact protection.
2. Wear Protective, Moisture-Proof Clothing — Wear a set of Bibs and a long jacket. This will prevent you from getting snow inside your clothing when shooting prone.
3. Take Care of Your Hands — Bring good winter gloves, preferably with a waterproof outer layer. Make sure the inner gloves can work with your trigger/trigger guard.
4. Bring a Good Tripod — A tripod keeps you elevated so you can avoid laying down in snow or slush. That, in turn, avoids body heat loss. “Keeping out of the snow and shooting from an elevated position is pretty important in the wintertime.”
5. Protect Optics and Action — Keep your scope lenses and action clear of moisture, snow, and fog. You will want to have good caps on both lenses. Make sure the action remains closed, and consider some kind of wrap over the action until you’re ready to load and shoot.
6. Ranging Challenges — Laser range-finders don’t perform optimally with intense, bright, ambient light. Also, if it’s showing you may get false readings from snow particles. So take multiple readings to ensure you have the right distance. Also, if you have a reticle with MOA or MIL marks, and you know the size of your target, then you can range the target with the scope.
7. Drop and Windage Info (DOPE) Chart — Bring a waterproof, hard copy dope chart. Out in the field on cold days, a phone battery dies fast, and you’ll want to preserve that battery for emergency phone use if needed. So, you should keep a good old-fashioned drop chart in a waterproof laminate.
8. Muzzle Velocity Issues — Cold temperatures can lower muzzle velocity. Before you go, get an idea of how your velocity will change with low temperatures. Some powders are more sensitive to temperature than others, causing a noticeable reduction in muzzle velocity. A load you’ve worked out in summer may shoot LOW in winter because the actual velocity is low. Even with a “temperature stable” powder you may see a 10 fps slow-down. Do some winter velocity testing if you can before you go.
9. Keep Your Ammo Warm — A simple way to avoid muzzle velocity changes with low ambient temperatures is to keep you ammunition ON YOUR BODY. Have a pouch under your layered clothing where the ammo can be kept relatively warm. See video: 07:50
10. Safeguard Keys and Valuables — Keep keys and valuables in a secure, zippered pocket. “There is nothing worse than losing something… keys, phone, wallet. It’s really hard to find something when its buried under [many] inches of snow”. We also recommend keeping a spare vehicle key hidden on your car/truck. There are magnetic holders that can keep that spare key secure but safely hidden from view.
Winter Hunting — Success with Snow on the Ground
There has been snow on the ground for much of November in many areas of the country. Hunters have had to cope with the snow and cold temperatures. Our hunting editor, Colton Reid, recently returned from a successful deer hunt in the mountains of Utah. He said it was beautiful, but you needed really high-quality outdoor clothing — otherwise you could get in trouble. You need to stay warm and dry.
With careful planning, and some skilled tracking, Colton had success, making a perfect hit on a buck at 300 yards. The animal dropped instantly. Colton brought back a good harvest of deer meat, which formed part of the Thanksgiving feast for his family.
Colton offered these 5 TIPS for hunters. These apply in any season, but are even more important in winter with freezing temps and snow on the ground:
1. Have a Plan — know where you plan to go and when. Try to be where you want in the early morning and early evening hours when deer are likely most active.
2. Take Your Time — If you spot a deer and get too excited and don’t take your time you may spook him. Go slow and glass. If possible, wait for the animals to bed down and relax. Then work out the best way to approach your prey. Remember, “You get so few opportunities, don’t screw it up!”
3. Glass More, Walk Less — Let your eyes do the walking — get good binoculars and use them. With their heightened senses of smell and hearing, deer/elk are able to spot you way better than you can spot them. If you are walking around a lot, chances are you are getting spotted by your prey.
4. Pace Yourself When Packing Out — If you DO succeed, and bring down a big buck, will you be able to dress the animal and carry out the meat? Always be prepared to hike out with extra weight. If you are successful, make sure not to waste the meat you worked so hard for. Choose a pack that can help you carry a heavy load. Remember, this is not an insignificant challenge — you may be carrying 60 to 100 extra pounds in addition to your other gear. Again, take your time. Rest as needed. Don’t hurt yourself.
5. Always Enjoy the Experience — Have fun, and appreciate your hunt, whether you bag a buck or not. It is a privilege to experience the wilderness and to get away from the city. Enjoy it while you’re out there. And keep your spirits up. You may get tired, but remember that ‘comes with the territory’. At the end of the day, yes you may be exhausted. And you may want to quit and go home. But stay positive, stay focused. Be patient, the experience is worth it.
Winter Solace in the Backcountry
There is a nice thread in our Forum appropriately entitled “Winter Time”. You’ll find some great backcountry images taken by our Forum members. Winter is a special time in the outdoors. Forum member JDP explains: “Winter is the best time to shoot! One of the few of life’s ironies that works in my favor. The range is empty and barrels keep cool, no bugs, no waiting on people, no mirage. Yup, this world needs more thin blooded snow birds. This cool weather is terrible and dangerous, tell your friends! Do people get lonely while shooting or something? It’s the true holiday season in multiple ways.”
Forum member DNorton posted: “I live way up north where our white sandy beaches look like this!”


 Outdoorsmans Tripod Adapters


 Making the 1032-Yard Shot with a 20 BR

 Hitting the Mark — Dead Dog at 1032 Yards


 With careful planning, and some skilled tracking, Colton had success, making a perfect hit on a buck at 300 yards. The animal dropped instantly. Colton brought back a good harvest of deer meat, which formed part of the Thanksgiving feast for his family.


