Eurooptic vortex burris nightforce sale


teslong borescope digital camera barrel monitor


As an Amazon Associate, this site earns a commission from Amazon sales.


June 5th, 2021

My Shooting — New FREE Group Measuring Android App

My Shooting Group Measuring App Android Ballistic-X

Want to instantly measure your shot groups with precision, just by using your smartphone? You can do this with the excellent, proven Ballistic-X program, which has versions for both Android and Apple (iOS) devices. Ballistic-X is handy, relatively precise, and easy to use. But it does cost $7.99.

If you want to try a group measuring App that is completely FREE, there is a good new Android App called My Shooting from Bokili Production software. This new My Shooting App was created by a match shooter in Europe. It actually offers some cool features not available with most other group-measuring Apps. For example you can measure and display MULTIPLE group sizes on the same screen and keep them all in one file so you can quickly compare group size. There is a radius value in addition to group size (center to center of farthest shots). The App also includes an INFO box where you can display rifle type, sights/optics, ammo caliber, target distance, date, and even wind values and temperature. That’s handy.

FREE APP — You can download My Shooting App from the Google Play Store for FREE. Sorry there is NO Apple iOS/iPhone version at this time.

My Shooting Group Measuring App Android Ballistic-X

My Shooting lets you take images and perform all measurements internally within the application. To use the My Shooting App, simply take a photo of the target(s) with your smartphone. Then enter a known dimension on the target (such as the diameter of 10 Ring). Next click a circle on each shot-hole, and then mark the aiming point on the target. The App then does all the calculations, listing the group size in inches or mm (as you prefer). The App also list the Radius of the group, and the group’s Point of Impact (POI) separation from the Point of Aim.*

NOTE: If you enter bullet caliber and target distance, My Shooting App will display the angular measurement in MOA or Milliradians. That can be VERY handy when shooting at long ranges. The “smart” App shows the group’s actual dimension PLUS the equivalent MOA or Mils at your shooting distance. The App lets you choose either imperial (inches/yards) or metric measurements (millimeters/meters).

My Shooting Group Measuring App Android Ballistic-X

Bojan Radović, the creator of My Shooting App, is a shooter himself and an AccurateShooter.com visitor. He told us: “I am a shooter and a programmer from Europe. I recently created an Android App that works very precisely to measure a group of hits. The application is free!” NOTE, however, like most free Apps, the My Shooting App does contain small advertisements.


* POI (indicated with “X”) is precisely calculated as the mean value of all hits in relation to the center of the target — i.e. the mean distance from Point of Aim. The POI location reference (e.g. “down-left”) states a directional angle for which you can make a correction on your optical sight. POI displays with an actual distance (mm or inches) and the equivalent MOA or MRAD.

Permalink Competition, New Product, Optics No Comments »
August 29th, 2019

How to Sight-In Your Hunting Rifle in Four Shots

hunting zero zeroing sight-in easy NSSF boresighting
Photo courtesy Vortex Optics.

Hunting season is right around the corner. We know many readers have acquired a new hunting rifles, or perhaps are using new ammo or a new optic. If you’ve got new gear, you’ll want to zero your hunting rig properly. Here’s how…

Here’s a simple procedure that lets you get a solid zero in just four shots. Of course you probably want to fire a few more rounds to confirm your zero before you head off to your hunting grounds, but this will let you get on-target with a minimum amount of time and ammo expended. (This assumes your scope is securely mounted, and the bases are not drastically out of alignment.)

QUICK-TIP: The Key to this procedure is Dialing to Shot One Point of Impact (POI). Re-aim at center of target after SHOT ONE. Then with the rifle motionless, use the turrets to put the middle of the cross-hair on the first shot location.

1. First, remove the bolt and boresight the rifle. Adjust the position of the rifle so that, looking through the bore, you can see the center of the target with your eyes. Secure the rifle in the rests to maintain its position as boresighted. Then, without moving the rifle, center the reticle. That should get you on paper. With the rifle solidly secured in front and rear rests or sandbags, aim at the center of a target placed at your zeroing distance (50 or 100 yards). Confirm there are no obstructions in the barrel! Then load and fire SHOT ONE. Then, return the gun to the exact position it was when you pulled the trigger, with the cross-hair centered on the target as before.

2. Locate, in the scope, where your first bullet landed on the target. Now, while you grip the rifle firmly so it doesn’t move, have a friend adjust the turrets on your scope. While you look through the scope, have your friend turn the windage and elevation turrets until the cross-hairs, as viewed through the scope, bisect the first bullet hole on the target. Use the turrets to move the center of the reticle to the actual position of shot number one. IMPORTANT: Dial the crosshairs to the hole — don’t move the rifle.

Watch NSSF Zeroing Video showing method of moving reticle to Shot 1 Point of Impact.

3. After you’ve adjusted the turrets, now re-aim the rifle so the cross-hairs are, once again, positioned on the target center. Keep the rifle firmly supported by your rest or sandbag. Take the SECOND SHOT. You should find that the bullet now strikes in the center of the target.

3-Shot Zero

4. Take a THIRD SHOT with the cross-hairs aligned in the center of the target to confirm your zero. Make minor modifications to the windage and elevation as necessary.

5. Finally, shoot the rifle from a field rest (shooting sticks, bipod, or rucksack) as you would use when actually hunting. Confirm, with SHOT FOUR, that your zero is unchanged. You may need to make slight adjustments. Some rifles, particularly those with flexy fore-arms, exhibit a different POI (point of impact) when fired from a bipod or ruck vs. a sandbag rest.

This Video Shows the Process Described Above:

Fouling Shots and Cold Bore Condition
If you recently cleaned your rifle, you may want to fire two or three fouling shots before you start this procedure. But keep in mind that you want to duplicate the typical cold bore conditions that you’ll experience during the hunt. If you set your zero after three fouling shots, then make sure the bore is in a similar condition when you actually go out hunting.

Permalink Bullets, Brass, Ammo, Hunting/Varminting, Tech Tip No Comments »
August 31st, 2017

Vortex 15-60x52mm Golden Eagle Scope Review by James Mock

Vortex Optics Golden Eagle Scope 15-60x52mm review F-Class F-TR

Review by James Mock
If you were charged with building a scope for F-Class or long range Benchrest, what features would you want? Vortex asked that question, received feedback from many competitors, and then set out to build a new high-magnification, zoom comp scope that would set a new “performance for price” standard.

The new Vortex Golden Eagle has features that this shooter really appreciates. It has a power range of 15x to 60x with a 52mm objective lens. Vortex has attempted to keep the weight as low as possible and the cost reasonable. My initial impression is that Vortex spared no expense in developing this scope. The “street price” for this premium scope is a reasonable $1499.00. Plus it has Unconditional Lifetime Warranty. Given its features, performance, and price, I believe that this scope will sell very well.

Vortex Optics Golden Eagle Scope 15-60x52mm review F-Class F-TR

Here are the important features of the new 15-60x52mm Golden Eagle:

Quality Construction

Premium HD, extra-low dispersion glass
APO (apochromatic) objective lens system with index-matched lenses
XRP multi-coated lenses for max light transmission
ArmorTek extra-hard lens coating to protect lens from dust, dirt, and smudges
Fogproof and Waterproof (Argon gas purged)

Specifications

Field of View at 100 yards: 6.3 feet at 15X; 1.7 feet at 60X
Main Tube: One-piece 30mm
Length: 16.1 inches; Weight is 29.7 ounces
Objective Lens: 52mm
Eye Relief: 3.9 inches
Reticles: SCR-1 FCH; ECR-1 MOA

Testing the Golden Eagle

I recently tested a Golden Eagle with the ECR-1 reticle. On this model the Hash Marks subtend 1 MOA at 40X. There is also a fine crosshair reticle (SCR-1) available. Initial tests with the scope were done on June 28th and I was very impressed with what I saw. With a new scope I always shoot the square (box test) to test tracking and amount of movement. I shot the square today after shooting a 5-shot group at 250 yards (my longest available distance). Below is a picture of the box test target that I shot. Yes, shot #5 went through the exact same hole as shot #1.

Vortex Optics Golden Eagle Scope 15-60x52mm review F-Class F-TR

Below is the 250-yard target I shot before doing the box test. To get to the 100-yard target, I clicked down 14 clicks (1/8th MOA) and the scope was spot on. It is really a pleasure to use instruments that do exactly what they are supposed to do. With the Louisiana mirage, I shot this orange/white target at 40X instead of the maximum 60X. I did not have any problem seeing the 6mm bullet holes at 40X. The optics in this scope are to my old eyes are as good as any that I have used (regardless of price).

Vortex Optics Golden Eagle Scope 15-60x52mm review F-Class F-TR

Vortex Optics Golden Eagle Scope 15-60x52mm review F-Class F-TRCompetition Test Success — Golden Eagle Delivers a Win
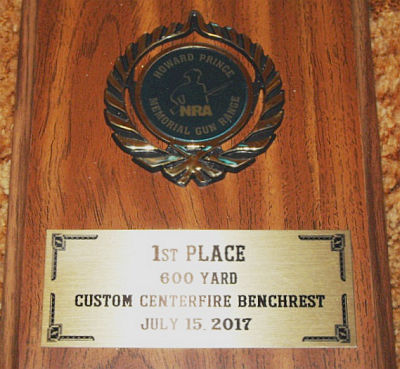
My next use of this scope was at our monthly 600-yard match on July 15th. It was a typical mid-July day in north Louisiana — very hot and humid with light switching winds. The mirage was terrible, but I managed to squeak out a victory with a 188/5X score out of 200/20X possible. I shot the Golden Eagle at 40X all day and it performed perfectly. No one could see bullet holes today, even with the high powered premium spotting scopes. This is a quality scope and it may be a “lucky” scope in that I did not expect a win with a 6mm Dasher barrel with 2500 or more rounds through it.

Point of Aim Test with Hood Scope Checker
I also tested the Golden Eagle for holding Point of Aim (POA). For this procedure, I used the Hood scope checker (loaned to me by Bart Sauter). To use this, one mounts two scopes side by side. Ideally one scope has proven its ability to hold POA. Here I used a Valdada 36X BR model as my control scope. It has proven over an 8-year period of time to hold its point of aim. I mounted these scopes on my BAT/Leonard 6mm PPC and adjusted each to the same point on the target.

Vortex Optics Golden Eagle Scope 15-60x52mm review F-Class F-TR

As one can see in the above picture, these are big scopes. After the first shot, I noticed that the reticle dot on the Vortex seemed to be about 1/8th MOA to the right of its original position. I stopped to check for ring slippage (which I had experienced in prior tests). There was no apparent slippage, so I checked the parallax and found that there was some parallax correction needed. This was probably the source of the apparent shift in point of aim, but I cannot be sure of that. I fired three more shots (checking after each) and found no shift.

Vortex Optics Golden Eagle Scope 15-60x52mm review F-Class F-TR

After testing for POA shift, I fired the remaining rounds using different aiming points. I fired 5 rounds (upper left) using the Vortex and 3 rounds to the right of those using the Valdada scope.

CONCLUSION — A Very Fine Optic at a Reasonable Price
While testing this Vortex Golden Eagle scope, I developed a real fondness for it. I appreciate its great optics, eye relief and crispness of adjustments. If I thought that this scope did not hold POA, I would use my old Valdada in the 600-yard matches in which I participate. Further testing has shown no tendency to shift point of aim.

If I am allowed to keep this scope until the fall, I am sure that I will be able to see 6mm bullet holes in the white at 600 yards. Seeing those 6mm holes is very difficult, but that is my dream for a premium high-powered scope. During the summer months in north Louisiana, the air is much too “dirty” to spot small holes at 600 yards. By October, there should be some conditions in which one can use the premium optics to see bullet holes in the white at 600.

In summary, let me say that this scope has become one of my all-time favorites because of its bright, clear images and its great reliability. If you are looking for a great long-range scope that is reasonable in cost, try the Golden Eagle from Vortex.– James Mock

Permalink Gear Review, Optics 6 Comments »