|
|
April 22nd, 2015
OK, guys, it’s time to practice your downloading skills. Here’s a very handy cartridge information sheet you will definitely want to save for future reference. Shown below is Page One of the Primer Size and Bullet Diameter Chart created by Graf & Sons. This chart shows the bullet diameter and primer size for more than 320 popular cartridges*. The full three-page chart is available in PDF format for easy printing.
DOWNLOAD Graf’s Cartridge Primer Size and Bullet Diameter Chart
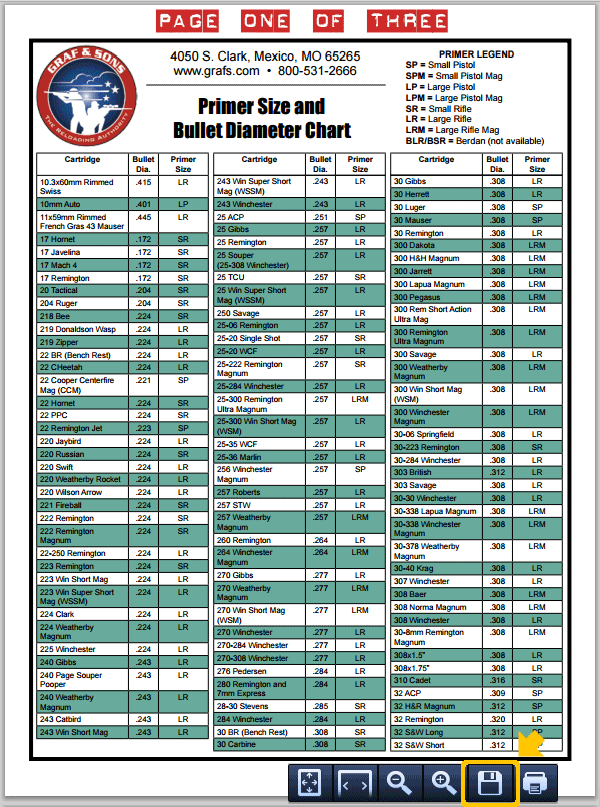
NOTE: If you have the PDF reader installed in your browser, the Graf’s Chart may open in a new tab when you click on the image above. To save the three-page PDF file to your computer or device, click the Floppy Disc icon that appears in the lower right (after the PDF file opens). Here is the direct link: http://www.grafs.com/uploads/technical-resource-pdf-file/12.pdf.
Note: There are a few mistakes. If you are making 22 BR from Lapua brass, you’ll want a small rifle primer. Likewise with 25-20 WCF, you want a small primer.
Resource Tip from EdLongrange. We welcome reader submissions.
November 19th, 2014
Many shooters, particular those who shoot vintage military rifle matches, reload once-fired military cartridge brass. This brass may be high-quality and stout, but you may encounter a primer crimp* that interferes with the seating of a new primer. There are a variety of dedicated, military-crimp tools on the market, such as Dillon’s excellent Super Swage 600 tool that “rolls the crimp away”. But the Dillon tool costs $100.95 and takes quite a bit of room on your reloading bench. If you don’t want to drop a C-note and give up valuable bench space — here’s another (much cheaper) solution.
If you already have a Wilson case trimmer set-up, you can ream away those military crimps using an affordable Wilson accessory — the Primer Pocket Reamer (large #PPR-210, small #PPR-175). This $32.99 accessory is used in conjunction with a Wilson case trimmer and case-holder as shown below.
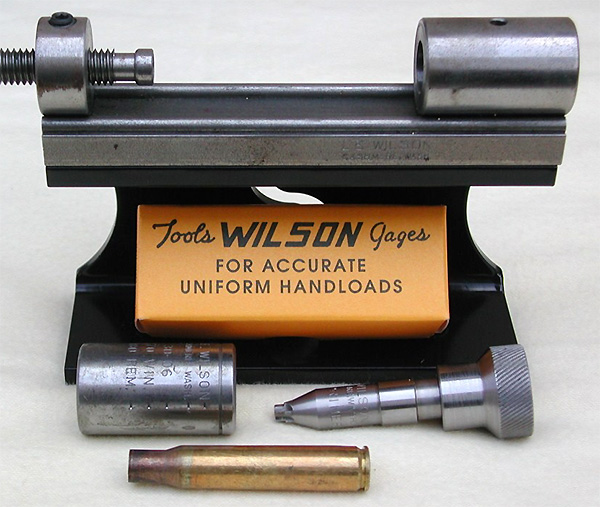
 In the older Riflemans Journal website, the Editor, “GS Arizona”, shows how to use the Wilson primer pocket reamer to remove military crimps on Lake City .30-06 cartridge brass. He explains: “The case goes into the Wilson case-holder, the same one used for case trimming, and the reamer replaces the trimmer head in the tool base. The threaded rod on the left side, which is normally used to regulate trim length has no use for this operation and it is simply backed out. Hold the case-holder as you turn the reamer into the primer pocket, it cuts easily and quickly. The reamer will stop cutting when the proper depth is reached.” In the older Riflemans Journal website, the Editor, “GS Arizona”, shows how to use the Wilson primer pocket reamer to remove military crimps on Lake City .30-06 cartridge brass. He explains: “The case goes into the Wilson case-holder, the same one used for case trimming, and the reamer replaces the trimmer head in the tool base. The threaded rod on the left side, which is normally used to regulate trim length has no use for this operation and it is simply backed out. Hold the case-holder as you turn the reamer into the primer pocket, it cuts easily and quickly. The reamer will stop cutting when the proper depth is reached.”
 
Do you really need to do this operation with military-crimped brass? Yes, and here’s why: “any attempt to prime the case without removing the crimp will simply result in a mangled primer that cannot be expected to fire and certainly won’t fire reliably.”
Read Full Article on Riflemans’ Journal Website (more photos and detailed write-up).
*Why does military brass has a primer crimp? GS Arizona answers: “The crimp is nothing more than an intentional deformation of the case around the primer pocket, the purpose of which is to retain the primer in the case despite high pressure situations in machine guns and other automatic weapons where a loose primer may cause a malfunction. As reloaders, our task is to get rid of the remnants of the crimp in order to allow re-priming the case.”
July 13th, 2013
When developing loads, it is important to know the true internal capacity of your cases, both fired and “as FL-sized”. In particular, when using the QuickLOAD program, it is vital to determine true case capacity. The default case capacity values listed by QuickLOAD may be off half a grain (or more) because brass from different manufacturers can vary considerably in capacity. Case capacity is a very important variable that will affect the pressure of a load and the velocity of your bullets.
To determine the true internal capacity of your cases, first weigh an empty cartridge case, then fill the case with water (all the way to the top of the neck) and weigh the case again. The difference in weight is your H20 capacity in grains. But how do you keep the H20 from flowing out the bottom? When measuring fired, unsized cases, you can simply leave the spent primer in the pocket. However, if you want to measure new brass or “as-FL sized” cases that have been deprimed, you’d have to insert a spent primer to “stem the tide”. Until now that is… 21st Century Shooting has come up with a simple tool that plugs the bottom of the case so you can measure H20 capacity with ease.

When we saw 21st Century’s Primer Pocket Plug we thought “That’s smart — why didn’t someone think about that a long time ago?”. This handy “end-cap” lets you quickly measure multiple new brass cases or deprimed FL-sized cases so you can get an average H20 capacity. The primer pocket plugs are NOT case-specific (they feature an O-ring that fits the pocket). One version will work with all small-primer-pocket cases, while another works with all large-primer-pocket cartridge types. Price is $19.95 for either small-pocket or large-pocket version.
NOTE: If you want to measure H20 capacity on fired, sized brass, but don’t want to shell out the money for the tool (or re-insert a spent primer), here’s a simple suggestion. When you size your case, first remove the decapping rod from the die. Then you can FL-size the case without removing the primer. Of course, you will eventually have to knock the primer out, and that requires putting the decapping rod back in the die and running the case through a second time. To avoid that hassle, the Primer Pocket Plug may be worth the $19.95 over the long haul. We just ordered one of each (small and large).
Product Find by EdLongrange. We welcome reader submissions.
December 6th, 2012
Even with high-quality brass from Lapua, Norma, and RWS, occasionally you may find one or two cases per box which have a small flake or obstruction in the flash-hole. This will appear like a thin crescent on one side of the flash hole (see photo). You should inspect ALL new brass before loading to identify any pieces with a partially-obstructed flash hole. It’s a good idea to remove any flake or thin crescent left as an artifact of the flash-hole forming process. Because the flash-hole itself is normally centered and of the correct diameter, it is not necessary to ream the flash-hole to a larger diameter. All you really need to do is remove the small obstruction(s). This can be done quickly with inexpensive tools.

Use a Small Pin Vise to Remove Flash-Hole Obstructions
Folks have asked if there is a tool that can remove obstructions from a Lapua small, BR-sized flash hole without opening the hole size. The Lapua PPC/BR flash hole is spec’d at 1.5mm, which works out to 0.059055″. Most of the PPC/BR flash-hole uniforming tools on the market use a 1/16″ bit which is nominally 0.0625″, but these often run oversize — up to 0.066″.
If you want to just clear out any obstructions in the flash hole, without increasing the flash hole diameter, you can use an inexpensive “pin vise” with an appropriate drill bit. For $1.00, eHobbyTools.com sells a 1.5mm drill bit, item 79186, that matches the Lapua flash hole exactly. Other vendors offer a #53 pin vise drill bit that measures .0595″ or .060″ (depending or source). An 0.0595″ bit is close enough. You can find pin vises and these small-diameter drill bits at hobby stores.

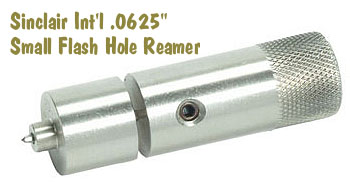
For quite some time, Sinclair Int’l has sold a similar device for small (PPC and BR-size) flash holes. Like the new 07-3081 unit for large flash holes, the 07-3000 Reamer for small flash holes works from the outside, so it can index off the primer pocket. It reams to .0625″, and also costs $45.99. The standard dimension for Lapua 220 Russian and 6mmBR flash holes is 1.5mm or .0590″. This tool will permit standard-size decapping rods with .0625″ tips to work without binding. However, note that both Forster and Redding normally supply .057″ decapping pins with their PPC and BR dies. So, it is NOT necessary to ream your Lapua BR/PPC flashholes, unless you prefer to do so for uniformity. It IS, however, a good idea to check BR/PPC flash holes for burrs before loading the first time.
NOTE: If you purchase either the 07-3081 or 07-3000 Sinclair Flash Hole Reamer tools, we recommend you mic the cutter tip before you process a bunch of cases. Sometimes a tip comes through that is oversize. This will ream the flash holes larger than you may intend.
February 8th, 2012
Robert Whitley of AR-X Enterprises, LLC builds match-grade uppers for AR-platform rifles. Many of Robert’s favorite chamberings are based on the 6.5 Grendel case necked-down to 6mm. Until 2011, Lapua was the only source for 6.5 Grendel brass. As you’d expect, Lapua’s Grendel brass is truly excellent, but it is also pricey, and sometimes hard to find. Now Hornady is producing USA-made 6.5 Grendel brass. Robert Whitley has worked with the Hornady 6.5 Grendel brass for over a year now and he is able to assess its performance compared to the original Lapua version. Writing in our Shooters’ Forum, Robert reveals: “It’s decent brass but hot loads will loosen the primer pockets fast. With moderate loads you will get good case life and service from the brass and it can deliver excellent accuracy as well. Not Lapua but not bad either.”
Robert reports: “I was able to get my hands on some of Hornady’s 6.5 Grendel brass. My big question was how it would measure up, particularly the loaded necks, and whether it would be compatible with our existing 6mmAR and Turbo 40 die sets. As it turns out, this brass looks like a perfect fit for our existing die sets (and obviously 6.5 Grendel die sets too). Accordingly, folks with existing die sets will be able to use the Hornady brass without any issues.” However, as the loaded neck on the Hornady brass is .001″ (one-thousandth) slimmer than Lapua brass, you may want to try a smaller bushing when sizing Hornady Grendel brass.

The Hornady 6.5 Grendel brass has a LARGE Flash Hole, about .078″ versus .0591″ for Lapua brass. Dimensionally, the biggest difference is the shoulder diameter, with the Hornady brass measuring 0.428″ vs. 0.424″ for the Lapua brass. The Hornady is actually a better fit for 6mmAR chambers which are about 0.432″ at the shoulder. Interestingly, case H20 capacity is virtually identical. Water capacity of new, unfired Hornady 6.5 Grendel brass is 35.1 grains, while new, unfired Lapua Grendel brass holds 35.0 grains of H20. Both brands of Grendel brass increase to about 36.0 grains H20 capacity after firing and full-length sizing.
Here are some of the particulars of the Hornady cases:
| Hornady 6.5 Grendel Brass |
Lapua 6.5 Grendel Brass |
Flash hole diameter: ~ .078″
OAL of brass: Average 1.515″
Weight of cases: 111.7 to 113.0 grains
Web diameter, unfired: 0.4375″
Shoulder diameter, unfired: 0.428″
Loaded neck diameter: 0.2895″
6mmAR loaded neck: 0.270″ |
Flash hole diameter: 1.5mm (0.0591″)
OAL of brass: Average 1.515″
Weight of cases: 111.0 to 112.5 grains
Web diameter, unfired: 0.4385″
Shoulder diameter, unfired: 0.424″
Loaded neck diameter: 0.290″
6mmAR loaded neck: 0.271″ |
November 1st, 2009
For years, Sinclair Int’l has offered a reamer for small, BR-sized flash-holes, product #07-3000. This popular tool features an 0.0625″ cutting tip to uniform the .059″ flash-holes on Lapua 220 Russian, 6mmBR, 6.5 Grendel, and 6.5×47 brass. Sinclair’s tool works from the outside, indexing off the primer pocket. For those people who believe in the utility of reaming small flash-holes (an open question), the Sinclair “outside-in” design may be the best. But until now, there has been no equivalent “outside-in” reamer for cases with large flash-holes.
 Sinclair recently introduced its NEW .081″ large flash-hole reamer, item #07-3081. This $37.50 tool is designed to ream standard flash holes (.080″) to exactly .081 inch, both for small primer pockets and large primer pockets. This tool will remove most burrs left in manufacturing and will uniform the flash-hole diameter of all your brass to ensure consistent ignition. Sinclair recently introduced its NEW .081″ large flash-hole reamer, item #07-3081. This $37.50 tool is designed to ream standard flash holes (.080″) to exactly .081 inch, both for small primer pockets and large primer pockets. This tool will remove most burrs left in manufacturing and will uniform the flash-hole diameter of all your brass to ensure consistent ignition.
Double-Ended Design Works with Both Small and Large Primer Pockets
Sinclair’s all-stainless three-piece tool features a double-ended reamer guide for both large and small primer pockets, a knurled handle for easy turning and a straight fluted .081″ reamer. It is designed for all cartridges (with either small OR large primer pockets) with standard .080″ flash holes.
As one Sinclair customer noted: “This is a tool that has been needed for a long time.” As a result, the .081″ flash-hole reamers have been back-ordered through 12/1/2009. But if you order now you should have yours within 5-6 weeks.
IMPORTANT: We recommend, if you order this tool, that you mic the actual diameter of the cutter tip. We have found that some flash-hole reamers, of ALL brands, arrive with slightly oversized cutter tips. Indeed we’ve seen tip diameters of other brands (not Sinclair) vary by as much as .006″ (six-thousandths). You want to make sure you don’t have an oversize cutter before you ream hundreds of cases.
|


