A few years back, Our friend Grant Guess had a “close encounter” with a bad primer. An apparently defective primer caused part of the casehead on one of his rounds to blow out. This, in turn, allowed high pressure gas to vent through the damaged primer pocket. Take a good look, boys and girls. This is yet another very good reason to wear safety glasses. The cartridge was a 6.5-06, handloaded in necked-down Winchester-headstamp .270 Win brass. Grant reports:
“I had a blow through between the primer and the primer pocket today. The action was really smoking and I got a face full of gas. This was a reasonably light charge. Thank God for safety glasses.
I should also mention that it appears there is a 3/64 hole that is halfway between the primer and the primer pocket. Like it burned a small jet hole through both of them.”
Could this happen to you? It just might. On seeing this damaged case, one of Grant’s Facebook friends, Chris D., observed: “Search the internet, you will see a lot of these pin hole ‘in the corner’ failures. Obviously Winchester has some issues with the LR primers.”
Careful Examination Reveals Apparent Primer Defect
After this incident, Grant examined the damaged case: “I pinned the flash hole and it is not over-sized or under-sized. The primer clearly has an area where it had a defect. At [50,000 CUP], it doesn’t take much of a defect to cause issues. There was a slight bit of pucker-factor on the next shot….”
One of our Forum members complained that he wasn’t able to set his primers flush to the rim. He tried a variety of primer tools, yet no matter what he used, the primers still didn’t seat deep enough. He measured his primers, and they were the right thickness, but it seemed like his primer pockets just weren’t deep enough. He was mystified as to the cause of the problem.
Well, our friend Boyd Allen diagnosed the problem. It was the decapping rod. If the rod is adjusted too low (screwed in too far), the base of the full-diameter rod shaft (just above the pin) will contact the inside of the case. That shaft is steel whereas your case is brass, a softer, weaker metal. So, when you run the case up into the die, the shaft can actually stretch the base of the primer pocket outward. Most presses have enough leverage to do this. If you bell the base of the primer pocket outwards, you’ve essentially ruined your case, and there is no way a primer can seat correctly.
The fix is simple. Just make sure to adjust the decapping rod so that the base of the rod shaft does NOT bottom out on the inside of the case. The pin only needs to extend through the flash hole far enough to knock the primer out. The photo shows a Lyman Universal decapping die. But the same thing can happen with any die that has a decapping rod, such as bushing neck-sizing dies, and full-length sizing dies.
Whenever you use a die with a decapping pin for the first time, OR when you move the die to a different press, make sure to check the decapping rod length. And it’s a good idea, with full-length sizing dies, to always re-check the height setting when changing presses.
Lee Universal Decapping Die on SALE for $10.96
Speaking of decapping tools, Midsouth Shooters Supply sells the Lee Universal Decapping Die for just $10.96 (item 006-90292), a very good deal. There are many situations when you may want to remove primers from fired brass as a separate operation (prior to case sizing). For example, if your rifle brass is dirty, you may want to de-cap before sizing. Or, if you load on a progressive press, things will run much more smoothly if you decap you brass first, in a separate operation.
NOTE: Some Euro Small Flash Holes are 1.5mm or 0.059″.
The low-cost Lee Universal Decapping Die will work with cartridges from 17 Fireball all the way up to big Magnums. However, NOTE that the decapping pin supplied with this Lee die is TOO LARGE for LAPUA 220 Russian, 6mmBR, 6.5×47, 6.5 Creedmoor, .308 Win (Palma) and Norma 6 PPC flash holes. Because the pin diameter is too large for these brass types, you must either turn down the pin, or decap with a different tool for cases with .059″ flash-holes. Otherwise, the Lee Decapping Die works well and it’s a bargain.
Product Review by F-Class John
Case preparation is critical for precision reloading. One must trim cases, debur/chamfer case mouths, clean necks, spruce up primer pockets and do other important tasks. Complete case prep can involve many separate processes, each requiring its own tools. With each of those tools comes additional cost as well as the need for more storage and bench space. To make case prep easier, faster, and more convenient Lyman created the Case Prep Xpress. The Case Prep Xpress, introduced a few years back, combines up to five prep stages into one well-built, stable, versatile unit. Watch this video to see the machine in action:
The Case Prep Xpress features five (5) independently-turning spindles all with the common 8/32 thread. This allows you to attach multiple tools supplied with the unit PLUS many other screw-on prep tools. For our testing we started out using a variety of the 12 included tools and found they cover the majority of case prep tasks. Lyman supplies deburr and chamfer tools, pocket uniformers, reamers and cleaners, as well as an assortment of neck brushes.
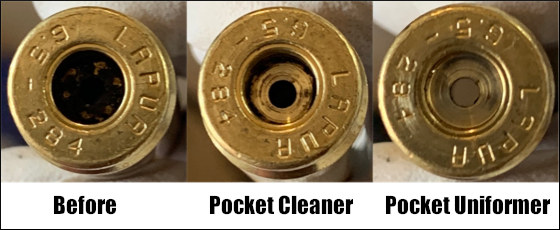
The deburr and chamfer tools worked really well, creating beautiful bevels all while leaving a nice flat edge across the top of the neck which is critical for accuracy and brass life. We found the primer pocket cleaning tool did a good job, but for truly clean pockets we recommend using the primer pocket uniforming tool, which very efficiently removes even hard residues.
The benefit of having interchangeable heads is that you can add your own accessories. We like to use a bore brush with bronze wool wrapped around it for use inside our necks. This worked perfectly once we screwed it in. In fact, we couldn’t think of any 8/32-threaded accessory that wouldn’t work well on this machine. Another great design feature is how all the accessories are oriented straight up. This allows for perfect visual alignment of your cases onto the tools which is critical — especially when performing cutting operations such as primer pocket uniforming.
Along with the five power stations there are six female-threaded storage spots on the sides where tools can be placed to ensure they don’t get lost. We like this feature since there will be more than five accessories you want to use and having them easily available is a great feature. You can keep 11 tools right on the machine (5 on top, 6 on the sides). That way you don’t have to dig through storage bins.
The Case Prep Xpress has a removable front bin to hold brass shavings, and there are two circular trays on either side of the bin. In front is a long tray that holds the provided brush. This makes it relatively easy to clean off brass shavings and other debris from case prep processes.
SUMMARY — Versatile Case Prep Xpress Is A Great Value
For the money, Lyman’s Case Prep Xpress is tough to beat. It performs multiple tasks well while being stable and easy-to-use. Yes there are some multi-spindle prep centers that offer variable or fast/slow RPM spindles while the Lyman’s spindles are all fixed RPM. (See, e.g. the RCBS Brass Boss). However those other systems don’t include all the convenient on-board storage of the Case Prep Xpress, and are more expensive. The Lyman Case Prep Xpress sells for $130-$150 “street price” ($129.59 at Amazon). This makes the Lyman Case Prep Xpress a great value — it offers great versatility while saving space and saving money compared to buying five or more separate, powered tools.
The U.S. Army Marksmanship Unit (USAMU) has published a series of reloading “how-to” articles on its Facebook Page. This post explains how to uniform primer pockets and remove burrs in flash holes. These brass prep operations can help ensure greater consistency, shot after shot. Visit the USAMU Facebook Page for other, helpful handloading tips.
Primer Pocket and Flash-Hole Conditioning
This week, we’ll address a question that frequently arises: “Do you uniform primer pockets and deburr flash-holes?”
As we tailor our handloading methods to the specific needs of each instance, the answer, not surprisingly, is “occasionally!” Generally, the USAMU Handloading Shop does not uniform primer pockets (PP) or deburr flash holes (FH) of our rifle brass. That’s not to say we’re against it — rather, it reflects the very high volume of ammunition loaded, the fact that very few cases are ever re-loaded for a second firing, and the types of brass we use. However, as a need is perceived, we DO deburr flash holes (of which, more later.)
As to the type cases we use, many thousands of our long-range 5.56x45mm cases come to us from the arsenal with the primer of our choice pre-installed and staked in per their usual practice. Obviously, we could not uniform either FHs or PPs on this live-primed brass. However, after careful sorting, inspection and preparation, we do obtain match-winning results with it. Regular readers have seen photos of some of the tiny 1000-yard test groups we’ve fired with weight-selected domestic brass which had neither Primer Pockets uniformed nor flash holes deburred.
Figure 1 shows a fired, deprimed 7.62×51 case with primer residue intact. In Figure 2, the primer pocket has been uniformed to SAAMI specs. Note the shiny finish — evidence of the metal removed to uniform and square the primer pocket.
Shooters who reload their brass several times may decide to uniform PPs and deburr FHs, especially on their “300-yard and beyond” brass. Unlike us, they will be using their cases many times, while the operations are only needed once. Also, most handloaders only process a relatively moderate amount of brass compared to our 20-thousand round lots. Having high quality Long Range (LR) brass helps. Many of the better brass manufacturers form their flash holes so that no burrs are created.
Still, it does pay to inspect even THESE manufacturer’s products, as occasional slips are inevitable. Very rarely, some of these makers will have a significant burr in, say, 1 per 1000 or 2000 cases, and it’s worth catching those. Recently, we began processing a large lot of match brass from a premier manufacturer, and were startled to find that every case had a burr in the FH — something we’d never before seen from this maker. We then broke out the FH deburring tool and went to work.
For those who do opt for these procedures, note that various tool models may have adjustable depth-stops. Pay attention to the instructions. Some flash hole deburring tools which enter the case mouth, not the primer pocket, depend on uniform case length for best results.
Does It Really Make a Difference?
It can be difficult to truly verify the contribution to accuracy of these procedures, particularly when firing from the shoulder, in conditions. Members of this staff, as individual rifle competitors, do often perform these operations on their privately-owned LR rifle brass.
One could ascribe this to the old High Power Rifle maxim that “if you think it helps, then it helps”. Another thought is to “leave no stone unturned” in the search for accuracy.
However, an extremely talented World Champion and Olympic Gold/Silver medalist commented on his own handloading (for International competition, which demands VERY fine accuracy). He noted that he did seem to see a decline in accuracy whenever he did not uniform FH’s, deburr FH’s and clean primer pockets before each reloading; however, with the wisdom of decades’ experience, he also remarked that “It could have been that I just wasn’t shooting as well that day.”
One side of this gauge is the “go” side which quickly tells you the depth of a primer pocket, whether any crimp is properly removed, and whether the primer pocket is loose. If it feels loose on the “go” side, use the other end of the tool, the “no go” side, to test to see if the primer pocket is too loose to hold a primer. If the no-go slides into the pocket, then you know to junk that brass.
Primer Pocket Growth and Useful Case Life
Repeated firings at stout pressures can cause primer pockets to grow in diameter. This can create an unsafe condition if your primers are not seating properly. Are your primer pockets “good to go”, or have they been pushed to the point of no return? Do you really know? Many guys try to gauge primer pocket tightness by “feel”, as they seat the primer. But that method isn’t precise. Now there’s a better way…
The folks at Ballistictools.com have created a handy set of precision-machined gauges that let you quickly and accurately check your primer pockets. These gauges (aka “gages”) are offered in two sizes — for large and small primer pockets. A two-piece set of both large and small gauges costs just $19.99. These gauges let you quickly measure the depth of a primer pocket, and check if the crimp has been removed properly. Most importantly, the gauge tells you if the primer pocket has opened up too much. One side of the gauge has an enlarged diameter plug. If that “No-Go” side fits in the primer pocket, you should ditch the case — it’s toast.
Precision ground from O-1 tool steel, The Ballistic Tools primer pocket gauges serve multiple functions. The inventor of these tools explains: “I created the prototype of this tool for my own use in brass processing. I needed a way to quickly and easily measure primer pockets that was reliable and did not require wasting a primer. This tool has been indispensable for me and I would never go back to the old method of uncertainty and guessing.”
Product tip from Boyd Allen. We welcome reader submissions.
The U.S. Army Marksmanship Unit (USAMU) regularly releases a reloading “how-to” article on the USAMU Facebook page. Here’s a helpful USAMU guide on removing military primer pocket crimps. If you ever use surplus military brass, you really should this article. It contains vital information “learned the hard way”. The writer has tried many different options for removing/swaging out crimps. He weighs the pros and cons of various methods and provides some advice that will save you time and headaches. This article was the second in a 3-part series. Visit the USAMU Facebook page regularly for other informative articles on reloading methods.
A common question, and important issue with US GI surplus 5.56 brass is “what to do with the primer crimp?” Our Handloading Shop does not prime/re-prime GI 5.56 brass, as we receive it in virgin state (primed) and don’t reload it. However, our staff has extensive private experience handloading GI brass in our own competitive shooting careers, and have several tips to offer.
Once the brass is full-length sized and decapped, the staked-in ring of displaced metal from the primer crimp remains, and hinders re-priming. Some swaging tools exist to swage out this ring, allowing free access to the primer pocket. Some are stand-alone products, and some are reloading-press mounted. Early in this writer’s High Power career, he used the common press-mounted kit several times, with less than stellar results.
Setting Up Swaging Tools
Surplus brass tends to come from mixed lots, and primer crimp varies from very mild to strong. Also, primer pocket dimensions vary. So, setting up this “one size fits most” tool involves trying to find a happy medium for a selection of different types of brass in your particular lot. Some are over-swaged, some under-swaged, and some are “Just Right.” Overall, it was a time-consuming and sub-optimal process, in this writer’s experience.
Cutting Out the Crimp Ring with a Chamfer Tool
[After trying swaging tools] this writer evolved to using the ubiquitous Wilson/RCBS/Other brands chamfer and deburring tool to cut out only the displaced crimp ring at the top of the primer pocket. One caution: DON’T OVER-DO IT! Just a little practice will let the handloader develop a “feel” for the right degree of chamfer that permits easy re-priming without removing so much metal that primer edges start to flow under pressure. For this writer, it was three half-turns of the tool in the primer pocket, with medium pressure.
Here, as with all bulk reloading operations, mechanization is our friend. A popular reloading supply house has developed an inexpensive adaptor that houses the chamfer/deburr tool (retained by an allen screw) and allows mounting in a hand drill or drill press. This speeds the operation significantly, as does use of one of the popular Case Preparation Stations that feature multiple powered operations. (Say good-bye to carpal tunnel syndrome and arthritis!)
One advantage of chamfering the primer pockets lightly to remove remnants of primer crimp, vs. swaging, is that primer pockets are not loosened in this process. US GI (usually LC) NATO 5.56 brass has a great reputation for longevity due to the superior hardness of the case head vs. some softer brands of commercial brass. This means the brass will stand up well to multiple full-pressure loads without loosening primer pockets, and the chamfering method helps support this benefit.
Powered Case Prep Centers — What to Look For
A word of advice (often learned the hard way) — think carefully before jumping on the “latest/greatest” case prep center. One with a proven, long-time track record of durability and excellent customer support has a lot going for it, vs. the flashy “new kid on the block.” Analyze the functions each case prep center can support simultaneously — i.e., can it chamfer, deburr and clean primer pockets all at the same time, without having to re-configure?
Do the tool-heads that come with it look truly functional and durable? If not, can they be easily replaced with proven or more-needed versions, such as a VLD chamfer tool, or a solid/textured primer pocket cleaner rather than a less-durable wire-brush type?
Tips for Priming with Progressive Presses
When re-priming, a couple of factors are worth noting. When re-priming using either single-stage presses, hand tools, or bench-mounted tools (such as the RCBS bench-mounted priming tool), precise alignment of the primer pocket entrance with the primer is easily achieved, and priming goes very smoothly. When using certain progressive presses, due to the tolerances involved in shell-heads, etc., one may occasionally encounter a primer that isn’t quite perfectly aligned with the primer pocket.
If resistance is felt when attempting to re-prime, DO NOT attempt to force the primer in — doing so can be dangerous! Rather, just exert SLIGHT upward pressure to keep the primer in contact with the case-head, and with the support hand, move the case back/forth a trifle. The primer will drop into alignment with the primer pocket, and then prime as usual. After priming, check each seated primer by feel. Ensure it is below flush with the case head (cleaning primer pockets helps here), and that there are no snags, burrs or deformed primers.
More Info on Primer Pocket Swaging
For more information about removing military crimps in primer pockets, we recommend you read Get the Crimp Out on the Squibloads Gun Thoughts Blog. This is a detailed, well-illustrated article that shows how to use various primer pocket reamers/cutters. It also has a very extensive discussion of swaging using CH4D, RCBS, and Dillon tools. The Squibloads author had much better luck with swaging tools than did the USAMU’s writer — so if you are considering swaging, definitely read the Squibloads article.
The illustration of primer pocket types is from the Squibloads Blog Article, Get the Crimp Out.
For centerfire rounds, consistent ignition (and low ES/SD) all begins with the primer in the base of the cartridge. When the firing pin strikes the primer, it sets off a small flame/spark which lights the powder in the case. Energy from that burning powder pushes the bullet out of the cartridge, down the barrel, and out to the target. It’s fair to say, then, that accurate shooting all begins with the primer.
When seating primers, consistency counts. You want to make sure the primer is fully seated in the primer pocket in the base of the case. You want to ensure a slight bit of crush (flattening) for proper seating, and it doesn’t hurt to have very consistent primer seating depths. That’s why guys use tools to uniform their primer pockets.
Here’s a new tool that lets you measure the consistency of primer seating depths. We haven’t used this device yet, but Forum members have reported it works well — measurements are quick and repeatable. Will this tool lower your ES/SD or improve accuracy? That’s hard to say. However, it will definitely help you detect when a primer in a loaded round is seated too high or too low — that’s important. In addition, it can give you precise measurements for comparison testing with different types of primers.
Accuracy One Precision Primer Gauge
The Accuracy One Precision Primer Gauge will precisely measure primer pocket depth and the depth of seated primers in relationship to the face of the case head. The Precision Primer Gauge can also be used to measure the thickness of an unseated primer, allowing you to calculate the optimum seating depth for the particular primers and cases you are loading.
Precision Primer Gauge Features:
Digital Indicator with 0.01mm/0.0005″ resolution
Gauge Body is machined from 303 stainless steel
Small Primer Stem and Large Primer Stem
Both .223 Rem and .308 Win zeroing block
Magnum and .338 Lapua zeroing block
Case Compatibility: The Precision Primer Gauge works with 300 Win. Mag case head diameter (.532”) cartridges, .308 Win. case head diameter (.473”) cartridges, and .223 Rem case head diameter (.378”) cartridges using either large or small primers.
Precision Primer Gauge Pricing:
PPG Without Indicator: $100.00
PPG With Indicator: $150.00
PPG Main Body Only: $40.00
Phone Orders: Call (814) 684-5322
How to Order the Precision Primer Gauge:
The Precision Primer Gauge can be ordered via phone, or by sending in the PDF ORDER FORM form via mail or email.
Assembly Tips: Nylon screw is provided for securing the gauge body to the indicator. The contact point of the indicator must be removed to provide proper function. Also, please note that the standard gauge body is not compatible with cartridges that share the .338 Lapua case head diameter unless the diameter of the magnum step is machined to .595” to accept the larger diameter case head. This modification of the gauge body is available upon request.
Product Tip from EdLongRange. We welcome reader submissions.
For a few years now, Lyman has offered the Case Prep Xpress, an all-in-one case prep center that chamfers necks (inside and out), cleans and uniforms primer pockets, brushes the inside of case-necks, and uniforms flash holes. The unit can also ream out the crimps on military brass. However, the Lyman Case Prep Xpress does NOT trim cases.
The Lyman Case Prep Xpress comes with all the necessary tools (listed above), so you don’t have to purchase extra accessories. The five (5) gear-driven heads on the unit are powered by a high torque, low-speed motor ideal for case prep operations. Lyman’s Case Prep Xpress features handy storage areas for accessories, a removable brass shavings dump pan, and a handy clean-up brush.
Sinclair Int’l video clearly illustrates all case prep functions. Worth watching.
In the 5 years that this product has been on the market it has been a strong seller. If you’re prepping hundreds of cases, this unit will save considerable time and reduce hand/finger fatigue. While the Case Prep Xpress is not as sturdy as the metal-bodied Hornady prep center, the Lyman unit offers a lot of functionality for the money ($115-$125 normal price, and sometimes around $100 on sale).
Lyman Case Prep Xpress Pros and Cons
GOOD Features
Quite Affordable (under $120)
Compatible with RCBS and Redding Tool-heads
Removable Bin for Shavings
Four Brush Sizes: .25, .30, .38, .45
Compact Footprint
Not-So-Good Features
Tool-heads Not Particularly Sharp
No Case Trim Function
No Flash-hole Uniformer
No Top Dust-Cover
Only 1-Year Warranty
Reviews by Verified Purchasers
“Case prep is the most tedious and boring aspect for hand loading in my opinion. The process center makes all the steps in prepping the case very quick and with consistent results. It has reduced the time required to do these steps with separate tools by easily 50% if not more. Highly recommended.” — Brandon G.
“Quiet and capable. Worth every penny. I adapted a Lee Cutter and Lock Stud, to cut case lengths, and I can fly through my brass. I can do so much more brass without getting the sore, cramped-up hands.” — Dean Ellis
“This unit has plenty of torque, and my unit is very quiet. This unit will also work with tools made by RCBS and Hornady, or anything else with 8-32 threads. My Redding tools (specifically, my primer pocket uniformers) do in fact fit on this machine. This unit is certainly worth the money, and will revolutionize the way you reload by saving you massive amounts of time and wear on your hands/fingers.” — Mule
“A simple machine to perform complex solutions. I was up and running in about 10 minutes flat. This thing has made my life of reloading so much easier. I do wish there was a trimmer included, but I have a manual one from L.E. Wilson.” — Richard Niles
You can find Lyman’s Case Prep Xpress for under $100.00 at Amazon and under $120.00 at Brownells, making it much less expensive than the larger Hornady Case Prep Center, which runs over $450.00. The Hornady unit is beefier, and will trim cases. However, we think the compact Lyman unit makes sense for guys who already have a good case trimmer, such as a Forster or Wilson. The Lyman Case Prep Xpress is hundreds of dollars less than the Hornady prep center. The money you save will buy lots of bullets and brass.
Case Prep Xpress $99.99 at Amazon
The Lyman Case Prep Xpress is sold by most of the big vendors. The best current price we found was at Amazon, which sells the Lyman unit for $99.99, with free shipping.
Gear Review Tip from Edlongrange. We welcome reader submissions.
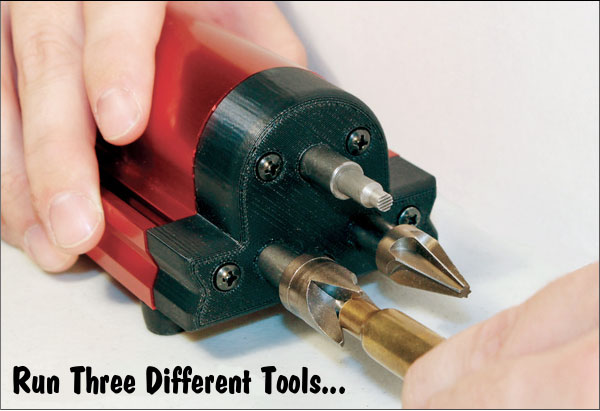
Nobody likes to spend hours manually chamfering cases and cleaning primer pockets. There are simple hand tools that will perform these tasks, but the process is time-consuming and tedious after a couple dozen cases. To speed up case prep duties, you can get one of the large, powered case prep centers. These function well, but frankly we didn’t want to give up that much precious space on our reloading bench. One good solution is Hornady’s compact Case Prep Trio (item 050160). This triple-threat tool packs a lot of functionality in a small package.
This cleverly-designed powered tool has a small footprint, yet it can perform three tasks as well as much more expensive, tower-style case prep units. The Hornady Case Prep Trio is now $85.99 at Midsouth Shooters Supply. We’ve used this machine and it works well. The only negative is that you will get metal shavings on your bench (unlike some of the larger case prep centers). We’ve seen some guys put a small pan under the power head — then you can just dump the shavings out of the pan.
With three active stations, you can chamfer, deburr and clean primer pockets without having to change tools. The Case Prep Trio ships with inside chamfer, outside chamfer, and deburr tools. You can also use the machine with other optional 8/32 threaded accessories such as primer pocket reamers and case neck brushes. Conveniently, the Case Prep Trio has on-board storage for your tool-heads. User reviews have been very positive.
Here’s a really good deal on a very handy reloading product, the Case Prep Trio. This versatile device features three powered heads and ships with both Inside Chamferer and Outside Chamferer tools. You can add optional accessories such as large/small primer pocket cleaners, primer pocket reamer, case neck brushes, and other 8-32 threaded tools.
This $79.99 deal at Midsouth is the best price we’ve found (the unit normally sells for $95.00 or more). Plus, if you purchase by the end of 2016, you get 100 FREE Bullets from Hornady. If you figure those 100 bullets are worth thirty dollars or so, that brings your net cost for the Case Prep Trio to around fifty bucks. Hard to argue with that. We have this tool and it’s a very welcome addition to our loading bench that definitively saves time and reduces hand fatigue.


 The folks at

 Tips for Priming with Progressive Presses


 You can find Lyman’s Case Prep Xpress for