Try a club match this summer! Every summer weekend hundreds of local club “fun matches” are conducted around the country. And the first official day of summer — the Summer Solstice — is June 20, 2025, just 9 days away. That means local summer weekend fun matches will be held at ranges across the country. So load some ammo, get your rifle, and have some fun.
One of the good things about club shoots is that you don’t have to spend a fortune on equipment to have fun. But we’ve seen that many club shooters handicap themselves with a few common equipment oversights or lack of attention to detail while reloading. Here are SIX TIPS that can help you avoid these common mistakes, and build more accurate ammo for your club matches.
1. Align Front Rest and Rear Bag
We see many shooters whose rear bag is angled left or right relative to the bore axis. This can happen when you rush your set-up. But even if you set the gun up carefully, the rear bag can twist due to recoil or the way your arm contacts the bag. After every shot, make sure your rear bag is aligned properly (this is especially important for bag squeezers who may actually pull the bag out of alignment as they squeeze).
Forum member ArtB adds: “To align my front rest and rear bag with the target, I use an old golf club shaft. I run it from my front rest stop through a line that crosses over my speed screw and into the slot between the two ears. I stand behind that set-up and make sure I see a straight line pointing at the target. I also have a piece of tape that I’ve placed on the golf shaft that indicates how far the back end of the rear bag should be placed from the front rest stop.”
2. Avoid Contact Interference
We see three common kinds of contact or mechanical interference that can really hurt accuracy. First, if your stock has front and/or rear sling swivels make sure these do NOT contact the front or rear bags at any point of the gun’s travel. When a sling swivel digs into the front bag that can cause a shot to pop high or low. To avoid this, reposition the rifle so the swivels don’t contact the bags or simply remove the swivels before your match. Second, watch out for the rear of the stock grip area. Make sure this is not resting on the bag as you fire and that it can’t come back to contact the bag during recoil. That lip or edge at the bottom of the grip can cause problems when it contacts the rear bag. Third, watch out for the stud or arm on the front rest that limits forward stock travel. With some rests this is high enough that it can actually contact the barrel. We encountered one shooter recently who was complaining about “vertical flyers” during his match. It turns out his barrel was actually hitting the front stop! With most front rests you can either lower the stop or twist the arm to the left or right so it won’t contact the barrel.
3. Weigh Your Charges — Every One
This may sound obvious, but many folks still rely on a powder measure. Yes we know that most short-range BR shooters throw their charges without weighing, but if you’re going to pre-load for a club match there is no reason NOT to weigh your charges. You may be surprised at how inconsistent your powder measure actually is. One of our testers was recently throwing H4198 charges from a mechanical measure for his 30BR. Each charge was then weighed twice with a Denver Instrument lab scale. Our tester found that thrown charges varied by up to 0.7 grains! And that’s with a premium measure.
4. Measure Your Loaded Ammo — After Bullet Seating
Even if you’ve checked your brass and bullets prior to assembling your ammo, we recommend that you weigh your loaded rounds and measure them from base of case to bullet ogive using a comparator. If you find a round that is “way off” in weight or more than .005″ off your intended base to ogive length, set it aside and use that round for a fouler. (Note: if the weight is off by more than 6 or 7 grains you may want to disassemble the round and check your powder charge.) With premium, pre-sorted bullets, we’ve found that we can keep 95% of loaded rounds within a range of .002″, measuring from base (of case) to ogive. Now, with some lots of bullets, you just can’t keep things within .002″, but you should still measure each loaded match round to ensure you don’t have some cases that are way too short or way too long.
5. Check Your Fasteners
Before a match you need to double-check your scope rings or iron sight mounts to ensure everything is tight. Likewise, you should check the tension on the screws/bolts that hold the action in place. Even with a low-recoiling rimfire rifle, action screws or scope rings can come loose during normal shooting.
6. Make a Checklist and Pack the Night Before
Ever drive 50 miles to a match then discover you have the wrong ammo or that you forgot your bolt? Well, mistakes like that happen to the best of us. You can avoid these oversights (and reduce stress at matches) by making a checklist of all the stuff you need. Organize your firearms, range kit, ammo box, and shooting accessories the night before the match. And, like a good Boy Scout, “be prepared”. Bring a jacket and hat if it might be cold. If you have windflags, bring them (even if you’re not sure the rules allow them). Bring spare batteries, and it’s wise to bring a spare rifle and ammo for it. If you have just one gun, a simple mechanical breakdown (such as a broken firing pin) can ruin your whole weekend.
When a rifle isn’t shooting up to it’s potential, we need to ask: “Is it the gun or the shooter?” Having multiple shooters test the same rifle in the same conditions with the same load can be very revealing…
When developing a load for a new rifle, one can easily get consumed by all the potential variables — charge weight, seating depth, neck tension, primer options, neck lube, and so on. When you’re fully focused on loading variables, and the results on the target are disappointing, you may quickly assume you need to change your load. But we learned that sometimes the load is just fine — the problem is the trigger puller, or the set-up on the bench.
Here’s an example. A while back we tested two new Savage F-Class rifles, both chambered in 6mmBR. Initial results were promising, but not great — one gun’s owner was getting round groups with shots distributed at 10 o’clock, 2 o’clock, 5 o’clock, 8 o’clock, and none were touching. We could have concluded that the load was no good. But then another shooter sat down behind the rifle and put the next two shots, identical load, through the same hole. Shooter #2 eventually produced a 6-shot group that was a vertical line, with 2 shots in each hole but at three different points of impact. OK, now we can conclude the load needs to be tuned to get rid of the vertical. Right? Wrong. Shooter #3 sat down behind the gun and produced a group that strung horizontally but had almost no vertical.
Hmmm… what gives?
Shooting Styles Created Vertical or Horizontal Dispersion
What was the problem? Well, each of the three shooters had a different way of holding the gun and adjusting the rear bag. Shooter #1, the gun’s owner, used a wrap-around hold with hand and cheek pressure, and he was squeezing the bag. All that contact was moving the shot up, down, left and right. The wrap-around hold produced erratic results.
Shooter #2 was using no cheek pressure, and very slight thumb pressure behind the tang, but he was experimenting with different amounts of bag “squeeze”. His hold eliminated the side push, but variances in squeeze technique and down pressure caused the vertical string. When he kept things constant, the gun put successive shots through the same hole.
Shooter #3 was using heavy cheek pressure. This settled the gun down vertically, but it also side-loaded the rifle. The result was almost no vertical, but this shooting style produced too much horizontal.
A “Second Opinion” Is Always Useful
Conclusion? Before you spend all day fiddling with a load, you might want to adjust your shooting style and see if that affects the group size and shape on the target. Additionally, it is nearly always useful to have another experienced shooter try your rifle. In our test session, each time we changed “drivers”, the way the shots grouped on the target changed significantly. We went from a big round group, to vertical string, to horizontal string.
Interestingly, all three shooters were able to diagnose problems in their shooting styles, and then refine their gun-handling. As a result, in a second session, we all shot that gun better, and the average group size dropped from 0.5-0.6 inches into the threes — with NO changes to the load.
That’s right, we cut group size in half, and we didn’t alter the load one bit. Switching shooters demonstrated that the load was good and the gun was good. The skill of the trigger-puller(s) proved to be the limiting factor in terms of group size.
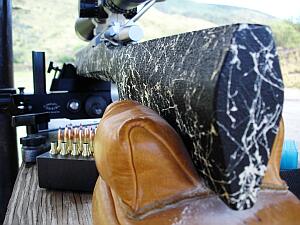
To get the best accuracy out of any benchrest rifle, you need to find the optimal position of front rest and rear bag. The important point to remember is that each rig is different. One gun may perform best with the front rest right at the tip of the forearm (Position ‘D’ in photo), while another gun will work best with the rest positioned much further back. This Editor’s own 6mmBR rifle has a laminated stock that is pretty flexy in the front. It shoots best with the front rest’s sandbag located a good 6″ back from the forearm tip (position ‘A’).
Here’s some benchrest advice that can help you reduce vertical and shoot tighter groups… without spending another penny. Many benchrest shooters spend a fortune on equipment and devote countless hours to meticulous handloading, but they never experiment with their rifle’s position/balance on the bags. This article explains why you should test your rifle in various positions. What you learn may surprise you (and improve your scores).
Next time you go to the range, experiment with the position of your rifle on the front rest, and try a couple different positions for the rear bag. You may find that the rifle handles much better after you’ve made a small change in the placement of your gun on the bags. Recoil can be tamed a bit, and tracking can improve significantly, if you optimize the front rest and rear bag positioning.
This competitor has the front rest positioned fairly far forward but not all the way out. Note the stop on the front rest — this limits forward stock travel.
A small change in the position of the forearm on the front rest, or in the placement of the rear bag, can make a big difference in how your gun performs.
Balance Your Gun BEFORE You Spend Hours Tuning Loads
In the pursuit of ultimate accuracy, shooters may spend countless hours on brass prep, bullet selection, and load tuning. Yet the same shooters may pay little attention to how their gun is set-up on the bags. When you have acquired a new rifle, you should do some basic experimentation to find the optimal position for the forearm on the front rest, and the best position for the rear bag. Small changes can make a big difference.
Joel Kendrick, past IBS 600-yard Shooter of the Year, has observed that by adjusting forearm position on the front rest, he can tune out vertical. He has one carbon-fiber-reinforced stock that is extremely rigid. When it was placed with the front rest right under the very tip of the forearm, the gun tended to hop, creating vertical. By sliding the whole gun forward (with more forearm overhang ahead of the front sandbag), he was able to get the whole rig to settle down. That resulted in less vertical dispersion, and the gun tracked much better.
Fore/aft stock position is important even with very wide fore-ends.
Likewise, the placement of the rear bag is very important. Many shooters, by default, will simply place the rear bag the same distance from the front rest with all their guns. In fact, different stocks and different calibers will NOT behave the same. By moving the rear bag forward and aft, you can adjust the rifle’s overall balance and this can improve the tracking significantly. One of our shooters had a Savage 6BR F-Class rifle. By default he had his rear bag set almost all the way at the end of the buttstock. When he slid the rear bag a couple inches forward the gun tracked much better. He immediately noticed that the gun returned to point of aim better (crosshairs would stay on target from shot to shot), AND the gun torqued (twisted) less. The difference was quite noticeable.
A small change in the position of the forearm on the front rest, or in the placement of the rear bag, can make a big difference in how your gun performs. You should experiment with the forearm placement, trying different positions on the front rest. Likewise, you can move the rear bag back and forth a few inches. Once you establish the optimal positions of front rest and rear bag, you should find that your gun tracks better and returns to battery more reliably. You may then discover that the gun shoots smaller groups, with less vertical dispersion. And all these benefits are possible without purchasing any expensive new gear.
Vertical stringing is a common problem that all precision shooters will face sooner or later. In addition to ammo inconsistencies, many other factors can cause vertical stringing. Accordingly, it’s important that you analyze your gun handling and bench set-up systematically.
EDITOR: Folks, READ THIS ARTICLE! You WILL benefit. There are some VERY important insights here. You’ll learn ways to set up your gun better, and check for various technical issues. That can save you time at the range and save you money spent on expensive bullets and powder.
In this article, Hall of Fame benchrest Shooter Speedy Gonzalez explains how to eliminate mechanical and gun-handling problems that cause vertical spread in your groups. Speedy’s article addresses the many human and the hardware factors that can cause vertical.
Speedy Gonzalez, noted shooter, gunsmith and member of the Benchrest Hall of Fame, offers these pearls of wisdom to help you eliminate vertical in your shot strings. Remember that vertical can result from myriad gear issues and gun-handling mistakes. Try to isolate one item at a time as you work to improve your groups.
BAGS and REST–VERY IMPORTANT
• Front Rest Wobble — You will get vertical if the top section of the front rest is loose. Unfortunately, a lot of rests have movement even when you tighten them as much as you can. This can cause unexplained shots.
• Rifle Angle — If the gun is not level, but rather angles down at muzzle end, the rifle will recoil up at butt-end, causing vertical. You may need to try different rear bags to get the set-up right.
• Front Bag Tension–Vertical can happen if the front sand bag grips the fore-arm too tightly. If, when you pull the rifle back by hand, the fore-arm feels like it is stuck in the bag, then the front bag’s grip is too tight. Your rifle should move in evenly and smoothly in the sand bags, not jerk or chatter when you pull the gun back by hand.
• Sandbag Fill — A front sandbag that is too hard can induce vertical. Personally, I’ve have never had a rifle that will shoot consistently with a rock-hard front sandbag. It always causes vertical or other unexplained shots.
• Bag Ears — If the channel between the Rear Bag’s ears is not in line with the barrel, but is twisted left or right, this can affect recoil and vertical consistency. And take note — if the bag is off-axis quite a bit, you can also get horizontal stringing.
• Reliability — ALL your bench equipment must work flawlessly. If it doesn’t, get it fixed or get rid of it. We need all our attention on wind flags.
GUN HANDLING and BENCH TECHNIQUE
• Be Consistent — You can get vertical if your bench technique is not the same every shot. One common problem is putting your shoulder against the stock for one shot and not the next.
• Free Recoil — Free recoil shooters should be sure their rifle hits their shoulder squarely on recoil, not on the edge of their shoulder or the side of their arm.
• Head Position — Learn to keep your head down and follow-through after each shot. Stay relaxed and hold your position after breaking the shot.
• Eyes — Learn to shoot with both eyes open so you can see more of the conditions.
• Last Shot Laziness — If the 5th shot is a regular problem, you may be guilty of what I call “wishing the last shot in”. This is a very common mistake. We just aim, pull the trigger, and do not worry about the wind flags. Note that in the photo above, the 5th shot was the highest in the group–probably because of fatigue or lack of concentration.
• Last Shot Low — I hear a lot of discussion about low shots in a group and apparently this occurs a lot on the 5th shot. If your 5th shot that goes out most of the time, you can bet you are doing something at the bench.
• Seating — When possible, bring your own stool so that you can sit comfortably, at a consistent height, every time you shoot.
LOAD TUNING
• Find the Sweet Spot — A load that is too light or too heavy can cause vertical problems. When you’ve tuned the load right, you should see a reduction in vertical. Even 0.1 grain may make a difference, as will small changes in seating depth.
• Primers — If you’re getting vertical, and everything else looks fine, try another brand of primers. And remove the carbon from the primer pockets so the primers seat uniformly every time.
• Case Prep — When you chamfer the inside of your case necks make sure they are smooth enough that they don’t peel jacket material off when you seat the bullet. Bullets with J4 Jackets (like Bergers) and Lapua Scenar bullets seem more prone to jacket scratching or tearing than Sierra bullets.
• Shell Holders — Keep shell holders clean, in both your press and priming tool. I have seen so much dirt/crud in shell holders that the cases end up get sized crooked because the rim is not square to the die.
• Water in Cases — I see people walking around with case necks turned up in the loading block. A lot of the time there is condensation dropping from the roof of your loading area. If one drop of water gets in a case you are in trouble. How many times have you had a bad low shot when it has been raining and you have been walking around with your cases turned up in your block?
MECHANICAL and HARDWARE ISSUES
• Barrel Weight — A lot of rifles are muzzle-heavy. Some rifles have too heavy a barrel and this causes vertical, especially when shooting free recoil. Basically the gun wants to tip forward. The remedy is to trim or flute the barrel, or add weight in the rear (if you can stay within weight limits).
• Unbalanced Rifle — If the rifle is not balanced, it does not recoil straight, and it will jump in the bags. If the rifle is built properly this will not happen. Clay Spencer calls this “recoil balancing”, and he uses dual scales (front and rear) to ensure the rifle recoils properly.
• Firing Pin — A number of firing-pin issues can cause vertical. First, a firing pin spring that is either too weak or too strong will induce vertical problems. If you think this is the problem change springs and see what happens. Second, a firing pin that is not seated correctly in the bolt (in the cocked position) will cause poor ignition. Take the bolt out of rifle and look in the firing pin hole. If you cannot see the entire end of firing pin it has come out of the hole. Lastly, a firing pin dragging in bolt or shroud can cause vertical. Listen to the sound when you dry fire. If you don’t hear the same sound each shot, something is wrong.
• Trigger — A trigger sear with excessive spring load can cause problems. To diagnose, with an UNLOADED gun, hold the trigger in firing position and push down on sear with your thumb. If it is hard to push down, this will cause vertical problems.
• Stock Flex — Some stocks are very flexible. This can cause vertical. There are ways to stiffen stocks, but sometimes replacement is the best answer.
SCOPE ISSUES
• Lock Rings — This year alone I have seen nine lock rings on scopes that are not tight. Guess what that does to your group? Make sure yours are tight.
• Big Tubes Need Tension — We’ve observed that some 30mm scope rings are not getting tight enough, and scopes are slipping in the rings under recoil. This will cause point of aim movement.
• Windage Bases — If you’re using a conventional-style single dovetail with rear windage adjustment, make sure both sides of the windage screws are tight. This can induce both windage AND vertical issues since the rear ring is held down by the windage tension.
AWARENESS of CONDITIONS and READING WIND
• Basic Wind-Reading Rule–If you do not know how to read wind flags or are very inexperienced, try to shoot your group with the flags all going in one direction.
• Rate of Fire — The longer you wait between shots when a condition is changing, the more the condition change will affect your shots.
• Look Far and Wide — Learn to look at the whole field of flags, not just the row in front of you. Many times a change quite a ways out will cause shot to go out of your group well before that change shows up in front of your bench.
• Don’t Fear the Wind — When you realize that the wind is your friend you will become a much better benchrest shooter. By this I mean that wind skills can separate you from other shooters who have equally good equipment. To learn how to read the wind, you must practice in challenging winds, not only in good conditions.
• Watch Wind Direction AND Velocity — Pay attention to angle changes on flags. Even though you see the same windspeed indicators, angle changes make a big difference in your groups.
• Watch While You Wait — Between courses of fire, whenever possible, watch conditions on the range. That way you will be aware of any changes in conditions since your last group and you will be mentally prepared for the new condition.
SPECIAL ADVICE for HUNTING RIFLES
• Clean That Barrel — Most hunting rifle barrels do not get cleaned enough. If you keep barrel clean it will shoot better for you. You should clean your barrel well after every 10 to 12 shots. If you’re lazy, just use Wipe-Out.
• First Shot Inconsistency — Most hunting rifles will not put the first shot (after cleaning) with the subsequent shots. So, after cleaning, if you have a rifle that tosses that first shot high or wide, then shoot one fouling shot before going hunting or before you shoot for group.
• Barrel Heat — Thin-contour “sporter” barrels WILL change point of impact as they heat up. When testing loads for your hunting rifle, take your time and don’t let the barrel get hot on you.
How to Fill Shooting Sandbags Most Effectively
For both front and rear Edgewood bags, start by looking for the black nylon/cordura flap. This flap will have white stiches running along both sides. Note that the flap is actually two pieces of nylon/cordura which are sewn together. These two pieces must be separated at the end where there are no stitches in order to insert a funnel or other filling device.
Hold the bag so that the flap is pointed straight up and fill half way. Using a blunted rod and alternating between filling and packing, begin packing the sand firmly into the bag until the shape is uniform and you are satisfied with the firmness. Slam the base of the bag firmly on the bench several times to compact and evenly seat the sand. Then, check to see if more sand needs to be added. Repeat this process for the ears if you are filling a rear bag. Note that as the sand continues to condense during use, the bag may occasionally require additional sand until it reaches maximum capacity. NOTE: This tip is from Creedmoor Sports, which carries Edgewood Shooting Bags.
Edgewood offers an innovative rear Twisted Gater bag with an unusual asymmetrical footprint. This provides arm/hand support for the shooter while still providing superb rear support for your bench rifles.
SANDBAG Fill Options — Yes Weight Matters
For most shooting applications, “heavy is good” when it comes to sandbags. The more your sandbag weighs, the better it will resist movement or mis-alignment that can throw off a shot. In order to increase the weight of their rear bags, serious shooters have turned to exotic sand formulations that offer greater density (hence higher weight by volume) than plain silica sand (aka “play sand”).
In this article, Jason Baney reviews three popular alternatives to play sand for rear sandbags. He tested each variety to determine its density, i.e. how much volume it would displace per pound. Then he calculated how much each type of sand would weigh in various sizes of rear sandbags: standard, large, and ultra-large (Bigfoot). Check our Rapid Reference Chart to see how much weight you can add to your sandbag by switching to heavy sand.
Is heavy sand worth the added expense? For serious shooters, the answer is yes. More mass equals more stability, and a more stable bag will help you shoot tighter groups. By switching from conventional sand to Zircon or Chromite, you can DOUBLE the weight of sand in your rear bag.
Shown above are the SEB Bigfoot Bags. Note that the bags sit perfectly flat — there is no bulge on the bottom even though the bags are “packed to the brim with sand”.
Heavy Sand — Weighing the Benefits by Jason Baney
Many serious Benchrest shooters fill their sand bags with “heavy sand”. This practice may seem “overkill” to most shooters, but its benefits are realized quickly when shooting from a bench. Heavy sand is more dense than normal silica “play sand” and therefore makes the sandbag heavier and more stable. How much heavier is the heaviest sand? Check the chart below and you’ll see that Zircon sand weighs essentially TWICE as much as ordinary play sand. More weight equals more inertia opposing bag movement, plus more gravity-induced “stiction” on the bottom of the bag. In other words, using heavy sand helps your rear bag stay planted on the bench during a string of fire. When you shoot a hard-recoiling gun, the difference between a bag filled with play sand vs. Zircon is very noticeable. The Zircon-filled bag stays put. The play sand-filled bag may not.
Rapid Reference Chart
Comparative Sand Weights by Sandbag Size
SandBag Type
Play Sand
Riverbed Sand
Chromite
Zircon
Standard 5″x6″
5.1 lbs.
7.9 lbs.
9.9 lbs.
10.1 lbs.
Large 6″x8″
6.8 lbs.
10.5 lbs.
13.2 lbs.
13.4 lbs.
BigFoot 6″x13″
10.2 lbs.
15.8 lbs.
19.7 lbs.
20.1 lbs.
Weight Increase Compared to Play Sand
Zincon +98%
Chromite +94%
Riverbed Sand +55%
The Benefits of Heavier Sand
Heavy Sand helps your sandbag resist the tendency to shift or change alignment (relative to the stock) during recoil. This ability to maintain sandbag alignment is vital when shooting competitive Benchrest, either short-range or long-range. Having to fight a “migrating” rear bag during a group at 1000 yards will not do anything to help your accuracy. In non-competitive use, heavy sand can still benefit shooters. Friction from the stock on the rear bag, or bumping the bag on recoil with either a body part or pistol grip can move a lighter bag out of place and necessitate realigning the bag to get on target.
Of course there are some shooting situations where you don’t need (or don’t want) maximum sandbag weight. During a “walk-around” varmint session you may prefer a lighter bag. Beanbags that I carry around the groundhog fields stay filled with plastic beads, making the bag handier to tote. But, any rear bag used on a bench will be as heavy as I can make it while still using “sand” as filler.
Heavy Sand, Lead Shot, and Competition Rules
Some will say, “Well if you want a heavier sandbag, why not just add lead shot?” That is a great idea, but as far as I know, it is also illegal in every form of Benchrest competition. The material in sandbags must actually be “sand”, and only sand. It’s tempting to filter in a mix of shot and sand to increase weight, but that would also violate the rules.
Heavy Sand — Available Types and Properties
Heavy sand comes in several different varieties. In this article we tested three types: Zircon, Chromite, and commercial Riverbed sand (Exo-Terra brand “Reptile Sand”). All these are heavier alternatives to normal silica “play sand.” There are other types of Heavy Sand not tested here, such as Garnet Sand, which is between Chromite and Zircon in weight.
Sources: ProtektorModel.com sells black “Heavy Sand”, basically chromite. Large quantities of Zircon and Chromite are available from IFS Industries, and other industrial suppliers.
Exo-Terra Riverbed sand (amber). Available at pet stores.
Silica “Play Sand” (tan or light gray). Available at Home/Garden stores.
Zircon — Heavy-Weight Champion
To my knowledge, “Dupont Zircon M” is the heaviest “sand” that a normal human can acquire. It is also the most expensive. Zircon is a very light tan/brown color and is very similar in appearance to normal sandbox “play sand”. Zircon is normally rated as having the greatest density among heavy sands and it has the smallest particle size, though some Chromite sand density values overlap the Zircon numbers.
1.00 pound of Zircon displaces 149cc vs. 295cc for Play Sand. So, that means Zircon is 98% heavier than an equal volume of Play Sand.
CONSUMER TIP: Real ZIRCON sand is TAN in color, not black or dark gray. Some “heavy sand” vendors promise Zircon but deliver a dark gray sand that is something else entirely!
Chromite — Almost as Heavy as Zircon, and 30% Cheaper
Chromite sand is nearly the same density as Zircon but it costs quite a bit less. Chromite typically sells for about 25-30% less than Zircon (comparing bulk prices of both types of sand). Chromite sand is black in color. So when you buy “heavy sand,” make sure you are getting what you pay for.
1.00 pound of Chromite displaces 152cc vs. 295cc for Play Sand. So, that means Chromite is 94% heavier than an equal volume of Play Sand.
Riverbed Sand — Weighs Less but Costs More than Chromite
Riverbed sand, is about 30% less dense than Zircon or Chromite, but is about 150% more dense than silica sand. Depending upon where you buy this sand, and the quantity, you will most likely pay more for this sand than you would Zircon or Chromite. Riverbed sand is a conglomerate of several different sizes and colors and appears red and black. Unless you are unable to get Zircon or Chromite, I would not bother with the riverbed sand.
1.00 pound of Riverbed Sand displaces 190cc vs. 295cc for Play Sand. So, that means Riverbed Sand is 55% heavier than an equal volume of Play Sand.
Density/Volume Testing and Weight Comparisons
All four sand varieties mentioned above were tested for volumetric density by weight. Each type of sand was weighed out to 1.00 lbs. on a commercial postal scale. Each 1.00 lb sample of sand was then poured loosely into a 600ml beaker and shaken minimally to level the top surface. This served to determine the volume that the sand occupied.
1.00 pound of sand displaced the following volumes:
Zircon: 149 cc
Chromite: 152 cc
Riverbed sand: 190 cc
Play Sand: 295 cc
How do the density-volume numbers translate to the real world? Here is an estimate of how much each sand would weigh in various sizes of rear bag:
Standard Bunny Ear Bag
5″ by 6″ footprint or about 1500cc
Zircon: 10.1 lbs.
Chromite: 9.9 lbs.
Riverbed Sand: 7.9 lbs.
Play Sand: 5.1 lbs.
Protektor Doctor Bag
6″ by 8″ footprint or about 2000cc
Zircon: 13.4 lbs.
Chromite: 13.2 lbs.
Riverbed Sand: 10.5 lbs.
Play Sand: 6.8 lbs.
Seb BigFoot Rear Loaf Bag
6″ by 13″ footprint or about 3000cc
Zircon: 20.1 lbs.
Chromite: 19.7 lbs.
Riverbed Sand: 15.8 lbs.
Play Sand: 10.2 lbs.
Conclusions and Recommendations
What’s the best choice? For most users, we recommend Chromite. Chromite delivers nearly the same bag weight as Zircon but is more economical to buy. But for those who demand the maximum weight in their sandbag (without consideration of cost), Zircon is the top choice because it is sold at a finer grade (higher density) than Chromite. However, Chromite will save you money, and deliver very nearly the same amount of weight by volume. When purchased in bulk, Chromite is typically 25-30% LESS expensive than Zircon.
I would not suggest using the Riverbed sand unless you really need to fill a sandbag immediately and can’t wait to locate a source for either Zircon or Chromite. Keep in mind that Sinclair Int’l and other major mail-order vendors do sell heavy sand (though Zircon and Chromite may be much less expensive when purchased in larger quantities from local industrial sources.) The price of the Riverbed sand will vary quite a bit depending on the pet store and quantity bought. The Riverbed sand I tested, Exo-Terra Reptile sand (photo right), was fairly expensive as purchased at a pet store.
Bottom Line: When it comes time to fill your new rear bag, you may want to save a few dollars and go with cheaper Chromite sand, but if you want to gain every bit of weight possible, step up to the heavier Zircon.
Lenzi Rear bags work very well and are popular with top competitors. This are sold through PMA Tool.
Try a club match this summer! Every summer weekend hundreds of local club “fun matches” are conducted around the country. And the first official day of summer — the Summer Solstice — is June 20, 2025, just 9 days away. That means local summer weekend fun matches will be held at ranges across the country. So load some ammo, get your rifle, and have some fun.
One of the good things about club shoots is that you don’t have to spend a fortune on equipment to have fun. But we’ve seen that many club shooters handicap themselves with a few common equipment oversights or lack of attention to detail while reloading. Here are SIX TIPS that can help you avoid these common mistakes, and build more accurate ammo for your club matches.
1. Align Front Rest and Rear Bag
We see many shooters whose rear bag is angled left or right relative to the bore axis. This can happen when you rush your set-up. But even if you set the gun up carefully, the rear bag can twist due to recoil or the way your arm contacts the bag. After every shot, make sure your rear bag is aligned properly (this is especially important for bag squeezers who may actually pull the bag out of alignment as they squeeze).
Forum member ArtB adds: “To align my front rest and rear bag with the target, I use an old golf club shaft. I run it from my front rest stop through a line that crosses over my speed screw and into the slot between the two ears. I stand behind that set-up and make sure I see a straight line pointing at the target. I also have a piece of tape that I’ve placed on the golf shaft that indicates how far the back end of the rear bag should be placed from the front rest stop.”
2. Avoid Contact Interference
We see three common kinds of contact or mechanical interference that can really hurt accuracy. First, if your stock has front and/or rear sling swivels make sure these do NOT contact the front or rear bags at any point of the gun’s travel. When a sling swivel digs into the front bag that can cause a shot to pop high or low. To avoid this, reposition the rifle so the swivels don’t contact the bags or simply remove the swivels before your match. Second, watch out for the rear of the stock grip area. Make sure this is not resting on the bag as you fire and that it can’t come back to contact the bag during recoil. That lip or edge at the bottom of the grip can cause problems when it contacts the rear bag. Third, watch out for the stud or arm on the front rest that limits forward stock travel. With some rests this is high enough that it can actually contact the barrel. We encountered one shooter recently who was complaining about “vertical flyers” during his match. It turns out his barrel was actually hitting the front stop! With most front rests you can either lower the stop or twist the arm to the left or right so it won’t contact the barrel.
3. Weigh Your Charges — Every One
This may sound obvious, but many folks still rely on a powder measure. Yes we know that most short-range BR shooters throw their charges without weighing, but if you’re going to pre-load for a club match there is no reason NOT to weigh your charges. You may be surprised at how inconsistent your powder measure actually is. One of our testers was recently throwing H4198 charges from a mechanical measure for his 30BR. Each charge was then weighed twice with a Denver Instrument lab scale. Our tester found that thrown charges varied by up to 0.7 grains! And that’s with a premium measure.
4. Measure Your Loaded Ammo — After Bullet Seating
Even if you’ve checked your brass and bullets prior to assembling your ammo, we recommend that you weigh your loaded rounds and measure them from base of case to bullet ogive using a comparator. If you find a round that is “way off” in weight or more than .005″ off your intended base to ogive length, set it aside and use that round for a fouler. (Note: if the weight is off by more than 6 or 7 grains you may want to disassemble the round and check your powder charge.) With premium, pre-sorted bullets, we’ve found that we can keep 95% of loaded rounds within a range of .002″, measuring from base (of case) to ogive. Now, with some lots of bullets, you just can’t keep things within .002″, but you should still measure each loaded match round to ensure you don’t have some cases that are way too short or way too long.
5. Check Your Fasteners
Before a match you need to double-check your scope rings or iron sight mounts to ensure everything is tight. Likewise, you should check the tension on the screws/bolts that hold the action in place. Even with a low-recoiling rimfire rifle, action screws or scope rings can come loose during normal shooting.
6. Make a Checklist and Pack the Night Before
Ever drive 50 miles to a match then discover you have the wrong ammo or that you forgot your bolt? Well, mistakes like that happen to the best of us. You can avoid these oversights (and reduce stress at matches) by making a checklist of all the stuff you need. Organize your firearms, range kit, ammo box, and shooting accessories the night before the match. And, like a good Boy Scout, “be prepared”. Bring a jacket and hat if it might be cold. If you have windflags, bring them (even if you’re not sure the rules allow them). Bring spare batteries, and it’s wise to bring a spare rifle and ammo for it. If you have just one gun, a simple mechanical breakdown (such as a broken firing pin) can ruin your whole weekend.
Every Saturday we present interesting, informative videos for our Daily Bulletin readers. Here we feature five YouTube videos that offer a ton of useful information for serious shooters. We start with a great video about setting up rifle, rest, and bag on the bench. Then Hall-of-Fame benchrest shooter Speedy Gonzalez shows smart methods for cleaning barrels. Next F-Class Ace Keith Glasscock explains how to optimize your rifle after travel. In the fourth video, AutoTrickler inventor Adam MacDonald shows how to optimize the AutoTrickler V4. Next the truly outstanding 21st Century Power Neck-Turning lathe is showcased.
How to Set Up Your Rifle, Rest, and Bag on the Bench
To get the best results in benchrest shooting, you need to set up all the gear on your bench properly. That includes front rest placement, rear bag position, spotting scope set-up, and placement of cartridge holder/caddy, and possibly an elbow/forearm rest. When setting up the hardware, you need to align the front rest and rear bag properly to get optimal tracking. In addition you want to make sure the rear bag doesn’t slide or rotate a bit from shot to shot. And you also want to set your seat height/location so the shooter’s position is optimal and comfortable. This helpful video shows how to set up your rifle and gear for a benchrest match or load development/practice at the range. Credit to Boyd Allen for finding video.
Cleaning Barrels with Speedy — Smart Techniques
There are many effective methods to clean barrels. But some are more efficient that others and can help you do the job more quickly, with less effort. Here respected gunsmith and Hall-of-Fame benchrest shooter Speedy Gonzalez shows his procedures for cleaning competition barrels. He uses Sharpshoot-R Liquid Patch-Out and Wipe-Out Accelerator as primary solvents. Watch carefully — Speedy has some clever techniques for starting a patch in the rifling, and he is also careful about exiting the muzzle when brushing. Speedy also explains the importance of keeping your rods clean. And he prefers nylon brushes because, as the barrel starts to get wear in the throat, “the bronze bristles will actually start eating into that and you’ll see little grooves if you have a good borescope.” (See video 00:38-01:35)
Loading for PRS vs. F-Class — Keith Glasscock
Keith Glasscock is one of America’s top F-Class shooters, having finished second at the National Championships multiple times. He also now shoots PRS/NRL Precision Rifle matches. Keith, who has an engineering background, runs the popular Winning in the Wind YouTube channel. There you’ll find great advice on wind reading, load tuning, precision reloading and many other topics. In this video, Keith offers very smart advice on how to optimize a PRS load compared to a F-Class load. Accuracy counts for both disciplines, but the key objectives can be different.
Adjusting AutoTrickler V4 with its Inventor, Adam MacDonald
Adam MacDonald is the brilliant Canadian engineer who created the AutoTrickler series of automated powder dispensing systems. These work with advanced scales to dispense powder rapidly, but with a precise final trickle accurate to a single kernel. In this video, Adam explains how best to adjust and calibrate the AutoTrickler V4 when using powders that flow at different rates.
21st Century Power Neck-Turning Lathe — Great Tool
Turning case-necks can be tedious and tough on older hands if you’re using hand-held tools. Quite a few years ago 21st Century released a great compact, neck-turning lathe that delivers superb, consistent results. This Editor uses that original lathe with hand crank and I can affirm that it works great. It is easy to use, fast, and the turned necks come out smooth with consistent rim thickness. But you still had to turn a crank. Well, in 2018, 21st Century created an upgraded Power Neck-Turning Lathe with an electric motor and lever to advance the cases to the cutter. The power head glides on stainless steel guide rails. Power is controlled with a red button in the feed handle.
This advanced, powered mini-lathe is absolutely superb. It works brilliantly and makes the task of turning case-necks fast and VERY easy. And there is even a 3-Way trimmer upgrade that will trim cases to length at the same time as the necks are turned.
BONUS — How to Spot Fake Online Sellers of Components
With the shortage of premium reloading components, particularly powder and primers, many handloaders are desperate to find components when even big companies such as Midsouth and MidwayUSA are completely sold out. Enter the scammers. There are criminals, many based overseas, who have created entire websites designed to steal your money. You might find such a site when searching for “Varget powder in stock” or “CCI BR4 primers”. These sites look like regular business webstores, with product photos and modern shopping cart systems. But it’s all a scam.
Key giveaways are: 1) The site does NOT take Visa, Mastercard, or Discover but requires payment with Zelle, Venmo, Bitcoin, or AppleCash only; and 2) The site has hard-to-find powders, such as H4895 and H4198, that nobody else has, and you can put thousands of pounds in the shopping cart.
Bottom line here — if the site allows you to order vast amounts of powder and/or primers, and does not take ANY major Credit Card types, it is almost surely a scam. If you see links to pay with Crypto-Currency (such as Bitcoin) run away!
Vertical stringing is a common problem that all precision shooters will face sooner or later. In addition to ammo inconsistencies, many other factors can cause vertical stringing. Accordingly, it’s important that you analyze your gun handling and bench set-up systematically.
EDITOR: Folks, READ THIS ARTICLE! You WILL benefit. There are some VERY important insights here. You’ll learn ways to set up your gun better, and check for various technical issues. That can save you time at the range and save you money spent on expensive bullets and powder.
In this article, Hall of Fame benchrest Shooter Speedy Gonzalez explains how to eliminate mechanical and gun-handling problems that cause vertical spread in your groups. Speedy’s article addresses the many human and the hardware factors that can cause vertical.
Speedy Gonzalez, noted shooter, gunsmith and member of the Benchrest Hall of Fame, offers these pearls of wisdom to help you eliminate vertical in your shot strings. Remember that vertical can result from myriad gear issues and gun-handling mistakes. Try to isolate one item at a time as you work to improve your groups.
BAGS and REST–VERY IMPORTANT
• Front Rest Wobble — You will get vertical if the top section of the front rest is loose. Unfortunately, a lot of rests have movement even when you tighten them as much as you can. This can cause unexplained shots.
• Rifle Angle — If the gun is not level, but rather angles down at muzzle end, the rifle will recoil up at butt-end, causing vertical. You may need to try different rear bags to get the set-up right.
• Front Bag Tension–Vertical can happen if the front sand bag grips the fore-arm too tightly. If, when you pull the rifle back by hand, the fore-arm feels like it is stuck in the bag, then the front bag’s grip is too tight. Your rifle should move in evenly and smoothly in the sand bags, not jerk or chatter when you pull the gun back by hand.
• Sandbag Fill — A front sandbag that is too hard can induce vertical. Personally, I’ve have never had a rifle that will shoot consistently with a rock-hard front sandbag. It always causes vertical or other unexplained shots.
• Bag Ears — If the channel between the Rear Bag’s ears is not in line with the barrel, but is twisted left or right, this can affect recoil and vertical consistency. And take note — if the bag is off-axis quite a bit, you can also get horizontal stringing.
• Reliability — ALL your bench equipment must work flawlessly. If it doesn’t, get it fixed or get rid of it. We need all our attention on wind flags.
GUN HANDLING and BENCH TECHNIQUE
• Be Consistent — You can get vertical if your bench technique is not the same every shot. One common problem is putting your shoulder against the stock for one shot and not the next.
• Free Recoil — Free recoil shooters should be sure their rifle hits their shoulder squarely on recoil, not on the edge of their shoulder or the side of their arm.
• Head Position — Learn to keep your head down and follow-through after each shot. Stay relaxed and hold your position after breaking the shot.
• Eyes — Learn to shoot with both eyes open so you can see more of the conditions.
• Last Shot Laziness — If the 5th shot is a regular problem, you may be guilty of what I call “wishing the last shot in”. This is a very common mistake. We just aim, pull the trigger, and do not worry about the wind flags. Note that in the photo above, the 5th shot was the highest in the group–probably because of fatigue or lack of concentration.
• Last Shot Low — I hear a lot of discussion about low shots in a group and apparently this occurs a lot on the 5th shot. If your 5th shot that goes out most of the time, you can bet you are doing something at the bench.
• Seating — When possible, bring your own stool so that you can sit comfortably, at a consistent height, every time you shoot.
LOAD TUNING
• Find the Sweet Spot — A load that is too light or too heavy can cause vertical problems. When you’ve tuned the load right, you should see a reduction in vertical. Even 0.1 grain may make a difference, as will small changes in seating depth.
• Primers — If you’re getting vertical, and everything else looks fine, try another brand of primers. And remove the carbon from the primer pockets so the primers seat uniformly every time.
• Case Prep — When you chamfer the inside of your case necks make sure they are smooth enough that they don’t peel jacket material off when you seat the bullet. Bullets with J4 Jackets (like Bergers) and Lapua Scenar bullets seem more prone to jacket scratching or tearing than Sierra bullets.
• Shell Holders — Keep shell holders clean, in both your press and priming tool. I have seen so much dirt/crud in shell holders that the cases end up get sized crooked because the rim is not square to the die.
• Water in Cases — I see people walking around with case necks turned up in the loading block. A lot of the time there is condensation dropping from the roof of your loading area. If one drop of water gets in a case you are in trouble. How many times have you had a bad low shot when it has been raining and you have been walking around with your cases turned up in your block?
MECHANICAL and HARDWARE ISSUES
• Barrel Weight — A lot of rifles are muzzle-heavy. Some rifles have too heavy a barrel and this causes vertical, especially when shooting free recoil. Basically the gun wants to tip forward. The remedy is to trim or flute the barrel, or add weight in the rear (if you can stay within weight limits).
• Unbalanced Rifle — If the rifle is not balanced, it does not recoil straight, and it will jump in the bags. If the rifle is built properly this will not happen. Clay Spencer calls this “recoil balancing”, and he uses dual scales (front and rear) to ensure the rifle recoils properly.
• Firing Pin — A number of firing-pin issues can cause vertical. First, a firing pin spring that is either too weak or too strong will induce vertical problems. If you think this is the problem change springs and see what happens. Second, a firing pin that is not seated correctly in the bolt (in the cocked position) will cause poor ignition. Take the bolt out of rifle and look in the firing pin hole. If you cannot see the entire end of firing pin it has come out of the hole. Lastly, a firing pin dragging in bolt or shroud can cause vertical. Listen to the sound when you dry fire. If you don’t hear the same sound each shot, something is wrong.
• Trigger — A trigger sear with excessive spring load can cause problems. To diagnose, with an UNLOADED gun, hold the trigger in firing position and push down on sear with your thumb. If it is hard to push down, this will cause vertical problems.
• Stock Flex — Some stocks are very flexible. This can cause vertical. There are ways to stiffen stocks, but sometimes replacement is the best answer.
SCOPE ISSUES
• Lock Rings — This year alone I have seen nine lock rings on scopes that are not tight. Guess what that does to your group? Make sure yours are tight.
• Big Tubes Need Tension — We’ve observed that some 30mm scope rings are not getting tight enough, and scopes are slipping in the rings under recoil. This will cause point of aim movement.
• Windage Bases — If you’re using a conventional-style single dovetail with rear windage adjustment, make sure both sides of the windage screws are tight. This can induce both windage AND vertical issues since the rear ring is held down by the windage tension.
AWARENESS of CONDITIONS and READING WIND
• Basic Wind-Reading Rule–If you do not know how to read wind flags or are very inexperienced, try to shoot your group with the flags all going in one direction.
• Rate of Fire — The longer you wait between shots when a condition is changing, the more the condition change will affect your shots.
• Look Far and Wide — Learn to look at the whole field of flags, not just the row in front of you. Many times a change quite a ways out will cause shot to go out of your group well before that change shows up in front of your bench.
• Don’t Fear the Wind — When you realize that the wind is your friend you will become a much better benchrest shooter. By this I mean that wind skills can separate you from other shooters who have equally good equipment. To learn how to read the wind, you must practice in challenging winds, not only in good conditions.
• Watch Wind Direction AND Velocity — Pay attention to angle changes on flags. Even though you see the same windspeed indicators, angle changes make a big difference in your groups.
• Watch While You Wait — Between courses of fire, whenever possible, watch conditions on the range. That way you will be aware of any changes in conditions since your last group and you will be mentally prepared for the new condition.
SPECIAL ADVICE for HUNTING RIFLES
• Clean That Barrel — Most hunting rifle barrels do not get cleaned enough. If you keep barrel clean it will shoot better for you. You should clean your barrel well after every 10 to 12 shots. If you’re lazy, just use Wipe-Out.
• First Shot Inconsistency — Most hunting rifles will not put the first shot (after cleaning) with the subsequent shots. So, after cleaning, if you have a rifle that tosses that first shot high or wide, then shoot one fouling shot before going hunting or before you shoot for group.
• Barrel Heat — Thin-contour “sporter” barrels WILL change point of impact as they heat up. When testing loads for your hunting rifle, take your time and don’t let the barrel get hot on you.
Try a club match this summer! Every summer weekend, there are hundreds of local club “fun matches” conducted around the country. One of the good things about club shoots is that you don’t have to spend a fortune on equipment to have fun. But we’ve seen that many club shooters handicap themselves with a few common equipment oversights or lack of attention to detail while reloading. Here are SIX TIPS that can help you avoid these common mistakes, and build more accurate ammo for your club matches.
1. Align Front Rest and Rear Bag
We see many shooters whose rear bag is angled left or right relative to the bore axis. This can happen when you rush your set-up. But even if you set the gun up carefully, the rear bag can twist due to recoil or the way your arm contacts the bag. After every shot, make sure your rear bag is aligned properly (this is especially important for bag squeezers who may actually pull the bag out of alignment as they squeeze).
Forum member ArtB adds: “To align my front rest and rear bag with the target, I use an old golf club shaft. I run it from my front rest stop through a line that crosses over my speed screw and into the slot between the two ears. I stand behind that set-up and make sure I see a straight line pointing at the target. I also have a piece of tape that I’ve placed on the golf shaft that indicates how far the back end of the rear bag should be placed from the front rest stop.”
2. Avoid Contact Interference
We see three common kinds of contact or mechanical interference that can really hurt accuracy. First, if your stock has front and/or rear sling swivels make sure these do NOT contact the front or rear bags at any point of the gun’s travel. When a sling swivel digs into the front bag that can cause a shot to pop high or low. To avoid this, reposition the rifle so the swivels don’t contact the bags or simply remove the swivels before your match. Second, watch out for the rear of the stock grip area. Make sure this is not resting on the bag as you fire and that it can’t come back to contact the bag during recoil. That lip or edge at the bottom of the grip can cause problems when it contacts the rear bag. Third, watch out for the stud or arm on the front rest that limits forward stock travel. With some rests this is high enough that it can actually contact the barrel. We encountered one shooter recently who was complaining about “vertical flyers” during his match. It turns out his barrel was actually hitting the front stop! With most front rests you can either lower the stop or twist the arm to the left or right so it won’t contact the barrel.
3. Weigh Your Charges — Every One
This may sound obvious, but many folks still rely on a powder measure. Yes we know that most short-range BR shooters throw their charges without weighing, but if you’re going to pre-load for a club match there is no reason NOT to weigh your charges. You may be surprised at how inconsistent your powder measure actually is. One of our testers was recently throwing H4198 charges from a mechanical measure for his 30BR. Each charge was then weighed twice with a Denver Instrument lab scale. Our tester found that thrown charges varied by up to 0.7 grains! And that’s with a premium measure.
4. Measure Your Loaded Ammo — After Bullet Seating
Even if you’ve checked your brass and bullets prior to assembling your ammo, we recommend that you weigh your loaded rounds and measure them from base of case to bullet ogive using a comparator. If you find a round that is “way off” in weight or more than .005″ off your intended base to ogive length, set it aside and use that round for a fouler. (Note: if the weight is off by more than 6 or 7 grains you may want to disassemble the round and check your powder charge.) With premium, pre-sorted bullets, we’ve found that we can keep 95% of loaded rounds within a range of .002″, measuring from base (of case) to ogive. Now, with some lots of bullets, you just can’t keep things within .002″, but you should still measure each loaded match round to ensure you don’t have some cases that are way too short or way too long.
5. Check Your Fasteners
Before a match you need to double-check your scope rings or iron sight mounts to ensure everything is tight. Likewise, you should check the tension on the screws/bolts that hold the action in place. Even with a low-recoiling rimfire rifle, action screws or scope rings can come loose during normal shooting.
6. Make a Checklist and Pack the Night Before
Ever drive 50 miles to a match then discover you have the wrong ammo or that you forgot your bolt? Well, mistakes like that happen to the best of us. You can avoid these oversights (and reduce stress at matches) by making a checklist of all the stuff you need. Organize your firearms, range kit, ammo box, and shooting accessories the night before the match. And, like a good Boy Scout, “be prepared”. Bring a jacket and hat if it might be cold. If you have windflags, bring them (even if you’re not sure the rules allow them). Bring spare batteries, and it’s wise to bring a spare rifle and ammo for it. If you have just one gun, a simple mechanical breakdown (such as a broken firing pin) can ruin your whole weekend.
This discussion of rear bag designs and fill levels may offer some new insights for many readers. By “tuning” your rear bag you can reduce hop on shot-firing and help your rifle track better. All that can translate to better scores, particularly with large-caliber rifles.
Tuning Your Rear Sand Bags
Over the years, noted gunsmith and a Benchrest Hall-of-Fame inductee Thomas ‘Speedy’ Gonzalez has learned a few things about “tuning” rear sandbags for best performance. On his Facebook page, Speedy recently discussed how sand bag fill levels (hard vs. soft) can affect accuracy. Speedy says you don’t want to have both your front and rear sandbags filled up ultra-hard. One or the other bag needs to have some “give” to provide a shock-absorbing function (and prevent stock jump). And you want to tune your fill arrangements to match your shooting style. Free recoil shooters may need a different fill levels than bag squeezers (who a softer bag but harder ears).
SAND BAGS & HOW TO FILL THEMby Speedy Gonzalez
I was asked several times by competitors at the S.O.A. Matches and F-Class Nationals as to how I fill my sand bags for benchrest competition. Here is a copy of a reply I gave several years ago:
Back in the old days, Pat McMillan told me: “You can not have two bags filled so hard that you gun bounces on them in the process of firing round at your target, especially if you have a rig with a very flexible stock. The bags must be set up in a manner for them to absorb the initial shock of the firing pin moving forward and igniting the primer.
Then [they must] maintain their shape and absorb the second shock wave as well the rearward thrust and torque of the rifle. What happens to the rifle when this is not done? Well let me tell you. The rifles have a very bad tendency to jump and roll in the bags. This causes many of those wild, lost shots that one can’t explain.”
Here’s some Good General Advice for Bag Set-up:
1. You should not have TWO hard bags [i.e. both front AND rear] in your set-up.
2. Heavy sand magnifies these phenomena.
3. If you are a bag squeezer, pack ears hard and leave bag pliable enough to squeeze for the movement required. You may pack front bag as hard as rules permit.
4. Free recoil shooters pack both bags firm, but not so hard as to allow stock jump. Especially if you have a stock with a very flexible forearm.
5. We use play-ground sand, also know as silica sand. I sift mine to get any large impurities out then mix it with 25% to 50% with Harts parakeet gravel to the desired hardness that I am looking for. The bird gravel keeps the sand from packing itself into that solid as a brick state.
Speaking of bricks — another thing that happens when shooters employ that heavy zircon sand is the ears form a low spot under them from recoil and then tend to rock back and forth with the rifle causing many low shots to crop up. Edgewood makes an Edgewood/Speedy rear bag specially reinforced under the ears to eliminate this scenario.
Shown below are the latest SEB Bigfoot Bags. Note that the bags sit perfectly flat — there is no bulge on the bottom even though the bags are “packed to the brim with sand”.
General Thoughts about Bag Construction and Ear Materials
I do not like the solid double-stitched leather bottoms. While this seems like a good idea, I see more shooters have problems because of them. They tend to slide around the bench and or slide with the rifle on recoil. The standard Protektor with Cordura rabbit ears and an Otto ring bag with a Cordura front would be what I would suggest to the new shooter or one of the Edgewood / Speedy rear bags, these mimic the “Donut” and feature a ring of leather around the bottom circumference that keep the bottom from rocking on the bench or ground[.]
One last note –If you use the Cordura bags, keep them sprayed with a good silicon spray or “Rain-Ex”. This keeps them from getting sticky. — Speedy


 1. Align Front Rest and Rear Bag
 5. Check Your Fasteners


 In this article, Hall of Fame benchrest Shooter Speedy Gonzalez explains how to eliminate mechanical and gun-handling problems that cause vertical spread in your groups. Speedy’s article addresses the many human and the hardware factors that can cause vertical.
  • Front Bag Tension–Vertical can happen if the front sand bag grips the fore-arm too tightly. If, when you pull the rifle back by hand, the fore-arm feels like it is stuck in the bag, then the front bag’s grip is too tight. Your rifle should move in evenly and smoothly in the sand bags, not jerk or chatter when you pull the gun back by hand.


 How to Fill Shooting Sandbags Most Effectively
 For most shooting applications, “heavy is good” when it comes to sandbags. The more your sandbag weighs, the better it will resist movement or mis-alignment that can throw off a shot. In order to increase the weight of their rear bags, serious shooters have turned to exotic sand formulations that offer greater density (hence higher weight by volume) than plain silica sand (aka “play sand”).
 Many serious Benchrest shooters fill their sand bags with “heavy sand”. This practice may seem “overkill” to most shooters, but its benefits are realized quickly when shooting from a bench. Heavy sand is more dense than normal silica “play sand” and therefore makes the sandbag heavier and more stable. How much heavier is the heaviest sand? Check the chart below and you’ll see that Zircon sand weighs essentially TWICE as much as ordinary play sand. More weight equals more inertia opposing bag movement, plus more gravity-induced “stiction” on the bottom of the bag. In other words, using heavy sand helps your rear bag stay planted on the bench during a string of fire. When you shoot a hard-recoiling gun, the difference between a bag filled with play sand vs. Zircon is very noticeable. The Zircon-filled bag stays put. The play sand-filled bag may not.
 Dupont Zircon M (pale tan): 165-175 lb/cu.ft; avg. particle size 0.01″.
 Prince Minerals Chrome CAST 7850 (Chromite) (black): 172 lb/cu.ft; avg. particle size 0.02″.

 Zircon — Heavy-Weight Champion
 Chromite — Almost as Heavy as Zircon, and 30% Cheaper
 Riverbed Sand — Weighs Less but Costs More than Chromite


 I would not suggest using the Riverbed sand unless you really need to fill a sandbag immediately and can’t wait to locate a source for either Zircon or Chromite. Keep in mind that


 Back in the old days, Pat McMillan told me: “You can not have two bags filled so hard that you gun bounces on them in the process of firing round at your target, especially if you have a rig with a very flexible stock. The bags must be set up in a manner for them to absorb the initial shock of the firing pin moving forward and igniting the primer.


