Many novice hand-loaders believe that neck bushing Inside Diameter (ID) size is the only important factor in neck tension. In fact, many different things will influence the grip on your bullet and its ability to release from the case neck. To learn more about neck tension and “case grip”, take the time to read this article carefully. We bet you’ll gain knowledge that will let you load more accurate ammo, with better ES/SD.
Editor: Guys, this is a VERY important article. You really should read it over carefully, twice. Variations in the force required to release a bullet can significantly affect accuracy and ES/SD. You really need to know how the grip on bullet can be altered by many different factors.
Neck Tension (i.e. Grip on Bullets) Is a Complex Phenomenon
While we certainly have considerable control over neck tension by using tighter or looser bushings (with smaller or bigger Inside Diameters), bushing size is only one factor at work. It’s important to understand the multiple factors that can increase or decrease the resistance to bullet release. Think in terms of overall brass-on-bullet “grip” instead of just bushing size (or the internal neck diameter in non-bushing full-length sizing dies).
Bullet grip is affected by many things, such as:
1. Neck-wall thickness.
2. Amount of bullet bearing surface (shank) in the neck.
3. Surface condition inside of neck (residual carbon can act as a lubricant; ultrasonic cleaning makes necks “grabby”).
4. Length of neck (e.g. 6mmBR neck vs. 6mm Dasher).
5. Whether or not the bullets have an anti-friction coating.
6. The springiness of the brass (which is related to degree of work-hardening; number of firings etc.)
7. The bullet jacket material.
8. The outside diameter of the bullet and whether it has a pressure ridge.
9. Time duration between bullet seating and firing (necks can stiffen with time).
10. How often the brass is annealed.
11. Amount (length) of neck sized (e.g. you can size only half the neck).
12. Interior diameter of bushing, or neck section of non-bushing die. – and there are others…
One needs to understand that bushing size isn’t the beginning and end of neck tension questions, because, even if bushing size is held constant, the amount of bullet “grip” can change dramatically as the condition of your brass changes. Bullet “grip” can also change if you alter your seating depth, and it can even change if you ultrasonically clean your cases.
6-time U.S. National Long-Range Champion John Whidden adds: “Our tests show us that the condition of the necks in regards to lubed or not, carbon inside or not, squeaky clean or not, etc., matter even more than the size of the bushing used. An ultrasonically cleaned or brand new dry case neck make for some quite high seating force.”
In our Shooters’ Forum a reader asked: “How much neck tension should I use?” This prompted a lengthy Forum discussion in which other Forum members recommended a specific number based on their experience, such as .001″, .002″, or .003″. These numbers, as commonly used, correspond to the difference between case-neck OD after sizing and the neck OD of a loaded round, with bullet in place. In other words, the numbers refer to the nominal amount of interference fit (after sizing).
While these commonly-used “tension numbers” (of .001″, .002″ etc.) can be useful as starting points, neck tension is actually a fairly complex subject. The actual amount of “grip” on the bullet is a function of many factors, of which neck-OD reduction during sizing is just one. Understanding these many factors will help you maintain consistent neck tension as your brass “evolves” over the course of multiple reloadings.
Seating Depth Changes Can Increase or Decrease Grip on Bullet
You can do this simple experiment. Seat a boat-tail bullet in your sized neck with .150″ of bearing surface (shank) in the neck. Now remove the bullet with an impact hammer. Next, take another identical bullet and seat it with .300″ of bearing surface in another sized case (same bushing size/same nominal tension). You’ll find the deeper-seated bullet is gripped much harder.
Neck-Wall Thickness is Important Too
I have also found that thinner necks, particularly the very thin necks used by many 6mm PPC benchrest shooters, require more sizing to give equivalent “grip”. Again, do your own experiment. Seat a bullet in a case turned to .008″ neckwall thickness and sized down .003″. Now compare that to a case with .014″ neckwall thickness and sized down .0015″. You may find that the bullet in the thin necks actually pulls out easier, though it supposedly has more “neck tension”, if one were to consider bushing size alone.
In practical terms, because thick necks are less elastic than very thin necks, when you turn necks you may need to run tighter bushings to maintain the same amount of actual grip on the bullets (as compared to no-turn brass). Consequently, I suspect the guys using .0015″ “tension” on no-turn brass may be a lot closer to the guys using .003″ “tension” on turned necks than either group may realize.
Toward a Better Definition of Neck Tension
As a convenient short-cut, we tend to describe neck tension by bushing size alone. When a guy says, “I run .002 neck tension”, that normally means he is using a die/bushing that sizes the necks .002″ smaller than a loaded round. Well we know something about his post-sizing neck OD, but do we really have a reliable idea about how much force is required to release his bullets? Maybe not… This use of the term “neck tension” when we are really only describing the amount of neck diameter reduction with a die/bushing is really kind of incomplete.
My point here is that it is overly simplistic to ask, “should I load with .001 tension or .003?” In reality, an .001″ reduction (after springback) on a thick neck might provide MORE “grip” on a deep-seated bullet than an .003″ reduction on a very thin-walled neck holding a bullet with minimal bearing surface in the neck. Bushing ID is something we can easily measure and verify. We use bushing size as a descriptor of neck tension because it is convenient and because the other important factors are hard to quantify. But those factors shouldn’t be ignored if you want to maintain consistent neck tension for optimal accuracy.
Consistency and accuracy — that’s really what this all about isn’t it? We want to find the best neck tension for accuracy, and then maintain that amount of grip-on-bullet over time. To do that you need to look not only at your bushing size, but also at how your brass has changed (work-hardened) with time, and whether other variables (such as the amount of carbon in the neck) have changed. Ultimately, optimal neck tension must be ascertained experimentally. You have to go out and test empirically to see what works, in YOUR rifle, with YOUR bullets and YOUR brass. And you may have to change the nominal tension setting (i.e. bushing size) as your brass work-hardens or IF YOU CHANGE SEATING DEPTHS.
Remember that bushing size alone does not tell us all we need to know about the neck’s true “holding power” on a bullet, or the energy required for bullet release. True bullet grip is a more complicated phenomenon, one that is affected by numerous factors, some of which are very hard to quantify.
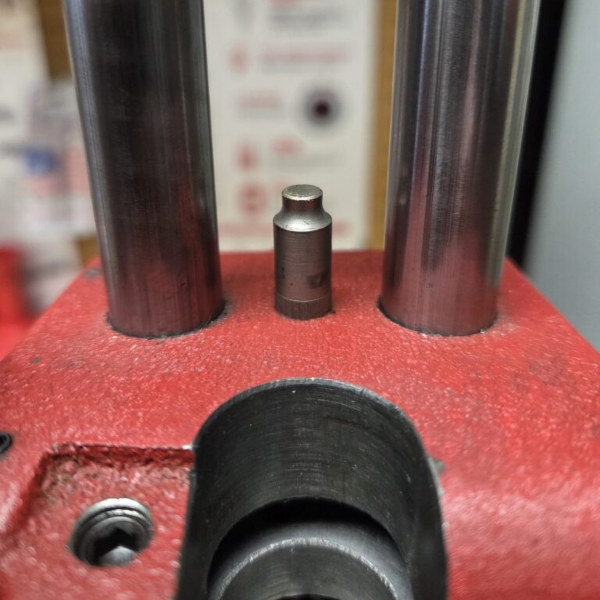
A few months ago, Forster Products released a limited run of a new prototype Primer Pocket Swaging Tool for the Co-Ax press. This is a metal shaft that attaches to the base of the press. After receiving very positive feedback from initial testers, Forster has determined to offer the product again, priced at $30.00 for a set of two (2) swage tools (for both small and large primer pockets). CLICK HERE to order.
Intial Testing Feedback on Forster’s Swaging Tool:
Several reloaders told us the tool required less force than expected and preferred using it over other swaging methods. Setup was straightforward, and overall performance removing military crimps from .223/5.56 brass was consistent and effective.
One customer ran over 270 cases through the tool across multiple headstamps and reported solid results removing 3- and 4-point crimps. Others noted that once properly adjusted, it did a clean job swaging primer pockets and allowed primers to seat properly afterward.
A few important observations also came through:
• Brass varies — even cases with the same headstamp can behave differently.
• Heavily crimped brass may require more care during operation.
• As with any swaging operation, excessive force can damage rims if the operator overpowers the case.
In other words — the tool works well, but like most case prep operations, proper setup and feel matter. Overall, Forster reports that user reports have been very positive given the good performance on real benches. Because of that response, Forster has made another limited quantity available.
If you process crimped military brass on your Co-Ax press and want to streamline primer pocket prep without adding another expensive, standalone tool to your bench, the new swaging tool for the Co-Ax is now available for $30.00. This include both small and large swaging units. CLICK HERE to order.
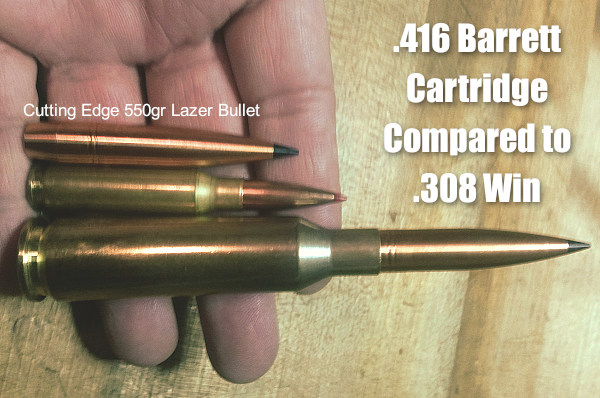
In the ELR game, particularly the King of 2 Miles (KO2M), it’s “go big or go home”. The top shooters run large-capacity cartridges that push large-caliber, ultra-high BC bullets at very high velocities. Bullets launched by cartridges such as the .416 Barrett can sustain supersonic velocities at Extreme Long Ranges — and that’s what it takes to win. The .416 Barrett can launch a 550-grain solid bullet at 3000+ FPS.
Photo from ELR Competitor Corbin Shell.
2018 and 2019 Kings of 2 Miles Loaded on RCBS Presses
So how do you load jumbo cartridges such as the .416 Barrett? It takes a big, heavy, super-strong reloading press. We’ve learned that two recent King of 2 Miles champions, Paul Phillips (2019) and Robert Brantley (2018) both loaded their KO2M ammo on RCBS AmmoMaster .50 BMG presses. Phillips loaded .416 Barrett ammo, while Brantley loaded a similar .416 MCS cartridge.
In 2018, Robert Brantley topped the field using his custom .416 MCS cartridge. Then in 2019, Paul Phillips won the K02M competition shooting a .416 Barrett, with Brantley a close second. Both Phillips and Brantley use the RCBS AmmoMaster .50 BMG single stage press kit and RCBS .416 Barrett dies to hand-load for extreme long-range. “My ammo has been much more consistent after switching to the RCBS press and dies,” remarked Phillips, who runs the Global Precision Group. Brantley said he uses RCBS products for most of his reloading needs — from the dies and AmmoMaster, to the ChargeMaster and Brass Boss. His custom .416 MCS loads launch a 550-grain bullet more than 3,100 fps.
Loading with RCBS AmmoMaster .50 BMG Press
This video shows reloading with the RCBS AmmoMaster .50 BMG press. While this video shows .50 BMG cases being loaded, the principles are the same for loading the .416 Barrett cartridge or other big rounds. Big cases need big presses!
He who dies with the most toys wins — right? Well Sinclair has another interesting gadget you can add to your reloading bench. The Sinclair Case Neck Sorting Tool lets you quickly sort brass by neck-wall thickness. For those who shoot “no-turn” brass, this can improve neck-tension consistency. Large variances in neck-wall thickness can cause inconsistent neck “grip” on the bullet. Generally, we’ve found that more consistent neck tension will lower ES and (usually) improve accuracy. We know some guys who shoot no-turn 6mmBR brass in competition with considerable success — but their secret is pre-sorting their brass by neck-wall thickness. Cases that are out-of-spec are set aside for sighters (or are later skim-turned).
Watch Case Neck Sorting Tool Operation in Video
How the Case Neck Sorting Tool Works
Here’s how the Sinclair tool works. Cases are rotated under an indicator tip while they are supported on a case-neck pilot and a support pin through the flash hole. The unit has a nice, wide base and low profile so it is stable in use. The tool works for .22 through .45 caliber cases and can be used on .17- and .20-caliber cases with the optional carbide alignment rod. The MIC-4 pin fits both .060 (PPC size) and .080 (standard size) flash holes. Sinclair’s Case Neck Sorting Tool can be ordered with or without a dial indicator. The basic unit without dial indicator (item item 749006612) is priced at $59.99. With this standard tool you can use your own dial indicator with standard specifications. You can also buy the tool complete with dial indicator (item 749007129) for $89.99. IMPORTANT: This sorting tool requires caliber-specific Case Neck Pilots which must be ordered separately.
Editor’s Comment: The purpose of this Sinclair tool is rapid, high-quantity sorting of cartridge brass to ascertain significant case-neck-wall thickness variations. Consider this a rapid culling/sorting tool. If you are turning your necks, you will still need a quality ball micrometer tool to measure neck-wall thickness (to .0005) before and after neck-turning operations.
Creedmoor Sports is a leading vendor of products for competitive shooters and serious hand-loaders. Along with great gear, Creedmoor Sports provides informative content for its customers. The Creedmoor InfoZone provides Reloading Tips, Gear Reviews, Shooting News, and basic gunsmithing information.
Bill Gravatt, President of Creedmoor Sports, is an expert on reloading processes and gear. He developed many of the popular tools marketed by Sinclair Int’l, and he brings that expertise to Creedmoor Sports. Bill hosts a series of “how-to” videos produced for the Creedmoor InfoZone.
In this video, Bill Gravatt demonstrates several methods to clean your cases. Bill tells us: “Powder residue should be removed before you insert your cases into your reloading dies. There are several ways to clean your cases. Many shooters use a combination of various methods…”
1. Manual Cleaning — You can use 0000 Steel wool for the outside of the case and a Case Neck brush for the inside. A paper towel can remove any remaining residue. This is a handy way to clean if you load at the range.
2. Vibratory Tumbling — This traditional method works well, particularly for pistol brass. Experiment with both Corn Cob and Walnut media. You can get a brighter shine by putting a small amount of liquid brass polish in the media.
3. Wet Tumbling with Stainless Media — This process can get your brass clean inside and out. Do check to ensure no pins are stuck in the flash-holes. Watch for peening of case mouths that can occur over time.
4. Ultrasonic Cleaning — Ultrasonic cleaning works great for small parts as well as brass. The ultrasonic process removes all carbon and traces of lube, which can leave the inside of case necks too dry. To smooth bullet seating, try putting a tablespoon of Ballistol in the cleaning solution.
Cleaning Reloading Dies
Cleaning your reloading dies is something that many hand-loaders neglect. In this 60-second Tech Tip, Bill Gravatt provides some smart advice on cleaning your dies. Bill notes: “After heavy use, case lube and carbon can build up in your reloading dies. It’s important to keep them clean. Also, with new dies, give them a good cleaning before first use, because they ship with a corrosion inhibitor.”
1. Step 1 — Prior to cleaning, disassemble the die and spray it with a good degreaser. Do this with brand new dies too.
2. Step 2 – Take a patch and run it in the die to remove old lube and gunk. Don’t forget the decapping assembly and other internal parts.
3. Step 3 — After cleaning the die, but before reassembly, spray the die with a good corrosion inhibitor, such as Corrosion-X or Starrett M1.
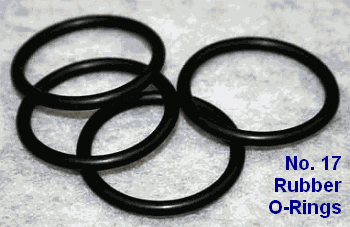
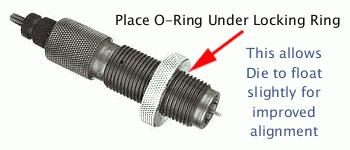
Here’s an inexpensive procedure that can help you load straighter ammo, with slightly better measured concentricity (i.e. less run-out) on the case necks and bullets. Simply use a Rubber O-Ring on the underside of the die locking ring. This allows the die to self-align itself (slightly) to the case that is being sized. Without the O-Ring, if the flat surface on the top of your press is not perfectly square with the thread axis, your die can end up slightly off-angle. This happens when the bottom of the locking ring butts up tight against the top of the press. The O-Ring allows the die to float slightly, and that may, in turn, reduce the amount of run-out induced during case sizing.
Top prone shooter GSArizona, who sadly passed in 2022, tried this trick and said it works: “Go to your local hardware store and get a #17 O-Ring (that’s the designation at Ace Hardware, don’t know if its universal). Slip the O-Ring on the die and re-adjust the lock ring so that the O-Ring is slightly compressed when the die is at the correct height. Size and measure a few more cases. You will probably see a slight improvement in neck concentricity as the die can now float a bit as the case enters and leaves it. This isn’t going to be a dramatic improvement, but it’s a positive one.”
We want to stress that adding O-Rings to sizing dies may help some reloaders, but we don’t offer this as a panacea. Try it — if using the O-Ring reduces measured runout that’s great. If it doesn’t, you’ve only spent a few pennies to experiment.
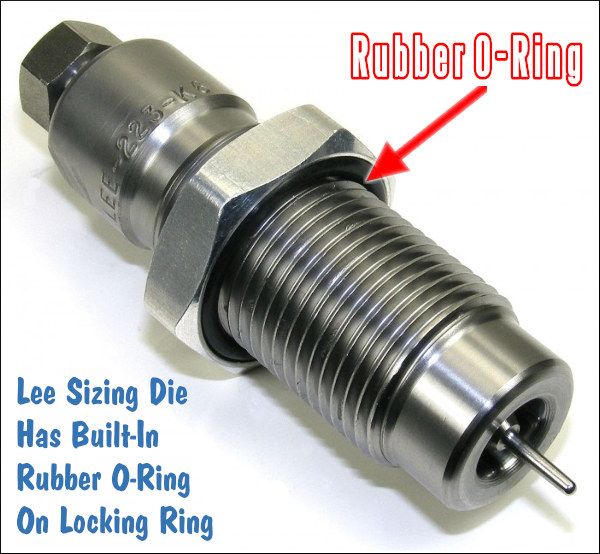
Lee Precision makes die lock rings with built-in O-Rings. Lee’s distinctive lock ring design allows the same kind of self-alignment, which is good. However, Lee lock rings don’t clamp in place on the die threads, so they can move when you insert or remove the dies — and that can throw off your die setting slightly. By using an O-Ring under a conventional die lock ring (that can be locked in place), you get the advantages of the Lee design, without the risk of the lock ring moving.
Photo 1: Three Near-Equal-Weight 7mm Bullets with Different Shapes
TECH TIP: Bullets of the same weight (and caliber) can generate very different pressure levels due to variances in Bearing Surface Length (BSL).
This article, from the USAMU Facebook Page, concerns reloading safety. In the relentless quest for more speed and flatter ballistics, some hand-loaders load way too hot, running charges that exceed safe pressure levels. Hint: If you need a mallet to open your bolt, chances are your load is too hot. Stay within safe margins — your equipment will last longer, and you won’t risk an injury caused by over-pressure. In this article, the USAMU explains that you need to account for bullet shape, diameter, and bearing surface when working up a load. Don’t assume that a load which is safe for one bullet will be safe for another even if both bullets are exactly the same weight.
How Bullet Profile and Bearing Surface Affect Pressure Levels
Today, we continue our handloading safety theme, focusing on not inadvertently exceeding the boundaries of known, safe data. Bullet manufacturers’ loading manuals often display three, four, or more similar-weight bullets grouped together with one set of load recipes. The manufacturer has tested these bullets and developed safe data for that group. However, seeing data in this format can tempt loaders — especially new ones — to think that ALL bullets of a given weight and caliber can interchangeably use the same load data. Actually, not so much.
The researchers ensure their data is safe with the bullet yielding the highest pressure. Thus, all others in that group should produce equal or less pressure, and they are safe using this data.
However, bullet designs include many variables such as different bearing surface lengths, hardness, and even slight variations in diameter. In fact, diameters can occasionally range up to 0.001″ by design. Thus, choosing untested bullets of the same weight and caliber, and using them with data not developed for them can yield excess pressures.
This is only one of the countless reasons not to begin at or very near the highest pressure loads during load development. Always begin at the starting load and look for pressure signs as one increases powder charges.
Bullet Bearing Surface and Pressure
Bullet bearing surface length (BSL) is often overlooked when considering maximum safe powder charges and pressures. In Photo 1, note the differences in the bullets’ appearance. All three are 7 mm, and their maximum weight difference is just five grains. Yet, the traditional round nose, flat base design on the left appears to have much more BSL than the sleeker match bullets. All things being equal, based on appearance, the RN/FB bullet seems likely to reach maximum pressure with significantly less powder than the other two designs.
TECH TIP: Bullets of the same weight (and caliber) can generate very different pressure levels due to variances in Bearing Surface Length (BSL).
Bullet 1 (L-R), the RN/FB, has a very slight taper and only reaches its full diameter (0.284 inch) very near the cannelure. This taper is often seen on similar bullets; it helps reduce pressures with good accuracy. The calculated BSL of Bullet 1 was ~0.324″. The BSL of Bullet 2, in the center, was ~0.430″, and Bullet 3’s was ~ 0.463″. Obviously, bullets can be visually deceiving as to BSL!
Some might be tempted to use a bullet ogive comparator (or two) to measure bullets’ true BSL for comparison’s sake. Unfortunately, comparators don’t typically measure maximum bullet diameter and this approach can be deluding.
Note: Due to time constraints, the writer used an approximate, direct measurement approach to assess the bullets’ different BSLs. While fairly repeatable, the results were far from ballistics engineer-grade. Still, they are adequate for this example.
Photo 2: The Perils of Measuring Bearing Surface Length with Comparators
In Photo 2, two 7mm comparators have been installed on a dial caliper in an attempt to measure BSL. Using this approach, the BSLs differed sharply from the original [measurements]. The comparator-measured Bullet 1 BSL was 0.694” vs. 0.324” (original), Bullet 2 was 0.601” (comparator) vs. 0.430” (original), and Bullet 3 (shown in Photo 2) was 0.602” (comparator) vs. 0.463” (original). [Editor’s comment — Note the very large difference for Bullet 1, masking the fact that the true full diameter on this bullet starts very far back. You can use comparators on calipers, but be aware that this method may give you deceptive reading — we’ve seen variances just by reversing the comparators on the calipers, because the comparators, typically, are not perfectly round, nor are they machined to precision tolerances.]
Thanks to the U.S. Army Marksmanship Unit for allowing the reprint of this article.
We are re-publishing this article at the request of Forum members who found the information very valuable. If you haven’t read this Safety Tip before, take a moment to learn how you can inspect your fired brass to determine if there may be a potential for case separation. A case separation can be dangerous, potentially causing serious injury.
On the highly-respected Riflemans’ Journal blog, created by our late, dear friend German Salazar*, there was an excellent article about Cartridge Case-Head Separation. In this important article, Salazar (aka GS Arizona) examined the causes of this serious problem and explained the ways you can inspect your brass to minimize the risk of a case-head separation. As cases get fired multiple times and then resized during reloading, the cases can stretch. Typically, there is a point in the lower section of the case where the case-walls thin out. This is your “danger zone” and you need to watch for tell-tale signs of weakening.
The photo below shows a case sectioned so that you can see where the case wall becomes thinner near the web. You can see a little arrow into the soot inside the case pointing to the thinned area. This case hadn’t split yet, but it most likely would do so after one or two more firings.
Paper Clip Hack for Detecting Problems
The article provided a great, easy tip for detecting potential problems. You can use a bent paper clip to detect potential case wall problems. Slide the paper clip inside your case to check for thin spots. GS Arizona explains: “This simple little tool (bent paper clip) will let you check the inside of cases before you reload them. The thin spot will be immediately apparent as you run the clip up the inside of the case. If you’re seeing a shiny line on the outside and the clip is really hitting a thin spot inside, it’s time to retire the case. If you do this every time you reload, on at least 15% of your cases, you’ll develop a good feel for what the thin spot feels like and how it gets worse as the case is reloaded more times. And if you’re loading the night before a match and feel pressured for time — don’t skip this step!”
* Sadly, German Salazar passed away unexpectedly on June 21, 2022 at age 62. German was a great inspiration to this site who helped guide the creation of the AccurateShooter Forum. A brilliant man, expert attorney, and top-tier marksman, German will be sorely missed in the shooting sports world.
Do you have some ammo that got loaded incorrectly, perhaps with the wrong powder? Then you’ll want to disassemble the ammo for safety’s sake. You can use an impact puller to do this task, but if you have more than a dozen rounds or so, you may prefer to use a collet-style bullet puller. These work very quickly and positively, making quick work of big jobs. The efficiency of the collet-style puller is worth the investment if you frequently disassemble ammo. These devices retail for under $35.00 (collets sold separately). Normally, you’ll need a specific collet for each bullet diameter. But collets are not that costly, so this isn’t a big deal, particularly if you only load a few calibers, such as .223, 6mm, and .308.
Hornady and RCBS use different mechanisms to tighten the collet around the bullet. On the red lever Hornady Cam-Lock Bullet Puller, a lever-arm on the top of the bullet puller serves to tighten the collet around the bullet. Simply rotate the lever from the vertical to the horizontal position to grab the bullet. Lower the ram to remove the case. The bullet will drop out when you return the lever arm to the vertical position. This is demonstrated in the video below:
Hornady Cam-Lock Bullet Puller Demonstrated
Collet bullet-pullers resemble a loading die with a lever or handle on the top. They screw into a standard reloading press. Hornady and RCBS both make collet-style bullet pullers. They use the same basic principle — the device tightens a collet around the bullet, and then the bullet is separated from the case by lowering the press ram. NOTE: Collet pullers may leave small marks on your bullets, unlike impact (kinetic) pullers.*
Like the Hornady tool, the RCBS Bullet Puller employs a collet to grab the bullet. However, the RCBS tool tightens the collet in a different way. The head of the RCBS tool is threaded internally. By rotating the lever arm clockwise in a horizontal circle you squeeze the collet around the bullet. To remove the bullet, after lowering the press ram, simply spin the lever arm back in the opposite direction. The use of the RCBS tool is demonstrated in these two videos:
RCBS Collet Bullet Puller Demonstrated:
WARNING: When removing bullets from loaded cartridges, always make sure there are no obstructions or debris in your shell-holder or under the loaded round. NEVER engage a primer seating accessory on your press when working with loaded rounds. You can cause a round to discharge by contacting the primer! Also, we recommend you keep your head and torso away from the bullet puller tool at all times.
*By contrast, impact pullers rarely mark bullets, particularly if you put a little bit of foam or paper wadding in the closed end of your impact puller. When dismantling loaded rounds, powder kernels can get trapped in the wadding, so you should remove and replace the wadding before changing to cartridges loaded with a different powder type (assuming you intend to save the powder).
If you don’t match your ammo to your chamber, bad things can happen, that’s for sure. A while back, Forum member BigBlack had an experience at the gun range that reminds us of the importance of safety when shooting. He encountered evidence that someone had fired the wrong cartridge in a 7mm WSM rifle. The problem is more common than you may think. This Editor has personally seen novices try to shoot 9mm ammo in 40sw pistols. BigBlack’s story is along those lines, though the results were much more dramatic. It’s too bad a knowledgeable shooter was not nearby to “intervene” before this fellow chambered the wrong ammo.
7mm-08 is Not the Same as a 7mm WSM
BigBlack writes: “I know this has probably been replayed a thousand times but I feel we can never be reminded enough about safety. This weekend at the range I found a ruptured case on the ground. My immediate thoughts were that it was a hot load, but the neck area was begging for me to take a closer look, so I did. I took home the exploded case and rummaged through my old cases until I found a close match. From my investigative work it appears someone shot a 7mm-08 in a 7mm WSM. Take a look. In the above photo I’ve put together a 7mm WSM case (top), the ruptured case (middle), and a 7mm-08 case (bottom).”
The photo reveals what probably happened to the 7mm-08 case. The shoulder moved forward to match the 7mm WSM profile. The sidewalls of the case expanded outward in the much larger 7mm WSM chamber until they lacked the strength to contain the charge, and then the case sides ruptured catastrophically. A blow-out of this kind can be very dangerous, as the expanding gasses may not be completely contained within the action.
Can’t Happen to You? Think Again.
This kind of mistake — chambering the wrong cartridge — can happen to any shooter who is distracted, who places even a single wrong round in an ammo box, or who has two types of ammo on the bench. One of our Forum members was testing two different rifles recently and he picked up the wrong cartridge from the bench. As a result, he fired a .30-06 round in a .300 Win Mag chamber, and the case blew out. Here is his story:
“I took two of my hunting rifles I have not used for over 25 years to the range yesterday to get new scopes on paper, a .30-06 and .300 Win Mag. I had four boxes of old Winchester factory ammo (two of each cartridge), which had near identical appearances. I accidentally chambered a .30-06 round in the Sako .300 Win Mag rifle. It sprayed powder on my face and cracked the stock at the pistol grip. If I had not been wearing safety glasses I might be blind right now.
You should always wear protective eyewear, EVERY time you shoot.
“I feel lucky and am very thankful for being OK — other than my face looks funny right now. I am also grateful for learning a valuable lesson. I will never put two different cartridges on the bench at the same time again.”


 In our Shooters’ Forum a reader asked: “How much neck tension should I use?” This prompted a lengthy Forum discussion in which other Forum members recommended a specific number based on their experience, such as .001″, .002″, or .003″. These numbers, as commonly used, correspond to the difference between case-neck OD after sizing and the neck OD of a loaded round, with bullet in place. In other words, the numbers refer to the nominal amount of interference fit (after sizing).
 Neck-Wall Thickness is Important Too
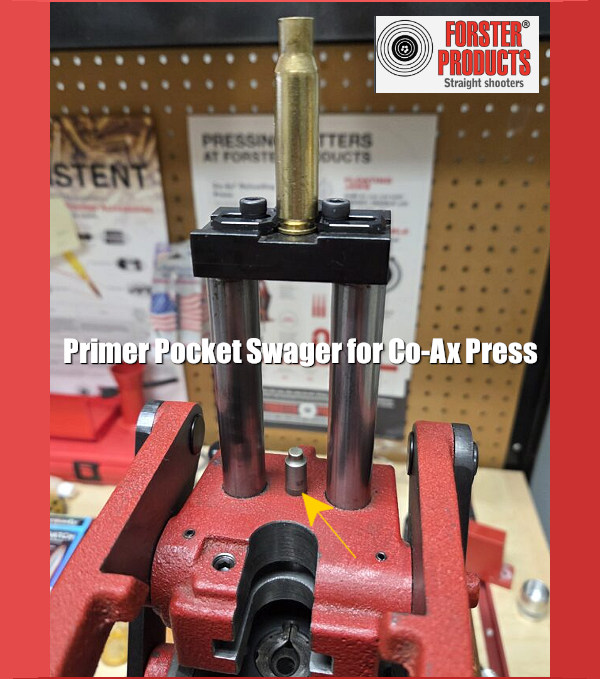


 He who dies with the most toys wins — right? Well Sinclair has another interesting gadget you can add to your reloading bench. The Sinclair


 Bullet 1 (L-R), the RN/FB, has a very slight taper and only reaches its full diameter (0.284 inch) very near the cannelure. This taper is often seen on similar bullets; it helps reduce pressures with good accuracy. The calculated BSL of Bullet 1 was ~0.324″. The BSL of Bullet 2, in the center, was ~0.430″, and Bullet 3’s was ~ 0.463″. Obviously, bullets can be visually deceiving as to BSL!

 On the highly-respected Riflemans’ Journal blog, created by our late, dear friend German Salazar*, there was an excellent article about Cartridge Case-Head Separation. In this important article, Salazar (aka GS Arizona) examined the causes of this serious problem and explained the ways you can inspect your brass to minimize the risk of a case-head separation. As cases get fired multiple times and then resized during reloading, the cases can stretch. Typically, there is a point in the lower section of the case where the case-walls thin out. This is your “danger zone” and you need to watch for tell-tale signs of weakening.

 Like the Hornady tool, the


