Today is Friday the 13th. For those of you who are superstitious — maybe you should avoid climbing ladders, playing the stock market, or using power tools today.
When it comes to shooting, there are many things that shooters chalk up to “bad luck”. In fact, most of these instances of “bad fortune” just come from a failure to anticipate problems. When you have a major, critical problem at a shooting match, i.e. a “train wreck”, this can be the end of your weekend. In this article, Ballistics Guru Bryan Litz talks about “train wrecks” and how to avoid them, even if you are shooting on Friday the 13th. As Bryan told us: “I don’t believe in superstition — we make our own luck!”
How to Avoid “Train Wrecks” In Competition
In any shooting competition, you must try to avoid major screw-ups that can ruin your day (or your match). In this article, past F-TR National Mid-Range and Long Range Champion Bryan Litz talks about “Train Wrecks”, i.e. those big disasters (such as equipment failures) that can ruin a whole match. Bryan illustrates the types of “train wrecks” that commonly befall competitors, and he explains how to avoid these “unmitigated disasters”.
Urban Dictionary “Train Wreck” Definition: “A total @#$&! disaster … the kind that makes you want to shake your head.”
Success in long range competition depends on many things. Those who aspire to be competitive are usually detail-oriented, and focused on all the small things that might give them an edge. Unfortunately it’s common for shooters lose sight of the big picture — missing the forest for the trees, so to speak.
Consistency is one of the universal principles of successful shooting. The tournament champion is the shooter with the highest average performance over several days, often times not winning a single match. While you can win tournaments without an isolated stellar performance, you cannot win tournaments if you have a single train wreck performance. And this is why it’s important for the detail-oriented shooter to keep an eye out for potential “big picture” problems that can derail the train of success!
Train wrecks can be defined differently by shooters of various skill levels and categories. Anything from problems causing a miss, to problems causing a 3/4-MOA shift in wind zero can manifest as a train wreck, depending on the kind of shooting you’re doing.
Below is a list of common Shooting Match Train Wrecks, and suggestions for avoiding them.
1. Cross-Firing. The fastest and most common way to destroy your score (and any hopes of winning a tournament) is to cross-fire. The cure is obviously basic awareness of your target number on each shot, but you can stack the odds in your favor if you’re smart. For sling shooters, establish your Natural Point of Aim (NPA) and monitor that it doesn’t shift during your course of fire. If you’re doing this right, you’ll always come back on your target naturally, without deliberately checking each time. You should be doing this anyway, but avoiding cross-fires is another incentive for monitoring this important fundamental. In F-Class shooting, pay attention to how the rifle recoils, and where the crosshairs settle. If the crosshairs always settle to the right, either make an adjustment to your bipod, hold, or simply make sure to move back each shot. Also consider your scope. Running super high magnification can leave the number board out of the scope’s field view. That can really increase the risk of cross-firing.
2. Equipment Failure. There are a wide variety of equipment failures you may encounter at a match, from loose sight fasteners, to broken bipods, to high-round-count barrels that that suddenly “go south” (just to mention a few possibilities). Mechanical components can and do fail. The best policy is to put some thought into what the critical failure points are, monitor wear of these parts, and have spares ready. This is where an ounce of prevention can prevent a ton of train wreck. On this note, if you like running hot loads, consider whether that extra 20 fps is worth blowing up a bullet (10 points), sticking a bolt (DNF), or worse yet, causing injury to yourself or someone nearby.
[Editor’s Note: The 2016 F-Class Nationals will employ electronic targets so conventional pit duties won’t be required. However, the following advice does apply for matches with conventional targets.]
3. Scoring/Pit Malfunction. Although not related to your shooting technique, doing things to insure you get at least fair treatment from your scorer and pit puller is a good idea. Try to meet the others on your target so they can associate a face with the shooter for whom they’re pulling. If you learn your scorer is a Democrat, it’s probably best not to tell Obama jokes before you go for record. If your pit puller is elderly, it may be unwise to shoot very rapidly and risk a shot being missed (by the pit worker), or having to call for a mark. Slowing down a second or two between shots might prevent a 5-minute delay and possibly an undeserved miss.
4. Wind Issues. Tricky winds derail many trains. A lot can be written about wind strategies, but here’s a simple tip about how to take the edge off a worse case scenario. You don’t have to start blazing away on the command of “Commence fire”. If the wind is blowing like a bastard when your time starts, just wait! You’re allotted 30 minutes to fire your string in long range slow fire. With average pit service, it might take you 10 minutes if you hustle, less in F-Class. Point being, you have about three times longer than you need. So let everyone else shoot through the storm and look for a window (or windows) of time which are not so adverse. Of course this is a risk, conditions might get worse if you wait. This is where judgment comes in. Just know you have options for managing time and keep an eye on the clock. Saving rounds in a slow fire match is a costly and embarrassing train wreck.
5. Mind Your Physical Health. While traveling for shooting matches, most shooters break their normal patterns of diet, sleep, alcohol consumption, etc. These disruptions to the norm can have detrimental effects on your body and your ability to shoot and even think clearly. If you’re used to an indoor job and eating salads in air-conditioned break rooms and you travel to a week-long rifle match which keeps you on your feet all day in 90-degree heat and high humidity, while eating greasy restaurant food, drinking beer and getting little sleep, then you might as well plan on daily train wrecks. If the match is four hours away, rather than leaving at 3:00 am and drinking five cups of coffee on the morning drive, arrive the night before and get a good night’s sleep.”
Keep focused on the important stuff. You never want to lose sight of the big picture. Keep the important, common sense things in mind as well as the minutia of meplat trimming, weighing powder to the kernel, and cleaning your barrel ’til it’s squeaky clean. Remember, all the little enhancements can’t make up for one big train wreck!
Do you have some ammo that got loaded incorrectly, perhaps with the wrong powder? Then you’ll want to disassemble the ammo for safety’s sake. You can use an impact puller to do this task, but if you have more than a dozen rounds or so, you may prefer to use a collet-style bullet puller. These work very quickly and positively, making quick work of big jobs. The efficiency of the collet-style puller is worth the investment if you frequently disassemble ammo. These devices retail for under $35.00 (collets sold separately). Normally, you’ll need a specific collet for each bullet diameter. But collets are not that costly, so this isn’t a big deal, particularly if you only load a few calibers, such as .223, 6mm, and .308.
Hornady and RCBS use different mechanisms to tighten the collet around the bullet. On the red lever Hornady Cam-Lock Bullet Puller, a lever-arm on the top of the bullet puller serves to tighten the collet around the bullet. Simply rotate the lever from the vertical to the horizontal position to grab the bullet. Lower the ram to remove the case. The bullet will drop out when you return the lever arm to the vertical position. This is demonstrated in the video below:
Hornady Cam-Lock Bullet Puller Demonstrated
Collet bullet-pullers resemble a loading die with a lever or handle on the top. They screw into a standard reloading press. Hornady and RCBS both make collet-style bullet pullers. They use the same basic principle — the device tightens a collet around the bullet, and then the bullet is separated from the case by lowering the press ram. NOTE: Collet pullers may leave small marks on your bullets, unlike impact (kinetic) pullers.*
Like the Hornady tool, the RCBS Bullet Puller employs a collet to grab the bullet. However, the RCBS tool tightens the collet in a different way. The head of the RCBS tool is threaded internally. By rotating the lever arm clockwise in a horizontal circle you squeeze the collet around the bullet. To remove the bullet, after lowering the press ram, simply spin the lever arm back in the opposite direction. The use of the RCBS tool is demonstrated in these two videos:
RCBS Collet Bullet Puller Demonstrated:
WARNING: When removing bullets from loaded cartridges, always make sure there are no obstructions or debris in your shell-holder or under the loaded round. NEVER engage a primer seating accessory on your press when working with loaded rounds. You can cause a round to discharge by contacting the primer! Also, we recommend you keep your head and torso away from the bullet puller tool at all times.
*By contrast, impact pullers rarely mark bullets, particularly if you put a little bit of foam or paper wadding in the closed end of your impact puller. When dismantling loaded rounds, powder kernels can get trapped in the wadding, so you should remove and replace the wadding before changing to cartridges loaded with a different powder type (assuming you intend to save the powder).
Bryan Litz and The Science of Accuracy Academy has released a new Podcast with vital information for all handloaders. This Podcast examines the effects of humidity variances on powder. Bryan notes: “If you want to know how much this can matter, we’re talking up to 200 fps difference for the same load of H4350 in 6.5 Creedmoor” at opposite extremes of humidity.
Bryan adds that “Most shooters don’t realize what a big deal this can be — it overshadows many of our efforts to make consistent velocity and hit targets. This can happen in loaded rounds not just for hand loading where you expose powder to ambient humidity. This is especially important for hunters considering the range of environments hunting ammo goes through.”
25% Off Sale on The Science of Accuracy Academy Products
As a Black Friday/Cyber Monday promotion, The Science of Accuracy Academy is running a 25% OFF Sale on everything in the store, now through Monday, November 28, 2022. Save on Bryan Litz’s six impressive books about Ballistics, Bullet Performance, and Long Range Shooting. The Berger Bullets Reloading Manual is also discounted. Use Discount Code BF2022.
In addition you can get your own subscription to the Academy, allowing you to access all podcasts, exclusive videos, learning resources, and bullet data sheets.
Many novice hand-loaders believe that neck bushing Inside Diameter (ID) size is the only important factor in neck tension. In fact, many different things will influence the grip on your bullet and its ability to release from the case neck. To learn more about neck tension and “case grip”, take the time to read this article carefully. We bet you’ll gain knowledge that will let you load more accurate ammo, with better ES/SD.
Editor: Guys, this is a VERY important article. You really should read it over carefully, twice. Variations in the force required to release a bullet can significantly affect accuracy and ES/SD. You really need to know how the grip on bullet can be altered by many different factors.
Neck Tension (i.e. Grip on Bullets) Is a Complex Phenomenon
While we certainly have considerable control over neck tension by using tighter or looser bushings (with smaller or bigger Inside Diameters), bushing size is only one factor at work. It’s important to understand the multiple factors that can increase or decrease the resistance to bullet release. Think in terms of overall brass-on-bullet “grip” instead of just bushing size (or the internal neck diameter in non-bushing full-length sizing dies).
Bullet grip is affected by many things, such as:
1. Neck-wall thickness.
2. Amount of bullet bearing surface (shank) in the neck.
3. Surface condition inside of neck (residual carbon can act as a lubricant; ultrasonic cleaning makes necks “grabby”).
4. Length of neck (e.g. 6mmBR neck vs. 6mm Dasher).
5. Whether or not the bullets have an anti-friction coating.
6.The springiness of the brass (which is related to degree of work-hardening; number of firings etc.)
7. The bullet jacket material.
8. The outside diameter of the bullet and whether it has a pressure ridge.
9. Time duration between bullet seating and firing (necks can stiffen with time).
10. How often the brass is annealed.
11. Amount (length) of neck sized (e.g. you can size only half the neck).
12. Interior diameter of bushing, or neck section of non-bushing die.
– and there are others…
One needs to understand that bushing size isn’t the beginning and end of neck tension questions, because, even if bushing size is held constant, the amount of bullet “grip” can change dramatically as the condition of your brass changes. Bullet “grip” can also change if you alter your seating depth, and it can even change if you ultrasonically clean your cases.
5-time U.S. National Long-Range Champion John Whidden adds: “Our tests show us that the condition of the necks in regards to lubed or not, carbon inside or not, squeaky clean or not, etc., matter even more than the size of the bushing used. An ultrasonically cleaned or brand new dry case neck make for some quite high seating force.”
In our Shooters’ Forum a reader recently asked: “How much neck tension should I use?” This prompted a Forum discussion in which other Forum members recommended a specific number based on their experience, such as .001″, .002″, or .003″. These numbers, as commonly used, correspond to the difference between case-neck OD after sizing and the neck OD of a loaded round, with bullet in place. In other words, the numbers refer to the nominal amount of interference fit (after sizing).
While these commonly-used “tension numbers” (of .001″, .002″ etc.) can be useful as starting points, neck tension is actually a fairly complex subject. The actual amount of “grip” on the bullet is a function of many factors, of which neck-OD reduction during sizing is just one. Understanding these many factors will help you maintain consistent neck tension as your brass “evolves” over the course of multiple reloadings.
Seating Depth Changes Can Increase or Decrease Grip on Bullet
You can do this simple experiment. Seat a boat-tail bullet in your sized neck with .150″ of bearing surface (shank) in the neck. Now remove the bullet with an impact hammer. Next, take another identical bullet and seat it with .300″ of bearing surface in another sized case (same bushing size/same nominal tension). You’ll find the deeper-seated bullet is gripped much harder.
Neck-Wall Thickness is Important Too
I have also found that thinner necks, particularly the very thin necks used by many PPC shooters, require more sizing to give equivalent “grip”. Again, do your own experiment. Seat a bullet in a case turned to .008″ neckwall thickness and sized down .003″. Now compare that to a case with .014″ neckwall thickness and sized down .0015″. You may find that the bullet in the thin necks actually pulls out easier, though it supposedly has more “neck tension”, if one were to consider bushing size alone.
In practical terms, because thick necks are less elastic than very thin necks, when you turn necks you may need to run tighter bushings to maintain the same amount of actual grip on the bullets (as compared to no-turn brass). Consequently, I suspect the guys using .0015″ “tension” on no-turn brass may be a lot closer to the guys using .003″ “tension” on turned necks than either group may realize.
Toward a Better Definition of Neck Tension
As a convenient short-cut, we tend to describe neck tension by bushing size alone. When a guy says, “I run .002 neck tension”, that normally means he is using a die/bushing that sizes the necks .002″ smaller than a loaded round. Well we know something about his post-sizing neck OD, but do we really have a reliable idea about how much force is required to release his bullets? Maybe not… This use of the term “neck tension” when we are really only describing the amount of neck diameter reduction with a die/bushing is really kind of incomplete.
My point here is that it is overly simplistic to ask, “should I load with .001 tension or .003?” In reality, an .001″ reduction (after springback) on a thick neck might provide MORE “grip” on a deep-seated bullet than an .003″ reduction on a very thin-walled neck holding a bullet with minimal bearing surface in the neck. Bushing ID is something we can easily measure and verify. We use bushing size as a descriptor of neck tension because it is convenient and because the other important factors are hard to quantify. But those factors shouldn’t be ignored if you want to maintain consistent neck tension for optimal accuracy.
Consistency and accuracy — that’s really what this all about isn’t it? We want to find the best neck tension for accuracy, and then maintain that amount of grip-on-bullet over time. To do that you need to look not only at your bushing size, but also at how your brass has changed (work-hardened) with time, and whether other variables (such as the amount of carbon in the neck) have changed. Ultimately, optimal neck tension must be ascertained experimentally. You have to go out and test empirically to see what works, in YOUR rifle, with YOUR bullets and YOUR brass. And you may have to change the nominal tension setting (i.e. bushing size) as your brass work-hardens or IF YOU CHANGE SEATING DEPTHS.
Remember that bushing size alone does not tell us all we need to know about the neck’s true “holding power” on a bullet, or the energy required for bullet release. True bullet grip is a more complicated phenomenon, one that is affected by numerous factors, some of which are very hard to quantify.
Coating bullets with a friction-reducing compound such as Molybdenum Disulfide (Moly) offers potential benefits, including reduced barrel heat, and being able to shoot longer strings of fire between bore cleanings. One of the effects of reduced friction can be the lessening of internal barrel pressures. This, in turn, means that coated bullets MAY run slower than naked bullets (with charges held equal).
To restore velocities, shooters running coated bullets are inclined to “bump up” the load — but you need to be cautious.
Be Careful When Increasing Loads for Coated Bullets
We caution shooters that when your start out with coated bullets in a “fresh barrel” you should NOT immediately raise the charge weight. It may take a couple dozen coated rounds before the anti-friction coating is distributed through the bore, and you really start to see the reduced pressures. Some guys will automatically add a grain or so to recommended “naked” bullet charge weights when they shoot coated bullets. That’s a risky undertaking.
We recommend that you use “naked” bullet loads for the first dozen coated rounds through a new barrel. Use a chronograph and monitor velocities. It may take up to 30 rounds before you see a reduction in velocity of 30-50 fps that indicates that your anti-friction coating is fully effective.
We have a friend who was recently testing moly-coated 6mm bullets in a 6-6.5×47. Moly had not been used in the barrel before. Our friend had added a grain to his “naked” bullet load, thinking that would compensate for the predicted lower pressures. What he found instead was that his loads were WAY too hot initially. It took 30+ moly-coated rounds through the bore before he saw his velocities drop — a sign that the pressure had lowered due to the moly. For the rounds fired before that point his pressures were too high, and he ended up tossing some expensive Lapua brass into the trash because the primer pockets had expanded excessively.
LESSON: Start low, even with coated bullets. Don’t increase your charge weights (over naked bullet loads) until you have clear evidence of lower pressure and reduced velocity.
Procedure After Barrel Cleaning
If you shoot Moly, and clean the barrel aggressively after a match, you may want to shoot a dozen coated “foulers” before starting your record string. Robert Whitley, who has used Moly in some of his rifles, tells us he liked to have 10-15 coated rounds through the bore before commencing record fire. In a “squeaky-clean” bore, you won’t get the full “benefits” of moly immediately.
To learn more about the properties of dry lubricants for bullets, read our Guide to Coating Bullets. This covers the three most popular bullet coatings: Molybdenum Disulfide (Moly), Tungsten Disulfide (WS2 or ‘Danzac’), and Hexagonal Boron Nitride (HBN). The article discusses the pros and cons of the different bullet coatings and offers step-by-step, illustrated instructions on how to coat your bullets using a tumbler.
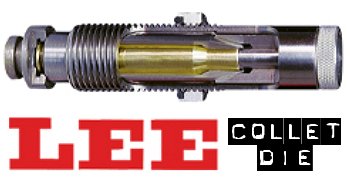
For those who prefer to neck-size their brass (rather than full-length-size), the LEE Collet Die is a popular, inexpensive option. It works by having collet tangs or “fingers” press the neck against a central mandrel. The benefit is that you get a very straight neck, which is sized consistently from top to bottom. Canadian shooter Jerry Teo explains: “LEE Collet Dies produce sized cases with very low runout (measured runout is under .001″ using a Sinclair concentricity gauge). You also don’t get the build-up of brass at the base of the neck, as can happen with bushing neck dies. The neck-shoulder junction stays nice and crisp.”
NOTE: For most handloading, we recommend FULL-LENGTH sizing of cases. You should always have a good Full-length sizing die for your brass. But there are some situations where neck-sizing may be useful. This article explains how to neck-size effectively with a LEE Collet Die.
Here’s a good video that explains how to use a Lee Collet Die to Neck-Size .243 Win brass:
TIP ONE — Adjusting Tension
LEE Collet dies don’t have a specific mechanical adjustment for neck tension. But you CAN easily modify the die to provide more or less tension. If you want to adjust the neck tension using a Lee Collet die, you can simply chuck the mandrel in a drill and reduce the diameter with some sand-paper (to increase neck tension) or you can order a mandrel the next caliber larger and turn it to whatever diameter you want (the larger the mandrel diameter, the less the neck tension). You can also order custom mandrels from Lee sized to any diameter you want.
Regarding neck tension, Boyd Allen makes an important point: “The only way to properly get more neck tension with collet dies is to either reduce the diameter of the mandrel, or order a smaller-diameter mandrel from Lee. I remind folks that adjusting the die position to have more toggle at the top of the ram stroke (not the factory recommended method), or leaning on the press handle with more force than recommended will NOT increase neck tension.”
TIP TWO — Polish and Tune for Easy Case Removal
Some users have complained that their Collet Dies grab the case-neck too firmly, making the case hard to remove. There are solutions to this problem. First inspect the collet fingers and smooth the inner surface up a bit with polishing compound or an extra-fine sanding pad. Second, you can open up the fingers a little bit. LEE recommends that if your Collet Die is sticking, take a steel punch and tap the fingers apart a little bit so that the natural “unloaded” position is wider. Lastly, you should lightly lubricate the outside of the collet fingers (see arrows) before you re-assemble the die. This will ensure they slide smoothly. Also, to prevent the collet fingers from closing too tight, never load up the die with your press without putting a case in place first. Without a case neck between the collet fingers and the mandrel, the collet can clamp itself too tight as you raise the ram.
TIP THREE — Always Have a Case Inside When Operating Collet Die
Our friend Boyd Allen tells us that you need to follow directions and NEVER operate the die without a case inside. Boyd explains: “This is because doing so will spring the quadrants of the collet inward so that they interfere with the insertion of a case, and the user will have to figure out how to undo the damage if the die is to operate properly. This advice would not be needed if everyone read the instructions before using the die…. but many times, they don’t. Another thing that I tell new users is to take the die apart so that they will have a better chance of understanding how it works.”
TIP FOUR — Size Twice and Spin Your Case 1/8th Turn
After reaching fully “down” on your press handle, withdraw the case about an inch and manually rotate it about 1/8th (NOT 1/4 or 1/2) turn while still in the shell-holder, then size again. This will place the die’s collet petals on the four “high spots” of the case neck and will result in a rounder, more evenly-sized neck with slightly more bullet tension. This takes only about one second more per case and is well worth the slight extra effort. (We thank reader Stonecreek for this smart tip).
Get CUSTOM Lee Collet Dies for Your Brass
Yes LEE does make custom collet neck-sizing dies! LEE Precision currently offers Custom Collet Neck-Sizing Dies, made from two of your fired cases. LEE offers custom standard-thread (7/8×14) collet dies for $100.00 (plus S/H) and custom large-thread (1¼x12) collet dies for $300.00 (plus S/H). This is a good option if you run wildcats or have unusual chamber dimensions. CLICK HERE to ORDER.
The 2022 NRA F-Class National Championships commence this weekend at the Ben Avery range in Phoenix, Arizona. The Mid-Range F-Class Nationals commence this Sunday, October 16, with practice on Saturday, October 15. The 1000-yard Long Range match starts on October 20th.
How to Avoid “Train Wrecks” In Competition
In any shooting competition, you must try to avoid major screw-ups that can ruin your day (or your match). In this article, past F-TR National Mid-Range and Long Range Champion Bryan Litz talks about “Train Wrecks”, i.e. those big disasters (such as equipment failures) that can ruin a whole match. Bryan illustrates the types of “train wrecks” that commonly befall competitors, and he explains how to avoid these “unmitigated disasters”.
Urban Dictionary “Train Wreck” Definition: “A total @#$&! disaster … the kind that makes you want to shake your head.”
Success in long range competition depends on many things. Those who aspire to be competitive are usually detail-oriented, and focused on all the small things that might give them an edge. Unfortunately it’s common for shooters lose sight of the big picture — missing the forest for the trees, so to speak.
Consistency is one of the universal principles of successful shooting. The tournament champion is the shooter with the highest average performance over several days, often times not winning a single match. While you can win tournaments without an isolated stellar performance, you cannot win tournaments if you have a single train wreck performance. And this is why it’s important for the detail-oriented shooter to keep an eye out for potential “big picture” problems that can derail the train of success!
Train wrecks can be defined differently by shooters of various skill levels and categories. Anything from problems causing a miss, to problems causing a 3/4-MOA shift in wind zero can manifest as a train wreck, depending on the kind of shooting you’re doing.
Below is a list of common Shooting Match Train Wrecks, and suggestions for avoiding them.
1. Cross-Firing. The fastest and most common way to destroy your score (and any hopes of winning a tournament) is to cross-fire. The cure is obviously basic awareness of your target number on each shot, but you can stack the odds in your favor if you’re smart. For sling shooters, establish your Natural Point of Aim (NPA) and monitor that it doesn’t shift during your course of fire. If you’re doing this right, you’ll always come back on your target naturally, without deliberately checking each time. You should be doing this anyway, but avoiding cross-fires is another incentive for monitoring this important fundamental. In F-Class shooting, pay attention to how the rifle recoils, and where the crosshairs settle. If the crosshairs always settle to the right, either make an adjustment to your bipod, hold, or simply make sure to move back each shot. Also consider your scope. Running super high magnification can leave the number board out of the scope’s field view. That can really increase the risk of cross-firing.
2. Equipment Failure. There are a wide variety of equipment failures you may encounter at a match, from loose sight fasteners, to broken bipods, to high-round-count barrels that that suddenly “go south” (just to mention a few possibilities). Mechanical components can and do fail. The best policy is to put some thought into what the critical failure points are, monitor wear of these parts, and have spares ready. This is where an ounce of prevention can prevent a ton of train wreck. On this note, if you like running hot loads, consider whether that extra 20 fps is worth blowing up a bullet (10 points), sticking a bolt (DNF), or worse yet, causing injury to yourself or someone nearby.
[Editor’s Note: The 2016 F-Class Nationals will employ electronic targets so conventional pit duties won’t be required. However, the following advice does apply for matches with conventional targets.]
3. Scoring/Pit Malfunction. Although not related to your shooting technique, doing things to insure you get at least fair treatment from your scorer and pit puller is a good idea. Try to meet the others on your target so they can associate a face with the shooter for whom they’re pulling. If you learn your scorer is a Democrat, it’s probably best not to tell Obama jokes before you go for record. If your pit puller is elderly, it may be unwise to shoot very rapidly and risk a shot being missed (by the pit worker), or having to call for a mark. Slowing down a second or two between shots might prevent a 5-minute delay and possibly an undeserved miss.
4. Wind Issues. Tricky winds derail many trains. A lot can be written about wind strategies, but here’s a simple tip about how to take the edge off a worse case scenario. You don’t have to start blazing away on the command of “Commence fire”. If the wind is blowing like a bastard when your time starts, just wait! You’re allotted 30 minutes to fire your string in long range slow fire. With average pit service, it might take you 10 minutes if you hustle, less in F-Class. Point being, you have about three times longer than you need. So let everyone else shoot through the storm and look for a window (or windows) of time which are not so adverse. Of course this is a risk, conditions might get worse if you wait. This is where judgment comes in. Just know you have options for managing time and keep an eye on the clock. Saving rounds in a slow fire match is a costly and embarrassing train wreck.
5. Mind Your Physical Health. While traveling for shooting matches, most shooters break their normal patterns of diet, sleep, alcohol consumption, etc. These disruptions to the norm can have detrimental effects on your body and your ability to shoot and even think clearly. If you’re used to an indoor job and eating salads in air-conditioned break rooms and you travel to a week-long rifle match which keeps you on your feet all day in 90-degree heat and high humidity, while eating greasy restaurant food, drinking beer and getting little sleep, then you might as well plan on daily train wrecks. If the match is four hours away, rather than leaving at 3:00 am and drinking five cups of coffee on the morning drive, arrive the night before and get a good night’s sleep.”
Keep focused on the important stuff. You never want to lose sight of the big picture. Keep the important, common sense things in mind as well as the minutia of meplat trimming, weighing powder to the kernel, and cleaning your barrel ’til it’s squeaky clean. Remember, all the little enhancements can’t make up for one big train wreck!
The U.S. Army Marksmanship Unit (USAMU) has published a series of reloading articles on its Facebook Page. In this article, the second in a 3-part series, the USAMU covers the process of loading competition pistol ammunition. The authors focus on two key elements — the taper crimp and the quality/uniformity of the original brass. If you shoot pistol competitively, or just want to maximize the accuracy of your handguns, read this article. The taper crimp tips are very important.
Loading Accurate Competition Pistol Ammunition — Part 2 of 3
Today, we resume our series on factors affecting accuracy in pistol handloads. Readers who missed Part One can visit our USAMU Facebook Page. Scroll down to March 28, 2018 to find that first installment which is worth reading.
One often-overlooked aspect of handloading highly-accurate pistol ammunition is the amount of taper crimp used, and its effect on accuracy. (NOTE: this article pertains to loading for semi-autos – revolver crimp techniques involve some quite different issues.) Briefly, different amounts of taper crimp are used with various handloads to obtain best accuracy. The amount is based on bullet weight, powder burn rate and charge, plus other factors such as case neck tension. During machine-rest testing of experimental Service Pistol ammunition, many variables are examined. Among these, our Shop often varies a load’s crimp in degrees of 0.001″ when re-testing for finest accuracy.
How to Measure Taper Crimp on Pistol Cartridges
One question that often arises is, “How do I measure the taper crimp I’m putting on my cartridges?” Using the narrow part of one’s dial caliper jaws, carefully measure the case diameter at the exact edge of the case mouth on a loaded cartridge. It’s important to take several measurements to ensure consistency. Also, be sure to measure at several places around the case mouth, as case wall thickness can vary. After measuring 2-3 cartridges with a given crimp setting, one can be confident of the true dimension and that it can be repeated later, if needed.
However, for good results, one must use brass from one maker due to variances in case wall thickness. For example, the same degree of crimp that imparts a measurement of 0.471″ with Brand X brass may result in 0.469″ with Brand Y. Thus, for best accuracy, using brass from the same manufacturer is important — particularly for 50-yard Slow Fire. In a perfect world, it is better still to use brass from one lot number if possible. With the popularity of progressive presses using interchangeable tool heads, keeping separate tool heads adjusted for each load helps maximize uniformity between ammunition lots.
Brass Uniformity and Accuracy
Brass is important to pistol accuracy. While accurate ammunition can be loaded using brass of mixed parentage, that is not conducive to finest results, particularly at 50 yards. It is important for the serious competitor to pay attention to his brass – even if only for the 50-yard “Slow Fire” portions of “Bullseye” matches and practice. By segregating brass as described above, and additionally keeping track of the number of times a given batch of cases has been fired, one can ensure case neck tension and case length are at their most uniform.
Given the large volumes of ammunition consumed by active pistol competitors, using inexpensive, mixed surplus brass for practice, particularly at the “short line” (25 yards), is understandable. In NRA Outdoor Pistol (“Bullseye”), the 10-ring is relatively generous — especially for a well-trained shooter with an accurate pistol and load. However, for the “long line” (50 yards), purchasing and segregating a lot of high-quality brass to be used strictly for slow-fire is a wise idea. To keep track of your brass on the line, use a unique headstamp marking with 1 or 2 colors of marking pen ink.
Uniform Cartridge Overall Length is Important
Cartridge case Overall Length (OAL) uniformity as it comes from the factory is important to achieving utmost accuracy. More uniform case lengths (best measured after sizing) contribute to greater consistency of crimp, neck tension, ignition/burn of powder charge, headspace (rimless cartridges), etc. Cartridge case-length consistency varies noticeably by maker and, with lesser manufacturers, also from lot to lot. Some manufacturers are more consistent in their dimensions than others, and also in the hardness/ductility of their brass. Similarly, pay attention to primer brands, powder lot numbers, etc.
Consider Using a Lock-Out Die with Progressive Presses
When reloading pistol ammo with a Progressive press, we strongly recommend the use of a lock-out die, or other system that can detect double charges or low charges. If your progressive is manually advanced, the possibility of a double charge is very real — and that can have disastrous consequences.
On UltimateReloader.com website you’ll find an excellent two-part series on the function and set-up of the RCBS Lock-Out Die. This die prevents loading if a high or low powder charge is detected. The video below shows setup of the RCBS Lock-Out Die on the Dillon XL-650 progressive press.
Here’a useful article by Sierra Bullets Media Relations Manager Carroll Pilant. This story, which originally appeared in the Sierra Bullets Blog, covers some of the more common ammo problems that afflict hand-loaders. Some of those issues are: excessive OAL, high primers, and improperly-sized cases. Here Mr. Pilant explains how to avoid these common problems that lead to “headaches at the range.
I had some gentlemen at my house last fall getting rifle zeros for an upcoming elk hunt. One was using one of the .300 short mags and every 3rd or 4th round would not chamber. Examination of the case showed a bulge right at the body/shoulder junction. These were new cases he had loaded for this trip. The seating die had been screwed down until it just touched the shoulder and then backed up just slightly. Some of the cases were apparently slightly longer from the base to the datum line and the shoulder was hitting inside the seating die and putting the bulge on the shoulder. I got to thinking about all the gun malfunctions that I see each week at matches and the biggest percentage stem from improper handloading techniques.
One: Check Your Cases with a Chamber Gage
Since I shoot a lot of 3-gun matches, I see a lot of AR problems which result in the shooter banging the butt stock on the ground or nearest solid object while pulling on the charging handle at the same time. I like my rifles too well to treat them that way (I cringe every time I see someone doing that). When I ask them if they ran the ammo through a chamber gage, I usually get the answer, “No, but I need to get one” or “I didn’t have time to do it” or other excuses. The few minutes it takes to check your ammo can mean the difference between a nightmare and a smooth running firearm.
A Chamber Gauge Quickly Reveals Long or Short Cases
Size Your Cases Properly
Another problem is caused sizing the case itself. If you will lube the inside of the neck, the expander ball will come out a lot easier. If you hear a squeak as the expander ball comes out of a case neck, that expander ball is trying to pull the case neck/shoulder up (sometimes several thousandths). That is enough that if you don’t put a bulge on the shoulder when seating the bullet … it can still jam into the chamber like a big cork. If the rifle is set up correctly, the gun will not go into battery and won’t fire but the round is jammed into the chamber where it won’t extract and they are back to banging it on the ground again (with a loaded round stuck in the chamber). A chamber gage would have caught this also.
Oversizing cases also causes problems because the firing pin doesn’t have the length to reach the primer solid enough to ignite it 100% of the time. When you have one that is oversized, you usually have a bunch, since you usually do several cases at a time on that die setting. If the die isn’t readjusted, the problem will continue on the next batch of cases also. They will either not fire at all or you will have a lot of misfires. In a bolt action, a lot of time the extractor will hold the case against the face of the breech enough that it will fire. The case gets driven forward and the thinner part of the brass expands, holding to the chamber wall and the thicker part of the case doesn’t expand as much and stretches back to the bolt face. If it doesn’t separate that time, it will the next time. When it does separate, it leaves the front portion of the case in the chamber and pulls the case head off. Then when it tries to chamber the next round, you have a nasty jam. Quite often range brass is the culprit of this because you never know how many times it has been fired/sized and in what firearm.’Back to beating it on the ground again till you figure out that you have to get the forward part of the case out.
Just a quick tip — To extract the partial case, an oversized brush on a cleaning rod [inserted] and then pulled backward will often remove the case. The bristles when pushed forward and then pulled back act like barbs inside the case. If you have a bunch of oversized case that have been fired, I would dispose of them to keep from having future problems. There are a few tricks you can use to salvage them if they haven’t been fired though. Once again, a case gage would have helped.
Two: Double Check Your Primers
Another thing I see fairly often is a high primer, backwards primer, or no primer at all. The high primers are bad because you can have either a slam fire or a misfire from the firing pin seating the primer but using up its energy doing so. So, as a precaution to make sure my rifle ammo will work 100% of the time, I check it in a case gage, then put it in an ammo box with the primer up and when the box is full, I run my finger across all the primers to make sure they are all seated to the correct depth and you can visually check to make sure none are in backwards or missing.
Three: Check Your Overall Cartridge Length
Trying to load the ammo as long as possible can cause problems also. Be sure to leave yourself enough clearance between the tip of the bullet and the front of the magazine where the rounds will feed up 100%. Several times over the years, I have heard of hunters getting their rifle ready for a hunt. When they would go to the range to sight in, they loaded each round single shot without putting any ammo in the magazine. On getting to elk or deer camp, they find out the ammo is to long to fit in the magazine. At least they have a single shot, it could be worse. I have had hunters that their buddies loaded the ammo for them and then met them in hunting camp only to find out the ammo wouldn’t chamber from either the bullet seated to long or the case sized improperly, then they just have a club.
Four: Confirm All Cases Contain Powder
No powder in the case doesn’t seem to happen as much in rifle cartridges as in handgun cartridges. This is probably due to more handgun ammo being loaded on progressive presses and usually in larger quantities. There are probably more rifle cartridges that don’t have powder in them than you realize though. Since the pistol case is so much smaller internal capacity, when you try to fire it without powder, it usually dislodges the bullet just enough to stick in the barrel. On a rifle, you have more internal capacity and usually a better grip on the bullet, since it is smaller diameter and longer bearing surface. Like on a .223, often a case without powder won’t dislodge the bullet out of the case and just gets ejected from the rifle, thinking it was a bad primer or some little quirk.
For rifle cases loaded on a single stage press, I put them in a reloading block and always dump my powder in a certain order. Then I do a visual inspection and any case that the powder doesn’t look the same level as the rest, I pull it and the one I charged before and the one I charged after it. I inspect the one case to see if there is anything visual inside. Then I recharge all 3 cases. That way if a case had powder hang up and dump in the next case, you have corrected the problem.
On progressive presses, I try to use a powder that fills the case up to about the base of the bullet. That way you can usually see the powder as the shell rotates and if you might have dumped a partial or double charge, you will notice as you start to seat the bullet if not before. On a progressive, if I don’t load a cartridge in one smooth stroke (say a bullet tipped over sideways and I raised the ram slightly to reset it) Some presses actually back the charge back adding more powder if it has already dumped some so you have a full charge plus a partial charge. When I don’t complete the procedure with one stroke, I pull the case that just had powder dumped into it and check the powder charge or just dump the powder back into the measure and run the case through later.
.243 Ackley Improved for Long-Range Varminting and Benchrest Competition
Whenever Matt Bianchini brings his bright yellow .243 Ackley to the firing line, heads turn. This is one truly handsome rig–as good-looking as it is accurate. Built to smoke varmints at long-range as well as compete in 1000-yard benchrest matches, this rifle is proof that competition improves the breed. Fitted with a Farley action, Jewell trigger, Leupold LRT scope, and Lilja or Krieger barrel, the Yellow Ackley is a “no compromise” match rifle that can run with the big dogs in 1K Benchrest competition. And with the Ackley’s ability to toss 106gr Clinch Rivers at 3350 fps, this is one flat-shooting, hard-hitting varmint rifle.
Ultra-Fast, Ultra-Smooth Farley Action…and One Wicked Paint Job
The heart of Matt’s rifle is a Farley action. Farleys have found favor with Benchrest competitors, because the bolt can be worked so fast. And the Farley is as smooth as it is speedy. The difference is quite noticeable if you compare it to a blue-printed Rem 700, or even a recent Stolle Panda. Farleys were true customs, built one at a time by the Farley family in Oklahoma. Unlike a BAT action which is machined from billet steel, a Farley starts with a stainless investment casting, much like Ruger pistol frames. It uses a cone bolt for smooth, yet solid lock-up.
One of the unique features of the Farley is the ejector–it can be switched on or off, depending on the shooter’s preference. So, if you’re load testing some hot rounds, you can turn the ejector off. In a match you can turn the ejector “on” to function normally. Matt is now a confirmed Farley fanatic. He tells us: “I’ve got quite a few other very nice actions, including Nesikas. But none of them are as slick as that Farley. When you work the bolt it feels like it’s on ball-bearings.”
Matt’s Screamin’ Yellow Ackley–The Need for Speed
.243 Ackley Improved Speed Demon
In a long-range varmint rifle, speed kills. Ultra-high velocities will deliver flatter trajectories and more explosive hits on critters. That’s where the .243 Ackley Improved really shines.
Matt has explored the upper limits of .243 Ackley Improved (AI) performance with his yellow long-range rig, fitted with a 29″ Lilja 3-groove, 1:8″-twist barrel. Using a stout load of Alliant Reloder 25, Matt’s “Screamin’ Yellow Ackley” has topped 3340 fps with Clinch River 106s. That’s serious speed for heavy 6mm bullets. This shows a well-built .243 AI leaves Dashers and 6XCs in the dust when it comes to pure velocity.
Ultimate Evolution of the .243 Winchester
Matt’s show-stopping rifle is a .243 Ackley Improved (40-degree shoulder, .271″ neck), chambered with a Manson reamer. On top of the stainless Farley “S” action, in Farley 30mm rings, sits a Leupold LRT (1/16 MOA dot) boosted to 18X-40X by Premier Reticles. Matt has SIX barrels for the gun, three Lilja 3-grooves, a couple Kriegers, and a Shilen.
Matt’s gun currently sports an 8-twist 29″ Lilja 3-groove HV taper that Matt says cleans up like a dream. The stock is a Shehane ST-1000 Tracker made in fiberglass by McMillan, with a BAT trigger guard and Shehane polished billet aluminum buttplate. Prior to final finishing, Matt worked over the flats and some of the angles. That’s why the facets are so well-defined on this rifle compared to some ‘glass Trackers you may have seen. The gun was chambered by Dave Bruno of Cheswick, PA.
Matt bedded the stock and applied the stunning Sikken “Viper” yellow paint job himself. That flawless, smooth-as-glass Screamin’ Yellow finish is no ordinary paint-job, but then Matt Bianchini is no ordinary do-it-yourself painter. His family runs an automotive body-shop, so he had access to premium paints and a quarter-million-dollar spray booth with all the latest technology. Still, Matt spent many hours on this stock to get everything right, trying a couple colors before he settled on a Sikken automotive “Viper Race Yellow” formulated for the Dodge Viper sports car. After careful prep work, Matt sprayed two coats of Viper Yellow, and then added three coats of high-grade automotive clear, which was then baked-on in a heat chamber. Matt also painted the Sinclair front rest to match the stock, and even polished the surfaces of the Hoehn windage top. A lot of effort, Matt told us, was required to achieve the results you see here.
3300 fps for 1000 Yards
Though Matt’s Ackley has harvested its share of varmints, the gun was built with 1000-yard benchrest competition in mind. At left is the firing line at Thunder Valley, Ohio. Yep those targets (upper right) are 1000 yards away. Now you know why Matt has a 40-power scope.
The Yellow Ackley weighs just under 17 pounds to meet IBS and NBRSA “Light Gun” weight limits. While Matt says his bullets don’t “go to sleep” for a couple hundred yards, this gun can still shoot 1/4″ groups at 100 yards and hold that accuracy much, much farther. Matt reports, “my best-ever group was five shots in .397″ at 400 yards. Yep, I got lucky with the conditions, but this is a very accurate rifle.”
.243 Ackley Improved–More Velocity, Less Case Stretch
by Bob Blaine, Sinclair International
Parker Ackley reluctantly developed the .243 Ackley Improved (“AI”). Ackley finally gave in to his customers’ requests to develop the .243 AI. He had always felt that the .243 Winchester was already an improved configuration, but he did say that the best thing to be gained by improving the .243 Winchester was to substantially reduce the case-stretching problems. The .243 Winchester parent case has always stretched brass, almost as bad as the Swift. Even though you get more velocity with the improved .243, I’ve also found that the improved version gives a bit more throat life than the parent case does.
The .243 AI delivers more velocity by virtue of enhanced case capacity–roughly five grains more H20 capacity than a standard .243 Winchester. The .243 AI has a water capacity of approximately 57 to 58 grains, compared to 52-53 grains for the standard .243 Winchester.
Loading for Long-Range
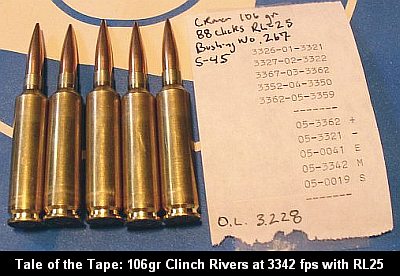
For long-range shooting, Matt loads 106gr Clinch Rivers with 47.5gr of Alliant Reloder 25 for his Krieger barrels, a little more powder with the Lilja 3-grooves. The Lilja load runs 3342 fps, with a 3.228″ OAL. Cases are neck-turned Lapua .243 Winchester. He uses Wilson inline seater and Wilson eck-sizer dies (.267″ bushing), and a custom, reamer-cut FL sizing die.
Not Just for BR, This Gun Can Hunt
While Matt has a big stable of varmint rifles, the Yellow Ackley has seen plenty of duty in the ‘Hog fields. Matt is from a farming family and he can shoot practically right out his back door (see top photo at the farm). He has nailed some big ground-hogs at 800 yards and beyond. The .243 AI does kick a bit compared to other varmint cartridges, but even with 105-106gr bullets, it’s not bad. He has considered adding a muzzle brake at some point to one of the barrels, just so he can see impacts better.
Screamin’ Yellow Dasher?
Matt originally thought of building the gun up as a 6BR or a 6BR Improved. He has a Manson reamer similar to a 6mm Dasher, with a 40-degree shoulder and .008″ body taper. He actually chambered a couple barrels with that 6BR Improved reamer, but he hasn’t shot them yet. He was so pleased with how the gun performed in .243 AI, that he saw no reason to change. And it may be a while before he slaps a Dasher-chambered barrel on the rig: “I really like the way it shoots as a .243 AI. I’m so impressed with it that I don’t want to mess with anything. And I don’t think I’ll be running out of Ackley barrels anytime soon.”
Since the .243 Win is such a popular cartridge, all the major die-makers offer reloading dies. It’s hard to go wrong with a Redding Type ‘S’ Full-length bushing die–item 77114 for the standard .243 Win and item 77420 for .243 AI. Whidden Gunworks also makes great .243 Win sizing dies (and custom .243 Win AI dies on request). These will both resize the case (and bump the shoulder) as necessary, and allow you to adjust neck tension with bushings. Alternatively, you can go with a body die, and a separate neck bushing die.
If you load primarily one brand of bullets, another slick set-up is to buy a Forster or Whidden full-length, non-bushing .243 Win sizing die, and then have Forster or Whidden hone the neck for your desired amount of tension. This elegant one-pass sizing solution produces very straight rounds with low run-out.
For bullet seating, both the Redding Competition Seater (item 55114) and the Forster Ultra-Seater (item U00034) work great for the standard .243 Win case. If you shoot a .243 Ackley, Redding’s .243 AI Comp Seater (item 55420) costs quite a bit more than the standard version Forster doesn’t list a .243 AI seater in their catalog. However, you can just run your chambering reamer into the inner sleeve of either seating die to fit the .243 Ackley Improved case.
If you want the “Cadillac” of production seater dies for the .243 Win, order the Wilson Stainless Micrometer seater (item 50-1114S) from Sinclair International. Costing only a few dollars more than a Redding Comp seater, this die is a joy to use, providing very positive control over bullet seating depth. When used with a quality arbor press, the Wilson offers unrivaled “feel” for bullet-seating force. This can help you monitor neck tension, one of the most critical factors in maintaining low ES and SD for long-range accuracy.


 Train Wrecks (and How to Avoid Them)
 4. Wind Issues. Tricky winds derail many trains. A lot can be written about wind strategies, but here’s a simple tip about how to take the edge off a worse case scenario. You don’t have to start blazing away on the command of “Commence fire”. If the wind is blowing like a bastard when your time starts, just wait! You’re allotted 30 minutes to fire your string in long range slow fire. With average pit service, it might take you 10 minutes if you hustle, less in F-Class. Point being, you have about three times longer than you need. So let everyone else shoot through the storm and look for a window (or windows) of time which are not so adverse. Of course this is a risk, conditions might get worse if you wait. This is where judgment comes in. Just know you have options for managing time and keep an eye on the clock. Saving rounds in a slow fire match is a costly and embarrassing train wreck.
 Like the Hornady tool, the


 In our
  Neck-Wall Thickness is Important Too


 TIP ONE — Adjusting Tension
 TIP TWO — Polish and Tune for Easy Case Removal
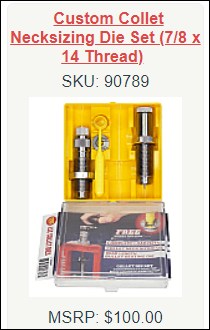


 Oversizing cases also causes problems because the firing pin doesn’t have the length to reach the primer solid enough to ignite it 100% of the time. When you have one that is oversized, you usually have a bunch, since you usually do several cases at a time on that die setting. If the die isn’t readjusted, the problem will continue on the next batch of cases also. They will either not fire at all or you will have a lot of misfires. In a bolt action, a lot of time the extractor will hold the case against the face of the breech enough that it will fire. The case gets driven forward and the thinner part of the brass expands, holding to the chamber wall and the thicker part of the case doesn’t expand as much and stretches back to the bolt face. If it doesn’t separate that time, it will the next time. When it does separate, it leaves the front portion of the case in the chamber and pulls the case head off. Then when it tries to chamber the next round, you have a nasty jam. Quite often range brass is the culprit of this because you never know how many times it has been fired/sized and in what firearm.’Back to beating it on the ground again till you figure out that you have to get the forward part of the case out.


 Ultimate Evolution of the .243 Winchester


 If you load primarily one brand of bullets, another slick set-up is to buy a Forster or Whidden full-length, non-bushing .243 Win sizing die, and then have Forster or Whidden hone the neck for your desired amount of tension. This elegant one-pass sizing solution produces very straight rounds with low run-out.


