The last 18 months has been a frustrating time for hand-loaders, and particular competitive rifle shooters who want the very best components for their match loads. Some of the most popular powders, such as Varget and H4350, are very difficult to find. And the price of primers has skyrocketed, with vendors changing as much as $150-$200 per thousand of popular types such as CCI BR2s. And even brass for popular cartridges, such as 6.5 Creedmoor and 6mmBR has been in short supply. And there are dozens of scam websites now that claim to have primers and powder for sale. Be wary of ANY site that will not take major credit cards, but insist on CashApp, Zelle, Venmo Bitcoin etc. for payment.
Thankfully, there ARE some strategies that can help competitors keep shooting despite the component shortages. First, you can use different types of bullets for practice. Creedmoor Sports offers big-name factory seconds Practice Bullets in multiple calibers. Second, you can look for alternate powder sources if you can’t find the Hodgdon or Alliant powders you prefer. You’ll find a wide selection of Vihtavuori and Accurate powders in stock at many vendors and also look for Shooters World powders. Also if you check local gunstores you may get lucky and find the H4350 or Alliant Reloder 16 you need.
To help fellow shooters overcome the problems of component shortages, our friend Dennis Santiago recently wrote a good article for Shooting Sports USA. This article talks about strategies that can help you keep up your monthly round count. One is to use more available powder and bullets for off-hand practice, where the nth degree of load accuracy is less critical. Dennis also recommends connecting with fellow shooters in your area. You may find that you may trade one hard-to-find component you’ve got for the powder or primers you need. This Editor recently traded some CCI 450 primers for H4350 powder.
We recommend you read the article by Dennis. There are many good suggestions that can help you maintain your live-fire shooting skills, and still attend matches regularly during this time of shortages.
Forest of Windflags at World Benchrest Championships in France in 2011
There’s a simple, inexpensive “miracle device” that can cut your groups in half. If you’re not using this device, you’re giving away accuracy. The “miracle device” to which we refer is a simple wind indicator aka “windflag”. Using windflags may actually improve your accuracy on target much more than weighing charges to the kernel, or spending your life savings on the “latest and greatest” hardware.
Remarkably, many shooters who spend $3000.00 or more on a precision rifle never bother to set up windflags, or even simple wood stakes with some ribbon to show the wind. Whether you’re a competitive shooter, a varminter, or someone who just likes to punch small groups, you should always take a set of windflags (or some kind of wind indicators) when you head to the range or the prairie dog fields. And yes, if you pay attention to your windflags, you can easily cut your group sizes in half. Here’s proof…
Miss a 5 mph Shift and You Could DOUBLE Your Group Size
The table below records the effect of a 5 mph crosswind at 100, 200, and 300 yards. You may be thinking, “well, I’d never miss a 5 mph let-off.” Consider this — if a gentle 2.5 mph breeze switches from 3 o’clock (R to L) to 9 o’clock (L to R), you’ve just missed a 5 mph net change. What will that do to your group? Look at the table to find out.
Values from Point Blank Ballistics software for 500′ elevation and 70° temperature.
Imagine you have a 6mm rifle that shoots half-MOA consistently in no-wind conditions. What happens if you miss a 5 mph shift (the equivalent of a full reversal of a 2.5 mph crosswind)? Well, if you’re shooting a 68gr flatbase bullet, your shot is going to move about 0.49″ at 100 yards, nearly doubling your group size. With a 105gr VLD, the bullet moves 0.28″ … not as much to be sure, but still enough to ruin a nice small group. What about an AR15, shooting 55-grainers at 3300 fps? Well, if you miss that same 5 mph shift, your low-BC bullet moves 0.68″. That pushes a half-inch group well past an inch. If you had a half-MOA capable AR, now it’s shooting worse than 1 MOA. And, as you might expect, the wind effects at 200 and 300 yards are even more dramatic. If you miss a 5 mph, full-value wind change, your 300-yard group could easily expand by 2.5″ or more.
If you’ve already invested in an accurate rifle with a good barrel, you are “throwing away” accuracy if you shoot without wind flags. You can spend a ton of money on fancy shooting accessories (such as expensive front rests and spotting scopes) but, dollar for dollar, nothing will potentially improve your shooting as much as a good set of windflags, used religiously.
Windflags Sources and Options
Which Windflag to buy? There are many vendors selling windflags of various types, some with daisy wheels others without. You may want to go to a match and see what types works best for you. CLICK HERE for the Benchrest Central Classifieds with multiple windflag types and accessories for sale. Here is a sample:
For this Saturday-at-the-Movies session we offer a selection of videos featuring interesting tools and products for handloaders. If you spend much time in your reloading room, these tools can save you time and help you load better ammo in less time. Today’s feature products range from sophisticated, premium tools such as 21st Century powered neck-turning lathe, to basic add-ons such as Lee Breech Lock Bushings, which are very handy if you load a variety of cartridge types.
21st Century Powered Neck-Turning Lathe
Power is activated by the red button on the end of the blue, horizontal feed handle:
Do you neck-turn hundreds of cases annually? Then you deserve this outstanding tool. The 21st Century Innovation Powered Neck-Turning Lathe may well be quite simply the best system ever created for quickly and precisely uniforming (and reducing) the neckwall thickness of cartridge brass. We have the original manual 21st Century neck-turning lathe, and can attest that it works great. With this powered system you can turn necks faster and more efficiently, with less effort. This is like going from a stick shift to an automatic transmission. The cases feed very smoothly and the results are beautiful. Note: The videos show the version as first marketed by 21st Century Shooting, which now operates as 21st Century Innovation.
The Powered Neck-Turning lathe is a modular system. Swing the bar from right to left to feed the case. The power head (with case holder) glides on stainless steel rails for smooth movement. This allows very precise feed rate. Power is supplied via a button that is built into the end of the feed handle. Push the red button to make the case spin. It’s as simple as that.
Hornady OAL Tool and Hornady Bullet Comparator
Gun Tech Steve Ostrem explains how to properly use Hornady’s Overall Length Gauge to determine length-to-land precisely. The OAL Gauge uses a “Modified Case” that threads onto the tool and holds a bullet. Push on the back of the gauge until you feel the bullet just touch the rifling. (We do this gently at first, tapping the rod a couple time to ensure the bullet is aligned correctly). Once you’ve got the length, then use the tool with a comparator on your calipers to get the length-to-lands. NOTE: We recommend taking the measurement 3-4 times in a row to get a reliable number. With a little practice your should be able to get repeatable measurements within .0015″.
Henderson Power Case Trimming/Chamfering Machine Test
F-Class John tests some of the finest reloading and shooting equipment you can buy. Recently he added the impressive Henderson Gen 3 Powered Trimmer to his inventory of tools. John is now a Henderson fan. He likes the speed, precision, and repeatability of the $779.00 Henderson machine, which trims-to-length and chamfers the case mouth all in one pass. Unlike some other trimming tools, the Henderson indexes off the overall case length NOT the shoulder. John found this worked just fine for his .284 Winchester brass, which has all been full-length sized prior to trimming.
Watch the video to see the Henderson trimmer in action. The dual, parallel horizontal support shafts provide precise alignment of the case as it moves inward toward the cutter blade. The Taper-Lock cutter provides a 14-degree inside chamfer and 30-degree outside chamfer. The trimming process is very consistent case after case, and the Henderson’s design captures brass shavings effectively.
This related video shows a comparison with the popular Giraud Powder Trimer
As noted in this comparison, John liked the precision of the Henderson trimmer and the overall design of the machine, which offers good ergonomics and very precise alignment of the cases. Cycling is smooth and positive, as you can see from the videos. The Giraud is also an excellent machine for bulk trimming/chamfering but the Henderson has some advantages.
Concentricity Checking with Accuracy One Gauge
Every serious hand-loader needs a quality concentricity gauge. The Accuracy One Concentricity Gauge boasts a smart design that delivers precise, repeatable results. We like the unit’s easy adjustability and its ability to work in a variety of configurations. The Accuracy One Gauge measures internal and external neck runout of cartridge cases as well as seated bullet runout. It can also measure the runout of the ogive, bearing surface, and boat-tail of individual bullets. And it can even measure your primer pocket runout.
Lee Die Lock Rings and Spline Drive Breech Lock Bushings
In this recent video Gavin Gear reviews three types of die accessories from LEE. These work for virtually all standard dies, not just LEE-brand reloading dies. The new LEE basic silver-finish die lock rings now feature splines for enhanced grip and compatibility with LEE’s new die lock ring wrench (photo right). They still boast a rubber 0-Ring that helps “float” the die for improved concentricity. Gavin also reviews Lee’s Spline Drive Breech Lock Bushings for use with presses fitted with LEE’s Breech Lock system. These Breech Lock bushings allow rapid change-out of dies without modifying the setting. The colorful new bushings feature splines on top that work with the new Lee Lock ring wrench shown above. In addition, the Breech Lock Bushings have a clamp to preserve die depth setting.
Tools Galore — Affordable Tools and Accessories for Reloaders
This detailed 15-minute video from the Bolt Action Reloading YouTube Channels, features a variety of lower-cost products/tool that help with key reloading tasks. The video looks at hand priming tools, case prep tools, Lyman stepped loading blocks, powder tricklers, expander mandrels, powder trickler, long-tube funnels and more! If you are getting started in hand-loading, this is a very helpful video to watch. It covers a lot of ground, illustrating options for tool types.
This Lyman case prep tool is one of many products reviewed in this 15-minute video.
A while back, we featured a portable reloading bench built on a Black & Decker Workmate. That proved a VERY popular do-it-yourself project so we’re showing it again, in case you missed it the first time.
Texan Robert Lewis made himself a great portable reloading bench from plywood mounted to a Black & Decker Workmate. The bench, roughly 22″ x 19″ on top, folds up to fit easily in your car’s trunk or behind the seats in a pick-up truck cab. Four recessed bolts hold the wood top section to the collapsible B&D Workmate. The sides and back of the unit are attached to the base with small nails. There is a small shelf (also nailed in place) which can be used to clamp a powder measure or hold a scale. Shown in the photo is a Harrell’s Benchrest measure and Harrell’s single-stage “C” press.
The whole unit can be built for about $65.00 with pine, or $80.00 with oak (as shown). Robert explained: “The Workmate was $40. If someone bought a 2’x4′ sheet of 3/4″ oak plywood, I think it is around $30. Using pine plywood would be about half that. Fasteners were $3. Spar Urethane would be $5.”
Robert told us: “I used a couple ideas I found on the web. The Larry Willis website gave me the idea to use the Black and Decker Workmate as a base. I found the Workmate on sale for $40 and the top is made from oak plywood I had in my shop. I sealed the wood with three coats of Spar Urethane. The whole thing folds into a nice package for transportation to and from the range.”
NOTE: Since we first ran this story, the price of a Black & Decker Workmate WM225 has increased. However you can still pick a WM225 Workmate for under $75.00. Amazon is currently selling WM225 Workmates for $70.34. The next best price we found was $72.96 at Home Depot, still a good price (Lowe’s is charging $94.98).
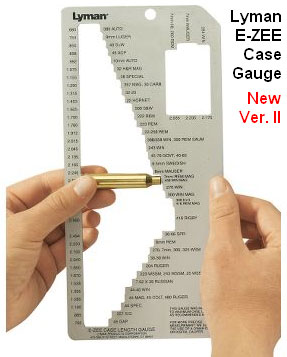
Lyman’s popular Case Length Gauge is now bigger and better. The enhanced version II of Lyman’s Case Length Gauge is much larger than the original version. The E-Zee Case Gauge II now measures more than 70 cartridge types — way more than before. This tool is a metal template with SAAMI-max-length slots for various cartridge types, including relatively new cartridges such as the .204 Ruger and Winchester Short Magnums. This tool allows you to quickly sort brass or check the dimensions. If you have a bucketful of mixed pistol brass this can save you hours of tedious work with calipers. You can also quickly check case lengths to see if it’s time to trim your fired brass.
If you load a wide variety of calibers, or do a lot of pistol shooting, we think you should pick up one of these Lyman Case Gauge templates. They are available for under $26.00 at Brownells ($24.99) and Amazon.com ($19.39). The E-Zee Case Gauge has long been a popular item for hand-loaders.
NOTE: For years the E-Zee Case Gauge had a silver finish with black lettering, as shown in the video. Some of the most recent production of E-Zee Case Gauges have a new “high contrast” look, with white lettering on a black frame. You may get either Case Gauge version when you order online (Brownells shows silver, Amazon shows black). We actually prefer the older, silver version.
Case Gauge Should Last a Lifetime
Easily measure the case length of over 70 popular rifle and pistol cases with Lyman’s new E-Zee Case Length Gauge II. This really is a “must-have” piece of kit for any gun owner who hand-loads numerous pistol and rifle calibers.
This rugged, precisely-made metal gauge makes sorting or identifying cases fast and accurate. The template is machined with SAAMI max recommended case lengths. Made from metal, with no moving parts, the E-Zee Case Gauge II should last a lifetime.
As a 2022 New Year’s bonus for our Bulletin readers we decided to showcase 10 of our favorite gun tech, reloading, and shooting technique videos for our readers. These videos were created by top YouTube content providers: F-Class John, Gavin Gear, Keith Glasscock, Erik Cortina, Thomas Haugland, and Pieter Malan. Consider this like an all-star gun channel collection. These videos will help you load more accurate ammo, improve your “mental game”, and shoot better in matches. Enjoy!
This article originally appeared on the USAMU Facebook Page. The USAMU regularly published reloading advice for many years. Check the Facebook archives for related USAMU articles.
Here at the U.S. Army Marksmanship Unit (USAMU), we receive inquiries from shooters at many skill levels. One of the most frequent questions we are asked is, “What equipment do you recommend I buy to start handloading?”
Often, the handloader will be focused on producing ammo in quantity, and a big concern is whether to begin with a single-stage vs. a progressive press. However, there is one critical item that often gets overlooked as folks talk about the especially interesting topics such as reloading die brands and types, scale types and brands. And, what might that item be?
“When all else fails, read the what?” Yes, we recommend those new to handloading actually begin with reading the early chapters of one or, preferably two quality handloading manuals. They contain copious information on basic handloading safety, how to choose and use components, and how to recognize and avoid potentially dangerous conditions. Of course, they also do a fine job of teaching new loaders the correct methods of adjusting dies, determining safe loads and improving accuracy. Beginners can recognize and avoid many potential pitfalls, shortening the learning curve tremendously.
As a government entity, we aren’t able to make specific brand-name recommendations as such. However, recent manuals from the major bullet and powder manufacturers, especially those who emphasize accuracy and match-type bullets are generally a wise choice.
Handloaders often come to prefer one or two maker’s manuals over others for various reasons. Asking a friend who’s already an experienced loader which manuals they recommend is a good start. Borrowing one or more to read before purchasing is another.
This is a good way to both save money and get a feel for the variety of component types and data that are available. Comparing differences in data from different manuals in the same caliber, with the same powder and bullet weight can be an eye-opener. It is also a wise step in researching any loading project before one begins—and the reasons for the differences are fully explained in the manuals!
The AMU recommends buying proven, high-quality equipment. It should have a reputation for great durability, good ergonomics and reasonable-to-excellent precision. In addition, ask fellow shooters which companies have a good reputation for support after the sale. Several of the better handloading companies set the bar very high.
Video Shows Special Features of Forster Co-Ax Reloading Press
With the better ones, it’s common to call to order small replacement parts and receive them at no charge in the mail immediately thereafter. Other companies don’t enjoy such a sterling reputation. Often, these focus on cheap equipment made with low-quality materials, aimed at those to whom cost is the prime consideration.
Good quality equipment not only leads to less frustration, faster production, better results and less misery — it is also an excellent investment. Certain companies’ products sell virtually instantly on the used market and retain high resale value. Other gear from less well-regarded companies is much more difficult to sell. Moreover, it brings far less of its original purchase price—if it can be sold at all.
Ask veteran handloaders — preferably those who are still very active in the shooting sports — which equipment they prefer, and why. After getting specific recommendations, search for reviews of that equipment, as well as possible alternates and newer designs. Learn the steps of operating the various options, and evaluate them for efficiency, effort and precision. A little research can pay big dividends here!
Photo 1: Three Near-Equal-Weight 7mm Bullets with Different Shapes
TECH TIP: Bullets of the same weight (and caliber) can generate very different pressure levels due to variances in Bearing Surface Length (BSL).
Bullet 1 (L-R), the RN/FB, has a very slight taper and only reaches its full diameter (0.284″) very near the cannelure. This taper is often seen on similar bullets — it helps reduce pressures with good accuracy. The calculated BSL of Bullet 1 was ~0.324″. The BSL of Bullet 2, in the center, was ~0.430”, and Bullet 3’s was ~ 0.463″. Obviously, bullets can be visually deceiving as to BSL!
This article from the USAMU covers an important safety issue — why you should never assume that a “book” load for a particular bullet will be safe with an equal-weight bullet of different shape/design. The shape and bearing surface of the bullet will affect the pressure generated inside the barrel. This is part of the USAMU’s Handloading Hump Day series, published on the USAMU Facebook page.
Beginning Handloading, Part 13:
Extrapolating Beyond Your Data, or … “I Don’t Know, What I Don’t Know!”
We continue our Handloading Safety theme, focusing on not inadvertently exceeding the boundaries of known, safe data. Bullet manufacturers’ loading manuals often display three, four, or more similar-weight bullets grouped together with one set of load recipes. The manufacturer has tested these bullets and developed safe data for that group. However, seeing data in this format can tempt loaders — especially new ones — to think that ALL bullets of a given weight and caliber can interchangeably use the same load data. Actually, not so much.
The researchers ensure their data is safe with the bullet yielding the highest pressure. Thus, all others in that group should produce equal or less pressure, and they are safe using this data.
However, bullet designs include many variables such as different bearing surface lengths, hardness, and even slight variations in diameter. These can occasionally range up to 0.001″ by design. Thus, choosing untested bullets of the same weight and caliber, and using them with data not developed for them can yield excess pressures.
This is only one of the countless reasons not to begin at or very near the highest pressure loads during load development. Always begin at the starting load and look for pressure signs as one increases powder charges.
Bullet bearing surface length (BSL) is often overlooked when considering maximum safe powder charges and pressures. In photo 1 (at top), note the differences in the bullets’ appearance. All three are 7mm, and their maximum weight difference is just five grains. Yet, the traditional round nose, flat base design on the left appears to have much more BSL than the sleeker match bullets. All things being equal, based on appearance, the RN/FB bullet seems likely to reach maximum pressure with significantly less powder than the other two designs.
Bearing Surface Measurement Considerations
Some might be tempted to use a bullet ogive comparator (or two) to measure bullets’ true BSL for comparison’s sake. Unfortunately, comparators don’t typically measure maximum bullet diameter and this approach can be deceiving.
Photo 2: The Perils of Measuring Bearing Surface Length with Comparators
In Photo 2, two 7mm comparators have been installed on a dial caliper in an attempt to measure BSL. Using this approach, the BSLs differed sharply from the original [measurements]. The comparator-measured Bullet 1 BSL was 0.694” vs. 0.324” (original), Bullet 2 was 0.601” (comparator) vs. 0.430” (original), and Bullet 3 (shown in Photo 2) was 0.602” (comparator) vs. 0.463” (original). [Editor’s comment — Note the very large difference for Bullet 1, masking the fact that the true full diameter on this bullet starts very far back.]
Lyman makes a very handy product for reloaders that can save space on your reloading bench and give you more efficient powder flow into your cases. With common plastic “one size fits all” type powder funnels, the powder sometimes sticks to the sides of the funnel. Or, the fit to the case mouth is less than ideal so some of the kernels end up on the bench.
Precision powder funnels solve those problems. But what if you shoot a wide range of calibers with big and small case mouths? Lyman has the answer: the Brass-Smith Precision Funnel set, now $28.99 on Amazon. This handy product combines a static-free cast aluminum funnel with a set of SIX (6) CNC-machined inserts that fit cartridges from .22 caliber all the way up to .338 caliber. It is easy to swap the inserts to match the particular cartridge you are loading. In this Ultimate Reloader video, our friend Gavin Gear shows how to use the Lyman Precision Powder Funnel Set with multiple neck-diameter inserts:
Product Description: “The Brass-Smith Precision Funnel set is made to be completely static-free, no more powder clinging to surfaces which can happen with lightweight plastic Funnel. This is no ‘one size fits all’ funnel — the Brass Smith Precision Funnel set uses precision-machined, caliber-specific inserts to properly fit the case neck. CNC-turned aluminum inserts to fit specific cartridge families for calibers 22 to 338. Inserts are laser-marked for caliber identification. The inserts can be quickly and easily installed by simply pushing them into place and then pulling them out when changing calibers. The Funnel comes with inserts for .22, .243/6mm, .25/6.5mm, .270/7mm, .30 and .338 caliber rifle cartridges. A padded storage case neatly stores the funnel and inserts when not in use.”
Forum Member Likes the Lyman Precision Powder Funnel Set
One of our Accurate Shooter Forum members, Garandman, purchased the Lyman Precision Funnel System. He has used it now for multiple cartridge types and is very pleased with the results. Here is his report:
“I wanted to share my good experience with the Lyman powder funnel. First off, with the funnels being aluminum / pot metal, no static charge forms and the powder kernels go right down the funnel into the case with no hang-up.
Also the funnel comes with interchangeable case neck dimension inserts so you get no powder loss outside the case neck. And the funnel is also is less likely to stick to the case neck and pull it out of your loading block. That could spill powder all over the place.”
Overall, the Lyman Precison Funnel Set with case neck inserts has done a great job for Garandman and he suggests you may want to add this tool to your reloading tool collection. Below is a Lyman Precision Funnel Set review from Johnny’s Reloading Bench. This video review has nice close-ups of the six precision inserts from .22 to .338 calibers.
You can never be too safe when hand-loading your own ammunition. This helpful Brownells video outlines the Seven Fundamental Reloading Safety Tips. This is important information for novice hand-loaders and a good refresher for those with reloading experience!
Summary of the Seven Safety Tips:
1. Store your reloading supplies in a safe and dry location, away from children and away from any possible source of ignition. It is also smart to keep your powder and primers separate.
2. Get and use respected reloading manuals, especially for new cartridges. Start low and work up slowly while watching for warning signs of pressure and/or case fatigue.
3. Locate your reloading activity where you will not be distracted. If you get interrupted, stop. (Distractions will eventually lead to mistakes.)
4. Do NOT mix powders. Keep your powders clearly marked and dated. You can use masking tape to write the date on the container.
5. If you load the same cartridge type for different firearms, make sure your ammo headspaces properly in each gun.
6. Check cases frequently. Look for split necks, case head separation or other signs of fatigue and excessive pressure.
7. If reloading military brass, be aware that case capacity is usually reduced, and initial loads should be at least 10-15% lower than published data.
Here are some other tips that will help your avoid making costly mistakes (such as using the wrong powder, or undercharging a case):
Powder Type — Always double-check the label on your powder containers. After placing powder in the powder measure, put a piece of tape on the measure with the powder type written on it. Some guys write the powder type on a card and place that right in the hopper.
Scale Drift — Electronic balances can drift. If you are using a digital powder scale, calibrate the scale with a test weight every 50 rounds or so.
Case Fill — If you throw more than one charge at a time, look INSIDE every case before seating a bullet. Squib charges can be dangerous if you don’t notice them before firing the next round.
Progressive Presses — When using a progressive press, consider using an RCBS Lock-Out Die. This will detect a low charge and stop the machine. These dies will work with RCBS, Hornady, and Dillon progressives.


 There’s a simple, inexpensive “miracle device” that can cut your groups in half. If you’re not using this device, you’re giving away accuracy. The “miracle device” to which we refer is a simple wind indicator aka “windflag”. Using windflags may actually improve your accuracy on target much more than weighing charges to the kernel, or spending your life savings on the “latest and greatest” hardware.


 In this recent video Gavin Gear reviews three types of die accessories from LEE. These work for virtually all standard dies, not just LEE-brand reloading dies. The new LEE basic silver-finish die lock rings now feature splines for enhanced grip and compatibility with LEE’s new die lock ring wrench (photo right). They still boast a rubber 0-Ring that helps “float” the die for improved concentricity. Gavin also reviews Lee’s
 A while back, we featured a portable reloading bench built on a Black & Decker Workmate. That proved a VERY popular do-it-yourself project so we’re showing it again, in case you missed it the first time.


 Lyman’s popular


 Handloaders often come to prefer one or two maker’s manuals over others for various reasons. Asking a friend who’s already an experienced loader which manuals they recommend is a good start. Borrowing one or more to read before purchasing is another.


