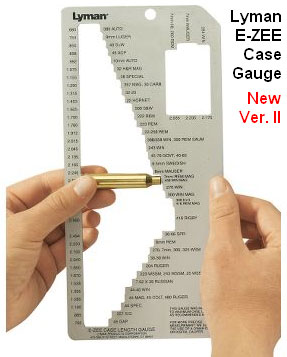
Lyman’s popular Case Length Gauge is now bigger and better. The enhanced version II of Lyman’s Case Length Gauge is much larger than the original version. The E-Zee Case Gauge II now measures more than 70 cartridge types — way more than before. This tool is a metal template with SAAMI-max-length slots for various cartridge types, including relatively new cartridges such as the .204 Ruger and Winchester Short Magnums. This tool allows you to quickly sort brass or check the dimensions. If you have a bucketful of mixed pistol brass this can save you hours of tedious work with calipers. You can also quickly check case lengths to see if it’s time to trim your fired brass.
If you load a wide variety of calibers, or do a lot of pistol shooting, we think you should pick up one of these Lyman Case Gauge templates. They are available for under $26.00 at Brownells ($24.99) and Amazon.com ($19.39). The E-Zee Case Gauge has long been a popular item for hand-loaders.
NOTE: For years the E-Zee Case Gauge had a silver finish with black lettering, as shown in the video. Some of the most recent production of E-Zee Case Gauges have a new “high contrast” look, with white lettering on a black frame. You may get either Case Gauge version when you order online (Brownells shows silver, Amazon shows black). We actually prefer the older, silver version.
Case Gauge Should Last a Lifetime
Easily measure the case length of over 70 popular rifle and pistol cases with Lyman’s new E-Zee Case Length Gauge II. This really is a “must-have” piece of kit for any gun owner who hand-loads numerous pistol and rifle calibers.
This rugged, precisely-made metal gauge makes sorting or identifying cases fast and accurate. The template is machined with SAAMI max recommended case lengths. Made from metal, with no moving parts, the E-Zee Case Gauge II should last a lifetime.
As a 2022 New Year’s bonus for our Bulletin readers we decided to showcase 10 of our favorite gun tech, reloading, and shooting technique videos for our readers. These videos were created by top YouTube content providers: F-Class John, Gavin Gear, Keith Glasscock, Erik Cortina, Thomas Haugland, and Pieter Malan. Consider this like an all-star gun channel collection. These videos will help you load more accurate ammo, improve your “mental game”, and shoot better in matches. Enjoy!
This article originally appeared on the USAMU Facebook Page. The USAMU regularly published reloading advice for many years. Check the Facebook archives for related USAMU articles.
Here at the U.S. Army Marksmanship Unit (USAMU), we receive inquiries from shooters at many skill levels. One of the most frequent questions we are asked is, “What equipment do you recommend I buy to start handloading?”
Often, the handloader will be focused on producing ammo in quantity, and a big concern is whether to begin with a single-stage vs. a progressive press. However, there is one critical item that often gets overlooked as folks talk about the especially interesting topics such as reloading die brands and types, scale types and brands. And, what might that item be?
“When all else fails, read the what?” Yes, we recommend those new to handloading actually begin with reading the early chapters of one or, preferably two quality handloading manuals. They contain copious information on basic handloading safety, how to choose and use components, and how to recognize and avoid potentially dangerous conditions. Of course, they also do a fine job of teaching new loaders the correct methods of adjusting dies, determining safe loads and improving accuracy. Beginners can recognize and avoid many potential pitfalls, shortening the learning curve tremendously.
As a government entity, we aren’t able to make specific brand-name recommendations as such. However, recent manuals from the major bullet and powder manufacturers, especially those who emphasize accuracy and match-type bullets are generally a wise choice.
Handloaders often come to prefer one or two maker’s manuals over others for various reasons. Asking a friend who’s already an experienced loader which manuals they recommend is a good start. Borrowing one or more to read before purchasing is another.
This is a good way to both save money and get a feel for the variety of component types and data that are available. Comparing differences in data from different manuals in the same caliber, with the same powder and bullet weight can be an eye-opener. It is also a wise step in researching any loading project before one begins—and the reasons for the differences are fully explained in the manuals!
The AMU recommends buying proven, high-quality equipment. It should have a reputation for great durability, good ergonomics and reasonable-to-excellent precision. In addition, ask fellow shooters which companies have a good reputation for support after the sale. Several of the better handloading companies set the bar very high.
Video Shows Special Features of Forster Co-Ax Reloading Press
With the better ones, it’s common to call to order small replacement parts and receive them at no charge in the mail immediately thereafter. Other companies don’t enjoy such a sterling reputation. Often, these focus on cheap equipment made with low-quality materials, aimed at those to whom cost is the prime consideration.
Good quality equipment not only leads to less frustration, faster production, better results and less misery — it is also an excellent investment. Certain companies’ products sell virtually instantly on the used market and retain high resale value. Other gear from less well-regarded companies is much more difficult to sell. Moreover, it brings far less of its original purchase price—if it can be sold at all.
Ask veteran handloaders — preferably those who are still very active in the shooting sports — which equipment they prefer, and why. After getting specific recommendations, search for reviews of that equipment, as well as possible alternates and newer designs. Learn the steps of operating the various options, and evaluate them for efficiency, effort and precision. A little research can pay big dividends here!
Photo 1: Three Near-Equal-Weight 7mm Bullets with Different Shapes
TECH TIP: Bullets of the same weight (and caliber) can generate very different pressure levels due to variances in Bearing Surface Length (BSL).
Bullet 1 (L-R), the RN/FB, has a very slight taper and only reaches its full diameter (0.284″) very near the cannelure. This taper is often seen on similar bullets — it helps reduce pressures with good accuracy. The calculated BSL of Bullet 1 was ~0.324″. The BSL of Bullet 2, in the center, was ~0.430”, and Bullet 3’s was ~ 0.463″. Obviously, bullets can be visually deceiving as to BSL!
This article from the USAMU covers an important safety issue — why you should never assume that a “book” load for a particular bullet will be safe with an equal-weight bullet of different shape/design. The shape and bearing surface of the bullet will affect the pressure generated inside the barrel. This is part of the USAMU’s Handloading Hump Day series, published on the USAMU Facebook page.
Beginning Handloading, Part 13:
Extrapolating Beyond Your Data, or … “I Don’t Know, What I Don’t Know!”
We continue our Handloading Safety theme, focusing on not inadvertently exceeding the boundaries of known, safe data. Bullet manufacturers’ loading manuals often display three, four, or more similar-weight bullets grouped together with one set of load recipes. The manufacturer has tested these bullets and developed safe data for that group. However, seeing data in this format can tempt loaders — especially new ones — to think that ALL bullets of a given weight and caliber can interchangeably use the same load data. Actually, not so much.
The researchers ensure their data is safe with the bullet yielding the highest pressure. Thus, all others in that group should produce equal or less pressure, and they are safe using this data.
However, bullet designs include many variables such as different bearing surface lengths, hardness, and even slight variations in diameter. These can occasionally range up to 0.001″ by design. Thus, choosing untested bullets of the same weight and caliber, and using them with data not developed for them can yield excess pressures.
This is only one of the countless reasons not to begin at or very near the highest pressure loads during load development. Always begin at the starting load and look for pressure signs as one increases powder charges.
Bullet bearing surface length (BSL) is often overlooked when considering maximum safe powder charges and pressures. In photo 1 (at top), note the differences in the bullets’ appearance. All three are 7mm, and their maximum weight difference is just five grains. Yet, the traditional round nose, flat base design on the left appears to have much more BSL than the sleeker match bullets. All things being equal, based on appearance, the RN/FB bullet seems likely to reach maximum pressure with significantly less powder than the other two designs.
Bearing Surface Measurement Considerations
Some might be tempted to use a bullet ogive comparator (or two) to measure bullets’ true BSL for comparison’s sake. Unfortunately, comparators don’t typically measure maximum bullet diameter and this approach can be deceiving.
Photo 2: The Perils of Measuring Bearing Surface Length with Comparators
In Photo 2, two 7mm comparators have been installed on a dial caliper in an attempt to measure BSL. Using this approach, the BSLs differed sharply from the original [measurements]. The comparator-measured Bullet 1 BSL was 0.694” vs. 0.324” (original), Bullet 2 was 0.601” (comparator) vs. 0.430” (original), and Bullet 3 (shown in Photo 2) was 0.602” (comparator) vs. 0.463” (original). [Editor’s comment — Note the very large difference for Bullet 1, masking the fact that the true full diameter on this bullet starts very far back.]
Lyman makes a very handy product for reloaders that can save space on your reloading bench and give you more efficient powder flow into your cases. With common plastic “one size fits all” type powder funnels, the powder sometimes sticks to the sides of the funnel. Or, the fit to the case mouth is less than ideal so some of the kernels end up on the bench.
Precision powder funnels solve those problems. But what if you shoot a wide range of calibers with big and small case mouths? Lyman has the answer: the Brass-Smith Precision Funnel set, now $28.99 on Amazon. This handy product combines a static-free cast aluminum funnel with a set of SIX (6) CNC-machined inserts that fit cartridges from .22 caliber all the way up to .338 caliber. It is easy to swap the inserts to match the particular cartridge you are loading. In this Ultimate Reloader video, our friend Gavin Gear shows how to use the Lyman Precision Powder Funnel Set with multiple neck-diameter inserts:
Product Description: “The Brass-Smith Precision Funnel set is made to be completely static-free, no more powder clinging to surfaces which can happen with lightweight plastic Funnel. This is no ‘one size fits all’ funnel — the Brass Smith Precision Funnel set uses precision-machined, caliber-specific inserts to properly fit the case neck. CNC-turned aluminum inserts to fit specific cartridge families for calibers 22 to 338. Inserts are laser-marked for caliber identification. The inserts can be quickly and easily installed by simply pushing them into place and then pulling them out when changing calibers. The Funnel comes with inserts for .22, .243/6mm, .25/6.5mm, .270/7mm, .30 and .338 caliber rifle cartridges. A padded storage case neatly stores the funnel and inserts when not in use.”
Forum Member Likes the Lyman Precision Powder Funnel Set
One of our Accurate Shooter Forum members, Garandman, purchased the Lyman Precision Funnel System. He has used it now for multiple cartridge types and is very pleased with the results. Here is his report:
“I wanted to share my good experience with the Lyman powder funnel. First off, with the funnels being aluminum / pot metal, no static charge forms and the powder kernels go right down the funnel into the case with no hang-up.
Also the funnel comes with interchangeable case neck dimension inserts so you get no powder loss outside the case neck. And the funnel is also is less likely to stick to the case neck and pull it out of your loading block. That could spill powder all over the place.”
Overall, the Lyman Precison Funnel Set with case neck inserts has done a great job for Garandman and he suggests you may want to add this tool to your reloading tool collection. Below is a Lyman Precision Funnel Set review from Johnny’s Reloading Bench. This video review has nice close-ups of the six precision inserts from .22 to .338 calibers.
You can never be too safe when hand-loading your own ammunition. This helpful Brownells video outlines the Seven Fundamental Reloading Safety Tips. This is important information for novice hand-loaders and a good refresher for those with reloading experience!
Summary of the Seven Safety Tips:
1. Store your reloading supplies in a safe and dry location, away from children and away from any possible source of ignition. It is also smart to keep your powder and primers separate.
2. Get and use respected reloading manuals, especially for new cartridges. Start low and work up slowly while watching for warning signs of pressure and/or case fatigue.
3. Locate your reloading activity where you will not be distracted. If you get interrupted, stop. (Distractions will eventually lead to mistakes.)
4. Do NOT mix powders. Keep your powders clearly marked and dated. You can use masking tape to write the date on the container.
5. If you load the same cartridge type for different firearms, make sure your ammo headspaces properly in each gun.
6. Check cases frequently. Look for split necks, case head separation or other signs of fatigue and excessive pressure.
7. If reloading military brass, be aware that case capacity is usually reduced, and initial loads should be at least 10-15% lower than published data.
Here are some other tips that will help your avoid making costly mistakes (such as using the wrong powder, or undercharging a case):
Powder Type — Always double-check the label on your powder containers. After placing powder in the powder measure, put a piece of tape on the measure with the powder type written on it. Some guys write the powder type on a card and place that right in the hopper.
Scale Drift — Electronic balances can drift. If you are using a digital powder scale, calibrate the scale with a test weight every 50 rounds or so.
Case Fill — If you throw more than one charge at a time, look INSIDE every case before seating a bullet. Squib charges can be dangerous if you don’t notice them before firing the next round.
Progressive Presses — When using a progressive press, consider using an RCBS Lock-Out Die. This will detect a low charge and stop the machine. These dies will work with RCBS, Hornady, and Dillon progressives.
There is an excellent article about primers on the Shooting Times website. We strongly recommend you read Mysteries And Misconceptions Of The All-Important Primer, written by Allan Jones. Mr. Jones is a bona fide expert — he served as the manager of technical publications for CCI Ammunition and Speer Bullets and Jones authored three editions of the Speer Reloading Manual.
This authoritative Shooting Times article explains the fine points of primer design and construction. Jones also reveals some little-known facts about primers and he corrects common misconceptions. Here are some highlights from the article:
Size Matters
Useful Trivia — even though Small Rifle and Small Pistol primer pockets share the same depth specification, Large Rifle and Large Pistol primers do not. The standard pocket for a Large Pistol primer is somewhat shallower than its Large Rifle counterpart, specifically, 0.008 to 0.009 inch less.
Magnum Primers
There are two ways to make a Magnum primer — either use more of the standard chemical mix to provide a longer-burning flame or change the mix to one with more aggressive burn characteristics. Prior to 1989, CCI used the first option in Magnum Rifle primers. After that, we switched to a mix optimized for spherical propellants that produced a 24% increase in flame temperature and a 16% boost in gas volume.
Foiled Again
Most component primers have a little disk of paper between the anvil and the priming mix. It is called “foil paper” not because it’s made of foil but because it replaces the true metal foil used to seal early percussion caps. The reason this little disk exists is strictly a manufacturing convenience. Wet primer pellets are smaller than the inside diameter of the cup when inserted and must be compacted to achieve their proper diameter and height. Without the foil paper, the wet mix would stick to the compaction pins and jam up the assembly process.
The Lee Hand Press Kit comes complete with: Breech Lock Hand Press, Ram Primer fittings, Powder Funnel, Case Lube, and one Breech Lock Quick Change Bushing.
The Lee Breech Lock Hand Press is a useful addition to any reloader’s tool collection. This Hand Press allows you to resize brass or seat bullets while at the range or away from your loading room. No it won’t replace your Co-Ax or Rockchucker, but this is a handy piece of gear. And it’s very affordable. Midsouth sells the Lee Breech Lock Hand Press Kit, with everything shown above, for $64.52. Or you can buy just the Hand Press by itself for $49.91 at Amazon. That’s a great deal.
Lee Hand Press Quick-Change Die Functionality
This Lee Press includes the Breech Lock Quick-Change Die Feature, so you can instantly change dies with just a twist of the wrist. One Breech Lock Quick Change Bushing is included. The Breech Lock Hand Press is light and compact. It tips the scale at a mere 1 3/4 pounds and overall product length is 11.5″. Note: the maximum overall length cartridge the Lee Hand Press can accept is 3.650 inches.
While we don’t recommend the Hand Press for major full-length sizing chores, it does a good job seating bullets. This makes it a handy “field expedient” tool when doing load development at the range. For example you can experiment with seating depth by loading a batch of cartridges at home with the bullets deliberately seated long. Then, at the range, you can re-seat the bullets progressively shorter (in a series of rounds), until you find the optimal Cartridge OAL.
Lee’s Hand Press is also great for decapping operations. One verified buyer reports: “I mostly use it for decapping while watching TV, with a universal decapper die. Of course it is also useful for other operations. I wouldn’t love sizing large rifle cases with it, but if you’ve prepped your cases on a bigger press you could comfortably take it to the range for load development, one round at a time, working right there at the line instead of making a bunch of loads at home that you’ll have to disassemble later. It’s smaller and more lightweight than it looks[.]”
Using Hand Press to Load at the Range
To learn more about using the Lee Hand Press in the field with a compact scale, read Reloading Without a Bench on GunsAmerica.com. Author Christopher Mace explains: “whether you want a better way to do load development, the capability to reload out of your ‘bugout bag’, or you’re short of space but wanting to get into reloading, the Lee Loaders and the Lee Hand Press offer you some options.”
He who dies with the most toys wins — right? Well Sinclair has another interesting gadget you can add to your reloading bench. The Sinclair Case Neck Sorting Tool lets you quickly sort brass by neck-wall thickness. For those who shoot “no-turn” brass, this can improve neck-tension consistency. Large variances in neck-wall thickness can cause inconsistent neck “grip” on the bullet. Generally, we’ve found that more consistent neck tension will lower ES and (usually) improve accuracy. We know some guys who shoot no-turn 6mmBR brass in competition with considerable success — but their secret is pre-sorting their brass by neck-wall thickness. Cases that are out-of-spec are set aside for sighters (or are later skim-turned).
Watch Case Neck Sorting Tool Operation in Video
How the Case Neck Sorting Tool Works
Here’s how the Sinclair tool works. Cases are rotated under an indicator tip while they are supported on a case-neck pilot and a support pin through the flash hole. The unit has a nice, wide base and low profile so it is stable in use. The tool works for .22 through .45 caliber cases and can be used on .17- and .20-caliber cases with the optional carbide alignment rod. The MIC-4 pin fits both .060 (PPC size) and .080 (standard size) flash holes. Sinclair’s Case Neck Sorting Tool can be ordered with or without a dial indicator. The basic unit without dial indicator (item 749-006-612WB) is priced at $59.99. You can also buy the tool complete with dial indicator (item 749-007-129WB) for $89.99. IMPORTANT: This sorting tool requires caliber-specific Case Neck Pilots which must be ordered separately.
Editor’s Comment: The purpose of this Sinclair tool is rapid, high-quantity sorting of cartridge brass to ascertain significant case-neck-wall thickness variations. Consider this a rapid culling/sorting tool. If you are turning your necks, you will still need a quality ball micrometer tool to measure neck-wall thickness (to .0005) before and after neck-turning operations.
Many years ago, when we decided to do a story about SAKO’s TRG series of rifles, we remembered our friend Terje Fjørtoft in Norway. Terje has owned, and hunted with, both the TRG-22 (in .308 Win), and its big brother, the TRG-42 (chambered in .338 Lapua Magnum). Unlike many TRG owners in the USA, Terje has carried his “tactical hunters” into the field, and tested their effectiveness on large game in both coastal and mountain environments, in warm weather and cold. Terje tells us the TRGs have proven to be rugged and reliable. And they are accurate. The .308 Win TRG-22 delivers about 0.45 MOA groups at 420 yards shot from bipod. The .338 LM TRG-42 shoots about 0.55 – 0.7 MOA at that distance.
A Tale of Two TRGsby Terje Fjørtoft
I live in Brattvåg, along the coast of Norway, but I hunt and shoot at the nearby island “Fjørtoft” (same as my last name) and a small island outside Fjørtoft. I grew up on Fjørtoft as a child, and we hunt seals there in the spring and fall. The large, top photo shows me with my black TRG-42 338 Lapua Mag (“LM”) during a seal hunt a couple years ago. Click on the thumbnail at right to watch a video that shows me shooting the .338 LM. Most of the photos in this story are from that hunt. Because the .338 LM was really “overkill” on the seals (and expensive to reload), I replaced that rifle with a TRG-22 in .308 Winchester.
We hunt seals primarily for wildlife control. This is because the seals carry an internal parasite, called “Kveis”, a small worm that breeds inside the seals (after eating contaminated fish). When the seals expel the Kveis into the water, the Kveis larvae are consumed by the fish and then the fish become unfit to eat. The parasite literally eats the fish from the inside out. It’s not very pretty and it has hurt our Norwegian fishing industry. So there is an important purpose for our seal hunting. We hunt mostly from islands, targeting the seals in the water, and retrieving them with a small boat.
Because the seals spend most of their time in the water, a seal-hunter needs a very accurate rifle [to take head shots at distance]. I like the TRG-22 because it is very accurate out of the box, with a very nice bipod that works well in the field. The stock is comfortable with good adjustment range. The TRG features a 10-rd magazine and the barrel is pre-threaded for a muzzle brake or suppressor.
I have also used my TRGs for hunting big game, deer and what Americans call “Elk”. You can see, further down on this page, a picture from a hunting stand taken late in the evening, in the fading light. Yes I successfully bagged a nice buck during that trip with my TRG-42. When hunting, I use a Leica 900 rangefinder, Swarovski 7×42 Habicht binoculars, and a Silva windwatch. For Optics on the TRG-22, I have a Zeiss 6-24×56 scope, in Tikka Optilock rings. To get more scope adjustment I milled 0.9 mm off the front scope base mount. The Zeiss is great for viewing small targets past 400 meters. It was very difficult to find a longer shooting place than 575 meters on this Island (Uksnøy) but I found a place where I can shoot out to 930 meters, and I’ve made an 80-cm steel gong for a target. At this range, the bullet must fly nearly all the distance over the water.
Terje Shooting the TRG-42 without suppressor. Big recoil, big flash.
Both the TRG-22 and TRG-42 are very accurate right out of the box. The only thing I did before I first shot the TRGs was to clean the barrels very thoroughly. This is because the SAKO factory test shoots the gun without cleaning the barrel. I also adjust the cheek piece upward when shooting the rifles with a big scope. However, if you raise the cheek piece too high you can’t get the bolt out without removing the whole cheek piece. The only real modification I’ve made to my TRGs was to put rubber foot pads on the feet of the SAKO factory bipod. This gives the bipod better grip on slick surfaces such as concrete, or the rocks on the offshore islands.
.338 LM vs. .308 Win — Smaller Can Be Better
A few years ago I had a black TRG-42 (338 LM), but after a year, I sold it, and ordered a TRG-22 from the SAKO factory. After a one-year wait, I got the new green TRG-22 in February this year. One main reason I changed to .308 Win was the cost of ammo. I can reload .308 Win ammo for about one-third the price that it costs to reload .338 LM. One other reason is that my usual shooting distance is about 390 meters–at that distance the .308 is more than effective enough. Also, with the .338 LM, the barrel and the suppressor heated up after only a few shots, but with my new .308, I can shoot at my own pace without this problem. After my most recent shooting trip I once again confirmed how accurate, and fun-to-shoot, the TRG-22 is. I think now the TRG-22 has become my favorite plinking gun.
Though it is fun to experience the big boom and flash of the .338 LM, I’ll admit that it is just too much rifle for most applications. The .338 LM is REAL overkill for seal hunting. Here in Norway we have a rule that the smallest caliber we can use is 6.5×55 with a 140gr (or heavier) bullet, but everyone who hunts seals knows that the seals stay mostly in the water, and therefore you must take a headshot at distance up to about 200 meters. Making the headshot with a smaller caliber is advised for two reasons. First, when a big .338 bullet hits the water, there is a danger it will skip and ricochet quite some distance. Second, if you use too powerful a load/gun/caliber and take a headshot on a swimming seal, the seal sinks like a rock.
Reloading for the TRG-22 (.308 Win) With the TRG-22, I found it was easy to get an accurate load. My groups with 155gr Scenars are consistently good with a variety of different powders. I’ve tried both light and heavy bullets, but I favor the 155gr Scenars over the 185gr Scenars because the 155s fly a lot faster and drop less.
Three loads (all with Fed 210m primers) that have worked well are: 155gr Scenar with VV N150, 885m/sec; 155gr Scenar with Norma N-11, 890m/sec, and 185gr Scenar, VV N150, 770m/sec. Norma N-11 is a low-cost powder for target shooting. N-11 is similar to Norma 203B or Norma 202 but it varies quite a bit from lot to lot.
I use a RCBS Rock Chucker press, and currently use a standard RCBS full-length die kit to reload my .308 rounds. However, I recently ordered a Redding Competition 3-die set with a .335 bushing. I look forward to trying the Reddings. I have just started to test different seating depths. The 155s just “kiss” the lands at 74.10 mm. I’ve tried 74.00 mm, 74.10 mm and 73.55 mm, but so far saw no significant differences.
Reloading for the TRG-42 (.338 LM)
For the .338 LM, I started with a 250gr Scenar and 95 grains of Vihtavuori N-170. That load was very accurate at about 850 m/sec, but it produced excessive muzzle flash. And, in the winter, the muzzle velocity was inconsistent, and there was too much unburned powder. Next I tried Norma N-15, which proved very accurate at about 880 m/sec. With that load I shot my best TRG-42 group at 380 meters. I set the 250gr Scenar to touch the rifling with 93.2 mm COAL, and I used Federal 215m primers in Lapua-brand brass. Norma MPR2 and VV N-560 (860 m/sec) also were very accurate with the 250 Scenar.
My seal hunting bullet was the 200gr Nosler BT. This bullet grouped very well with 90-94 grains Norma N-15. Velocity was about 970m/sec if I remember correctly. I also tried the 300gr Sierra MK, and got 1/2″ 3-shot groups at 100 meters with 93.5 grains of VV N-170, but this combination produced terrible groups at longer range.
Loading for the .338 LM was not difficult — about the same as loading for .308 Win, except that you use nearly twice the amount of powder. I didn’t crimp the bullets in the neck, didn’t use any special tricks or neck lube. I used RCBS .338 LM full-length die. That functioned, but it would not be my first choice today. Overall, my better loads in the .338 shot in the 0.5-0.7 MOA range. My best group was four shots in 25mm (1″) at 380 meters (416 yards).
Hunting in Norway
I’m not a competitive sport-shooter. Normally, the only time I go to a “commercial” rifle range is to take the test for my hunting license. Every year, I must re-qualify for a shooting license to hunt big game and seals.
Hunters Tested Annually
In Norway, you must pass an actual shooting test before you can hunt big game. This test requires five shots at a deer silhouette target at 100 meters. No rests are allowed–you must shoot off-hand or with a sling only. You have to place five shots inside a 30 cm circle over the front leg.
Every big game hunter that passes this test is authorized to hunt at “dusk and dawn” and in moonlight. So, we do a lot of our hunting in the twilight hours. However, no night-vision or artificial illumination (spotlights) are allowed. We usually hunt deer at dusk and dawn. In the evening, we go on post two to three hours before it is dark, and sit there waiting for the deer to show up–hopefully before it is too dark. In the morning we go to the post one hour before you see any light of the sun, and wait for the deer to show up until the daylight. But when it is full moon we sometime have enough light to hunt in the middle of the night. In the photo, you can see a deer through the scope of my TRG-42. This was very late in the evening. CLICK HERE for BIG Photo.
Sound Suppressors for Hunting Rifles
Suppressors are legal to use for hunting in Norway. I have suppressors on all my rifles, even my little CZ 452 in 17 HMR. To me, shooting a rifle without a suppressor is like driving a car without an exhaust system. The suppressor reduces both noise AND recoil significantly. With a good suppressor, there is no loss of accuracy. The only “negative” in using a suppressor is extra weight on the end of the barrel.
I crafted my own home-made suppressor. It’s similar to my commercially-made TRG-22 suppressor, but the core is made from titanium to be lighter in weight and more corrosion-resistant. I used a lathe at work to craft the inside of the new suppressor. The core of the unit is built from a 27.5 cm X 40mm round bar of titanium while the outer cylinder is made from a 42mm stainless steel tube. I wanted to use titanium for the exterior cylinder as well, but I couldn’t source the right size titanium tube.
Commercial Suppressor on TRG-42
Comparing .308 Win vs. 6mmBR I also have a 6BR hunting rifle (compensated of course). I have a lot of field time with the 6BR rifle, and feel very confident with that gun. When I got the Krieger 6mmBR barrel on the SAKO Varminter, I fell in love with that rifle from day one, and that rifle is my first choice for small game hunting.
I also like the TRG-22 gun very much and enjoy it more and more with each new field trip. That .308 is my big game rifle and my long-range target rifle.
I recently tested my TRG-22 rifle at 387 meters. This was just “fun shooting” at steel plates, and I didn’t measure groups. But I was happy with the results. Once I corrected for the 5 m/sec crosswind, I was able to put five successive shots on a 10 cm (4″) diameter steel target at 387 meters (423 yards).
My SAKO Varminter in 6mm BR and my TRG-22 are two very different rifles. The TRG-22 is much heavier. I guess the TRG-22 is about 6.5-7 kg while my SAKO 6BR is about 4.5-5 kg, both with suppressor, scope, and bipod. The 6BR with suppressor is much quieter than the TRG-22 with suppressor. The recoil of the 6BR is a lot softer than the TRG-22. So far my 6BR is more accurate. A typical three-shot group with the 6BR is 25-40 mm at 387 meter (423 yards), and that is with just 10X magnification from a Zeiss scope. With my TRG-22, my 3-shot groups run about 50-60 mm, shooting with bipod and beanbag. But I think with a better .308 Win reloading die and more practice, I can improve my groupings with the TRG-22.
SPEC SHEET
The SAKO TRG-22 and TRG-42 are built in Finland by SAKO, a subsidiary of Beretta. In America, the guns are distributed by Beretta USA. Both TRGs (22/42) are available in forest green or a matte black textured finish. A two-stage match trigger is standard.
The stock is somewhat unconventional. It is an external shell, bolted to an internal metal chassis. The action bolts directly to the chassis, without bedding. The injection-molded stock is adjustable for comb height, length of pull (with spacers), vertical butt-pad height and cast-off.
Weight TRG-22 4.7 kg (black) 4.9 kg (green)
Barrel TRG-22 660 mm (26″), hammer-forged, optional stainless or phosphate finish


 Lyman’s popular Case Length Gauge is now bigger and better. The enhanced version II of Lyman’s Case Length Gauge is much larger than the original version. The E-Zee Case Gauge II now measures more than 70 cartridge types — way more than before. This tool is a metal template with SAAMI-max-length slots for various cartridge types, including relatively new cartridges such as the .204 Ruger and Winchester Short Magnums. This tool allows you to quickly sort brass or check the dimensions. If you have a bucketful of mixed pistol brass this can save you hours of tedious work with calipers. You can also quickly check case lengths to see if it’s time to trim your fired brass.


 Handloaders often come to prefer one or two maker’s manuals over others for various reasons. Asking a friend who’s already an experienced loader which manuals they recommend is a good start. Borrowing one or more to read before purchasing is another.


 Lee Hand Press Quick-Change Die Functionality

 He who dies with the most toys wins — right? Well Sinclair has another interesting gadget you can add to your reloading bench. The Sinclair


 Because the seals spend most of their time in the water, a seal-hunter needs a very accurate rifle [to take head shots at distance]. I like the TRG-22 because it is very accurate out of the box, with a very nice bipod that works well in the field. The stock is comfortable with good adjustment range. The TRG features a 10-rd magazine and the barrel is pre-threaded for a muzzle brake or suppressor.
 Both the TRG-22 and TRG-42 are very accurate right out of the box. The only thing I did before I first shot the TRGs was to clean the barrels very thoroughly. This is because the SAKO factory test shoots the gun without cleaning the barrel. I also adjust the cheek piece upward when shooting the rifles with a big scope. However, if you raise the cheek piece too high you can’t get the bolt out without removing the whole cheek piece. The only real modification I’ve made to my TRGs was to put rubber foot pads on the feet of the SAKO factory bipod. This gives the bipod better grip on slick surfaces such as concrete, or the rocks on the offshore islands.
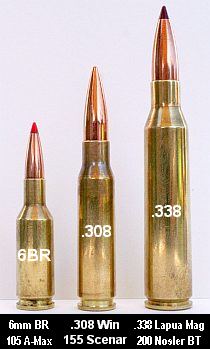 .338 LM vs. .308 Win — Smaller Can Be Better
 Reloading for the TRG-22 (.308 Win)
 Reloading for the TRG-42 (.338 LM)
 Hunting in Norway


 I also have a 6BR hunting rifle (compensated of course). I have a lot of field time with the 6BR rifle, and feel very confident with that gun. When I got the Krieger 6mmBR barrel on the SAKO Varminter, I fell in love with that rifle from day one, and that rifle is my first choice for small game hunting.


