Many shooters prefer to deprime their brass before resizing. That way they can tumble cases or keep primer debris off their main press. To deprime cases before sizing or cleaning you can use a Depriming Die (aka “decapping die”). This pushes out the spent primer without changing the neck or body of a case. Such decapping dies work fine, but they do require the use of a press. Here is a handy alternative — a cool tool that allows you to deprime brass anywhere — no press needed.
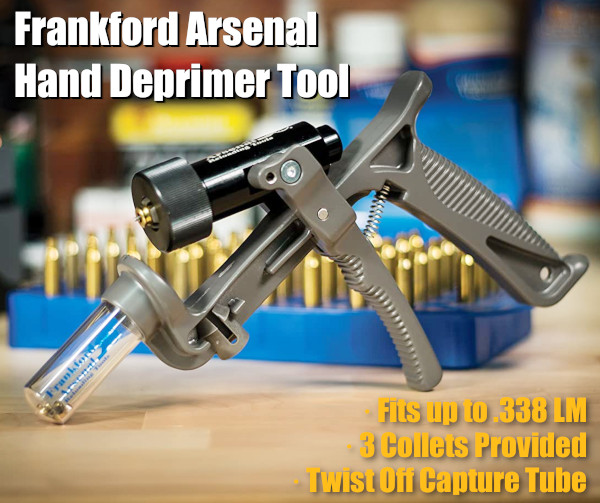
Handheld Primer Removal Tool From Frankford Arsenal
This cleverly-designed Hand Deprimer Tool allows you to deprime cartridge cases without a press. This hand-tool from Frankford Arsenal will deprime brass and capture primers conveniently. You can deprime your cases while watching TV or relaxing in your favorite chair.
This device lets you remove spent primers anywhere — no press needed and all the mess (cups/anvils/residue) stays in the capture chamber. This tool comes works with nearly all common case types up to .338 Lapua Magnum. With good leverage, this tool does the job quicklyi and efficiently. Forum members have praised this handy tool, but recommend wearing a thick glove if doing more than 100 cases in a sesssion.
This handy depriming tool is very versatile. With a universal, cylinder-style cartridge-holder, the tool can deprime a wide variety of cartridge types from .20 caliber up to .338 caliber. Three different plastic collets are provided to handle for different diameter cases. Spent primers are captured in a removable spent primer catch tube. Simply twist off the clear catch tube to dump the spent primers. With die-cast metal construction, this tool should last through many thousands of depriming cycles. MSRP is $54.99. Right now it is $44.99 on Amazon with 82% 5-star ratings.
User Modifications — Grip Padding and High-Volume Capture
Many users recommended putting some kind of padding on the grip and front lever to reduce pressure on the fingers. This can be done with a wrap or a rubber covering. In addition, users have adapted the unit with an attached hose and large primer capture jug. If you depriming hundreds of cases at a time, this hose conversion may make sense.
Review from actual owner: “I have owned one of these for about eight years and deprimed over 10,000 cases with this tool. I have never had to replace a single part on it. You will have to adjust the return spring every so often, but that is a very easy task. If you are depriming a LOT of brass, the handle can tear up your hand a bit. Solution: Wear a Mechanics Glove. Easy Peasy! You will NOT regret this purchase.”
How to Adapt Tool for Small Flash Hole Brass
The Frankford Arsenal Deprimer Tool was designed for LARGE flash-hole brass. To deprime brass with small (1.5mm/0.59″) small flash-holes, as found on Lapua .220 Russian and 6mmBR cases, you will need to reduce the pin diameter. A smaller pin is “in development” according to the manufacturer. Frankford Arsenal currently recommends purchasing a replacement pin and “sanding it down” to the smaller diameter. NOTE: This is NOT difficult — simply spin the stock pin in some sandpaper.
A while back, we featured a portable reloading bench built on a Black & Decker Workmate. That proved a VERY popular do-it-yourself project so we’re showing it again, in case you missed it the first time.
Texan Robert Lewis made himself a great portable reloading bench from plywood mounted to a Black & Decker Workmate. The bench, roughly 22″ x 19″ on top, folds up to fit easily in your car’s trunk or behind the seats in a pick-up truck cab. Four recessed bolts hold the wood top section to the collapsible B&D Workmate. The sides and back of the unit are attached to the base with small nails. There is a small shelf (also nailed in place) which can be used to clamp a powder measure or hold a scale. Shown in the photo is a Harrell’s Benchrest measure and Harrell’s single-stage “C” press.
The whole unit can be built for about $65.00 with pine, or $80.00 with oak (as shown). Robert explained: “The Workmate was $40. If someone bought a 2’x4′ sheet of 3/4″ oak plywood, I think it is around $30. Using pine plywood would be about half that. Fasteners were $3. Spar Urethane would be $5.”
Robert told us: “I used a couple ideas I found on the web. The Larry Willis website gave me the idea to use the Black and Decker Workmate as a base. I found the Workmate on sale for $40 and the top is made from oak plywood I had in my shop. I sealed the wood with three coats of Spar Urethane. The whole thing folds into a nice package for transportation to and from the range.”
NOTE: Since we first ran this story, the price of a Black & Decker Workmate WM225 has increased. However you can still pick a WM225 Workmate for under $60.00. Amazon is currently selling WM225 Workmates for $59.58. The next best price we found was $69.61 at Home Depot, still a good price (Lowe’s is charging $94.98).
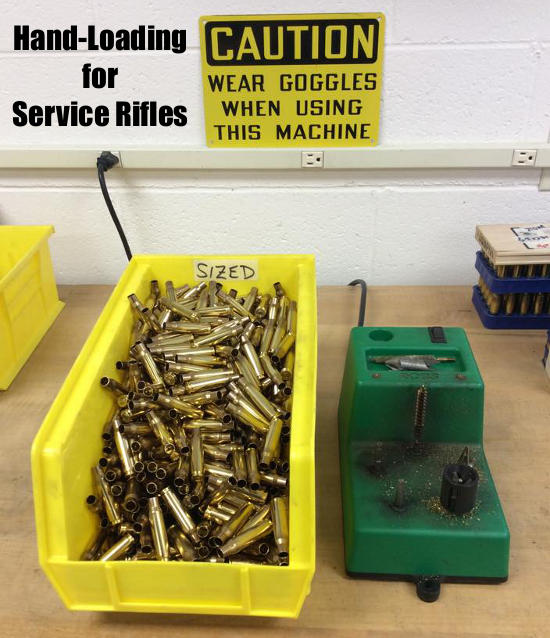
The U.S. Army Marksmanship Unit (USAMU) has published a great series of reloading “how-to” articles on its Facebook Page. This post covers key factors to consider when loading ammunition for Match Rifles and Service Rifles, with a particular focus on self-loading “gas guns”. Visit the USAMU Facebook Page each Wednesday for other, helpful “Handloading Hump-Day” tips.
We offer some “cardinal rules” to help new gas-gun handloaders with safety and efficiency. These address both Match Rifle and Service Rifle versions of the AR15, M1 Garand, M1A, and M110. However, they can also improve safe reloading for many other auto-loaders such as M1 Carbines, FALs, SIGs, etc. The author distilled these principles many years ago to help focus on the essential aspects of these rifles.
RULE ONE: Service Rifles Are Not Benchrest Rifles
Gas-guns require a relatively loose fit between ammunition and chamber (vs. bolt actions) for safe, smooth operation. Many techniques, such as neck sizing and keeping cartridge headspace quite tight, are popular in the extreme bolt gun accuracy realm. However, they are of little value with Service Rifles, and some could even be hazardous. Before adopting a specialized technique, seriously consider whether it is appropriate and beneficial in a gas-gun.
RULE TWO: Never Compromise Safety to Obtain Accuracy
Example: If choosing a brand of great, but ultra-sensitive match primers offers possibly better accuracy at the risk of slam-fires in your design of rifle, don’t do it! You are issued exactly two eyes and ten fingers (best-case scenario). Risking them trying to squeeze 0.25 MOA better accuracy out of an M1A, etc. simply isn’t worth it.
RULE THREE: Tailor the Precision to Your Individual Skill and Your Rifle’s Potential
This has been addressed here before, but bears repeating for newcomers. If you are struggling to break out of the Marksman Class, or using a CMP M1 “As-Issued,” then laboriously turning the necks of your 600-yard brass is a waste of time. Your scores will improve much faster by practicing or dry-firing. On the other hand, if the reigning champions anxiously check your scores each time you fire an event, a little neck-turning might not be so far-fetched.
Verifying Load Improvements — Accuracy hand-loading involves a wide variety of techniques, ranging from basic to rather precise. Carefully select those which offer a good return on investment for your time and labor. In doubt? Do a classic pilot study. Prepare ammo for at least three or four ten-shot groups with your new technique, vs. the same with your standard ammo. Then, pick a calm day and test the ammo as carefully as possible at its full distance (e.g. 200, 300, or 600 yards) to verify a significant improvement. A little testing can save much labor!
RULE FOUR: Be Your Own Efficiency Expert
Serious Service Rifle shooters generally think of ammunition in terms of thousands of rounds, not “boxes”, or even “hundreds”. Analyze, and WRITE DOWN each step in your reloading process. Count the number of times each case is handled. Then, see if any operations can be dropped or changed without reducing safety or accuracy. Eliminating just two operations saves 2000 steps per 1000 rounds loaded. Conversely, carefully consider any measurable benefits before adding a step to your routine.
RULE FIVE: In Searching for Greater Accuracy with Efficiency, Look for System Changes
For example, instead of marking your 300-yard rounds individually to differentiate them from your 200-yard ammo, would a simple change in primers work? If accuracy is maintained, using brass-colored primers for 200 and silver for 300 provides an indelible indicator and eliminates a step! Similarly, rather than spending hours selecting GI surplus brass for weight and neck uniformity, consider splurging on some known, high-quality imported match brass for your 600-yard loads. Results should be excellent, time is saved, and given limited shooting at 600 yards, brass life should be long.
RULE SIX: Check All Your Primers Before Packaging Your Loaded Ammo
This seems simple and even intuitive. However, many slam-fires (which were much more common when M1s and M1As were the standard) are due, at least in part, to “high” primers. Primers should be seated below flush with the case head. The USAMU has addressed this at length in a previous column, but each round should be checked for properly-seated primers before they are packaged for use.
Three near-equal-weight 7mm bullets with different shapes and bearing surface.
This article, from the USAMU Facebook Page, concerns reloading safety. In the relentless quest for more speed and flatter ballistics, some hand-loaders load way too hot, running charges that exceed safe pressure levels. Hint: If you need a mallet to open your bolt, chances are your load is too hot. Stay within safe margins — your equipment will last longer, and you won’t risk an injury caused by over-pressure. In this article, the USAMU explains that you need to account for bullet shape, diameter, and bearing surface when working up a load. Don’t assume that a load which is safe for one bullet will be safe for another even if both bullets are exactly the same weight.
Today, we continue our handloading safety theme, focusing on not inadvertently exceeding the boundaries of known, safe data. Bullet manufacturers’ loading manuals often display three, four, or more similar-weight bullets grouped together with one set of load recipes. The manufacturer has tested these bullets and developed safe data for that group. However, seeing data in this format can tempt loaders — especially new ones — to think that ALL bullets of a given weight and caliber can interchangeably use the same load data. Actually, not so much.
The researchers ensure their data is safe with the bullet yielding the highest pressure. Thus, all others in that group should produce equal or less pressure, and they are safe using this data.
However, bullet designs include many variables such as different bearing surface lengths, hardness, and even slight variations in diameter. In fact, diameters can occasionally range up to 0.001″ by design. Thus, choosing untested bullets of the same weight and caliber, and using them with data not developed for them can yield excess pressures.
This is only one of the countless reasons not to begin at or very near the highest pressure loads during load development. Always begin at the starting load and look for pressure signs as one increases powder charges.
Bullet Bearing Surface and Pressure
Bullet bearing surface length (BSL) is often overlooked when considering maximum safe powder charges and pressures. In Photo 1, note the differences in the bullets’ appearance. All three are 7 mm, and their maximum weight difference is just five grains. Yet, the traditional round nose, flat base design on the left appears to have much more BSL than the sleeker match bullets. All things being equal, based on appearance, the RN/FB bullet seems likely to reach maximum pressure with significantly less powder than the other two designs.
TECH TIP: Bullets of the same weight (and caliber) can generate very different pressure levels due to variances in Bearing Surface Length (BSL).
Bullet 1 (L-R), the RN/FB, has a very slight taper and only reaches its full diameter (0.284 inch) very near the cannelure. This taper is often seen on similar bullets; it helps reduce pressures with good accuracy. The calculated BSL of Bullet 1 was ~0.324″. The BSL of Bullet 2, in the center, was ~0.430″, and Bullet 3’s was ~ 0.463″. Obviously, bullets can be visually deceiving as to BSL!
Some might be tempted to use a bullet ogive comparator (or two) to measure bullets’ true BSL for comparison’s sake. Unfortunately, comparators don’t typically measure maximum bullet diameter and this approach can be deluding.
Note: Due to time constraints, the writer used an approximate, direct measurement approach to assess the bullets’ different BSLs. While fairly repeatable, the results were far from ballistics engineer-grade. Still, they are adequate for this example.
Photo 2: The Perils of Measuring Bearing Surface Length with Comparators
In Photo 2, two 7mm comparators have been installed on a dial caliper in an attempt to measure BSL. Using this approach, the BSLs differed sharply from the original [measurements]. The comparator-measured Bullet 1 BSL was 0.694” vs. 0.324” (original), Bullet 2 was 0.601” (comparator) vs. 0.430” (original), and Bullet 3 (shown in Photo 2) was 0.602” (comparator) vs. 0.463” (original). [Editor’s comment — Note the very large difference for Bullet 1, masking the fact that the true full diameter on this bullet starts very far back. You can use comparators on calipers, but be aware that this method may give you deceptive reading — we’ve seen variances just by reversing the comparators on the calipers, because the comparators, typically, are not perfectly round, nor are they machined to precision tolerances.]
Thanks to the U.S. Army Marksmanship Unit for allowing the reprint of this article.
Looking for a faster, easier, and more accurate way to measure bullet positions on your loaded rounds? Check out the Accuracy One Seating Depth Comparator. This unique tool provides a shoulder-to-ogive measurement instead of the traditional cartridge base-to-ogive measurement. The Accuracy One Comparator just might work for you. This unique tool allows a very rapid and secure measurement that provides a precise determination of the bullet seating depth in the case.
Accuracy One Seating Depth Comparator
Product Review by F-Class John
You probably check your loaded ammo by measuring cartridge base to ogive, but have you ever considered there may be a better way? Curt at Accuracy One has considered the question, and after exhaustive research and testing he created the Accuracy One Seating Depth Comparator. As opposed to looking for a base to ogive measurement, this tool measures from the shoulder to ogive, which is arguably the more repeatable number when it comes to accuracy.
Click Arrow to Watch Video Tool Review
As Curt explains, “Well, when you fire a chambered cartridge, the strike from the firing pin first pushes the cartridge forward until it bottoms against the shoulder. The primer is then ignited. What this means is that your seated bullet depth consistency can more accurately be gauged using the dimension from shoulder to ogive. Using this dimension, you effectively eliminate any small variances in your sized case length from the equation”. As a result, it made sense that when he was designing the measurement tool his goal was to create a universal insert that allowed a user a quick, easy, accurate and repeatable process that measures from mid-shoulder to ogive.
The comparator fits cartridges from .22 to .30 Caliber with 0.400″ and larger shoulder diameters. The tool fits so many bullet sizes because of the specific taper that Curt developed. This ensures that any caliber in that range makes good contact along the ogive. As I used this tool and talked to people about it, I kept getting skeptical comments with people asking how it could measure the ogive on that many calibers accurately. I had to remind them that the ogive is not a single point on the bullet but in fact the entire curve from the tip of the bullet to the point it straightens out. As a result, it’s only important that the tool you use is consistent in what point along the ogive it measures and that’s where the Accuracy One Seating Depth Comparator shines. According to Curt, he went through countless iterations on his design until he was able to accurately and repeatably measure all those calibers (.22 to .30).
How to Use the Accuracy One Seating Depth Comparator
Using the comparator is simple. There are alternative methods. The easiest way is to simply zero the indicator, insert a loaded round, note the measurement and compare any future rounds against it for variation. An alternative to this is a method I use. I insert a loaded round and then zero the indicator. This allows you to see the exact variation without mental math (and frankly it’s faster this way). I also use this method to sort loaded rounds for matches in order from shortest to longest ensuring that rounds that measure the same are fired together.
Bonus Option — Measuring Length to Lands with Tool
Another great use for this Accuracy One comparator is to take my initial depth to lands. This helps ensure my seating depth was properly set. Using a case with very light neck tension, I load a bullet, and with a stripped bolt I load and close it. Then I can remove the round and take a measurement, zero the indicator and make a note of it in my book. After that the comparator will remember the new zero until it’s zeroed again and if that happens by accident, I can always reference the number that my round measured and pull on the indicator stem until that number is found and then zero it again. I found this entire process fast, easy and repeatable as I loaded rounds and needed to check for any seating depth variance.
Tool Pricing:
Seating Depth Comparator without Indicator: $65.00
Seating Depth Comparator with Indicator: $115.00
Gauge Stand: $47.00
Purchase Options
You can buy the tool with or without an Digital Indicator. Accuracy One also makes a Primer Depth Gauge. Both Accuracy One tools employ the same digital indicator. This helps save money as you can order the comparator alone if you already have one (either from another Accuracy Tool or another tool).
The Accuracy One Seating Depth Comparator is essentially the same size as the Accuracy One Primer Depth Gauge, so you can even utilize Accuracy One’s primer gauge storage case. There is also an optional stand that I HIGHLY RECOMMEND as it can hold either the seating depth OR primer gauge, making for amazingly simple one-handed operation while you’re loading.
CONCLUSION — Tool Is Precise, Repeatable, and Fast
Overall, this tool left me feeling confident in my depth setting and I found it quick and easy compared to past methods. At the end of the day there are several ways to skin the proverbial cat when it comes to measuring seating depth. But if you’re looking for what just might be the most accurate, consistent and speediest method, give the Accuracy One Seating Depth Comparator a try.
We are re-publishing this article at the request of Forum members who found the information very valuable. If you haven’t read this Safety Tip before, take a moment to learn how you can inspect your fired brass to determine if there may be a potential for case separation. A case separation can be dangerous, potentially causing serious injury.
On the respected Riflemans’ Journal blog there was an excellent article about Cartridge Case-Head Separation. In this important article, Journal Editor GS Arizona examined the causes of this serious problem and explained the ways you can inspect your brass to minimize the risk of a case-head separation. As cases get fired multiple times and then resized during reloading, the cases can stretch. Typically, there is a point in the lower section of the case where the case-walls thin out. This is your “danger zone” and you need to watch for tell-tale signs of weakening.
The photo below shows a case sectioned so that you can see where the case wall becomes thinner near the web. You can see a little arrow into the soot inside the case pointing to the thinned area. This case hadn’t split yet, but it most likely would do so after one or two more firings.
Paper Clip Hack for Detecting Problems
The article provided a great, easy tip for detecting potential problems. You can use a bent paper clip to detect potential case wall problems. Slide the paper clip inside your case to check for thin spots. GS Arizona explains: “This simple little tool (bent paper clip) will let you check the inside of cases before you reload them. The thin spot will be immediately apparent as you run the clip up the inside of the case. If you’re seeing a shiny line on the outside and the clip is really hitting a thin spot inside, it’s time to retire the case. If you do this every time you reload, on at least 15% of your cases, you’ll develop a good feel for what the thin spot feels like and how it gets worse as the case is reloaded more times. And if you’re loading the night before a match and feel pressured for time — don’t skip this step!”
Spring varmint season is just around the corner. So here’s a very accurate Half-Mile ‘Hog rifle, that can drill a groundhog at long range. While just about any cartridge from a 22 magnum on up will do the job on a groundhog at close range, when you want to “reach out and touch” your prey at very long distance, it takes a case capable of tossing a heavier, wind-bucking projectile at ultra-high speeds. This week we feature a 6mm Remington Ackley Improved (6mm AI) belonging to our friend John Seibel, who ran the Varmints for Forum website for many years. John’s handsome BAT-actioned rifle sends the 87gr V-Max at a blistering 3675 fps. With its 1/4-MOA accuracy and flat-shooting ballistics, this gun is a varmint’s worst nightmare, a rig that regularly nails groundhogs at a half-mile (880 yards) and beyond.
Quarter-MOA Accuracy For Long-Distance Varminting
GunDay Report by John Seibel
John reports: “So far this gun has been an awesome long-distance varmint rig, with enough velocity to smack those critters hard at 800 yards and beyond. I have some more testing to do, but it seems that the 87gr V-Max (molyed) pushed by 52 grains of N160 or 51.5 grains of RL-19 shoots very well indeed. Velocity runs around 3675 fps. I shot consistent 1″ groups at 500 yards with both of these loads. Warning: These are max loads that work in my rifle, so start at least 10% lower and work up.
My fire-forming procedure is just jam and shoot. I start with a powder (such as H414) that works for the parent case, fire a few cases as I work up the load to where I get a well-formed case, then shoot them at varmints. Then I work my load up with the newly-formed cases over a chrono. If a load looks good at 100 yards, I will go straight for 200 yards. I’ve seen that some loads which grouped well at 100 won’t shoot well at 200. If it is consistent at 200, then I’ll shoot it a steel plate at 500 yards. Then the truth will be told.
Man I love that BAT action! I have tried some Berger 88gr Lo-Drag bullets as well. They have the same BC as the V-Maxs but offer excellent accuracy. The action is BAT’s Model B round action configured Right Bolt, Left Port, with a fluted .308-faced bolt. The port is 3.0 inches wide — perfect for the 6mm Rem Improved cartridge’s OAL. I use a NightForce 8-32x56mm NXS scope mounted to BAT’s 20-MOA aluminum Weaver-style base. I use Burris Signature Zee rings because they are self-aligning and easy on scope tubes, plus you have the option of adding more MOA if needed.
Krieger with Harrell Brake
The barrel is a stainless Krieger 1:12″ twist Heavy Varmint contour, finished at 26″. I installed a Harrell’s muzzle brake because I hate recoil and I like to be able to spot my hits when target shooting and hunting–especially hunting.
When hunting I am usually by myself so when I eyeball a varmint I want to see my shot flatten him … and I hardly ever miss (heh-heh). Make sure you have your earplugs in though — that muzzle brake is loud!
Easy-Steering Thumbhole Varminter
The stock is Richard’s Custom Rifles Model 005 Thumbhole Varminter. This is a big stock that rides the sand bags very well. Took me a while to get used to this stock as I had never shot a thumbhole before. It is very comfortable and easy to control when you are shooting a moving target. In fact, my first kill with this rifle was a coyote at a little over 200 yards, she was moving along at a slow clip and I had to give her the ole’ Texas heart shot before she disappeared over a hill! (It’s pretty rare for me to shoot moving varmints though — at long-range, I want my cross-hairs steady on the target.)
Regarding the stock selection, I like Richard Franklin’s stocks because they are well-suited to my kind of shooting. I prefer a stock that is flat most of the way back towards the action because when I’m shooting out of my truck window it has to balance around mid-point. Also his stocks seem to track very well on the bench. I guess the stocks I like the most are his Model 001 and Model 008 F-Class. [Editor’s note: John often shoots from the driver’s seat of his truck because he is partially paralyzed. He also has a hoist in his truck bed for his wheelchair. Even with his mobility challenges, John tags more varmints in a season than most of us ever will.]
Choice of Caliber — A 6mm with More Punch for Long Distance
I picked the 6mm Rem Improved mainly because it has that long neck for holding long bullets and it doesn’t burn the throats out as fast as a .243 AI would. I don’t use Remington brass; it splits when fire-forming and seems to work-harden fast. Another reason I picked the 6mm Improved was what I saw in the field–it seemed to be a perfect long-range groundhog getter. I saw my stocker, Richard Franklin, flat smack groundhogs out to 900+ yards with regularity. The OAL of a 6mm Improved does make it hard to remove a loaded round from a standard Remington 700 action. That’s why I went with the BAT Model B, with its longer 3.0″ port. For a standard action, a .243 AI might function better.
As for the 6 Dasher, from what I have read, I think it is a fine round. I’m a hunter though and a lot of case-forming isn’t worth it to me. Forming the Ackleyized cases is bad enough. The 6-250 is a real screamer and very accurate but it doesn’t have the capacity to drive the heavier bullets as well as the 6mm Improved. I have tried a .243 WSSM, also with a Richard’s stock (#008) and a BAT action. It may not shoot as well as the 6mm Rem Improved, but I like those short fat cases.
John’s Views on the Great Moly Debate
Editor: John started with moly-coated bullets for this 6mm Rem AI rifle, but he has moved away from that. He does have considerable experience with coated bullets, and now, at least with custom, hand-lapped barrels, he normally uses uncoated bullets. He now favors coated bullets only for the small .17 caliber.
Moly or no moly… hmm? I have used moly and Danzac for several years, mainly Danzac. In my experience, both moly and Danzac can work well for somebody who shoots a lot of rounds before cleaning. A barrel has to be broken-in correctly whether you use moly or not. I have done break-in with naked bullets, using the conventional method of shooting and cleaning till the copper stops sticking. I have also gone through the break-in process using molyed bullets from the start. It seems to me the barrels broke-in more readily with moly bullets than with naked bullets. I think if there are any rough or sharp places in the barrel the slick molyed bullet doesn’t grab it as badly and the moly will “iron” the flaw out without leaving copper behind.
The main mistake I think most people make with moly is improper cleaning. By that I mean they don’t get the bore clean from the beginning. Some people will scoff at me for this but I use JB bore paste for most all my cleaning, hardly ever use a brush. Just JB and Montana Extreme or Butch’s Bore Shine. It works for me! Now shooting molyed bullets works fine to say 500 yards, but any further and you really need a lot of tension on the bullet. If not you will get bad flyers.
Personally, I use coated bullets only with .17 cal rounds now. I did use them initially in my 6mm Rem AI but I am starting to move away from that. With proper break-in, the fine custom barrels we have now will not copper if you clean correctly and don’t push those bullets too fast! And remember that powder-fouling build-up is an accuracy-killer too. That is another reason I use a lot of JB paste.
John lives and works on a farm in Virginia. Getting rid of intrusive varmints is part of the job of running the farm. Here is one of John’s bolt-action pistols, which is very handy when shooting from a vehicle.
The Guru of Varmints For Fun
For many years John Seibel ran the popular Varmints For Fun website (now offline). This site offered excellent advice for hunters and reloaders. John covered a wide variety of varmint chamberings, from big 6mm wildcats, to the popular 6BR, 22BR and .22-250 caliber varmint rounds, and even the micro-caliber wildcats such as the 20 Vartarg and 20 PPC. Shown below is one of his favorite rifles, a 20 PPC with a special short version of Richard Franklin’s Model 008 stock.
John tells us: “I guess one reason I started my web site is that I was getting a lot of inquiries about hunting groundhogs, custom rifles and reloading. Plus I thought it was a fine way to get young people interested in the shooting sports. Lord knows hunting and firearms aren’t taught any more. I get a lot of young hunters and shooters asking what’s the best caliber for hunting varmints, and they’ll ask for reloading help too. It’s a shame, but many of them have no one to teach them. I do my best to help.
Showing others that a person can still shoot, even with a disability, is another reason I started my web site. I am a C 6-7 Quadraplegic, which means I have no grip in my hands. Imagine shooting those 1.5 oz Jewels that way! I had a therapist tell me I wouldn’t be able to shoot or reload once I got out of the hospital…shows you how much he knows! First time I got home from the hospital it was deer season and I had Pops park me at the edge of some woods. Well I had a 7-point buck on the ground in thirty minutes! Being raised on a farm didn’t hurt none either–it helped me figger ways to jury-rig stuff. Of course I couldn’t have done much if it wasn’t for my family and my lovely wife Cathy[.]”
John’s Favorite 20 PPC Varmint Rifle
Cartridge History Lesson — the Original .244 Remington
Here’s bit of cartridge history. The 6mm Remington, parent of John’s 6mm AI, actually started its life with a different name, the “.244 Remington”. What we now know as the “6mm Remington” was originally called the .244 Remington. The cartridge was renamed because it was not a commercial success initially, being eclipsed by the .243 Winchester. The .244 Remington and the 6mm Remington are identical — only the name was changed.
The Tactical Rifle Shooters Facebook Group recently showcased tools used to measure case headspace before and after “bumping” the shoulder. After a case is fired, hand-loaders who full-length size their cases will typically bump the shoulders back anywhere from .001″ to .0035″, depending on the rifle and application. With our 6mmBR and Dasher cases we like about .0015″ bump.
You want the amount of case sizing and bump to be the same for all your brass. To ensure uniformity, it makes sense to measure your cases before and after the FL sizing process. When we have time, we check every case. Other folks will simply check the first 3-4 cases coming out of the FL sizing die to ensure the FL die setting is correct and delivering desired headspace/bump.
1. Whidden Gunworks Shoulder Bump Gauge
There are a variety of tools that can be used to measure shoulder bump. Our favorite is a special cartridge-specific bushing made by Whidden Gunworks. The Whidden Shoulder Bump Gauge enables you to adjust your sizing die to the desired measurement. The bump gauge is attached to your calipers with a set screw and determines the measurement from the base to the shoulder of the case. The photo below, from Tactical Rifle Shooters, shows the Whidden Bump Gauge for the .375 CheyTac cartridge.
2. Dave Manson Vertical Comparator with Dial Read-Out
Dave Manson states: “This tool was designed to make life easier for the advanced shooter and re-loader by allowing precise measurement of ammunition, case, and chamber headspace. With this information, the re-loader will be able to fine-tune clearances and fits between his ammunition and chamber, with resultant improvements in accuracy and case life.” The functions of the Manson Comparator are:
1. Measure headspace of factory or reloaded ammunition
2. Quantify chamber headspace by measuring headspace of a fired case
3. Ensure minimal shoulder set-back when setting up re-loading dies
4. Compare base-to-ogive length to ensure consistent bullet-to-rifling relationship.
In addition to the Dial Indicator and Stand, the $130.00 Vertical Comparator is supplied with multiple Datum Blocks of precise length and inside diameter (.3300″/.3750″/.4000″/.4375″). MORE INFO HERE — Catalog page 20.
3. Hornady L-N-L Headspace Comparator System
Hornady’s Lock-N-Load Headspace Comparator system is easy-to-use and handy. You can get a kit with Red bushing-holder body and 5 bushings for $40.12. Hornady explains: “The Lock-N-Load® Headspace Comparator… gauge measures variations in brass before and after firing or re-sizing. It allows for headspace comparison between fire-formed brass and re-sized brass.” IMPORTANT: Hornady states: “To determine the proper bushing diameter for your cartridge, simply add the neck diameter and the shoulder diameter and divide that number by two. Use the bushing closest to that number.” Hornady offers five: .330″, .350″, .375″, .400″, and .420″.
One tip — We have found the Hornady gauges may vary a little from unit to unit even with the same nominal size. If you have more than one gauge for the same cartridge, test each on your brass — you may then note a slight difference in your bump measurements. There is also an Anvil Base Kit that mounts to the opposite blade on the caliper. This provides a more stable surface for the base of your case.
4. L.E. Wilson Case Gage Depth Micrometer
If you are looking for precise “bump” measurements without having to mess with calipers and clamp-on gauge blocks, you may want to consider the L.E. Wilson Case Gage Depth Micrometer. This takes very precise, repeatable measurements, but you need to know your starting point. The manufacturer explains: “Every reloader should know exactly how much your Full Length Sizing Die is pushing back the shoulder. With the NEW Case Gage Depth Micrometer you can do just that! It has never been easier to measure you cases headspace before and after sizing. The Depth Mic allows you to slip the micrometer perfectly over the top of the Gage with your case inserted into the Gage and take a measurement. Micrometer has graduations of .001″. The Case Gage Depth Micrometer is set to a zero of .100″ on the scale at our factory. Because of differences in ‘feel’ and temperature, we include a the Gage Block for you to test Zero and to adjust if necessary.”
5. Pistol Brass Case DIY Bump Gauge
Last is a “field expedient” set-up if you do not have any of the comparator tools shown above. A sized .45 ACP case (or other suitable pistol case) can be used to measure shoulder bump. The mouth of the pistol case sits on the shoulder of your rifle cartridge brass.
Make sure the .45 ACP case is trimmed square and that it is round. We recommend you first run it through an expander, then size it, trim it and chamfer. Next, take the .45 ACP case and slip it over the neck of a fired, unsized rifle case with the primer removed. Align the two cases between the jaws of your calipers and note the length from rim to rim (See left photo below).
OK, now you have the length for a fired rifle case BEFORE sizing. Next, take a full-length sized rifle case (without primer) and do the same thing, placing the .45 ACP case over the neck of the FL-sized case (Right Photo). The difference between the two numbers is the amount of “bump” or set-back you are applying to the shoulder. Here the difference is .0015″. The amount of bump you need varies with your chamber and your load, but .0015-.002″ is a good initial setting.
by Sierra Bullets Ballistic Technician Philip Mahin for Sierra Bullets Blog
A lot of calls that come into the Sierra Customer Service Center are made by shooters [of retirement age]. Most of the time the shooter used to reload back when they were [younger] and stopped in order to raise a family, pursue a career, or both. Maybe their father or grandfather taught them back in the day and they are looking for an answer to the new whatchamacallit they found on the internet. The point is they are coming back to it because it was fun.
Reloading Can Provide Stress Relief
As a father of three, a husband, a brother, a son and son-in-law, and a friend and neighbor, I get pulled in a lot of directions. In all honesty, reloading and shooting has become a stress relief for me even though I work in the shooting industry.
Sometimes, the shooting gets put on hold for other more important things but there will always be another project or repair to accomplish. There are a lot out there that have found a way to balance the work life, the family life, and the play life. I would like to applaud you on your efforts because it is a hard thing to accomplish.
Remember to take time and relieve that stress. Do something fun, especially if it is shooting that special hand-load you just made.
AccurateShooter Comment — Hand-Loading and the Creative Process
Reloading your own precise ammo can be rewarding in many ways. First it allows you a temporary escape from work pressures, “Honey-Dos”, filing your taxes — whatever. It’s just you and Mr. Rockchucker spending quality time in the loading room. Second, hand-loading is a creative process that engages the mind. During load development, you are like an inventor, selecting a powder charge, choosing the bushing size, experimenting with seating depths, working to perfect your load.
Lastly, the process of hand-loading is rewarding because you are building something start to finish. You begin with components — bullets, brass, and powder, and end up with a finished product that (hopefully) is better than the best factory ammo you could buy. It is enormously satisfying to start with piles of bullets and brass and end up with beautiful hand-loads that can deliver great accuracy.
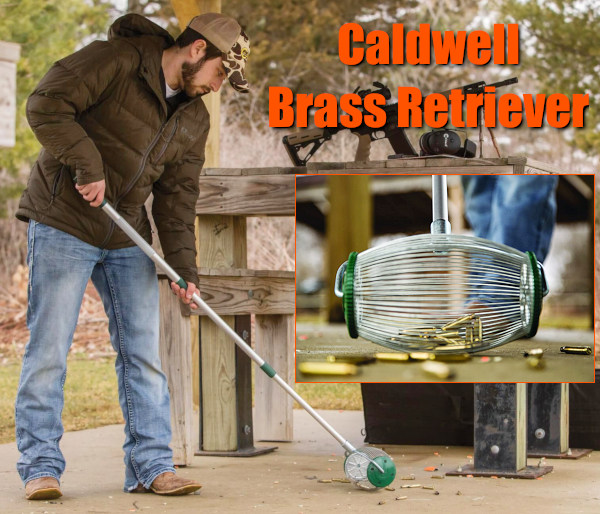
Caldwell Brass Retriever
Tired of bending over or kneeling down to retrieve your fired cartridge brass? For older shooters (including this Editor) getting down on the ground to pick up brass is tough on the lower back and knees. Here’s a product that makes brass retrieval quick, easy, and pain-free. The Caldwell Brass Retriever works quite well with a little practice, once you apply the correct pressure. While it won’t always grab every fired case, it will capture nearly all, and that can really make the job go much faster. These days cartridge brass (along with other components) is getting more expensive — so you want to recover your brass after every shooting session.
One owner praises this as a “very good tool” that is “a lot easier on my back.” While it can work on grass, gravel, and hard-packed earth, the unit works best on smooth, hard surfaces. The Brass Retriever is under $40 at Amazon.
Caldwell states: “Spend less time bending over and picking up brass at the range and more time shooting. The Caldwell® Brass Retriever picks up brass, saving your back and time. Picking up spent brass is as easy as pushing a mop. The Brass Retriever can pick up rifle and pistol brass quickly and efficiently. The Brass Retriever works anywhere, even on grass and gravel. The retriever comes complete with a roll cage separator that allows you to dump the collected brass into a bucket quickly. It is collapsible as well, making it convenient to transport. The retriever’s handle expands from 28″ up to 57″ tall.”
Caldwell Brass Retriever Owner Reviews
Here are Amazon reviews from actual purchasers. The device is not perfect and can miss a case or two. However, as you can see from the video, the Brass Retriever does pick the vast majority of brass on the ground, sized .223 Rem or larger diameter. This will save time and reduces stress on your back and joints:
“This thing … does a terrific job of collecting the brass from a standing posture quickly and efficiently. It helps to have the cases on a smooth surface like concrete or dirt without a lot of vegetation. But we used it on open desert yesterday and it collected nearly every case with a single pass.” — Hans H.
“This WILL save your back. The only drawback is you can’t overload it with brass. After couple dozen pieces (or less) it will start dropping brass while you’re attempting to collect others. That’s the limitation (one of them). There is a short learning curve (15 min.) in which you’ll learn how much brass is too much and how you need to orientate the wires to pick up the brass. It doesn’t do as well on gravel or high grass as it does on a smooth, firm surface. Even with its limitations, it’s a keeper. Just empty every dozen or so pieces and it works very well.” — Jeff M.
“It’s not perfect. But neither is using a broom or picking it up by hand. Sure, a 9mm might drop out while you’re picking up a .45 ACP. But you roll back over the 9mm and pick it up again. I now pick up my brass in a fraction of the time it used to take me and I stand upright while doing it.” — Johnny C.


 A while back, we featured a portable reloading bench built on a Black & Decker Workmate. That proved a VERY popular do-it-yourself project so we’re showing it again, in case you missed it the first time.


 Purchase Options
 On the respected Riflemans’ Journal blog there was an excellent article about Cartridge Case-Head Separation. In this important article, Journal Editor GS Arizona examined the causes of this serious problem and explained the ways you can inspect your brass to minimize the risk of a case-head separation. As cases get fired multiple times and then resized during reloading, the cases can stretch. Typically, there is a point in the lower section of the case where the case-walls thin out. This is your “danger zone” and you need to watch for tell-tale signs of weakening.


 My fire-forming procedure is just jam and shoot. I start with a powder (such as H414) that works for the parent case, fire a few cases as I work up the load to where I get a well-formed case, then shoot them at varmints. Then I work my load up with the newly-formed cases over a chrono. If a load looks good at 100 yards, I will go straight for 200 yards. I’ve seen that some loads which grouped well at 100 won’t shoot well at 200. If it is consistent at 200, then I’ll shoot it a steel plate at 500 yards. Then the truth will be told.

 Choice of Caliber — A 6mm with More Punch for Long Distance

 The Guru of Varmints For Fun