Hodgdon and IMR powders, including H4198, Varget, H4350, and IMR 4451, are some of the most successful propellants used by competitive shooters. If you want to find solid, reliable load data for these and other Hodgdon and IMR powders, we recommend you go right to the source — visit the Hodgdon/IMR Reloading Data Center, at www.HodgdonReloading.com. There you’ll find the latest, updated load recipes for pistol, rifle, and shotgun reloaders.
In the Data Center, you’ll find thousands of load recipes for pistol, rifle, and shotgun. Rifle shooters will find dozens of loads for their favorite Hodgdon, IMR, and Winchester powders such as H4198, Varget, H4350, and IMR 8208 XBR. And Hodgdon’s Reloading Center is now faster and easier to use. Navigation is simplified and the whole interface is more user-friendly.
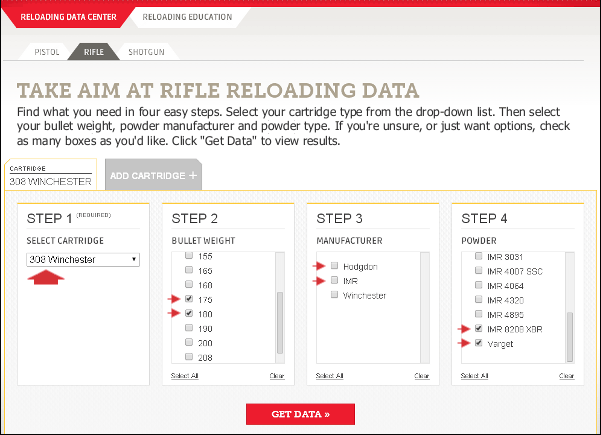
Precise Search Results for your Cartridge and Favorite Powders
The online Reloading Data Center allows you to get precise search results for any listed cartridge. You can select your preferred powders and bullets. After choosing a cartridge, you can pre-select specific bullet weights and powder types. That quickly delivers just the information you want and need. You won’t have to scroll through scores of entries for bullets or powders you don’t use.
Data Center Works Well with Mobile Devices
Mobile users will notice Reloading Center is very “user-friendly” for smart-phone and tablet users. Controls have been optimized for touch-screens, and buttons are large and easy to use. Likewise the results are displayed in a large, easy-to read format.
Hodgdon tip from EdLongrange. We welcome reader submissions.
Our friend Erik Cortina is at Raton, NM this week at the F-Class Nationals. When he’s not shooting (or working) Erik produces YouTube videos. One of his most popular videos explained why you should full-length size cartridge brass. In no uncertain terms Erik says: “Quit Neck Sizing!!!” Watch the Video:
Why It’s Smart to Full-Length Size Your Brass
Commentary by Erik Cortina
Should You Full-Length Size Your Cartridge Brass?
Absolutely. Let Me Explain Why…
I have seen it time and time again, shooters on the line wrestling with their rifle trying to get the bolt closed while the wind is switching. They were too focused trying to get their bolt to close and getting their rifle settled back on the bags that they missed the wind switch. Bang… Eight! The straw that broke the camel’s back for me was at the 2017 Canadian Nationals. I was paired up with a young girl and she would try really hard to close the bolt on her rifle. The majority of the time she would get it to close, but often times she could not even get the round to chamber. She was focused on her rifle the entire time rather than on the conditions. When we completed our strings, she had five rounds that did not chamber our of 15! That is way too many!. I told her she needed to think about Full-length sizing with 0.002″ shoulder bump, or Controlled Full-length Sizing like I call it. I told her not to worry about losing accuracy. I told her that I full-length size all my rounds and asked if she noticed how smooth my bolt was and noticed my score. She said yes, they were both great!
Controlled Full-length Sizing Does NOT Harm Accuracy
I have found that Controlled Full-length Sizing does NOT hurt accuracy or shorten brass life. I find that I can focus much more on the conditions when I don’t have to think about chambering a round nor extracting it. It has become second nature. After firing, I keep my head welded to the stock, I open the bolt by placing my thumb on top of stock and rotating hand upwards. I reach in and retrieve spent case, place it back in ammo box, and pick up another loaded round and put in chamber. I verify conditions and when ready, I push the bolt in and close it with my index and middle finger.
With Controlled Full-length Sizing you “bump” the shoulder around .002″ for bolt guns.* Image courtesy Sinclair International which carries a variety of Full-length dies.
Whidden Full-Length Sizing Dies by AccurateShooter.com Editor
For proper Full-length sizing, you want a quality die that’s a very good match to your chamber. For our project rifles we usually turn to Whidden Gunworks which offers both bushing and non-bushing FL dies. And if you want the hot new option, check out Whidden’s patent-pending, click-adjustable FL-sizing die. This gives instant, precise control over shoulder bump. It works great.
*With gas guns, such as the AR10, you may want to increase shoulder bump to .003″ or more. With some benchrest cartridges, .0015″ bump may prove optimal. But .002″ is a good starting point.
Who doesn’t want to save money? If you can get a significant discount, you should really take advantage of that opportunity. Guys, we’ve been tracking prices on shooting sports products at vendors around the country. Sad to say, we’ve seen price increases across the board in 2019. Reloading components, loading tools, stocks, targets, electronic gadgets — you name it, the price trend is moving upwards. Thankfully our friends at Precision Reloading are holding the line. Even better, Precision Reloading is running a really significant promotion right now.
Take Note! For today and tomorrow, January 16 and January 17, you can get 15% OFF All ORDERS over $100.00. That’s right, save 15% on your purchases at Precision Reloading with Code 15OFF. If you buy a $400.00 item that could save you $60.00. Yes, this applies to pretty much everything in stock at Precision Reloading, including all major brands below (and dozens more including Lapua, Berger, Forster, Hodgdon, Nosler, RCBS, Redding, Sierra etc.).
If you need bullets, brass, powder, dies, presses, powder dispensers, check out this sale. It’s a very good deal. Use Code 15OFF at check-out to save 15% on your orders over $100.00.
You’ll find lots of notable new products in Shooting Industry’s January 2019 issue. This 108-page issue is filled with timely articles ranging from marketing insights and SHOT Show 2019 coverage to tips for success in the new year. The January issue also includes Part II of the 2019 New Product Showcase. January’s 30-page New Product Showcase features over 150 products from 115 brands. Here are some highlights from the Product Showcase:
Steyr’s Monobloc — Barrel and Action are one piece of steel. Impressive engineering, but what happens when your barrel wears out?
Berger has new 6mm Creedmoor Ammo plus new .375-Caliber bullets for ELR shooters:
Lyman has a great new Case Trimmer with speed control and carbide cutter:
New Brass from Jagemann and BOG “DeathGrip” Clamping Tactical Tripod:
New Generation Mantis — Accelerometer and software tracks your muzzle movement:
Have a LONG F-Class Rifle or a PRS rig with suppressor? This nice case will hold your rig:
MORE SHOT Show Coverage
Shooting Industry’s January Issue has extensive SHOT Show coverage, including the comprehensive Exhibitors Guide, SHOT Show Auction info, plus a sizable pullout map in the printed editions.
Harrell’s Precision sells “semi-custom” full-length bushing dies for the PPC and 6BR chamberings. While the Harrell brothers do not cut the die to spec, they carry a large selection of dies made with slightly different internal dimensions. When you send in your fired brass, the Harrells choose a die from inventory with just the right amount of sizing (diameter reduction) at the top and bottom of the case. Given the quality, and precise fit, Harrell’s full-length dies are a good value at $75.00 plus shipping.
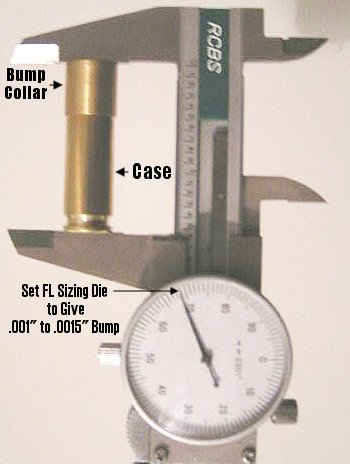
Bump Measuring Collar
The Harrell brothers provide a nice bonus item with each full-length die — a neat, little shoulder bump measuring device as shown in the photo at right. Hornady/Stoney Point sells a stand-alone tool that does the same job, but the Harrell’s bump collar is simpler and faster. To measure your shoulder bump, simply place the Harrell’s bump collar over the front of your deprimed case (before sizing) and measure the OAL with your calipers. Then size the case in your full-length die, replace the collar and repeat the measurement. You want to set your die so the shoulder moves back about .001″ to .0015″ for most applications. (With semi-auto guns you may want more bump.)
Clearance Check — Remove the seating stem and drop a bullet into it. The farther down the ogive or nose-cone the step recess grips the bullet, the better. If it’s only pressing down against the bullet tip, a crooked seat is assured, along with inconsistent seating depth. — Glen Zediker
Some folks acquire a new seating die and then are surprised to find their hand-loads show crooked bullets and/or inconsistent seating depth. The problem could be a mis-match between the bullet and the die’s seating stem. In some case, particularly with long, streamlined bullets, the bullet tip can actually touch the bottom inside of the stem. This can cause a variety of problems, as Glen Zediker explains…
Invest in a Good Seating Die Reloading Tip by Glen Zediker
The bullet seating operation is the “last thing” that happens and it’s also the one thing that can corrupt the care and treatment given to the quality of the loaded round prior. A sleeve-style seater, well-machined, goes a whopping long ways toward preserving alignment, and, therefore, concentricity. Also make sure that the stem in yours comes to rest well down onto the bullet ogive, and, above all else, is not contacting the bullet tip! That will wreck a round.
If you have this problem, you should contact the die maker — some will offer a different seating stem expressly designed for longer, pointier bullets. This “long bullet stem” will normally drop right into your existing die. If you plan to run long, VLD-style bullets you should request the special seating stem right from the get-go.
At the request of our readers, we provide select “Deals of the Week”. Every Monday morning we offer our Best Bargain selections. Here are some of the best deals on firearms, hardware, reloading components, optics, and shooting accessories. Be aware that sale prices are subject to change, and once clearance inventory is sold, it’s gone for good. You snooze you lose.
1. Natchez — Rock Chucker Supreme Reloading Kit, $269.99
Everything you see above can be yours for just $269.99. Great Deal. Right now, Natchez is selling the Rock Chucker Supreme Master Reloading Kit for $269.99, a great price considering all the hardware you get: Press, Primer Tool, Scale, Powder Measure, Loading Tray, Reloading Manual and more. Heck, the Rock Chucker press alone is worth $160.00+. This is good starter kit for any reloader with sturdy items (like the Rock Chucker press), that will last a lifetime.
2. Bruno Shooters Supply — All Lapua Brass on Sale
Chances are you use Lapua brass and if you’re like most serious shooters you can’t resist it when it’s on sale. Here’s your chance to pick up nearly every variety of Lapua Brass at some of the best prices we’ve seen. Bruno’s is known for only shipping one consistent lot of brass whenever possible if you order multiple boxes. So don’t hesitate to lay in a good supply now. NOTE: You’ll find the most popular brass types, including 220 Russian, .223 Rem, .243 Win, 6mm Creedmoor, 6.5 Creedmoor, 6.5×47 Lapua, .260 Rem, 6.5-284, .308 Win (sm and lrg primer), .30-06, 50 BMG and more. However 6mmBR is currently offered by Bruno’s only as custom neck-turned brass.
3. Many Vendors — LabRadar Chrono $60 Off Nov. 15 — Dec. 9
If you’ve been wanting to get a LabRadar Chronograph, here’s your chance. Now through Dec. 9th you can save $60 on this very advanced piece of technology — probably the most sophisticated chronograph system ever offered to the general public. That’s notable because you almost never see this discounted below the $559.95 MAP price. Recent updates also now allow you to operate your LabRadar with your mobile device making it that much more amazing. You can take advantage of this deal and grab one for $499.95 or $499.99 at Brownells (Code VB5 for FREE Shipping), Bruno’s Shooters Supply, Creedmoor Sports, or Midsouth Shooters, or MyLabRadar.com.
Looking for a great spotting scope to score targets and observe mirage and wind conditions? These Kowa 82SV combos sold out earlier this year but they’re back in limited supplies at Creedmoor Sports for just $849.95. Not only that they come with the desirable 25X LER eyepiece that is ideal for watching mirage — a key task for long range competitors. With this LER eyepiece you can quickly move from riflescope to spotter (and back again). Kowa is a a highly-respect optics maker, and this is a very good value for a quality spotting scope that should last a lifetime.
Still laying on the ground or using your wife’s yoga mat for shooting? For $21.25 now you can grab this NcStar Vism shooting mat and give your knees, belly, and elbows a break from the ground below. It opens wide and even has straps for pre-loading your bipod. This is a quality pad that helps put some space between you and your rocky position. When you’re done simply fold in the edges, roll it up and it takes up the same or less space as a sleeping bag. This is a good product tested and used by our staff.
6. Stocky’s — LR Stocks with Aluminum Bedding Block, $179.99
Here’s a good deal on a versatile Stocky’s Long Range Stock with aluminum V-block bedding system. For just $179.99, order this for Rem/Rem Clone long actions or short actions, with either narrow or wide (varmint/tactical) barrel channel. This would be a good choice for a varmint rifle. This is also offered with handsome hydrographic or web-pattern baked-on textured finishes for $199.99.
We’re in the holiday season with many super stocking stuffers to choose from. Here’s a great knife design from one of the premier knife-makers in the country. This Kershaw CQC-6C is on sale for just $15.49. This Kershaw is versatile, easy to open, and converts for left- or right-handed use. Who wouldn’t love to find one of these in a stocking on Christmas morning?
8. Bullet Central — Magnifying Light, $12.95 – $19.50
If you’re like most shooters, you can use more light and magnification when inspecting brass and small gun parts. Here is the perfect tool to help and it doesn’t take up a ton of space. With the Bullet Central Magnifying Light you can ease your eyes and see into the primer pockets, flash holes or case-necks without straining. With your choice of battery-powered or rechargeable models, why not buy two and give one to your favorite range buddy?
9. SK Ammo — $5/Brick Rebate Now Through December 31, 2018
SK makes excellent rimfire ammo, and this Holiday Special makes SK even more attractive. Now you can get $5 cash back per 500-rd brick, up to $100. The offer is valid on qualifying SK rimfire ammunition brick purchases from November 15 to December 31, 2018. Download the rebate form at www.Capstonepg.com/skrebate. To get your rebate, mail in the sales receipt PLUS the UPC/Lot codes from your SK ammo boxes no later than January 31, 2019. This deal is good for purchases through the end of the year. Additional conditions apply — see Capstone website for details.
Credit Forum Member F-Class John for most of this week’s deals.
Many novice hand-loaders believe that neck bushing Inside Diameter (ID) size is the only important factor in neck tension. In fact, many different things will influence the grip on your bullet and its ability to release from the case neck. To learn more about neck tension and “case grip”, take the time to read this article carefully. We bet you’ll gain knowledge that will let you load more accurate ammo, with better ES/SD.
Neck Tension (i.e. Grip on Bullets) Is a Complex Phenomenon
While we certainly have considerable control over neck tension by using tighter or looser bushings (with smaller or bigger Inside Diameters), bushing size is only one factor at work. It’s important to understand the multiple factors that can increase or decrease the resistance to bullet release. Think in terms of overall brass-on-bullet “grip” instead of just bushing size (or the internal neck diameter in non-bushing full-length sizing dies).
Bullet grip is affected by many things, such as:
1. Neck-wall thickness.
2. Amount of bullet bearing surface (shank) in the neck.
3. Surface condition inside of neck (residual carbon can act as a lubricant; ultrasonic cleaning makes necks “grabby”).
4. Length of neck (e.g. 6mmBR neck vs. 6mm Dasher).
5. Whether or not the bullets have an anti-friction coating.
6.The springiness of the brass (which is related to degree of work-hardening; number of firings etc.)
7. The bullet jacket material.
8. The outside diameter of the bullet and whether it has a pressure ridge.
9. Time duration between bullet seating and firing (necks can stiffen with time).
10. How often the brass is annealed.
11. Amount (length) of neck sized (e.g. you can size only half the neck).
12. Interior diameter of bushing, or neck section of non-bushing die.
— and there are others…
One needs to understand that bushing size isn’t the beginning and end of neck tension questions, because, even if bushing size is held constant, the amount of bullet “grip” can change dramatically as the condition of your brass changes. Bullet “grip” can also change if you alter your seating depth, and it can even change if you ultrasonically clean your cases.
In our Shooters’ Forum a reader recently asked: “How much neck tension should I use?” This prompted a Forum discussion in which other Forum members recommended a specific number based on their experience, such as .001″, .002″, or .003″. These numbers, as commonly used, correspond to the difference between case-neck OD after sizing and the neck OD of a loaded round, with bullet in place. In other words, the numbers refer to the nominal amount of interference fit (after sizing).
While these commonly-used “tension numbers” (of .001″, .002″ etc.) can be useful as starting points, neck tension is actually a fairly complex subject. The actual amount of “grip” on the bullet is a function of many factors, of which neck-OD reduction during sizing is just one. Understanding these many factors will help you maintain consistent neck tension as your brass “evolves” over the course of multiple reloadings.
Seating Depth Changes Can Increase or Decrease Grip on Bullet
You can do this simple experiment. Seat a boat-tail bullet in your sized neck with .150″ of bearing surface (shank) in the neck. Now remove the bullet with an impact hammer. Next, take another identical bullet and seat it with .300″ of bearing surface in another sized case (same bushing size/same nominal tension). You’ll find the deeper-seated bullet is gripped much harder.
Neck-Wall Thickness is Important Too
I have also found that thinner necks, particularly the very thin necks used by many PPC shooters, require more sizing to give equivalent “grip”. Again, do your own experiment. Seat a bullet in a case turned to .008″ neckwall thickness and sized down .003″. Now compare that to a case with .014″ neckwall thickness and sized down .0015″. You may find that the bullet in the thin necks actually pulls out easier, though it supposedly has more “neck tension”, if one were to consider bushing size alone.
In practical terms, because thick necks are less elastic than very thin necks, when you turn necks you may need to run tighter bushings to maintain the same amount of actual grip on the bullets (as compared to no-turn brass). Consequently, I suspect the guys using .0015″ “tension” on no-turn brass may be a lot closer to the guys using .003″ “tension” on turned necks than either group may realize.
Toward a Better Definition of Neck Tension
As a convenient short-cut, we tend to describe neck tension by bushing size alone. When a guy says, “I run .002 neck tension”, that normally means he is using a die/bushing that sizes the necks .002″ smaller than a loaded round. Well we know something about his post-sizing neck OD, but do we really have a reliable idea about how much force is required to release his bullets? Maybe not… This use of the term “neck tension” when we are really only describing the amount of neck diameter reduction with a die/bushing is really kind of incomplete.
My point here is that it is overly simplistic to ask, “should I load with .001 tension or .003?” In reality, an .001″ reduction (after springback) on a thick neck might provide MORE “grip” on a deep-seated bullet than an .003″ reduction on a very thin-walled neck holding a bullet with minimal bearing surface in the neck. Bushing ID is something we can easily measure and verify. We use bushing size as a descriptor of neck tension because it is convenient and because the other important factors are hard to quantify. But those factors shouldn’t be ignored if you want to maintain consistent neck tension for optimal accuracy.
Consistency and accuracy — that’s really what this all about isn’t it? We want to find the best neck tension for accuracy, and then maintain that amount of grip-on-bullet over time. To do that you need to look not only at your bushing size, but also at how your brass has changed (work-hardened) with time, and whether other variables (such as the amount of carbon in the neck) have changed. Ultimately, optimal neck tension must be ascertained experimentally. You have to go out and test empirically to see what works, in YOUR rifle, with YOUR bullets and YOUR brass. And you may have to change the nominal tension setting (i.e. bushing size) as your brass work-hardens or IF YOU CHANGE SEATING DEPTHS.
Remember that bushing size alone does not tell us all we need to know about the neck’s true “holding power” on a bullet, or the energy required for bullet release. True bullet grip is a more complicated phenomenon, one that is affected by numerous factors, some of which are very hard to quantify.
The Lee Hand Press Kit comes complete with: Breech Lock Hand Press, Ram Primer fittings, Powder Funnel, Case Lube, and one Breech Lock Quick Change Bushing.
The Lee Breech-Lock Hand Press is a useful addition to any reloader’s tool collection. This Hand Press allows you to resize brass or seat bullets while at the range or away from your loading room. No it won’t replace your Co-Ax or Rockchucker, but this is a handy piece of gear. And it’s very affordable. Midsouth Shooters’ Supply sells the Lee Breech-Lock Hand Press Kit, with everything shown above, for just $55.44. Or you can buy just the Hand Press by itself for $44.61 at Amazon.That’s a great deal.
While we don’t recommend the Hand Press for major full-length sizing chores, it does a good job seating bullets. This makes it a handy “field expedient” tool when doing load development at the range. For example you can experiment with seating depth by loading a batch of cartridges at home with the bullets deliberately seated long. Then, at the range, you can re-seat the bullets progressively shorter (in a series of rounds), until you find the optimal Cartridge OAL. Note: the maximum overall length cartridge the Lee Hand Press can accept is 3.650 inches.
The Hand Press is also great for decapping operations. Here’s a review from a verified buyer: “I mostly use it for decapping while watching TV, with a universal decapper die. Load a case, CLACK! Drop case, load another, CLACK! I can fly through them in comfort, reclined on the couch[.] Of course it is also useful for other operations. I wouldn’t love sizing large rifle cases with it, but if you’ve prepped your cases on a bigger press you could comfortably take it to the range for load development, one round at a time, working right there at the line instead of making a bunch of loads at home that you’ll have to disassemble later. It’s smaller and more lightweight than it looks and would be great for a zombie apocalypse bug-out bag.”
Using Hand Press to Load at the Range
To learn more about using the Lee Hand Press in the field with a compact scale, read Reloading Without a Bench on GunsAmerica.com. Author Chistopher Mace explains: “whether you want a better way to do load development, the capability to reload out of your ‘bugout bag’, or you’re short of space but wanting to get into reloading, the Lee Loaders and the Lee Hand Press offer you some options.”
You can never be too safe when hand-loading your own ammunition. This helpful Brownells video outlines the Seven Fundamental Reloading Safety Tips. This is important information for novice hand-loaders and a good refresher for those with reloading experience!
Summary of the Seven Safety Tips:
1. Store your reloading supplies in a safe and dry location, away from children and away from any possible source of ignition. It is also smart to keep your powder and primers separate.
2. Get and use respected reloading manuals, especially for new cartridges. Start low and work up slowly while watching for warning signs of pressure and/or case fatigue.
3. Locate your reloading activity where you will not be distracted. If you get interrupted, stop. (Distractions will eventually lead to mistakes.)
4. Do NOT mix powders. Keep your powders clearly marked and dated. You can use masking tape to write the date on the container.
5. If you load the same cartridge type for different firearms, make sure your ammo headspaces properly in each gun.
6. Check cases frequently. Look for split necks, case head separation or other signs of fatigue and excessive pressure.
7. If reloading military brass, be aware that case capacity is usually reduced, and initial loads should be at least 10-15% lower than published data.
Here are some other tips that will help your avoid making costly mistakes (such as using the wrong powder, or undercharging a case):
Powder Type — Always double-check the label on your powder containers. After placing powder in the powder measure, put a piece of tape on the measure with the powder type written on it. Some guys write the powder type on a card and place that right in the hopper.
Scale Drift — Electronic balances can drift. If you are using a digital powder scale, calibrate the scale with a test weight every 50 rounds or so.
Case Fill — If you throw more than one charge at a time, look INSIDE every case before seating a bullet. Squib charges can be dangerous if you don’t notice them before firing the next round.
Progressive Presses — When using a progressive press, consider using an RCBS Lock-Out Die. This will detect a low charge and stop the machine. These dies will work with RCBS, Hornady, and Dillon progressives.


 Bump Measuring Collar


 In our
  Neck-Wall Thickness is Important Too


