Tech Report by Brian Williams
Reloading for a military surplus gun is different than loading for a modern precision rifle in my opinion. There are a few tasks that carry over from one to the other, but the main goal is slightly different. The target shot in the CMP games matches has a rather generous 10 ring, and with a little larger target your focus needs to change from a round with ultra accuracy to a round that is safe and functions well in your particular rifle.
Reloading for Vintage .30-06 Springfield Rifles
Bullet Selection — With the .30-06 for my Garands and Springfields I stick mostly with 168gr bullets plus some 155-grainers. These bullet weights have just worked for me in the past.
Cartridge Brass (Milsurp vs. Commercial) — I use both military and commercial brass, having success with each. I do prefer commercial brass as it is easier to prep for the first reload. Military brass usually has a primer crimp of some kind that needs to be removed, and I have found that trimming these cases can sometimes leave you scratching your head as the OAL on military cases varies considerably.
Powder Charge and Dispensing — I have always had good success with Hodgdon H4895 powder. My load has always been right around 47.0 grains, with both the 168gr and 155gr bullets. I also use the Auto-Trickler to drop all of my powder charges. This is a fantastic piece of equipment that not only gives super-consistent powder charges quickly, but it also makes one less thing that you have to worry about while on the firing line. With the Auto-Trickler, there is never a question about the powder charge in your ammo. As for primers, I have been shooting CCI 200 Large Rifle primers for many years and have never had an issue.
Case Care and Trimming — With most of the .30-06 brass that I use, I will only reload them 5 times maximum. I don’t push the brass too much, because the Garand’s semi-auto cycling can be tough on the cases. I also trim my cases for OAL each reload cycle. I use a Giraud power trimmer, so trimming is relatively quick and easy.
The chambers in some of the older rifles are not perfectly-machined like a modern high-end rifle. This can cause the brass to grow a little inconsistently, so I find trimming every load cycle helps to make sure that everything stays in a nice safe spec.
Case Annealing — A few years ago I started to anneal my .223 Rem service rifle brass. Now I have added that process for all my match ammunition. I anneal after every firing. It is a rather easy step as I can have my auto-feeding Annealeez machine running while doing something else, so annealing does not add a great deal of time or effort to the reloading process.
The .30-06 case was the father of the .308 Winchester, which was adopted as the 7.62×51 NATO cartridge.
VIDEO Showcase — Brian Williams Shoots M1903A3 Prone in May 2021
As a cartridge case is reloaded multiple times, burnt powder residue and carbon builds up on the inside of the case. Unless the case interior is cleaned in some fashion, eventually you’ll see a slight reduction in case capacity. One of our Forum members from Australia wonders about the effects of reduced case capacity: “If the capacity of the case decreases as the crud builds up, then it effectively reduces the size of the cartridge (inside). Wouldn’t that change the pressure produced from that of an equivalent clean case?”
Interesting Test of Case Capacity Changes
Forum member Fred Bohl has actual test results that can help answer the above question. Fred proved that, over a 20-reload cycle, the case capacity of uncleaned cases did decline a small amount. However, surprisingly, this did not seem to affect the actual chronographed velocity of the load. Extreme Spread (ES) did increase, but Fred believes the higher ES was due to changes in case-neck tension, rather than due to the slight reduction in case capacity. Fred reports:
“Back when beginning to use ultrasonic case cleaning, part of the motivation was to get the inside clean based on the assumption that allowing burnt residue to build up inside cases would affect capacity, and, ultimately, performance. An experiment was done to test this hypothesis. The load used, 30.5 grains of RL15 behind 107gr SMKs in a 6mmBR, was selected for best group and lowest ES in prior load development. It turned out to be 92% of initial case capacity and neither “full” or compressed. (I would suspect that different powders, load weight, and total case capacity might produce very different results.)
We took 30 cases of identical initial capacity and tracked three lots of 10 each:
LOT 1: No Internal cleaning LOT 2: Cleaned with media in tumbler LOT 3: Cleaned with Ultrasound machine
Each case (in each lot) was shot and reloaded 20 times. The simplified results after 20 reloads of each lot were as follows:
Lot 1 (not cleaned) – 0.3 to 0.4 gr. loss of capacity, 5 to 8 fps greater ES.
Lot 2 (tumble cleaned) – 0.1 to 0.3 gr. loss of capacity, 4 to 6 fps greater ES.
Lot 3 (ultrasonic cleaned) – no loss of capacity, no detectable change in ES.
FINDINGS
There was no detectable correlation of velocity change to the lots. An oddity was that on very hot days Lot 1 velocities were, occasionally, slightly higher. From results of another ongoing test, I believe the above differences in ES are probably due more to variance in bullet grip tension than case capacity. The ultrasound cleaned cases (LOT 3) did maintain the lowest ES, but we are not 100% sure of the reasons why. More consistent bullet seating might be the reason.”
Editor’s NOTE: Fred’s results do suggest that carbon build-up inside the uncleaned cases might cause a slight increase in pressure that shows up on hot days. Fred has posted that: “A local shooter reported doing the 20 reload, no-clean test on a .308 that gave a loss of capacity of 2.0 grains, doubled ES and significant velocity changes. However, I don’t have any details on his load weight or powder.” Obviously a lot of carbon can build up with 20 reloads. Many shooters retire their brass before then.
Ultrasonic Cleaning and Neck Lube
Some time ago, Jason Baney did a lengthy test on ultrasonic cleaning. Jason found that with his ultrasonically-cleaned cases, the inside of the necks got so “squeaky clean” that he needed to use dry lube in the necks. Jason uses the $21.50 dry lube kit from Neconos.com. This applies ultra-fine Moly powder to the neck using small carbon steel balls.
The Shooting Sports USA website includes two excellent articles about the basics of metallic cartridge reloading. These two articles provide an excellent summary of the key procedures. If you are new to reloading, we recommend you read both articles:
Part II is particularly helpful because it explains the entire reloading process step-by-step, with 14 listed steps. The author notes: “In this, the second installment on metallic cartridge reloading, we’ll follow the sequence of steps involved in reloading a rifle cartridge and refining a metallic cartridge load. These steps are based on the use of a single-stage reloading press and a separate priming tool.”
Much important advice is provided as this article runs through the 14 Steps of Reloading. For example, when explaining Step 13, Bullet Seating, the article states:
“Proper seating depth is critical. Too much bullet protrusion and the cartridge may not work through the gun’s magazine, or it may fail to chamber. Too little and the bullet intrudes excessively into the powder chamber, decreasing volume and raising pressure. Neck tension is also important; any bullet that fails to seat with some resistance may be held only loosely by the neck and may be driven back into the case when the round is chambered, especially in semi-automatic arms.”
Important Guide to Detecting Over-Pressure Signs in Brass
As an example of the invaluable advice provided in these two articles, here’s a sample from Part II that explains how to determine if your load is over-pressure. We recommend that EVERY reader read this twice. There are more things to consider than a stiff bolt lift. You need to inspect cartridges very carefully:
Here’a useful article by Sierra Bullets Media Relations Manager Carroll Pilant. This story, which originally appeared in the Sierra Bullets Blog, covers some of the more common ammo problems that afflict hand-loaders. Some of those issues are: excessive OAL, high primers, and improperly-sized cases. Here Mr. Pilant explains how to avoid these common problems that lead to “headaches at the range.
I had some gentlemen at my house last fall getting rifle zeros for an upcoming elk hunt. One was using one of the .300 short mags and every 3rd or 4th round would not chamber. Examination of the case showed a bulge right at the body/shoulder junction. These were new cases he had loaded for this trip. The seating die had been screwed down until it just touched the shoulder and then backed up just slightly. Some of the cases were apparently slightly longer from the base to the datum line and the shoulder was hitting inside the seating die and putting the bulge on the shoulder. I got to thinking about all the gun malfunctions that I see each week at matches and the biggest percentage stem from improper handloading techniques.
One: Check Your Cases with a Chamber Gage
Since I shoot a lot of 3-gun matches, I see a lot of AR problems which result in the shooter banging the butt stock on the ground or nearest solid object while pulling on the charging handle at the same time. I like my rifles too well to treat them that way (I cringe every time I see someone doing that). When I ask them if they ran the ammo through a chamber gage, I usually get the answer, “No, but I need to get one” or “I didn’t have time to do it” or other excuses. The few minutes it takes to check your ammo can mean the difference between a nightmare and a smooth running firearm.
A Chamber Gauge Quickly Reveals Long or Short Cases
Size Your Cases Properly
Another problem is caused sizing the case itself. If you will lube the inside of the neck, the expander ball will come out a lot easier. If you hear a squeak as the expander ball comes out of a case neck, that expander ball is trying to pull the case neck/shoulder up (sometimes several thousandths). That is enough that if you don’t put a bulge on the shoulder when seating the bullet … it can still jam into the chamber like a big cork. If the rifle is set up correctly, the gun will not go into battery and won’t fire but the round is jammed into the chamber where it won’t extract and they are back to banging it on the ground again (with a loaded round stuck in the chamber). A chamber gage would have caught this also.
Oversizing cases also causes problems because the firing pin doesn’t have the length to reach the primer solid enough to ignite it 100% of the time. When you have one that is oversized, you usually have a bunch, since you usually do several cases at a time on that die setting. If the die isn’t readjusted, the problem will continue on the next batch of cases also. They will either not fire at all or you will have a lot of misfires. In a bolt action, a lot of time the extractor will hold the case against the face of the breech enough that it will fire. The case gets driven forward and the thinner part of the brass expands, holding to the chamber wall and the thicker part of the case doesn’t expand as much and stretches back to the bolt face. If it doesn’t separate that time, it will the next time. When it does separate, it leaves the front portion of the case in the chamber and pulls the case head off. Then when it tries to chamber the next round, you have a nasty jam. Quite often range brass is the culprit of this because you never know how many times it has been fired/sized and in what firearm. Back to beating it on the ground again till you figure out that you have to get the forward part of the case out.
Just a quick tip — To extract the partial case, an oversized brush on a cleaning rod [inserted] and then pulled backward will often remove the case. The bristles when pushed forward and then pulled back act like barbs inside the case. If you have a bunch of oversized case that have been fired, I would dispose of them to keep from having future problems. There are a few tricks you can use to salvage them if they haven’t been fired though. Once again, a case gage would have helped.
Two: Double Check Your Primers
Another thing I see fairly often is a high primer, backwards primer, or no primer at all. The high primers are bad because you can have either a slam fire or a misfire from the firing pin seating the primer but using up its energy doing so. So, as a precaution to make sure my rifle ammo will work 100% of the time, I check it in a case gage, then put it in an ammo box with the primer up and when the box is full, I run my finger across all the primers to make sure they are all seated to the correct depth and you can visually check to make sure none are in backwards or missing.
Three: Check Your Overall Cartridge Length
Trying to load the ammo as long as possible can cause problems also. Be sure to leave yourself enough clearance between the tip of the bullet and the front of the magazine where the rounds will feed up 100%. Several times over the years, I have heard of hunters getting their rifle ready for a hunt. When they would go to the range to sight in, they loaded each round single shot without putting any ammo in the magazine. On getting to elk or deer camp, they find out the ammo is to long to fit in the magazine. At least they have a single shot, it could be worse. I have had hunters that their buddies loaded the ammo for them and then met them in hunting camp only to find out the ammo wouldn’t chamber from either the bullet seated to long or the case sized improperly, then they just have a club.
Four: Confirm All Cases Contain Powder
No powder in the case doesn’t seem to happen as much in rifle cartridges as in handgun cartridges. This is probably due to more handgun ammo being loaded on progressive presses and usually in larger quantities. There are probably more rifle cartridges that don’t have powder in them than you realize though. Since the pistol case is so much smaller internal capacity, when you try to fire it without powder, it usually dislodges the bullet just enough to stick in the barrel. On a rifle, you have more internal capacity and usually a better grip on the bullet, since it is smaller diameter and longer bearing surface. Like on a .223, often a case without powder won’t dislodge the bullet out of the case and just gets ejected from the rifle, thinking it was a bad primer or some little quirk.
For rifle cases loaded on a single-stage press, I put them in a reloading block and always dump my powder in a certain order. Then I do a visual inspection and any case that the powder doesn’t look the same level as the rest, I pull it and the one I charged before and the one I charged after it. I inspect the one case to see if there is anything visual inside. Then I recharge all 3 cases. That way if a case had powder hang up and dump in the next case, you have corrected the problem.
On progressive presses, I try to use a powder that fills the case up to about the base of the bullet. That way you can usually see the powder as the shell rotates and if you might have dumped a partial or double charge, you will notice as you start to seat the bullet if not before. On a progressive, if I don’t load a cartridge in one smooth stroke (say a bullet tipped over sideways and I raised the ram slightly to reset it) Some presses actually back the charge back adding more powder if it has already dumped some so you have a full charge plus a partial charge. When I don’t complete the procedure with one stroke, I pull the case that just had powder dumped into it and check the powder charge or just dump the powder back into the measure and run the case through later.
When neck-turning cases, it’s a good idea to extend the cut slightly below the neck-shoulder junction. This helps keep neck tension more uniform after repeated firings, by preventing a build-up of brass where the neck meets the shoulder. One of our Forum members, Craig from Ireland, a self-declared “neck-turning novice”, was having some problems turning brass for his 20 Tactical cases. He was correctly attempting to continue the cut slightly past the neck-shoulder junction, but he was concerned that brass was being removed too far down the shoulder.
Craig writes: “Everywhere I have read about neck turning, [it says] you need to cut slightly into the neck/shoulder junction to stop doughnutting. I completely understand this but I cant seem to get my neck-turning tool set-up to just touch the neck/shoulder junction. It either just doesn’t touch [the shoulder] or cuts nearly the whole shoulder and that just looks very messy. No matter how I adjust the mandrel to set how far down the neck it cuts, it either doesn’t touch it or it cuts far too much. I think it may relate to the bevel on the cutter in my neck-turning tool…”
Looking at Craig’s pictures, we’d agree that he didn’t need to cut so far down into the shoulder. There is a simple solution for this situation. Craig is using a neck-turning tool with a rather shallow cutter bevel angle. This 20-degree angle is set up as “universal geometry” that will work with any shoulder angle. Unfortunately, as you work the cutter down the neck, a shallow angled-cutter tip such as this will remove brass fairly far down. You only want to extend the cut about 1/32 of an inch past the neck-shoulder junction. This is enough to eliminate brass build-up at the base of the neck that can cause doughnuts to form.
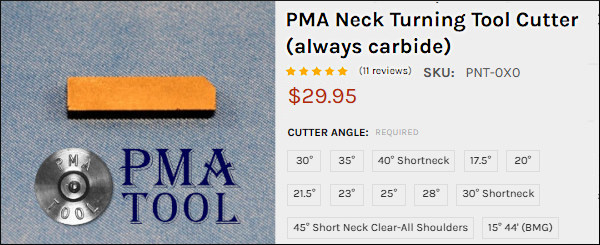
The answer here is simply to use a cutter tip with a wider angle — 30 to 40 degrees. The cutter for the K&M neck-turning tool (above) has a shorter bevel that better matches a 30° shoulder. There is also a 40° tip available. PMA Tool and 21st Century Shooting also offer carbide cutters with a variety of bevel angles to exactly match your case shoulder angle*. WalkerTexasRanger reports: “I went to a 40-degree cutter head just to address this same issue, and I have been much happier with the results. The 40-degree heads are available from Sinclair Int’l for $15 or so.” Forum Member CBonner concurs: “I had the same problem with my 7WSM… The 40-degree cutter was the answer.” Below is Sinclair’s 40° Cutter for its NT-series neck-turning tools. Item NT3140, this 40° Cutter sells for $14.99. For the same price, Sinclair also sells the conventional 30° Cutter, item NT3100.
Al Nyhus has another clever solution: “The best way I’ve found to get around this problem is to get an extra shell holder and face it off .020-.025 and then run the cases into the sizing die. This will push the shoulder back .020-.025. Then you neck turn down to the ‘new’ neck/shoulder junction and simply stop there. Fireforming the cases by seating the bullets hard into the lands will blow the shoulder forward and the extra neck length you turned by having the shoulder set back will now be blended perfectly into the shoulder. The results are a case that perfectly fits the chamber and zero donuts.”
Shown are funnel with ultra-long drop tube (which helps get more kernels in the cases), RCBS Chargemaster (in wood box), and Hood Press (similar to Harrell’s Combo press).
Loading at the range remains important in the Benchrest for Group discipline. In a Special Report below, past IBS President Jeff Stover explains how loading methods (and hardware) have evolved over the years. The advent of accurate, affordable electronic powder dispensers, such as the RCBS ChargeMaster and Frankford’s new Intellidropper, have changed the game and made it easier to load efficiently at the range. And quality manual powder measures are fast and can be very consistent, with a little practice. Loading at the range permits competitors to tune their load to the conditions, change seating depths, or even choose different bullets to suit the barrel’s preferences on any given day.
Although pre-loading is not uncommon, most 100/200-yard group shooters usually load at the match, often between relays. The goal is to shoot smaller groups by staying “in tune”. In a game where 5-shot groups “in the 1s and Zeros” is the goal, tuning loads for the conditions helps deliver match-winning accuracy. Nearly all competitors in this short-range discipline shoot the 6mm PPC cartridge, or a PPC variant.
Loading at the Range — Then and Now
In benchrest shooting for group, loading at the range has been de rigueur for decades. In the Score discipline, preloading is usually the custom. The main reason is that, in Score competition, only one Aggregate (warm-up match and five record targets) per day is usually shot. That would be less than 50 shots, assuming a few sighter shots. Also, the 30BR, the dominant Benchrest-for-Score cartridge, is very amenable to pre-loading.
By contrast, the Group discipline includes 21 targets (two warm-ups and twenty record targets) over a weekend, usually shot with 6PPC-chambered rifles. Many times, the 6PPC shooters may tweak their loads through the day given changing atmospheric conditions or simply trying to find the correct tune to “dot up”. This term, “Dot up”, means the shots are essentially going through the same hole, or closely so.
Loading at the range was a bit different when benchrest competition was in its infancy. The 1951 book, Modern Accuracy by Bob Wallack, is the best of the early benchrest books. Copies can be found, from time to time, on eBay or Alibris. It is a fascinating survey of benchrest as it existed more than six decades ago. There’s even coverage of a controversial target that was argued over at the time. In it, there is a photo of Wallack using the rear bumper of a car at the bench to clamp his reloading tools. Things have come a long way compared to the range loading set-ups of modern shooters. Here you can see Bob Wallack way back in 1950:
Modern loading bench set-ups shown in this Special Report belong to top shooters Howie Levy, Bob Hamister, and Kent Harshman.
The Tactical Rifle Shooters Facebook Group recently showcased tools used to measure case headspace before and after “bumping” the shoulder. After a case is fired, hand-loaders who full-length size their cases will typically bump the shoulders back anywhere from .001″ to .0035″, depending on the rifle and application. With our 6mmBR and Dasher cases we like about .0015″ bump.
You want the amount of case sizing and bump to be the same for all your brass. To ensure uniformity, it makes sense to measure your cases before and after the FL sizing process. When we have time, we check every case. Other folks will simply check the first 3-4 cases coming out of the FL sizing die to ensure the FL die setting is correct and delivering desired headspace/bump.
Whidden Gunworks Shoulder Bump Gauge
There are a variety of tools that can be used to measure shoulder bump. Our favorite is a special cartridge-specific bushing made by Whidden Gunworks. The Whidden Shoulder Bump Gauge enables you to adjust your sizing die to the desired measurement. The bump gauge is attached to your calipers with a set screw and determines the measurement from the base to the shoulder of the case. The photo below, from Tactical Rifle Shooters, shows the Whidden Bump Gauge for the .375 CheyTac cartridge.
Dave Manson Vertical Comparator with Dial Read-Out
Dave Manson states: “This tool was designed to make life easier for the advanced shooter and re-loader by allowing precise measurement of ammunition, case, and chamber headspace. With this information, the re-loader will be able to fine-tune clearances and fits between his ammunition and chamber, with resultant improvements in accuracy and case life.” The functions of the Manson Dial Cartridge Comparator are:
1. Measure headspace of factory or reloaded ammunition
2. Quantify chamber headspace by measuring headspace of a fired case
3. Ensure minimal shoulder set-back when setting up re-loading dies
4. Compare base-to-ogive length to ensure consistent bullet-to-rifling relationship.
In addition to the Dial Indicator and Stand, the $180.00 Dial Cartridge Comparator is supplied with multiple Datum Blocks of precise length and inside diameter (.3300″/.3750″/.4000″/.4375″). MORE INFO HERE.
Hornady L-N-L Headspace Comparator System
Hornady’s Lock-N-Load Headspace Comparator system is easy-to-use and handy. You can get a kit with Red bushing-holder body and 5 bushings for $43.99 at MidwayUSA. Hornady explains: “The Lock-N-Load® Headspace Comparator… gauge measures variations in brass before and after firing or re-sizing. It allows for headspace comparison between fire-formed brass and re-sized brass.” IMPORTANT: Hornady states: “To determine the proper bushing diameter for your cartridge, simply add the neck diameter and the shoulder diameter and divide that number by two. Use the bushing closest to that number.” Hornady offers seven: .188″, .240″, .330″, .350″, .375″, .400″, and .420″.
One tip — We have found the Hornady gauges may vary a little from unit to unit even with the same nominal size. If you have more than one gauge for the same cartridge, test each on your brass — you may then note a slight difference in your bump measurements. Mark one and use that consistently. There is also an Anvil Base Kit that mounts to the opposite blade on the caliper. This provides a more stable surface for the base of your case.
L.E. Wilson Case Gage Depth Micrometer
If you are looking for precise “bump” measurements without having to mess with calipers and clamp-on gauge blocks, you may want to consider the L.E. Wilson Case Gage Depth Micrometer (currently $140.00). This takes very precise, repeatable measurements, but you need to know your starting point. The manufacturer explains: “Every reloader should know exactly how much your Full Length Sizing Die is pushing back the shoulder. With the NEW Case Gage Depth Micrometer you can do just that! It has never been easier to measure you cases headspace before and after sizing. The Depth Mic allows you to slip the micrometer perfectly over the top of the Gage with your case inserted into the Gage and take a measurement. Micrometer has graduations of .001″. The Case Gage Depth Micrometer is set to a zero of .100″ on the scale at our factory. Because of differences in ‘feel’ and temperature, we include a the Gage Block for you to test Zero and to adjust if necessary.”
Pistol Brass Case DIY Bump Gauge
Last is a “field expedient” set-up if you do not have any of the comparator tools shown above. A sized .45 ACP case (or other suitable pistol case) can be used to measure shoulder bump. The mouth of the pistol case sits on the shoulder of your rifle cartridge brass.
Make sure the .45 ACP case is trimmed square and that it is round. We recommend you first run it through an expander, then size it, trim it and chamfer. Next, take the .45 ACP case and slip it over the neck of a fired, unsized rifle case with the primer removed. Align the two cases between the jaws of your calipers and note the length from rim to rim (See left photo below).
OK, now you have the length for a fired rifle case BEFORE sizing. Next, take a full-length sized rifle case (without primer) and do the same thing, placing the .45 ACP case over the neck of the FL-sized case (Right Photo). The difference between the two numbers is the amount of “bump” or set-back you are applying to the shoulder. Here the difference is .0015″. The amount of bump you need varies with your chamber and your load, but .0015-.002″ is a good initial setting.
Many shooters prefer to deprime their brass before resizing. That way they can tumble cases or keep primer debris off their main press. To deprime cases before sizing or cleaning you can use a Decapping Die. This pushes out the spent primer without changing the neck or body of a case. Such decapping dies work fine, but they do require the use of a press. Here is a handy alternative — a cool tool that allows you to deprime brass anywhere — no press needed.
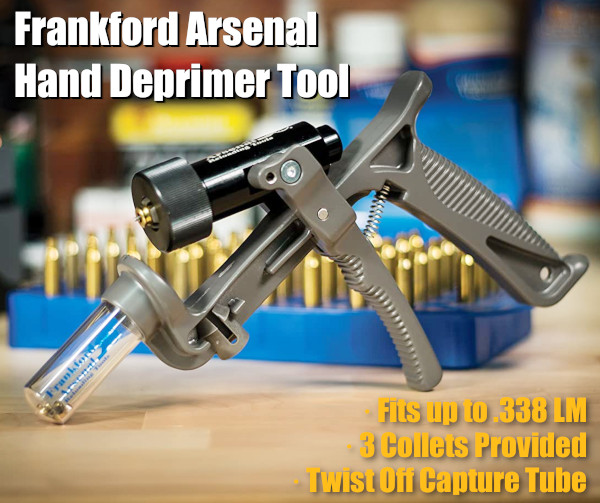
Handheld Primer Removal Tool From Frankford Arsenal
This cleverly-designed Hand Deprimer Tool allows you to deprime cartridge cases without a press. This hand-tool from Frankford Arsenal will deprime brass and capture primers conveniently. You can deprime your cases while watching TV or relaxing in your favorite chair.
This device lets you remove spent primers anywhere — no press needed and all the mess (cups/anvils/residue) stays in the capture chamber. This tool comes works with nearly all common case types up to .338 Lapua Magnum. With good leverage, this tool does the job quickly and efficiently. Forum members have praised this handy tool, but recommend wearing a thick glove if doing more than 100 cases in a session.
How to Adapt Tool for Small Flash Hole Brass
The Frankford Arsenal Deprimer Tool was designed for LARGE flash-hole brass. To deprime brass with small (1.5mm/0.59″) small flash-holes, as found on Lapua .220 Russian and 6mmBR cases, you will need to reduce the pin diameter. Frankford Arsenal currently recommends purchasing a replacement pin and “sanding it down” to the smaller diameter. NOTE: This is NOT difficult — simply spin the stock pin in some sandpaper.
This handy depriming tool is very versatile. With a universal, cylinder-style cartridge-holder, the tool can deprime a wide variety of cartridge types from .20 caliber up to .338 caliber. Three different plastic collets are provided to handle for different diameter cases. Spent primers are captured in a removable spent primer catch tube. Simply twist off the clear catch tube to dump the spent primers. With die-cast metal construction, this tool should last through many thousands of depriming cycles. MSRP is $54.99. Right now it is $52.00 on Amazon with 81% 5-star ratings.
User Modifications — Grip Padding and High-Volume Capture
Many users recommended putting some kind of padding on the grip and front lever to reduce pressure on the fingers. This can be done with a wrap or a rubber covering. In addition, users have adapted the unit with an attached hose and large primer capture jug. If you depriming hundreds of cases at a time, this hose conversion may make sense.
Review from actual owner: “I have owned one of these for about eight years and deprimed over 10,000 cases with this tool. I have never had to replace a single part on it. You will have to adjust the return spring every so often, but that is a very easy task. If you are depriming a LOT of brass, the handle can tear up your hand a bit. Solution: Wear a Mechanics Glove. Easy Peasy! You will NOT regret this purchase.”
by Sierra Bullets Ballistic Technician Paul Box
One thing that plays a major role in building an accuracy load is neck tension [one of the factors that controls the “grip” on a bullet]. I think a lot of reloaders pretty much take this for granted and don’t give that enough thought.
So, how much neck tension is enough?
Through the years and shooting both a wide variety of calibers and burn rates of powder, I’ve had the best accuracy overall with .002″ of neck tension. Naturally you will run into a rifle now and then that will do its best with something different like .001″ or even .003″, but .002″ has worked very well for me. So how do we control the neck tension? Let’s take a look at that.
First of all, if you’re running a standard sizing die with an expander ball, just pull your decapping rod assembly out of your die and measure the expander ball. What I prefer [for starters] is to have an expander ball that is .003″ smaller than bullet diameter. So for example in a .224 caliber, run an expander ball of .221″. If you want to take the expander ball down in diameter, just chuck up your decapping rod assembly in a drill and turn it down with some emery cloth. When you have the diameter you need, polish it with three ought or four ought steel wool. This will give it a mirror finish and less drag coming through your case neck after sizing.
Tips for Dies With Interchangeable Neck Bushings
If you’re using a bushing die, I measure across the neck of eight or ten loaded rounds, then take an average on these and go .003″ under that measurement. There are other methods to determine bushing size, but this system has worked well for me.
Proper Annealing Can Deliver More Uniform Neck Tension
Another thing I want to mention is annealing. When brass is the correct softness, it will take a “set” coming out of the sizing die far better than brass that has become too hard. When brass has been work hardened to a point, it will be more springy when it comes out of a sizing die and neck tension will vary. Have you ever noticed how some bullets seated harder than others? That is why.
Paying closer attention to neck tension will give you both better accuracy and more consistent groups.
Today’s Saturday Video Showcase features informative videos about loading at the range. AccurateShooter.com contributor F-Class John shows efficient procedures for load development at the range, testing both powder charge and seating depth. And Ultimate Reloader’s Gavin Gear shows how to load in the field with a mechanical powder dispenser, small scale, and a high-tech hand press. We also include a video from a benchrest competitor in France loading his 6PPC, plus tips for loading at the range by Glen Zediker, author of the Handloading for Competition book.
Reloading at the Range with F-Class John
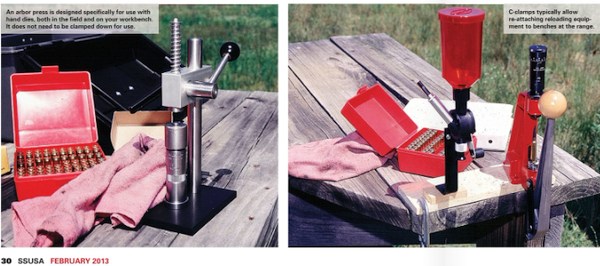
This excellent 25-minute video covers all aspects of loading at the range — case sizing, powder measuring/dispensing, priming, bullet seating and more. In the video, F-Class John also talks about transport of tools and how to develop loads at the range, as you test different powder charges and seating depths. Viewers have praised this video as one of F-Class John’s best ever. John employs a compact RCBS Summit press and an RCBS ChargeMaster. Highlights by time: 6:14 powder test with grain increments; 14:30 setting depth test; 16:18 test fire seating depth; 18:31 refine seating depth; 20:52 refined seating depth firing; 22:32 “take away” commentary.
Design and Function of Open Front RCBS Summit Press
Unlike other presses, the open front RCBS Summit moves the die up and down while the cartridge case remains stationary. The ambidextrous open-front design allows great access to your cases, and you can quickly change dies very quickly. The Summit has an all-steel linkage and cast iron frame. The Summit also offers compound leverage, a massive 2-inch diameter ram, full access through the front, a press adapter bushing, spent primer catcher, and wide 4.5-inch operating window for convenient access.
Ultimate Reloader Video of Loading at the Range
Sometimes the ONLY practical solution for load development is loading ammunition at the range. In this video Ultimate Reloader’s Gavin Gear demonstrates the loading process from start to finish, and covers what gear is required to “load where you shoot”. This applies to both loading at a covered range and loading in the field. In the video Gavin employs a bench-attached powder thrower and the impressive ($300) Buchanan Precision Machine (BPM) hand press.
Loading Between Matches — Precision Loading at a Pace
In this video, French benchrest competitor Carlos Pacheco loads ammo efficiently between relays at a Benchrest for Group match. He has a single-stage press clamped to a bench, and has a separate arbor press for bullet seating. 6PPC group-shooting competitors commonly tune their loads during the course of the competition, adjusting powder volumes to keep their rifles in optimal tune. Some competitors may also change bullet seating depth, but “tuning” is most commonly done with powder charge. Some benchrest-for-group competitors also believe that best accuracy is achieve with freshly-made ammo loaded before the brass necks take a set.
Loading at the Range — Then and Now
In benchrest shooting for Group, loading at the range has been de rigueur for decades. In the Score discipline, preloading is usually the custom. The main reason is that, in Score competition, only one Aggregate (warm-up match and five record targets) per day is usually shot. That would be less than 50 shots, assuming a few sighter shots. Also, the 30BR, the dominant Benchrest-for-Score cartridge, is very amenable to pre-loading.
By contrast, the Group discipline includes 21 targets (two warm-ups and twenty record targets) over a weekend, usually shot with 6PPC-chambered rifles. Many times, the 6PPC shooters may tweak their loads through the day given changing atmospheric conditions or simply trying to find the correct tune to “dot up”. This term, “Dot up”, means the shots are essentially going through the same hole, or closely so.
Loading at the range was a bit different when benchrest competition was in its infancy. The 1951 book, Modern Accuracy by Bob Wallack, is the best of the early benchrest books. Copies can be found, from time to time, on eBay or Alibris. It is a fascinating survey of benchrest as it existed more than six decades ago. In it, there is a photo of Wallack using the rear bumper of a car at the bench to clamp his reloading tools. Things have come a long way compared to the range loading set-ups of modern shooters. Here you can see Bob Wallack way back in 1950:
Good Article on Reloading at the Range by Glen Zediker
The February 2013 edition of Shooting Sports USA magazine has an interesting feature by Glen Zediker, who sadly passed away in October 2020. In this Transporting Success, Part I article, Zediker explains the advantages of loading at the range when you are developing new loads or tuning existing loads. Glen, the author of the popular Handloading for Competition book, discusses the gear you’ll need to bring and he explains his load development procedure. In discussing reloading at the range, Glen focuses on throwing powder and seating bullets, because he normally brings enough sized-and-primed brass to the range with him, so he doesn’t need to de-prime, re-size, and then re-prime his cases.
Zediker writes: “Testing at the range provides the opportunity to be thorough and flexible. You also have the opportunity to do more testing under more similar conditions and, therefore, get results that are more telling. Once you are there, you can stay there until you get the results you want. No more waiting until next time.”
Zediker starts with three-shot groups: “I usually load and fire three samples [with] a new combination. I’ll then increase propellant charge… based on the results of those three rounds, and try three more. I know that three rounds is hardly a test, but if it looks bad on that few, it’s not going to get any better.”
Glen reminds readers to record their data: “Probably the most important piece of equipment is your notebook! No kidding. Write it down. Write it all down.”
There’s More to the Story…
Editor’s Note: In Zediker’s discussion of loading at the range, he only talks about throwing powder and seating bullets. In fact, Glen opines that: “there is little or no need for sizing.” Well, maybe. Presumably, for each subsequent load series, Zediker uses fresh brass that he has previously sized and primed. Thus he doesn’t need to de-prime or resize anything.
That’s one way to develop loads, but it may be more efficient to de-prime, re-size, and load the same cases. That way you don’t need to bring 50, 80, or even 100 primed-and-sized cases to the range. If you plan to reload your fired cases, you’ll need a system for de-priming (and re-priming) the brass, and either neck-sizing or full-length sizing (as you prefer). An arbor press can handle neck-sizing. But if you plan to do full-length sizing, you’ll need to bring a press that can handle case-sizing chores. Such a press need not be large or heavy. Many benchresters use the small but sturdy RCBS Partner Press, an “O-Design” that costs about $119.99 on Amazon. You may even get by with the more basic Lee Precision Compact Reloading Press, shown in Zediker’s article. This little Lee press, Lee product #90045, retails for under $50.00.
Wind Box Shelters Scales When Reloading at Outdoor Ranges
Beat the Breezes with a Wind Box for your Scale
Forum member Boyd Allen has come up with a smart solution for reloaders who use scales outdoors — a windproof scale enclosure, aka “Wind Box”. Boyd explains: “Many guys have good set-ups for loading at the range, with clamping mounts for powder measure and press. But they lack a good enclosure for a scale. This is vitally important with beam scales because they have a lot of surface area to catch the wind. With much wind at all, the beam can oscillate to the point that is not really very usable. While a low-profile electronic scale may be less wind-sensitive, breezes DO affect weight read-outs on digital scales. And of course you always have the issue of blowing powder particles.”
Boyd Allen has used his Wind Box successfully for many seasons. He explains: “The essence of the idea is to have a scale set up in a box with a clear cover that can be opened and closed. On one side the trickler handle/control emerges through a ‘just big enough’ hole. You raise the cover, add a sub-target-weight thrown charge to the pan, and then close the cover. With the cover secure, the set-up is protected from the wind, and you can now trickle up to your desired charge. It works very well. The scale in the photo is an old Ohaus that I picked up. You can adapt this Wind Box design to any beam scale, or portable electronic scale. Simply adjust the dimensions to fit your particular scale and trickler.”
Saturday Movies range loading story concept and video links by Boyd Allen


 Bullet Selection — With the .30-06 for my Garands and Springfields I stick mostly with 168gr bullets plus some 155-grainers. These bullet weights have just worked for me in the past.
  Powder Charge and Dispensing — I have always had good success with Hodgdon H4895 powder. My load has always been right around 47.0 grains, with both the 168gr and 155gr bullets. I also use the Auto-Trickler to drop all of my powder charges. This is a fantastic piece of equipment that not only gives super-consistent powder charges quickly, but it also makes one less thing that you have to worry about while on the firing line. With the Auto-Trickler, there is never a question about the powder charge in your ammo. As for primers, I have been shooting CCI 200 Large Rifle primers for many years and have never had an issue.


 Oversizing cases also causes problems because the firing pin doesn’t have the length to reach the primer solid enough to ignite it 100% of the time. When you have one that is oversized, you usually have a bunch, since you usually do several cases at a time on that die setting. If the die isn’t readjusted, the problem will continue on the next batch of cases also. They will either not fire at all or you will have a lot of misfires. In a bolt action, a lot of time the extractor will hold the case against the face of the breech enough that it will fire. The case gets driven forward and the thinner part of the brass expands, holding to the chamber wall and the thicker part of the case doesn’t expand as much and stretches back to the bolt face. If it doesn’t separate that time, it will the next time. When it does separate, it leaves the front portion of the case in the chamber and pulls the case head off. Then when it tries to chamber the next round, you have a nasty jam. Quite often range brass is the culprit of this because you never know how many times it has been fired/sized and in what firearm. Back to beating it on the ground again till you figure out that you have to get the forward part of the case out.


 When neck-turning cases, it’s a good idea to extend the cut slightly below the neck-shoulder junction. This helps keep neck tension more uniform after repeated firings, by preventing a build-up of brass where the neck meets the shoulder. One of our Forum members, Craig from Ireland, a self-declared “neck-turning novice”, was having some problems turning brass for his 20 Tactical cases. He was correctly attempting to continue the cut slightly past the neck-shoulder junction, but he was concerned that brass was being removed too far down the shoulder.


 There’s More to the Story…


