The 6mmBR Norma cartridge has spawned many great variants in multiple calibers: 6mm Dasher, 6BRA, 22 BR, 22 Dasher, 30 BR and others. This article is about a handsome 22 BR Rem-action varmint rig.
Richard Franklin (who operated Richard’s Custom Rifles prior to his retirement), has built scores of varmint rifles, in many different calibers. One of Richard’s all-time favorite varmint rifles is a 1:14″-twist, 22 BR built on his Model 11 stock in laminated Black Walnut and fiddleback maple. Richard says the rifle is versatile and deadly accurate out to 400 yards. Richard uses a Leupold 8.5-25x50mm LRT with varmint reticle.
Richard’s 22 BR Varmint Rifle with Lilja Barrel
Richard tells us: “[Shown above] is my light walking varminter. It’s built on a blue-printed Stainless Steel Remington 700 short action and chambered as a no-turn 22 BR for Lapua brass. The bolt handle is a Dave Kiff replacement and I’ve fitted a Jewel BR trigger with bottom safety. The barrel is a Lilja, 1:14″ #6 contour with a muzzle diameter of .750″. I shoot the 40gr V-Max bullets in the rifle at 4000 FPS. It’s tough on hogs if you don’t try them too far. 400 yards is about the max with it.
Accuracy is outstanding and with Roy, Mike, my grandson and myself shooting this rifle I don’t believe it has missed more than three hogs out of over 100 we shot at one summer. This rifle is carried in a ceiling rack in the truck where it’s handy and is used by the first person that grabs it when a hog is sighted if we are moving between setups. The Varmint reticle on the Leupold (shown below) is nice for quick hold-overs as you change distances.”
At right is a another Franklin Model 11 stock in Birdseye maple. That photo shows the details of the thumbhole stock.
Editor’s Note: We have shot a 1:8″-twist 22 BR in varmint matches and it was very accurate with 80gr bullets. It actually shot flatter out to 500 yards than our 6mmBR running 105-grainers. If we were to build a new long-range, bolt-action varmint rifle it would probably be a 22 BRA, essentially a 22 BR with 40° shoulder. That gives you a very stable cartridge with a bit more capacity. The 22 BRA retains a longer neck compared to the 22 Dasher, which is also an excellent cartridge — versatile and accurate.
22 BR Rivals 22-250 Performance
With bullets in the 40gr to 60gr weight range, the 22 BR gives up very little in velocity to a 22-250, despite burning quite a bit less powder (30-32 grains for the 22 BR vs. 35-38 grains for the 22-250). With a match-quality chamber, the 22 BR will probably have an edge in accuracy over a 22-250, and you should experience longer barrel life. Here are some recommended 22 BR loads for 40-60gr bullets:
The 6mmBR Norma cartridge has spawned many great variants in multiple calibers: 6mm Dasher, 6BRA, 22 BR, 22 Dasher, 30 BR and others. This article is about a handsome 22 BR Rem-action varmint rig.
Richard Franklin (who operated Richard’s Custom Rifles prior to his retirement), has built scores of varmint rifles, in many different calibers. One of Richard’s all-time favorite varmint rifles is a 1:14″-twist, 22 BR built on his Model 11 stock in laminated Black Walnut and fiddleback maple. Richard says the rifle is versatile and deadly accurate out to 400 yards. Richard uses a Leupold 8.5-25x50mm LRT with varmint reticle.
Richard’s 22 BR Varmint Rifle with Lilja Barrel
Richard tells us: “[Shown above] is my light walking varminter. It’s built on a blue-printed Stainless Steel Remington 700 short action and chambered as a no-turn 22 BR for Lapua brass. The bolt handle is a Dave Kiff replacement and I’ve fitted a Jewel BR trigger with bottom safety. The barrel is a Lilja, 1:14″ #6 contour with a muzzle diameter of .750″. I shoot the 40gr V-Max bullets in the rifle at 4000 FPS. It’s tough on hogs if you don’t try them too far. 400 yards is about the max with it.
Accuracy is outstanding and with Roy, Mike, my grandson and myself shooting this rifle I don’t believe it has missed more than three hogs out of over 100 we shot at one summer. This rifle is carried in a ceiling rack in the truck where it’s handy and is used by the first person that grabs it when a hog is sighted if we are moving between setups. The Varmint reticle on the Leupold (shown below) is nice for quick hold-overs as you change distances.”
At right is a another Franklin Model 11 stock in Birdseye maple. That photo shows the details of the thumbhole stock.
Editor’s Note: We have shot a 1:8″-twist 22 BR in varmint matches and it was very accurate with 80gr bullets. It actually shot flatter out to 500 yards than our 6mmBR running 105-grainers. If we were to build a new long-range, bolt-action varmint rifle it would probably be a 22 BRA, essentially a 22 BR with 40° shoulder. That gives you a very stable cartridge with a bit more capacity. The 22 BRA retains a longer neck compare to the 22 Dasher, which is also an excellent cartridge — versatile and accurate.
22 BR Rivals 22-250 Performance
With bullets in the 40gr to 60gr weight range, the 22 BR gives up very little in velocity to a 22-250, despite burning quite a bit less powder (30-32 grains for the 22 BR vs. 35-38 grains for the 22-250). With a match-quality chamber, the 22 BR will probably have an edge in accuracy over a 22-250, and you should experience longer barrel life. Here are some recommended 22 BR loads for 40-60gr bullets:
Richard Franklin’s Step-by-Step Guide to Pillar Bedding
The Art of Stress-Free Stock Bedding
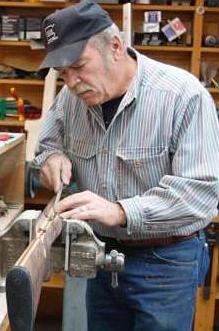
by Richard Franklin Richard Franklin prepared this article for our readers. Richard tells us: “I’m happy to do pillar-bedding work, but this is a job which many shooters can do themselves, with some practice and the right components. I do suggest you practice first on an old ‘beater stock’. When done right, you end up with a perfect fit of receiver to action, with no twisting, stretching, or compression forces being applied to the receiver through mis-alignment. That’s what I mean by ‘stress-free’.”
This article covers all the steps in the process. If you want to see more, Richard has a 200-minute DVD, Stress-Free Pillar Bedding, that shows the entire job–from start to finish–and contains many tips to help you achieve perfect results. Richard shows how to properly relieve the bedding area, how to make pillars, how to set up the barreled action, and how to test your work to ensure it is truly “stress-free”. In the DVD, Richard does a complete pillar bedding job on both a finished custom stock and a Remington stock. You can order the Pillar Bedding DVD by visiting the Instructional Video page on RichardsCustomRifles.com.
[Editor’s Note: This article was first published a decade ago. So, some of the listed bedding materials may have been enhanced slightly, or the product names may have changed. But the procedures described by Richard are still valid and still achieve great results.]
Before You Begin — Some Comments About Inletting
Richard told us: “You can’t do a great bedding job unless you start with really good inletting. Unfortunately, many ‘inletted stocks’ really require quite a lot of work to get the inletting right. You cannot inlet a stock 100% correctly just using a stock duplicator. That’s one reason I do bedding jobs only on the stocks I make. If the inletting isn’t right, you can have a myriad of problems–such as the holes for the action bolts being in the wrong place, or the stock not having enough clearance for the barrel or the trigger hanger. So, BEFORE you start your bedding job, make sure the inletting is really right. Don’t assume the inletting is really complete (and correct) just because the manufacturer claims that to be the case. This applies to both wood and fiberglass stocks.”
Pillars For Bedding
The BAT action featured in this article has three pillars, with the middle pillar sitting under the front of the trigger guard, and the third pillar at the rear of the guard. More typical installations will use two pillars. For either system, the installation procedures are the same.
In Photo 1, you will see part A, the bottom part of the front pillar which we call the “escutcheon”. Part B, which is a 1/4″ X 28 action bolt that is slightly longer than part C which is the top part of the front pillar. The two parts of the front pillar were machined as one piece and then the escutcheon was cut off just below the shoulder that is inside. This shoulder is for the head of the action bolt to tighten up against. I’ve found that a two-piece pillar has many advantages, particularly for hunting stocks where the underside of the stock is angled (i.e. not parallel with bore axis). I make the pillars I use, machining them from cut-off stainless barrel stubs.
Part D is a 1/4″ X 28 hex-head bolt with the head turned down to 1/4″ which permits the insertion of a hex-head driver to tighten and remove the bolt. This headless bolt will be inserted in the rear tang hole of the action and part E, the rear pillar will be placed on it.
STEP ONE — Getting Started
Photo 2 shows tape on recoil lug, pillars bolted in place and putty in voids. Release agent is polished to a very thin layer. The top half of the front pillar (part C) is placed on the action receiver ring and the bolt (part B) is inserted thru the pillar and tightened against the action. This bolt must have a tapered head on the underside so that, when it is tightened, it will center the top half of the front pillar around the action bolt hole. (This is also true for the middle pillar if the action has a middle bolt.)
PHOTO 2
The headless bolt is inserted into the rear tang hole of the action and the rear pillar is slipped down on it. You will notice in Photo 3, below, that the pillars have the hole drilled oversize so that a 1/4″ bolt has a little space around it. (I like to drill the pillars with a .260″ bit inside.)
The above scenario is the placement of the pillars prior to applying the bedding compound, which I call “Mud”. Devcon 10110 is my bedding compound of choice (and the only product I use) as the mud must set up as hard as concrete and most other epoxies will not do this. Also Devcon shrinks very little if at all. My comments on other bedding compounds are in the sidebar below.
STEP TWO — Relieving the Stock Before Bedding Relieving the right amount of wood in the area to be bedded–not too much, not too little–is very important to achieving the best results. You need to create some space for the mud to fill around the action, but you don’t want to alter the inletting too much.
PHOTO 3
Photo 3 shows the wood removed from the inside of the stock bedding area. Remove enough wood everywhere except along the top sides of the stock to allow at least 1/8″ to 3/16″ of room for the mud. Remove 1/4″ of wood behind the recoil lug. I like about .012″ clearance on the top inside edges.
NOTE: Leave a small area of original wood just behind the rear tang bolt hole as this wood will determine the elevation of the bedded action in the stock.
Photo 4 shows the tang area of the stock. Note the elevation wood left at tang. Be sure to leave some original wood for the action tang to sit on. This is very important.
STEP THREE — Wrapping Tape on the Barrel Photo 5 shows the barreled action in the vise. It also shows black electrical tape wrapped around the barrel just behind the front of the stock forearm. Wrap enough tape to hold the front of the barreled action at the proper elevation in the stock.
The idea is that the barreled action does not touch anything except the bit of original “elevation” wood left at the rear tang (behind the pillar) and the forearm resting on the electrical tape. This is very important to obtain 100% stress-free bedding. You want the bore of the barrel to be parallel with the top edge of the stock so wrap just the right amount of tape to ensure this. The tape also centers the barrel in the fore-arm. Done right, the barreled action will be contacting just at two points (tape in front, tang in rear) and the barrel’s bore will be parallel with the top of the fore-arm’s sidewalls.
Comments on Alternative Components and Methods
Bedding Compounds
There are at least a dozen popular products used for rifle bedding. At one time or another, Richard has tried most of them. Devcon 10110 “Plastic Steel® Putty” is the only compound he currently uses and the only product he endorses whole-heartedly. “The Devcon 10110 is expensive, but it is the best bedding product I’ve found. First, it sets up extremely hard. That is very important to the performance and longevity of the bedding job. You want it to get it as hard as concrete. You need it really hard so when you tension the action screws it doesn’t squish down or migrate. Some of the brown stuff other folks use is way too soft. Marine Tex is also too soft. Many products will shrink. Any compound that shrinks is useless in my book. Devcon has absolutely near-zero shrinkage. Acra-Glass I keep in my shop, as it is useful for stock repairs. However I would never bed with Acra-Glass.
Devcon also has just the right consistency — about that of peanut butter. So, it is easy to apply but not runny. It stays in place when I turn the stock upside-down. Devcon is also relatively forgiving to mix–the proportions of the two elements are not super-critical like some other products. I know Marine-Tex can give real problems if you don’t use just the right amount of catalyst. Overall, Devcon does everything you need it to do, and does it exceptionally well. Some other smiths think it’s too expensive–and yes I’ll use $10-$15 worth of Devcon in doing a typical bedding job. But I think the customer deserves the best possible, longest-lasting bedding, and that means Devcon. Among the products I’ve used, Bisonite is my second choice, but I think Devcon will last longer.”
Release Compounds
Richard tells us: “People use all sorts of release compounds and I’ve tried many. I strongly prefer Kiwi shoe polish (neutral color). With the Kiwi, I’ve never had an action stick in the stock. It goes on easy, and you can use a paper towel to polish it very thin and that’s a big benefit. If you have a thin layer of release compound the finished bedding is that much closer to the exact dimensions of the action. I’ve heard of guys using PAM spray. I don’t trust that stuff. The Brownells release compound goes on too thick. Car wax is not a great choice either because it can separate and it gets dusty as it dries. Go with the Kiwi stuff–a little can will last for years. But be sure to use the clear (neutral) kind so you don’t stain your stock or action.”
Clamping and Tension Materials
Read a few articles on pillar bedding and you’ll see many different systems for holding the barreled action to the stock when the bedding compound cures. We’ve seen surgical tubing used, or strips of bicycle inner tube. Some writers have even advocated using mechanical clamps (a bad idea). Richard has tried various tensioning set-ups over the years, and electrical tape is his strong recommendation: “First, let me say it’s crazy to use a C-Clamp or something like that. The clamp will cause a point-load where it attaches and that is just the opposite of what you want.”
Richard has tried many materials: “Surgical tubing I’ve found to be cumbersome to use, and it tends to loosen up during the curing time. Same thing with strips of inner tube. That’s bad news because any loosening or stretching will allow the action to shift. It’s absolutely critical that the action not move one bit while the bedding cures. Once you’ve bedded the action if it dries the wrong way you’ve screwed everything up. Using the electrical tape that isn’t an issue. The tape goes on very tight, doesn’t stretch (if you use enough turns) and I have no fears that the action will shift while curing. Just follow my advice and put a strip of paper towel under the electrical tape so you don’t mar the finish of the barrel or stock.”
Contoured vs. Straight (Flat-top) Pillars
Many factory rifles come with contoured (radiused) pillars, and many gunsmiths prefer to use these. The idea is that the contour provides a better fit with the bottom of round actions. Richard has tried contoured pillars and doesn’t recommend them. He explains: “Most of the contoured pillars don’t really match the contour of the action anyway. And every action is slightly different. Even some of the most favored custom actions aren’t exactly the same from one unit to another. What happens when the contour or curve of the pillar is too narrow is that the action touches just the extended top edges of the pillar (left and right of center). That is not as solid as when the action contacts the center of the pillar where the action screw runs. (And those sharp sides of curved pillars tend to point-load and dig into your action.) Also I feel you get a better match of the Devcon to the action with flat-top pillars. What you want is the bedding compound to cradle the action all the way around. I’ve found this works best with flat-top pillars and a very strong, hard compound like Devcon that doesn’t squish down or shrink.”
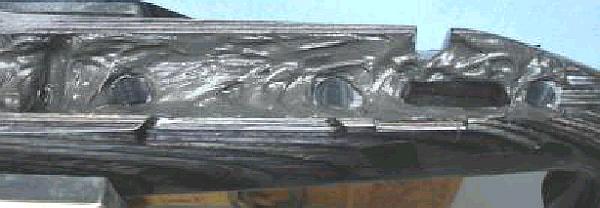
STEP FOUR–Applying Release Agent and Plumbers Putty
Failure to apply release agent (and putty) properly is a recipe for disaster. One of the most common mistakes novices make when doing bedding jobs is locking in the action. This happens by not covering enough of the action with release agent, not taping off the lug correctly, and not adding putty to plug any slots or spaces into which the mud can migrate. Remember, you are doing a bedding job, not a glue-in job! When you’ve completed the process, you want to be able to pop the action loose without difficulty.
PHOTO 6 — Showing putty and release agent before polishing, tape on lug.
First, remove the trigger, bolt release and spring, and anything else from the bottom of the action. Then, clean the action and recoil lug area with brake cleaner or parts degreaser. Apply plumbers’ putty to any hole or crevice that you don’t want the mud to get into. Wrap two layers of masking tape on the outside edges of the lug and trim with a razor blade. Do not apply tape to the front or back of the lug. (Apply tape to the front of the lug only if you do not have a way to remove the hardened mud). Let this tape go right around to the top of the action. Wipe the putty smooth with the brake parts cleaner. I highly recommend neutral Kiwi shoe polish as release agent. Apply liberally to the entire action using a Q-tip to get in around the lug (including front and rear of lug), bolt handle slot and loading port edges. Let the shoe polish dry for 10 minutes and then use a paper towel and buff and polish the release agent as thin as possible. You want any release agent to be as thin as possible so as to let the action set as close as possible to your bedding. You also want to apply release agent to the rear (headless) bolt.
STEP FIVE — Installing the Pillars
Now is the time to place the pillars. Screw the top half of the front pillar and middle pillar (if the action has a middle bolt) to the action with the tapered head bolt. Screw in the headless bolt and slip the pillar down around it. Apply release agent to the area of the guard around the rear bolt hole (and to the rear headless bolt). Apply top and bottom and from the inside out. We don’t want the guard stuck to the bedding. (This guard sits on the bolt head that is secures the middle pillar to the action. We need the guard in place to align the action in the stock.)
Install the trigger guard back in place on the stock as the guard is used to align the barreled action in the stock. Now is the time to make a trial run to ensure that everything fits properly. Slip the upside-down stock down over the pillars with the headless bolt coming up through the rear bolt hole in the guard. See Photo 7. Ensure that the stock is resting on two spots only–the tape you’ve wrapped around the barrel, and the little bit of wood you left behind the tang bolt. Ensure there is room everywhere around the action to accept the mud. The barreled action cannot be touching anywhere except the tape and the tang. Not even on the top edges of the stock.
STEP SIX — Applying the Mud
Mix up a generous portion of the Devcon 10110 Mud and apply to the pillars as shown in Photo 8. Do not get mud on top of the bolt head and front pillar(s). Do apply a little mud on top of the rear pillar and if a little gets on the headless bolt that is OK as you should have applied release agent to this bolt. This will properly bed the guard to the rear pillar. The front bolt that holds the front pillar need not have release agent applied to it. Note, as shown in Photo 8, each pillar has a bolt inserted.
PHOTO 8 — Showing mud on the pillars.
You cannot use too much mud as the hydraulic action of pressing the stock down on the barreled action is going to squeeze the mud everywhere it need to go and the excess will be forced out (falling on the floor for you to step in).
PHOTO 9 — Showing mud applied to stock.
Now apply the mud very generously to the stock as shown in Photo 9 above. If I am not bedding any portion of the barrel shank I will only apply a little mud behind the recoil lug area.
STEP SEVEN — Assembly and Compression
Now slip the upside-down stock down over the pillars as you did in the trial run. Ensure the stock is bottomed-out on the tape at the front end. Squeeze slowly, pressing the rear of the stock down and squeeze out the excess mud. After pressing the stock down, the action area should appear as in Photo 10. During the compression stage, stop a few times and use Q-tips to clean off the excess mud that is squeezing out between action and stock.
PHOTO 10 — Rifle right side up, with the mud squeezed out.
Cut a piece of paper towel about two inches wide by the length of the towel. Lay this on the stock 1.5″ in front of the action. Wrap black electrical tape around the stock and barrel, running the tape over the strip of paper towel. (The towel is to protect the stock finish.) Squeeze the stock and action together while taking wraps with the tape. If you have a skinny, pencil-thin barrel don’t apply too much pressure with the tape as the weak barrel can be curved slightly. That can cause the barrel to touch the stock when everything is done (not good). If you have a big, fat barrel don’t worry about deflection. With a heavy contour tube, whatever bend you put in the barrel will spring back when the tape is removed.
STEP EIGHT — Mud Removal and Curing Time
Using Q-tips, clean up very thoroughly around the front pillar and the bolt head. You need to be able to unscrew the bolt to separate the stock from the rifle and you do not want the bedding protruding above the pillar. (The escutcheon still has to have room to fit in there without touching the end of the pillar.) Before turning the rifle right-side-up, reach under with a few Q-tips and clean off the mud hanging there as it may get inside the action.
Turn the rifle right side up in the vise and, using lots of Q-tips, clean all of the mud off of everything. Remove the excess mud every place you can see it. Use a paper towel to wipe the stock as there could be some invisible mud hiding somewhere on the stock or action. After using Q-tips, I sometimes use Butch’s Bore Shine solvent. It does a good job of removing the mud residue (other solvents with ammonia would work well also).
When you’ve cleaned off all the excess mud. It’s time to let the bedding cure. Lie the rifle upside down with the weight on the rear of the action and about where the tape is on the barrel. Let the gun sit for about 8 to 10 hours or overnight. IMPORTANT, you should remove ALL the excess mud around the action before you let the rifle cure for this time period. Photo 11 shows the rifle upside down, but you want to have the excess mud cleaned off before curing.
PHOTO 11 — Position for curing the mud–but excess should be removed first.
IMPORTANT: Avoiding Mechanical Lock During Bedding
One major problem that can arise when novices bed their own stocks is mechanical lock. This occurs when some part of the action or barrel is trapped below the bedding. Effectively, the barreled action becomes anchored in the stock and can be very difficult to remove. Richard says avoiding mechanical lock is not that difficult, but you must be careful: “Locks usually occur because the bedding is applied too far up. Never, and I repeat, never, bed above the centerline of the action (bore axis), or the widest point of the action (whichever is lower). You need to leave the edge of the bedding at least 1/16″ below the centerline of the action and centerline of the bore axis. I normally leave about 1/8th of vertical clearance. If the widest point of the action is BELOW the bore axis, you have to keep the bedding below that. The other thing to watch out for are projections and holes in the sides of the action. All holes must be filled with plumbers’ putty. All projections–anything that sticks out–need to be removed. If some little part or fixture sticks out, even if you tape it over, and it is below the top of the bedding, it can lock the action in.”
STEP NINE — Popping the Barreled Action Loose
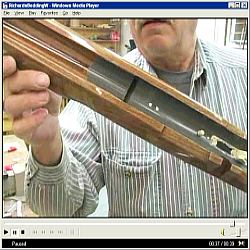
After the required curing time, you need to remove the barreled action to check the beading and fit the pillar escutcheons. If you cleaned away all the excess mud and there are no mechanical locks in the bedding, it should not be difficult to pop the stock loose. You can see how this is done in the short Video Clip from my DVD (Right-Click and “Save As” to download). Here is the procedure.
After the mud has set up and hardened, clamp the barrel in a vise with the gun upside down. The vise should camp just ahead of the forearm. Remove the bolt in the front pillar (and middle pillar) and the headless bolt. Remove the trigger guard.
With the left hand, apply upward pressure to the forearm and then with the right hand slap upward on the forearm. You will hear a crack like you might have busted the stock. Not to worry, that is just the bedding popping free. Now wiggle the stock up off the recoil lug as it is the only thing holding the stock down. [Editors Note: Here’s an older video clip that shows Richard “popping” the stock loose from the barreled action. CLICK HERE to download a 6 Meg Windows media file, or click these links for MPEG (2.3 megs), and Real Media (2.3 megs) versions.]
Remove the tape from the barrel and recoil lug and clean up the putty. Wipe the action down with brake parts cleaner. On the stock, remove the squeezed mud that went into the trigger and bolt release area. Relieve the lug area on both sides and the front. Lay the stock back on the barreled action. Be sure to check under the trigger guard to see if any cleanup of mud is required there. Then re-install the guard and insert the rear action bolt just snug (not tight).
STEP TEN — Installing the Pillar Escutcheons
Pillar escutcheons are a nice extra feature I add to my custom rifles. These are stainless, made from barrel stubs. The two-part front pillar is originally machined as one piece. I believe front pillars with the escutcheons (or outer ring) offer advantages over conventional pillars in terms of strength and alignment.
Before you actually install the escutcheons, you need to do some fit testing. Have a trial run at setting the front bolt to the proper length by placing the escutcheon in the hole and screwing in the bolt. Loosen off the back bolt to see if the bolt that is thru the escutcheon is holding the stock firmly in place. Retighten the rear bolt a wee bit.
Apply release agent to the front bolt, being careful to not get it on the escutcheon. Insert an Allen wrench into the head of the bolt so you can hold it easily. Slip the escutcheon over the bolt. Apply mud to the escutcheon and around the bolt. Photo 12 shows how much mud to put on the escutcheon. You want enough so when you tighten the bolt it will force the mud everywhere it needs to go, even though a bit will be squeezed in around the bolt. Photo 13 shows how the escutcheon should look installed, with the bolt tightened. Photo 14 (below right) shows the escutcheon after the mud has been removed–be sure to remove the excess while the Devcon is still soft.
PHOTOS 13 and 14 — Showing escutcheon before (left) and after mud clean-up (right).
Clean up the excess mud with Q-tips and paper towels. You need to do this before the mud hardens. I used Butch’s Bore Shine as a solvent, once I have removed the excess mud with Q-tips and towels. When the escutcheons are cleaned up, you’ve finished working with the mud. Now let the stock lay for another 8 hours or so to allow the escutcheons to become.
After the mud has hardened around the escutcheon clamp the rifle back in the vise. Remove the back tang bolt first then the front bolt that is through the escutcheon. The bolt will be tight in the hole and sometimes may need to be punched out with a punch unless it has threads right to the head in which case it will screw out. Go in the hole with a .260” bit and clean the mud out of the front pillar. Let the bedding harden for a day or two and then torque the bolts with about 35 inch-lbs of torque on the front bolt and maybe 25 on the tang bolt.
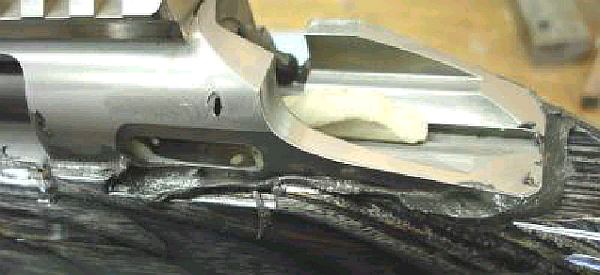
The finished result is an even coat of Devcon with no voids, air pockets, fissures, and perfect stress-free support for the action, as shown in Photo 15.
The 6mmBR Norma cartridge has spawned many great variants in multiple calibers: 6mm Dasher, 6BRA, 22 BR, 22 Dasher, 30 BR and others. This article is about a handsome 22 BR Rem-action varmint rig.
Richard Franklin (who operated Richard’s Custom Rifles prior to his retirement), has built scores of varmint rifles, in many different calibers. One of Richard’s all-time favorite varmint rifles is a 1:14″-twist, 22 BR built on his Model 11 stock in laminated Black Walnut and fiddleback maple. Richard says the rifle is versatile and deadly accurate out to 400 yards. Richard uses a Leupold 8.5-25x50mm LRT with varmint reticle.
Richard’s 22 BR Varmint Rifle with Lilja Barrel
Richard tells us: “[Shown above] is my light walking varminter. It’s built on a blue-printed Stainless Steel Remington 700 short action and chambered as a no-turn 22 BR for Lapua brass. The bolt handle is a Dave Kiff replacement and I’ve fitted a Jewel BR trigger with bottom safety. The barrel is a Lilja, 1:14″ #6 contour with a muzzle diameter of .750″. I shoot the 40gr V-Max bullets in the rifle at 4000 FPS. It’s tough on hogs if you don’t try them too far. 400 yards is about the max with it.
Accuracy is outstanding and with Roy, Mike, my grandson and myself shooting this rifle I don’t believe it has missed more than three hogs out of over 100 we shot at one summer. This rifle is carried in a ceiling rack in the truck where it’s handy and is used by the first person that grabs it when a hog is sighted if we are moving between setups. The Varmint reticle on the Leupold (shown below) is nice for quick hold-overs as you change distances.”
At right is a another Franklin Model 11 stock in Birdseye maple. That photo shows the details of the thumbhole stock.
Editor’s Note: We have shot a 1:8″-twist 22 BR in varmint matches and it was very accurate with 80gr bullets. It actually shot flatter out to 500 yards than our 6mmBR running 105-grainers. If we were to build a new long-range, bolt-action varmint rifle it would probably be a 22 BRA, essentially a 22 BR with 40° shoulder. That gives you a very stable cartridge with a bit more capacity. The 22 BRA retains a longer neck compare to the 22 Dasher, which is also an excellent cartridge — versatile and accurate.
22 BR Rivals 22-250 Performance
With bullets in the 40gr to 60gr weight range, the 22 BR gives up very little in velocity to a 22-250, despite burning quite a bit less powder (30-32 grains for the 22 BR vs. 35-38 grains for the 22-250). With a match-quality chamber, the 22 BR will probably have an edge in accuracy over a 22-250, and you should experience longer barrel life. Here are some recommended 22 BR loads for 40-60gr bullets:
Mr. Smith’s Tack-Driving Thumbhole Trio
What is it they say? “Can’t have too much of a good thing?” We’ll in the case of Sam Smith of Wisconsin, that goes for beautiful wood-stocked thumbhole rifles that shoot like the blazes. This week we feature a troika of thumbholes, all smithed and stocked by Richard Franklin of Richard’s Custom Rifles (Richard is now retired but still offers DVDs). Not content with a single caliber or twist, Sam commissioned three different chamberings and barrel twist rates.
First, in Fiddleback Walnut — a 6PPC Walking Varminter The most elegant of the three thumbholes is this handsome .261″-neck 6PPC. The blue-printed Rem 700 action is pillar-bedded in a highly-figured stock of laminated Curley Fiddleback Walnut, in Richard’s #004 pattern. Richard uses three sections of wood bonded together so the outside looks like a single piece of Walnut.
The lead photo at top, and the image at right show more details of this rifle. The grain really takes on a rich color in sunlight, with the Tiger-stripe figure showing brilliantly through the clearcoat. Believe it or not, Sam doesn’t even consider this one of his best-looking rifles. Sam tells us, “these three thumbhole stocks are not even close to the prettiest guns Richard has built for me–you should see the Maple ones he did for me–they are unbelievable.”
Sam tells us the gun’s 1:14″-twist Krieger barrel is a hummer — it regularly shoots one-holers at 100 yards. Sam has even logged some groups in the Zeros with the gun–awesome accuracy for a varmint rifle/Sam tells us that, using VV N133 and 58gr V-max bullets, this gun is absolutely deadly on prairie dogs out to 500 yards. (SEE: One-hole Sample Target.)
Rifle #2 — Cherry and Walnut Together in a 6mm Rem Improved
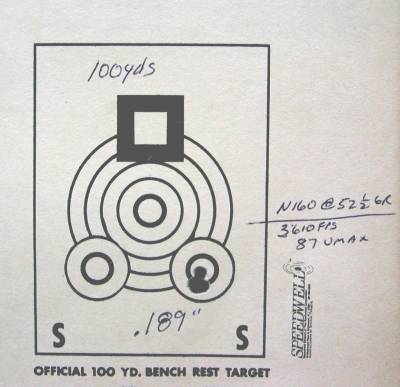
When more knock-down power or more distant targets are in order, Sam pulls out his 6mm Rem Improved 1:12″-twist thumbhole Varminter. Like the other two guns, this features a pillar-bedded Remington 700 action and Krieger barrel. While the 6mm AI’s #004 stock shares the same shape and form as the 6PPC above, it is much more colorful, employing a seven-layer laminate in Cherry and Walnut, covered with multiple coats of automotive clear-coat. One of Sam’s favorite varminters, this rifle sees more range use than his 6PPC because “the PPC is so accurate I want to keep the round count down.” That’s not to say the 6mm Improved is any slouch in the accuracy department. Using VV N160 and 75gr V-max bullets, the gun averages in the 2s and 3s. The best group to date was .189″ with the 87gr V-Max (See V-Max Target below). Chalk that up to another superbly accurate Krieger barrel combined with outstanding chambering work by Richard.
6mm Rem Improved with 87gr V-Max at 100 Yards
Rifle #3 — Fast-Twist 6.5-284 with Benchrest Forearm
Last but not least is Sam’s handsome 6.5-284 (below), also in a laminated Walnut and Cherry stock. The Krieger barrel is a Heavy Varmint contour, with an 8-twist and .290″ neck. This gun hasn’t been shot much yet, but during initial testing it grouped in the mid-threes with 53gr of H4831 and 142gr Sierra MKs. You’ll note the stock is a bit different than the other two guns–this is the #005 stock pattern, which boasts a 3″-wide, flat forearm. It is identical to the #004 from the recoil lug rearward. Sam tells us that the #005 tracks better than the #004, though he prefers the rounded forearm of the #004 for a walking varminter.
Sam’s all-time favorite stock pattern in Richard’s #007, a roll-over comb design with conventional wrist and Cooper-style Beavertail forearm. Sam has a similar Maple #007 that he says is “even nicer than the gun in the picture.”
Nice Wood? You Ain’t Seen Nothin’ Yet!
After this trio of thumbhole rifles, Sam commissioned two more rifles — a matched pair in 6mm BR Norma and 6PPC, done up in absolutely amazing 500 year-old Turkish Walnut, sourced from a one-of-a-kind 48″ diameter Burl. What does a piece of wood like this cost? Trust us, if you have to ask, you couldn’t possibly afford it. Let us just say these are some of the most spectacularly figured blanks ever shipped from Turkey and they are priced accordingly. Here’s a preview, taken right before Richard bonded the first stock together. The lower two pieces look lighter because of the flash angle but the upper section more accurately shows how all three pieces appear in natural light. “Wow” is right!
Richard Franklin is Now Retired in Montana
The last we heard, gunsmith Richard Franklin was enjoying his retirement years up in Montana. On RichardsCustomRifles.com Richard posted: “I built fine custom rifles and for many years. I was the first stock maker to laminate woods such high-grade walnut, fiddleback maple and other fancy woods. I designed my own ideas into my patterns and carved, finished, pillar bedded thousands of stocks on the rifles I built. My most popular stock pattern was my Model 11 thumbhole.
I love building rifles but my health has forced me to retire and to take time to smell the roses. I made many great videos on how to build rifles and have been selling them for many years. They are still in great demand.” CLICK HERE to check out Richard’s DVDs about rifle building and varmint hunting.
This story, from our Gun of the Week Archives, offers a good intro to the 30 BR cartridge, which is still the leading chambering for short-range Score Benchrest.
What’s better than one custom-built 30 BR with gorgeous wood and top-shelf components? A matching pair of course. Just ask Australian shooter Greg Roche (“Caduceus” in our Forum). A decade ago, Greg spent two years living and working in the USA. While in America, he commissioned two matched custom rifles to bring back to Australia for Hunter Class BR matches. Though the look-alike rigs are both chambered in 30 BR, one is designed for the Australian “Traditional” centerfire Hunter Class (10-lb limit), while the other is purpose-built for the “Custom” centerfire Hunter Class (14-lb limit). The 10-lb Traditional rifle features a fully-functioning two-round magazine and a 6-power scope. In contrast the Custom Class rifle is a single-shot action, with a 45X Leupold scope. The Custom weighs 13.5 pounds so it can also be used in traditional Heavy Varmint Benchrest matches if desired.
Tale of Two Rifles Story and Photos by Greg Roche (“Caduceus”)
The USA boasts some of the finest precision rifle-builders and Benchrest parts suppliers in the world. Before returning to Australia after two years in the States, I decided to have two special BR rifles built using American components and skilled labor. I wanted a matched pair–twin guns that would be as handsome as they were accurate. The heavier gun of the pair, the 13.5-lb Custom Class rifle, features top-of-the-line (but well-proven) technologies and components. With the 10.5-lb Traditional Class rifle, we had to develop new solutions to allow the 30 BR cartridge to feed from a functional two-round magazine. Here is my saga of how my twin 30 BRs were conceived and built, and how they have performed in competition.
BACKGROUND — The 30 BR for Score Competition
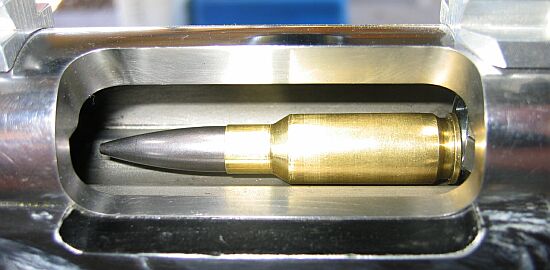
The 30 BR is a wildcat cartridge based on a necked-up version of the 6mmBR Norma case. It originated in U.S. Benchrest circles where it found its niche in Varmint For Score (VFS) matches. Unlike traditional Benchrest, where group size determines the winner, VFS matches are shot on a target with multiple, concentric-ringed bullseyes. Point total is based on “best edge” shot location (one shot per bull). In score competition, the 30 BR’s “supersized” .308-diameter hole offers an advantage over the 6mm hole created by a 6 PPC, the dominant group BR chambering.
The starting point for loading the 30 BR wildcat is Lapua 6mmBR brass. These are necked up as a single-step operation using a .30 caliber tapered expander ball (or dedicated expander mandrel). This will leave a bulge in the neck, so the expanded case neck is normally turned to bring the thickness down to the correct dimension for the chamber. I turned these necks down to .010″ wall thickness using a Stiller neck-turning tool. It features an eccentric mandrel similar to the Nielson “Pumpkin”. Loaded rounds measure .328″ neck diameter. This gives minimum clearance in my .330″ neck chamber, so very little neck resizing is needed after firing. Cases are trimmed to 1.500″ prior to turning to ensure consistency since the Stiller tool indexes the length of cut off the case mouth. Other than that, cases are just chamfered, loaded and made ready to shoot. No special fire-forming is required.
17-Twist Barrels for Both Rifles
Texan gunsmith Mike Bryant chambered both barrels. Mike also polished both barrels to a high-gloss to match the receivers. In this game, barrels are consumables, much like powder and primers, so most owners wouldn’t bother to polish their barrels. However a 30 BR barrel can provide up to 5000 rounds of accurate life (unlike a 6PPC barrel which might be tossed after 800-1000 rounds.) So, these barrels are likely to be on the rifles for many seasons. Given the high-gloss finish of the Grizzly actions and the beauty of the Red Cedar stocks, it would have been an injustice to leave a dull finish on the barrels.
The chambers were both cut with the same reamer supplied by Dave Kiff of Pacific Tool and Gauge. Randy Robinett, one of the originators of the 30 BR wildcat, specified the reamer dimensions. Randy’s 118gr, 10-ogive custom BIB bullets and the 30 BR cartridge enjoy a winning track record in the USA. The 30 BR Robinette reamer has zero free-bore and a .330″ neck, and is optimized for the BIB 118s. The bullets perform best when seated far enough out to jam firmly into the rifling as the bolt is closed. The long ogive means the bullet’s bearing surface is very short.
Slow Twists for Maximum Accuracy
You may note the unusually slow twist rate of both barrels. In most .30-caliber chamberings, the barrel twist rate is 1:11 or 1:12 to stabilize 150gr to 200gr bullets. The 30 BR is optimized for 115gr to 118gr flat-base bullets and 1:17 provides sufficient stability at muzzle velocities around 2900-3000 fps. In competitive Benchrest, where every thousandth of an inch counts, over-stabilization of projectiles can hurt accuracy, so “just stable enough” is the goal; hence the 1:17 twist.
Case Forming, Case Prep, and Reloading Methods
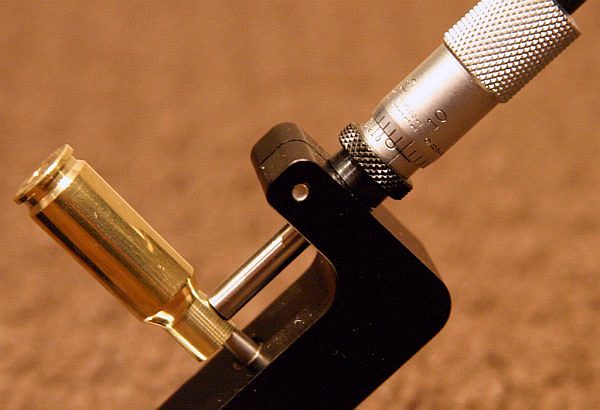
A Sinclair case neck micrometer indicates neck thickness of 0.010″ after neck turning.
30 BR dies are readily available from a number of manufacturers. I personally use Wilson neck and seating dies with a Sinclair Arbor press, but Redding and Forster both supply high-quality threaded dies for use in a conventional press. For under $100.00 US, custom full-length dies can be obtained from Hornady and CH Tool & Die by sending them reamer prints or a couple of fired cases. Harrell’s Precision offers “semi-custom” dies. Just send them some fired cases and they select a pre-made CNC-cut die that ideally fits your chamber. You can ask the Harrell brothers for a die that’s tighter at the shoulder or base, or otherwise customized to your preferences.
Load Development and Accuracy Testing
With cases formed and bullets selected, load development is simply a matter of choosing the right primer, powder and charge weight, and loading the most consistent ammunition possible. The Lapua BR cases use a small rifle primer. The choice here was Federal 205 Match primers vs. CCI BR4 Benchrest primers. Some shooters have also had success using CCI 450 Magnum primers but it is very unlikely the small case needs this much spark to light off regular extruded powders. In my case, I selected Federal primers because availability tends to be better in Australia.
The relatively large bore-to-capacity ratio of the 30 BR case means that fast burning powders are the order of the day. Once again, US experience suggests H4198 (the Hodgdon equivalent of ADI AR2207) is the choice of match winners. The fact that H4198/AR2207 is an Australian-made product is an added bonus. So, I loaded up test rounds with AR2207 from 32.5 grains to 35.0 grains in approximately 0.3 grain increments. All bullets were seated to jam +0.010″ into the lands. This places the bullet base about two-thirds of the way down the neck and well short of the neck-shoulder junction.
Richard Franklin (who operated Richard’s Custom Rifles prior to his retirement), has built scores of varmint rifles, in many different calibers. One of Richard’s all-time favorite varmint rifles is a 14-twist, 22BR built on his model 11 stock in laminated Black Walnut and fiddleback maple. Richard says the rifle is versatile and deadly accurate out to 400 yards. Richard uses a Leupold 8.5-25x50mm LRT with varmint reticle.
“This is my light walking varminter. It’s built on a blueprinted SS Remington 700 short action and chambered as a no-turn 22 BR for Lapua brass. The bolt handle is a Dave Kiff replacement and I’ve fitted a Jewel BR trigger with bottom safety. Barrel is a Lilja, 1:14″ # 6 contour with a muzzle diameter of .750″. I shoot the 40gr V-Max in the rifle at 4000 FPS. Its tough on hogs if you don’t try them too far. 400 yards is about the max with it. Accuracy is outstanding and with Roy, Mike, my grandson and myself shooting this rifle I don’t believe it has missed more than 3 hogs out of over 100 shot at this summer. This rifle is carried in a ceiling rack in the truck where its handy and is used by the first person that grabs it when a hog is sighted if we are moving between setups. The Varmint reticle on the Leupold is nice for quick hold-overs as you change distances.”
Detail of Model 11 Stock (Different Rifle in Birdseye Maple)
22BR Rivals 22-250 Performance
With bullets in the 40gr to 60gr weight range, the 22BR gives up very little in velocity to a 22-250, despite burning quite a bit less powder (30-32 grains for the 22BR vs. 35-38 grains for the 22-250). With a match-quality chamber, the 22BR will probably have an edge in accuracy over a 22-250, and you should experience longer barrel life. Here are some recommended 22BR loads for 40-60gr bullets:
Readers who have just recently discovered the Daily Bulletin may not realize that AccurateShooter.com has hundreds of reference articles in our archives. These authoritative articles are divided into mutiple categories, so you can easily view stories by topic (such as competition, tactical, rimfire, optics, shooting skills etc.). One of the most popular categories is our Technical Articles Collection. On a handy index page (with thumbnails for every story), you’ll find over 100 articles covering technical and gunsmithing topics. These articles can help you with major projects (such as stock painting), and they can also help you build more accurate ammo. Here are five popular selections from our Technical Articles archive.
Complete Precision Case Prep. Jake Gottfredson covers the complete case prep process, including brass weight sorting, case trimming, primer pocket uniforming, neck-sizing, and, case-neck turning.
Stress-Free Pillar Bedding. Richard Franklin explains how to do a top-quality bedding job, start to finish.
OnTarget Software Review. Our Editors test free software that measures shot groups with great precision. We explain how to use the program and configure advanced features.
Savage Action Tuning. Top F-TR shooter Stan Pate explains how to enhance the performance of your Savage rifle by optimizing the torque settings of the action screws.
Stock Painting Instructions. Step-by-step guide for stock painting by expert Mike Ricklefs. Mike shows both simple coverage and fancy effects.
Our readers have asked, “What’s happened to Richard Franklin? Is he still making rifles?” Well, we’re pleased to tell you that Richard is doing fine. He is up in Montana, building a new house, doing most of the construction himself. The good news is that the new house will have a big workshop, and Richard hopes to start building a few rifles near the end of this year. He won’t be taking orders for quite a while. But in the meantime, Richard is still sharing his knowledge about stock-making, gunsmithing, and varmint hunting via DVDs that can be purchased online.
Groundhog Hunting with Richard Franklin
A few seasons back, gunsmith Richard Franklin and his shooting partner Roy both achieved a varmint hunter’s dream — nailing a groundhog at 1000+ yards. The guns that did it were two of Richard’s 300 Varminters. These are 300 WSMs that push a 125gr bullet through 32″, 15-twist barrels to achieve velocities approaching 4000 fps. Here is Richard’s report, condensed for the Daily Bulletin.
The 1005-Yard Groundhog Adventure, by Richard Franklin
September 20th found Roy and I on our last groundhog hunt of the year. Bow season for Deer begins Oct. 4th and we wanted time to ready ourselves. Roy had killed 99 hogs so far this year and I had killed 97. In the morning, we headed over to the Overstreet farm leased by our good friend Richard Ruff. We set up the shooting trailer on top of a hill where we had a good view of several brush piles around the pasture. In the first ten minutes Roy put a hog in the air about four feet at 497 yards with his 300 Varminter, giving Roy an even 100 hogs for the year. I shot hogs at 180 yards, 506 yards, and 456 yards. That gave me a total of 100 for the year.
Then we decided to go up to Danny’s and Bill’s hard rock dairy farm. We set up on the top of a high hill and shoot over the farm buildings to another mountain where there is a huge pasture with large rock piles. We scanned this pasture for about an hour and a half. Roy has a pair of Ziess 8-power binocs and I use a pair of the Leica 10-power Geovids with built-in laser rangefinder. I also have a “Big Eyes” set-up — two 22-power Kowa spotting scopes mounted on a bracket and used on a sturdy tripod. After some time searching the field for hogs and seeing none, we decided to pack up and go to a farm owned by Donnie Campbell. Over the years we have shot many a hog here. Roy once shot one here at 905 yards and my longest shot on this farm was 714 yards. Most kills here are made at over 400 yards. There’s a perfect place to shoot hogs from a single firing position. At the back property line was a big hill about 400 feet higher than the surrounding pastures and we could see and shoot about 200 degrees around us all the way out to 1,200 yards.
Setting Up the 1005-yard Shot
I had the first shot and nailed an easy one at about 140 yards. He was thinking he was hidden from view. Wrong! BLAM…POOF. Roy nailed a hog at 469 yards under an old pear tree. Roy nailed another hog at 522 yards by a big log pile where we had killed about ten hogs this summer. Roy was looking through the Big Eyes and called out, “Hey Rich…I got you one way over there on the next farm by the edge of the woods.” I ranged the hog with the Geovids four times, registering 1003, 1007, 1006 and 1005 yards. I decided on the 1005 as the distance. Checking my chart, I clicked up to 18 and 1/4 minutes. We had a very stiff wind blowing left to right. I have a Nightforce 8-32 power scope with the MLR reticle. I held the fourth windage dot and touched one off. I see the bullet strike nearly in line with the hog but low. I click up another minute and a half making a total of 19 3/4 minutes. Roy is watching all this through the Big Eyes and can see better than I can. He confirms where the first bullet strike was. I hold the same windage and touch off another round in my Bat-actioned, 32″, 15-twist Bartlein-barreled 300 Varminter. The hog was standing up for this shot. Through the scope I see the bullet’s vapor trail going straight for the hog. I lost the vapor trail before the bullet got there but I saw the hog flip over.
Hot damn, what a shot! After Roy shakes my hand and slaps me on the back, I walk over to the Big Eyes for a better look. “Roy, there’s another hog trying to fight that dead one,” I say. This hog (evidently both are males) is biting and dragging the dead hog. He is really going at it. Both hogs were evidently eating fallen acorns from the huge White Oak tree at the edge of the woods.
Roy Gets His Chance
I tell Roy, “Get up there on your bench and try that hog, I’ll spot for you.” Roy clicks up to 19 1/2 minutes and holds three feet for windage. Roy lets it go and I see the vapor trail going in on the hog. It hits a foot to the right and low. “Hey Roy”, I say, “click up two more minutes and hold one more foot of wind.” The hog ran in under the tree at the bullet’s impact but was back within 30 seconds. Roy is now clicked up and lets the second round go. I see the vapor trail dropping in on the hog but the bullet impacts dead in line, but still a bit low. “Roy — give it another minute and a half and hold the same wind”. I can hear Roy furiously working the bolt and chambering another round, then POW, and I see the vapor trail again. It looks like it’s gonna be in the middle of the hog but it drops right in under his neck, nearly hitting him. The hog vacates back under the tree for an instant but decides he is winning the fight against the dead hog and comes right back. Roy lets the fourth round go with the same hold as the last shot. I see the vapor trail of the 125 grain Ballistic Tip dropping right in on the hog, catching him perfectly in the shoulder. The live hog flips up and falls on top of the dead hog, his tail coming up stiff as a poker as he flags us that he is instantly dead.
Two 1000+ Yard Hits. A Record for Roy, Near-Record for Richard.
This was Roy’s longest shot ever. His previous record was 905 yards. This was my second longest shot, as I had killed a hog at 1018 yards seven years ago about 40 miles from this spot. I tell Roy that I’m putting up my hog rifle for the year. I’ll let this long shot register in my memory as the last Groundhog kill of 2008. Roy says “That’s fine, I’m gonna do the same.” Hog hunting is officially over for 2008. Now it’s time for Deer.
[Editor’s Note: Richard’s rifle has a BAT action and is able to drive the 125 Nosler at about 3975 fps. Roy has a Remington action on his 300 Varminter. The Rem doesn’t take high pressures as well as the BAT, so Roy’s load is down-loaded to about 3825 fps. Roy also uses a “boosted” Leupold rather than a Nightforce. Because of the difference in scopes, and the lower velocity, Roy needed more elevation clicks to reach the 1005-yard distance.]
A couple seasons back, Gunsmith Richard Franklin and his shooting partner Roy both achieved a varmint hunter’s dream — nailing a groundhog at 1000+ yards. The guns that did it were two of Richard’s 300 Varminters. These are 300 WSMs that push a 125gr bullet through 32″, 15-twist barrels to achieve velocities approaching 4000 fps. Here is Richard’s report, condensed for the Bulletin.
The 1005-Yard Groundhog Adventure, by Richard Franklin
September 20th found Roy and I on our last groundhog hunt of the year. Bow season for Deer begins Oct. 4th and we wanted time to ready ourselves. Roy had killed 99 hogs so far this year and I had killed 97. In the morning, we headed over to the Overstreet farm leased by our good friend Richard Ruff. We set up the shooting trailer on top of a hill where we had a good view of several brush piles around the pasture. In the first ten minutes Roy put a hog in the air about four feet at 497 yards with his 300 Varminter, giving Roy an even 100 hogs for the year. I shot hogs at 180 yards, 506 yards, and 456 yards. That gave me a total of 100 for the year.
Then we decided to go up to Danny’s and Bill’s hard rock dairy farm. We set up on the top of a high hill and shoot over the farm buildings to another mountain where there is a huge pasture with large rock piles. We scanned this pasture for about an hour and a half. Roy has a pair of Ziess 8-power binocs and I use a pair of the Leica 10-power Geovids with built-in laser rangefinder. I also have a “Big Eyes” set-up — two 22-power Kowa spotting scopes mounted on a bracket and used on a sturdy tripod. After some time searching the field for hogs and seeing none, we decided to pack up and go to a farm owned by Donnie Campbell. Over the years we have shot many a hog here. Roy once shot one here at 905 yards and my longest shot on this farm was 714 yards. Most kills here are made at over 400 yards. There’s a perfect place to shoot hogs from a single firing position. At the back property line was a big hill about 400 feet higher than the surrounding pastures and we could see and shoot about 200 degrees around us all the way out to 1,200 yards.
Setting Up the 1005-yard Shot
I had the first shot and nailed an easy one at about 140 yards. He was thinking he was hidden from view. Wrong! BLAM…POOF. Roy nailed a hog at 469 yards under an old pear tree. Roy nailed another hog at 522 yards by a big log pile where we had killed about ten hogs this summer. Roy was looking through the Big Eyes and called out, “Hey Rich…I got you one way over there on the next farm by the edge of the woods.” I ranged the hog with the Geovids four times, registering 1003, 1007, 1006 and 1005 yards. I decided on the 1005 as the distance. Checking my chart, I clicked up to 18 and 1/4 minutes. We had a very stiff wind blowing left to right. I have a Nightforce 8-32 power scope with the MLR reticle. I held the fourth windage dot and touched one off. I see the bullet strike nearly in line with the hog but low. I click up another minute and a half making a total of 19 3/4 minutes. Roy is watching all this through the Big Eyes and can see better than I can. He confirms where the first bullet strike was. I hold the same windage and touch off another round in my Bat-actioned, 32″, 15-twist Bartlein-barreled 300 Varminter. The hog was standing up for this shot. Through the scope I see the bullet’s vapor trail going straight for the hog. I lost the vapor trail before the bullet got there but I saw the hog flip over.
Hot damn, what a shot! After Roy shakes my hand and slaps me on the back, I walk over to the Big Eyes for a better look. “Roy, there’s another hog trying to fight that dead one,” I say. This hog (evidently both are males) is biting and dragging the dead hog. He is really going at it. Both hogs were evidently eating fallen acorns from the huge White Oak tree at the edge of the woods.
Roy Gets His Chance
I tell Roy, “Get up there on your bench and try that hog, I’ll spot for you.” Roy clicks up to 19 1/2 minutes and holds three feet for windage. Roy lets it go and I see the vapor trail going in on the hog. It hits a foot to the right and low. “Hey Roy”, I say, “click up two more minutes and hold one more foot of wind.” The hog ran in under the tree at the bullet’s impact but was back within 30 seconds. Roy is now clicked up and lets the second round go. I see the vapor trail dropping in on the hog but the bullet impacts dead in line, but still a bit low. “Roy — give it another minute and a half and hold the same wind”. I can hear Roy furiously working the bolt and chambering another round, then POW, and I see the vapor trail again. It looks like it’s gonna be in the middle of the hog but it drops right in under his neck, nearly hitting him. The hog vacates back under the tree for an instant but decides he is winning the fight against the dead hog and comes right back. Roy lets the fourth round go with the same hold as the last shot. I see the vapor trail of the 125 grain Ballistic Tip dropping right in on the hog, catching him perfectly in the shoulder. The live hog flips up and falls on top of the dead hog, his tail coming up stiff as a poker as he flags us that he is instantly dead.
Two 1000+ Yard Hits. A Record for Roy, Near-Record for Richard.
This was Roy’s longest shot ever. His previous record was 905 yards. This was my second longest shot, as I had killed a hog at 1018 yards seven years ago about 40 miles from this spot. I tell Roy that I’m putting up my hog rifle for the year. I’ll let this long shot register in my memory as the last Groundhog kill of 2008. Roy says “That’s fine, I’m gonna do the same.” Hog hunting is officially over for 2008. Now it’s time for Deer.
[Editor’s Note: Richard’s rifle has a BAT action and is able to drive the 125 Nosler at about 3975 fps. Roy has a Remington action on his 300 Varminter. The Rem doesn’t take high pressures as well as the BAT, so Roy’s load is down-loaded to about 3825 fps. Roy also uses a “boosted” Leupold rather than a Nightforce. Because of the difference in scopes, and the lower velocity, Roy needed more elevation clicks to reach the 1005-yard distance.]


 The 6mmBR Norma cartridge has spawned many great variants in multiple calibers: 6mm Dasher, 6BRA, 22 BR, 22 Dasher, 30 BR and others. This article is about a handsome 22 BR Rem-action varmint rig.
 Accuracy is outstanding and with Roy, Mike, my grandson and myself shooting this rifle I don’t believe it has missed more than three hogs out of over 100 we shot at one summer. This rifle is carried in a ceiling rack in the truck where it’s handy and is used by the first person that grabs it when a hog is sighted if we are moving between setups. The Varmint reticle on the Leupold (shown below) is nice for quick hold-overs as you change distances.”


 Richard Franklin prepared this article for our readers. Richard tells us: “I’m happy to do pillar-bedding work, but this is a job which many shooters can do themselves, with some practice and the right components. I do suggest you practice first on an old ‘beater stock’. When done right, you end up with a perfect fit of receiver to action, with no twisting, stretching, or compression forces being applied to the receiver through mis-alignment. That’s what I mean by ‘stress-free’.”
 Pillars For Bedding
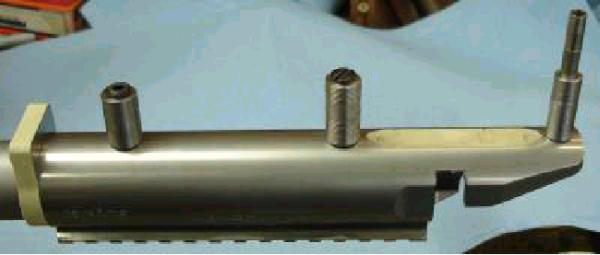

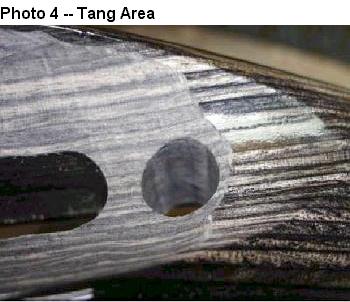 Photo 3 shows the wood removed from the inside of the stock bedding area. Remove enough wood everywhere except along the top sides of the stock to allow at least 1/8″ to 3/16″ of room for the mud. Remove 1/4″ of wood behind the recoil lug. I like about .012″ clearance on the top inside edges.
  The idea is that the barreled action does not touch anything except the bit of original “elevation” wood left at the rear tang (behind the pillar) and the forearm resting on the electrical tape. This is very important to obtain 100% stress-free bedding. You want the bore of the barrel to be parallel with the top edge of the stock so wrap just the right amount of tape to ensure this. The tape also centers the barrel in the fore-arm. Done right, the barreled action will be contacting just at two points (tape in front, tang in rear) and the barrel’s bore will be parallel with the top of the fore-arm’s sidewalls.
 Bedding Compounds
 Contoured vs. Straight (Flat-top) Pillars
 Install the trigger guard back in place on the stock as the guard is used to align the barreled action in the stock. Now is the time to make a trial run to ensure that everything fits properly. Slip the upside-down stock down over the pillars with the headless bolt coming up through the rear bolt hole in the guard. See Photo 7. Ensure that the stock is resting on two spots only–the tape you’ve wrapped around the barrel, and the little bit of wood you left behind the tang bolt. Ensure there is room everywhere around the action to accept the mud. The barreled action cannot be touching anywhere except the tape and the tang. Not even on the top edges of the stock.

 Before you actually install the escutcheons, you need to do some fit testing. Have a trial run at setting the front bolt to the proper length by placing the escutcheon in the hole and screwing in the bolt. Loosen off the back bolt to see if the bolt that is thru the escutcheon is holding the stock firmly in place. Retighten the rear bolt a wee bit.


 Accuracy is outstanding and with Roy, Mike, my grandson and myself shooting this rifle I don’t believe it has missed more than three hogs out of over 100 we shot at one summer. This rifle is carried in a ceiling rack in the truck where it’s handy and is used by the first person that grabs it when a hog is sighted if we are moving between setups. The Varmint reticle on the Leupold (shown below) is nice for quick hold-overs as you change distances.”


 The most elegant of the three thumbholes is this handsome .261″-neck 6PPC. The blue-printed Rem 700 action is pillar-bedded in a highly-figured stock of laminated Curley Fiddleback Walnut, in Richard’s #004 pattern. Richard uses three sections of wood bonded together so the outside looks like a single piece of Walnut.


 30 BR dies are readily available from a number of manufacturers. I personally use Wilson neck and seating dies with a Sinclair Arbor press, but Redding and Forster both supply high-quality threaded dies for use in a conventional press. For under $100.00 US, custom full-length dies can be obtained from


 Then we decided to go up to Danny’s and Bill’s hard rock dairy farm. We set up on the top of a high hill and shoot over the farm buildings to another mountain where there is a huge pasture with large rock piles. We scanned this pasture for about an hour and a half. Roy has a pair of Ziess 8-power binocs and I use a pair of the Leica 10-power Geovids with built-in laser rangefinder. I also have a “Big Eyes” set-up — two 22-power Kowa spotting scopes mounted on a bracket and used on a sturdy tripod. After some time searching the field for hogs and seeing none, we decided to pack up and go to a farm owned by Donnie Campbell. Over the years we have shot many a hog here. Roy once shot one here at 905 yards and my longest shot on this farm was 714 yards. Most kills here are made at over 400 yards. There’s a perfect place to shoot hogs from a single firing position. At the back property line was a big hill about 400 feet higher than the surrounding pastures and we could see and shoot about 200 degrees around us all the way out to 1,200 yards.


