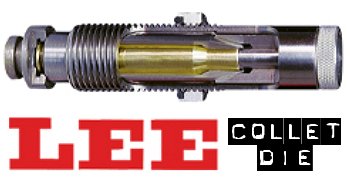
For those who prefer to neck-size their brass (rather than full-length-size), the LEE Collet Die is a popular, inexpensive option. It works by having collet tangs or “fingers” press the neck against a central mandrel. The benefit is that you get a very straight neck, which is sized consistently from top to bottom. Canadian shooter Jerry Teo explains: “LEE Collet Dies produce sized cases with very low runout (measured runout is under .001″ using a Sinclair concentricity gauge). You also don’t get the build-up of brass at the base of the neck, as can happen with bushing neck dies. The neck-shoulder junction stays nice and crisp.”
TIP ONE — Adjusting Tension
LEE Collet dies don’t have a specific mechanical adjustment for neck tension. But you CAN easily modify the die to provide more or less tension. If you want to adjust the neck tension using a Lee Collet die, you can simply chuck the mandrel in a drill and reduce the diameter with some sand-paper (to increase neck tension) or you can order a mandrel the next caliber larger and turn it to whatever diameter you want (the larger the mandrel diameter, the less the neck tension). You can also order custom mandrels from Lee sized to any diameter you want.
Lee also offers Custom Collet Dies, made from two fired cases. Lee offers custom standard collet dies for $78.00 and custom large collet dies for $160.00. CLICK HERE to ORDER.
TIP TWO — Polish and Tune for Easy Case Removal
Some users have complained that their Collet Dies grab the case-neck too firmly, making the case hard to remove. There are solutions to this problem. First inspect the collet fingers and smooth the inner surface up a bit with polishing compound or an extra-fine sanding pad. Second, you can open up the fingers a little bit. LEE recommends that if your Collet Die is sticking, take a steel punch and tap the fingers apart a little bit so that the natural “unloaded” position is wider. Lastly, you should lightly lubricate the outside of the collet fingers (see arrows) before you re-assemble the die. This will ensure they slide smoothly. Also, to prevent the collet fingers from closing too tight, never load up the die with your press without putting a case in place first. Without a case neck between the collet fingers and the mandrel, the collet can clamp itself too tight as you raise the ram.
TIP THREE — Size Twice and Spin Your Case 1/8th Turn
After reaching fully “down” on your press handle, withdraw the case about an inch and manually rotate it about 1/8th (NOT 1/4 or 1/2) turn while still in the shell-holder, then size again. This will place the die’s collet petals on the four “high spots” of the case neck and will result in a rounder, more evenly-sized neck with slightly more bullet tension. This takes only about one second more per case and is well worth the slight extra effort. (We thank reader Stonecreek for this smart tip).
Sinclair Internationalhas released an interesting article about Case Concentricity* and bullet “run-out”. This instructional article by Bob Kohl explains the reasons brass can exhibit poor concentricity, and why high bullet run-out can be detrimental to accuracy.
Concentricity, Bullet Alignment, and Accuracyby Bob Kohl
The purpose of loading your own ammo is to minimize all the variables that can affect accuracy and can be controlled with proper and conscientious handloading. Concentricity and bullet run-out are important when you’re loading for accuracy. Ideally, it’s important to strive to make each round the same as the one before it and the one after it. It’s a simple issue of uniformity.
Over the years, many different concentricity tools have been on the market. Various approaches have been taken to straightening rounds that exhibit poor concentricity. With extreme examples of excessive run-out, the bullet is is visibly crooked in the neck with the bullet tip clearly off-center. That’s never a good thing. Straight ammo shoots better.
Straighten-Up and Fly Right
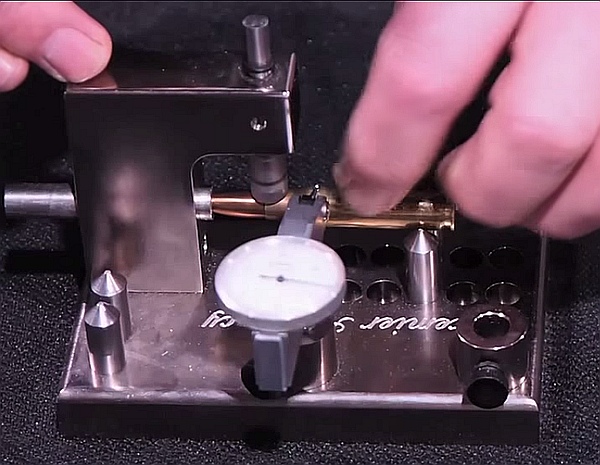
If you could straighten up crooked rounds, accuracy should be improved. In the past, some tools promised more than they delivered. But now Bill Goad, a record-setting benchrest shooter, has invented a new tool that improves concentricity via an impact or “jarring” method. A vertical rod with a curved face mates with the case-neck. You spin the case to find the “high spot” of max eccentricity. Then just tap the rod a couple of times and the neck comes back onto centerline. You can then confirm the concentricity improvement with the dial indicator. Watch the video to see how this is done. Pay particular attention to times 01:25 to 01:45. The case starts at .004″ run-out (01:32). After correction (01:40) the neck shows less than .001″ (one-thousandth) run-out.
Benchrest ace Bill Goad demonstrates his innovative Fli-Right Concentricity gauge tool. It works differently than other concentricity enhancers on the market.
Bill Goad knows something about accuracy. He shot a 10-target 100/200 benchrest Combined Aggregate of 0.178″ (see video at 00:15-00:35). Bill Goad’s tool offers advantages over systems that clamp a cartridge at both ends and try to bend the case or tilt the bullet without straightening the neck. Goad’s new Fli-Right tool is available now from PremierAccuracy.com.
This article originally appeared in Sinclair Intl’s Reloading Press Blog, which has been merged into the Gun Tech Section on Sinclair’s website, www.SinclairIntl.com
Steps to Minimize Bullet Run-Out
Poor bullet run-out can cause poor and inconsistent accuracy, and variations in bullet velocities. The truer the loaded round, the more consistent your results will be on paper and across the chronograph.
Measuring Concentricity
We all know that low run-out is the goal. But how can you tell if your run-out is high or low? Run-out is generally measured in thousandths of an inch with a concentricity gauge. There are many concentricity gauges to choose from that work well. Some work on loaded rounds only, some have a bullet straightening feature, and a few work on both loaded rounds and empty cases for checking case neck concentricity. The tool of choice for the Sinclair Reloading Tech Staff is the Sinclair Concentricity Gauge (Part # 09-175).
This tool is a mainstay on my bench, and it is used about as much as I use my reloading press! The tool uses two sets of bearings that are set on lateral, length-adjustable anodized aluminum blocks to accommodate cartridges from .221 Fireball-sized cases up to .50 BMG. The indicator is set on a height adjustable swiveling base on a stand that can be used for checking bullet or case neck run-out. The adjustable blocks ride aligned in a precision-milled slot. The entire set up is on an anodized base plate that gives excellent support during the process that is crucial to operation and accuracy. Basically the operation consists of placing a loaded round (for checking bullet run-out) or an empty case (for case run-out) on the bearings with the indicator end touching the chosen point to be measured. The case is easily spun with one finger as the indicator measures the amount of run-out. Once this process has been done a few times it is a fast and accurate means of measurement. In terms of indicator type being used, whether dial or digital, I actually prefer a standard dial indicator over the digital type. My reason for this choice is that you can see the needle jump when run-out is present. I believe this to be easier and faster than looking at digital numbers while measuring. In the video below, Sinclair’s Bill Gravatt shows how to use the Sinclair Concentricity Gauge correctly.
Sizing Steps to Minimize Run-Out
One of the most common steps in the reloading process that contributes to bullet run-out occurs is the sizing operation. If improper techniques are used or there are issues with the sizing die set up, a once perfectly concentric case can become out of whack. By using the proper dies for your application, properly setting up the die/shell holder or floating the de-capping/expander assembly, you can eliminate problems before they happen.
Many of us on the technical staff choose the Redding Type-S series of dies. These are full-Length or neck sizing dies that utilize a removable/changeable neck bushing (sold separately) to size the neck according to your application. These dies are machined with true precision and quality in mind. The Type-S dies come with a standard de-capping assembly with a caliber-specific expander ball in place. In addition to this an undersized retainer to hold the de-capping pin is included with the die. In my experience with these dies I use the standard expander ball with new, unfired brass on the initial re-size. I will then use the undersized retainer in place of the expander ball with brass that has been fired. I have found this step crucial in my reloading regiment to minimize bullet run out. The use of the expander ball can cause a few thousandths of run-out when the case is being pulled back out of the sizing die. With the undersized retainer in place the only thing that touches the neck of the case in sizing is the bushing. If you prefer to use an expander ball, Redding offers caliber specific carbide floating expander balls that fit on the de-capping rod. This free floating expander ball will self center on the case neck, and reduce the amount of run-out that can be caused by a standard expander ball.
When setting up a Type-S sizing die, set the neck bushing into the die with the numbers facing down toward the body of the die. Tighten the de-capping assembly until it contacts the bushing and then back it off ¼ of a turn. This allows the bushing to free float in the die. You should be able to hear the bushing rattle if you shake the die. Having the bushing free floating self centers the neck, and again minimizes any run-out that can occur.
If you prefer other brands of sizing dies there are a few tricks that people use to minimize run-out as well. Many reloaders claim that the use of an O-ring at the base of the de-capping assembly lock nut will float the assembly and help self center during sizing. Another trick that has been used is to remove the retaining pin on the shell holder slot on the press ram, and use an O-ring in its place to hold the shell holder in place. This allows the shell holder to self center during sizing as well.
Seating Steps to Minimize Run-Out
Run-out issues can arise during the bullet seating process. To reduce run-out during seating, use a high-quality die with a sliding sleeve. The sliding sleeve perfectly aligns the case with the bullet to be seated. Good examples of these dies are the Redding Competition Micrometer bullet seating dies, Forster Ultra Seaters, or RCBS Competition Seating dies. All of these dies utilize a micrometer top to precisely set seating depth. They are all very high quality dies that have tight tolerances to maximize bullet straightness during seating.
We receive many questions about seating long pointed bullets such as the Berger VLD or Hornady A-Max. One problem that the reloader faces with longer bullets is that they are so long that the standard seating stem is not machined deep enough to contact these bullets properly. The point of the bullet “bottoms out” in the stem and the result is off-center seating and/or rings and dents on the bullet nose. If you plan on using such bullets, you should purchase a “VLD” style seating stem, which is cut to accommodate the longer bullets. The use of this stem results in truer seating of the bullet without leaving a ring or marring the tip of the bullet.
Besides using a traditional press and threaded seating die, another great way to get a true bullet seat is by using an arbor press and Wilson chamber-type seating die. These dies are cut to very tight tolerances and have proven themselves as the main choice for bench rest enthusiasts. The design of the die positively aligns the case with the bullet as they are both captured by the die before the bullet is pushed straight into the case by the stem. These seating dies are available with the standard seating cap and stem or an additional micrometer top can be added for precise adjustment. Wilson also offers a stainless seating die with an integral micrometer seating head.
Finally another trick used by many in the seating process is to turn the case while the bullet is being seated. Some people claim this will keep things straight. What they do is raise the ram in increments while seating and rotate the case in the shellholder in increments of 90 degrees from the original starting while the bullet is being seated. Personally I have tried this and have seen no significant difference at all. However you may be the judge of this one. It makes sense, and maybe I should try this a little more before I rule it out.
After the Rounds Are Loaded — Batch Sorting by Concentricity Levels
No matter how meticulous you are, and no matter how good your components and tools are, run-out will still show up. Reloaders can drive themselves crazy trying to make each and every loaded round a true “0” in run-out. You will still see some minimal amount no matter what you do. Set yourself a standard of maximum allowable run-out for your loads. For instance for my Long Range 600- and 1000-yard F-Class loads I like to see .002” or less. I average .0015” and see a few in the range up to .004”. I spin each loaded round on my Sinclair Concentricity Gauge and sort them by run-out. Those that run over .002” I use for sighters or practice. Though achieving zero run-out (on every round) isn’t possible, minimizing run-out can definitely help your performance. Not only will your loads shoot better but you will have one less thing to worry about when you are lining up the sights on the target.
Here is a simple technique that can potentially help you load straighter ammo, with less run-out. It costs nothing and adds only a few seconds to the time needed to load a cartridge. Next time you’re loading ammo with a threaded (screw-in) seating die, try seating the bullet in two stages. Run the cartridge up in the seating die just enough to seat the bullet half way. Then lower the cartridge and rotate it 180° in the shell-holder. Now raise the cartridge up into the die again and finish seating the bullet.
Steve, aka “Short Range”, one of our Forum members, recently inquired about run-out apparently caused by his bullet-seating process. Steve’s 30BR cases were coming out of his neck-sizer with good concentricity, but the run-out nearly doubled after he seated the bullets. At the suggestion of other Forum members, Steve tried the process of rotating his cartridge while seating his bullet. Steve then measured run-out on his loaded rounds. To his surprise there was a noticeable reduction in run-out on the cases which had been rotated during seating. Steve explains: “For the rounds that I loaded yesterday, I seated the bullet half-way, and turned the round 180 degrees, and finished seating the bullet. That reduced the bullet runout by almost half on most rounds compared to the measurements from the first test.”
Steve recorded run-out measurements on his 30BR brass using both the conventional (one-pass) seating procedure, as well as the two-stage (with 180° rotation) method. Steve’s measurements are collected in the two charts above. As you can see, the run-out was less for the rounds which were rotated during seating. Note, the change is pretty small (less than .001″ on average), but every little bit helps in the accuracy game. If you use a threaded (screw-in) seating die, you might try this two-stage bullet-seating method. Rotating your case in the middle of the seating process won’t cost you a penny, and it just might produce straighter ammo (nothing is guaranteed). If you do NOT see any improvement on the target, you can always go back to seating your bullets in one pass. READ Forum Thread….
Talented tool-maker Curt Knitt has designed a better mousetrap — a new Concentricity Gauge that makes it easier than ever to get fast, repeatable results when measuring case and bullet run-out (aka “eccentricity”). The breakthrough design feature is the large-diameter wheel which spins the case. With most other concentricity gauges you must rotate the case with your finger(s). Anyone who has tried this knows that it is difficult to get a full, 360° rotation of the case without disturbing the indicator. Typically you can get two-thirds of a rotation or so, but then you have to reposition your finger to complete the rotation. Moving your finger often causes the case to jiggle or move slightly, and more often than not, the dial indicator jumps a bit, interrupting your measurement. Been there, done that.
Drive Wheel Smoothly Spins Cases for Fast, Error-Free Readouts
With the new Accuracy One Concentricity Gauge from CTK Precision, the rubber-rimmed drive wheel has a much larger diameter than any cartridge case (7:1 diameter ratio on magnums). So, when you rotate the drive wheel just a half-turn or so (using knurled knob on the wheel axis), you can easily and smoothly turn the cartridge three (or more) full rotations. The drive wheel maintains a constant, even load on the case, so the case doesn’t wobble and the dial indicator gives a continuous, un-interrupted read-out. What’s more, clever cartridge support design geometry pulls the case back against the rim stop as you engage the drive wheel. This holds the case in position laterally during measurement. Morever, this allows very fast one-handed operation. You don’t have to hold the case down with your fingers while maintaining side force against the case rim stop.
Watch Video Showing Concentricity Gauge Used with Small and Large Cartridges
The Accuracy One Concentricity Gauge works with the full range of cartridges — everything from .22LR to .50 BMG. Adjusting the tool for different-length cases is incredibly easy, because the roller blocks (case supports) are held in place by magnets. You just slide the blocks to the desired position — no tools needed! The indicator stand is also held by magnets so it can slide to any position you want along the case body or bullet. And, the indicator can be moved to the front rail and rotated 90°. This way you can measure on the inside of the case neck.
Does this new design really work? Absolutely — it works brilliantly and it’s FAST. Watch the video and see for yourself. We could do two-rotation (720°) measurements on cases in a third the time it takes to do a one-rotation gauging operation with other tools. And the actual measuring operation can be done one-handed, leaving your free hand to pic up the next case (or bullet) to be measured. And yes, this tool can also measure bullet concentricity — measured from tip, ogive, bearing surface, and/or boatail.
1. Directional Drive Wheel pushes the cartridge or bullet into the stop for accurate, repeatable readings with equal pressure. The replaceable rubber drive ring will not harm cartridges or bullets.
2. Two-position bullet and cartridge stop.
3. Precision ball bearings provide friction-free movement.
4. Heavy steel base with E-coat finish and bolt-on rubber feet.
5. Indicator stand and roller blocks ride in machined slots and are held in place by N42 Neodymium magnets. This allows rapid, smooth, tool-free adjustments.
6. Indicator stand can be place in front OR rear machined slots. This allows for both internal and external measurements.
7. Fine-Adjustment Horizontal Indicator Stand allows very precise indicator angle/load adjustments.
8. Indicator Stand will accept horizontal indicators that are .350″ wide or narrower, and are 1.75″ to 2.25″ from the indicator contact point to the center of the main body.
9. Adjustable mechanical arm stop holds the arm up for one-handed operation.
10. Precision Drive Wheel has a 13:1 ratio for .22 rimfire, 7:1 for magnums, and 3.7:1 for 50BMG.
11. Concentricity Gauge accepts cartridges from .22LR rimfire to .50 BMG.
The Accuracy One Concentricity Gauge is available from BulletTipping.com. Price for the unit, complete with quality horizontal indicator, is $325.00. Price, without indicator, is $280.00. The initial run of Concentricity Gauges is now in final production. Gauge sets should hit the market in 4 to 6 weeks. To place an advance order, fill out the PDF Order Form, or call (814) 684-5322. To learn more about setting up and using this new tool, read the Concentricity Gauge Instructions, and watch the video above.
21st Century Shooting’s all-new Concentricity Gauge looks like a winner. The cartridge case rides on four spinning rollers that allow smooth turning movement with low drag. These rollers are far superior to a set of V-Block supports, or even some ball-type supports.
The amount of eccentricity (run-out) is measured with a high-quality horizontal dial test indicator. In this application, a horizontal indicator works better than the typical vertical dial indicator with spring-loaded shaft used in most other concentricity gauges. We think that, with 21st Century’s new Concentricity Gauge, you can measure cases faster, with less effort, and greater repeatability. In addition, this device can measure the INSIDE of the case neck, not just the OUTSIDE.
Overall, this is a very impressive new tool that is unquestionably superior to many other Concentricity Gauges on the market. Given the capabilities of this device, the price is reasonable: $169.00 including Horizontal Indicator. The Gauge by itself costs $125.00, while the Indicator alone sells for $59.00.
Click Photos below to view larger Images
Why the New 21st Century Concentricity Gauge Works So Well
21st Century explains the advantages of its new design: “At 21st Century Shooting, our goal to modernize an industry that has seen little change over the years. The new concentricity gauge is a perfect example. Most conventional concentricity gauges use what is called a height indicator gauge (Dial Indicator with vertical shaft). Although economical, this type of gauge was not intended for the purpose of measuring rotating diameters. The vertical-style indicator can produce inaccuracies due to indicator rod flex and bounce.
Our new Concentricity Gauge uses a horizontal dial test indicator. This type of gauge was designed specifically for checking rotating diameters and in fact is exactly the type of gauge used in the machining industry for decades to measure run out — the very thing that we as hand loaders are striving to minimize or eliminate.
Additionally, our new gauge uses Stainless Steel turning rollers as opposed to fixed bearings or V-block style case supports. You will especially appreciate the roller supports that glide on linear guide-ways. Plus, with a simple push of a button you can adjust the case support base width. No tools are needed to move the base on the built-in guide-ways.”
Product tip from EdLongrange. We welcome reader submissions.
German Salazar has posted an informative article about concentricity-checking tools on his Rifleman’s Journal Blog. In that article, German provides a detailed review of the impressive new Bruno Concentricity Checker which features a high-grade dial indicator and an innovative system for holding both loaded cartridges and empty brass in place during the measurement process. German gives the Bruno tool high marks and it is now his favored concentricity gauge, replacing on older Sinclair tool (also reviewed in the article).
German writes: “When measuring a seated bullet, the Bruno [tool] is simple and intuitive in use: adjust the length of the tip holder, set up the indicator to bear on the ogive and get to it. I usually slip a Sinclair hex nut comparator over a bullet to make a faint mark right at the ogive to help me in determining where to set the indicator. I then set the indicator tip about 0.010″ behind the mark so that I am definitely on the bearing surface even if some of the bullets have a bit of variance. It’s a handy way to get set up consistently from one session to another.”
German continues: “Reading an empty case requires a little more effort, but not much…. Once the case mouth is smooth, the readings are in line with those of the Sinclair tool, although easier to read to a fine level of precision due to the finer gradations on the indicator and its horizontal mounting. The Bruno tool has become my principal tool for checking the concentricity resulting from different die setups and for comparing the results of one loading process to another. I simply have more confidence in my ability to get an accurate reading from it. After many years of service, I’ve decided to retire the old Sinclair and make the Bruno tool my primary concentricity tool. It is simply a better made, easier-to-use, more accurate tool and those are the qualities I value in any tool.”
In our feature article on Case Neck Tools we explained the importance of case neck uniformity and reviewed the best tools for measuring case neck thickness. But having uniform case neck walls is only part of the accuracy equation. You also want your cases to exhibit minimal run-out, as measured by a precision tool. For this reason, a quality concentricity gauge belongs on your loading bench if you are looking for the Nth degree of accuracy.
We’ve worked with quite a few concentricity gauges. They all have their strengths and weaknesses, but some just didn’t perform well at all with very short cases like the 6BR and 6PPC. One of our regular readers suggested we check out the H&H Concentricity Gauge, made by Bill Herron in Oregon. So far we are very impressed. A 6BR or PPC case doesn’t tip or rock, causing the needle to jump. We were able to get good, repeatable readings off a seated bullet, which wasn’t easy at all with some of the other units. Our friend agreed with our positive assessment of the H&H, saying: “I have four concentricity gauges. Among these tools, the H&H is the least expensive and the easiest to use of those designed for loaded round measurement AND bullet straightening. It is also built like a brick. However, the Sinclair is [probably] the best for looking at the case alone due to the bearing balls and their adjustability.”
The H&H uses an indicator block to eliminate off-center indicator readings. It will accept .22 PPC through .375 length cases. A reversible spindle acts as a pilot for checking neck thickness. Bill Herron says the unit can also re-align bullets, but we didn’t try out that capability. For more info, visit the H&H Industries website, or call Bill at (541) 327-1411.


 TIP TWO — Polish and Tune for Easy Case Removal


 Measuring Concentricity
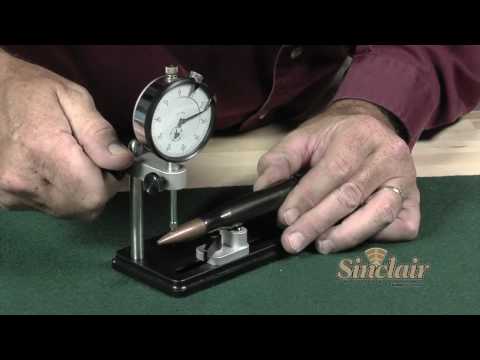
 Many of us on the technical staff choose the Redding Type-S series of dies. These are full-Length or neck sizing dies that utilize a removable/changeable neck bushing (sold separately) to size the neck according to your application. These dies are machined with true precision and quality in mind. The Type-S dies come with a standard de-capping assembly with a caliber-specific expander ball in place. In addition to this an undersized retainer to hold the de-capping pin is included with the die. In my experience with these dies I use the standard expander ball with new, unfired brass on the initial re-size. I will then use the undersized retainer in place of the expander ball with brass that has been fired. I have found this step crucial in my reloading regiment to minimize bullet run out. The use of the expander ball can cause a few thousandths of run-out when the case is being pulled back out of the sizing die. With the undersized retainer in place the only thing that touches the neck of the case in sizing is the bushing. If you prefer to use an expander ball, Redding offers caliber specific carbide floating expander balls that fit on the de-capping rod. This free floating expander ball will self center on the case neck, and reduce the amount of run-out that can be caused by a standard expander ball.
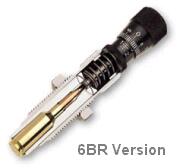 Here is a simple technique that can potentially help you load straighter ammo, with less run-out. It costs nothing and adds only a few seconds to the time needed to load a cartridge. Next time you’re loading ammo with a threaded (screw-in) seating die, try seating the bullet in two stages. Run the cartridge up in the seating die just enough to seat the bullet half way. Then lower the cartridge and rotate it 180° in the shell-holder. Now raise the cartridge up into the die again and finish seating the bullet.


 The Accuracy One Concentricity Gauge works with the full range of cartridges — everything from .22LR to .50 BMG. Adjusting the tool for different-length cases is incredibly easy, because the roller blocks (case supports) are held in place by magnets. You just slide the blocks to the desired position — no tools needed! The indicator stand is also held by magnets so it can slide to any position you want along the case body or bullet. And, the indicator can be moved to the front rail and rotated 90°. This way you can measure on the inside of the case neck.


 We’ve worked with quite a few concentricity gauges. They all have their strengths and weaknesses, but some just didn’t perform well at all with very short cases like the 6BR and 6PPC. One of our regular readers suggested we check out the


