If you don’t match your ammo to your chamber, bad things can happen, that’s for sure. A while back, Forum member BigBlack had an experience at the gun range that reminds us of the importance of safety when shooting. He encountered evidence that someone had fired the wrong cartridge in a 7mm WSM rifle. The problem is more common than you may think. This Editor has personally seen novices try to shoot 9mm ammo in 40 S&W pistols. BigBlack’s story is along those lines, though the results were much more dramatic. It’s too bad a knowledgeable shooter was not nearby to “intervene” before this fellow chambered the wrong ammo.
7mm-08 is Not the Same as a 7mm WSM
BigBlack writes: “I know this has probably been replayed a thousand times but I feel we can never be reminded enough about safety. This weekend at the range I found a ruptured case on the ground. My immediate thoughts were that it was a hot load, but the neck area was begging for me to take a closer look, so I did. I took home the exploded case and rummaged through my old cases until I found a close match. From my investigative work it appears someone shot a 7mm-08 in a 7mm WSM. Take a look. In the above photo I’ve put together a 7mm WSM case (top), the ruptured case (middle), and a 7mm-08 case (bottom).”
The photo reveals what probably happened to the 7mm-08 case. The shoulder moved forward to match the 7mm WSM profile. The sidewalls of the case expanded outward in the much larger 7mm WSM chamber until they lacked the strength to contain the charge, and then the case sides ruptured catastrophically. A blow-out of this kind can be very dangerous, as the expanding gasses may not be completely contained within the action.
Can’t Happen to You? Think Again.
This kind of mistake — chambering the wrong cartridge — can happen to any shooter who is distracted, who places even a single wrong round in an ammo box, or who has two types of ammo on the bench. One of our Forum members was testing two different rifles recently and he picked up the wrong cartridge from the bench. As a result, he fired a .30-06 round in a .300 Win Mag chamber, and the case blew out. Here is his story:
“I took two of my hunting rifles I have not used for over 25 years to the range yesterday to get new scopes on paper, a .30-06 and .300 Win Mag. I had four boxes of old Winchester factory ammo (two of each cartridge), which had near identical appearances. I accidentally chambered a .30-06 round in the Sako .300 Win Mag rifle. It sprayed powder on my face and cracked the stock at the pistol grip. If I had not been wearing safety glasses I might be blind right now.
You should always wear protective eyewear, EVERY time you shoot.
“I feel lucky and am very thankful for being OK — other than my face looks funny right now. I am also grateful for learning a valuable lesson. I will never put two different cartridges on the bench at the same time again.”
Team Smith & Wesson shooter Julie Golob has a message for Mother’s Day (Sunday, May 14th). Julie writes: “While some are using Mother’s Day week to push a gun control agenda, I’d like to encourage moms to ‘Take a Moment’. Talk to your kids about firearms safety. Help them learn what to do around firearms and have an open, honest discussion about guns and gun safety.
I truly believe that, no matter if you are pro-gun or anti-gun, everyone should know and understand the basic rules of firearm safety. It is equally important for parents to have the discussion about guns and what to do if your child finds one. Both the NSSF’s Project ChildSafe and the NRA’s Eddie Eagle GunSafe® Program are excellent. They offer resources for parents, educators, and child care providers to help ensure kids stay safe.
In this video, Julie encourages parents to have “the talk” about firearm safety with their kids sooner rather than later, and provides tips for how to have a helpful discussion. Sherra Scott, a mom and a certified NRA instructor, agrees with Julie: “Whether you have firearms in your home or not, if you have children in your life, please watch this video and talk WITH them about firearm safety and what to do if they come into contact with a firearm.”
We are re-publishing this article at the request of Forum members who found the information very valuable. If you haven’t read this Safety Tip before, take a moment to learn how you can inspect your fired brass to determine if there may be a potential for case separation. A case separation can be dangerous, potentially causing serious injury.
On the highly-respected Riflemans’ Journal blog, created by our late dear friend German Salazar*, there was an excellent article about Cartridge Case-Head Separation. In this important article, Salazar (aka GS Arizona) examined the causes of this serious problem and explained the ways you can inspect your brass to minimize the risk of a case-head separation. As cases get fired multiple times and then resized during reloading, the cases can stretch. Typically, there is a point in the lower section of the case where the case-walls thin out. This is your “danger zone” and you need to watch for tell-tale signs of weakening.
The photo below shows a case sectioned so that you can see where the case wall becomes thinner near the web. You can see a little arrow into the soot inside the case pointing to the thinned area. This case hadn’t split yet, but it most likely would do so after one or two more firings.
Paper Clip Hack for Detecting Problems
The article provided a great, easy tip for detecting potential problems. You can use a bent paper clip to detect potential case wall problems. Slide the paper clip inside your case to check for thin spots. GS Arizona explains: “This simple little tool (bent paper clip) will let you check the inside of cases before you reload them. The thin spot will be immediately apparent as you run the clip up the inside of the case. If you’re seeing a shiny line on the outside and the clip is really hitting a thin spot inside, it’s time to retire the case. If you do this every time you reload, on at least 15% of your cases, you’ll develop a good feel for what the thin spot feels like and how it gets worse as the case is reloaded more times. And if you’re loading the night before a match and feel pressured for time — don’t skip this step!”
* Sadly, German Salazar passed away unexpectedly on June 21, 2022 at age 62. German was a great inspiration to this site and help guide the creation of the AccurateShooter Forum. A brilliant man, expert attorney, and top-tier marksman, German will be sorely missed in the shooting sports world.
SUMMARY: Powder can have a very long shelf life. You need to watch for changes in smell and color. A reddish tinge, almost like rust on the powder, is a bad sign, as is a foul odor, not to be confused with a normal chemical smell. Either of these signs indicate it is time to dispose of your powder by means other than shooting.
Ever wondered about the stability of the propellants in your reloading room? There are some important things you should know about powder storage, to ensure consistent powder performance and safety. Western Powders (which has been acquired by Hodgdon) published an informative Q & A series entitled Dear Labby: Questions for our Ballistics Lab . Here are some excerpts that pertain to powder storage and shelf life. Worried that your powder may be too old? Western’s experts explain how to check your propellants for warning signs.
Proper Powder Storage
Q: I live in southern Arizona where it is very hot. I am told powders will become unstable if stored in an area not air-conditioned. My wife says no powder or primers in the house. Can powder be stored in a refrigerator? What about using a fireproof safe? I would appreciate your ideas. — M.C.
Lab Answer: SAAMI guidelines are pretty clear on issues of storage. They recommend storing smokeless powder in containers that will not allow pressure to build if the powder is ignited — ruling out gun safes and refrigerators.
In their original containers, the lifespan of smokeless powders is quite long, even in hot, arid climates. In fact the lifespan is typically longer than the average handloader would need to store them. Stored safely in a garage or outbuilding, your powder should last years. If you see the powder developing a reddish tint, or giving off a foul odor, it is time to discard it.
Clumps in Powder Container
Q: I ordered some of your Accurate 1680 powder back about in December. I just now opened it … and it is full of clumps. My knowledge tells me that means moisture. Am I wrong? I just now broke the seal and it has been stored in a ammo can with desiccant packs around it and a dehumidifier running 14-16 hours a day. I can’t imagine this being my fault, if this does indicate moisture. I don’t know if the pink part on the label is suppose to be red or not, but it is definitely pink, so if it was red I am wondering if I was shipped an old container? I hope that this isn’t bad and I am stuck with it…
Lab Answer: All powder contains a certain amount of moisture. When the powder is stored or during shipping, it can go through temperature cycles. During the cycling, the moisture can be pulled to the surface and cause clumping. Clumping can also be caused by static electricity if too dry or the powder has limited graphite content. You can break up the clumps before metering and they shouldn’t be a problem. This will not affect the powder performance, so your product is fine. Accurate 1680 labels are designed in Pink. As a side note, specification for testing powder is at 70° F and 60% humidity.
Shelf Life and Packaging Dates
Q: Does powder ever get to old to use and what identifying marks does your company put on the canister for when it is made, You have helped me out a while ago when I asked about keeping my cowboy shooting under 950 fps and it works great less stress on the hand and the recoil is very minimum. — R.B.
Lab Answer: On one pound bottles, the number is on the corner in a silver box. If the powder was poured today, it would read 012815 followed by a lot number. The whole number would look something like 012815749. Eight pound bottles have a sticker on the bottom with an obvious date code. The lot number appears above the date.
Above is a sectioned barrel showing an 80gr Sierra that was fired in a .223 bolt action with a cleaning rod in the bore. Both the bullet and the rod are still in the bore.
A Negligent Shooter Gets Lucky
“Here we have a story so filled with negligent acts that I can only marvel that the shooter survived the experience. The photo and narrative were provided by the gunsmith who took in the repair job, my comments are in italics. It’s worth reading, we can’t get enough safety warnings in our hobby.” — GS Arizona, Rifleman’s Journal
Description of Incident (with Commentary)
The shooter had a stuck case in his .223 chamber. The stuck case was actually a loaded round that didn’t fire. It wouldn’t extract because it was a .222 case that got mixed in with his .223 brass. [He had loaded the wrong brass.] I saw the loaded round with an 80gr bullet in it and a light primer strike. Negligent Act #1: Wrong brass was mixed in with the brass being reloaded.
The shooter removed the stuck case with a 3-piece aluminum rod. Negligent Act #2: Hammering out a loaded round with a cleaning rod. People have been killed doing this as the round can fire and drive the cleaning rod right into you. I remember one such incident about 5 years ago, the shooter was pounding out a stuck round, the cleaning rod went right through him, he didn’t survive.
The shooter didn’t notice only two segments of the cleaning rod came out when he removed it. Negligent Act #3: If you put anything at all down the barrel of a rifle you’d better make darn sure you got it all out before doing anything else!
He then chambered another round and fired it. Negligent act #4: If you’ve had a barrel obstruction of any kind, and if you’ve put something in the barrel, look through the barrel before proceeding! Within the past two years I know of an incident in which a benchrest shooter was killed in exactly this manner. The pressure built up and the rifle bolt came out of the receiver and into his chest.
The shooter is ‘OK’, but did not escape unscathed. He said there was a huge explosion and after regaining his senses found he was bleeding heavily from his forehead. The blood was thick enough that it ran in his eyes and he couldn’t see. In his words “I thought I was going to die”.
He has what looks like a pretty deep cut about an inch long on the side of his head, right in line with his right eye starting where the eye socket turns out to the side of the skull. And no telling what he’s got in the way of brass particles embedded in his forehead.
He was shooting on private property, and was alone when this happened. Negligent Act #5: Don’t shoot alone! Accidents happen, this is just one more example. If we could predict accidents, we wouldn’t have them. Always shoot with at least one other person.
He managed to get the bleeding stopped, or at least under control, packed his car and drove himself home without seeking immediate medical attention. Negligent Act #6: This one could have cost him his life after being lucky enough to survive the incident. There’s no way to know what’s happened just after an incident like this. He should have been at a hospital getting checked for shrapnel in the head.
The rod and slug could not be driven out. Since the barrel had a high round count there was no point in trying to salvage it. Note that the aluminum rod is expanded to a tight fit in the bore for the first couple inches. The base of the bullet is a little over 2″ from the mouth of the chamber.
What we’ve seen here is negligence and an absolute indifference to the established rules of safe reloading and gun handling, from start to finish, capped off with the shooter’s foolish avoidance of medical treatment. This shooter is lucky to be alive, but he’s surely used up all his luck. Don’t assume you’ll be so fortunate.
This article originally appeared in the Rifleman’s Journal website, which is no longer available.
We first ran this story a few years back. We’re republishing it today as a reminder to our readers that safety should be their paramount concern at the range. Avoid distractions and always check your barrel for obstructions before you chamber a round or pull the trigger. A moment of inattention can result in a catastrophic kaboom.
Discharging a .338 Lapua Magnum round with a cleaning rod in the barrel — that’s a recipe for disaster. What happens when a fired .338 caliber bullet and a cleaning rod try to occupy the same place at the same time? Well you get a catastrophic kaboom, with metal pieces flying all over the place, and a shooter very lucky to escape without serious injury. This incident occurred recently in Manatee, Florida, as reported by Sniper’s Hide member Queequeg. We thank SnipersHide.com for granting permission to publish these revealing images in the Daily Bulletin. CLICK HERE for more Kaboom info from the ‘Hide.
This story should serve as a chilling reminder to follow proper safety practices whenever you are at the range. Always check to make sure there is no obstruction in the bore BEFORE loading a live round.
.338 Lapua Magnum + Cleaning Rod + Inattention = Kaboom!
Kaboom at Manatee!
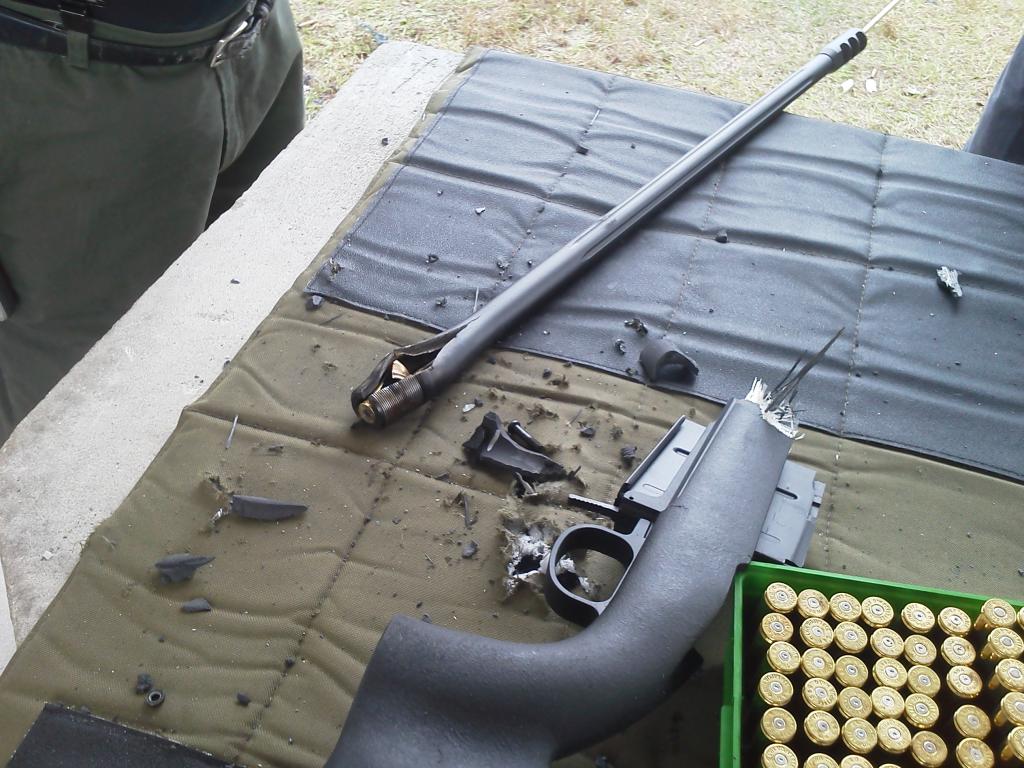
Sniper’s Hide member Queequeg recently published shocking photos of a catastrophic kaboom involving a .338 Lapua Magnum (Savage action). The action was blown off the rifle, shrapnel went through the roof, and the barrel split at the tenon before taking an excursion downrange. The action did crack in the front but the lugs remained engaged so the bolt did not slam to the rear (luckily for the shooter).
Here’s the report: “This happened [January 20, 2014] at the Manatee Gun and Archery Club. Al, Ren and myself were there with a couple other folks. Ren was at bench 12, I was at 13. The fellow at 11 was running a Savage .338 Lapua. He had a very bad day! He damn sure could have killed himself and quite likely Ren as well.”
Queeqeg added: “After the boom, I heard Ren ask ‘Are you alright’ and then turned to look in time to see the fellow reacting in total shock — literally stunned. Ren and I went over to him and could not see any major injuries. Ren was uninjured as well but had a lot of fiberglass splinters on him. The barrel nut is what I presume punched the two holes in the roof. The shooter is a regular there[.] He had been having a problem with sticky cases though he said he was certain the loads were mild. That’s why he was content to knock the sticky ones out with the rod. He simply forgot to remove the rod after knocking out the last stuck case. You can see what happened next.”
To learn more about this incident, go to the original Snipers Hide Forum Thread. There you’ll find more details and four pages of related discussions.
The Important Lesson Here
What did the .338 LM shooter do wrong here? You will say — “Well that’s obvious, he left a cleaning rod in the barrel and then shot a round.” Yes, that was a potentially fatal error. But that was his second mistake — one that occurred only because he made a more fundamental judgment error first.
The FIRST mistake was not acknowledging the problem with his ammo. Had he heeded the warning signs, he would still have a rifle (and an unsoiled pair of trousers). When he first observed that he was having problems with extracting cases, a warning light should have gone off in his head. Presuming his extractor was not broken (and that the chamber was cut properly) he should have been able to extract his brass if he was running safe loads. The lesson here we all need to learn is that if you observe a serious ammo-related issue, it is time to stop shooting. Don’t try to invent work-arounds just to extend your range session, when there are clear signs that something is wrong, very wrong.
We are a week into April. That means the spring shooting season is underway in most parts of the country. Before you head to the range for the first time, we recommend you do some basic tasks with your firearms. Here’s some good advice on readying your rifles for the 2022 shooting season.
by Ron Dague, Sinclair International I give my rifles a pre-season check before the shooting season starts. This starts with a general inspection starting with the butt-plate or recoil pad and making sure that all the screws and adjustable parts (on an adjustable butt-plate) move freely up or down and side to side. If you got caught in rain some of these screws and adjustable parts may not move when needed. I disassemble parts as needed and put rust preventative or a light oil and/or grease on threads and sliding parts. On rifles with recoil pads and fixed butt-plates, make sure the screws are tight and that holes in the stock aren’t stripped out. Make sure there are no cracks in the stock and around the butt-plate. If the recoil pad is glued-on, just make sure it hasn’t come loose.
Next I take the action out of the stock and check for cracks and wear marks. I look at the bedding to make sure that oils and cleaning solvents have not damaged the bedding. While the action is out of the stock, I look for any surface rust or dirt/dust in the recoil lug area and magazine well. Clean as needed and repair or re-bed if needed.
Trigger Assembly and Action With the barreled action out of the stock, it is a good time to spray out the trigger with cleaner. I use Ronson oil or lighter fluid. [Editor’s Note: Some trigger-makers advise against using any kind of lubricant, grease or oil — so plain lighter fluid is preferred.] After the trigger is cleaned you may want to check the trigger pull weight. If you don’t feel comfortable doing this, take it to a gun smith and have it checked. It is worth every penny to not have a trigger issue and/or a safety malfunction. I also take the bolt apart and clean the firing pin spring and bolt housing with Gun Scrubber or automotive brake cleaner. Then lube the firing pin-spring and firing pin with light oil. I use Kel Lube and/or Butch’s gun oil. Put a small dab of gun grease on the [bolt locking lugs] and cocking ramp.
I will also spray the outside of the action and barrel and give that a light coating of oil for rust prevention. I clean the action with Sinclair’s action cleaning tool. Don’t forget to clean the bore. Even though you didn’t fire the rifle, this makes sure nothing obstructs your barrel.
Checking Metal Fixtures and Fasteners Next I look at the trigger guard and hinged floor plate and make sure it works as designed. Make sure there are no cracks in the trigger guard from an accidental drop. Check guard screws and /or action screws for tightness and tighten to proper spec. There are torque specs for this, but on wood stocks the wood can crush and this should be checked throughout the year as weather change can affect this. My entire collection of rifles are bedded and I just tighten them just snug with screw driver or Allen wrench. The rimfire rifles have a spec of 55 to 74 inch/lbs and I think would carry over to center fire as well. I would caution you about torque wrenches as you need a good quality wrench, and read the directions on how to use it. You can over torque if not careful. Check the swivel studs and bipod to make sure there tight as well. You may want to take scope off and check the base screws and check the rings.
Test Fire the Rifle After Maintenance
After all cleaning and is done and everything is reassembled, take a few rounds out to the range and test fire to make sure everything works as it should. Don’t forget to run 3-5 rounds through the magazine at least two times for function. I look at this as preventive maintenance on the rifle. If you give it a look over you shouldn’t have any trouble during the rifle matches or hunting trip.
Ron Dague
Certified Reloading Instructor
Certified Range Safety Officer
Email: rond [at] sinclairintl.com
Phone: 800-717-8211
This Article Originally Appeared in Sinclair International’s The Reloading Press.
You can never be too safe when hand-loading your own ammunition. This helpful Brownells video outlines the Seven Fundamental Reloading Safety Tips. This is important information for novice hand-loaders and a good refresher for those with reloading experience!
Summary of the Seven Safety Tips:
1. Store your reloading supplies in a safe and dry location, away from children and away from any possible source of ignition. It is also smart to keep your powder and primers separate.
2. Get and use respected reloading manuals, especially for new cartridges. Start low and work up slowly while watching for warning signs of pressure and/or case fatigue.
3. Locate your reloading activity where you will not be distracted. If you get interrupted, stop. (Distractions will eventually lead to mistakes.)
4. Do NOT mix powders. Keep your powders clearly marked and dated. You can use masking tape to write the date on the container.
5. If you load the same cartridge type for different firearms, make sure your ammo headspaces properly in each gun.
6. Check cases frequently. Look for split necks, case head separation or other signs of fatigue and excessive pressure.
7. If reloading military brass, be aware that case capacity is usually reduced, and initial loads should be at least 10-15% lower than published data.
Here are some other tips that will help your avoid making costly mistakes (such as using the wrong powder, or undercharging a case):
Powder Type — Always double-check the label on your powder containers. After placing powder in the powder measure, put a piece of tape on the measure with the powder type written on it. Some guys write the powder type on a card and place that right in the hopper.
Scale Drift — Electronic balances can drift. If you are using a digital powder scale, calibrate the scale with a test weight every 50 rounds or so.
Case Fill — If you throw more than one charge at a time, look INSIDE every case before seating a bullet. Squib charges can be dangerous if you don’t notice them before firing the next round.
Progressive Presses — When using a progressive press, consider using an RCBS Lock-Out Die. This will detect a low charge and stop the machine. These dies will work with RCBS, Hornady, and Dillon progressives.
Above is a sectioned barrel showing an 80gr Sierra that was fired in a .223 bolt action with a cleaning rod in the bore. Both the bullet and the rod are still in the bore.
A Negligent Shooter Gets Lucky
“Here we have a story so filled with negligent acts that I can only marvel that the shooter survived the experience. The photo and narrative were provided by the gunsmith who took in the repair job, my comments are in italics. It’s worth reading, we can’t get enough safety warnings in our hobby.” — GS Arizona, Rifleman’s Journal
Description of Incident (with Commentary)
The shooter had a stuck case in his .223 chamber. The stuck case was actually a loaded round that didn’t fire. It wouldn’t extract because it was a .222 case that got mixed in with his .223 brass. [He had loaded the wrong brass.] I saw the loaded round with an 80gr bullet in it and a light primer strike. Negligent Act #1: Wrong brass was mixed in with the brass being reloaded.
The shooter removed the stuck case with a 3-piece aluminum rod. Negligent Act #2: Hammering out a loaded round with a cleaning rod. People have been killed doing this as the round can fire and drive the cleaning rod right into you. I remember one such incident about 5 years ago, the shooter was pounding out a stuck round, the cleaning rod went right through him, he didn’t survive.
The shooter didn’t notice only two segments of the cleaning rod came out when he removed it. Negligent Act #3: If you put anything at all down the barrel of a rifle you’d better make darn sure you got it all out before doing anything else!
He then chambered another round and fired it. Negligent act #4: If you’ve had a barrel obstruction of any kind, and if you’ve put something in the barrel, look through the barrel before proceeding! Within the past two years I know of an incident in which a benchrest shooter was killed in exactly this manner. The pressure built up and the rifle bolt came out of the receiver and into his chest.
The shooter is ‘OK’, but did not escape unscathed. He said there was a huge explosion and after regaining his senses found he was bleeding heavily from his forehead. The blood was thick enough that it ran in his eyes and he couldn’t see. In his words “I thought I was going to die”.
He has what looks like a pretty deep cut about an inch long on the side of his head, right in line with his right eye starting where the eye socket turns out to the side of the skull. And no telling what he’s got in the way of brass particles embedded in his forehead.
He was shooting on private property, and was alone when this happened. Negligent Act #5: Don’t shoot alone! Accidents happen, this is just one more example. If we could predict accidents, we wouldn’t have them. Always shoot with at least one other person.
He managed to get the bleeding stopped, or at least under control, packed his car and drove himself home without seeking immediate medical attention. Negligent Act #6: This one could have cost him his life after being lucky enough to survive the incident. There’s no way to know what’s happened just after an incident like this. He should have been at a hospital getting checked for shrapnel in the head.
The rod and slug could not be driven out. Since the barrel had a high round count there was no point in trying to salvage it. Note that the aluminum rod is expanded to a tight fit in the bore for the first couple inches. The base of the bullet is a little over 2″ from the mouth of the chamber.
What we’ve seen here is negligence and an absolute indifference to the established rules of safe reloading and gun handling, from start to finish, capped off with the shooter’s foolish avoidance of medical treatment. This shooter is lucky to be alive, but he’s surely used up all his luck. Don’t assume you’ll be so fortunate.
This article originally appeared in the Rifleman’s Journal website, which is no longer available.
We are re-publishing this article at the request of Forum members who found the information very valuable. If you haven’t read this Safety Tip before, take a moment to learn how you can inspect your fired brass to determine if there may be a potential for case separation. A case separation can be dangerous, potentially causing serious injury.
On the respected Riflemans’ Journal blog there was an excellent article about Cartridge Case-Head Separation. In this important article, Journal Editor GS Arizona examined the causes of this serious problem and explained the ways you can inspect your brass to minimize the risk of a case-head separation. As cases get fired multiple times and then resized during reloading, the cases can stretch. Typically, there is a point in the lower section of the case where the case-walls thin out. This is your “danger zone” and you need to watch for tell-tale signs of weakening.
The photo below shows a case sectioned so that you can see where the case wall becomes thinner near the web. You can see a little arrow into the soot inside the case pointing to the thinned area. This case hadn’t split yet, but it most likely would do so after one or two more firings.
Paper Clip Hack for Detecting Problems
The article provided a great, easy tip for detecting potential problems. You can use a bent paper clip to detect potential case wall problems. Slide the paper clip inside your case to check for thin spots. GS Arizona explains: “This simple little tool (bent paper clip) will let you check the inside of cases before you reload them. The thin spot will be immediately apparent as you run the clip up the inside of the case. If you’re seeing a shiny line on the outside and the clip is really hitting a thin spot inside, it’s time to retire the case. If you do this every time you reload, on at least 15% of your cases, you’ll develop a good feel for what the thin spot feels like and how it gets worse as the case is reloaded more times. And if you’re loading the night before a match and feel pressured for time — don’t skip this step!”


 Team Smith & Wesson shooter

 On the highly-respected Riflemans’ Journal blog, created by our late dear friend German Salazar*, there was an excellent article about Cartridge Case-Head Separation. In this important article, Salazar (aka GS Arizona) examined the causes of this serious problem and explained the ways you can inspect your brass to minimize the risk of a case-head separation. As cases get fired multiple times and then resized during reloading, the cases can stretch. Typically, there is a point in the lower section of the case where the case-walls thin out. This is your “danger zone” and you need to watch for tell-tale signs of weakening.


 I give my rifles a pre-season check before the shooting season starts. This starts with a general inspection starting with the butt-plate or recoil pad and making sure that all the screws and adjustable parts (on an adjustable butt-plate) move freely up or down and side to side. If you got caught in rain some of these screws and adjustable parts may not move when needed. I disassemble parts as needed and put rust preventative or a light oil and/or grease on threads and sliding parts. On rifles with recoil pads and fixed butt-plates, make sure the screws are tight and that holes in the stock aren’t stripped out. Make sure there are no cracks in the stock and around the butt-plate. If the recoil pad is glued-on, just make sure it hasn’t come loose.
 With the barreled action out of the stock, it is a good time to spray out the trigger with cleaner. I use Ronson oil or lighter fluid. [Editor’s Note: Some trigger-makers advise against using any kind of lubricant, grease or oil — so plain lighter fluid is preferred.] After the trigger is cleaned you may want to check the trigger pull weight. If you don’t feel comfortable doing this, take it to a gun smith and have it checked. It is worth every penny to not have a trigger issue and/or a safety malfunction. I also take the bolt apart and clean the firing pin spring and bolt housing with Gun Scrubber or automotive brake cleaner. Then lube the firing pin-spring and firing pin with light oil. I use Kel Lube and/or Butch’s gun oil. Put a small dab of gun grease on the [bolt locking lugs] and cocking ramp.
 Next I look at the trigger guard and hinged floor plate and make sure it works as designed. Make sure there are no cracks in the trigger guard from an accidental drop. Check guard screws and /or action screws for tightness and tighten to proper spec. There are torque specs for this, but on wood stocks the wood can crush and this should be checked throughout the year as weather change can affect this. My entire collection of rifles are bedded and I just tighten them just snug with screw driver or Allen wrench. The rimfire rifles have a spec of 55 to 74 inch/lbs and I think would carry over to center fire as well. I would caution you about torque wrenches as you need a good quality wrench, and read the directions on how to use it. You can over torque if not careful. Check the swivel studs and bipod to make sure there tight as well. You may want to take scope off and check the base screws and check the rings.


