Have you recently purchased a new scope? Then you should verify the actual click value of the turrets before you use the optic in competition (or on a long-range hunt). While a scope may have listed click values of 1/4-MOA, 1/8-MOA or 0.1 Mils, the reality may be slightly different. Many scopes have actual click values that are slightly higher or lower than the value claimed by the manufacturer. The small variance adds up when you click through a wide range of elevation.
In this video, Bryan Litz of Applied Ballistics shows how to verify your true click values using a “Tall Target Test”. The idea is to start at the bottom end of a vertical line, and then click up 30 MOA or so. Multiply the number of clicked MOA by 1.047 to get the claimed value in inches. For example, at 100 yards, 30 MOA is exactly 31.41 inches. Then measure the difference in your actual point of impact. If, for example, your point of impact is 33 inches, then you are getting more than the stated MOA with each click (assuming the target is positioned at exactly 100 yards).
How to Perform the Tall Target Test
The objective of the tall target test is to insure that your scope is giving you the proper amount of adjustment. For example, when you dial 30 MOA, are you really getting 30 MOA, or are you getting 28.5 or 31.2 MOA? The only way to be sure is to verify, don’t take it for granted! Knowing your scopes true click values insures that you can accurately apply a ballistic solution. In fact, many perceived inaccuracies of long range ballistics solutions are actually caused by the scopes not applying the intended adjustment. In order to verify your scope’s true movement and calculate a correction factor, follow the steps in the Tall Target Worksheet. This worksheet takes you thru the ‘calibration process’ including measuring true range to target and actual POI shift for a given scope adjustment. The goal is to calculate a correction factor that you can apply to a ballistic solution which accounts for the tracking error of your scope. For example, if you find your scope moves 7% more than it should, then you have to apply 7% less than the ballistic solution calls for to hit your target.
NOTE: When doing this test, don’t go for the maximum possible elevation. You don’t want to max out the elevation knob, running it to the top stop. Bryan Litz explains: “It’s good to avoid the extremes of adjustment when doing the tall target test.I don’t know how much different the clicks would be at the edges, but they’re not the same.”
Should You Perform a WIDE Target Test Too?
What about testing your windage clicks the same way, with a WIDE target test? Bryan Litz says that’s not really necessary: “The wide target test isn’t as important for a couple reasons. First, you typically don’t dial nearly as much wind as you do elevation. Second, your dialed windage is a guess to begin with; a moving average that’s different for every shot. Whereas you stand to gain a lot by nailing vertical down to the click, the same is not true of windage. If there’s a 5% error in your scope’s windage tracking, you’d never know it.”
Verifying Scope Level With Tall Target Test
Bryan says: “While setting up your Tall Target Test, you should also verify that your scope level is mounted and aligned properly. This is critical to insuring that you’ll have a long range horizontal zero when you dial on a bunch of elevation for long range shots. This is a requirement for all kinds of long range shooting. Without a properly-mounted scope level (verified on a Tall Target), you really can’t guarantee your horizontal zero at long range.”
NOTE: For ‘known-distance’ competition, this is the only mandatory part of the tall target test, since slight variations in elevation click-values are not that important once you’re centered “on target” at a known distance.
MIL-system scopes are popular with tactical shooters. One advantage of MIL scopes is that the mil-dot divisions in the reticle can be used to estimate range to a target. If you know the actual size of a target, you can calculate the distance to the target relatively easily with a mil-based ranging reticle. Watch this helpful NRA video to see how this is done:
Milliradian Definition and Yardage Ranging Formula
“MIL” or “Milrad” is short-hand for Milliradian, a unit of angular measurement. The subtension of 1 mil equals 3.6 inches at 100 yards or 36 inches at 1,000 yards. (In metric units, 1 mil equals 10 centimeters at 100 meters or 1 meter at 1,000 meters.) Knowing this subtension and knowing the size of the target (or a reference object near the target) allows the distance to the target to be estimated with considerable accuracy. The formula used to calculate range (in yards) based on MIL measurement is:
Height of Target in inches (divided by 36) x 1000, divided by the number of mils.
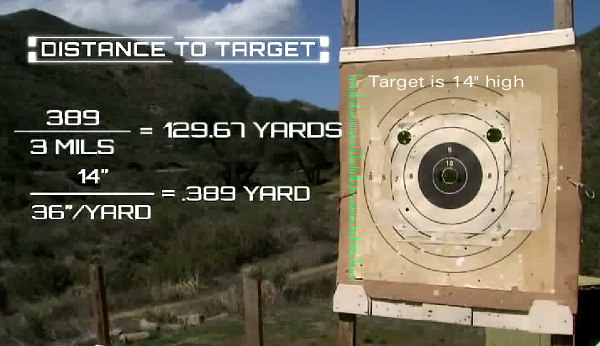
For example, if a 14″ tall target spans 3 mils from top to bottom, the distance is 129.67 yards calculated as follows: 14/36 x 1000 = 389, then divided by 3 = 129.67. You can also use a different conversion to find distance in meters.
Can You Estimate Range with an MOA-Marked Reticle? Yes You Can…
Reader Josh offers this handy advice: “It worth noting that the ability to measure range is not unique to mil-based systems. A MIL is just another unit for measuring angles, and any angular measurement will work. Considering that just about everybody knows that 1 MOA is about an inch per hundred yards, similar formulae can be developed for ranging with MOA marks. The advantage with mils is the precise relationship between units — the MOA-inch measurement is imprecise (being off by 0.047″) — so in principle MILs are a better unit”.
Burris Signature Rings with polymer inserts are an excellent product. The inserts allow you to clamp your scope securely without ring marks. Moreover, using the matched offset inserts you can “pre-load” your scope to add additional elevation. This helps keep the scope centered in its elevation range while shooting at long range. Additionally, with a -20 insert set in the front and a +20 insert set in the rear, you may be able to zero at very long ranges without using an angled scope base — and that can save money. (To move your point of impact upwards, you lower the front of the scope relative to the bore axis, while raising the rear of the scope.)
Insert Elevation Values and Ring Spacing
People are sometimes confused when they employ the Burris inserts. The inset numbers (-10, +10, -20, +20 etc.) refer to hundredths of inch shim values, rather than to MOA. And you need the correct, matched top/bottom pair of inserts to give you the marked thousandth value. Importantly, the actual amount of elevation you get with Burris inserts will depend BOTH on the insert value AND the spacing between ring centers.
Forum member Gunamonth has explained this in our Shooters’ Forum:
Working with Burris Signature Rings
Burris inserts are [marked] in thousandths of an inch, not MOA. To know how many MOA you gain you also need to know the ring spacing. For example, with a -20 thou insert set in the front and a +20 thou insert set in the rear, if the ring spacing is 6″, the elevation change will be approximately +24 MOA upwards.
Here’s how we calculate that. If you have a 2 X 0.020″ “lift” over a distance of 6 inches (i.e. 0.040″ total offset at 0.5 feet) that’s equivalent to 0.080″ “lift” over 12 inches (one foot). There are 300 feet in 100 yards so we multiply 0.080″ X 300 and get 24″ for the total elevation increase at 100 yard. (Note: One inch at 100 yards isn’t exactly a MOA but it’s fairly close.)
Here’s a formula, with all units in inches:
Total Ring Offset
——————– X 3600 = Change @ 100 yards
Ring Spacing
(.020 + .020)
—————– X 3600 = 24 inches at 100 yards
Ring Spacing: 6 inches
NOTE: Using the above formula, the only time the marked insert offset will equal the actual MOA shift is when the center to center ring spacing is 3.60″. Of course, you are not required to use 3.60″ spacing, but if you have a different spacing your elevation “lift” will be more or less than the values on the inserts.
Based on its external appearance, a modern riflescope may seem simple. It’s just a tube with two or three knobs on the outside right? Well, looks can be deceiving. Modern variable focal-length optics are complex systems with lots of internal parts. Modern scopes, even ‘budget’ optics, use multiple lens elements to allow variable magnification levels and parallax adjustment.
A few seasons back, we had a chance to look inside a riflescope thanks to a product display from ATK, now called Vista Outdoor, parent of Alliant Powder, CCI, Federal, RCBS, Speer, Weaver Optics. The Weaver engineers sliced open a Weaver Super Slam scope so you can see the internal lens elements plus the elevation and windage controls. We thought readers would like to see the “inner workings” of a typical modern rifle scope, so we snapped some pictures. The sectioned Super Slam scope was mounted inside a Plexiglas case, making it a bit hard to get super-sharp images, but you can still see the multiple lenses and the complex windage and elevation controls.
Check out the details of the focusing and magnification rings near the ocular (eyeball) end of the scope. There is very fine machining and threading to make everything work properly. The ocular lens is the piece of glass that faces the shooter while he aims.
In a helpful NSSF video, Ryan Cleckner explains why you normally should avoid canting your rifle — rotating it clockwise or counter-clockwise. Cleckner explains that canting the rifle in one direction or another will change the point of impact: “When you rotate the rifle, not only does the [POI move] in the direction that you’re rotated, [but] it also loses some of its elevation as it rolls down.” This, Cleckner explains, can make you miss on one side or the other:
Cant to the Left — You’re going to miss low and left.
Cant to the Right — You’re going to miss low and right.
In this video, starting at the one-minute mark, Cleckner shows the effect of rifle canting when engaging a 600-yard target. A few degrees of cant (either to the left or to the right), moves the shot POI completely off the steel silhouette target. The POI change occurs mainly because you are lowering (and laterally shifting) the scope sight-line relative to the bore axis, effectively changing your zero.
David Tubb has explained: “Every 1 degree you are off on a cant, is about six inches of difference laterally at 1000 yards”.
Position Shooting with Sling — Rifle Cant Considerations
Cleckner’s discussion assumes that the scope or sights are set to hit center with the rifle level and plumb. That works for most situations when shooting prone off bipod, front mechanical rest, or front sandbag. However, many sling shooters, including David Tubb and John Whidden, do tilt or cant their rifles slightly inward because this allows a more comfortable hold with sling, or allows better eye-to-sight alignment. Holding the rifle at an angle can work — but the angle of cant must be consistent for every shot. Canting the rifle is not a sin by itself. However, after you confirm your zero on your target, the degree of cant must be the same for EVERY shot. You must maintain that exact same degree of rotation on each shot or you will experience the shot POI movement Cleckner illustrates. Consistency is the key.
John Whidden, 5-time Nat’l Long Range Champion, holds a Palma rifle. John now shoots a match rifle with an Anschutz stock which he holds more upright, but still with some counter-clockwise cant. John also installed his iron sights at an angle so that the adjustments are correct (and plumb) even with his canted hold: “While it may not be obvious in the picture, the sights on my rifle are set up so that they’re straight vertical and horizontal while I hold the rifle canted. Making sure your adjustments (scope or sights) are vertical and horizontal is a critical piece of the pie.”
Inexpensive Dual-Diameter Scope-Mounted Bubble Level
The best way to avoid inconsistent rifle canting is to use a bubble level fitted to rail or scope. One very affordable and versatile product is the Jialitte Scope Bubble Level. This features a 30mm milled inside diameter, plus an inner insert ring so it will also fit 1″-diameter main tubes. The Jialitte unit is nicely radiused, and has a low profile in the middle. User reviews have been very positive. You could easily pay $35.00 or more for a 30mm scope level. This costs just $9.99 on Amazon.
In a helpful NSSF video, Ryan Cleckner explains why you normally should avoid canting your rifle — rotating it clockwise or counter-clockwise. Cleckner explains that canting the rifle in one direction or another will change the point of impact: “When you rotate the rifle, not only does the [POI move] in the direction that you’re rotated, [but] it also loses some of its elevation as it rolls down.” This, Cleckner explains, can make you miss on one side or the other:
Cant to the Left — You’re going to miss low and left.
Cant to the Right — You’re going to miss low and right.
In this video, starting at the one-minute mark, Cleckner shows the effect of rifle canting when engaging a 600-yard target. A few degrees of cant (either to the left or to the right), moves the shot POI completely off the steel silhouette target. The POI change occurs mainly because you are lowering (and laterally shifting) the scope sight-line relative to the bore axis, effectively changing your zero.
David Tubb has explained: “Every 1 degree you are off on a cant, is about six inches of difference laterally at 1000 yards”.
Position Shooting with Sling — Rifle Cant Considerations
Cleckner’s discussion assumes that the scope or sights are set to hit center with the rifle level and plumb. That works for most situations when shooting prone off bipod, front mechanical rest, or front sandbag. However, many sling shooters, including David Tubb and John Whidden, do tilt or cant their rifles slightly inward because this allows a more comfortable hold with sling, or allows better eye-to-sight alignment. Holding the rifle at an angle can work — but the angle of cant must be consistent for every shot. Canting the rifle is not a sin by itself. However, after you confirm your zero on your target, the degree of cant must be the same for EVERY shot. You must maintain that exact same degree of rotation on each shot or you will experience the shot POI movement Cleckner illustrates. Consistency is the key.
John Whidden, 5-time Nat’l Long Range Champion, holds a Palma rifle. John now shoots a match rifle with an Anschutz stock which he holds more upright, but still with some counter-clockwise cant. John also installed his iron sights at an angle so that the adjustments are correct (and plumb) even with his canted hold: “While it may not be obvious in the picture, the sights on my rifle are set up so that they’re straight vertical and horizontal while I hold the rifle canted. Making sure your adjustments (scope or sights) are vertical and horizontal is a critical piece of the pie.”
Inexpensive Dual-Diameter Scope-Mounted Bubble Level
The best way to avoid inconsistent rifle canting is to use a bubble level fitted to rail or scope. One very affordable and versatile product is the Jialitte Scope Bubble Level. This features a 30mm milled inside diameter, plus an inner insert ring so it will also fit 1″-diameter main tubes. The Jialitte unit is nicely radiused, and has a low profile in the middle. User reviews have been very positive. You could easily pay $35.00 or more for a 30mm scope level. This costs just $8.79 on Amazon (Cyber Monday special).
Burris Signature Rings with polymer inserts are an excellent product. The inserts allow you to clamp your scope securely without ring marks. Moreover, using the matched offset inserts you can “pre-load” your scope to add additional elevation. This helps keep the scope centered in its elevation range while shooting at long range. Additionally, with a -20 insert set in the front and a +20 insert set in the rear, you may be able to zero at very long ranges without using an angled scope base — and that can save money. (To move your point of impact upwards, you lower the front of the scope relative to the bore axis, while raising the rear of the scope.)
Insert Elevation Values and Ring Spacing
People are sometimes confused when they employ the Burris inserts. The inset numbers (-10, +10, -20, +20 etc.) refer to hundredths of inch shim values, rather than to MOA. And you need the correct, matched top/bottom pair of inserts to give you the marked thousandth value. Importantly, the actual amount of elevation you get with Burris inserts will depend BOTH on the insert value AND the spacing between ring centers.
Forum member Gunamonth has explained this in our Shooters’ Forum:
Working with Burris Signature Rings
Burris inserts are [marked] in thousandths of an inch, not MOA. To know how many MOA you gain you also need to know the ring spacing. For example, with a -20 thou insert set in the front and a +20 thou insert set in the rear, if the ring spacing is 6″, the elevation change will be approximately +24 MOA upwards.
Here’s how we calculate that. If you have a 2 X 0.020″ “lift” over a distance of 6 inches (i.e. 0.040″ total offset at 0.5 feet) that’s equivalent to 0.080″ “lift” over 12 inches (one foot). There are 300 feet in 100 yards so we multiply 0.080″ X 300 and get 24″ for the total elevation increase at 100 yard. (Note: One inch at 100 yards isn’t exactly a MOA but it’s fairly close.)
Here’s a formula, with all units in inches:
Total Ring Offset
——————– X 3600 = Change @ 100 yards
Ring Spacing
(.020 + .020)
—————– X 3600 = 24 inches at 100 yards
Ring Spacing: 6 inches
NOTE: Using the above formula, the only time the marked insert offset will equal the actual MOA shift is when the center to center ring spacing is 3.60″. Of course, you are not required to use 3.60″ spacing, but if you have a different spacing your elevation “lift” will be more or less than the values on the inserts.
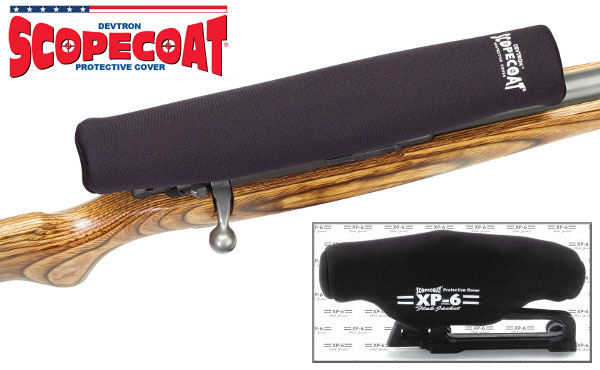
With the price of premium scopes approaching $3400.00 (and beyond), it’s more important than ever to provide extra protection for your expensive optics. ScopeCoat produces covers that shield scopes with a layer of neoprene rubber (wetsuit material) sandwiched between nylon. In addition to its basic covers, sold in a variety of sizes and colors, ScopeCoat has a line of heavy-duty 6mm-thick XP-6 covers that provide added security. CLICK HERE to review the full line of ScopeCoats on Amazon.
Triple-Thickness XP-6 Model for Added Protection
The XP-6 Flak Jacket™ is specifically designed for extra protection and durability. The 6mm-thick layer of neoprene is three times thicker than the standard ScopeCoat. XP-6 Flak Jackets are designed for tall turrets, with sizes that accommodate either two or three adjustment knobs (for both side-focus and front-focus parallax models). To shield an expensive NightForce, March, or Schmidt & Bender scope, this a good choice. XP-6 covers come in black color only, and are available for both rifle-scopes and spotting scopes.
The heavily padded XP-6 Flak Jacket is also offered in a Zippered version, shown at right. This is designed for removable optics that need protection when in storage. The full-length, zippered closure goes on quick-and-easy and provides more complete protection against dust, shock, and moisture. The line of XP-6 Scope Covers run $23 – $34 on Amazon.
Special Covers for Binos and Red-Dots
ScopeCoat offers many specialized products, including oversize covers for spotting scopes, protective “Bino-Bibs” for binoculars, rangefinder covers, even sleeves for small pistol scopes and red-dot optics. There are also custom-designed covers for the popular Eotech and Trijicon tactical optics.
Forum member Jacob spotted this simple, but effective set of scope ring inserts on the Brownells Website. With these inserts, you can use a scope with 1″-diameter main tube in 30mm rings. Non-marring, matte black Delrin sleeves surround the scope tube so it can fit larger-diameter rings. Each sleeve comes in two parts for easy installation around your scope tube. This way you can use the same 30mm rings for all your scopes.
Ring Reducers are sold as front/rear kits. Cost is $16.99 for the Delrin 30mm to 1″ converters, item 084-000-091WB. There are also sets that reduce 30mm rings to 26mm, and 1″ rings to 3/4″ or 7/8″.
Note: These Brownells units simply function as plastic bushings. Unlike Burris Signature Ring inserts, they do not allow you to “pre-load” windage or elevation. If your rings are misaligned, the Brownells Ring Reducers won’t correct that problem.
MIL-system scopes are popular with tactical shooters. One advantage of MIL scopes is that the mil-dot divisions in the reticle can be used to estimate range to a target. If you know the actual size of a target, you can calculate the distance to the target relatively easily with a mil-based ranging reticle. Watch this helpful NRA video to see how this is done:
Milliradian Definition and Yardage Ranging Formula
“MIL” or “Milrad” is short-hand for Milliradian, a unit of angular measurement. The subtension of 1 mil equals 3.6 inches at 100 yards or 36 inches at 1,000 yards. (In metric units, 1 mil equals 10 centimeters at 100 meters or 1 meter at 1,000 meters.) Knowing this subtension and knowing the size of the target (or a reference object near the target) allows the distance to the target to be estimated with considerable accuracy. The formula used to calculate range (in yards) based on MIL measurement is:
Height of Target in inches (divided by 36) x 1000, divided by the number of mils.
For example, if a 14″ tall target spans 3 mils from top to bottom, the distance is 129.67 yards calculated as follows: 14/36 x 1000 = 389, then divided by 3 = 129.67. You can also use a different conversion to find distance in meters.
Can You Estimate Range with an MOA-Marked Reticle? Yes You Can…
Reader Josh offers this handy advice: “It worth noting that the ability to measure range is not unique to mil-based systems. A MIL is just another unit for measuring angles, and any angular measurement will work. Considering that just about everybody knows that 1 MOA is about an inch per hundred yards, similar formulae can be developed for ranging with MOA marks. The advantage with mils is the precise relationship between units — the MOA-inch measurement is imprecise (being off by 0.047″) — so in principle MILs are a better unit”.


 Verifying Scope Level With Tall Target Test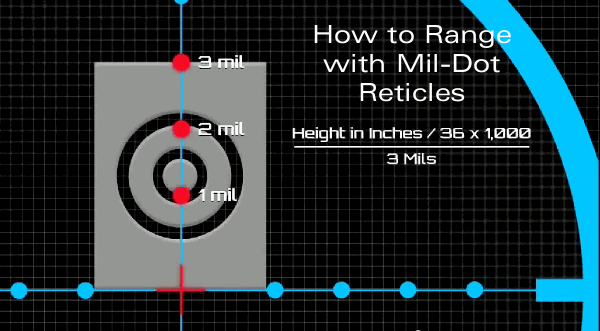


 With the price of premium scopes approaching $3400.00 (and beyond), it’s more important than ever to provide extra protection for your expensive optics.
  The heavily padded XP-6 Flak Jacket is also offered in a Zippered version, shown at right. This is designed for removable optics that need protection when in storage. The full-length, zippered closure goes on quick-and-easy and provides more complete protection against dust, shock, and moisture. The line of XP-6 Scope Covers run


