Larry Medler has come up with a smart little invention — a simple, inexpensive Empty Chamber Indicator for rimfire rifles. It is made from a section of plastic “weed-wacker” line and a wooden ball from a hobby shop. Larry says he was inspired by Juniors who used something similar for their 17-Caliber Air Rifles.
How to Make the Empty Chamber Indicator
Construction Method: First, drill a 7/64″ diameter hole all the way through the 1″-diameter wooden ball. Then enlarge half of that 1″-long hole using a 13/64” diameter drill. Next insert an 8″ piece of heavy duty (0.095″ diameter) weed wacker line through the ball, leaving about 2″ on the side with the bigger-diameter hole. Then, with the short end of the line, fold over the last half-inch so the line is doubled-over on itself. Then slide the line into the ball, stuffing the doubled-over section through the 13/64″ (large) hole. Finally, pull the longer end of the line until the doubled-over section is flush with the outside of the ball. This gives you a sturdy line attachment without messy adhesives. When the assembly’s complete, hold the ECI by the tail and dip the ball in yellow paint. If you’re making more than one ECI, you can drill horizontal holes in a spare block of wood and use that as a drying rack.
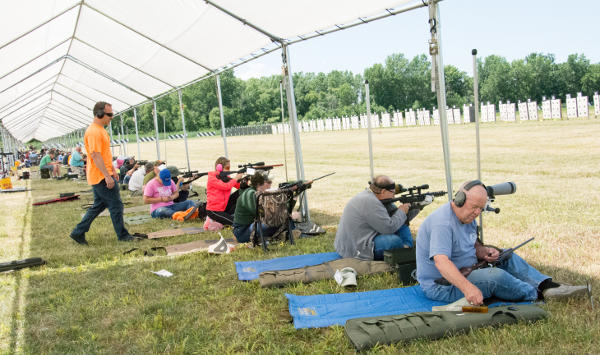
At a Rimfire Sporter match like this, all shooters must have an Empty Chamber Indicator.
The Empty Chamber Indicator for Smallbore Rifles
Larry explains: “At all Highpower rifle matches, silhouette matches, and other shooting events I have attended, Open Bore Indicators (OBI), or what are now called Empty Chamber Indicators (ECI) have been mandatory. The NRA’s yellow ECI for Highpower rifles is easy to use and has been well-received by the shooters. However, I had not seen a truly workable ECI for 22 rimfire rifles — until I visited Michigan’s Washtenaw Sportsman’s Club where I saw juniors using ECIs for their 17 Caliber Air Rifles. Someone at the club made the empty chamber indicators by attaching an 8″ piece of weed wacker line to a 1″-diameter wooden ball, painted bright yellow. I now make similar ECIs for the 22 rimfire silhouette matches I run.”
Here’s a tip we feature every year or so, because it is something that costs nothing, yet can be very useful in the reloading process.
With a simple, easy modification to a fired case, you can determine the length to lands in your rifle barrel. As long as you set the tension right, the measurements should be repeatable, and you’ve just saved yourself $47.40 — the combined cost of a Hornady commercial OAL gauge ($41.41) and Modified Case ($5.99).
To achieve best accuracy with a rifle, you must control bullet seating depth very precisely, so all bullets end up in the same place relative to the entrance of the lands, every time. There may be multiple cartridge OALs which prove accurate. However, with each, you first need to determine a “zero” point — a reliable, and repeatable OAL where the bullet is “just touching” the lands.
There are tools, such as the Hornady (formerly Stoney Point) OAL Gauge, that will help you find a seating OAL just touching the lands. However, the tool requires that you use a special modified case for each cartridge you shoot. And, while we find that the Hornady OAL Gauge is repeatable, it does take some practice to get in right.
Make Your Own Length-to-Lands Gauge with a Dremel
Here’s an inexpensive alternative to the Hornady OAL tool — a slotted case. Forum member Andris Silins explains how to create a slotted case to measure length to the lands in your rifle:
“Here’s what I did to find length to lands for seating my bullets. I made four cuts into the neck of fire-formed brass. Then I pressed the bullet in lightly and chambered the entire gauge. As the cartridge chambers, the bullet slides back into the case to give you length to lands. It took less than five minutes to get it cut and working. A little light oil in the barrel just past the chamber helps ensure the bullet does not get stuck in the lands. It works great and is very accurate.
How to Adjust Tension — Length and Number of Neck Cuts
I made the cuts using a Dremel with a cut-off wheel. You can adjust tension two ways. First, you can make the cuts longer or shorter. Longer cuts = less tension. If you used only three cuts instead of four you would get more tension. The trick is to be gentle when you open and close the bolt. If you ram the bolt closed you may wedge the bullet into the lands. When you open the bolt it helps to keep a finger or two near by to guide the case out straight because the ejector wants to push it sideways.”
Make Your Own Length-to-Lands Gauge to Check Bullet Position
Here’s a tip we feature every year or so, because it is something that costs nothing, yet can be very useful in the reloading process. With a simple, easy modification to a fired case, you can determine the length to lands in your rifle barrel. As long as you set the tension right, the measurements should be repeatable, and you’ve just saved yourself $47.98 — the combined cost of a Hornady C-1000 commercial OAL gauge ($41.99) and Modified Case ($5.99).
To achieve best accuracy with a rifle, you must control bullet seating depth very precisely, so all bullets end up in the same place relative to the entrance of the lands, every time. There may be multiple cartridge OALs which prove accurate. However, with each, you first need to determine a “zero” point — a reliable, and repeatable OAL where the bullet is “just touching” the lands.
There are tools, such as the Hornady (formerly Stoney Point) OAL Gauge, that will help you find a seating OAL just touching the lands. However, the tool requires that you use a special modified case for each cartridge you shoot. And, while we find that the Hornady OAL Gauge is repeatable, it does take some practice to get in right.
Make Your Own Length-to-Lands Gauge with a Dremel
Here’s an inexpensive alternative to the Hornady OAL tool — a slotted case. Forum member Andris Silins explais how to create a slotted case to measure length to the lands in your rifle:
“Here’s what I did to find length to lands for seating my bullets. I made four cuts into the neck of fire-formed brass. Then I pressed the bullet in lightly and chambered the entire gauge. As the cartridge chambers, the bullet slides back into the case to give you length to lands. It took less than five minutes to get it cut and working. A little light oil in the barrel just past the chamber helps ensure the bullet does not get stuck in the lands. It works great and is very accurate.
How to Adjust Tension — Length and Number of Neck Cuts
I made the cuts using a Dremel with a cut-off wheel. You can adjust tension two ways. First, you can make the cuts longer or shorter. Longer cuts = less tension. If you used only three cuts instead of four you would get more tension. The trick is to be gentle when you open and close the bolt. If you ram the bolt closed you may wedge the bullet into the lands. When you open the bolt it helps to keep a finger or two near by to guide the case out straight because the ejector wants to push it sideways.”
Make Your Own Length-to-Lands Gauge to Check Bullet Position
Here’s a tip we feature every year or so, because it is something that costs nothing, yet can be very useful in the reloading process. With a simple, easy modification to a fired case, you can determine the length to lands in your rifle barrel. As long as you set the tension right, the measurements should be repeatable, and you’ve just saved yourself $43.93 — the combined cost of a Hornady C-1000 commercial OAL gauge ($37.99) and Modified Case ($5.94).
To achieve best accuracy with a rifle, you must control bullet seating depth very precisely, so all bullets end up in the same place relative to the entrance of the lands, every time. There may be multiple cartridge OALs which prove accurate. However, with each, you first need to determine a “zero” point — a reliable, and repeatable OAL where the bullet is “just touching” the lands.
There are tools, such as the Hornady (formerly Stoney Point) OAL Gauge, that will help you find a seating OAL just touching the lands. However, the tool requires that you use a special modified case for each cartridge you shoot. And, while we find that the Hornady OAL Gauge is repeatable, it does take some practice to get in right.
Make Your Own Length-to-Lands Gauge with a Dremel
Here’s an inexpensive alternative to the Hornady OAL tool — a slotted case. Forum member Andris Silins explais how to create a slotted case to measure length to the lands in your rifle:
“Here’s what I did to find length to lands for seating my bullets. I made four cuts into the neck of fire-formed brass. Then I pressed the bullet in lightly and chambered the entire gauge. As the cartridge chambers, the bullet slides back into the case to give you length to lands. It took less than five minutes to get it cut and working. A little light oil in the barrel just past the chamber helps ensure the bullet does not get stuck in the lands. It works great and is very accurate.
How to Adjust Tension — Length and Number of Neck Cuts
I made the cuts using a Dremel with a cut-off wheel. You can adjust tension two ways. First, you can make the cuts longer or shorter. Longer cuts = less tension. If you used only three cuts instead of four you would get more tension. The trick is to be gentle when you open and close the bolt. If you ram the bolt closed you may wedge the bullet into the lands. When you open the bolt it helps to keep a finger or two near by to guide the case out straight because the ejector wants to push it sideways.”
Larry Medler has come up with a smart little invention — a simple, inexpensive Empty Chamber Indicator for rimfire rifles. It is made from a section of plastic “weed-wacker” line and a wooden ball from a hobby shop. Larry says he was inspired by Juniors who used something similar for their 17-Caliber Air Rifles.
How to Make the Empty Chamber Indicator
Construction Method: First, drill a 7/64″ diameter hole all the way through the 1″-diameter wooden ball. Then enlarge half of that 1″-long hole using a 13/64” diameter drill. Next insert an 8″ piece of heavy duty (0.095″ diameter) weed wacker line through the ball, leaving about 2″ on the side with the bigger-diameter hole. Then, with the short end of the line, fold over the last half-inch so the line is doubled-over on itself. Then slide the line into the ball, stuffing the doubled-over section through the 13/64″ (large) hole. Finally, pull the longer end of the line until the doubled-over section is flush with the outside of the ball. This gives you a sturdy line attachment without messy adhesives. When the assembly’s complete, hold the ECI by the tail and dip the ball in yellow paint. If you’re making more than one ECI, you can drill horizontal holes in a spare block of wood and use that as a drying rack.
At a Rimfire Sporter match like this, all shooters must have an Empty Chamber Indicator.
The Empty Chamber Indicator for Smallbore Rifles
Larry explains: “At all Highpower rifle matches, silhouette matches, and other shooting events I have attended, Open Bore Indicators (OBI), or what are now called Empty Chamber Indicators (ECI) have been mandatory. The NRA’s yellow ECI for Highpower rifles is easy to use and has been well-received by the shooters. However, I had not seen a truly workable ECI for 22 rimfire rifles — until I visited Michigan’s Washtenaw Sportsman’s Club where I saw juniors using ECIs for their 17 Caliber Air Rifles. Someone at the club made the empty chamber indicators by attaching an 8″ piece of weed wacker line to a 1″-diameter wooden ball, painted bright yellow. I now make similar ECIs for the 22 rimfire silhouette matches I run.”
In this video, Forum member Erik Cortina shows how to create a custom modified case for use with the Hornady Lock-N-Load Overall Length Gauge (formerly the Stoney Point Tool). While Hornady sells modified cases for many standard cartridges, if you shoot a wildcat such as the 6mm Dasher or .284 Shehane, you’ll need to create a custom modified case*. And even if you shoot a standard cartridge such as the .308 Winchester you can get more consistent measurements if you make a custom modified case from a piece of brass fired in your chamber.
The process is straight-forward. Take a piece of brass fired in your chamber and full-length size it (with about .002″ shoulder bump). Then you need to drill out the primer pocket. Erik uses a mini-lathe for the operation, but this general process can be done with a drill press or other tools. Erik shows how to do this with a 0.290″ HSS (High Speed Steel) drill bit on a mini-lathe. After drilling the hole comes the tricky part — you need to tap the case with the precise 5/16″ x 36 threads per inch (tpi) right-hand thread that matches the male thread on the O.A.L. Gauge. This 5/16″ x 36 tpi tap is pretty uncommon, but you can order it from Amazon.com if you can’t source it locally.
If you use a mini-lathe, Erik suggests loosening the tailstock slightly, so it can float while cutting the threads. Erik also says: “Make sure you get the tap on pretty tight — it’s going to want to spin.” Erik turns the case at about 100 rpm when tapping the threads. Once the case and tap are rigged, the actual tapping process (see video at 6:00) takes only a few seconds. While the mini-lathe makes the tapping process go more quickly, the threading can also be done with other systems.
TIP: Don’t just make one modified case, make three. That gives you one for your range kit, one for your home reloading bench, plus a spare (since you WILL eventually lose or misplace one).
Here’s the Stuff You Need
5/16″-36 TPI Threading Tap
The required thread is somewhat uncommon. You need a 5/16″ – 36 tpi Right Hand Thread Tap. If you can’t find it locally, Amazon.com carries the correct tap. Erik notes: “The 5/16-36 tpi tap is not a common size. I think Hornady did this on purpose to make it more difficult for the average guy to make his own modified cases.”
0.290″ Drill Bit
Erik uses an 0.290″ HSS “L” drill bit. (This “L” Letter Gauge code designates a 0.290″ diameter bit). A close metric equivalent would be 7.3 mm (0.286″). Erik says: “A 9/32″ drill will also work but it will be harder to run the tap in since the hole will be .281″ instead of .290″ with the Letter Gauge L bit.”
Tips for Using O.A.L. Gauge with Modified Case
We’ve noticed that many folks have trouble getting reliable, consistent results when they first start using the Hornady O.A.L. Gauge (formerly the Stoney Point Tool). We’ve found this is usually because they don’t seat the modified case properly and because they don’t use a gentle, consistent method of advancing the bullet until it just kisses the lands.
Here is our suggested procedure for use the O.A.L. Gauge. Following this method we can typically make three of four measurements (with the same bullet), all within .001″ to .0015″. (Yes, we always measure multiple times.)
1. Clean your chamber so there is no build-up of carbon, debris, or lube. Pay particular attention to the shoulder area.
2. Screw the modified case on to the O.A.L. Gauge. Make sure it is seated firmly (and doesn’t spin loose). Note, you may have to re-tighten the modified case after insertion in the chamber.
3. Place your selected bullet so that the ogive (max bullet diameter) is behind the case mouth. This prevents the bullet from “snagging” as you insert the tool in the action.
4. Insert the O.A.L. Gauge into your chamber smoothly. Push a little until you feel resistance. IMPORTANT — You need to ensure that the shoulder of the modified case is seated firmly against the front of your chamber. You may have to wiggle and twist the tool slightly. If you do not have the modified case seated all the way in, you will NOT get a valid measurement.
5. Advance the bullet slowly. (NOTE: This is the most important aspect for consistency!). Push the rod of the O.A.L. tool gently towards the chamber. DON’T shove it hard! Easy does it. Stop when you feel resistance.
6. IMPORTANT. After gently pushing on the rod, give the end of the rod a couple forward taps with your finger. If your bullet was slightly skewed, it may have stopped too far back. Adding a couple extra taps will fix that. If the bullet moves after the taps, then again push gently on the rod. NOT too much! You just want to push the bullet until it just “kisses” the lands and then stops. Do NOT jam the bullet into the rifling. If you do that you will never get consistent results from one measurement to the next.
* For a $15.00 fee, Hornady will make a custom modified case for you if you send two fired pieces of brass. Send two fired cases and $15.00 check to: Hornady Manufacturing, Attn: Modified Cases, 108 S. Apollo St., Alda, NE 68810. More Info HERE.
Here’s a tip we feature every year or so, because it is something that costs nothing, yet can be very useful in the reloading process. With a simple, easy modification to a fired case, you can determine the length to lands in your rifle barrel. As long as you set the tension right, the measurements should be repeatable, and you’ve just saved yourself $31 — the price of a commercial OAL gauge.
To achieve best accuracy with a rifle, you must control bullet seating depth very precisely, so all bullets end up in the same place relative to the entrance of the lands, every time. There may be multiple cartridge OALs which prove accurate. However, with each, you first need to determine a “zero” point — a reliable, and repeatable OAL where the bullet is “just touching” the lands.
There are tools, such as the Hornady (formerly Stoney Point) OAL Gauge, that will help you find a seating OAL just touching the lands. However, the tool requires that you use a special modified case for each cartridge you shoot. And, while we find that the Hornady OAL Gauge is repeatable, it does take some practice to get in right.
Make Your Own Length-to-Lands Gauge with a Dremel
Here’s an inexpensive alternative to the Hornady OAL tool — a slotted case. Forum member Andris Silins explains how to create a slotted case to measure length to the lands in your rifle:
“Here’s what I did to find length to lands for seating my bullets. I made four cuts into the neck of fire-formed brass. Then I pressed the bullet in lightly and chambered the entire gauge. As the cartridge chambers, the bullet slides back into the case to give you length to lands. It took less than five minutes to get it cut and working. A little light oil in the barrel just past the chamber helps ensure the bullet does not get stuck in the lands. It works great and is very accurate.
I made the cuts using a Dremel with a cut-off wheel. You can adjust tension two ways. First, you can make the cuts longer or shorter. Longer cuts = less tension. If you used only three cuts insted of four you would get more tension. The trick is to be gentle when you open and close the bolt. If you ram the bolt closed you may wedge the bullet into the lands. When you open the bolt it helps to keep a finger or two near by to guide the case out straight because the ejector wants to push it sideways.”
In this video, Forum member Erik Cortina shows how to create a custom modified case for use with the Hornady Lock-N-Load Overall Length Gauge (formerly the Stoney Point Tool). While Hornady sells modified cases for many standard cartridges, if you shoot a wildcat such as the 6mm Dasher or .284 Shehane, you’ll need to create a custom modified case*. And even if you shoot a standard cartridge such as the .308 Winchester you can get more consistent measurements if you make a custom modified case from a piece of brass fired in your chamber.
The process is straight-forward. Take a piece of brass fired in your chamber and full-length size it (with about .002″ shoulder bump). Then you need to drill out the primer pocket. Erik uses a mini-lathe for the operation, but this general process can be done with a drill press or other tools. Erik shows how to do this with a 0.290″ HSS (High Speed Steel) drill bit on a mini-lathe. After drilling the hole comes the tricky part — you need to tap the case with the precise 5/16″ x 36 threads per inch (tpi) right-hand thread that matches the male thread on the O.A.L. Gauge. This 5/16″ x 36 tpi tap is pretty uncommon, but you can order it from Amazon.com if you can’t source it locally.
If you use a mini-lathe, Erik suggests loosening the tailstock slightly, so it can float while cutting the threads. Erik also says: “Make sure you get the tap on pretty tight — it’s going to want to spin.” Erik turns the case at about 100 rpm when tapping the threads. Once the case and tap are rigged, the actual tapping process (see video at 6:00) takes only a few seconds. While the mini-lathe makes the tapping process go more quickly, the threading can also be done with other systems.
TIP: Don’t just make one modified case, make three. That gives you one for your range kit, one for your home reloading bench, plus a spare (since you WILL eventually lose or misplace one).
Here’s the Stuff You Need
5/16″-36 TPI Threading Tap
The required thread is somewhat uncommon. You need a 5/16″ – 36 tpi Right Hand Thread Tap. If you can’t find it locally, Amazon.com carries the correct tap. Erik notes: “The 5/16-36 tpi tap is not a common size. I think Hornady did this on purpose to make it more difficult for the average guy to make his own modified cases.”
0.290″ Drill Bit
Erik uses an 0.290″ HSS “L” drill bit. (This “L” Letter Gauge code designates a 0.290″ diameter bit). A close metric equivalent would be 7.3 mm (0.286″). Erik says: “A 9/32″ drill will also work but it will be harder to run the tap in since the hole will be .281″ instead of .290″ with the Letter Gauge L bit.”
Tips for Using O.A.L. Gauge with Modified Case
We’ve noticed that many folks have trouble getting reliable, consistent results when they first start using the Hornady O.A.L. Gauge (formerly the Stoney Point Tool). We’ve found this is usually because they don’t seat the modified case properly and because they don’t use a gentle, consistent method of advancing the bullet until it just kisses the lands.
Here is our suggested procedure for use the O.A.L. Gauge. Following this method we can typically make three of four measurements (with the same bullet), all within .001″ to .0015″. (Yes, we always measure multiple times.)
1. Clean your chamber so there is no build-up of carbon, debris, or lube. Pay particular attention to the shoulder area.
2. Screw the modified case on to the O.A.L. Gauge. Make sure it is seated firmly (and doesn’t spin loose). Note, you may have to re-tighten the modified case after insertion in the chamber.
3. Place your selected bullet so that the ogive (max bullet diameter) is behind the case mouth. This prevents the bullet from “snagging” as you insert the tool in the action.
4. Insert the O.A.L. Gauge into your chamber smoothly. Push a little until you feel resistance. IMPORTANT — You need to ensure that the shoulder of the modified case is seated firmly against the front of your chamber. You may have to wiggle and twist the tool slightly. If you do not have the modified case seated all the way in, you will NOT get a valid measurement.
5. Advance the bullet slowly. (NOTE: This is the most important aspect for consistency!). Push the rod of the O.A.L. tool gently towards the chamber. DON’T shove it hard! Easy does it. Stop when you feel resistance.
6. IMPORTANT. After gently pushing on the rod, give the end of the rod a couple forward taps with your finger. If your bullet was slightly skewed, it may have stopped too far back. Adding a couple extra taps will fix that. If the bullet moves after the taps, then again push gently on the rod. NOT too much! You just want to push the bullet until it just “kisses” the lands and then stops. Do NOT jam the bullet into the rifling. If you do that you will never get consistent results from one measurement to the next.
* For a $15.00 fee, Hornady will make a custom modified case for you if you send two fired pieces of brass. Send fired cases and $15.00 check to: Hornady Manufacturing, Attn: Modified Cases, 108 S. Apollo St., Alda, NE 68810. More Info HERE.